Herunterladen Inhalt Inhalt Diese Seite drucken
Vorschau ausblenden Andere Handbücher für P3365-V:
Inhaltsverzeichnis

Werbung

Verfügbare Sprachen
  • DE

Verfügbare Sprachen

  • DEUTSCH, seite 35
INSTALLATION GUIDE
AXIS P3365–V Fixed Dome Network Camera

Werbung

Inhaltsverzeichnis
loading

Inhaltszusammenfassung für Axis Communications P3365-V

  • Seite 1 INSTALLATION GUIDE AXIS P3365–V Fixed Dome Network Camera...
  • Seite 2 This equipment has been designed and tested to fulfill to, the implied warranties of merchantability and fitness for applicable standards for: a particular purpose. Axis Communications AB shall not be liable nor responsible for incidental or consequential • Radio frequency emission when installed according to damages in connection with the furnishing, performance the instructions and used in its intended environment.
  • Seite 3 Caused by Electronic Information Products (ACPEIP). product shall be connected using a shielded network cable (STP) that is properly grounded. Contact Information Axis Communications AB This product fulfills the requirements for immunity Emdalavägen 14 according to EN 61000-6-1 residential, commercial and 223 69 Lund light-industrial environments.
  • Seite 5: Safety Information

    AXIS P3365–V Fixed Dome Network Camera Safety Information Read through this Installation Guide carefully before installing the product. Keep the Installation Guide for future reference. Hazard Levels DANGER Indicates a hazardous situation which, if not avoided, will result in death or serious injury. WARNING Indicates a hazardous situation which, if not avoided, could result in death or serious injury.
  • Seite 6: Safety Instructions

    AXIS P3365–V Fixed Dome Network Camera Safety Instructions NOTICE NOTICE NOTICE • The Axis product shall be used in compliance with local laws and regulations. • To use the Axis product outdoors, or in similar environments, it shall be installed in an approved outdoor housing.
  • Seite 7 AXIS P3365–V Fixed Dome Network Camera WARNING • Risk of explosion if the battery is incorrectly replaced. • Replace only with an identical battery or a battery which is recommended by Axis. • Dispose of used batteries according to local regulations or the battery manufacturer's instructions.
  • Seite 9: Installation Steps

    AXIS P3365–V Fixed Dome Network Camera Installation Guide This Installation Guide provides instructions for installing AXIS P3365–V Network Camera on your network. For other aspects of using the product, see the User Manual available at www.axis.com Installation Steps 1. Make sure the package contents, tools and other materials necessary for the installation are in order.
  • Seite 10: Hardware Overview

    AXIS P3365–V Fixed Dome Network Camera Hardware Overview 2 3 4 5 6 Network connector (PoE) Audio out LED Indicators (network, status, power) Audio in I/O connector Control button Fan connector (for outdoor model) SD card slot Network cable 10. Wall screw (2 nos.) 11.
  • Seite 11: Led Indicators

    AXIS P3365–V Fixed Dome Network Camera LED Indicators Color Indication Net- Green Steady for connection to a 100 Mbit/s network. Flashes for network work activity. Amber Steady for connection to a 10 Mbit/s network. Flashes for network activity. Unlit No network connection. Status Green Steady green for normal operation.
  • Seite 12 AXIS P3365–V Fixed Dome Network Camera I/O Connector Use with external devices in combination with, for example, tampering alarms, motion detection, event triggering, time lapse recording and alarm notifications. In addition to the 0 V DC reference point and power (DC output), the I/O connector provides the interface to: •...
  • Seite 13: Operating Conditions

    AXIS P3365–V Fixed Dome Network Camera Specifications Operating Conditions The Axis product is intended for indoor use. Product Temperature Humidity Classification AXIS P3365–V IEC 62262 IK10 -0 °C to 50 °C (32 °F 15-85% RH (non-condensing) to 122 °F) Power Consumption Product AXIS P3365–V Power over Ethernet (PoE) IEEE 802.3af/802.3at Type 1 Class 2...
  • Seite 14 AXIS P3365–V Fixed Dome Network Camera 3.3 V max 50 mA Audio Connector 3.5 mm audio connectors (stereo) Audio Input Audio Output 1 Tip Microphone/Line in Line out (mono) 2 Ring 3 Sleeve Ground Ground SD Card Slot Supports SD cards with up to 64 GB of storage. For best recording performance, use an SDHC or SDXC card with speed class 10.
  • Seite 15: Install The Hardware

    AXIS P3365–V Fixed Dome Network Camera Install the Hardware Mount Camera Directly onto Wall NOTICE NOTICE NOTICE • This Axis product can be mounted with the cables routed through or along the wall. This product can also be fitted with a metal conduit for protecting the cabling when they are routed along the wall.
  • Seite 16 AXIS P3365–V Fixed Dome Network Camera 5. Insert the SD memory card (optional). 6. Attach the camera unit to the mounting bracket using the two M4x8 screws provided. Note Adjust the Lens Lines to help with horizontal alignment Locking screw Open the Live View page (see Access the Product, on page 17) in the web interface and make the following adjustments to the camera: 1.
  • Seite 17: Access The Product

    AXIS P3365–V Fixed Dome Network Camera Complete the Installation Side lid Dome cover 1. If the cables are routed along the wall, remove the side lid from the camera’s dome cover. 2. Rotate the black shield inside the dome to match the camera’s position. 3.
  • Seite 18: Further Information

    AXIS P3365–V Fixed Dome Network Camera Note The installation and management software tools are available on the CD supplied with the product and from the support pages on www.axis.com/techsup To reset the product to the factory default settings: 1. Disconnect power from the product. 2.
  • Seite 19: Informations Sur La Sécurité

    AXIS P3365–V Fixed Dome Network Camera Informations sur la sécurité Lisez attentivement ce guide d'installation avant d'installer l'appareil. Conservez le guide d'installation pour toute référence ultérieure. Niveaux de risques DANGER Indique une situation dangereuse qui, si elle n'est pas évitée, entraînera le décès ou des blessures graves.
  • Seite 20: Consignes De Sécurité

    AXIS P3365–V Fixed Dome Network Camera Consignes de sécurité AVIS AVIS AVIS • Le produit Axis doit être utilisé conformément aux lois et règlementations locales en vigueur. • Pour pouvoir utiliser le produit Axis à l'extérieur, ou dans des environnements similaires, il doit être installé...
  • Seite 21 AXIS P3365–V Fixed Dome Network Camera AVERTISSEMENT • Risque d'explosion si la batterie est remplacée de façon incorrecte. • Remplacez-la uniquement par une batterie identique ou une batterie recommandée par Axis. • Mettez au rebut les piles usagées conformément aux réglementations locales ou aux instructions du fabricant de la batterie.
  • Seite 23: Procédures D'installation

    AXIS P3365–V Fixed Dome Network Camera Guide d'installation Ce guide d'installation explique comment installer la caméra réseau AXIS P3365–V sur votre réseau. Pour toute autre information relative à l'utilisation du produit, reportez-vous au manuel de l'utilisateur disponible sur le site www.axis.com Procédures d’installation 1.
  • Seite 24: Aperçu Du Matériel

    AXIS P3365–V Fixed Dome Network Camera Aperçu du matériel 2 3 4 5 6 Connecteur réseau (PoE) Sortie audio Voyants DEL (réseau, état, alimentation) Entrée audio Connecteur d'E/S Bouton de commande Connecteur de ventilateur (pour le modèle en extérieur) Fente pour carte SD Câble réseau 10.
  • Seite 25 AXIS P3365–V Fixed Dome Network Camera Voyants Voyant Couleur Indication Réseau Vert Fixe en cas de connexion à un réseau de 100 Mbits/s. Clignote en cas d’activité réseau. Orange Fixe en cas de connexion à un réseau de 10 Mbits/s. Clignote en cas d’activité...
  • Seite 26 AXIS P3365–V Fixed Dome Network Camera AVIS AVIS AVIS Les réglementations locales ou les conditions environnementales et électriques dans lesquelles le produit est utilisé peuvent nécessiter l'utilisation d'un câble réseau blindé (STP). Tous les câbles réseau qui sont acheminés à l'extérieur ou dans des environnements électriques exigeants doivent être blindés (STP) et destinés à...
  • Seite 27: Caractéristiques Techniques

    AXIS P3365–V Fixed Dome Network Camera AVIS AVIS AVIS Pour éviter la corruption des enregistrements, la carte SD doit être démontée avant son retrait. Pour ce faire, rendez-vous dans Setup > System Options > Storage > SD Card (Configuration > Options du système > Stockage > Carte SD) et cliquez sur Unmount (Démonter).
  • Seite 28 AXIS P3365–V Fixed Dome Network Camera Connecteurs Connecteur d'E/S Bloc terminal à 4 broches pour : • Alimentation auxiliaire (sortie CC) 2 3 4 • Entrée numérique • Sortie numérique • 0 V CC (-) Fonction Bro- Notes Caractéristiques 0 V CC (-) Sortie CC Peut servir à...
  • Seite 29 AXIS P3365–V Fixed Dome Network Camera 3.3 V max 50 mA Connecteur audio Connecteurs audio 3,5 mm (stéréo) Entrée audio Sortie audio 1 Embout Entrée micro/ligne Sortie ligne (mono) 2 Anneau 3 Manche Mise à la terre Mise à la terre Emplacement pour carte SD Prise en charge des cartes SD jusqu'à...
  • Seite 30: Installation Du Matériel

    AXIS P3365–V Fixed Dome Network Camera Installation du matériel Montage de la caméra directement au mur AVIS AVIS AVIS • Cette caméra peut être montée avec les câbles d’alimentation acheminés à travers ou le long du mur. Cette caméra peut également être dotée d’un conduit métallique pour protéger le câblage en cas d'acheminement des câbles le long du mur.
  • Seite 31: Réglage De L'objectif

    AXIS P3365–V Fixed Dome Network Camera 5. Insérez la carte mémoire SD (en option). 6. Fixez la caméra au support de fixation à l’aide des deux vis M4x8 fournies. Note Réglage de l’objectif Lignes facilitant l'alignement horizontal Vis de verrouillage Ouvrez la page Live View (Vidéo en direct) (voir Accès au produit, à...
  • Seite 32: Fin De L'installation

    AXIS P3365–V Fixed Dome Network Camera Fin de l’installation Couvercle latéral Couvercle de dôme 1. Si les câbles sont acheminés le long du mur, retirez le couvercle latéral du couvercle du dôme de la caméra. 2. Tournez le bouclier de protection noir à l'intérieur du boîtier du dôme de la caméra pour l'aligner sur la position de la caméra.
  • Seite 33: Informations Sur La Garantie

    AXIS P3365–V Fixed Dome Network Camera Note Les logiciels d'installation et de gestion sont disponibles sur le CD fourni avec le produit et sur les pages d'assistance du site www.axis.com/techsup Pour réinitialiser l'appareil aux paramètres d'usine par défaut : 1. Déconnectez l'alimentation de l'appareil. 2.
  • Seite 35: Sicherheitsinformation

    AXIS P3365–V Fixed Dome Network Camera Sicherheitsinformation Lesen Sie das Installationshandbuch sorgfältig durch bevor sie das Produkt installieren. Bewahren Sie das Installationshandbuch für zukünftige Zwecke auf. Gefährdungsstufen GEFAHR Weist auf eine gefährliche Situation hin, die, falls nicht verhindert, zu Tod oder schweren Verletzungen führt. WARNUNG Weist auf eine gefährliche Situation hin, welche, falls nicht verhindert, zu Tod oder schweren Verletzungen führen kann.
  • Seite 36: Sicherheitsanweisungen

    AXIS P3365–V Fixed Dome Network Camera Sicherheitsanweisungen HINWEIS HINWEIS HINWEIS • Die Anwendung des Axis Produkts muss unter Beachtung der örtlich geltenden rechtlichen Bestimmungen erfolgen. • Bei der Anwendung von Axis Produkten im Außenbereich oder ähnlichen Umgebungen, müssen diese in zugelassenen Außengehäusen installiert werden. •...
  • Seite 37: Kuppelabdeckung

    AXIS P3365–V Fixed Dome Network Camera WARNUNG • Explosionsgefahr bei fehlerhaftem Batteriewechsel. • Die Batterie darf nur durch eine identische Batterie oder eine von Axis empfohlene Batterie ersetzt werden. • Verbrauchte Batterien sind gemäß den örtlichen Vorschriften oder den Anweisungen des Herstellers zu entsorgen.
  • Seite 39: Installationsschritte

    AXIS P3365–V Fixed Dome Network Camera Installationsanleitung In dieser Anleitung wird die Installation der AXIS P3365–V-Netzwerk-Kamera in Ihrem Netzwerk beschrieben. Weitere Informationen zur Nutzung dieses Produktes finden Sie im Benutzerhandbuch unter www.axis.com. Installationsschritte 1. Stellen Sie sicher, dass die Packungsinhalte, Werkzeuge und andere notwendige Materialien für die Installation in Ordnung sind.
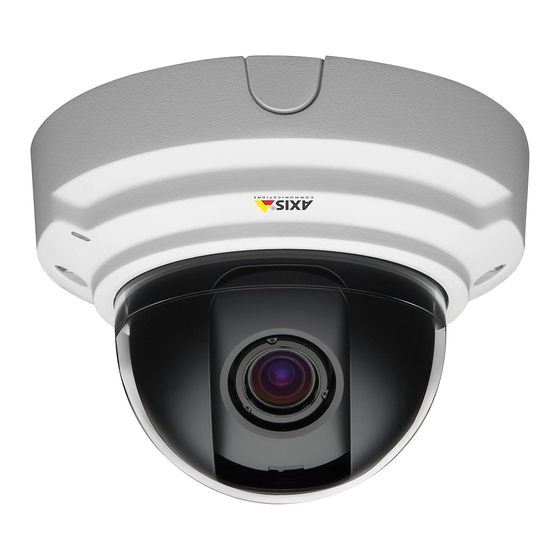
  • Seite 40: Übersicht Über Die Hardware

    AXIS P3365–V Fixed Dome Network Camera Übersicht über die Hardware 2 3 4 5 6 Netzwerkanschluss (PoE) Audioausgang LED-Anzeigen (Netzwerkstatus, Stromversorgung) Audioeingang E/A-Anschluss Steuertaste Lüfteranschluss (für Außenbereichsmodelle) SD-Karteneinschub Netzwerkkabel 10. Wandschraube (2 Stück) 11. Kuppelabdeckung Abmessungen 104 x 148 mm (4,07” x 5,83”) Gewicht 730 g (1,53 lb)
  • Seite 41: Led-Anzeigen

    AXIS P3365–V Fixed Dome Network Camera LED-Anzeigen Farbe Bedeutung Netz- Grün Leuchtet bei Verbindung mit einem 100 MBit/s-Netzwerk. Blinkt bei werk Netzwerkaktivität. Gelb Leuchtet bei Verbindung mit einem 10 MBit/s-Netzwerk. Blinkt bei Netzwerkaktivität. Leuchtet Keine Netzwerkverbindung vorhanden. nicht Status Grün Leuchtet bei Normalbetrieb grün.
  • Seite 42 AXIS P3365–V Fixed Dome Network Camera HINWEIS HINWEIS HINWEIS Aufgrund örtlicher Vorschriften oder umweltbedingter und elektrischer Bedingungen, unter denen das Produkt verwendet wird, kann ein abgeschirmtes Netzwerkkabel (STP) empfehlenswert oder notwendig sein. Alle Netzwerkkabel, die im Außenbereich oder in schwierigen elektrischen Umgebungen verlegt werden, sollten abgeschirmt (STP) und nur für die zweckgebundene Anwendung eingesetzt werden.
  • Seite 43: Technische Daten

    AXIS P3365–V Fixed Dome Network Camera HINWEIS HINWEIS HINWEIS Um einer Beschädigung der Aufnahmen vorzubeugen, sollte die SD-Karte vor dem mechanischen Auswerfen getrennt (deaktiviert) werden. Rufen Sie zum Trennen Setup > System Options > Storage > SD Card (Einrichtung > Systemoptionen > Speicher > SD-Karte) auf und klicken Sie auf Unmount (Trennen).
  • Seite 44: Anschlüsse

    AXIS P3365–V Fixed Dome Network Camera Anschlüsse E/A-Anschluss 4-poliger Anschlussblock für: • Zusatzstromversorgung (Gleichstromausgang) 2 3 4 • Digitaleingang • Digitalausgang • 0 V DC (-) Funktion Hinweise Technische Daten 0 V DC (-) Gleich- Kann für die Stromversorgung von 3,3 V DC strom- Zusatzgeräten verwendet werden.
  • Seite 45 AXIS P3365–V Fixed Dome Network Camera 3.3 V max 50 mA Audioanschlüsse 3,5-mm- Audioanschlüsse (stereo) Audioeingang Audioausgang 1 Spitze Mikrofon-/Leitungseingang Leitungsausgang (mono) 2 Ring 3 Schaft Masse Masse SD-Kartensteckplatz Unterstützt SD-Karten mit bis zu 64 GB Speicherplatz. Verwenden Sie eine SDHC- oder SDXC-Karte der Geschwindigkeitsklasse 10, um optimale Aufzeichnungsergebnisse zu erzielen.
  • Seite 46: Installieren Der Hardware

    AXIS P3365–V Fixed Dome Network Camera Installieren der Hardware Kamera direkt an der Wand anbringen HINWEIS HINWEIS HINWEIS • Bei der Montage dieses Axis-Produkts können Sie die Kabel entweder durch die Wand oder entlang der Wand führen. Sie können die Netzwerk-Kamera auch mit einer Kabelführung aus Metall zum Schutz der Kabel ausstatten, wenn die Kabel an der Wand entlang geführt werden.
  • Seite 47 AXIS P3365–V Fixed Dome Network Camera 4. Schließen Sie das Kabel an die Kameraeinheit an. 5. Setzen Sie die SD-Speicherkarte ein (optional). 6. Befestigen Sie die Kameraeinheit mit den zwei mitgelieferten M4x8-Schrauben an der Montagehalterung. Beachten Anpassen des Objektivs Linien zur Unterstützung einer horizontalen Ausrichtung Feststellschraube Öffnen Sie die Seite Live View (Live-Ansicht) (siehe Zugriff auf das Produkt, auf Seite 49) und nehmen Sie folgende Einstellung an der Kamera vor:...
  • Seite 48: Abschluss Der Installation

    AXIS P3365–V Fixed Dome Network Camera Beachten • Aufgrund der Lichtbrechungen auf der Glasoberfläche kann das Bild leicht unscharf erscheinen, nachdem die Kuppel installiert wurde. Sie können dies korrigieren, indem Sie in der Weboberfläche unter Setup > Basic Setup > Focus & Zoom (Einrichtung Basiskonfiguration Fokus und Zoom) die Seite Focus Adjustment (Bildschärfe einstellen) öffnen und die Bildschärfe erneut anpassen.
  • Seite 49: Zugriff Auf Das Produkt

    AXIS P3365–V Fixed Dome Network Camera Zugriff auf das Produkt Verwenden Sie die bereitgestellten Tools der Installations- und Management-Software-CD, um eine IP-Adresse zuzuordnen, ein Passwort einzurichten und auf den Videostrom zuzugreifen. Diese Information finden Sie ebenso auf den Support-Seiten unter www.axis.com/techsup/ Zurücksetzen auf Werkseinstellungen Wichtig Das Zurücksetzen auf die Werkseinstellungen sollte mit Vorsicht verwendet werden.
  • Seite 50: Garantieinformationen

    AXIS P3365–V Fixed Dome Network Camera Garantieinformationen Informationen zur Garantie der Axis Produkte und hierzu verbundene Informationen, finden Sie unter www.axis.com/warranty/...
  • Seite 51: Informazioni Di Sicurezza

    AXIS P3365–V Fixed Dome Network Camera Informazioni di Sicurezza Leggere questa Guida all'Installazione prima di installare il prodotto. Conservare la Guida all'Installazione per usi futuri. Livelli di pericolo PERICOLO Indica una situazione pericolosa che, se non evitata, provoca morte o lesioni gravi. AVVERTENZA Indica una situazione pericolosa che, se non evitata, può...
  • Seite 52: Istruzioni Di Sicurezza

    AXIS P3365–V Fixed Dome Network Camera Istruzioni di sicurezza AVVISO AVVISO AVVISO • Il prodotto Axis deve essere utilizzato in conformità alle leggi e alle disposizioni locali. • Per utilizzare il prodotto Axis in ambienti esterni, o in ambienti simili, deve essere installato in una custodia per esterni approvata.
  • Seite 53 AXIS P3365–V Fixed Dome Network Camera AVVERTENZA • Rischio di esplosione se la batteria viene sostituita in modo errato. • Sostituire solo con una batteria identica o una batteria consigliata da Axis. • Smaltire le batterie usate in base alle normative locali o alle istruzioni del produttore della batteria.
  • Seite 55: Guida All'installazione

    AXIS P3365–V Fixed Dome Network Camera Guida all’installazione La presente Guida all'installazione fornisce le istruzioni necessarie per installare la telecamera di rete AXIS P3365–V nella rete in uso. Per ulteriori informazioni sull’utilizzo del prodotto, consultare la Guida per l'utente disponibile all'indirizzo www.axis.com Procedure di installazione 1.
  • Seite 56: Panoramica Dell'hardware

    AXIS P3365–V Fixed Dome Network Camera Panoramica dell'hardware 2 3 4 5 6 Connettore di rete (PoE) Uscita audio Indicatori LED (stato, rete, alimentazione) Ingresso audio Connettore I/O Pulsante di comando Connettore della ventola (modelli per esterni) Slot per scheda SD Cavo di rete 10.
  • Seite 57: Indicatori Led

    AXIS P3365–V Fixed Dome Network Camera Indicatori LED Colore Indicazione Rete Verde Luce fissa per connessione di rete a 100 MBit/s. Luce lampeggiante: attività di rete. Giallo Luce fissa per connessione di rete a 10 MBit/s. Luce lampeggiante: attività di rete. Spento Assenza di connessione.
  • Seite 58 AXIS P3365–V Fixed Dome Network Camera Connettore I/O Utilizzare con dispositivi esterni in combinazione con, ad esempio, allarmi antimanomissione, rilevazione del movimento, attivazione di eventi, registrazione temporizzata e notifiche di allarme. Oltre al punto di riferimento 0 V CC e all'alimentazione (uscita CC), il connettore I/O fornisce l'interfaccia per: •...
  • Seite 59: Dati Tecnici

    AXIS P3365–V Fixed Dome Network Camera • Collegamento a un servizio AXIS Video Hosting System o AXIS Internet Dynamic DNS Service. Per ulteriori informazioni su questi servizi, consultare il Manuale Utente. Dati tecnici Condizioni di funzionamento Il prodotto Axis è destinato all'uso interno. Prodotto Classificazione Temperatura...
  • Seite 60 AXIS P3365–V Fixed Dome Network Camera Ingresso Collegare al pin 1 per attivarlo oppure da 0 a max 40 V CC digitale lasciarlo isolato (scollegato) per disattivarlo Uscita Collegare al pin 1 quando attiva, isolata Carico massimo =100 mA digitale (scollegata) quando inattiva.
  • Seite 61: Installazione Dell'hardware

    AXIS P3365–V Fixed Dome Network Camera Ingresso audio Uscita audio 1 Punta Ingresso microfono/linea Uscita linea (mono) 2 Anello 3 Guaina Terra Terra Slot per scheda SD Supporta schede SD con un massimo di 64 GB di archiviazione. Per prestazioni di registrazione ottimali, utilizzare una scheda SDHC o SDXC con classe di velocità...
  • Seite 62: Regolazione Dell'obiettivo

    AXIS P3365–V Fixed Dome Network Camera Vite M4x8 (non inclusa) Staffa di montaggio (opzionale/non inclusa) Montaggio della telecamera con una staffa di montaggio (non inclusa) 1. Usare la maschera di foratura per praticare 2 fori nella parete. 2. Installare tutti i cavi richiesti all’interno della parete e nei fori sulla staffa di montaggio, incluso il cavo di rete e talvolta anche i collegamenti a dispositivi di input/output esterni e all’altoparlante attivo/microfono esterno.
  • Seite 63: Completamento Dell'installazione

    AXIS P3365–V Fixed Dome Network Camera 4. Aprire la pagina Focus Adjustment (Regolazione messa a fuoco) nell'interfaccia web in Setup > Basic Setup > Focus & Zoom (Configurazione > Configurazione di base > Messa a fuoco e zoom) e seguire le istruzioni visualizzate. Utilizzare la finestra di regolazione delle immagini per impostare la messa a fuoco e lo zoom.
  • Seite 64: Ripristino Dei Valori Predefiniti Di Fabbrica

    AXIS P3365–V Fixed Dome Network Camera Accedere al Prodotto Utilizzare le utility contenute nel CD del software d'installazione e gestione per assegnare un indirizzo IP, impostare la password ed accedere al flusso video. Queste informazioni sono disponibili anche sulle pagine dedicate all'assistenza sul sito www.axis.com/techsup/ Ripristino dei valori predefiniti di fabbrica Importante Il ripristino delle impostazioni di fabbrica deve essere usato con cautela.
  • Seite 65: Informazioni Sulla Garanzia

    AXIS P3365–V Fixed Dome Network Camera Informazioni sulla garanzia Per informazioni sulla garanzia del prodotto Axis e informazioni ad esso relative, consultare la pagina www.axis.com/warranty/...
  • Seite 67: Información De Seguridad

    AXIS P3365–V Fixed Dome Network Camera Información de seguridad Lea esta Guía de instalación con atención antes de instalar el producto. Guarde la Guía de instalación para poder consultarla en otro momento. Niveles de peligro PELIGRO Indica una situación peligrosa que, si no se evita, provocará lesiones graves o la muerte.
  • Seite 68: Instrucciones De Seguridad

    AXIS P3365–V Fixed Dome Network Camera Instrucciones de seguridad AVISO AVISO AVISO • El producto de Axis debe utilizarse de acuerdo con las leyes y normas locales. • Para usar el producto de Axis en exteriores, o en entornos similares, debe instalarse en una carcasa exterior aprobada.
  • Seite 69 AXIS P3365–V Fixed Dome Network Camera ADVERTENCIA • La sustitución incorrecta de la batería implica riesgo de explosión. • Sustituya la batería con una batería idéntica u otra batería recomendada por Axis. • Deseche las baterías usadas de conformidad con la normativa local o las instrucciones del fabricante.
  • Seite 71: Contenido Del Paquete

    AXIS P3365–V Fixed Dome Network Camera Guía de instalación Esta guía de instalación proporciona instrucciones para instalar la cámara de red AXIS P3365–V en su red. Para conocer otros aspectos de uso del producto, consulte el Manual del usuario disponible en www.axis.com. Pasos de la instalación 1.
  • Seite 72: Información General Del Hardware

    AXIS P3365–V Fixed Dome Network Camera Información general del hardware 2 3 4 5 6 Conector de red (PoE) Salida de audio Indicadores LED (red, estado y encendido) Entrada de audio Conector de E/S Botón de control Conector del ventilador (para el modelo para exteriores) Ranura para tarjetas SD Cable de red 10.
  • Seite 73: Indicadores Led

    AXIS P3365–V Fixed Dome Network Camera Indicadores LED Color Indicación Verde Fijo para indicar una conexión a una red de 100 MBits/s. Parpadea cuando hay actividad de red. Fijo para indicar una conexión a una red de 10 MBits/s. Parpadea cuando Ámbar hay actividad de red.
  • Seite 74 AXIS P3365–V Fixed Dome Network Camera AVISO AVISO AVISO Debido a la normativa local o a las condiciones ambientales y eléctricas en las que se vaya a utilizar el producto, puede que sea adecuado u obligatorio el uso de un cable de red blindado (STP).
  • Seite 75: Condiciones De Funcionamiento

    AXIS P3365–V Fixed Dome Network Camera AVISO AVISO AVISO Antes de retirar la tarjeta SD, hay que desinstalarla para evitar que las grabaciones resulten dañadas. Para desinstalarla, vaya a Setup > System Options > Storage > SD Card (Configuración > Opciones del sistema > Almacenamiento > Tarjeta SD) y haga clic en Unmount (Desinstalar).
  • Seite 76 AXIS P3365–V Fixed Dome Network Camera Conectores Conector de E/S Bloque de terminales de 4 pines para: • Alimentación auxiliar (salida de CC) 2 3 4 • Entrada digital • Salida digital • 0 V CC (-) Notas Función Especificaciones 0 V CC (-) Salida de CC Se puede usar para conectar el equipo...
  • Seite 77 AXIS P3365–V Fixed Dome Network Camera 3.3 V max 50 mA Conector de audio Conectores de audio de 3,5 mm (estéreo) Entrada de audio Salida de audio 1 Punta Entrada de línea/micrófono Salida de línea (mono) 2 Anillo 3 Manguito Tierra Tierra Ranura para tarjetas SD...
  • Seite 78: Instalación Del Hardware

    AXIS P3365–V Fixed Dome Network Camera Instalación del hardware Montaje de la cámara directamente en la pared AVISO AVISO AVISO • Este producto de Axis puede montarse guiando los cables a través de la pared o a lo largo de ella. Este producto también puede estar equipado con una conexión metálica para proteger el cableado cuando se utiliza en pared.
  • Seite 79: Ajuste Del Objetivo

    AXIS P3365–V Fixed Dome Network Camera 6. Acople la cámara en el soporte de montaje mediante los dos tornillos M4x8 proporcionados. Nota Ajuste del objetivo Líneas de ayuda para la alineación horizontal Tornillo de bloqueo Abra la página Live View (consulte Acceso al producto, en la página 80) en la interfaz web y realice los siguientes ajustes en la cámara: 1.
  • Seite 80: Finalización De La Instalación

    AXIS P3365–V Fixed Dome Network Camera Finalización de la instalación Tapa lateral Cubierta del domo 1. Si los cables se utilizan en la pared, retire la tapa lateral de la cubierta del domo de la cámara. 2. Gire la cubierta negra dentro del domo para que coincida con la posición de la cámara. 3.
  • Seite 81: Más Información

    AXIS P3365–V Fixed Dome Network Camera Nota Las herramientas del software de instalación y gestión están disponibles en el CD suministrado con el producto, así como en las páginas de asistencia técnica en www.axis.com/techsup. Para restablecer el producto a la configuración predeterminada de fábrica: 1.
  • Seite 83 AXIS P3365–V Fixed Dome Network Camera 安 安 安 全 全 全 情 情 情 報 報 報 本製品を設置する前に、このインストールガイドをよくお読みください。インストー ルガイドは、後で参照できるように保管しておいてください。 危 危 危 険 険 険 レ レ レ ベ ベ ベ ル ル ル 回避しない場合、死亡または重傷につながる危険な状 危 危 危 険 険 険 態を示します。...
  • Seite 84 AXIS P3365–V Fixed Dome Network Camera 安 安 安 全 全 全 手 手 手 順 順 順 注 注 注 記 記 記 • 本製品は、お使いになる地域の法律や規制に準拠して使用してください。 • 本製品を屋外またはそれに準じる環境で使用する場合は、認定済みの屋外用 筐体に収納して設置する必要があります。 • 本製品は乾燥した換気のよい環境に保管してください。 • 本製品に衝撃または強い圧力を加えないでください。 • 本製品を不安定なブラケット、表面、または壁に設置しないでください。 • 本製品を設置する際には、適切な工具のみを使用してください。過剰な力 がかかると、製品が損傷することがあります。 • 化学薬品、腐食剤、噴霧式クリーナーは使用しないでください。清掃には、 きれいな水に浸した清潔な布を使用してください。...
  • Seite 85 AXIS P3365–V Fixed Dome Network Camera 警 警 警 告 告 告 • バッテリーは、正しく交換しないと爆発する危険があります。 • 交換用バッテリーとしては、同一品またはAxisが推奨するバッテリーのみを 使用してください。 • 使用済みバッテリーは、地域の規制またはバッテリーメーカーの指示に 従って廃棄してください。 ド ド ド ー ー ー ム ム ム カ カ カ バ バ バ ー ー ー 注 注 注 記 記 記 •...
  • Seite 87 AXIS P3365–V Fixed Dome Network Camera イ イ イ ン ン ン ス ス ス ト ト ト ー ー ー ル ル ル ガ ガ ガ イ イ イ ド ド ド このインストールガイドでは、AXIS P3365–Vネットワークカメラをネットワークに インストールする手順について説明します。本製品の使用の詳細については、Axisの www.axis.com ホームページ ( ) でユーザーズマニュアルを参照してください。 設...
  • Seite 88 AXIS P3365–V Fixed Dome Network Camera ハ ハ ハ ー ー ー ド ド ド ウ ウ ウ ェ ェ ェ ア ア ア の の の 概 概 概 要 要 要 2 3 4 5 6 ネットワークコネクタ (PoE) 音声出力...
  • Seite 89 AXIS P3365–V Fixed Dome Network Camera LED イ イ イ ン ン ン ジ ジ ジ ケ ケ ケ ー ー ー タ タ タ ー ー ー 色 色 色 表 表 表 示 示 示 ネット 緑 100 Mbit/sでネットワークに接続している場合、点灯します。 ワーク...
  • Seite 90 AXIS P3365–V Fixed Dome Network Camera 注 注 注 記 記 記 本製品を使用する場所の地域条例、環境、電気的条件によっては、シールド ネットワークケーブル (STP) の使用が推奨または必要になります。野外または 電気的に厳しい環境にネットワークケーブルを配線する場合は、個別の用途 に合ったシールドネットワークケーブル (STP) を使用してください。ネット ワークスイッチは適切に接地してください。法的な要求事項については、 Electromagnetic Compatibility (EMC), on page 2 を参照してください。 I/O コ コ コ ネ ネ ネ ク ク ク タ タ タ 外部装置を接続し、カメラに対するいたずらの警報、動体検知、イベントトリガー、...
  • Seite 91 AXIS P3365–V Fixed Dome Network Camera 注 注 注 記 記 記 録画データが破損しないように、SDカードはマウント解除してから取り外す [Setup] ( ( ( 設 設 設 定 定 定 ) ) ) ‑ ‑ ‑ [System [System Options] Options] 必要があります。マウントを解除するには、[Setup] [Setup] [System Options] ( ( ( シ シ シ ス ス ス テ テ テ ム ム ム オ オ オ プ プ プ シ シ シ ョ ョ ョ ン ン ン ) ) ) ‑ ‑ ‑ [Storage] [Storage] ( ( ( ス...
  • Seite 92 AXIS P3365–V Fixed Dome Network Camera コ コ コ ネ ネ ネ ク ク ク タ タ タ ー ー ー I/O コ コ コ ネ ネ ネ ク ク ク タ タ タ ー ー ー 4ピンターミナルブロック: • 補助電源 (DC出力) •...
  • Seite 93 AXIS P3365–V Fixed Dome Network Camera 3.3 V max 50 mA 音 音 音 声 声 声 コ コ コ ネ ネ ネ ク ク ク タ タ タ ー ー ー 3.5 mm音声コネク ター (ステレオ) 音 音 音 声 声 声 入 入 入 力 力 力 音...
  • Seite 94 AXIS P3365–V Fixed Dome Network Camera ハ ハ ハ ー ー ー ド ド ド ウ ウ ウ ェ ェ ェ ア ア ア の の の 設 設 設 置 置 置 カ カ カ メ メ メ ラ ラ ラ を を を 壁 壁 壁 に に に 直 直 直 接 接 接 取 取 取 り り り 付 付 付 け け け る る る 注...
  • Seite 95 AXIS P3365–V Fixed Dome Network Camera 4. ケーブルをカメラユニットに接続します。 5. SDメモリーカードを装着します (オプション)。 6. 2本のM4x8ネジを使用して、カメラユニットを取り付けブラケットに装 着します。 注意 レ レ レ ン ン ン ズ ズ ズ の の の 調 調 調 整 整 整 水平位置合わせライン 固定ネジ 製品へのアクセ Webインターフェースの [Live [Live [Live View] View] ( ( ( ラ...
  • Seite 96 AXIS P3365–V Fixed Dome Network Camera 設 設 設 置 置 置 の の の 完 完 完 了 了 了 サイドリッド ドームカバー 1. ケーブルを壁に沿って配線する場合は、カメラのドームカバーからサイ ドリッドを取り外します。 2. ドーム内の黒いシールドを回転させ、カメラの位置に合わせます。 3. 乾いた柔らかい布でドームを拭い、埃と指紋を除去します。ブロワーを使 用して、レンズから埃を吹き飛ばします。 4. ガスケットがドームカバーにしっかりと装着されていることを確認し、 ドームカバーを取り付け、付属のドライバーでネジを締めます。カメラの フォーカスが適切かどうか、チェックします。 これで、カメラの設置は完了です。 製 製 製 品 品 品 へ へ へ の の の ア ア ア ク ク ク セ セ セ ス ス ス IPアドレスの割り当て、パスワードの設定、ビデオストリームへのアクセスを行うに...
  • Seite 97 AXIS P3365–V Fixed Dome Network Camera 注意 インストール・管理ソフトウェアツールは、製品に付属のCD www.axis.com/techsup と、 のサポートページから入手できます。 本製品を工場出荷時の設定にリセットするには、以下の手順を実行します。 1. 本製品の電源を切ります。 ハードウェアの 2. コントロールボタンを押しながら、電源を再投入します。 概要, ページ 88 を参照してください。 3. ステータスインジケーターLEDが黄色に点滅するまで、コントロールボタン を押し続けます (約15~30秒間)。 4. コントロールボタンを離します。プロセスが完了すると、ステータスイン ジケーターLEDが緑色に変わります。これで本製品は工場出荷時の設定にリ セットされました。ネットワーク上に利用可能なDHCPサーバーがない場 合、デフォルトのIPアドレスは192.168.0.90になります。 5. インストール・管理ソフトウェアツールを使用して、IPアドレスの割り当 て、パスワードの設定、ビデオストリームのアクセスを行います。 Webインターフェースを使用して、各種パラメーターを工場出荷時の設定に戻す ことも可能です。[Setup [Setup [Setup ‑ ‑ ‑ System System System Options Options ‑...
  • Seite 98 Installation Guide Ver. M2.3 AXIS P3365–V Fixed Dome Network Camera Date: February 2014 © Axis Communications AB, 2014 Part No. 55204...

Inhaltsverzeichnis