Herunterladen Inhalt Inhalt Diese Seite drucken
auna SELECT Drive Bedienungsanleitung

auna SELECT Drive Bedienungsanleitung

Digitaler stereo-verstärker

Werbung

Verfügbare Sprachen
  • DE

Verfügbare Sprachen

  • DEUTSCH, seite 1

Werbung

Inhaltsverzeichnis
loading

Inhaltszusammenfassung für auna SELECT Drive

  • Seite 3: Inhaltsverzeichnis

    Sehr geehrter Kunde, wir gratulieren Ihnen zum Erwerb Ihres Gerätes. Lesen Sie die folgenden Hinweise sorgfältig durch und befolgen Sie diese, um möglichen Schäden vorzubeugen. Für Schäden, die durch Missachtung der Hinweise und unsachgemäßen Gebrauch entstehen, übernehmen wir keine Haftung. Scannen Sie den folgenden QR-Code, um Zugriff auf die aktuellste Bedienungsanleitung und weitere Informationen rund um das Produkt zu erhalten:...
  • Seite 4: Technische Daten

    TECHNISCHE DATEN Artikelnummer 10034537, 10034538, 10034539 Stromversorgung AC 220-240 V ~ 50/60 Hz Leistungsaufnahme Nennleistung: ≤ 400 W @ 1/8 RMS Leistung Standby: ≤ 0.5 W 170 W × 2 (4 Ohm,THD 1%,1 kHz), 85 x 4 (8 Ohm,THD 1% ,1 kHz) Ausgangsleistung 180 W x 2 (4 Ohm,THD 10%,1 kHz), 90 x 4 (8 Ohm,THD 10% ,1 kHz) 4 Ω...
  • Seite 5: Sicherheitshinweise

    SICHERHEITSHINWEISE • Kinder ab 8 Jahren, psychisch, sensorisch und körperlich eingeschränkte Menschen dürfen das Gerät nur benutzen, wenn sie vorher von einer für sie verantwortlichen Aufsichtsperson ausführlich mit den Funktionen und den Sicherheitsvorkehrungen vertraut gemacht wurden und die damit verbundenen Risiken verstehen. •...
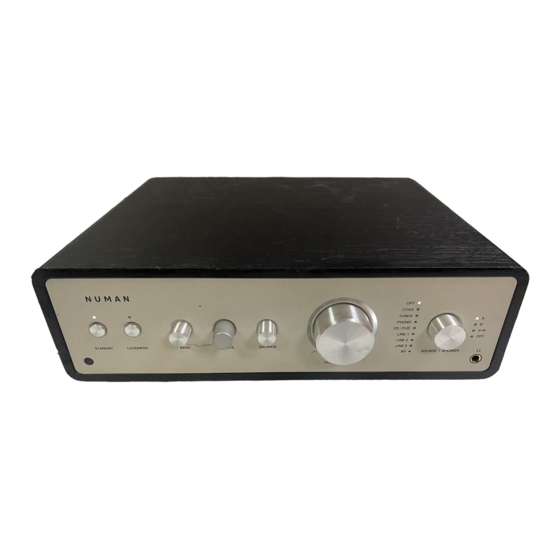
  • Seite 6: Geräteübersicht

    GERÄTEÜBERSICHT VOLUME & MUTE STANDBY (Lautstärkeregler & Stummschalten) SOURCE & SPEAKER LOUDNESS (Lautstärke) (Quellen- & Lautsprecherauswahl) 1 ¼“ Kopfhöreranschluss (3,5 BASS TREBLE Fernbedienungssensor BALANCE...
  • Seite 7 OPTICAL INPUT (optischer PHONO INPUT (Phono Eingangsanschluss) Eingangsanschluss) RECORD OUTPUT COAXIAL INPUT (koaxialer (Aufnahme Eingangsanschluss) Ausgangsanschluss) SUBWOOFER OUTPUT TUNER INPUT (Radio (Basslautsprecher Eingangsanschluss) Ausgangsanschluss) CD/DVD INPUT (RCA/Cinch GROUND CONNECTOR Eingangsanschluss) (Erdungsstecker) LINE 1 INPUT (LINE-IN- Lautsprecheranschlüsse 21-24 Anschluss 1) LINE 2 INPUT (LINE-IN- Stromanschluss Anschluss 2) LINE 3 INPUT (LINE-IN-...
  • Seite 8: Fernbedienung

    FERNBEDIENUNG Standby MUTE (Stummschalten) Lautstärke erhöhen Lautstärke senken Vorheriger Titel (nur im BT- Modus) Nächster Titel (nur im BT- Modus) Wiedergabe/Pause (nur im BT-Modus) HOCH: Lautsprecherauswahl nach oben scrollen RUNTER: Lautsprecherauswahl nach unten scrollen PAIR (die aktuelle BT- Verbindung wird getrennt und es wird nach neuen BT-Geräten gesucht) LOUD (Bass und Treble...
  • Seite 9: Bedienung

    BEDIENUNG Strom anschließen Schließen Sie ein Ende des Netzkabels an den Verstärker und das andere Ende an eine Wandsteckdose an. Bringen Sie die Ein-/ Ausschalttaste in die Position „ON“. Die LED-Anzeige leuchtet rot auf und der Verstärker befindet sich im Standby-Modus. Einschalten Aktivieren Sie den Verstärker, indem Sie die Taste STANDBY auf dem Gerät oder die Standby-Taste der Fernbedienung drücken.
  • Seite 10: Bt-Verbindung

    Basseinstellung • Drehen Sie an der Vorderseite des Geräts am Regler BASS. • Der Anpassungsbereich liegt bei ± 8 dB. Trebleeinstellung • Drehen Sie an der Vorderseite des Geräts am Regler TREBLE. • Der Anpassungsbereich liegt bei ± 8 dB. Lautstärkeeinstellung: Drehen Sie zur Lautstärkeanpassung an der Vorderseite des Geräts am Regler VOLUME/MUTE oder drücken Sie die Laustärketasten der Fernbedienung.
  • Seite 11: Eingänge Und Ausgänge

    EINGÄNGE UND AUSGÄNGE AUX-Eingang Schließen Sie ein Quellgerät mit analogem Audio (beispielsweise einen Kassetten- oder CD-Player) an den RCA- Anschluss an. Ein Kabel mit RCA- Steckern wird zur Verbindungsherstellung benötigt (nicht im Lieferumfang enthalten). TUNER Radiogerät PHONO Plattenspieler CD/DVD CD/DVD Player LINE 1 LINE 2 Externe Quelle mit AUX-Verbindung...
  • Seite 12: Reinigung Und Pflege

    REINIGUNG UND PFLEGE Ziehen Sie den Netzstecker vor der Reinigung und Wartung des Geräts aus der Steckdose. Reinigen Sie das Ge- rät mit einem weichen, feuchten Tuch. Verwenden Sie ein mildes Reinigungsmittel. Verwenden Sie zur Reinigung niemals Lösungsmittel oder starke, abreibende Reinigungsmittel.
  • Seite 13: Fehlerbehebung

    FEHLERBEHEBUNG Problem Mögliche Ursache Lösungsansatz Das Gerät funktioniert Kein Strom Stellen Sie sicher, dass nicht das Gerät eingesteckt ist. Überprüfen Sie die Funktion der Steckdose mit einem anderen Gerät. Kein Ton Falsche Eingabequelle Wählen Sie die richtige ausgewählt Eingabequelle aus Lautstärke zu niedrig Erhöhen Sie nach und eingestellt...
  • Seite 14: Spezielle Entsorgungshinweise Für Verbraucher In Deutschland

    SPEZIELLE ENTSORGUNGSHINWEISE FÜR VERBRAUCHER IN DEUTSCHLAND Entsorgen Sie Ihre Altgeräte fachgerecht. Dadurch wird gewährleistet, dass die Altgeräte umweltgerecht verwertet und negative Auswirkungen auf die Umwelt und menschliche Gesundheit vermieden werden. Bei der Entsorgung sind folgende Regeln zu beachten: • Jeder Verbraucher ist gesetzlich verpflichtet, Elektro- und Elektronikaltgeräte (Altgeräte) sowie Batterien und Akkus getrennt vom Hausmüll zu entsorgen.
  • Seite 15 • Bei einem Vertrieb unter Verwendung von Fernkommunikationsmitteln ist die unentgeltliche Abholung am Ort der Abgabe auf Elektro- und Elektronikgeräte der Kategorien 1, 2 und 4 gemäß § 2 Abs. 1 ElektroG, nämlich „Wärmeüberträger“, „Bildschirmgeräte“ (Oberfläche von mehr als 100 cm²) oder „Großgeräte“ (letztere mit mindestens einer äußeren Abmessung über 50 Zentimeter) beschränkt.
  • Seite 16: Hinweise Zur Entsorgung

    HINWEISE ZUR ENTSORGUNG Wenn es in Ihrem Land eine gesetzliche Regelung zur Entsorgung von elektrischen und elektronischen Geräten gibt, weist dieses Symbol auf dem Produkt oder auf der Verpackung darauf hin, dass dieses Produkt nicht im Hausmüll entsorgt werden darf. Stattdessen muss es zu einer Sammelstelle für das Recycling von elektrischen und elektronischen Geräten gebracht werden.
  • Seite 17 Dear customer, Congratulations on your purchase. Please read the following instructions carefully and follow them to prevent potential damage. We accept no liability for damage caused by disregarding the instructions or improper use. Please scan the QR code to access the latest operating instructions and for further information about the product.
  • Seite 18: Technical Data

    TECHNICAL DATA Product code 10034537, 10034538, 10034539 Power supply AC 220-240 V ~ 50/60 Hz Power consumption Rated power output: ≤ 400 W @ 1/8 RMS power Standby: ≤ 0.5 W 170 W × 2 (4 Ohm, THD 1%,1 kHz), 85 x 4 (8 Ohm, THD 1%,1 kHz) Output power 180 W x 2 (4 Ohm, THD 10%,1 kHz), 90 x 4 (8 Ohm, THD 10%,1 kHz) Resistance...
  • Seite 19: Safety Instructions

    SAFETY INSTRUCTIONS • Children over 8 years as well as mentally, sensory and physically impaired persons may only use the device if they have been informed in detail about the functions and safety precautions by a supervisor responsible for them beforehand and understand the associated risks. •...
  • Seite 20: Device Overview

    DEVICE OVERVIEW VOLUME & MUTE (volume STANDBY control & mute) SOURCE & SPEAKER (source LOUDNESS (volume) & speaker selection) 1 ¼“ headphone socket (3.5 BASS TREBLE Remote control sensor BALANCE...
  • Seite 21 OPTICAL INPUT (optical input PHONO INPUT (phono connector) input connector) RECORD OUTPUT COAXIAL INPUT (coaxial (recording output input connector) connector) SUBWOOFER OUTPUT TUNER INPUT (radio input (bass speaker connector) output connector) CD/DVD INPUT (RCA/cinch GROUND CONNECTOR input connector) (earth connector) LINE 1 INPUT (LINE-IN Speaker connections 21-24...
  • Seite 22: Remote Control

    REMOTE CONTROL Standby MUTE (mute) Increase volume Lower volume Previous track (only in BT mode) Next track (only in BT mode) Play/pause (only in BT mode) UP: scroll speaker selection DOWN: scroll speaker selection down PAIR (the current BT connection is disconnected and the device searches for new) BT devices)
  • Seite 23: Operation

    OPERATION Connect to power supply Connect one end of the mains cable to the amplifier and the other end to a wall socket. Move the on/off button to the "ON" position. The LED indicator lights up red and the amplifier is in standby mode. Switch on Activate the amplifier by pressing the STANDBY button on the device or the standby button on the remote control.
  • Seite 24: Bt Connection

    Bass setting • Turn the BASS knob on the front of the device. • The adjustment range is ± 8 dB. Treble setting • Turn the TREBLE knob on the front of the device. • The adjustment range is ± 8 dB. Sound Adjusting the volume: to adjust the volume, turn the VOLUME/MUTE knob on the front of the device or press the volume buttons on the...
  • Seite 25: Inputs And Outputs

    INPUTS AND OUTPUTS AUX input Connect a source device with analogue audio (for example, a cassette or CD player) to the RCA connector. A cable with RCA plugs is needed to make the connection (not included). TUNER Radio device PHONO Record player CD/DVD CD/DVD player...
  • Seite 26: Cleaning And Care

    CLEANING AND CARE Before cleaning and maintaining the device, disconnect the power plug from the socket. Clean the device with a soft, damp cloth. Use a gentle cleaning product. Never use solvents or strong, abrasive cleaning products for cleaning.
  • Seite 27: Troubleshooting

    TROUBLESHOOTING Problem Potential cause Possible solution The device does not No power Make sure that the work device is plugged in. Use another device to check that the socket is working. No sound Wrong input source Select the correct selected input source The volume is set too Gradually increase the...
  • Seite 28: Disposal Considerations

    DISPOSAL CONSIDERATIONS If there is a legal regulation for the disposal of electrical and electronic devices in your country, this symbol on the product or on the packaging indicates that this product must not be disposed of with household waste. Instead, it must be taken to a collection point for the recycling of electrical and electronic equipment.
  • Seite 29: Contenu De L'emballage

    Cher client, chère cliente, Toutes nos félicitations pour l’acquisition de ce nouvel appareil. Lisez attentivement les indications suivantes et suivez-les pour éviter d'éventuels dommages. Nous ne saurions être tenus pour responsables des dommages dus au non-respect des consignes et à la mauvaise utilisation de l’appareil.
  • Seite 30: Fiche Technique

    FICHE TECHNIQUE Numéro d'article 10034537, 10034538, 10034539 Alimentation CA 220-240 V ~ 50/60 Hz Puissance consommée Puissance nominale : ≤ 400 W @ 1/8 puissance RMS En veille : ≤ 0,5 W 170 W × 2 (4 ohms,THD 1%,1 kHz), 85 x 4 (8 ohms,THD 1% ,1 kHz) Puissance de sortie 180 W ×...
  • Seite 31: Consignes De Sécurité

    CONSIGNES DE SÉCURITÉ • Les enfants à partir de 8 ans et les personnes souff rant de handicaps mentaux, sensoriels et physiques ne peuvent utiliser l'appareil que s'ils ont été parfaitement familiarisés avec les fonctions et les précautions de sécurité par une personne responsable et s'ils comprennent les risques associés.
  • Seite 32: Aperçu De L'appareil

    APERÇU DE L'APPAREIL VOLUME & MUTE (contrôle STANDBY du volume & fonction muet) SOURCE & SPEAKER LOUDNESS (volume) (sélection de la source et des enceintes) BASS Prise casque 1 ¼" (3,5 mm) TREBLE Capteur de télécommande BALANCE...
  • Seite 33 PHONO INPUT OPTICAL INPUT (connecteur (Connecteur d'entrée d'entrée optique) phono) RECORD OUTPUT COAXIAL INPUT (connecteur (Connecteur de sortie d'entrée coaxiale) d'enregistrement) SUBWOOFER OUTPUT TUNER INPUT (prise d'entrée (prise de sortie radio) du subwoofer) CD/DVD INPUT (connecteur GROUND CONNECTOR d'entrée RCA) (prise de terre) Branchements des LINE 1 INPUT (prise LINE IN 1)
  • Seite 34: Télécommande

    TÉLÉCOMMANDE Veille MUTE (sourdine) Augmenter le volume Diminuer le volume Piste précédente (en mode BT uniquement) Piste suivante (en mode BT uniquement) Lecture/Pause (en mode BT uniquement) HAUT : faire défiler la sélection d'enceintes vers le haut BAS : faire défiler la sélection d'enceintes vers le bas PAIR (la connexion BT actuelle est interrompue et...
  • Seite 35: Utilisation

    UTILISATION Branchez l'alimentation Branchez une extrémité du câble d'alimentation à l'amplificateur et l'autre extrémité à une prise murale. Amenez la touche marche/arrêt sur la position « ON ». Le voyant LED s'allume en rouge et l'amplificateur est en mode veille. Allumer Activez l'amplificateur en appuyant sur la touche STANDBY de l'appareil ou de la télécommande.
  • Seite 36: Connexion Bt

    Réglage des basses • Tournez le bouton BASS à l'avant de l'appareil. • La plage d'adaptation est de ± 8 dB. Réglage des aigus • Tournez le bouton TREBLE à l'avant de l'appareil. • La plage d'adaptation est de ± 8 dB. Réglage du volume : pour régler le volume, tournez la commande VOLUME/MUTE située à...
  • Seite 37: Entrées Et Sorties

    ENTRÉES ET SORTIES Entrée AUX Connectez un appareil source avec audio analogique (par exemple un lecteur de cassettes ou de CD) à la prise RCA. Un câble avec des connecteurs RCA est nécessaire pour établir la connexion (non fourni). TUNER Appareil radio PHONO Platine vinyle...
  • Seite 38: Nettoyage Et Entretien

    NETTOYAGE ET ENTRETIEN Avant le nettoyage de l'appareil, débranchez la fiche d'alimentation de la prise. Essuyez l'appareil avec un chiffon doux et humide. Utilisez un produit de nettoyage doux. N'utilisez jamais de solvants ou de détergents puissants et abrasifs pour le nettoyage.
  • Seite 39: Résolution Des Problèmes

    RÉSOLUTION DES PROBLÈMES Problème Cause possible Solution L'appareil ne Pas de courant Assurez-vous fonctionne pas. que l'appareil est branché. Vérifiez le fonctionnement de la prise avec un autre appareil. Pas de son Mauvaise source Sélectionnez la bonne d'entrée sélectionnée source d'entrée. Le volume est réglé...
  • Seite 40: Conseils Pour Le Recyclage

    CONSEILS POUR LE RECYCLAGE S‘il existe une réglementation pour l‘élimination ou le recyclage des appareils électriques et électroniques dans votre pays, ce symbole sur le produit ou sur l‘emballage indique que cet appareil ne doit pas être jeté avec les ordures ménagères. Vous devez le déposer dans un point de collecte pour le recyclage des équipements électriques et électroniques.
  • Seite 41: Partes Suministradas

    Estimado cliente: Le felicitamos por la adquisición de este producto. Lea atentamente el siguiente manual y siga cuidadosamente las instrucciones de uso con el fin de evitar posibles daños. La empresa no se responsabiliza de los daños ocasionados por un uso indebido del producto o por haber desatendido las indicaciones de seguridad.
  • Seite 42: Datos Técnicos

    DATOS TÉCNICOS Número del artículo 10034537, 10034538, 10034539 Alimentación CA 220-240 V ~ 50/60 Hz Consumo eléctrico Potencia nominal: ≤ 400 W @ 1/8 RMS de salida En espera: ≤ 0,5 W 170 W × 2 (4 ohmios, THD 1%, 1 kHz), 85 x 4 (8 ohmios, THD 1%, 1 kHz) Potencia de salida 180 W ×...
  • Seite 43: Indicaciones De Seguridad

    INDICACIONES DE SEGURIDAD • Los niños mayores de 8 años y las personas con discapacidad física, sensorial o psíquica pueden utilizar el aparato si han sido previamente instruidos por una persona responsable sobre el funcionamiento del mismo y conocen las funciones, las indicaciones de seguridad y los riesgos asociados.
  • Seite 44: Descripción General Del Aparato

    DESCRIPCIÓN GENERAL DEL APARATO VOLUME & MUTE (control de STANDBY volumen y silencio) SOURCE & SPEAKER VOLUMEN (volumen) (selección de fuente y altavoz) 1 ¼“ conexión de los BASS auriculares (3,5 mm) Sensor del mando a TREBLE distancia BALANCE...
  • Seite 45 OPTICAL INPUT (conector de PHONO INPUT (conector entrada óptica) de entrada de tocadiscos) RECORD OUTPUT COAXIAL INPUT (conector de (conector de salida de entrada coaxial) grabación) SUBWOOFER OUTPUT TUNER INPUT (conector de (altavoz de graves entrada de radio) de conexión de salida) CD/DVD INPUT (conector de GROUND CONNECTOR entrada RCA)
  • Seite 46: Mando A Distancia

    MANDO A DISTANCIA Modo de espera MUTE (silenciar) Subir el volumen Bajar el volumen Pista anterior (solo en modo Pista siguiente (solo en modo Reproducir/Pausa (solo en modo BT) ARRIBA: desplazar la selección de altavoces hacia arriba ABAJO: desplazar la selección de altavoces hacia abajo PAIR (se desconecta la conexión BT actual y se...
  • Seite 47: Puesta En Funcionamiento

    PUESTA EN FUNCIONAMIENTO Conectar el aparato Conecte un extremo del cable de alimentación al amplificador y el otro a una toma de corriente. Coloque el botón de encendido/apagado en la posición "ON". El indicador LED se ilumina en rojo y el amplificador está en modo de espera.
  • Seite 48: Conexión Bt

    Ajuste de los graves • Gire el regulador BASS en la parte frontal del aparato. • El rango de ajuste es de ± 8 dB. Ajuste de agudos • Gire el regulador TREBLE en la parte frontal del aparato. • El rango de ajuste es de ±...
  • Seite 49: Entradas Y Salidas

    ENTRADAS Y SALIDAS Entrada AUX Conecte un dispositivo de fuente con audio analógico (por ejemplo, un reproductor de casetes o CD) al conector RCA. Se necesita un cable con conectores RCA para establecer la conexión (no incluido). TUNER Radio PHONO Tocadiscos CD/DVD Reproductor de CD/DVD...
  • Seite 50: Limpieza Y Cuidado

    LIMPIEZA Y CUIDADO Desconecte el aparato de la toma de corriente antes de limpiarlo. Limpie el aparato con un paño suave y húmedo. Utilice un producto de limpieza neutro. No utilice nunca disolventes o productos de limpieza fuertes y abrasivos para la limpieza.
  • Seite 51: Reparación De Anomalías

    REPARACIÓN DE ANOMALÍAS Problema Posible causa Propuesta de solución El aparato no funciona No hay electricidad Asegúrese de que el aparato esté enchufado. Compruebe el funcionamiento de la toma de corriente con otro aparato. No hay sonido Se ha seleccionado Seleccione la fuente una fuente de entrada de entrada correcta.
  • Seite 52: Indicaciones Sobre La Retirada Del Aparato

    RETIRADA DEL APARATO Si en su país existe una disposición legal relativa a la eliminación de aparatos eléctricos y electrónicos, este símbolo estampado en el producto o en el embalaje advierte que no debe eliminarse como residuo doméstico. En lugar de ello, debe depositarse en un punto de recogida de reciclaje de aparatos eléctricos y electrónicos.
  • Seite 53 Gentile cliente, La ringraziamo per l'acquisto del dispositivo. La preghiamo di leggere attentamente le seguenti indicazioni e di seguirle per prevenire eventuali danni. Non ci assumiamo alcuna responsabilità per danni scaturiti da una mancata osservanza delle indicazioni relative alla sicurezza e da un uso improprio del dispositivo.
  • Seite 54: Dati Tecnici

    DATI TECNICI Numero articolo 10034537, 10034538, 10034539 Alimentazione AC 220-240 V ~ 50/60 Hz Potenza assorbita Potenza nominale: ≤ 400 W @ 1/8 di potenza RMS Standby: ≤ 0,5 W 170 W × 2 (4 Ohm, THD 1%, 1 kHz), 85 x 4 (8 Ohm, THD 1%, 1 kHz) Potenza di uscita 180 W ×...
  • Seite 55: Avvertenze Di Sicurezza

    AVVERTENZE DI SICUREZZA • I bambini a partire da 8 anni e le persone con limitate capacità fi siche, psichiche e sensoriali possono utilizzare il dispositivo solo se sono stati istruiti da una persona responsabile della loro sicurezza sulle modalità d'uso e sulle procedure di sicurezza e se comprendono i rischi associati.
  • Seite 56: Descrizione Del Dispositivo

    DESCRIZIONE DEL DISPOSITIVO VOLUME & MUTE (manopola STANDBY del volume e silenziamento) SOURCE & SPEAKER LOUDNESS (volume) (selezione della sorgente e dell'altoparlante) 1 ¼“ connessione cuffie (3,5 BASS TREBLE Sensore del telecomando BALANCE...
  • Seite 57 OPTICAL INPUT (presa PHONO INPUT (presa ingresso ottico) ingresso Phono) COAXIAL INPUT (presa RECORD OUTPUT (presa ingresso coassiale) uscita registrazione) SUBWOOFER OUTPUT TUNER INPUT (presa (presa uscita ingresso radio) altoparlante bassi) INGRESSO CD/DVD (presa GROUND CONNECTOR ingresso RCA/cinch) (spina di messa a terra) Connessioni per LINE 1 INPUT (presa LINE-IN 1) 21-24...
  • Seite 58: Telecomando

    TELECOMANDO Standby MUTE (silenziamento) Alzare il volume Abbassare il volume Brano precedente (solo in modalità BT) Brano successivo (solo in modalità BT) Play/Pausa (solo in modalità SU: scorre la selezione dell'altoparlante verso l'alto GIU': scorre la selezione dell'altoparlante verso il basso PAIR (l'attuale connessione BT viene scollegata e si...
  • Seite 59: Utilizzo

    UTILIZZO Collegamento alla rete elettrica Collegare un'estremità del cavo di alimentazione all'amplificatore e l'altra estremità a una presa a muro. Posizionare il pulsante on/off su "ON". L'indicatore LED si illumina di rosso e l'amplificatore è in modalità standby. Accensione Attivare l'amplificatore premendo STANDBY sul dispositivo o sul telecomando.
  • Seite 60: Collegamento Bt

    Impostazione dei bassi • Girare la manopola BASS sulla parte anteriore del dispositivo. • La gamma di regolazione è di ± 8 dB. Regolazione degli alti • Girare la manopola TREBLE sulla parte anteriore del dispositivo. • La gamma di regolazione è di ± 8 dB. Suono Regolazione del volume: per regolare il volume girare la manopola VOLUME/MUTE sulla parte anteriore del dispositivo o premere i tasti...
  • Seite 61: Ingressi E Uscite

    INGRESSI E USCITE Ingresso AUX Collegare un dispositivo sorgente con audio analogico (per esempio, un lettore di mangianastri o CD) al connettore RCA. E' necessario un cavo con spine RCA per effettuare il collegamento (non incluso). TUNER Radio PHONO Giradischi CD/DVD Lettore CD/DVD LINE 1...
  • Seite 62: Pulizia E Manutenzione

    PULIZIA E MANUTENZIONE Staccare la spina dalla presa prima della pulizia e di eseguire lavori di manutenzione. Pulire il dispositivo con un panno morbido e umido. Utilizzare solo detergenti delicati. Non usare mai solventi o detergenti aggressivi e abrasivi per la pulizia.
  • Seite 63: Risoluzione Dei Problemi

    RISOLUZIONE DEI PROBLEMI Problema Possibile causa Soluzioni Il dispositivo non Non c'è corrente Assicurarsi che funziona il dispositivo sia collegato. Verificare il funzionamento della presa con un altro dispositivo. Nessun audio Selezione errata della Selezionare la sorgente d'ingresso sorgente d'ingresso corretta Il volume è...
  • Seite 64: Avviso Di Smaltimento

    RETIRADA DEL APARATO Si en su país existe una disposición legal relativa a la eliminación de aparatos eléctricos y electrónicos, este símbolo estampado en el producto o en el embalaje advierte que no debe eliminarse como residuo doméstico. En lugar de ello, debe depositarse en un punto de recogida de reciclaje de aparatos eléctricos y electrónicos.

Diese Anleitung auch für:

100345371003453810034539

Inhaltsverzeichnis