Inhaltsverzeichnis
Werbung
Verfügbare Sprachen
Verfügbare Sprachen
Quicklinks
H
S
ENRY
CHEIN
HANDHELD PULSE
OXIMETER
• Instructions for use
Pulsooxímetro de mano
ym tre de pouls de poche
S- inhandpulso imeter
®
Pulsossimetro a mano
Pulsoxímetro portátil
3x1.5V AA
IPX1
-20°C
®
70°C
• Instrucciones de uso
• ode d emploi
• ebrauchsan eisun
• Istru ioni per l uso
• Instru es de utili a ão
ade in China
Rev.2019/07
900-8275
1
Werbung
Inhaltsverzeichnis

Verwandte Anleitungen für Henry Schein 900-8275

Inhaltszusammenfassung für Henry Schein 900-8275
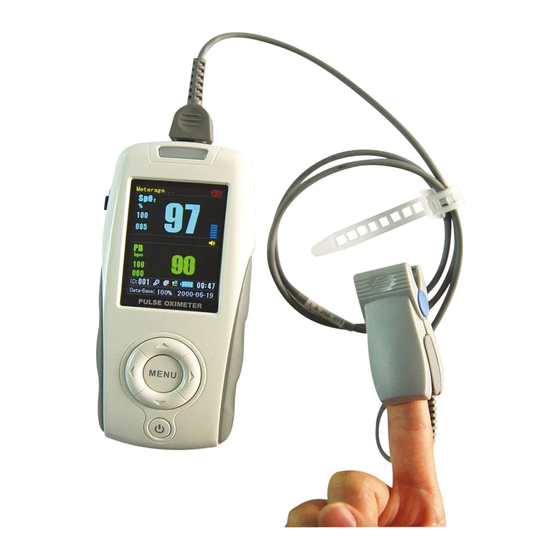
- Seite 1 ENRY CHEIN ® 900-8275 HANDHELD PULSE OXIMETER • Instructions for use Pulsooxímetro de mano • Instrucciones de uso ym tre de pouls de poche • ode d emploi S- inhandpulso imeter • ebrauchsan eisun ® Pulsossimetro a mano • Istru ioni per l uso Pulsoxímetro portátil...
- Seite 2 Copyright Our company owns all rights of this unpublished work and intends to maintain it as a confidential work. We may also seek to maintain this work as an unpublished copyright. This publication is to be used solely for the purpose of reference or operation of our software system.
-
Seite 3: Inhaltsverzeichnis
CONTENT 1 INTRODUCTION 1.1 Brief Introduction 1.2 Intended Use 1.3 Measurement Principle 1.4 Safety Information 1.5 Electromagnetism Interference 1.6 Explanation of Symbols 1.7 Product Features 1.8 Contraindication 2 GENERAL DESCRIPTION 2.1 Appearance 2.2 Power Supply 3 TIME AND DATE SETTINGS 4 TAKE A MEASUREMENT 4.1 Install the Probe 4.2 Measurement Screens... -
Seite 4: Introduction
1 INTRODUCTION 1.1 Brief Introduction Thank you for purchasing the MD300K2 pulse oximeter. The main functions of the device include SpO , PR and PI (Perfusion Index) measurements, visual and audible indication, probe o and finger out indicarion, data storage, transmitting and review etc. Please read this manual carefully before using the device. Notes: •... - Seite 5 3. Sensor malfunction may cause inaccurate data possibly resulting in patient injury or death, so pay close attention to the sensor and inspect it often. 4. Do not use the handheld pulse oximeter in an MRI or CT environment. 5. Although the pulse oximeter has alarms, it is not suggested for long time continuous monitoring. 6.
-
Seite 6: Electromagnetism Interference
4. Single use accessories should never be re-used. 5. Only use SpO sensors specified by the manufacturer. Other SpO sensors may cause improper perfor- mance. 6. Unplug the sensor from the monitor before cleaning or disinfecting to prevent sensor or monitor from being damaged, and to prevent user under safety situation. -
Seite 7: Explanation Of Symbols
MD300K2 PULSE OXIMETER MD300K2 This apparatus complies with the IEC 60601-1-2 international standard. The requirements of this internati- PULSE OXIMETER onal standard are: CISPR11, GROP1, and CLASS B. t h i s i n t e r n a t i o n a l s t a n d a r d a r e : C I S P R 11 , G R O P 1 , a n d C L A S S B . t h i s i n t e r n a t i o n a l s t a n d a r d a r e : C I S P R 11 , G R O P 1 , a n d C L A S S B . -
Seite 8: General Description
2 GENERAL DESCRIPTION 2.1 Appearance MENU Fig.2-1 Description of Fig.2-1: transmission. 2. Alarm indicator: it will flash with yellow when alarms occur. 3. Displaying screen. 4. Navigation buttons (UP, DOWN, LEFT, RIGHT): the function of the left button is confirming the items that you choose;... -
Seite 9: Power Supply
2.2 Power Supply The device can be powered by 3 AA alkaline batteries. Fig.2-2 Batteries Installation: 1) Open the battery cover: Slide the fixing screw slightly in the rear panel to the position which is marked with “ ” and then open the cover. 2) Batteries installation: Install 3 AA alkaline batteries or rechargeable batteries lightly as indicated by the polarity signs as shown in Fig.2-2. -
Seite 10: Time And Date Settings
AC Power Supply The device can be supplied by AC power through connecting the device to AC adapter. Note: Use the AC power supply, make sure put the device in the safety and proper place and convenient to power o . Warnings! •... -
Seite 11: Measurement Screens
2. Insert the SpO probe into the probe socket (refer to Fig.4.1). If the SpO probe is disconnected from the unit, a prompt “Probe O ” will be shown in the status bar in the top left of probe is the display screen. - Seite 12 100 : 4. : Pulse bar 100 : 5. 100: PR high alarm limit; 060: PR low alarm limit. PR : 6. PR: PR area of display ❚ It shows the pulse rate in beats per minute during normal measurement. ❚...
-
Seite 13: Settings
5 SETTINGS 5.1 System Setting Pick and enter the [System Setting] interface from the main menu. And then press the Navigation buttons to select di erent item to set. Fig.5.1 Fig.5.2 Alarm Volume: you can adjust the value of alarm volume, there are 7 levels, and the default level is 3 Alarm Pause: there are two modes, 60s and 120s, and the default mode is 120s. - Seite 14 How do you input passwords? 1. Press the Navigation button to change the numbers. 2. Press the OK button to confirm the number. 3. Press the Navigation button switch to the next numbers. 4. Press the OK button to confirm your selection. 5.
-
Seite 15: Data Management
6 DATA MANAGEMENT Pick and enter the [Data Management] interface from the main menu. You can choose continuous measu- rement or not. Fig.6.1 6.1 Data Review Pick and enter the “Data review” interface as shown in Fig.6.1. By pressing the UP / DOWN button, the user can turn to the earlier/later item page. -
Seite 16: Pr Trend
Fig.6.3 On the above of the trend, the date and time of the first item are displayed, with month/day; hour: minute: second. 6.3 PR Trend Pick and enter the “PR Trend” interface as shown in Fig.6.4. Press the Left / Right button; you can turn to the earlier or later item page. -
Seite 17: Alarm
Fig.6.5 7 ALARM ALARM PRIORITY: There are two-level priorities for selection. High priority: the highest level alarm, indicates the patient is in the very dangerous situation. Low priority: indicate the technical alarm caused by the device itself. Alarms of the oximeter include technical and physiological alarms. All the two priorities divided by built-in module and cannot be changed by user. -
Seite 18: Maintenance And Repair
Warnings! When the alarm occurs, check patients’ conditions immediately. • When the alarm occurs, check patients’ conditions immediately. • Check which parameter is alarming or which alarm is going on. • Check patient’s condition. • Search for the source of alarm. •... -
Seite 19: Safety Checks
• Do not pour liquid onto the equipment or accessories. • Do not allow liquid to enter the case. • Never use abrasive materials (such as steel wool or silver polish), or erosive cleaners (such as acetone or acetone-based cleaners). Caution: If you spill liquid on the equipment or accessories, contact us or your service personnel. -
Seite 20: Troubleshooting
8.3 Troubleshooting Malfunction Reason Solution SpO or PR is 1. Finger might not be 1. Retry by plugging the shown unstably plugged deep enough. finger. 2. Finger is trembling or pa- 2. Try not to move. tient’s body is in movement status. - Seite 21 c) The damage or lose sustained due to connection to peripheral equipment (such as printer, computer etc.), that are not provided by our company are not covered by the warranty. d) Responsibility limitation In the duration of warranty, if user changes the parts manufactured by other manufacturers without our company permission, our company is entitled to cancel contract.
- Seite 22 • Try to use original package and packing material. User will be responsible for such damage caused by bad package during transportation. • Please o er guarantee list and copy of invoice to standby with the period of guarantee. • Please describe failure phenomenon in detail and altogether o er oximeter. Storage and Transportation Storage: Storage Temperature -20°C~70°C, Relative Humidity ≤93% Transportation: Transport by airline, train or vessel after packing according to request.
-
Seite 23: Appendix A Specifications
APPENDIX A SPECIFICATIONS Notes: • Specifications may be changed without prior notice. • The circuit diagrams, the list of components, the illustration of diagrams, and the detailed rules of calibration, are provided exclusively to professional personnel authorized by our company. •... - Seite 24 Pulse Rate Measurement range: 30~250 bpm Resolution: 1 bpm Accuracy: ±2 bpm or 2% (The larger are applied) Perfusion Index Display range: 0.1%~20% Accuracy: 0.1%~1.0%, ±0.2%; 1.1%~20%, ±20% Probe LED Specifi cations Wavelength Radiant Power 660±3nm 3.2mW 905±10nm 2.4mW Equipment data update period As shown in the following fi...
- Seite 25 AC Adapter Input Voltage: AC 100~240V Input Frequency: 50Hz~60Hz Output Voltage: DC 5V±5% Output Current: 2A MAX SMD chip fuse 32V3A0466003.NR(1206) Data store and replay Outline of product Dimension: 143.3mm(L)X67.4mm(W)X36mm(H) Weight: ≤140±10g (excluding the batteries) Box contents: 1. Three AA alkaline batteries 2.
-
Seite 26: Appendix B Clinical Study Summary
APPENDIX B CLINICAL STUDY SUMMARY The following details are provided to disclose actual performance observed in the clinical validation study of healthy adult volunteers. The ARMS value analysis statement and Bland-Altman plot of data for MD300K2 and its supporting probes are shown as following: Clinical study details of MD300K2 Pulse Oximeter and its supporting M-50E012CS09 Oximeter probe: Value Analysis Statement... - Seite 27 Bland-Altman Plot Graphic Clinical study details of MD300K2 Pulse Oximeter and its supporting M-50J033CS045 Oximeter probe: Value Analysis Statement Item 90--100 80--<90 70--<80 #pts Bias -0.51 0.41 1.56 ARMS 1.34 1.49 2.36 Bland-Altman Plot Graphic...
-
Seite 28: Appendix B Decalaration
APPENDIX C DECLARATION Guidance and manufacturer’s declaration - Electromagnetic emission---- for all EQUIPMENT AND SYSTEM Guidance and manufacturer’s declaration - electromagnetic emission The model MD300K2 Pulse Oximeter is intended for use in the electromagnetic specified below. The customer or the user of the model MD300K2 Pulse Oximeter should assure that it is such an environment. - Seite 29 Guidance and manufacturer’s declaration- electromagnetic immunity The model MD300K2 Pulse Oximeter is intended for use in the electromagnetic environment specified below. The customer or the user of the model MD300K2 Pulse Oximeter should assure that it is used in such an environment. Immunity test IEC 60601 test level Compliance level...
- Seite 30 MD300K2 INSTRUCTION MANUAL Guidance and manufacturer’s declaration- electromagnetic immunity- Guidance and manufacturer’s declaration- electromagnetic immunity- For EQUIPMENT and SYSTEM that are not LIFE-SUPPORTING For EQUIPMENT and SYSTEM that are not LIFE-SUPPORTING Guidance and manufacturer’s declaration – electromagnetic immunity Guidance and manufacturer’s declaration- electromagnetic immunity The model MD300K2 Pulse Oximeter is intended for use in the electromagnetic environment specified below.
- Seite 31 a.) Field strengths from fixed transmitters, such as base situation for radio (cellular/cordless) telephones and land/mobile radios, amateur radio, AM and FM radio broadcast and TV broadcast cannot be predicted theoretically with accuracy. To assess the electromagnetic environment due to fixed RF transmitters, an electromagnetic site survey should be considered.
- Seite 32 Derechos de autor Nuestra empresa es propietaria de todos los derechos de esta obra inédita y tiene intención de mantenerla como una obra confidencial. Es posible que mantengamos también inéditos los derechos de autor de la obra. Esta obra debe utilizarse únicamente como referencia o para consultar el funcionamiento de nuestro sistema de software.
- Seite 33 CONTENIDO 1 INTRODUCCIÓN 1.1 Introducción breve 1.2 Uso previsto 1.3 Principio de medición 1.4 Información sobre seguridad 1.5 Interferencias electromagnéticas 1.6 Explicación de los símbolos 1.7 Características del producto 1.8 Contraindicaciones 2 DESCRIPCIÓN GENERAL 2.1 Apariencia 2.2 Fuente de alimentación 3 CONFIGURACIÓN DE LA FECHA Y LA HORA 4 CÓMO REALIZAR UNA MEDICIÓN 4.1 Instalación de la sonda...
-
Seite 34: Introducción
1 INTRODUCCIÓN 1.1 Breve introducción Gracias por adquirir el oxímetro de pulso MD300K2. Las funciones principales del dispositivo incluyen la medición de la SPO , la PR y el PI (índice de perfusión), alarma visual y sonora, indicación de sonda desconectada y dedo fuera, almacenamiento, transmisión y revisión de datos, etc. - Seite 35 Nota - Ofrece al usuario otra información importante, como sugerencias, requisitos e infor- mación adicional. ¡Advertencia! 1. Antes de usar el producto, lea atentamente el manual. Este dispositivo está diseñado para su uso por parte de personas capacitadas como profesional sanitario. Nuestra empresa no asumirá...
- Seite 36 14. Utilice el equipo de acuerdo con la información sobre la directiva CEM proporcionada en los documentos adjuntos. 15. Los equipos de comunicación de RF portátiles y móviles pueden interferir con los equipos electromédicos. 16. Este dispositivo no debe utilizarse cerca de o apilado con otros equipos. 17.
-
Seite 37: Interferencias Electromagnéticas
3. Para el mantenimiento rutinario del dispositivo, consulte los procedimientos de servicio en la sección correspondiente, como se indica en el manual. 5. Las funciones del dispositivo deben usarse de forma segura. 6. El material del dispositivo no contiene látex natural. Posibles causas de las mediciones inexactas: 1. -
Seite 38: Explicación De Los Símbolos
MD300K2 PULSE OXIMETER MD300K2 PULSE OXIMETER 1.6 Significado de los símbolos this international standard are: CISPR11, GROP1, and CLASS B. this international standard are: CISPR11, GROP1, and CLASS B. Símbolo Significado Símbolo Significado 1.6 Explanation of Symbols 1.6 Explanation of Symbols Parte aplicada de tipo B Protecci n contra fu as de IPX1... -
Seite 39: Descripción General
2 DESCRIPCIÓN GENERAL El oxímetro de pulso portátil dispone de una pantalla TFT de 2,4 pulgadas. Permite visualizar la de parámetros, como el tiempo, número de identificación, nivel de carga de las pilas y más. 2.1. Apariencia MENU Fig.2-1 Descripción de la Fig.2.1: 3. -
Seite 40: Fuente De Alimentación
9. Botones laterales arriba/abajo: realice una pulsación larga con estos botones para aumen- tar/disminuir el brillo de la retroiluminación. NOTA: en la pantalla de medición, realice una pulsación larga con el botón de menú, la alarma se pausará. Realice otra pulsación larga, la alarma se reanudará. 2.2 Fuente de alimentación El dispositivo funciona con 3 pilas alcalinas AA. -
Seite 41: Configuración De La Fecha Y La Hora
Fuente de alimentación de CA El dispositivo puede alimentarse con corriente alterna utilizando un adaptador de CA. Nota: cuando utilice la fuente de alimentación de CA, asegúrese de que el dispositivo esté colocado en un lugar seguro y adecuado y que sea fácil acceder a él para apagarlo. ¡Advertencia! •... -
Seite 42: Cómo Realizar Una Medición
4 CÓMO REALIZAR UNA MEDICIÓN 4.1 Instalación de la sonda 1. Antes de usarlo, compruebe el oxímetro de pulso en busca de daños mecánicos. 2. Inserte la sonda de SpO en el conector para son- da (consulte la figura 4.1). Si la sonda de SpO se p r o b e i s desconecta del dispositivo, se mostrará... - Seite 43 Descripción de las pantallas de medición: 1. Medición: el oxímetro de pulso está en el estado de medición. Se muestra el mensaje “Dedo fuera” cuando el dedo no está insertado o no se detecta ninguna señal. Description of measurement screens: Se muestra el mensaje “Sonda desconectada”...
-
Seite 44: Configuración
a) La sonda está demasiado apretada. b) La iluminación es excesiva debido a la presencia de fuentes de luz como lámparas quirúrgi- cas, lámparas de bilirrubina o la luz solar. Debe evitarse exponer el sensor a fuentes de luz, como lámparas radiales o lámparas de infrarrojos. c) Hay un manguito de tensiómetro inflado en la misma extremidad en la que se ha colocado el sensor de SpO . -
Seite 45: Configuración De La Alarma
Config. de ID: ➀ Pulse el botón “Aceptar”. ➁ Pulse el botón de navegación pulse para cambiar el número. ➂ Pulse el botón “Aceptar” para confirmar. Config. de fábrica: restablece los valores predeterminados de fábrica. Nota: 1. Cada vez que acceda a la opción “Volumen de alarma” o “Pausar alarma”, deberá introducir la contraseña. -
Seite 46: Administración De Datos
4. Cada vez que acceda a “Config. de alarma” en el menú principal o “Volumen de alarma” o “Pausar alarma” en la pantalla “Config. del sistema”, deberá introducir la contraseña. Acceda a la pantalla “Config. de alarma”. Fig.5.4 Puede activar o desactivar la alarma. El límite máximo del rango de la SpO es 71-100. -
Seite 47: Tendencia De La Spo
El oxímetro de pulso puede registrar el parámetro de alarma marcado en rojo. Pulse el botón de menú para regresar a la pantalla de menú principal. Fig.6.2 6.2 Tendencia de la SpO Acceda a la pantalla "Tendencia SpO ", como se muestra en la figura 6.3. Pulse el botón iz- quierda/derecha para desplazarse a la página de elementos siguiente/anterior. -
Seite 48: Cómo Eliminar Todos Los Datos
Fig.6.4 6.4 Cómo eliminar todos los datos Acceda a la pantalla "Borrar todos los datos", como se muestra en la figura 6.5. Seleccione “Sí” o “No” pulsando el botón arriba o el botón abajo. Pulse el botón “Aceptar” para confirmar la selección. -
Seite 49: Alarma
7 ALARMA PRIORIDAD DE LA ALARMA Puede seleccionar entre dos niveles de prioridad: Prioridad alta: la alarma de nivel más alto, indica que el paciente está en una situación muy peligrosa. Prioridad baja: la alarma técnica disparada por el propio dispositivo. Las alarmas del oxímetro incluyen alarmas técnicas y fisiológicas. -
Seite 50: Mantenimiento Y Reparación
• Desactive el audio de la alarma, si es necesario. • Compruebe la alarma cuando no haya ninguna advertencia. Retardo de la alarma El retardo de la condición de alarma y el retardo de la generación de la señal de alarma es de menos de 1 s. -
Seite 51: Comprobaciones De Seguridad
• No sumerja ninguna parte del dispositivo en líquido. • No vierta líquido sobre el dispositivo o sus accesorios. • No permita que entre líquido en el dispositivo. • No utilice materiales abrasivos (como lana de acero o pulidor de plata) ni productos de limpieza erosivos (como acetona o limpiadores a base de acetona). -
Seite 52: Resolución De Problemas
Desinfección Las piezas que entran en contacto con el cuerpo del paciente deben desinfectarse después de cada uso. Los desinfectantes recomendados incluyen: etanol al 70 %, isopropanol al 70 % y desinfectantes líquidos de tipo glutaraldehído al 2 %. La desinfección puede causar daños al dispositivo y, por lo tanto, no se recomienda para este oxímetro de pulso, a menos que se indique lo contrario en el plan de mantenimiento del hospital. -
Seite 53: Garantía Y Reparación
8.4 Garantía y reparaciones 8.4.1 Método de mantenimiento Horario de consulta de reparación: de 9:00 a. m. a 5:30 p. m. de lunes a viernes, excepto festivos. Horario de reparación: de 9:00 a. m. a 5:30 p. m. de lunes a viernes, excepto festivos. 8.4.2 Exenciones y limitaciones a) Nuestra empresa no se hará... - Seite 54 • Evidencia de daños a la sonda por aplastamiento. • No se ha usado el embalaje original durante el transporte. • Reparaciones realizadas por un servicio técnico no autorizado. • Daños al producto por no ajustarse a las especificaciones del manual. •...
-
Seite 55: Apéndice A: Especificaciones
APÉNDICE A: ESPECIFICACIONES Nota: • Las especificaciones pueden cambiar sin previo aviso. • Los diagramas de circuitos, la lista de componentes, las ilustraciones de diagramas y las instrucciones de calibración detalladas se proporcionan exclusivamente al personal profesi- onal autorizado por nuestra empresa. •... - Seite 56 Precisión: Classification Accuracy Adults ±2% No motion Pediatrics ±2% Neonates ±3% Adults ±3% Motion Pediatrics ±3% Neonates ±3% Adults ±2% Low Perfusion Pediatrics ±2% Neonates ±3% Low Perfusion Performance PI=0.1% ±3% Anti-interference Performance Fluke Index2 simulator Level2 ±3% Frecuencia de pulso Rango de medición: 30 bpm ~ 250 bpm Resolución: 1 bpm Precisión: ±...
- Seite 57 Entorno de funcionamiento Temperatura de funcionamiento: 0°C ~ 40°C Humedad relativa: < 80 %, sin condensación Presión atmosférica: 86 kPa ~ 106 kPa Entorno de transporte y almacenamiento Temperatura: -20°C ~ 70°C Humedad relativa: ≤ 93 %, sin condensación Presión atmosférica: 50 kPa ~ 106 kPa Requisitos de alimentación Pilas alcalinas Alimentación: tres pilas alcalinas AA...
- Seite 58 Tamaño del producto Dimensiones: 143,3 (l) x 67,4 (an) x 36 (al) mm Peso: ≤ 140 ± 10 g (excluyendo las pilas) Contenido de la caja: 1. Tres pilas alcalinas AA 2. Manual de instrucciones 3. Sonda de dedo para adulto: M-50E012CS09 4.
-
Seite 59: Apéndice B: Resumen Del Estudio Clínico
APÉNDICE B: RESUMEN DEL ESTUDIO CLÍNICO Los siguientes datos se proporcionan para mostrar el rendimiento real observado en el estudio de valida- ción clínica con voluntarios adultos sanos. A continuación se muestra el análisis del valor ARMS y el gráfi co de datos de Bland-Altman para el MD300K2 y las sondas admitidas por éste. - Seite 60 Gráfi co de Bland-Altman Detalles del estudio clínico del oxímetro de pulso MD300K2 y la sonda M-50J033CS045: Análisis del valor ARMS Elemento 90--100 80--<90 70--<80 N.º de puntos Desvío -0.51 0.41 1.56 ARMS 1.34 1.49 2.36 Gráfi co de Bland-Altman...
-
Seite 61: Apéndice C: Declaración
APPENDIX C DECLARATION Guidance and manufacturer’s declaration - Electromagnetic emission---- for all EQUIPMENT AND SYSTEM Guidance and manufacturer’s declaration - electromagnetic emission The model MD300K2 Pulse Oximeter is intended for use in the electromagnetic specified below. The customer or the user of the model MD300K2 Pulse Oximeter should assure that it is such an environment. - Seite 62 Guidance and manufacturer’s declaration- electromagnetic immunity The model MD300K2 Pulse Oximeter is intended for use in the electromagnetic environment specified below. The customer or the user of the model MD300K2 Pulse Oximeter should assure that it is used in such an environment. Immunity test IEC 60601 test level Compliance level...
- Seite 63 MD300K2 INSTRUCTION MANUAL Guidance and manufacturer’s declaration- electromagnetic immunity- Guidance and manufacturer’s declaration- electromagnetic immunity- For EQUIPMENT and SYSTEM that are not LIFE-SUPPORTING For EQUIPMENT and SYSTEM that are not LIFE-SUPPORTING Guidance and manufacturer’s declaration – electromagnetic immunity Guidance and manufacturer’s declaration- electromagnetic immunity The model MD300K2 Pulse Oximeter is intended for use in the electromagnetic environment specified below.
- Seite 64 a.) Field strengths from fixed transmitters, such as base situation for radio (cellular/cordless) telephones and land/mobile radios, amateur radio, AM and FM radio broadcast and TV broadcast cannot be predicted theoretically with accuracy. To assess the electromagnetic environment due to fixed RF transmitters, an electromagnetic site survey should be considered.
- Seite 66 Copyright Notre entreprise possède tous les droits de ce travail non publié et entend le conserver comme travail confidentiel. Nous pourrons également décider de conserver le présent travail comme copyright non publié. La présente publication doit uniquement être utilisée à des fins de référence ou d’opération du système de notre logiciel.
- Seite 67 TABLE DES MATIÈRES 1 INTRODUCTION 1.1 Brève introduction 1.2 Utilisation prévue 1.3 Principe de la mesure 1.4 Information relative à la sécurité 1.5 Interférences électromagnétiques 1.6 Explication des symboles 1.7 Caractéristiques du produit 1.8 Contre-indications 2 DESCRIPTION GÉNÉRALE 2.1 Apparence 2.2 Bouton d’alimentation 3 REGLAGES DE L’HEURE ET DE LA DATE 4 PRENDRE UNE MESURE...
-
Seite 68: Introduction
1 INTRODUCTION 1.1 Brève introduction Nous vous remercions d’avoir acheté l’oxymètre de pouls MD300K2. Les fonctions principa- les de l’appareil comprennent les mesures de SpO , PR et PI (Perfusion Index), l’indication visuelle et audible, l’indication de doigt externe et de sonde, le stockage des données ainsi que la transmission et l’analyse etc. -
Seite 69: Avertissements
Avertissement - Information concernant une situation susceptible de blesser le patient ou l’opérateur. Attention - Rappel à l'utilisateur de faire attention lors de l’utilisation de l’appareil, le non-res- pect de cette consigne pourrait entrainer le mauvais fonctionnement de l’appareil Remarque - Informe l’utilisateur au sujet des autres informations importantes par suggestion, exigence ou complément d’information. - Seite 70 13. Cet appareil est conforme à la norme IEC 60601-1-2:2014 relative à la compatibilité élec- tromagnétique des équipements et/ou des systèmes électriques médicaux. Cependant, en raison de la prolifération des équipements de transmission de radio fréquence et des autres sources de bruit électrique dans les centres de santé et d’autres environnements, il est possible que des niveaux élevés d‘interférence en raison de la proximité...
- Seite 71 7. L’alarme doit être réglée en fonction des conditions particulières du patient. S’assurer que le son audio soit activé lorsqu’une alarme se déclenche. Remarques : 1. Lorsque deux ou plusieurs capteurs sont situés dans des zones adjacentes, une croix op- tique pourrait survenir.
-
Seite 72: Interférences Électromagnétiques
1.5 Interférence électromagnétique Cet oxymètre est conçu et testé en conformité avec la norme EMC, respectant la norme in- ternationale EMC relative au matériel médical électronique – IEC 60601-1-2. Cependant, en raison de la prolifération des équipements de transmission de radio fréquence et des autres sources de bruit électrique dans les centres de santé... -
Seite 73: Caractéristiques Du Produit
1.7 Caractéristiques du produit • Compact, l er et simple utiliser. • us u 127 ID d utilisateur et 72 heures de dur e d enre istrement. • larme visuelle et audible trois niveau , alarme de batterie faible. • Transfert de donn es au PC via c ble USB. . •... -
Seite 74: Bouton D'alimentation
bouton droit est de retourner à l’interface précédente ou du menu. Dans l’interface de mes- ure, appuyer sur le bouton droit pour basculer entre le mode numérique et le mode d’onde. 5. Bouton du menu : appuyer légèrement pour entrer dans le menu principal, appuyer longue- ment pour mettre l’alarme d’audio en mode silence, l’appareil va a cher l’icône d’indica- teur d’alarme audio couvert par «... -
Seite 75: Alimentation Par Piles
• S’assurer d’insérer les piles suivant les polarités indiquées, en respectant les marquages de polarité indiqués dans le compartiment interne de la batterie. 2.2.1 Alimentation par piles • Évitez d’utiliser des piles non spécifiées. • Évitez de mettre les piles dans le feu. •... -
Seite 76: Reglages De L'heure Et De La Date
3 REGLAGES DE L’HEURE ET DE LA DATE Pour régler l’heure, suivre les étapes suivantes : 1) Appuyer sur le bouton d’alimentation pendant 3 secondes pour allumer l’oxymètre et ap- puyer ensuite sur le bouton menu pour accéder au menu principal, se référer à la Fig.3.1. Fig.3.1 Fig.3.2 2. -
Seite 77: Écrans De Mesures
Note: Medview pour analyse. Pour des informations détaillées, se référer au manuel d’utilisation du logiciel Medview. Après avoir terminé le réglage de l’heure, mettre votre doigt dans le capteur tel qu’illustré dans l’image suivante. Fig.4.2 Placement du capteur Sélectionner le capteur le plus approprié en termes de type et de dimension. 4.2 Écrans de mesures Il y a deux modes d’a chage tel qu’indiqué... - Seite 78 100 : 4. : Barre du pouls 100 : 5. 100 : La limite d’alarme haute de PR ; 060 : limite d’alarme basse de PR PR : 6. PR : Zone d'a chage PR Il a che la fréquence cardiaque en battements par minute pendant la mesure normale.La couleur de la valeur PR devient rouge lorsque PR dépasse les limites d’alarme ;...
-
Seite 79: Réglages
5 RÉGLAGES 5.1 Réglage du système Sélectionner et enter dans l’interface de [Réglage du système] à partir du menu principal. Ap- puyer ensuite sur les boutons de navigation pour sélectionner les di érents éléments à régler. Fig.5.1 Fig.5.2 Volume d’alarme : Vous pouvez régler la valeur du volume d’alarme, il y a 7 niveaux et le niveau par défaut est 3. -
Seite 80: Réglage De L'alarme
5.2 Réglage d’alarme Sélectionner l’interface de [Réglage d’alarme] à partir du menu principal. Avant le réglage, veuillez saisir le mot de passe (1234) pour régler les paramètres. Ou vous pouvez directement accéder pour vérifier les paramètres mais sans possibilité de les modifier. Comment saisir les mots de passe? 1. -
Seite 81: Gestion Des Données
La plage de limite haute de la SpO2 est 71~100, la plage de limite basse de la SpO2 est 70~99 La plage de limite haute PR est 31~250, la plage de limite basse PR est 30~249 Fig.5.4 6 GESTION DES DONNÉES Sélectionner et entrer dans l’interface de [Gestion des données] à... -
Seite 82: Tendance Spo
6.2 Tendance SpO Sélectionner et entrer dans l’interface de » tendance SpO « comme présenté dans la Fig.6. 3. En appuyant sur le bouton gauche/droite, l’utilisateur peut passer à une page de données suivante ou précédente. Appuyer sur le bouton haut, l’oxymètre de pouls retourne à l’interface précédente. -
Seite 83: Alarme
et en appuyant sur le bouton OK pour confirmer votre sélection. Remarque : 1. Veuillez faire attention à la suppression des données car une fois e acées, elles ne pourront plus être récupérées. 2. Les données ne peuvent pas être supprimées pen- dant le monitoring Fig.6.5 7 ALARME... -
Seite 84: Entretien Et Reparation
Remarques : 1. L’alarme apparaitra si la valeur de mesure est hors de la plage. 2. Le son d’alarme retentit jusqu’à ce que l’alarme disparaisse ou jusqu’à soit éteinte. 3. Après le silence de l’alarme, l’indicateur correspondant l’indiquera 4. Alarme de puissance faible: le voyant de contrôle correspondant clignotera avec un cadre rouge Avertissements! •... -
Seite 85: Entretien
• Ne pas ouvrir le couvercle de l’oxymètre ou réparer les circuits électroniques. Son ouverture provoquera l’endommagement de l’appareil et l’annulation de la garantie. 8.1 Entretien Utiliser uniquement les substances et méthodes approuvées par nous et listées dans le cha- pitre relatif au nettoyage et à... - Seite 86 En cas de dommage ou d’anormalité, ne pas utiliser cet oxymètre de pouls. Contacter immédi- atement vos ingénieurs biomédicaux hospitaliers ou votre personnel de maintenance. Nettoyage Veuillez utiliser l’alcool médical pour nettoyer le silicone touchant le doigt à l’intérieur de la sonde SpO en utilisant un tissu doux imbibé...
-
Seite 87: Dépannage
8.3 Dépannage Défaillance Raison Résolution SpO ou PR est 1. Le doigt n’est pas entièrement 1. Réessayer en insérant instable inséré. le doigt 2. Le doigt tremble ou le corps du 2. Essayer de ne pas patient est en mouvement. bouger. - Seite 88 • L’endommagement ou les pertes causées par une inspection ou la réparation par un orga- nisme non certifié; • L’endommagement ou les pertes causées par l’utilisateur ou son représentant n’utilisant pas l’appareil suivant le manuel d’utilisation c) L’endommagement ou la perte causés par la connexion à des équipements périphériques (notamment l’imprimante, l’ordinateur, etc.) non fournis par notre entreprise ne sont pas couverts par la garantie;...
- Seite 89 • Exemple d’étiquette de code • Tout dommage sur une sonde occasionné par une force mécanique ne donnera pas lieu à un échange gratuit de pièce. Pendant la mesure de SpO , les principes donnent lieu à des valeurs de mesures complexes ou inappropriées. •...
-
Seite 90: Annexe A Spécifications
ANNEXE A SPÉCIFICATIONS Remarques : • Les spécifications pourraient changer sans notification préalable; • Les schémas de circuit, la liste des composants, les illustrations de schémas et les règles détaillées de calibrage sont fournis exclusivement aux personnels professionnels autorisés par notre entreprise. •... - Seite 91 Fiabilité: Classification Fiabilité Adultes ±2% Aucun mouvement Pédiatrie ±2% Néonatale ±3% Adultes ±3% Mouvement Pédiatrie ±3% Néonatale ±3% Adultes ±2% Faible perfusion Pédiatrie ±2% Néonatale ±3% Performance de faible perfusion PI=0.1% ±3% Performance anti interférence Index de hasard 2 simulateur Niveau2 ±3% Fréquence cardiaque Plage de mesure : 30bpm~250bpm...
-
Seite 92: Environnement D'utilisation
Période de mise à jour des données d’équipement Tel qu’indiqué dans la fi gure suivante. La période de mise à jour des données de moyenne la plus lente est 8s. Environnement d’utilisation Température de fonctionnement 0°C~40°C Humidité relative : ≤80%, aucune condensation Pression atmosphérique 86 kPa~106 kPa Transport et environnement de stockage Température : -20°C~70°C Humidité... - Seite 93 Caractéristiques du produit Dimension : 143.3mm(L) X67, 4mm(l) X36mm(H) Poids : ≤140±10 G(sans les piles) Contenu de la boîte: 1. Trois piles alcalines AA 2. une notice d’instruction 3. Une sonde de doigt pour adulte: M-50E012CS09 4. Une sonde de doigt pédiatrique: M-50B008CS09 (en option) 5.
-
Seite 94: Annexe B Resume De L'etude Clinique
ANNEXE B RESUME DE L’ETUDE CLINIQUE Les détails suivants sont fournis pour a cher la performance actuelle observée dans l’étude de validation clinique des adultes volontaires en bonne santé. La déclaration d’analyse de valeur ARMS et Bland-Altman et les données pour MD300K2 et ses sondes d’appui sont af- fi... - Seite 95 Grahique Bland-Altman Plot Détails de l’étude clinique de l’oxymètre de pouls MD300K2 et la sonde d’oxymètre d’appui M-50J033CS045: Déclaration d’analyse de valeur A Élément 90--100 80--<90 70--<80 #pts Bias -0.51 0.41 1.56 ARMS 1.34 1.49 2.36 Grahique Bland-Altman Plot...
-
Seite 96: Annexe C Déclaration
ANNEXE C DECLARATION Guidance and manufacturer’s declaration - Electromagnetic emission---- for all EQUIP- MENT AND SYSTEM Guidance and manufacturer’s declaration - electromagnetic emission The model MD300K2 Pulse Oximeter is intended for use in the electromagnetic specified below. The customer or the user of the model MD300K2 Pulse Oximeter should assure that it is such an environment. - Seite 97 Guidance and manufacturer’s declaration- electromagnetic immunity The model MD300K2 Pulse Oximeter is intended for use in the electromagnetic environment specified below. The customer or the user of the model MD300K2 Pulse Oximeter should assure that it is used in such an environment. Immunity test IEC 60601 test level Compliance level...
- Seite 98 MD300K2 I N STRUCTIO N M A N U A L G uidance and manufacturer ’ s declaration- electroma g netic immunity- Guidance and manufacturer’s declaration- electromagnetic immunity- For E Q UIPME N T and S Y STEM t h at are not LIFE-SUPPORTI N G For EQUIPMENT and SYSTEM that are not LIFE-SUPPORTING G uidance and manufacturer ’...
- Seite 99 a.) Field strengths from fixed transmitters, such as base situation for radio (cellular/cordless) telephones and land/mobile radios, amateur radio, AM and FM radio broadcast and TV broadcast cannot be predicted theoretically with accuracy. To assess the electromagnetic environment due to fixed RF transmitters, an electromagnetic site survey should be considered.
-
Seite 100: Urheberrechtshinweis
Urheberrechtshinweis Copyright schützen. Diese Publikation dient ausschließlich als Referenz oder Bedienung unseres Softwaresystems. Kein Teil dieser Arbeit kann für andere Zwecke verbreitet werden. Dokumentation. Diejenigen, die Zugang zu dieser Arbeit haben, dürfen die Informationen in dieser Arbeit nicht kopieren, verwenden oder weitergeben, sofern dies nicht ausdrücklich von unserer Firma genehmigt wurden. - Seite 101 1 VORSTELLUNG 1.1 Kurze Vorstellung 1.2 Vorgesehene Verwendung 1.3 Messprinzip 1.4 Sicherheitsinformationen 1.5 Elektromagnetische Störung 1.6 Symbole 1.7 Produktbeschreibung 1.8 Kontraindikation 2 ALLGEMEINE BESCHREIBUNG 2.1 Erscheinung 2.2 Stromversorgung 3 ZEIT- UND DATUMSEINSTELLUNGEN 4 EINE MESSUNG VORNEHMEN 4.1 Die Messsonde anschließen 4.2 Messbildschirme 5 EINSTELLUNGEN 5.1 Systemeinstellungen...
-
Seite 102: Vorstellung
1 VORSTELLUNG 1.1 Kurze Vorstellung Vielen Dank für den Kauf des MD300K2 Pulsoximeters. Zu den Hauptfunktionen des Gerätes gehören die Messungen von SpO , PR und PI (Perfusionsindex), ein visueller und akustischer Alarm, „Sensor aus“ und die „Finger draußen“-Anzeige, die Datenspeicherung, -übertragung und -überprüfung usw. - Seite 103 Achtung - Sicherheitshinweis, deren Nichtbeachtung zu möglichen Schäden an Gerät/Zube- hör führen. Hinweis - Informiert den Benutzer von anderen wichtigen Informationen durch Vorschlag, Anforderung und Ergänzung Warnung! 1. Vor Gebrauch das Handbuch sorgfältig lesen. Dieses Gerät ist für den Gebrauch von Per- sonen gedacht, die in der professionellen Gesundheitsversorgung ausgebildet sind.
- Seite 104 für medizinische elektrische Geräte und/oder Systeme. Jedoch ist es aufgrund der Ver- breitung von Hochfrequenzübertragungsgeräten und anderen Quellen von elektrischem Rauschen im Gesundheitswesen und in anderen Umgebungen möglich, dass ein hohes Maß an derartigen Störungen aufgrund der Nähe oder der Stärke einer Quelle die Leistung dieses Geräts stören könnte.
-
Seite 105: Elektromagnetische Störung
Anmerkungen: 1. Optische Überlagerungen können auftreten, wenn sich zwei oder mehr Sensoren in angren- zenden Bereichen befinden. Diese kann beseitigt werden, indem man jeden Standort mit undurchsichtigem Material bedeckt. Optische Überlagerungen können die Genauigkeit der SpO -Messwerte beeinträchtigen. 2. Hindernisse oder Schmutz auf dem roten Licht oder dem Detektor des Sensors können dazu führen, dass der Sensor ausfällt. -
Seite 106: Symbole
60601-1-2. Wegen der Verbreitung von Hochfrequenz-Sendegeräten und anderen Quellen von elektrischem Rauschen sowohl in der Gesundheitspflege als auch in der Wohnumgebung (z. B. Mobiltelefone, mobile Zwei-Wege-Funkgeräte, Elektrogeräte) ist es möglich, dass ein hohes Maß an derartigen Störungen durch die enge Nähe oder durch die Stärke einer Quelle zu einer Leistungsunterbrechung dieses Gerätes führen kann. -
Seite 107: Produktbeschreibung
1.7 Produktbeschreibung TFT-Display mit verstellbarer Hintergrundbeleuchtung. • Bis u 127 Benut er-ID und 72-Stunden- ufnahmespeicherun . • Visuelle und dreistufige akustische larme, Batteriealarm. • Datenübertra un um PC ber USB- abel. • n etrieben durch drei - l alibatterien oder et teil optional . 1.8 Kontraindikation eine 2 ALLGEMEINE BESCHREIBUNG... -
Seite 108: Stromversorgung
auf, in dem das Passwort geändert werden kann. Mit der rechten Taste kehren Sie wieder zum vorherigen Menü zurück. Drücken Sie die rechte Taste, um zwischen dem Digitalmo- dus und dem Wellenmodus zu wechseln. 5. Menütaste: Kurz drücken, um das Hauptmenü aufzurufen; lange drücken, um den Au- dio-Alarm zu stummschalten. - Seite 109 4. Batteriestatus und Austausch 5. Wenn die Batteriespannung niedriger ist, verschwinden die Balken der Batterieanzeige und der Rahmen der Anzeige wird rot dargestellt, was bedeutet, dass die Akkukapazität sinkt. Sie sollten die Batterien rechtzeitig durch neue ersetzen. Warnung! • Wenn Batterieflüssigkeit in die Augen gelangt, spülen Sie diese sofort mit reichlich sauberem Wasser aus.
-
Seite 110: Zeit- Und Datumseinstellungen
3. ZEIT- UND DATUMSEINSTELLUNGEN Stellen Sie die korrekte Zeit gemäß der folgenden Schritte ein: 1) Halten Sie die Einschalttaste 3 Sekunden lang gedrückt, um das Oximeter einzuschalten. Drücken Sie dann die Menütaste, um das Hauptmenü aufzurfen. Sehen Sie dazu Abb.3.1 Abb. -
Seite 111: Messbildschirme
Abb. 4.2 Anbringen des Sensors Wählen Sie einen passenden Sensor gemäß Art und Abmessung. 4.2 Messbildschirme Es gibt zwei Anzeigemodi, wie sie in den folgenden Bildern dargestellt sind. MD300K2 PULSE OXIMETER 4.2 Measurement Screens - 9 - Abb. 4.3 (Wellenmodus) Abb. - Seite 112 6. PR: PR Anzeige Es zeigt die Pulsfrequenz in Schlägen pro Minute bei normaler Messung an. Die Farbe des PR -Wertes wird rot, wenn der PR-Wert jenseits der Alarmgrenzen liegt. Es er- scheinen drei Bindestriche an, wenn die Sonde aus ist und/oder kein Finger eingesteckt ist. 7.
-
Seite 113: Einstellungen
5 EINSTELLUNGEN 5.1 Systemeinstellungen Wählen Sie die [Systemeinstellung]-Schnittstelle aus dem Hauptmenü. Drücken Sie dann die Navigationstasten, um die einzustellenden Elemente zu wählen Abb. 5.1 Abb. 5.2 Alarmlautstärke: Sie können die Alarmlautstärke einstellen. Es gibt 7 Stufen und die Stan- dardstufe ist 3. Alarmpause: Es gibt zwei Modi, 60s und 120s, und der Standardmodus ist 120s. -
Seite 114: Alarmeinstellungen
5.2 Alarmeinstellung Wählen Sie die [Alarmeinstellung] -Schnittstelle aus dem Hauptmenü. Vor der Einstellung bitte das Passwort eingeben (1234), um den Parameter einzustellen. Oder Sie können direkt auf den Parameter zugreifen, um ihn zu überprüfen, aber nicht um ihn zu ändern. Passwörter eingeben 1. -
Seite 115: Datenverwaltung
6 DATENVERWALTUNG Wählen Sie das [Datenverwaltung]-Interface aus dem Hauptmenü. Fig.6.1 6.1 Datenprüfung Wählen Sie das „Datenprüfung”-Interface wie in Abb.6.2 gezeigt. Drücken Sie die AUF/ AB-Taste, um die „vorherige/nächste“ Seite zu ö nen. Das Pulsoximeter kann den alarmierenden Parameter mit roter Farbe aufzeichnen. Drücken Sie die MENÜ-Taste, um zum Hauptmenü-Interface zurückzukehren. -
Seite 116: Pr-Trend
Fig.6.3 Im obigen Trend werden Datum und Uhrzeit des ersten Elements mit Monat/Tag, Stunde: Mi- nute: Sekunde angezeigt. 6.3 PR-Trend Wählen Sie wie in Abb.6.4 gezeigt das „PR Trend"-Interface. Drücken Sie die linke/rechte Taste, um die „vorherige/nächste“ Seite zu ö nen. Wenn Sie die AUF-Taste drücken, kehrt das Pulsoximeter zum vorherigen Interface zurück. -
Seite 117: Alarm
2. Daten können während der Messung nicht gelöscht werden 7 ALARM ALARMPRIORITÄT: Es stehen zwei Prioritäten zur Auswahl. Hohe Priorität: Die höchste Alarmstufe, zeigt an, dass der Patient sich in einer sehr gefährli- chen Situation befindet. Niedrige Priorität: Ein technischer Alarm wurde vom Gerät selbst verursachten. Alarme des Oximeters sind technische und physiologische Alarme. -
Seite 118: Alarmverzögerung
Hinweise: 1. Der Alarm ertönt, wenn der Messwert außerhalb des zulässigen Bereichs liegt. 2. Der Alarm ertönt solange, bis der Alarm verschwindet oder ausgeschaltet ist. 3. Nach dem Ausschalten des Alarms zeigt die entsprechende Anzeige dies an. 4. Der Energiesparmodus: Das entsprechende Anzeigelicht blinkt mit einem roten Rahmen. Warnungen! •... -
Seite 119: Pflege Und Reparatur
8 PFLEGE UND REPARATUR Warnungen! • Der fortgeschrittene Schaltkreis im Oximeter erfordert keine periodische Kalibrierung und Pflege. Lediglich die Batterien müssen ausgetauscht werden. • Ö nen Sie nicht die Abdeckung des Oximeters und reparieren Sie auch nicht den elektroni- schen Schaltkreis. Sonst wird das Gerät beschädigt und die Garantie verfällt 8.1 Pflege Verwenden Sie nur die von uns genehmigten Sto e und die in diesem Kapitel aufgeführten Methoden, um Ihr Gerät zu reinigen oder zu desinfizieren. -
Seite 120: Reinigung
• Vergewissern Sie sich, dass nur spezifiziertes Zubehör angewendet wird. • Überprüfen Sie, ob das Alarmsystem ordnungsgemäß funktioniert. • Stellen Sie sicher, dass die Batterien die Leistungsanforderungen erfüllen. • Stellen Sie sicher, dass das Pulsoximeter in einwandfreiem Zustand ist. Im Falle eines Schadens oder eines ungewöhnlichen Verhaltens verwenden Sie das Pulsoxi- meter nicht weiter. -
Seite 121: Problemsuche
8.3 Problemsuche Problem Grund Lösung Die SpO2 oder PR 1.Der Finger ist möglicherweise 1. Den Finger bitte erneut Anzeige ist instabil nicht tief genug eingesteckt. einstecken. 2.Der Finger zittert oder der 2. Bitte nicht bewegen. Patient bewegt sich. Das Oximeter kann 1. -
Seite 122: Benutzergarantien
• Schäden und Versagen, die vom Benutzer oder seinem Vertreter verursacht werden, weil sie das Gerät nicht gemäß der Bedienungsanleitung verwenden. c) Schäden, die durch den Anschluss an Peripheriegeräte (z. B. Drucker, Computer etc.) ent- stehen, die nicht von unserer Firma zur Verfügung gestellt werden, sind nicht von der Garantie abgedeckt. -
Seite 123: Spezielle Forderung Des Benutzers Nach Garantiezeit
• Während der Messung der SpO kommt es aufgrund normaler Umstände zu schwierigen oder ungenauen Messungen. • Die Versiegelung des Oximeters wird nicht geö net. 8.4.5 Spezielle Forderung des Benutzers nach Garantiezeit Wir haben die Garantiezeit basierend auf den relevanten elektronischen Richtlinien des Lan- des für das Gerät auf ein Jahr, bzw. - Seite 124 Anzeigen Daten: SpO , PR, Pulsleiste, PI, Pulswellenform Andere: Informationen wie Verbindungsstatus der Sonde und Strom ist niedrig. Alarm Alarm: SpO und Pulsfrequenz, Sonde aus, Batterie leer Alarmmodus: Audioalarm, visueller Alarm und Informationen Alarmgrenzenbereich: SpO 70% ~ 100%, PR 30 bpm ~ 250 bpm Standardlimit: SpO High 100%, niedrig 90%;...
-
Seite 125: Betriebsumgebung
Sonden LED Spezifi kationen Wavelength Radiant Power 660±3nm 3.2mW 905±10nm 2.4mW Aktualisierungszeitraum für die Gerätedaten Wie in der folgenden Abbildung gezeigt. Die Datenaktualisierungsperiode des langsameren Durchschnitts beträgt 8s. Betriebsumgebung Betriebstemperatur: 0°C ~ 40°C Relative Luftfeuchtigkeit: ≤80%, keine Kondensation Atmosphärendruck: 86 kPa ~ 106 kPa Transport und Lagerumgebung Temperatur: -20°C ~ 70°C Relative Luftfeuchtigkeit: ≤93%, keine Kondensation... - Seite 126 Ausgangsspannung: DC 5V ± 5% Ausgangsstrom: 2A MAX SMD-Chip-Sicherung 32V3A0466003.NR (1206) Datenspeicher und Wiederholung 4 Sekunden. Produktgröße Abmessungen: 143,3 mm (L) X 67,4 mm (B) X 36 mm (H) Gewicht: ≤140±10g(Ohne Batterien) Lieferumfang: 1. Drei AA-Alkalibatterien 2. Eine Bedienungsanleitung 3. Ein Fingersensor für Erwachsene: M-50E012CS09 4.
-
Seite 127: Anhang B Zusammenfassung Der Klinischen Studie
ANHANG B ZUSAMMENFASSUNG DER KLINISCHEN STUDIE Die folgenden Details werden zur Verfügung gestellt, um die tatsächliche Leistung, die in der klinischen Validierungsstudie von gesunden erwachsenen Freiwilligen beobachtet wurde, zu o enbaren. Die ARMS-Wertanalyse-Anweisung und das Bland-Altman-Diagramm der Daten für MD300K2 und seine unterstützenden Sonden sind wie folgt dargestellt: Details der klinischen Studie des MD300K2 Pulsoximeters und die dazugehörige M-50E012CS09 Oximeter-Sonde: Erklärung zur ARMS Wertanalyse... - Seite 128 Bland-Altman-Diagramm Details der klinischen Studie des MD300K2 Pulsoximeters und die dazugehörige M-50J033CS045 Oximeter-Sonde: ARMS Value Analysis Statement Element 90--100 80--<90 70--<80 #pts Bias -0.51 0.41 1.56 ARMS 1.34 1.49 2.36 Bland-Altman-Diagramm...
- Seite 129 APPENDIX C DECLARATION Guidance and manufacturer’s declaration - Electromagnetic emission---- for all EQUIPMENT AND SYSTEM Guidance and manufacturer’s declaration - electromagnetic emission The model MD300K2 Pulse Oximeter is intended for use in the electromagnetic specified below. The customer or the user of the model MD300K2 Pulse Oximeter should assure that it is such an environment.
- Seite 130 Guidance and manufacturer’s declaration- electromagnetic immunity The model MD300K2 Pulse Oximeter is intended for use in the electromagnetic environment specified below. The customer or the user of the model MD300K2 Pulse Oximeter should assure that it is used in such an environment. Immunity test IEC 60601 test level Compliance level...
- Seite 131 MD300K2 I N STRUCTIO N M A N U A L G uidance and manufacturer ’ s declaration- electroma g netic immunity- Guidance and manufacturer’s declaration- electromagnetic immunity- For E Q UIPME N T and S Y STEM t h at are not LIFE-SUPPORTI N G For EQUIPMENT and SYSTEM that are not LIFE-SUPPORTING G uidance and manufacturer ’...
- Seite 132 a.) Field strengths from fixed transmitters, such as base situation for radio (cellular/cordless) telephones and land/mobile radios, amateur radio, AM and FM radio broadcast and TV broadcast cannot be predicted theoretically with accuracy. To assess the electromagnetic environment due to fixed RF transmitters, an electromagnetic site survey should be considered.
- Seite 134 Diritto d'autore La nostra societa’detiene tutti i diritti di questo lavoro non pubblico che intende mantenere riservato. Intendiamo mantenere su questo lavoro non pubblico il diritto d'autore. Questa pu- bblicazione deve essere usata esclusivamente come riferimento o strumento di esercizio del In caso di pubblicazione involontaria o deliberata, eserciteremo il diritto su questo lavoro in base alle leggi sul diritto d'autore.
- Seite 135 SOMMARIO 1 INTRODUZIONE 1.1 Breve introduzione 1.2 Uso previsto 1.3 Principio di misura 1.4 Informazioni sulla sicurezza 1.5 Interferenze elettromagnetiche 1.6 Spiegazione dei simboli 1.7 Caratteristiche del prodotto 1.8 Controindicazioni 2 DESCRIZIONE GENERALE 2.1 Aspetto 2.2 Alimentazione elettrica 3 IMPOSTAZIONE ORA E DATA 4 ESECUZIONE DELLA MISURA 4.1 Installazione della sonda 4.2 Schermate delle misure...
-
Seite 136: Introduzione
1 INTRODUZIONE 1.1 Breve introduzione Grazie per aver acquistato il pulsossimetro MD300K2. Le principali funzioni del dispositivo includono misurazioni di SpO , PR e PI (indice di perfusione), notifica di allarme visiva e acusti- ca, indicazione di sonda spenta o dito non presente, memorizzazione, trasmissione e riesame dei dati e molto altro ancora. - Seite 137 Nota - Informazioni per l'utente in merito ad altri aspetto importanti fornite sotto forma di suggerimenti, requisiti e integrazioni.. Avvertenza! 1. Prima dell'uso, leggere attentamente il manuale. Questo dispositivo e’ destinato a personale addestrato per l'assistenza sanitaria professionale. La nostra azienda non si assume alcuna responsabilita’...
- Seite 138 genti di disturbo elettrico in ambito sanitario e in altri ambienti, e’ possibile che gli elevati livelli di interferenza dovuti alla vicinanza di una sorgente o alla sua intensita’ possano compromettere le prestazioni di questo dispositivo. 14. È consigliabile utilizzare l'apparecchiatura in base alle informazioni EMC fornite nei do- cumenti allegati.
-
Seite 139: Interferenze Elettromagnetiche
2. Ostruzioni o sporco sulla sorgente di luce rossa del sensore o sul rivelatore possono causare condizioni di anomalia. Assicurarsi che non vi siano ostruzioni e che il sensore sia pulito. 3. Per la manutenzione ordinaria delle apparecchiature, fare riferimento alle procedure di as- sistenza riportate nella relativa sezione del manuale. -
Seite 140: Spiegazione Dei Simboli
MD300K2 PULSE OXIMETER this international standard are: CISPR11, GROP1, and CLASS B. this international standard are: CISPR11, GROP1, and CLASS B. 1.6 Spiegazione dei simboli 1.6 Explanation of Symbols 1.6 Explanation of Symbols Symbol Explanation Symbol Explanation Symbol Explanation Symbol Explanation Symbol Explanation... -
Seite 141: Descrizione Generale
2 DESCRIZIONE GENERALE Il pulsossimetro palmare adotta uno schermo di visualizzazione TFT da 2,4 pollici. È in grado di parametri, ad esempio l'ora, il codice ID, lo stato della batteria e così via. 2.1 Aspetto MENU Fig.2-1 Descrizione Fig.2-1: 3. Schermo di visualizzazione. 4. -
Seite 142: Alimentazione Elettrica
8. Interfaccia USB: Utilizzato per collegare il cavo USB per la trasmissione dati. 9. Pulsante SU/GIÙ: Premere per un tempo prolungato per aumentare/diminuire la luminosita’ della retroilluminazione. NOTA: Nell'interfaccia di misura, premendo il pulsante del menu per un tempo prolungato mettera’... -
Seite 143: Impostazione Ora E Data
Attenzione! • Non utilizzare batterie non specificate per questa unita’. • Non smaltire le batterie nei rifiuti domestici. • Rimuovere le batterie se l'unita’ non viene utilizzata per lunghi periodi. • Non utilizzare batterie di tipo diverso insieme. • Non utilizzare batterie nuove e usate insieme. •... -
Seite 144: Chapter 4 Take A Measurement
Premere il pulsante di navigazione per selezionare la voce "Data e ora", quindi premere il MD300K2 I N STRUCTIO N M A N U A L pulsante OK per entrare nella schermata di impostazione dell'ora (fare riferimento a Fig.3.2). CHAPTER 4 Take a Measurement Premere il pulsante di navigazione regolare il valore e quindi premere il pulsante OK per con- fermare il valore. -
Seite 145: Schermate Delle Misure
4.2 Schermate delle misure Come mostrato nelle seguenti immagini esistono due modalita’ di visualizzazione MD300K2 PULSE OXIMETER 4.2 Measurement Screens Fig.4.3 Fig.4.4 Descrizione delle schermate di misura: 1. Misura: Il pulsossimetro è nello stato di misura. • Viene visualizzato "Dito non presente" [Finger o ] quando non e’ inserito il dito o non viene rilevato alcun segnale. -
Seite 146: Impostazione
8. 12:00: Ora corrente. 9. PI%: Area di visualizzazione dell'indicatore di indice di perfusione. Avvertenza! • Utilizzare solo sonde SpO fornite dal produttore. Altre sonde SpO possono portare a presta- zioni non corrette. • Non utilizzare una sonda SpO con componenti ottici esposti. •... -
Seite 147: Impostazione Allarme
Volume allarme: e’ possibile regolare il volume dell'allarme su 7 livelli: il livello predefinito e’ 3. Pausa allarme: sono previste due modalita’: 60s e 120s. La modalita’ predefinita e’ 120s. Il dispositivo emette l'allarme su nuove condizioni di allarme. Segnale acustico: il livello va da 0 a 7. Il livello predefinito e’ 3. Impostazione della retroilluminazione: il livello di luminosita’... - Seite 148 La seconda volta inserire le nuove password. Quindi è possibile cambiare le password. Note: 1. La password di sola lettura e’ 0000. Con questa password e’ possibile controllare solo il parametro, ma non modificarlo. 2. La password di modifica e’ 1234. Inserendo questa password e’ possibile impostare i pa- rametri.
-
Seite 149: Gestione Dati
6 GESTIONE DATI Selezionare l'interfaccia "Gestione dati" [Data management] dal menu principale. Fig.6.1 6.1 Riesame dei dati Selezionare ed accedere all'interfaccia "Riesame dati" [Data review] come mostrato in Fig.6.2. Premendo il tasto SU/GIÙ, l'utente puo’ passare alla pagina precedente/successiva. Il pulsossimetro puo’ registrare il parametro allarmante contrassegnato con il colore rosso. Premere il pulsante MENU per tornare al menu principale. -
Seite 150: Trend Pr
Fig.6.3 In corrispondenza del trend vengono visualizzati la data e l'ora della prima voce, con mese/ giorno; ora: minuti: secondi. 6.3 Trend PR Selezionare ed accedere all'interfaccia “Trend PR” [PR Trend] come mostrato in Fig.6.4. Pre- mendo il tasto SINISTRA/DESTRA per passare alla pagina precedente/successiva. Premendo il pulsante SU, il pulsossimetro torna all'interfaccia precedente. -
Seite 151: Allarme
Fig.6.5 7 ALLARME PRIORITÀ ALLARME: È possibile scegliere due livelli di priorita’. Alta priorita’: allarme di livello piu’ alto che indica che il paziente e’ in una situazione molto pericolosa. Bassa priorita’: indica un allarme tecnico causato dal dispositivo stesso. Gli allarmi dell'ossimetro includono situazioni tecniche e fisiologiche. -
Seite 152: Manutenzione E Riparazione
3. Dopo aver silenziato l'allarme, l'indicatore corrispondente lo indicherà. 4. Allarme di alimentazione bassa: la spia corrispondente lampeggia con una cornice rossa. Avvertenze! • Quando si verifica l'allarme, verificare immediatamente le condizioni dei pazienti. • Controllare il parametro responsabile dell'allarme o quale allarme e’in corso. •... -
Seite 153: Manutenzione
8.1 Manutenzione Per pulire o disinfettare l'apparecchiatura utilizzare solo sostanze di nostra approvazione e metodi indicati in questo capitolo. La garanzia non copre i danni causati da sostanze o metodi non approvati. Non ci assumiamo alcuna responsabilita’ in merito all'e cacia dei prodotti chimici o dei me- todi indicati come ai fini del controllo delle infezioni. - Seite 154 Pulizia Utilizzare alcool medico per pulire il silicone a contatto con il dito all'interno della sonda di SpO . Ricorrere a un panno morbido ammorbidito con alcool isopropilico 70%. Inoltre, deter- gere con alcool il dito utilizzato per il test prima e dopo ogni misura. Per pulire l'apparecchia- tura, attenersi alle seguenti regole: 1.
-
Seite 155: Risoluzione Dei Problemi
8.3 Risoluzione dei problemi Malfunzionamento Motivo Solution SpO o PR sono 1. Il dito potrebbe non essere 1. Riprovare a inserire il visualizzati in modo inserito abbastanza in profondita’. dito. instabile 2. Il dito sta tremando o il corpo 2. Cercate di non muovere. del paziente e’... - Seite 156 • danni e guasti causati dall'utente o dal suo rappresentante che non utilizza il dispositivo in base al manuale d'utente c) I danni o le perdite sostenuti dovuti alla connessione ad apparecchiature periferiche (come stampanti, computer, ecc.) non forniti dalla nostra società non sono coperti da garanzia. d) Limitazione di responsabilita’...
-
Seite 157: Immagazzinaggio E Trasporto
8.4.5 Richieste speciale dell'utente per il periodo di garanzia Il periodo di garanzia viene concordato in base alla normativa elettronica pertinente del paese, che di solito e’ di un anno. Per gli accessori il periodo di garanzia e’ di tre mesi. Se il cliente richiede di prolungare il periodo di garanzia, occorre considerare la ragionevolezza della ri- chiesta stessa. -
Seite 158: Appendice A Specifiche
APPENDICE A SPECIFICHE Note: • Le specifiche possono cambiare senza preavviso. • Gli schemi elettrici, l'elenco dei componenti, l'illustrazione dei diagrammi e le regole dettagliate di calibrazione sono destinate esclusivamente al personale professionale autorizzato dalla nostra azienda. • L'apparecchiatura e’ gia’ calibrata: gli utenti non devono e ettuare alcuna calibrazi- one. -
Seite 159: Battito Cardiaco
Battito cardiaco Intervallo di misurazione: 30bpm~250bpm Risoluzione: 1 bpm Precisione: ±2 bpm o 2% (viene utilizzato il valore maggiore) Indice di perfusione Gamma di visualizzazione: 0,1% ~ 20% Precisione: 0,1%~1,0%, ±0,2%; 1,1%~20%, ±20% Specifi che del LED della sonda Lunghezza d'onda Potenza radiante ROSSO 660±3nm... - Seite 160 Specifiche di alimentazione Batterie alcaline Alimentazione: Tre batterie alcaline AA Periodo di lavoro: massimo di 10 ore Adattatore CA (opzionale) Tensione di ingresso: 100V~240V CA Frequenza di ingresso: 50Hz~60Hz Tensione di uscita: 5V±5% CC Corrente di uscita: 2A MAX Fusibile chip SMD 32V3A0466003.NR(1206) Memorizzazione e riproduzione dei dati Dimensioni del prodotto...
- Seite 161 Secondo il grado di protezione contro l’ingresso di acqua: IPX1; Secondo i metodi di sterilizzazione o di disinfezione: Non sterilizzazione, uso solo di disinfettanti superficiali liquidi; Secondo la modalità di funzionamento: Funzionamento continuo.
-
Seite 162: Appendice B Sintesi Dello Studio Clinico
APPENDICE B SINTESI DELLO STUDIO CLINICO I seguenti dettagli sono forniti per descrivere le prestazioni reali osservate nello studio di vali- dazione clinica su volontari adulti sani. La dichiarazione di analisi dei valori ARMS e il grafi co dei dati Bland Altman per l'MD300K2 e le sonde di supporto sono illustrati di seguito: Dettagli studio clinico del pulsossimetro MD300K2 e della relativa sonda ossimetrica M-50E012CS09: Dichiarazione di analisi dei valori ARMS... - Seite 163 Grafi co curva Bland-Altman Dettagli studio clinico del pulsossimetro MD300K2 e della relativa sonda ossimetrica M-50J033CS045: Dichiarazione di analisi dei valori ARMS Voce 90--100 80--<90 70--<80 Bias -0.51 0.41 1.56 ARMS 1.34 1.49 2.36 Grafi co curva Bland-Altman...
-
Seite 164: Appendice B Dichiarazione
APPENDIX C DECLARATION Guidance and manufacturer’s declaration - Electromagnetic emission---- for all EQUIPMENT AND SYSTEM Guidance and manufacturer’s declaration - electromagnetic emission The model MD300K2 Pulse Oximeter is intended for use in the electromagnetic specified below. The customer or the user of the model MD300K2 Pulse Oximeter should assure that it is such an environment. - Seite 165 Guidance and manufacturer’s declaration- electromagnetic immunity The model MD300K2 Pulse Oximeter is intended for use in the electromagnetic environment specified below. The customer or the user of the model MD300K2 Pulse Oximeter should assure that it is used in such an environment. Immunity test IEC 60601 test level Compliance level...
- Seite 166 MD300K2 I N STRUCTIO N M A N U A L G uidance and manufacturer ’ s declaration- electroma g netic immunity- Guidance and manufacturer’s declaration- electromagnetic immunity- For E Q UIPME N T and S Y STEM t h at are not LIFE-SUPPORTI N G For EQUIPMENT and SYSTEM that are not LIFE-SUPPORTING G uidance and manufacturer ’...
- Seite 167 a.) Field strengths from fixed transmitters, such as base situation for radio (cellular/cordless) telephones and land/mobile radios, amateur radio, AM and FM radio broadcast and TV broadcast cannot be predicted theoretically with accuracy. To assess the electromagnetic environment due to fixed RF transmitters, an electromagnetic site survey should be considered.
-
Seite 168: Direitos De Autor
Direitos de autor A nossa empresa possui todos os direitos deste trabalho não publicado e pretende mantê-lo como um trabalho confidencial. Podemos também procurar manter este trabalho como direitos de autor não publicados. Esta publicação deve ser utilizada apenas para o propósito de referência ou operação do nosso sistema de software. - Seite 169 ÍNDICE 1 INTRODUÇÃO 1.1 Breve introdução 1.2 Utilização prevista 1.3 Princípio de medição 1.4 Informações de segurança 1.5 Interferência eletromagnética 1.6 Explicação dos símbolos 1.7 Características do produto 1.8 Contra-indicação 2 DESCRIÇÃO GERAL 2.1 Aspeto 2.2 Fonte de alimentação 3 DEFINIÇÕES DE HORA E DATA 4 REALIZAR UMA MEDIÇÃO 4.1 Instalar a sonda 4.2 Ecrãs de medição...
-
Seite 170: Introdução
1 INTRODUÇÃO 1.1 Breve Introdução Obrigado por comprar o oxímetro de pulso MD300K2. As funções principais do dispositivo incluem as medições SpO , FC e IP (Índice de perfusão), indicação visual e auditiva, indicação de sonda desligada e desempenho, armazenamento de dados, transmissão e análise, etc.. Leia este manual atentamente antes de utilizar o dispositivo. - Seite 171 Nota - Informa o utilizador de outras informações importantes por sugestão, requisitos e complementos. Avisos! 1. Antes de utilizar, leia atentamente o manual. Este dispositivo destina-se à utilização por pessoas formadas em cuidados de saúde. A nossa empresa não assume nenhuma garantia para a utilização inadequada deste equipamento.
- Seite 172 desta interferência, devido à proximidade ou força de uma fonte, perturbem o desempen- ho deste dispositivo. 14. Deve operar o equipamento de acordo com as informações de EMC fornecidas nos docu- mentos em anexo. 15. Os equipamentos de comunicações de RF móveis e portáteis podem afetar o equipamento médico elétrico.
-
Seite 173: Interferência Eletromagnética
3. Para a manutenção de rotina do equipamento, consulte os procedimentos de manutenção na secção associada, conforme indicado no manual. 4. Todas as funções do dispositivo que se destinam ao operador podem ser utilizadas em segurança. 5. O material do dispositivo não possui látex. Medições imprecisas podem ser causadas por: 1. -
Seite 174: Explicação Dos Símbolos
MD300K2 PULSE OXIMETER MD300K2 PULSE OXIMETER 1.6 Explicação dos símbolos this international standard are: CISPR11, GROP1, and CLASS B. this international standard are: CISPR11, GROP1, and CLASS B. 1.6 Explanation of Symbols 1.6 Explanation of Symbols Símbolo Explicação Símbolo Explicação Pe a aplicada tipo B Prote ido contra pin os de IPX1... -
Seite 175: Descrição Geral
2 DESCRIÇÃO GERAL O oxímetro de pulso portátil adota um ecrã de exibição TFT de 2,4 polegadas. Tem a capaci- de onda e outros tipos de parâmetros, como a hora, número de ID, estado da bateria e outros. 2.1 Aspeto MENU Descrição de Fig.2-1: 3. -
Seite 176: Fonte De Alimentação
9. Botão lateral CIMA/BAIXO: Pressione-o durante um tempo prolongado para aumentar/dimi- nuir o brilho da retroiluminação. NOTA: Na interface de medição, pressione o botão de menu durante um tempo prolongado, a pausa do alarme será ativada; pressione-o novamente, a pausa do alarme será desligada 2.2 Fonte de alimentação The device can be powered by 3 AA alkaline batteries. -
Seite 177: Definições De Hora E Data
MANUAL DE INSTRUÇÕES • Não utilizar pilhas não especificadas para esta unidade. • Não eliminar as pilhas num incêndio. • Remover as pilhas desta unidade quando não voltar a utilizá-la durante um longo período. • Não utilizar pilhas de diferentes tipos em conjunto. •... -
Seite 178: Realizar Uma Medição
MD300K2 I N STRUCTIO N M A N U A L 2) Pressione o botão de navegação para selecionar o item “Data e Hora” e, em seguida, pres- sione o botão OK para entrar no ecrã de definição da hora, consulte a Fig.3.2. CHAPTER 4 Take a Measurement I N STRUCTIO N M A N U A L... -
Seite 179: Ecrãs De Medição
4.2 Ecrãs de medição Existem dois modos de exibição, conforme apresentado nas imagens a seguir. MD300K2 PULSE OXIMETER 4.2 Measurement Screens Fig.4.3 (Digital Mode) Fig.4.4 (Wave Mode) Descrição dos ecrãs de medição:: 1. Medição: O oxímetro de pulso está no estado de medição. •... -
Seite 180: Definição
7. ID: 001, o número de ID do paciente atual é 001. 8. 12:00: A hora atual. 9. % de IP: Área de exibição do índice de perfusão. Avisos! • Utilizar apenas as sondas de SpO fornecidas pelo fabricante. Utilizar outros sensores de SpO pode causar um desempenho inadequado. -
Seite 181: Definição De Alarme
Volume do alarme: pode ajustar o valor do volume de alarme, existem 7 níveis e o nível padrão é 3. Pausar alarme: Existem dois modos, 60 e 120s e o modo padrão é 120s. O alarme sonoro do dispositivo em novas condições de alarme. Sinal sonoro: o nível é... - Seite 182 Depois pode alterar as palavras-passe Notas: 1. A palavra-passe só de leitura é 0000. Com esta palavra-passe, apenas pode verificar o parâmetro mas não o pode alterar. 2. A palavra-passe para efetuar alterações é 1234; se introduzir esta palavra-passe, pode definir os parâmetros.
-
Seite 183: Data Management
6 DATA MANAGEMENT Selecione e aceda à interface de [Gestão de dados] no menu principal. Fig.6.1 6.1 Análise de dados Selecione e aceda à interface de “Revisão de dados”, conforme mostrado na Fig. 6.2. Ao pre- mir o botão CIMA/BAIXO, o utilizador pode aceder à primeira/última página de itens. O oxímetro de pulso pode gravar o parâmetro de alarme marcado a vermelho. -
Seite 184: Tendência De Fc
Fig.6.3 Na parte superior da tendência, é apresentada a data e a hora do primeiro item, com o mês/ dia, horas, minutos e segundos. 6.3 Tendência de FC Selecione e aceda à interface "Tendência de FC", conforme mostrado na Fig. 6.4. Prima o botão Esquerda/Direita;... -
Seite 185: Alarme
Fig.6.5 7 ALARME PRIORIDADE DO ALARME: Existem dois níveis de prioridade que pode selecionar. Alta prioridade: o alarme de nível mais elevada; indica que o paciente está numa situação muito perigosa. Baixa prioridade: indica o alarme técnico causado pelo próprio dispositivo. Os alarmes do oxímetro incluem alarmes técnicos e fisiológicos. -
Seite 186: Manutenção E Reparação
Notas: 1. O alarme aparece se o valor da medição estiver fora do intervalo. 2. O alarme soa até ser desligado ou até o aviso do alarme desaparecer. 3. Depois de silenciar o alarme, o indicador correspondente indica essa ação. 4. -
Seite 187: Manutenção
8.1 Manutenção Utilize apenas substâncias aprovadas por nós e os métodos indicados neste capítulo para limpar ou desinfetar o seu equipamento. A garantia não cobre danos causados pela utilização de substâncias ou métodos não aprovados. Não damos garantias sobre a eficácia dos produtos químicos ou métodos indicados como meio de controlo de infeções. - Seite 188 Limpeza Utilize álcool de grau médico para limpar o silicone que toca no dedo dentro da sonda de SpO com um pano macio humedecido com álcool isopropílico 70%. Limpe também o dedo a ser testado com álcool antes e depois de cada teste. Para limpar o equipamento, siga estas regras: 1.
-
Seite 189: Resolução De Problemas
8.3 Resolução de problemas Avaria Motivo Resolução SpO ou FC instáveis 1. O dedo pode não estar 1. Repetir voltando a inserido corretamente. colocar o dedo. 2. O dedo está a tremer ou 2. Tentar não se mover. o corpo do paciente está em movimento. - Seite 190 • Danos ou prejuízos sofridos devido a inspeção e reparação efetuadas por um instituto não certificado. • Danos e avarias causados pelo utilizador ou pelo seu representante devido ao facto de o dispositivo não ter sido utilizado de acordo com o manual do operador c) Danos ou prejuízos sofridos devido à...
-
Seite 191: Anexo A Especificações
por força mecânica não é gratuita. • Durante a medição da SpO , há dificuldade em medir o valor ou uma medição incorreta. • O selo de manutenção do oxímetro não foi aberto. 8.4.5 Pedido especial de garantia do utilizador O período de garantia, de acordo com a regulação sobre equipamentos eletrónicos do país, é... - Seite 192 Visor Dados: SpO , FC, barra indicadora de pulsação, IP, forma de onda de pulsação Outros: Informações como o estado da ligação da sonda e indicação de pouca bateria. Alarme Alarme: SpO e o valor da frequência cardíaca, sonda desligada, bateria vazia Modo de alarme: alarme sonoro, alarme visual e informações Os limites de alarme variam: SpO 70% ~ 100%, FC 30 bpm ~ 250 bpm Limites padrão: SpO alta 100%, baixa 90%;...
-
Seite 193: Ambiente Operacional
Precisão: 0,1% ~ 1,0% ± 0,2%; 1,1% ~ 20%, ± 20% Especifi cações da sonda LED Comprimento de onda Energia radiante VERMELHO 660±3nm 3.2mW 905±10nm 2.4mW Equipment data update period As shown in the following fi gure. Data update period of slower average is 8s. Ambiente operacional Temperatura operacional: 0°C ~ 40°C Humidade relativa: ≤80%, sem condensação... - Seite 194 Tensão de saída: CC 5V±5% Corrente de saída: 2A MÁX Fusível SMD de chip 32V3A0466003.NR(1206) Armazenamento de dados e reprodução Descrição do produto Dimensão: 143,3 mm (C) X 67,4 mm (L) X 36 mm (A) Peso: ≤140 ± 10 g (excluindo as pilhas) Conteúdo da caixa: 1.
-
Seite 195: Anexo B Resumo Dos Estudos Clínicos
ANEXO B RESUMO DOS ESTUDOS CLÍNICOS Os seguintes detalhes são disponibilizados para divulgar o desempenho real observado no estudo de validação de voluntários adultos saudáveis realizado na clínica. A declaração de análise ARMS e conjunto de dados BlandAltman para MD300K2 e suas sondas auxiliares são apresentados da seguinte forma: Detalhes dos estudos clínicos de Oxímetro de pulso MD300K2 e o seu Oxímetro com sonda auxiliar Sonda oxímetro:... - Seite 196 Gráfi co de linhas Bland-Altman Detalhes dos estudos clínicos de Oxímetro de pulso MD300K2 e o seu Oxímetro com sonda auxiliar Sonda oxímetro: Declaração de análise de valores A Item 90--100 80--<90 70--<80 #pts Bias -0.51 0.41 1.56 ARMS 1.34 1.49 2.36 Gráfi...
-
Seite 197: Anexo C Declaração
APPENDIX C DECLARATION Guidance and manufacturer’s declaration - Electromagnetic emission---- for all EQUIPMENT AND SYSTEM Guidance and manufacturer’s declaration - electromagnetic emission The model MD300K2 Pulse Oximeter is intended for use in the electromagnetic specified below. The customer or the user of the model MD300K2 Pulse Oximeter should assure that it is such an environment. - Seite 198 Guidance and manufacturer’s declaration- electromagnetic immunity The model MD300K2 Pulse Oximeter is intended for use in the electromagnetic environment specified below. The customer or the user of the model MD300K2 Pulse Oximeter should assure that it is used in such an environment. Immunity test IEC 60601 test level Compliance level...
- Seite 199 Guidance and manufacturer’s declaration- electromagnetic immunity- Guidance and manufacturer’s declaration- electromagnetic immunity- For EQUIPMENT and SYSTEM that are not LIFE-SUPPORTING For EQUIPMENT and SYSTEM that are not LIFE-SUPPORTING Guidance and manufacturer’s declaration – electromagnetic immunity Guidance and manufacturer’s declaration- electromagnetic immunity The model MD3 0 0 K 2 Pulse Oximeter is intended for use in the electromagnetic specified below.
- Seite 200 a.) Field strengths from fixed transmitters, such as base situation for radio (cellular/cordless) telephones and land/mobile radios, amateur radio, AM and FM radio broadcast and TV broadcast cannot be predicted theoretically with accuracy. To assess the electromagnetic environment due to fixed RF transmitters, an electromagnetic site survey should be considered.