Herunterladen Inhalt Inhalt Diese Seite drucken
Haier Cube HCR7918EIMP Bedienungsanleitung
Vorschau ausblenden Andere Handbücher für Cube HCR7918EIMP:
Inhaltsverzeichnis

Werbung

Verfügbare Sprachen
  • DE

Verfügbare Sprachen

  • DEUTSCH, seite 54
HCR7918EIMP
HCR7918EIMB
HCR7918EIMP(UK)
HCR7918ENMP
Refrigerator
User Guide
Kühlschrank
Bedienungsanleitung
Frigorífico
Guía del usuario
Réfrigérateur
Manuel d'utilisation
Frigorifero
Guida per l'utente
Chladnička
Uživatelská příručka
Lodówka
Podręcznik użytkownika
Chladnička
Návod na použitie
Koelkast
Gebruiksaanwijzing
GB
DE
ES
FR
IT
CS
PL
SK
NL

Werbung

Inhaltsverzeichnis
loading

Inhaltszusammenfassung für Haier Cube HCR7918EIMP

  • Seite 1 HCR7918EIMP HCR7918EIMB HCR7918EIMP(UK) HCR7918ENMP Refrigerator User Guide Kühlschrank Bedienungsanleitung Frigorífico Guía del usuario Réfrigérateur Manuel d'utilisation Frigorifero Guida per l'utente Chladnička Uživatelská příručka Lodówka Podręcznik użytkownika Chladnička Návod na použitie Koelkast Gebruiksaanwijzing...
  • Seite 2 WARNING: Risk of fire/flammable material. The symbol indicates there is a risk of fire since flammable materials are used. Take care to avoid causing a fire by igniting flammable material. WARNUNG: Brandgefahr/ brennbares Material. Das Symbol weist auf Brandgefahr hin, da brennbare Materialien verwendet werden.
  • Seite 3 User Manual Refrigerator-Freezer HCR7918EIMP HCR7918EIMB HCR7918EIMP(UK) HCR7918ENMP...
  • Seite 4 Thank You Thank you for purchasing a Haier Product. Please read these instructions carefully before using this appliance. The instructions con- tain important information which will help you get the best out of the appliance and ensure safe and proper installation, use and maintenance.
  • Seite 5: Inhaltsverzeichnis

    Content Safety information ..........................4 Product description ..........................10 Control panel ............................11 Use ................................14 Equipment ............................32 Care and cleaning ..........................35 Troubleshooting ..........................37 Installation ............................42 Technical data ............................46 Customer service ..........................48 Accessories Check the accessories and literature in accordance with this list: *Water *Water pipe Energy...
  • Seite 6: Safety Information

    Safety information Before switching on the appliance for the first time read the fol- lowing safety hints!: WARNING! Before first use ▶ Make sure there is no transport damage. ▶ Remove all packaging and keep out of children´s reach. ▶ Wait at least two hours before installing the appliance in order to ensure the refrigerant circuit is fully efficient.
  • Seite 7 Safety information WARNING! ▶ Only for UK: The appliance’s power cable is fitted with 3-cord (grounding) plug that fits a standard 3-cord (grounded) socket. Never cut off or dismount the third pin (grounding). After the ap- pliance is installed, the plug should be accessible. ▶...
  • Seite 8 Safety information WARNING! ▶ To avoid contamination of food, please respect the following in- structions: ▶ – Opening the door for long periods can cause a significant in- crease of the temperature in the compartments of the appliance. ▶ – Clean regularly surfaces that can come in contact with food and accessible drainage systems.
  • Seite 9 Safety information WARNING! ▶ Unplug the appliance in the event of a power interruption or be- fore cleaning. Allow at least 7 minutes before restarting the appli- ance, as frequent starting may damage the compressor. ▶ WARNING: Do not use electrical appliances inside the food stor- age compartments of the appliance, unless they are of the type recommended by the manufacturer.
  • Seite 10 Safety information WARNING! ▶ Do not spray or flush the appliance during cleaning. ▶ Do not use water spray or steam to clean the appliance. ▶ Do not clean the cold glass shelves or glass door with hot water. Sudden temperature change may cause the glass to break. ▶...
  • Seite 11 Safety information Intended use This appliance is intended for cooling and freezing food. It has been designed exclusively for use in household and similar applications such as staff kitchen areas in shops, offices and other working en- vironments; farm houses and by clients in hotels, motels and other residential type environments as well as in bed-and-breackfast and catering business.
  • Seite 12: Product Description

    Product description Model (HCR7918EIMP/HCR7918EIMB/HCR7918EIMP(UK)) (With Icemaker in door) A: Fridge compartment 14 My Zone drawer 1 Control panel 15 Freezer/Switch Zone lamp 2 Dispenser paddle B: Freezer compartment 3 Drop tray 16 Sliding tray 4 Vertical beam 17 Air duct 5 Automatic Icemaker 18 Freezer storage drawers 6 Glass shelves...
  • Seite 13: Control Panel

    Control panel Control panel (HCR7918EIMP/HCR7918EIMB/HCR7918EIMP(UK)) Buttons: Indicators: A Auto Set mode selector a Auto Set mode B Holiday mode selector b Holiday mode C My Zone drawer selector c1 Fruit & Vegetable mode D Temperature adjustment c2 Quick Cool mode button “-”...
  • Seite 14 Control panel Model (HCR7918ENMP) (Without Icemaker in door) A: Fridge compartment B: Freezer compartment 1 Vertical beam 14 Sliding tray 2 Control panel 15 Water box 3 Glass shelves 16 Air duct 4 Bottle holder/Door rack 17 Icemaker 5 Humidity zone drawer 18 Freezer storage drawers 6 Storage drawer 19 Ice box...
  • Seite 15 Control panel Control panel (HCR7918ENMP) Buttons: A Auto Set mode selector B Holiday mode selector C1 Fruit & Vegetable function selector C2 Quick Cool function selector C3 0° C Fresh function selector D Temperature adjustment button “-” E Temperature adjustment button “+” F Zone selector G Super-Cool selector H Super-Freeze selector...
  • Seite 16: Use

    Sensor keys The buttons on the control panel are sensor keys, which already respond when lightly touched with the finger. Switch on /of the appliance The appliance is in operation as soon as it is connected to the power supply. When the refrigerator is first powered on, the indicator “d”...
  • Seite 17 Adjust the temperature for fridge 1. When the display screen is unlocked, press the button “F” (Zone selector). The buzzer rings once, the indicator “f1” (Fridge indicator) flashes, and then here comes the temperature setting mode of the fridge. 2. Press the button “D” (Temperature adjustment button “-”) every time, the buzzer rings once, the set temperature of the fridge will be reduced by 1.
  • Seite 18 Notice After setting the temperature, if there is no operation within 5 seconds, the system will be automatically determined and save the set temperature. Adjust the temperature for Switch Zone (S-Zone) When the display screen is unlocked, press the button “F” (Zone selector). The buzzer rings once, the indicator “f3”...
  • Seite 19 Notice Under Super-cool state, the fridge temperature cannot be adjusted. If either button “D” (Temperature adjustment button “-”) or button “E” (Temperature adjustment button “+”) is pressed to adjust the temperature of fridge, the indicator “f1” (Fridge indicator) will flash with a prompt sound to indicate that this operation cannot be carried out. In the state of Super-cool function, the Auto-set function cannot be turned on at the same time due to different control modes.
  • Seite 20: Holiday Mode

    Auto Set mode 1. When the display screen is unlocked, press the button “A” (Auto Set mode selector), the buzzer rings once, the indicator “a” (Auto Set mode) illuminates, and then the Auto Set function will be turned on. 2. When the indicator “a” (Auto Set mode) illuminates, press the button “A” (Auto Set mode selector), the buzzer rings once, the indicator “a”...
  • Seite 21 3. Under unlocked state, hold the button “B” (Holiday mode selector) for 3 seconds, the buzzer rings once, then the projection lamp will be turned off. The projection lamp function can likewise be turned with same operation. Notice Under Holiday state, the fridge temperature cannot be adjusted. If either button “D” (Temperature adjustment button “-”) or button “E”...
  • Seite 22: Filter Function

    Filter function When the refrigerator operates for six months, the reminder indicator “i” (Filter Reset function) will light up to remind users to replace with a new filter. When filter is replaced, hold the button “I” (Filter Reset function selector) for 3 seconds to cancel the reminder, the timing will reset with buzzer ringing.
  • Seite 23 Notice 1. When the indicator “k” (Water intake function) illuminates, the indicator “l” (Cubed ice function) and the indicator “m” (Crushed ice function) go off. After the dispenser pad- dle is pressed, water will flow out of the intake port. 2.
  • Seite 24 Crushed ice function Under any state (locked or unlocked), press the button “M” (Crushed ice function selec- tor), the buzzer rings once, the indicator “m” (Crushed ice function) illuminates, and then the Crushed ice function will be turned on. Press 1 time Indicator on Crushed ice function on Notice...
  • Seite 25 EPP function Under unlocked state, continuously press the button “H” (Super-Freeze selector) and button “A” (Auto Set mode selector) 5times (within 5 seonds), the buzzer rings once, then the EPP function will be turned off. The EPP function can likewise be turned on with same operation.
  • Seite 26 Ice maker instructions WARNING! ▶ Connect to potable water supply only. ▶ Connecting the water line must only be installed by a qualified plumber and in ac- cordance with local legislation and regulations governing water quality. Notice This water line installation is not covered by the appliance warranty. Connecting water to the appliance ①...
  • Seite 27 Ice and water dispenser Before using the ice and water dispenser CAUTION! ▶ Keep children away from the dispenser to prevent children playing with or damaging the controls. CAUTION! ▶ Throw away the first few batches of ice (about 20 cubes and 7 cups of water). This is also necessary if the appliance has not been used for a long time.
  • Seite 28: Automatic Icemaker

    Cleaning the dispenser Cleaning the ice and water outlet Wipe the water outlet (1) or ice outlet (2) frequently with a clean cloth as it may get dirty easily. ② ① Notice Lint from a cloth may adhere to the outlets. Cleaning the dispenser tray Wipe the entire area with a damp cloth.
  • Seite 29: In-Door Icemaker

    CAUTION! ▶ It is normal for milky or cloudy water to be dispensed after replacing the water filter. This air in the water will clear eventually and is safe to drink. ▶ The first ice and water dispensed may include particles or odour from the water sup- ply line or the water tank.
  • Seite 30: Water Filter

    Gently pull the handle to open the ice compartment. 2. To remove the in-door ice bin, grip the front handle, slightly lift the lower part, and slowly pull out the bin as shown. 3. Refit the in-door ice bin in the reverse sequence of their re- moval.
  • Seite 31 CAUTION! ▶ Do not install if water pressure exceeds 827 kPa. If your water pressure exceeds 827 kPa, you must install a pressure limiting valve. Contact a plumbing professional if you are uncertain how to check your water pressure. ▶ Do not install where water hammer conditions may occur.
  • Seite 32 6. Dispense water for approximately 5 minutes to remove trapped air and contami- nants. CAUTION! ▶ Failure to replace filters when required or using non Haier authorised water filters can cause the filter cartridge to leak and result in property damage. Water Filter Model: Haier HRXWF ▶...
  • Seite 33 It is essential that the manufacturer’s recommended installation, maintenance and filter replacement requirements be carried out for the product to perform as advertised. See Installation Manual for Warranty information. Notice While the testing was performed under standard laboratory conditions, actual perfor- mance may vary.
  • Seite 34: Equipment

    Equipment Multi-air-flow The refrigerator is equipped with a multi-air-flow sys- tem, with which cool air flows are located on every shelf level. This helps to maintain a uniform temperature to ensure that your food is kept fresher for longer. Adjustable shelves The height of the shelves can be adjusted to fit your storage needs.
  • Seite 35 Equipment Removable door racks/bottle holder The door racks can be removed for cleaning: Place hands on each side of the rack, lift it upwards (1) and pull it out (2). In order to insert the door rack, the above steps are carried out in reverse order.
  • Seite 36: Energy Saving Tips

    Equipment Energy saving tips ▶ Make sure the appliance is properly ventilated (see INSTALLATION). ▶ Do not install the appliance in direct sunlight or in the near of heat sources (e.g. sto- ves, heaters). ▶ Avoid unnecessarily low temperature in the appliance. The energy consumption in- creases the lower the temperature in the appliance is set.
  • Seite 37: Care And Cleaning

    4. In case some small part or component gets stuck inside of the fridge (between shelves or drawers), use small soft brush to release it. If you could not reach the part, please contact Haier service ▶ Rinse and dry with soft cloth.
  • Seite 38 Care and cleaning Replacing the LED-lamps WARNING! Do not replace the LED lamp yourself, it must only be replaced by either the manufac- turer or the authorised service agent. The lamps adopts LED as its light source, featuring low energy consumption and long ser- vice life.
  • Seite 39: Troubleshooting

    Troubleshooting Many occuring problems could be solved by yourself without specific expertise. In case of a problem please check all shown possibilities and follow below instructions before you contact an after sales service. See CUSTOMER SERVICE. WARNING! ▶ Before maintenance, deactivate the appliance and disconnect the mains plug from the mains socket.
  • Seite 40 Troubleshooting Problem Possible Cause Possible Solution It is not cold enough • The temperature is set too high. • Reset the temperature. inside the appli- • Too warm goods has been stored. • Always cool down goods before ance. storing them. •...
  • Seite 41 Troubleshooting Problem Possible Cause Possible Solution The appliance • The appliance is not located on • Adjust the feet to level the ap- makes abnormal level ground. pliance. sounds. • The appliance touches some ob- • Remove objects around the ap- ject around it.
  • Seite 42 Troubleshooting Problem Possible Cause Possible Solution The automatic ice- • Do not connect the water supply • Connect the water supply pipe maker does pipe to the appliance and open the to the appliance and open the produce ice or supply valve.
  • Seite 43: Power Interruption

    Troubleshooting To contact the technical assistance, visit our website: https://corporate.haier-europe.com/en/ Under the section “website”, choose the brand of your product and your country. You will be re- directed to the specific website where you can find the telephone number and form to contact the technical assistance.
  • Seite 44: Installation

    Installation Unpacking WARNING! ▶ The appliance is heavy. Always handle with at least two persons. ▶ Keep all packaging materials out of children´s reach and dispose them in an environ- mentally friendly manner. ▶ Take the appliance out of the packaging. ▶...
  • Seite 45 Installation 3. The stability can be checked by alternately bump- ing on the diagonals. The slightly swaying should be the same in both directions. Otherwise the frame can warp; possible leaking door seals are the result. A low tendency to the rear facilitates the closing of the doors.
  • Seite 46: Waiting Time

    Installation Waiting time To the maintenance-free lubrication oil is located in the capsule of the compressor. This oil can get through the closed pipe system during slanting transport. Be- fore connecting the appliance to the power supply you have to wait at least 2 hours so that the oil runs back into the capsule.
  • Seite 47 Ice and Water and Automatic Ice models ▶ Your Ice and Water and Automatic Ice refrigerator must be installed by a qualified plumber or Haier trained and supported service technician as incorrect plumbing can lead to water leaks. ▶ Haier appliances does not accept responsibility for damage (including water damage) caused by faulty installation or plumbing.
  • Seite 48: Technical Data

    Technical data Product fiche according to regulation EU No. 2019/2016 Brand Haier Haier HCR7918EIMP Model name / identifier HCR7918EIMB HCR7918ENMP HCR7918EIMP(UK) Refrigerator-freezer Refrigerator-freezer Category of the model Energy efficiency class Annual energy consumption(kWh/year)(1) Total volume(L) Volume refrigerator(L) Volume freezer(L) Volume variable temperature...
  • Seite 49 Technical data Explanations: • Yes, featured (1) Based on the results of the standards conformance test over 24 hours. The actual consumption depends on the use and the location of the appliance. (2) Climate rating SN: This appliance is intended for use in an ambient temperature of be- tween + 10°C and +32°C Climate rating N: This appliance is intended for use in an ambient temperature of be- tween + 16°C and +32°C...
  • Seite 50: Customer Service

    ▶ your local dealer or ▶ our European Call Service-Center (see listed phone numbers below) or ▶ the Service & Support area at www.haier.com where you can activate the service ▶ claim and also find FAQs. To contact our Service, ensure that you have the following data available.
  • Seite 51 Customer service * For other countries please refer to www.haier.com Haier Europe Trading S.r.l Branch UK Westgate House, Westgate, Ealing London, W5 1YY *Duration of the guarantee of the refrigerating appliance: Minimum guarantee is: 2 years for EU Countries, 3 years for Turkey, 1 year for UK, 1 year for Russia, 3 years for Sweden, 2 years for Serbia, 5 years for Norway, 1 year for Morocco, 6 months for Algeria, Tunisia no legal warranty required.
  • Seite 53 Benutzerhandbuch Kühl-Gefrierkombination HCR7918EIMP HCR7918EIMB HCR7918EIMP(UK) HCR7918ENMP...
  • Seite 54 Vielen Dank Vielen Dank für den Kauf eines Haier-Produkts. Bitte lesen Sie diese Anweisungen sorgfältig durch, bevor Sie dieses Gerät benutzen. Die Anleitung enthält wichtige Informationen, die Ihnen helfen, das Gerät optimal zu nutzen und eine sichere und ordnungsgemäße Installation, Verwendung und Wartung zu gewährleisten.
  • Seite 55 Inhalt Sicherheitsinformationen ....................4 Produktbeschreibung ....................10 Bedienfeld ........................11 Nutzung ......................... 14 Ausrüstung ........................32 Pflege und Reinigung ....................35 Fehlerbehebung ......................36 Installation ........................42 Technische Daten ......................46 Kundenservice ......................48 Zubehör Überprüfen Sie Zubehör und Dokumentation gemäß dieser Liste: * Wasseranschluss *Wasserleitung Energielabel Garantie- karte...
  • Seite 56: Sicherheitsinformationen

    Sicherheitsinformationen Sicherheitsinformationen Lesen Sie vor dem ersten Einschalten des Geräts folgende Sicherheitshinweise: WARNUNG! Vor der ersten Inbetriebnahme ► Vergewissern Sie sich, dass keine Transportschäden vorliegen. ► Entfernen Sie alle Verpackungsteile und bewahren Sie sie außerhalb der Reichweite von Kindern auf. ►...
  • Seite 57 Sicherheitsinformationen WARNUNG! ► Nur für Großbritannien: Das Gerätenetzkabel ist mit einem 3-adrigen Stecker (Erdungsstecker) ausgestattet, der in eine 3-adrige Norm-Buchse (geerdet) passt. Den dritten Stift (Erdung) auf keinen Fall kappen oder entfernen. Das Gerät muss so installiert werden, dass der Stecker erreichbar ist.
  • Seite 58 Sicherheitsinformationen WARNUNG! ► Um eine Verunreinigung der Lebensmittel zu vermeiden, beachten Sie die folgenden Hinweise: ► - Das längere Öffnen der Tür kann zu einem bedeutenden Temperaturan- stieg in den Kühlfächern des Geräts führen. ► - Die mit den Lebensmitteln in Berührung kommenden Oberflächen und zugänglichen Ablaufsysteme müssen regelmäßig gereinigt werden.
  • Seite 59 Sicherheitsinformationen WARNUNG! ► Ziehen Sie den Gerätestecker aus der Steckdose, falls die Stromversorgung unterbrochen wird oder bevor Sie das Gerät reinigen. Warten Sie vor dem Neustart mindestens 7 Minuten, da durch häufiges Einschalten der Kompressor beschädigt werden kann. ► WARNUNG: Im Inneren des Haushaltsgeräts keine elektrischen Geräte benutzen, es sei denn, sie sind vom Hersteller empfohlen.
  • Seite 60: Wenn Sie Das Wassersystem Reinigen Möchten, Lesen Sie Zuerst

    Sicherheitsinformationen WARNUNG! ► Das Gerät während der Reinigung nicht besprühen oder mit Wasser beschütten. ► Das Gerät nicht mit Wasser besprühen oder mit Dampf reinigen. ► Die kalten Einlegeböden aus Glas oder die Glastüre nicht mit heißem Wasser reinigen. Plötzliche Temperaturschwankungen können dazu führen, dass das Glas zerspringt.
  • Seite 61: Bestimmungsgemäße Verwendung

    Bestimmungsgemäße Verwendung Bestimmungsgemäße Verwendung Bestimmungsgemäße Verwendung Dieses Gerät ist zum Kühlen und Gefrieren von Lebensmitteln bestimmt. Es ist ausschließlich für den Einsatz in Haushalten und ähnlichen Bereichen konzipiert, Personalküchen Geschäften, Büros anderen Arbeitsumgebungen, auf Bauernhöfen und in Hotels, Motels und anderen wohnähnlichen Umgebungen sowie in Bed-and-Breakfasts und fürs Catering.
  • Seite 62: Produktbeschreibung

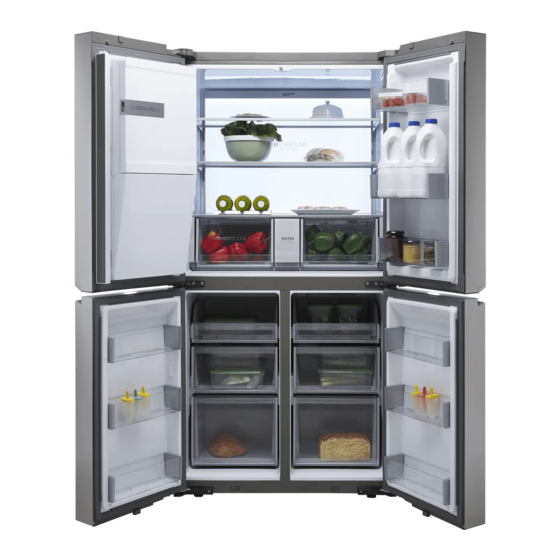
    Produktbeschreibung Produktbeschreibung Hinweis Aufgrund von technischen Änderungen und unterschiedlichen Modellen können einige der Abbildungen in dieser Anleitung von Ihrem Modell abweichen. Modell (HCR7918EIMP/HCR7918EIMB/HCR7918EIMP(UK)) (Mit Eiswürfelbereiter in der Tür) A: Kühlfach My Zone Schublade Bedienfeld Gefrierschrank/Leuchte Switch Zone Hebel des Spenders B: Gefrierfach Abtropffach Ausziehfach...
  • Seite 63: Bedienfeld

    Bedienfeld Bedienfeld Bedienfeld Bedienfeld (HCR7918EIMP/HCR7918EIMB/HCR7918EIMP(UK)) Tasten: Anzeigen: A Auswahl Auto-Set-Modus a Auto-Set-Modus B Auswahl Urlaubsmodus b Urlaubsmodus C Auswahl My Zone-Schubladen c1 Modus Fruit & Vegetable D Taste zur Einstellung c2 Quick Cool-Modus der Temperatur „-“ c3 0°C Fresh-Modus E Taste zur Einstellung d Temperaturanzeige der Temperatur „+“...
  • Seite 64 Bedienfeld Hinweis Aufgrund von technischen Änderungen und unterschiedlichen Modellen können einige der Abbildungen in dieser Anleitung von Ihrem Modell abweichen. Modell (HCR7918ENMP) (Ohne Eiswürfelbereiter in der Tür) A: Kühlfach B: Gefrierfach Vertikale Stützleiste Ausziehfach Bedienfeld Wasserkasten Einlegeböden aus Glas Luftkanal Flaschenhalter/Türfach Eismaschine Humidity zone-Schublade...
  • Seite 65 Bedienfeld Bedienfeld (HCR7918ENMP) Tasten: A Auswahl Auto-Set-Modus B Auswahl Urlaubsmodus C1 Funktionsauswahl Fruit & Vegetable C2 Funktionsauswahl Quick Cool C3 Funktionsauswahl 0°C Fresh D Taste zur Einstellung der Temperatur „-“ E Taste zur Einstellung der Temperatur „+“ F Zonenauswahl G Auswahl Super-Cool Super-Freeze-Wahlschalter N Auswahl Bedienfeldsperre Anzeigen:...
  • Seite 66: Nutzung

    Nutzung Nutzung Sensortasten Die Tasten auf dem Bedienfeld sind Sensortasten, die schon bei leichter Berührung mit dem Finger ansprechen. Gerät ein-/ausschalten Das Gerät ist sofort in Betrieb, wenn es an die Stromversorgung angeschlossen wird. Wenn der Kühlschrank zum ersten Mal eingeschaltet wird, leuchtet die Anzeige „d“ (Temperaturanzeige) auf.
  • Seite 67: Einstellen Der Temperatur Für Den Kühlschrank

    Nutzung Einstellen der Temperatur für den Kühlschrank Wenn das Display entsperrt ist, drücken Sie die Taste „F“ (Zonenauswahl). Der Summer ertönt einmal, die Anzeige „f1“ (Kühlschrankanzeige) blinkt, und dann wird der Temperatureinstellungsmodus für den Kühlschrank aktiviert. Drücken Sie jedes Mal die Taste „D“ (Temperatureinstellungstaste „-“), der Summer ertönt einmal und die eingestellte Kühlschranktemperatur wird um 1 reduziert.
  • Seite 68 Nutzung Hinweis Wenn nach dem Einstellen der Temperatur innerhalb von 5 Sekunden keine Bedienung erfolgt, wird das System automatisch die eingestellte Temperatur ermitteln und speichern. Einstellen der Temperatur für die Switch Zone (S-Zone) Wenn das Display entsperrt ist, drücken Sie die Taste „F“ (Zonenauswahl). Der Summer ertönt einmal, die Anzeige „f3“...
  • Seite 69: Super-Freeze-Funktion (Super-Frz)

    Nutzung Hinweis Im Super-Cool-Modus kann die Kühlschranktemperatur nicht eingestellt werden. Wenn zur Temperatureinstellung entweder die Taste „D“ (Temperatureinstellungstaste „-“) oder die Taste „E“ (Temperatureinstellungstaste „+“) gedrückt wird, blinkt die Anzeige „f1“ (Kühlschrankanzeige) und es ertönt ein Signalton als Hinweis, dass dieser Vorgang nicht ausgeführt werden kann.
  • Seite 70: Urlaubsmodus

    Nutzung Auto-Set-Modus Wenn das Display entsperrt ist, drücken Sie die Taste „A“ (Auto-Set-Modus-Auswahl), der Summer ertönt einmal, die Anzeige „a“ (Auto-Set-Modus) leuchtet auf und der Auto-Set-Modus wird eingeschaltet. Wenn die Anzeige „a“ (Auto-Set-Modus) leuchtet, drücken Sie die Taste „A“ (Auto- Set-Modus-Auswahl), der Summer ertönt einmal, die Anzeige „a“...
  • Seite 71 Nutzung Halten Sie im entsperrten Zustand die Taste „B“ (Auswahl Urlaubsmodus) 3 Sekunden lang gedrückt, der Summer ertönt einmal, dann wird die Kontrollleuchte ausgeschaltet. Die Kontrollleuchte kann auf die gleiche Weise wieder aktiviert werden. Hinweis Im Urlaubsmodus kann die Kühlschranktemperatur nicht eingestellt werden. Wenn zur Temperatureinstellung entweder die Taste „D“...
  • Seite 72 Nutzung Filterfunktion Wenn der Kühlschrank sechs Monate lang in Betrieb ist, leuchtet die Erinnerungsanzeige „i“ (Funktion Filter zurücksetzen) auf, um den Benutzer daran zu erinnern, einen neuen Filter einzusetzen. Wenn der Filter ausgetauscht wurde, halten Sie die Taste „I“ (Auswahl Filter zurücksetzen) 3 Sekunden lang gedrückt, um die Erinnerung zu löschen;...
  • Seite 73 Nutzung Hinweis Wenn die Anzeige „k“ (Funktion Wassereinlass) aufleuchtet, erlöschen die Anzeige „l“ (Eiswürfelfunktion) und die Anzeige „m“ (Zerstoßenes Eis-Funktion). Nach dem Drücken des Spenderhebels fließt das Wasser aus der Ansaugöffnung. Wenn 150 Sekunden lang Wasser ausgegeben wurde, gibt der Kühlschrank einen Signalton aus und hält das Wasser an, bis 180 Sekunden erreicht sind.
  • Seite 74: Zerstoßenes Eis-Funktion

    Nutzung Zerstoßenes Eis-Funktion Drücken Sie in einem beliebigen Display-Zustand (verriegelt oder entsperrt) die Taste „M“ (Auswahl zerstoßenes Eis-Funktion), der Summer ertönt einmal, die Anzeige „m“ (Zerstoßenes Eis-Funktion) leuchtet, und die Funktion für zerstoßenes Eis wird eingeschaltet. Anzeige an 1 Mal drücken Zerstoßenes Eis-Funktion ein Hinweis Wenn die Anzeige „m“...
  • Seite 75: Epp-Funktion

    Nutzung EPP-Funktion Drücken Sie bei entsperrtem Display die Taste „H“ (Auswahl Super Freeze) und die Taste „A“ (Auswahl Auto-Set-Modus) 5 Mal (innerhalb von 5 Sekunden), der Summer ertönt einmal, dann wird die EPP-Funktion ausgeschaltet. Die EPP-Funktion kann auf die gleiche Weise wieder aktiviert werden.
  • Seite 76 Nutzung Anweisungen Eismaschine WARNUNG! Nur an die Trinkwasserversorgung anschließen. ► Der Anschluss an die Wasserleitung darf nur von einem qualifizierten Installateur und ► unter Beachtung der örtlichen Gesetze und Vorschriften zur Wasserqualität vorgenommen werden. Hinweis Diese Wasserleitungsinstallation ist nicht durch die Gerätegarantie abgedeckt. Wasseranschluss des Geräts Entfernen Sie den Gummistopfen (1) vom Wassereinlassventil.
  • Seite 77 Nutzung Eis- und Wasserspender Vor der Verwendung des Eis- und Wasserspenders VORSICHT! Kinder vom Spender fernhalten, um zu verhindern, dass sie mit den Bedienelementen ► spielen oder sie beschädigen. VORSICHT! Entsorgen Sie die ersten hergestellten Eiswürfel (etwa 20 Würfel und 7 Tassen ►...
  • Seite 78: Reinigung Der Spenderschale

    Nutzung Reinigung des Spenders Reinigung des Eis- und Wasserauslasses Wischen Sie den Wasserauslass (1) oder den Eisauslass (2) häufig mit einem sauberen Tuch ab, da er leicht verschmutzt werden kann. Hinweis An den Auslässen können Fusseln von einem Tuch haften bleiben. Reinigung der Spenderschale Wischen Sie die gesamte Schale mit einem feuchten Tuch ab.
  • Seite 79: Eiswürfelbereiter In Der Tür

    Nutzung VORSICHT! Es ist normal, dass nach dem Auswechseln des Wasserfilters milchiges oder trübes ► Wasser ausgegeben wird. Diese Luft im Wasser verschwindet mit der Zeit und es kann bedenkenlos getrunken werden. Das zuerst ausgegebene Eis und Wasser können Partikel oder Gerüche aus der ►...
  • Seite 80 Nutzung Ziehen Sie vorsichtig am Griff, um das Eisfach zu öffnen. Um den Eisbehälter aus der Türe zu entfernen, fassen Sie den vorderen Griff, heben den unteren Teil leicht an und ziehen den Behälter langsam wie abgebildet heraus. Setzen Sie den Eisbehälter in um- gekehrter Reihenfolge wieder ein.
  • Seite 81: Auswechseln Des Wasserfilters

    Nutzung VORSICHT! Nicht installieren, wenn der Wasserdruck 827 kPa übersteigt. Wenn der Wasserdruck ► 827 kPa übersteigt, muss ein Druckbegrenzungsventil installiert werden. Wenden Sie sich an einen Sanitärfachmann, wenn Sie nicht sicher sind, wie Sie Ihren Wasserdruck überprüfen können. Nicht an Orten installieren, an denen Wasserhammer auftreten können. Wenn ►...
  • Seite 82 6. Geben Sie zirka 5 Minuten lang Wasser aus, um eingeschlossene Luft und Verunreinigungen zu entfernen. VORSICHT! Wenn Sie die Filter nicht rechtzeitig austauschen oder nicht von Haier zugelassene ► Wasserfilter verwenden, kann die Filterpatrone undicht werden und zu Sachschäden führen.
  • Seite 83 Nutzung Hinweis Obwohl die Tests unter Standard-Laborbedingungen durchgeführt wurden, kann die tatsächliche Leistung abweichen. Ersatzkartusche: HRXWF Kostenvoranschläge für Ersatzteile finden Sie auf unserer Website unter www.haierspares.eu. WARNUNG! Verringerung des mit der Aufnahme von Schadstoffen verbundenen Risikos: ► Verwenden Sie kein Wasser, das mikrobiologisch bedenklich oder von ►...
  • Seite 84: Ausrüstung

    Ausrüstung Ausrüstung Mehrfach-Luftstrom Der Kühlschrank ist mit einem Mehrfach-Luftstrom- System ausgestattet, bei dem auf jeder Regalebene kühle Luftströme zirkulieren. Dadurch wird eine gleichmäßige Temperatur aufrechterhalten, sicherzustellen, dass Ihre Lebensmittel länger frisch bleiben. Verstellbare Einlegeböden Die Höhe der Einlegeböden kann an Ihren Lagerbedarf angepasst werden.
  • Seite 85 Ausrüstung Herausnehmbare Türablagen/Flaschenhalter Die Türablagen können zur Reinigung herausgenommen werden: Halten Sie dazu die Ablage mit beiden Händen fest, heben Sie sie nach oben (1) und ziehen Sie sie heraus (2). Um die Ablage wieder einzusetzen, werden die oben genannten Schritte in umgekehrter Reihenfolge durchgeführt.
  • Seite 86: Energiespartipps

    Ausrüstung Energiespartipps Stellen Sie sicher, dass das Gerät ordnungsgemäß belüftet ist (siehe ► INSTALLATION). Stellen Sie das Gerät nicht in direktem Sonnenlicht oder in der Nähe von Hitzequellen ► (z. B. Herden, Heizungen) auf. Vermeiden Sie unnötig niedrige Temperaturen im Gerät. Je niedriger die im Gerät ►...
  • Seite 87: Pflege Und Reinigung

    Falls ein kleines Teil oder Krümel im Inneren des Kühlschranks (zwischen die Ablagen oder Schubladen) festsitzen, lösen Sie die Verunreinigung mit einer weichen Bürste. Wenn Sie die Verunreinigung nicht entfernen konnten, wenden Sie sich an den Haier- Kundenservice Wischen Sie den Kühlschrank mit einem feuchten Tuch gründlich aus und trocknen Sie ►...
  • Seite 88: Fehlerbehebung

    Fehlerbehebung Austausch der LED-Leuchten WARNUNG! Wechseln Sie die LED nicht selbst. Sie darf nur vom Hersteller oder von einem autorisierten Service-Mitarbeiter ausgetauscht werden. Die Leuchte nutzt als Lichtquelle eine LED mit geringem Energieverbrauch und langer Lebensdauer. Bei Anomalien wenden Sie sich bitte an den Kundenservice. Siehe KUNDENSERVICE.
  • Seite 89 Fehlerbehebung Viele auftretende Probleme können von Ihnen selbst ohne spezifische Fachkenntnisse gelöst werden. Bei Problemen prüfen Sie bitte alle angezeigten Möglichkeiten und befolgen Sie die nachstehenden Anweisungen, bevor Sie einen Kundenservice kontaktieren. Siehe KUNDENSERVICE. WARNUNG! Das Gerät vor der Wartung deaktivieren und den Netzstecker aus der Steckdose ►...
  • Seite 90 Fehlerbehebung Problem Mögliche Ursache Mögliche Behebung Das Innere des Geräts  Temperatur zu hoch  Temperatur zurücksetzen. ist nicht kalt genug. eingestellt.  Es wurden zu warme  Lassen Sie die Lebensmittel Lebensmittel eingelagert. immer abkühlen, bevor Sie sie hineinlegen. ...
  • Seite 91 Fehlerbehebung Problem Mögliche Ursache Mögliche Behebung Die Seitenwände des  -  Das ist normal. Geräts und die Türleiste werden warm. Das Gerät macht  Das Gerät befindet sich nicht  Füße einstellen, um das Gerät in unnormale auf einem ebenen Untergrund. die Waage zu bringen.
  • Seite 92 Fehlerbehebung Problem Mögliche Ursache Mögliche Behebung  Die Gerätetür wurde zu häufig  Wenn Sie die Gerätetür häufig geöffnet. öffnen, entweicht kalte Luft, was die Geschwindigkeit der Eisproduktion verringert. Öffnen und schließen Sie die Gerätetür möglichst selten.  Die Gerätetür ist nicht ...
  • Seite 93 Fehlerbehebung Um den technischen Kundendienst zu kontaktieren, besuchen Sie unsere Website: https://corporate.haier-europe.com/en/ Wählen Sie im Abschnitt „Website“ die Marke Ihres Produkts und Ihr Land aus. Sie werden auf die entsprechende Website weitergeleitet, auf der Sie die Telefonnummer und das Formular zur Kontaktaufnahme mit dem technischen Kundendienst finden.
  • Seite 94: Installation

    Installation Installation Auspacken WARNUNG! Das Gerät ist schwer. Transportieren oder bewegen Sie es immer mit mindestens ► zwei Personen. Bewahren Sie sämtliches Packungsmaterial außerhalb der Reichweite von Kindern ► auf und entsorgen Sie es umweltfreundlich. Nehmen Sie das Gerät aus der Verpackung. ►...
  • Seite 95 Installation Die Stabilität kann durch abwechselndes Anschlagen gegen die Diagonalen überprüft werden. Das leichte Schwanken sollte in beide Richtungen gleich sein. Andernfalls kann sich der Rahmen verziehen; mögliche undichte Türdichtungen sind die Folge. Eine geringe Neigung nach hinten erleichtert das Schließen der Tür.
  • Seite 96 Installation Wartezeit Das wartungsfreie Schmieröl befindet sich in der Kapsel des Kompressors. Dieses Öl kann beim Transport durch das geschlossene Rohrsystem gelangen, wenn das Gerät gekippt wird. Warten Sie mindestens 2 Stunden, bevor Sie das Gerät an die Stromversorgung anschließen, damit das Öl wieder in die Kapsel zurückfließt.
  • Seite 97 Modelle mit Eis- und Wasserspender und Automatischer Eiszubereitung Kühlschränke mit Eis- und Wasserspender und Automatischer Eiszubereitung ► müssen von einem qualifizierten Klempner oder einem von Haier geschulten und anerkannten Servicetechniker installiert werden, da eine falsche Installation zu Wasserlecks führen kann.
  • Seite 98: Technische Daten

    Technische Daten Technische Daten Produktdatenblatt gemäß EU-Nr. 2019/2016 Marke Haier Haier HCR7918EIMP Modellname / Kennung HCR7918EIMB HCR7918ENMP HCR7918EIMP(UK) Kühl- Kühl- Kategorie des Modells Gefrierkombination Gefrierkombination Energieeffizienzklasse Jährlicher Energieverbrauch (kWh/Jahr) (1) Gesamtvolumen (L) Volumen Kühlschrank (L) Volumen Gefrierschrank (L) Volumen variables Temperaturfach (L)
  • Seite 99 Technische Daten Erläuterungen: • Ja, vorhanden (1) Basierend auf den Ergebnissen des Normenkonformitätstests über 24 Stunden. Der tatsächliche Verbrauch hängt von der Verwendung und dem Standort des Geräts ab. (2) Klima-Bewertung SN: Dieses Gerät ist für die Verwendung bei einer Umgebungs- temperatur zwischen +10°C und +32°C ausgelegt.
  • Seite 100: Kundenservice

    Ihren Händler vor Ort oder ► an unser European Call Service-Center (siehe unten aufgeführte Telefonnummern) ► oder an den Service und Support unter www.haier.com, wo Sie den Serviceanspruch ► aktivieren können und auch FAQs finden. aktivieren können und auch FAQs finden. ►...
  • Seite 101 Kundenservice * Informationen zu anderen Ländern finden Sie unter www.haier.com Haier Europe Trading SRL Niederlassung UK Westgate House, Westgate, Ealing London, W5 1YY *Gewährleistungsdauer des Kühlgeräts: Die Mindestgarantie beträgt: 2 Jahre für EU-Länder, 3 Jahre für die Türkei, 1 Jahr für Großbritannien, 1 Jahr für Russland, 3 Jahre für Schweden, 2 Jahre für Serbien, 5 Jahre...
  • Seite 102 Kundenservice...
  • Seite 103 Manual de usuario Frigorífico-congelador HCR7918EIMP HCR7918EIMB HCR7918EIMP (UK) HCR7918ENMP...
  • Seite 104 Gracias Gracias por comprar un producto Haier. Lea atentamente estas instrucciones antes de utilizar este electrodoméstico. Las instrucciones contienen información importante que le ayudará a sacar el máximo provecho del electrodoméstico y a garantizar una instalación, uso y mantenimiento seguros y adecuados.
  • Seite 105 Índice Información de seguridad ....................4 Descripción del producto ..................... 10 Panel de control ......................11 Uso ..........................14 Equipo ..........................32 Cuidado y limpieza ......................35 Solución de problemas ....................37 Instalación ........................42 Datos técnicos ......................46 Atención al cliente ......................48 Accesorios Compruebe los accesorios y guías de acuerdo con esta lista: *Conector de...
  • Seite 106: Información De Seguridad

    Información de seguridad Información de seguridad Antes de encender el electrodoméstico por primera vez, lea las siguientes directrices de seguridad: ADVERTENCIA Antes del primer uso ► Asegúrese de que no haya daños causados por el transporte. ► Retire todo el embalaje y manténgalo fuera del alcance de los niños. ►...
  • Seite 107: Uso Diario

    Información de seguridad ADVERTENCIA ► Solo para el Reino Unido: El cable de alimentación de este electrodoméstico está equipado con un enchufe de 3 cables (a tierra) que se ajusta a una toma de corriente estándar de 3 cables (a tierra). No corte ni desmonte la tercera patilla (toma de tierra).
  • Seite 108 Información de seguridad ADVERTENCIA ► Para evitar que los alimentos puedan contaminarse, cíñase a las siguientes instrucciones: ► - Dejar la puerta abierta durante largos períodos de tiempo puede causar un aumento significativo de la temperatura en los compartimentos del electrodoméstico. ►...
  • Seite 109 Información de seguridad ADVERTENCIA ► Desenchufe el electrodoméstico en caso de interrupción del suministro eléctrico o antes de limpiarlo. Deje pasar al menos 7 minutos antes de reiniciar el electrodoméstico, ya que el arranque frecuente puede dañar el compresor. ► ADVERTENCIA: dispositivos eléctricos...
  • Seite 110: Información Sobre El Gas Refrigerante

    Información de seguridad ADVERTENCIA ► No rocíe ni enjuague el electrodoméstico durante la limpieza. ► No use agua pulverizada o vapor para limpiar el electrodoméstico. ► No limpie los estantes o la puerta de cristal fríos con agua caliente. Un cambio repentino de temperatura puede causar que el cristal se rompa.
  • Seite 111: Uso Previsto

    Uso previsto Uso previsto Uso previsto Este electrodoméstico está diseñado para enfriar y congelar alimentos. Ha sido diseñado exclusivamente para su uso en aplicaciones domésticas y similares, como áreas de cocina para personal en tiendas, oficinas y otros entornos de trabajo;...
  • Seite 112: Descripción Del Producto

    Descripción del producto Descripción del producto Aviso Debido a cambios técnicos y a las diferencias entre modelos, algunas de las ilustraciones de este manual pueden diferir de su modelo. Modelo (HCR7918EIMP/HCR7918EIMB/HCR7918EIMP(UK)) (Con fabricador de cubitos de hielo en la puerta) A: Compartimento frigorífico Cajón My Zone Panel de control...
  • Seite 113: Panel De Control

    Panel de control Panel de control Panel de control Panel de control (HCR7918EIMP/HCR7918EIMB/HCR7918EIMP(UK)) Botones: Indicadores: A Selector del modo a Modo de Ajuste automático de Ajuste automático b Modo Vacaciones B Selector del modo Vacaciones c1 Modo Fruit & Vegetable C Selector del cajón My Zone c2 Modo Enfriamiento rápido D Botón de ajuste de la temperatura "-"...
  • Seite 114 Panel de control Aviso Debido a cambios técnicos y a las diferencias entre modelos, algunas de las ilustraciones de este manual pueden diferir de su modelo. Modelo (HCR7918ENMP) (Sin fabricador de cubitos de hielo en la puerta) A: Compartimento frigorífico B: Compartimento congelador Viga vertical Bandeja deslizante...
  • Seite 115 Panel de control Panel de control (HCR7918ENMP) Botones: A Selector del modo de Ajuste automático B Selector del modo Vacaciones C1 Selector de la función Fruit & Vegetable C2 Selector de la función Enfriamiento rápido C3 Selector de la función 0 °C Fresh D Botón de ajuste de la temperatura "-"...
  • Seite 116: Uso

    Teclas táctiles Los botones del panel de control son teclas táctiles, que responden aún cuando las toca ligeramente con el dedo. Encender/apagar el electrodoméstico El electrodoméstico se pondrá en marcha en cuanto se conecte a la fuente de alimentación. Cuando el frigorífico se enciende por primera vez, se ilumina el indicador "d" (Indicación de la temperatura).
  • Seite 117 Ajustar la temperatura del frigorífico Cuando la pantalla esté desbloqueada, pulse el botón "F" (Selector de zonas). El zumbador suena una vez, el indicador "f1" (Indicador del frigorífico) parpadea y aparece el modo de ajuste de la temperatura del frigorífico. Pulse el botón "D"...
  • Seite 118 Aviso Después de ajustar la temperatura, si no se realiza ninguna otra operación en el plazo de 5 segundos, el sistema guardará la temperatura seleccionada automáticamente. Ajuste de la temperatura de la Switch Zone (S-Zone) Cuando la pantalla esté desbloqueada, pulse el botón "F" (Selector de zonas). El zumbador suena una vez, el indicador "f3"...
  • Seite 119 Aviso En estado Súper Fresco, la temperatura del frigorífico no se puede ajustar. Si se pulsa el botón "D" (botón de ajuste de la temperatura "-") o "E" (botón de ajuste de la temperatura "+") para ajustar la temperatura del frigorífico, el indicador "f1" (indicador del frigorífico) parpadeará...
  • Seite 120: Modo Vacaciones

    Modo de Ajuste automático Cuando la pantalla esté desbloqueada, pulse el botón "A" (selector del modo de Ajuste automático), el zumbador suena una vez, se ilumina el indicador "a" (modo de Ajuste automático) y, a continuación, se activará la función de Ajuste automático. Cuando se ilumine el indicador "a"...
  • Seite 121 En estado desbloqueado, mantenga pulsado el botón "B" (selector del modo Vacaciones) durante 3 segundos, el zumbador suena una vez y se apaga la lámpara de proyección. La función de lámpara de proyección también puede activarse realizando la misma operación. Aviso En estado Vacaciones, la temperatura del frigorífico no se puede ajustar.
  • Seite 122 Función del filtro Cuando el frigorífico lleve funcionando seis meses, se iluminará el indicador de recordatorio "i" (función de reinicio del filtro) para recordar a los usuarios que sustituyan el filtro por uno nuevo. Cuando cambie el filtro, mantenga pulsado el botón "I" (selector de la función de reinicio del filtro) durante 3 segundos para cancelar el recordatorio: el tiempo se restablecerá...
  • Seite 123 Aviso Cuando el indicador "k" (función de entrada de agua) se ilumina, se apagan el indicador "l" (función de cubitos de hielo) y el indicador "m" (función de hielo picado). Una vez pulsada la pala dispensadora, el agua saldrá del puerto de entrada. Cuando el tiempo de entrada de agua alcance los 150 s, el frigorífico emitirá...
  • Seite 124 Función de hielo picado En cualquier estado (bloqueado o desbloqueado), pulse el botón "M" (selector de la función de hielo picado), el zumbador suena una vez, se ilumina el indicador "m" (función de hielo picado) y, a continuación, se activa la función de hielo picado. Indicador encendido Pulse 1 vez Función de hielo picado activada...
  • Seite 125 Función EPP En estado de desbloqueo, pulse repetidamente el botón "H" (selector de Súper Congelación) y el botón "A" (selector de Ajuste automático) 5 veces (en 5 segundos), el zumbador suena una vez, entonces la función EPP se desactivará. La función EPP también puede activarse realizando la misma operación.
  • Seite 126 Instrucciones del fabricador de cubitos de hielo ADVERTENCIA Conéctese únicamente al suministro de agua potable. ► La conexión de la línea de agua solo debe instalarla un fontanero cualificado ► y de acuerdo con la legislación local y las regulaciones que rigen la calidad del agua. Aviso La instalación de esta línea de agua no está...
  • Seite 127 Dispensador de agua y hielo Antes de usar el dispensador de agua y hielo ¡PRECAUCIÓN! Mantenga a los niños alejados del dispensador para evitar que jueguen con los ► controles o los dañen. ¡PRECAUCIÓN! Tire los primeros lotes de hielo (aproximadamente 20 cubitos y 7 vasos de agua). ►...
  • Seite 128 Limpieza del dispensador Limpieza de la salida de hielo y agua Limpie la salida de agua (1) o la salida de hielo (2) frecuentemente con un paño limpio, ya que puede ensuciarse fácilmente. Aviso La pelusa de la tela puede adherirse a las salidas. Limpieza de la bandeja del dispensador Limpie toda el área con un trapo húmedo.
  • Seite 129 ¡PRECAUCIÓN! Es normal que se dispense agua turbia después de reemplazar el filtro de agua. ► Este aire en el agua se aclarará y es seguro beber. El primer hielo y agua dispensados pueden incluir partículas o olores de la línea ►...
  • Seite 130 Tire suavemente de la manija para abrir el compartimento de hielo. Para quitar el depósito de hielo de la puerta, agarre la manija frontal, levante ligeramente la parte inferior y tire lentamente del depósito como se muestra en la imagen. Vuelva a colocar el depósito de hielo en la puerta siguiendo esta misma secuencia al revés.
  • Seite 131 ¡PRECAUCIÓN! No lo instale si la presión de agua supera los 827 kPa. Si su presión de agua supera los ► 827 kPa, debe instalar una válvula limitadora de presión. Póngase en contacto con un fontanero profesional si no está seguro de cómo controlar la presión del agua. No lo instale donde puedan producirse golpes de ariete.
  • Seite 132 ¡PRECAUCIÓN! Si no se reemplazan los filtros cuando es necesario o si se utilizan filtros de agua ► no autorizados por Haier, se pueden producir fugas en el cartucho del filtro y provocar daños materiales. Filtro de agua Modelo: Haier HRXWF Sistema certificado por IAPMO R&T según los estándares NSF/ANSI 42, 53, 401...
  • Seite 133 Aviso Si bien las pruebas se realizaron bajo condiciones de laboratorio estándar, el rendimiento real puede variar. Cartucho de repuesto: HRXWF Para conocer los costes estimados de las piezas de repuesto, visite nuestro sitio web www.haierspares.eu. ADVERTENCIA Para reducir el riesgo asociado a la ingestión de contaminantes: ►...
  • Seite 134: Equipo

    Equipo Equipo Flujo de aire múltiple El frigorífico está equipado con un sistema de flujo de aire múltiple, con el que se aseguran corrientes de aire frío en cada nivel de estante. Esto ayuda a mantener una temperatura uniforme para asegurar que sus alimentos se mantienen frescos por más tiempo.
  • Seite 135 Equipo Estantes de puerta extraíbles/Soporte para botellas Los estantes de la puerta se pueden desmontar para limpiarlos: Coloque las manos en cada lado del estante, levántelo hacia arriba (1) y extráigalo (2). Para insertar el estante de la puerta, realice los pasos anteriores en orden inverso.
  • Seite 136 Equipo Consejos de ahorro de energía Asegúrese de que el electrodoméstico esté bien ventilado (vea INSTALACIÓN). ► No instale el electrodoméstico bajo la luz directa del sol o cerca de fuentes de calor ► (p. ej.: fogones, estufas...). Evite una temperatura innecesariamente baja en el electrodoméstico. El consumo ►...
  • Seite 137: Cuidado Y Limpieza

    En caso de que alguna parte o componente pequeño quede atascada dentro del frigorífico (entre las estanterías o los cajones), utilice un cepillo suave pequeño para sacarlo. Si no la alcanza, póngase en contacto con el servicio de Haier Aclare y seque con un paño suave.
  • Seite 138 Cuidado y limpieza Sustitución de las lámparas LED ADVERTENCIA No sustituya usted mismo la lámpara LED, solo debe cambiarla el fabricante o un técnico autorizado. Las lámparas utilizan LED como fuente de luz, con bajo consumo energético y larga vida útil.
  • Seite 139: Solución De Problemas

    Solución de problemas Solución de problemas Usted mismo puede resolver muchos de los problemas que puedan presentarse sin tener conocimientos específicos. En caso de que se produzca algún problema, compruebe todas las posibilidades ilustradas y siga las instrucciones pertinentes antes de ponerse en contacto con un servicio posventa.
  • Seite 140 Solución de problemas Problema Causa posible Solución posible La temperatura  La temperatura establecida  Restablezca la temperatura. del interior del es demasiado alta. electrodoméstico  Se han almacenado alimentos  Enfríe siempre los alimentos antes no es lo suficiente- demasiado calientes.
  • Seite 141 Solución de problemas Problema Causa posible Solución posible Los lados del  -  Esto es normal. frigorífico y la tira de la puerta se calientan. El electrodomés-  El electrodoméstico no está ubicado  Ajuste las patas para nivelar tico hace sonidos sobre una superficie plana.
  • Seite 142 Solución de problemas Problema Causa posible Solución posible El fabricador  No conecte la tubería de suministro  Conecte la tubería de suministro de cubitos de hielo de agua al electrodoméstico y abra de agua al electrodoméstico y abra automático la válvula de alimentación.
  • Seite 143 Solución de problemas Para ponerse en contacto con la asistencia técnica, visite nuestro sitio web: https://corporate.haier-europe.com/en/. En la sección «sitio web», elija la marca de su producto y su país. Se le redirigirá a la página web específica donde podrá encontrar el número de teléfono y el formulario para ponerse en contacto con el servicio...
  • Seite 144: Instalación

    Instalación Instalación Desempaquetado ADVERTENCIA Este es un electrodoméstico pesado. Manipúlelo con la ayuda de otra persona. ► Mantenga todo el material de embalaje fuera del alcance de los niños y deséchelo ► de forma respetuosa con el medio ambiente. Saque el electrodoméstico de su embalaje. ►...
  • Seite 145 Instalación Puede comprobarse la estabilidad golpeando alternativamente las diagonales. El ligero bamboleo debe ser el mismo en ambas direcciones. De lo contrario, el marco puede deformarse y resultar en fugas en las juntas de la puerta. Una ligerísima inclinación hacia atrás facilita el cierre de las puertas. Ajuste de las puertas Si las puertas no están niveladas, este desajuste puede ser solucionado de la siguiente manera:...
  • Seite 146 Instalación Tiempo de espera El aceite de lubricación sin mantenimiento se encuentra en la cápsula del compresor. Este aceite puede pasar por el sistema de tuberías cerradas durante el transporte si el electrodoméstico está inclinado. Antes de conectar el electrodoméstico a la fuente de alimentación, espere al menos 2 horas para que el aceite vuelva a entrar en la cápsula.
  • Seite 147 Su frigorífico con Hielo y agua y Hielo automático debe ser instalado por un fontanero ► cualificado o un técnico de servicio capacitado y apoyado por Haier, ya que una fontanería incorrecta puede producir fugas de agua. Los aparatos Haier no asumen la responsabilidad de los daños (incluidos los daños ►...
  • Seite 148: Datos Técnicos

    Datos técnicos Datos técnicos Ficha del producto conforme al Reglamento UE n.º 2019/2016 Marca Haier Haier HCR7918EIMP Nombre del modelo / identificador HCR7918EIMB HCR7918ENMP HCR7918EIMP (UK) Frigorífico- Frigorífico- Categoría del modelo congelador congelador Clase de eficiencia energética Consumo anual de energía (kWh/año) (1) Volumen total (L) Volumen de frigorífico (L)
  • Seite 149 Datos técnicos Explicaciones: • Sí, presentes (1) Basado en los resultados de la prueba de conformidad normativa durante 24 horas. El consumo real depende del uso y de la ubicación del electrodoméstico. (2) Calificación climática SN: Este electrodoméstico está diseñado para ser utilizado a una temperatura ambiente comprendida entre + 10 °C y +32 °C Calificación climática N: Este electrodoméstico está...
  • Seite 150: Atención Al Cliente

    Atención al cliente Atención al cliente Recomendamos nuestro Servicio de atención al cliente Haier y el uso de repuestos originales. Si tiene algún problema con su electrodoméstico, compruebe primero la sección SOLUCIÓN DE PROBLEMAS. Si no encuentra una solución allí, póngase en contacto con su distribuidor local o ►...
  • Seite 151 Atención al cliente www.haier.com * Para otros países, consulte Haier Europe Trading S.r.l Sucursal Reino Unido Westgate House, Westgate, Ealing Londres, W5 1YY *Duración de la garantía del aparato de refrigeración: La garantía mínima es de: 2 años para los países de la UE, 3 años para Turquía, 1 año para el Reino Unido, 1 año para Rusia, 3 años para Suecia, 2 años para Serbia, 5 años para...
  • Seite 152 Atención al cliente...
  • Seite 153 Manuel d’utilisation Réfrigérateur-congélateur HCR7918EIMP HCR7918EIMB HCR7918EIMP (UK) HCR7918ENMP...
  • Seite 154 Merci Merci d'avoir acheté un produit Haier. Veuillez lire attentivement ces instructions avant d'utiliser cet appareil. Les instructions contiennent des informations importantes qui vous aideront à tirer le meilleur parti de l'appareil et à assurer l'installation, l'utilisation et l'entretien sûrs et appropriés de celui-ci.
  • Seite 155 Sommaire Informations sur la sécurité .................... 4 Description du produit ....................10 Panneau de commande ....................11 Utilisation ........................14 Matériel .......................... 32 Entretien et nettoyage ....................35 Dépannage ........................36 Installation ........................42 Données techniques ..................... 46 Service clientèle ......................48 Accessoires Vérifiez les accessoires et la littérature conformément à...
  • Seite 156: Informations Sur La Sécurité

    Informations sur la sécurité Informations sur la sécurité Avant d'allumer l'appareil pour la première fois, lisez les conseils de sécurité suivants : AVERTISSEMENT ! Avant la première utilisation ► Assurez-vous qu'il n'a pas été endommagé pendant le transport. ► Retirez tous les emballages et gardez-les hors de portée des enfants. ►...
  • Seite 157: Utilisation Quotidienne

    Informations sur la sécurité AVERTISSEMENT ! ► Uniquement pour le Royaume-Uni : le cordon d'alimentation de l'appareil est équipé d'une fiche 3 pôles (de mise à la terre) qui s'adapte à une prise standard 3 pôles (de mise à la terre). Ne coupez jamais ou ne démontez jamais la troisième broche (mise à...
  • Seite 158 Informations sur la sécurité AVERTISSEMENT ! ► Pour éviter la contamination des aliments, veuillez respecter les instructions suivantes : ► - L’ouverture prolongée de la porte peut entraîner une augmentation significative de la température dans les compartiments de l’appareil. ► - Nettoyez régulièrement les surfaces pouvant se retrouver au contact des aliments et les systèmes d'écoulement accessibles.
  • Seite 159: Entretien/Nettoyage

    Informations sur la sécurité AVERTISSEMENT ! ► Débranchez l'appareil en cas de coupure de courant ou avant de le nettoyer. Attendez au moins 7 minutes avant de redémarrer l'appareil, car le démarrage fréquent risque d'endommager le compresseur. ► AVERTISSEMENT : n’utilisez pas d’appareils électriques à l'intérieur des compartiments de conservation des aliments de l'appareil, sauf s'ils correspondent aux modèles recommandés par le fabricant.
  • Seite 160 Informations sur la sécurité AVERTISSEMENT ! ► Ne pulvérisez pas et ne rincez pas l'appareil pendant le nettoyage. ► N'utilisez pas de jet d'eau ou de vapeur pour nettoyer l'appareil. ► Ne nettoyez pas les clayettes froides en verre ou la porte vitrée à l'eau chaude.
  • Seite 161: Utilisation Prévue

    Utilisation prévue Utilisation prévue Utilisation prévue Cet appareil est destiné à réfrigérer et à congeler les aliments. Il a été conçu exclusivement pour une utilisation dans les habitations et des applications similaires telles que les espaces de cuisine dans les magasins, bureaux et autres environnements de travail ;...
  • Seite 162: Description Du Produit

    Description du produit Description du produit Remarque En raison des changements techniques et de différents modèles, certaines des illustrations de ce manuel peuvent différer de votre modèle. Modèle (HCR7918EIMP/HCR7918EIMB/HCR7918EIMP(UK)) (avec la machine à glaçons dans la porte) A: Compartiment réfrigérateur Conduit d'air (derrière les tiroirs) Panneau de commande Tiroir My Zone...
  • Seite 163: Panneau De Commande

    Panneau de commande Panneau de commande Panneau de commande Panneau de commande (HCR7918EIMP/HCR7918EIMB/HCR7918EIMP(UK)) Boutons : Indicateurs : A Sélecteur du mode Réglage a Mode Réglage automatique automatique b Mode Vacances B Sélecteur du mode Vacances c1 Mode Fruit & Vegetable C Sélecteur du tiroir My Zone c2 Mode Refroidissement rapide D Bouton de réglage de la température "-"...
  • Seite 164 Panneau de commande Remarque En raison des changements techniques et de différents modèles, certaines des illustrations de ce manuel peuvent différer de votre modèle. Modèle (HCR7918ENMP) (sans machine à glaçons dans la porte) A: Compartiment réfrigérateur B: Compartiment congélateur Bandeau vertical Plateau coulissant Panneau de commande Bac à...
  • Seite 165 Panneau de commande Panneau de commande (HCR7918ENMP) Boutons : Sélecteur du mode Réglage automatique Sélecteur du mode Vacances C1 Sélecteur de fonction Fruit & Vegetable C2 Sélecteur de fonction Refroidissement rapide C3 Sélecteur de fonction 0 °C Fresh Bouton de réglage de la température "-" Bouton de réglage de la température "+"...
  • Seite 166: Utilisation

    Utilisation Utilisation Touches tactiles Les boutons du panneau de commande sont des touches tactiles qui réagissent dès que le doigt les touche légèrement. Allumez/éteignez l'appareil L'appareil fonctionne dès qu'il est branché sur l'alimentation électrique. Lors de la première mise sous tension du réfrigérateur, l'indicateur "d" (affichage de la température) s'allume.
  • Seite 167 Utilisation Réglez la température du réfrigérateur Lorsque l’écran d'affichage est déverrouillé, appuyez sur le bouton "F" (sélecteur de zone). Le signal sonore retentit une fois, l'indicateur "f1" (indicateur du réfrigérateur) clignote, puis le mode de réglage de la température du réfrigérateur apparaît. Appuyez sur le bouton "D"...
  • Seite 168 Utilisation Remarque Après avoir réglé la température, s'il n'y a pas d'opération dans les 5 secondes, le système est automatiquement déterminé et enregistre la température définie. Réglez la température de la Switch Zone (S-Zone) Lorsque l’écran d'affichage est déverrouillé, appuyez sur le bouton "F" (sélecteur de zone). Le signal sonore retentit une fois, l'indicateur "f3"...
  • Seite 169 Utilisation Remarque En mode Super refroidissement, la température du réfrigérateur ne peut pas être réglée. Si vous appuyez sur le bouton "D" (bouton de réglage de la température "-") ou sur le bouton "E" (bouton de réglage de la température "+") pour régler la température du réfrigérateur, l'indicateur "f1"...
  • Seite 170 Utilisation Mode Réglage automatique Lorsque l'écran d'affichage est déverrouillé, appuyez sur le bouton "A" (sélecteur du mode Réglage automatique), le signal sonore retentit une fois, l'indicateur "a" (mode Réglage automatique) s'allume, puis la fonction Réglage automatique s'allume. Lorsque l'indicateur "a" (mode Réglage automatique) s'allume, appuyez sur le bouton "A"...
  • Seite 171 Utilisation Lorsque l'écran d'affichage est déverrouillé, maintenez le bouton "B" (sélecteur du mode Vacances) enfoncé pendant 3 secondes, le signal sonore retentit une fois, puis la lampe de projection s’éteint. La fonction lampe de projection peut également être allumée avec la même opération. Remarque En mode Vacances, la température du réfrigérateur ne peut pas être réglée.
  • Seite 172: Fonction Filtre

    Utilisation Fonction filtre Lorsque le réfrigérateur fonctionne pendant six mois, l'indicateur de rappel "i" (fonction de réinitialisation du filtre) s'allume pour rappeler aux utilisateurs de le remplacer par un filtre neuf. Lorsque le filtre est remplacé, maintenez le bouton "I" (sélecteur de la fonction de réinitialisation du filtre) enfoncé...
  • Seite 173 Utilisation Remarque Lorsque l'indicateur "k" (fonction arrivée d'eau) s'allume, l'indicateur "l" (fonction glaçons) et l'indicateur "m" (fonction glace pilée) s'éteignent. Lorsque vous appuyez sur la languette du distributeur, l'eau sort de l'orifice. Lorsque le temps d'arrivée d'eau atteint 150 s, le réfrigérateur émet un bip et maintient l'eau jusqu'à...
  • Seite 174 Utilisation Fonction glace pilée Dans tous les états (verrouillé ou déverrouillé), appuyez sur le bouton "M" (sélecteur de la fonction glace pilée), le signal sonore retentit une fois, l'indicateur "m" s'allume (fonction glace pilée), puis la fonction glace pilée est activée. Indicateur allumé...
  • Seite 175: Alarme D'ouverture De Porte

    Utilisation Fonction EPP Lorsque l'écran d’affichage est déverrouillé, appuyez en continu sur le bouton "H" (sélecteur Super congélation) et sur le bouton "A" (sélecteur du mode Réglage automatique) 5 fois (dans les 5 secondes), le signal sonore retentit une fois, puis la fonction EPP est désactivée.
  • Seite 176 Utilisation Instructions de la machine à glaçons AVERTISSEMENT ! Raccordez uniquement à l'alimentation en eau potable. ► Le raccordement de la conduite d'eau ne doit être effectué que par un plombier ► qualifié et conformément à la législation locale et aux règlements régissant la qualité de l'eau.
  • Seite 177 Utilisation Distributeur de glaçons et d'eau Avant d'utiliser le distributeur de glaçons et d'eau ATTENTION ! Tenez les enfants à l'écart du distributeur pour éviter que les enfants ne jouent avec ► les commandes ou ne les endommagent. ATTENTION ! Jetez les premières quantités de glace (environ 20 glaçons et 7 tasses d'eau).
  • Seite 178 Utilisation Nettoyage du distributeur Nettoyage de la sortie de glace et d'eau Essuyez fréquemment la sortie d'eau (1) ou la sortie de glace (2) à l'aide d'un chiffon propre car elle peut facilement se salir. Remarque Les peluches provenant d'un tissu peuvent adhérer aux sorties. Nettoyage du bac du distributeur Essuyez toute la zone avec un chiffon humide.
  • Seite 179 Utilisation ATTENTION ! Il est normal que de l'eau laiteuse ou trouble soit distribuée après avoir remplacé le filtre ► à eau. Cet air dans l'eau finira par être éliminé et l’eau peut être bue sans danger. Les premiers glaçons et l'eau distribuée peuvent comprendre des particules ou des ►...
  • Seite 180 Utilisation Tirez doucement la poignée pour ouvrir le compartiment à glaçons. Pour retirer le bac à glaçons de la porte, saisissez la poignée avant, soulevez légèrement la partie inférieure et retirez lentement le bac comme indiqué. Replacez le bac à glaçons de la porte en effectuant l’opération dans l’ordre inverse.
  • Seite 181 Utilisation ATTENTION ! Ne l’installez pas si la pression de l'eau dépasse 827 kPa. Si votre pression d'eau ► dépasse 827 kPa, vous devez installer une soupape de limitation de pression. Si vous ne savez pas comment vérifier la pression de votre eau, contactez un professionnel de la plomberie.
  • Seite 182 ATTENTION ! Le non-remplacement des filtres lorsque cela s’avère nécessaire ou l'utilisation ► de filtres à eau non autorisés par Haier peut entraîner une fuite au niveau de la cartouche du filtre et causer des dégâts matériels. Filtre à eau Modèle : Haier HRXWF...
  • Seite 183 Utilisation Remarque Bien que les essais aient été effectués dans des conditions de laboratoire normalisées, les performances réelles peuvent varier. Cartouche de rechange : HRXWF Pour les coûts estimés des éléments de rechange, veuillez visiter notre site Web www.haierspares.eu. AVERTISSEMENT ! Pour réduire le risque associé...
  • Seite 184: Matériel

    Matériel Matériel Flux multi-air Le réfrigérateur est équipé d'un système à flux multi-air, avec lequel des flux d'air froid se trouvent au niveau de chaque clayette. Cela permet de maintenir une température uniforme afin de garantir que vos aliments conservent leur fraîcheur pendant plus longtemps. Clayettes réglables La hauteur des clayettes peut être réglée en fonction de vos besoins de conservation.
  • Seite 185 Matériel Porte-bouteilles/balconnets de porte amovibles Les balconnets de porte peuvent être retirés pour le nettoyage : Placez les mains de chaque côté du balconnet, soulevez-le (1) et tirez-le (2). Pour insérer le balconnet de porte, vous devez suivre les étapes ci-dessus dans l’ordre inverse. OPTION : Indicateur de température OK L'indicateur de température OK peut être utilisé...
  • Seite 186: Conseils D'économie D'énergie

    Matériel Conseils d’économie d’énergie Assurez-vous que l'appareil est bien ventilé (voir INSTALLATION). ► N’installez pas l'appareil en plein soleil ou à proximité de sources de chaleur (par ex. ► cuisinières, chauffages). Évitez une température inutilement basse dans l'appareil. Plus vous réglez bas ►...
  • Seite 187: Entretien Et Nettoyage

    Si une petite partie ou un élément reste coincé à l'intérieur du réfrigérateur (entre les clayettes ou les tiroirs), utilisez une petite brosse souple pour l’éliminer. Si vous ne pouvez pas atteindre la pièce, veuillez contacter le service clientèle Haier Rincez et séchez avec un chiffon doux.
  • Seite 188: Dépannage

    Dépannage Remplacement des lampes LED AVERTISSEMENT ! Ne remplacez pas la lampe LED vous-même, elle ne doit être remplacée que par le fabricant ou l’agent de maintenance agréé. La lampe utilise la LED comme source de lumière, avec une faible consommation d'énergie et une longue durée de vie.
  • Seite 189 Dépannage Vous pouvez résoudre de nombreux problèmes vous-même sans expertise spécifique. En cas de problème, veuillez vérifier toutes les possibilités indiquées et suivre les instructions ci-dessous avant de contacter un service après-vente. Reportez-vous au paragraphe SERVICE CLIENTÈLE. AVERTISSEMENT ! Avant l'entretien, désactivez l'appareil et débranchez la fiche secteur de la prise ►...
  • Seite 190 Dépannage Problème Cause possible Solution possible Il ne fait pas  La température réglée est trop élevée.  Réinitialisez la température. suffisamment froid  Des produits trop chauds ont été  Laissez toujours refroidir les à l'intérieur stockés. aliments avant de les mettre de l'appareil.
  • Seite 191 Dépannage Problème Cause possible Solution possible L'appareil émet des  L'appareil n'est pas situé sur  Réglez le pied pour mettre sons anormaux. un sol plan. l’appareil à niveau.  L'appareil touche un objet situé  Retirez les objets autour à...
  • Seite 192 Dépannage Problème Cause possible Solution possible La machine à glaçons  Ne raccordez pas le tuyau  Raccordez le tuyau d'alimentation automatique d'alimentation en eau à l'appareil en eau à l'appareil et ouvrez ne produit pas et ouvrez la vanne d'alimentation. complètement la vanne de glaçons d'alimentation.
  • Seite 193: Coupure De Courant

    Dépannage Pour contacter l'assistance technique, visitez notre site web : https://corporate.haier- europe.com/en/ Dans la rubrique « site web », choisissez la marque de votre produit et votre pays. Vous serez redirigé vers le site web spécifique où vous trouverez le numéro de téléphone et le formulaire pour contacter l'assistance technique.
  • Seite 194: Installation

    Installation Installation Déballage AVERTISSEMENT ! L'appareil est lourd. Manipulez-le toujours avec au moins deux personnes. ► Conservez tous les emballages hors de la portée des enfants, puis jetez-les d'une ► manière respectueuse de l'environnement. Sortez l'appareil de l'emballage. ► Retirez tous les matériaux d'emballage. ►...
  • Seite 195 Installation La stabilité peut être vérifiée en alternant les diagonales. Le léger flottement doit être le même dans les deux directions. Dans le cas contraire, le cadre peut se déformer ; cela se traduit par des fuites au niveau des joints de la porte. Une faible tendance vers l'arrière facilite la fermeture des portes.
  • Seite 196 Installation Temps d'attente L'huile de lubrification sans entretien se trouve dans la capsule du compresseur. Cette huile peut passer par le système fermé de tuyauterie pendant le transport incliné. Avant de brancher l'appareil sur l'alimentation électrique, vous devez attendre au moins 2 heures afin que l'huile revienne dans la capsule.
  • Seite 197 Votre réfrigérateur à glace et à eau et à glace automatique doit être installé par ► un plombier qualifié ou un technicien d'entretien formé et agréé par Haier, car une plomberie incorrecte peut entraîner des fuites d'eau. Les appareils Haier n'acceptent pas la responsabilité des dommages (y compris ►...
  • Seite 198: Données Techniques

    Données techniques Données techniques Fiche du produit selon la réglementation UE n° 2019/2016 Marque Haier Haier HCR7918EIMP Nom du modèle / identifiant HCR7918EIMB HCR7918ENMP HCR7918EIMP (UK) Réfrigérateur- Réfrigérateur- Catégorie du modèle congélateur congélateur Classe d'efficacité énergétique Consommation d'énergie annuelle (kWh/an) (1) Volume total (L) Volume du réfrigérateur (L)
  • Seite 199 Données techniques Explications : • Oui, fonction présente (1) Sur la base des résultats de l'essai de conformité aux normes pendant plus de 24 heures. La consommation réelle dépend de l'utilisation et de l'emplacement de l'appareil. (2) Classe climatique SN : Cet appareil est destiné à être utilisé à une température ambiante comprise entre + 10 °C et +32 °C Classe climatique N : Cet appareil est destiné...
  • Seite 200: Service Clientèle

    Service clientèle Service clientèle Nous recommandons notre Service Clientèle Haier et l'utilisation de pièces détachées d'origine. Si vous rencontrez un problème avec votre appareil, veuillez d'abord consulter le paragraphe DÉPANNAGE. Si vous ne trouvez pas de solution, veuillez contacter votre revendeur local ou ►...
  • Seite 201 Service clientèle * Pour d'autres pays, veuillez vous référer à www.haier.com Haier Europe Trading S.r.l Filiale Royaume-Uni Westgate House, Westgate, Ealing Londres, W5 1YY *Durée de la garantie de l'appareil de réfrigération : La garantie minimale est : 2 ans pour les pays de l'UE, 3 ans pour la Turquie, 1 an pour le Royaume-Uni, 1 an pour la Russie, 3 ans pour la Suède, 2 ans pour la Serbie, 5 ans pour...
  • Seite 202 Service clientèle...
  • Seite 203 Manuale per l'utente Frigorifero-Congelatore HCR7918EIMP HCR7918EIMB HCR7918EIMP (Regno Unito) HCR7918ENMP...
  • Seite 204 Grazie Grazie per aver acquistato un prodotto Haier. Leggere attentamente queste istruzioni prima di utilizzare l'elettrodomestico. Le istruzioni contengono informazioni importanti per ottimizzare l'uso dell'elettrodomestico e garantire l'installazione, l'uso e la manutenzione sicuri e corretti. Conservare il presente manuale in un luogo comodo, in modo da poterlo sempre consultare per un uso sicuro e corretto dell'elettrodomestico.
  • Seite 205 Indice Informazioni per la sicurezza ..................4 Descrizione del prodotto ....................10 Pannello di controllo ..................... 11 Utilizzo ........................... 14 Dotazioni ........................32 Cura e pulizia ......................... 35 Soluzione dei problemi ....................36 Installazione ........................42 Dati tecnici ........................46 Assistenza clienti ......................
  • Seite 206: Informazioni Per La Sicurezza

    Informazioni per la sicurezza Informazioni per la sicurezza Prima di accendere l’elettrodomestico per la prima volta, leggere i seguenti consigli sulla sicurezza! AVVERTENZA! Operazioni preliminari al primo utilizzo ► Accertarsi dell'assenza di danni dovuti al trasporto. ► Rimuovere tutti gli elementi di imballo e tenerli fuori dalla portata dei bambini. ►...
  • Seite 207: Utilizzo Quotidiano

    Informazioni per la sicurezza AVVERTENZA! ► Solo per il Regno Unito: il cavo di alimentazione dell'elettrodomestico è dotato di una spina a 3 conduttori (collegata a terra) adatta a una presa standard a 3 conduttori (collegata a terra). Non tagliare né smontare mai il terzo conduttore (collegamento a terra).
  • Seite 208 Informazioni per la sicurezza AVVERTENZA! ► Per evitare la contaminazione degli alimenti, attenersi alle seguenti istruzioni: ► - Se gli sportelli rimangono aperti a lungo, la temperatura nei comparti dell'elettrodomestico aumenta notevolmente. ► - Pulire regolarmente le superfici che entrano a contatto con gli alimenti e i sistemi di scarico accessibili.
  • Seite 209 Informazioni per la sicurezza AVVERTENZA! ► In caso di blackout o prima della pulizia, scollegare l'elettrodomestico. Attendere almeno 7 minuti prima di riavviare l'elettrodomestico, poiché un avvio frequente può danneggiare il compressore. ► AVVERTENZA: non adoperare apparecchiature elettriche all'interno dei vani dell'elettrodomestico destinati alla conservazione degli alimenti, a meno che non siano del tipo consigliato dal produttore.
  • Seite 210 Informazioni per la sicurezza AVVERTENZA! ► Non spruzzare o schizzare liquidi sull'elettrodomestico durante la pulizia. ► Per pulire questo elettrodomestico non utilizzare apparecchi a vapore. ► Non pulire i ripiani di vetro freddi o lo sportello di vetro con acqua calda. Un'improvvisa variazione della temperatura può...
  • Seite 211 Uso previsto Uso previsto Uso previsto Questo elettrodomestico è destinato al raffreddamento e al congelamento di alimenti. È stato progettato esclusivamente per l'uso in applicazioni domestiche e simili, ad es. zone cucina del personale in negozi, uffici e altri ambienti di lavoro; fattorie, clienti in hotel, motel e altri ambienti di tipo residenziale, nonché...
  • Seite 212: Descrizione Del Prodotto

    Descrizione del prodotto Descrizione del prodotto Avviso A causa di modifiche tecniche e della varietà dei modelli, alcune illustrazioni riportate nel presente manuale possono essere diverse dall'aspetto reale del modello acquistato. Modello (HCR7918EIMP/HCR7918EIMB/HCR7918EIMP (Regno Unito)) (Con macchina per il ghiaccio nello sportello) A: Vano frigorifero Cassetto My Zone Pannello di controllo...
  • Seite 213: Pannello Di Controllo

    Pannello di controllo Pannello di controllo Pannello di controllo Pannello di controllo (HCR7918EIMP/HCR7918EIMB/HCR7918EIMP (Regno Unito)) Tasti: Spie: A Selettore modalità Auto Set a Modalità Auto Set B Selettore modalità Holiday b Modalità Holiday C Selettore cassetto My Zone c1 Modalità Fruit & Vegetable D Pulsante di regolazione della c2 Modalità...
  • Seite 214 Pannello di controllo Avviso A causa di modifiche tecniche e della varietà dei modelli, alcune illustrazioni riportate nel presente manuale possono essere diverse dall'aspetto reale del modello acquistato. Modello (HCR7918ENMP) (Senza macchina per il ghiaccio nello sportello) A: Vano frigorifero B: Vano congelatore Supporto verticale Vassoio scorrevole...
  • Seite 215 Pannello di controllo Pannello di controllo (HCR7918ENMP) Tasti: A Selettore modalità Auto Set B Selettore modalità Holiday C1 Selettore funzione Fruit & Vegetable C2 Selettore funzione Raffreddamento rapido C3 Selettore funzione 0° C Fresh D Pulsante di regolazione della temperatura "-" E Pulsante di regolazione della temperatura "+"...
  • Seite 216: Utilizzo

    Utilizzo Utilizzo Tasti a sensore I pulsanti del pannello di controllo sono tasti a sensore che rispondono toccandoli lievemente con un dito. Accensione e spegnimento dell'elettrodomestico L'elettrodomestico entra in funzione non appena viene collegato all'alimentazione elettrica. Quando il frigorifero viene acceso per la prima volta, si accende l’indicatore “d” (visualizzazione della temperatura).
  • Seite 217 Utilizzo Regolazione della temperatura del frigorifero Quando lo schermo del display è sbloccato, premere il pulsante "F" (selettore di zona). Viene emesso un segnale acustico, l’indicatore “f1” (indicatore frigorifero) lampeggia e viene visualizzata la modalità di impostazione della temperatura del frigorifero. Premere il pulsante “D”...
  • Seite 218 Utilizzo Avviso Dopo aver impostato la temperatura, se non viene eseguita alcuna operazione entro 5 secondi, il sistema verrà determinato automaticamente e salverà la temperatura impostata. Regolazione della temperatura per la Switch Zone (S-Zone) Quando lo schermo del display è sbloccato, premere il pulsante "F" (selettore di zona). Viene emesso un segnale acustico, l’indicatore “f3”...
  • Seite 219 Utilizzo Avviso Nello stato Super-Cool non è possibile regolare la temperatura del frigorifero. Se si preme il pulsante “D” (pulsante di regolazione della temperatura “-”) o il pulsante “E” (pulsante di regolazione della temperatura “+”) per regolare la temperatura del frigorifero, l’indicatore “f1”...
  • Seite 220 Utilizzo Modalità Auto Set Quando lo schermo del display è sbloccato, premere il pulsante “A” (selettore Auto Set): viene emesso un segnale acustico, l’indicatore “a” (funzione Auto Set) si accende e viene attivata la funzione Auto Set. Quando l’indicatore “a” (modalità Auto Set) si accende, premere il pulsante “A” (selettore Auto Set): viene emesso un segnale acustico, l’indicatore “a”...
  • Seite 221 Utilizzo In stato sbloccato, tenere premuto il pulsante “B” (selettore modalità Holiday) per 3 secondi: viene emesso un segnale acustico e la lampada di proiezione viene spenta. Procedere allo stesso modo per attivare la funzione della lampada di proiezione. Avviso Nello stato Holiday non è...
  • Seite 222 Utilizzo Funzione filtro Quando il frigorifero è stato in funzione per sei mesi, l’indicatore di promemoria “i” (funzione Ripristino filtro) si accende per ricordare all’utente di sostituire il filtro con uno nuovo. Quando il filtro viene sostituito, tenere premuto il pulsante “I” (selettore funzione Ripristino filtro) per 3 secondi per annullare il promemoria: la rilevazione del tempo di funzionamento verrà...
  • Seite 223 Utilizzo Avviso Quando si accende l’indicatore “k” (funzione Prelievo acqua), l’indicatore “l” (funzione Ghiaccio a cubetti) e l’indicatore “m” (funzione Ghiaccio tritato) si spengono. Dopo aver premuto la leva dell’erogatore, l’acqua uscirà dalla porta di prelievo. Quando il tempo di prelievo dell’acqua raggiunge i 150 secondi, il frigorifero emette un segnale acustico e trattiene l’acqua fino al raggiungimento di 180 secondi;...
  • Seite 224 Utilizzo Funzione Ghiaccio tritato In qualsiasi stato (bloccato o sbloccato), premere il pulsante “M” (selettore funzione Ghiaccio tritato): viene emesso un segnale acustico, l’indicatore “m” (funzione Ghiaccio tritato) si accende e viene attivata la funzione Ghiaccio tritato. Indicatore acceso Premere 1 volta Funzione Ghiaccio tritato attivata Avviso Quando si accende l’indicatore “m”...
  • Seite 225 Utilizzo Funzione EPP In stato sbloccato, tenere premuto il pulsante “H” (selettore Super-Freeze) e premere il pulsante “A” (selettore modalità Auto Set) 5 volte (entro 5 secondi); viene emesso un segnale acustico e viene disattivata la funzione EPP. Procedere allo stesso modo per attivare la funzione EPP.
  • Seite 226 Utilizzo Istruzioni per la macchina per il ghiaccio AVVERTENZA! Collegare solo a una fonte di acqua potabile. ► Il collegamento della tubazione dell’acqua deve essere effettuato solo da un idraulico ► qualificato e in conformità con le leggi e i regolamenti locali in materia di qualità dell'acqua.
  • Seite 227 Utilizzo Erogatore di ghiaccio e acqua Prima di utilizzare l’erogatore di ghiaccio e acqua ATTENZIONE! Tenere i bambini lontani dall’erogatore per evitare che giochino con i comandi ► o li danneggino. ATTENZIONE! Eliminare la prima produzione di ghiaccio (circa 20 cubetti e 7 tazze d'acqua). Questa ►...
  • Seite 228 Utilizzo Pulizia dell'erogatore Pulizia dell'uscita del ghiaccio e dell'acqua Pulire frequentemente l’uscita dell’acqua (1) o del ghiaccio (2) con un panno pulito poiché può sporcarsi facilmente. Avviso L’eventuale lanugine del panno può restare attaccata alle uscite. Pulizia del vassoio dell'erogatore Pulire con un panno umido l’intera area.
  • Seite 229 Utilizzo ATTENZIONE! È normale che dopo la sostituzione del filtro dell’acqua venga erogata acqua ► lattiginosa o torbida. L’acqua torna limpida man mano che l’aria in essa contenuta viene eliminata ed è sicura da bere. Il primo ghiaccio e la prima acqua erogati possono emanare odore o includere ►...
  • Seite 230 Utilizzo Tirare delicatamente la maniglia per aprire lo scomparto del ghiaccio. Per rimuovere il contenitore del ghiaccio nello sportello, afferrare la maniglia anteriore, sollevare leggermente la parte inferiore ed estrarre lentamente il contenitore come illustrato. Rimontare il contenitore del ghiaccio nello sportello procedendo nell’ordine inverso rispetto alla rimozione.
  • Seite 231: Sostituzione Del Filtro Dell'acqua

    Utilizzo ATTENZIONE! Non installare se la pressione dell’acqua è superiore a 827 kPa. Se la pressione ► dell’acqua è superiore a 827 kPa, è necessario installare una valvola limitatrice di pressione. Contattare un idraulico professionista se non si è certi di come controllare la pressione dell'acqua.
  • Seite 232 ATTENZIONE! La mancata sostituzione dei filtri quando richiesto o l’utilizzo di filtri dell’acqua ► non autorizzati da Haier può causare perdite dalla cartuccia del filtro e provocare danni materiali Filtro dell'acqua Modello: Haier HRXWF Sistema certificato da IAPMO R&T secondo gli standard NSF/ANSI 42, 53, 401 e P473 ►...
  • Seite 233 Utilizzo Avviso Sebbene il test sia stato eseguito in condizioni di laboratorio standard, le prestazioni effettive possono variare. Cartuccia di ricambio: HRXWF. Per un preventivo dei costi degli elementi sostitutivi, visitare il nostro sito Web all'indirizzo www.haierspares.eu. AVVERTENZA! Per ridurre il rischio associato all’ingestione di sostanze contaminanti: ►...
  • Seite 234: Dotazioni

    Dotazioni Dotazioni Flusso d'aria multiplo Il frigorifero è dotato di un sistema a flusso d’aria multiplo con il quale i flussi di aria fresca investono tutti i ripiani. Ciò facilita il mantenimento di una temperatura uniforme per garantire la freschezza degli alimenti per un periodo maggiore.
  • Seite 235 Dotazioni Cassetti incassati nello sportello/portabottiglie rimovibili I cassetti incassati nello sportello possono essere rimossi per pulirli: Mantenere con le mani entrambi i lati del cassetto incassato, sollevarlo (1) ed estrarlo (2). Per inserire il cassetto incassato nello sportello, seguire la procedura inversa. OPZIONALE: spia della temperatura OK La spia della temperatura OK può...
  • Seite 236: Suggerimenti Per Il Risparmio Energetico

    Dotazioni Suggerimenti per il risparmio energetico Accertarsi che l'elettrodomestico sia adeguatamente ventilato (v. INSTALLAZIONE). ► Non installare l'elettrodomestico esposto alla luce diretta del sole o in prossimità ► di fonti di calore (ad es. stufe o radiatori). Evitare che la temperatura dell'elettrodomestico sia inutilmente bassa. Riducendo ►...
  • Seite 237: Cura E Pulizia

    Nel caso in cui parti o componenti di piccole dimensioni rimangano bloccati all’interno del frigorifero (tra i ripiani o i cassetti), utilizzare con una spazzolina morbida per liberarli. Se non si riesce a raggiungere la parte, rivolgersi all'assistenza Haier. Sciacquare e asciugare con un panno morbido ►...
  • Seite 238: Soluzione Dei Problemi

    Soluzione dei problemi Sostituzione delle lampade a LED AVVERTENZA! La lampada a LED deve essere sostituita solo dal produttore o da un tecnico dell'assistenza autorizzato. Le lampade utilizzano una sorgente luminosa a LED che riduce i consumi energetici e garantisce una lunga durata. In caso di anomalie, rivolgersi all'assistenza clienti. V.
  • Seite 239 Soluzione dei problemi Molti problemi possono essere risolti personalmente senza particolari competenze. In caso di problemi, consultare tutte le soluzioni possibili indicate e attenersi alle seguenti istruzioni prima di contattare l'assistenza post-vendita. V. ASSISTENZA CLIENTI. AVVERTENZA! Prima di effettuare la manutenzione dell'elettrodomestico, spegnerlo e staccare ►...
  • Seite 240 Soluzione dei problemi Problema Causa possibile Soluzione possibile La temperatura  La temperatura impostata  Reimpostare la temperatura. nell'elettrodomesti è troppo alta. co non  Sono stati collocati alimenti  Gli alimenti devono essere sempre è sufficientemente troppo caldi. raffreddati prima di conservarli. bassa.
  • Seite 241 Soluzione dei problemi Problema Causa possibile Soluzione possibile I lati del vano  -  È normale. e la striscia dello sportello si riscaldano. L'elettrodomestico  L'elettrodomestico non è a livello.  Regolare i piedini per collocare emette suoni l'elettrodomestico a livello. anomali.
  • Seite 242 Soluzione dei problemi Problema Causa possibile Soluzione possibile La macchina  Il tubo di alimentazione dell’acqua  Collegare il tubo di alimentazione automatica non è collegato all’elettrodomestico dell’acqua all’elettrodomestico per il ghiaccio non e la valvola di alimentazione e aprire completamente la valvola produce ghiaccio non è...
  • Seite 243 Soluzione dei problemi Per contattare l'assistenza tecnica, visitare il nostro sito web: https://corporate.haier- europe.com/en/ Nella sezione "website", scegliere la marca del prodotto e il paese. Si aprirà il sito web specifico contenente il numero di telefono e il modulo per contattare l'assistenza tecnica.
  • Seite 244: Installazione

    Installazione Installazione Disimballo AVVERTENZA! L'elettrodomestico è pesante. Per spostarlo occorrono almeno due persone. ► Tenere fuori dalla portata dei bambini tutti i materiali di imballaggio e smaltirli nel ► rispetto dell'ambiente. Estrarre l'elettrodomestico dall'imballo. ► Togliere tutti i materiali di imballo. ►...
  • Seite 245 Installazione La stabilità può essere verificata spingendo diagonalmente l'elettrodomestico destra e a sinistra. Il lieve ondeggiamento deve essere identico in entrambe le direzioni. In caso contrario, il telaio potrebbe deformarsi e le guarnizioni dello sportello potrebbero perdere. Una lieve inclinazione posteriore facilita la chiusura degli sportelli.
  • Seite 246 Installazione Tempo di attesa L'olio di lubrificazione esente da manutenzione si trova nella capsula del compressore. Questo olio può percorrere il sistema di tubazioni chiuse durante il trasporto. Prima di collegare l’elettrodomestico all’alimentazione elettrica, attendere almeno 2 ore in modo che l'olio torni nella capsula. Collegamento elettrico Prima di ogni collegamento, effettuare i seguenti controlli: La fonte di alimentazione, la presa e i fusibili sono conformi ai dati indicati nella...
  • Seite 247 I frigoriferi Ice and Water e Automatic Ice devono essere installati da un idraulico ► qualificato o da un tecnico dell’assistenza formato da Haier in quanto un’installazione idraulica errata può causare perdite d'acqua. Haier non risponde di danni (inclusi danni causati dall’acqua) dovuti a installazione ►...
  • Seite 248: Dati Tecnici

    Dati tecnici Dati tecnici Specifiche del prodotto secondo il regolamento UE n. 2019/2016 Marca Haier Haier HCR7918EIMP HCR7918EIMB Nome / identificativo del modello HCR7918ENMP HCR7918EIMP (Regno Unito) Frigorifero- Frigorifero- Categoria del modello congelatore congelatore Classe di efficienza energetica Consumo energetico annuo (kWh/anno)(1)
  • Seite 249 Dati tecnici Descrizioni: • Sì (1) In base ai risultati del test di conformità agli standard per 24 ore. Il consumo effettivo dipende dall'uso e dalla posizione dell'elettrodomestico. (2) Classe climatica SN: questo elettrodomestico è destinato all'uso con temperature ambiente comprese tra +10 °C e +32 °C. Classe climatica N: questo elettrodomestico è...
  • Seite 250: Assistenza Clienti

    Assistenza clienti Assistenza clienti Si consiglia di rivolgersi all'Assistenza Clienti Haier e di utilizzare ricambi originali. In caso di problemi con l'elettrodomestico, consultare prima la sezione SOLUZIONE DEI PROBLEMI. Se non si riesce a trovare una soluzione, contattare il rivenditore locale o ►...
  • Seite 251 Assistenza clienti * Per altri paesi. fare riferimento al sito www.haier.com Haier Europe Trading S.r.l. Filiale Regno unito Westgate House, Westgate, Ealing London, W5 1YY *Durata della garanzia del frigorifero: Garanzia minima: 2 anni per i paesi UE, 3 anni per la Turchia, 1 anno per il Regno Unito, 1 anno per la Russia, 3 anni per la Svezia, 2 anni per la Serbia, 5 anni per la Norvegia, 1 anno per il Marocco, 6 mesi per l'Algeria;...
  • Seite 252 Assistenza clienti...
  • Seite 253 Uživatelská příručka Chladnička-mraznička HCR7918EIMP HCR7918EIMB HCR7918EIMP(UK) HCR7918ENMP...
  • Seite 254 Děkujeme Děkujeme vám, že jste si koupili výrobek značky Haier. Před použitím spotřebiče si pozorně přečtěte tyto pokyny. Obsahují důležité informace, které vám pomohou co nejlépe využít spotřebič a zajistit jeho bezpečnou a správnou instalaci, používání a údržbu. Uschovejte tuto příručku na praktickém místě, abyste do ní mohli kdykoli nahlédnout ohledně...
  • Seite 255 Obsah Bezpečnostní informace ..........................4 Popis výrobku ............................... 10 Ovládací panel ............................. 11 Používání ............................... 14 Vybavení ................................ 32 Čištění a údržba ............................35 Řešení problémů ............................37 Instalace ................................ 42 Technické údaje ............................46 Zákaznický servis ............................48 Příslušenství Zkontrolujte příslušenství...
  • Seite 256: Bezpečnostní Informace

    Bezpečnostní informace Bezpeč nostní informace Před prvním zapnutím spotřebiče si přečtěte následující rady týkající se bez- pečnosti!: VAROVÁNÍ! Před prvním použitím Ujistěte se, že při přepravě nedošlo k žádnému poškození. ► Odstraňte veškerý obalový materiál a uschovejte ho mimo dosah dětí. ►...
  • Seite 257 Bezpečnostní informace VAROVÁNÍ! Pouze pro Spojené království: Napájecí kabel spotřebiče je vybaven ► trojpólovou zástrčkou (s uzemněním), která se zapojuje do standardní trojpólové zásuvky (s uzemněním). Nikdy neodřezávejte ani nedemon- tujte třetí kolík (uzemnění). Zástrčka by měla být přístupná i po instalaci spotřebiče.
  • Seite 258 Bezpečnostní informace VAROVÁNÍ! Aby se předešlo kontaminaci potravin, dodržujte následující pokyny: ► - Otvírání dvířek na delší dobu může významně zvýšit teplotu v jed- ► notlivých prostorech spotřebiče. - Pravidelně čistěte povrchy, které mohou přijít do styku s potravinami, ► a přístupné...
  • Seite 259 Bezpečnostní informace VAROVÁNÍ! V případě výpadku napájení nebo před čištěním odpojte spotřebič od ► napájení. Před opětovným spuštěním spotřebiče počkejte alespoň 7 minut, protože časté spouštění by mohlo poškodit kompresor. VAROVÁNÍ: Uvnitř prostoru pro skladování potravin ve spotřebiči nepou- ► žívejte elektrické...
  • Seite 260 Bezpečnostní informace VAROVÁNÍ! Během čištění na spotřebič nestříkejte ani nelijte vodu. ► K čištění spotřebiče nepoužívejte vodní postřik ani proud vody. ► Nečistěte chladné skleněné police ani skleněná dvířka horkou vodou. ► Náhlá změna teploty by mohla způsobit, že sklo praskne. Pokud spotřebič...
  • Seite 261 Bezpečnostní informace Určené použití Tento spotřebič je určen k chlazení a mrazení potravin. Je určen výhradně k používání v domácnostech a podobných oblastech, jako jsou kuchyňky pro personál v obchodech, kancelářích a na dalších pracovištích, chalupy a hotely, motely a další obytné objekty, kde je používají...
  • Seite 262: Popis Výrobku

    Popis výrobku Popis výrobku Upozornění Vzhledem k technickým změnám a různým modelům nemusí některé obrázky v této příručce přesně zobrazovat váš model. Model (HCR7918EIMP/HCR7918EIMB/HCR7918EIMP(UK)) (S výrobníkem ledu ve dvířkách) A: Prostor chladničky Zásuvka My Zone Ovládací panel Světlo mrazničky / Switch Zone Dávkovací...
  • Seite 263: Ovládací Panel

    Ovládací panel Ovláda cí pa nel Ovládací panel (HCR7918EIMP/HCR7918EIMB/HCR7918EIMP(UK)) Tlačítka: Indikátory: A Volič režimu Auto Set a Režim Auto Set B Volič režimu Holiday b Režim Holiday C Volič zásuvky My Zone c1 Režim Fruit & Vegetable D Tlačítko Nastavení teploty „-“ c2 Režim Quick Cool E Tlačítko Nastavení...
  • Seite 264 Ovládací panel Upozornění Vzhledem k technickým změnám a různým modelům nemusí některé obrázky v této příručce přesně zobrazovat váš model. Model (HCR7918ENMP) (Bez výrobníku ledu ve dvířkách) A: Prostor chladničky B: Prostor mrazničky Svislý nosník Výsuvná přihrádka Ovládací panel Nádoba na vodu Skleněné...
  • Seite 265 Ovládací panel Ovládací panel (HCR7918ENMP) Tlačítka: A Volič režimu Auto Set B Volič režimu Holiday C1 Volič funkce Fruit & Vegetable C2 Volič funkce Quick Cool C3 Volič funkce 0° C Fresh D Tlačítko nastavení teploty „-“ E Tlačítko nastavení teploty „+“ F Volič...
  • Seite 266: Používání

    Používání Používání Dotyková tlačítka Na ovládacím panelu jsou dotyková tlačítka, která reagují již na lehký dotyk prstem. Zapínání/vypínání spotřebiče Spotřebič se spustí ihned po připojení k napájení. Při prvním zapnutí chladničky se rozsvítí indikátor „d“ (ukazatel teploty). Teplota v chladničce, teplota v S-Zone a teplota v mrazničce se automaticky nastaví...
  • Seite 267 Používání Nastavení teploty v chladničce 1. Po odemčení displeje stiskněte tlačítko „F“ (volič zón). Zazní jednou zvukový signál, blikne indikátor „f1“ (indikátor chladničky) a poté se spustí režim nastavení teploty chladničky. 2. Když stiskněte tlačítko „D“ (tlačítko Nastavení teploty „-“), zazní jednou zvukový signál a nastavená teplota chladničky se sníží...
  • Seite 268 Používání Upozornění Pokud po nastavení teploty neproběhne do 5 sekund žádná akce, systém automaticky určí a uloží nastavenou teplotu. Nastavení teploty pro Switch Zone (S-Zone) Po odemčení displeje stiskněte tlačítko „F“ (volič zón). Zazní jednou zvukový signál, blikne indikátor „f3“ (indikátor S-Zone) a poté...
  • Seite 269 Používání Upozornění Ve stavu Super-Cool nelze teplotu chladničky nastavit. Pokud stisknete tlačítko „D“ (tlačítko Nastavení teploty „-“) nebo tlačítko „E“ (tlačítko Nastavení teploty „+“) pro nastavení teploty chladničky, indikátor „f1“ (indikátor chladničky) začne blikat a zazní zvukový signál, že tuto operaci nelze provést. Ve stavu funkce Super-Cool nelze současně...
  • Seite 270 Používání Režim Auto Set 1. Po odemčení displeje stiskněte tlačítko „A“ (volič funkce Auto Set), zazní jednou zvukový signál, rozsvítí se indikátor „a“ (funkce Auto Set) a poté se zapne funkce Auto Set. 2. Pokud se rozsvítí indikátor „a“ (režim Auto Set), stiskněte tlačítko „A“ (volič funkce Auto Set), zazní jednou zvukový...
  • Seite 271 Používání 3. V odemčeném stavu podržte tlačítko „B“ (volič režimu Holiday) po dobu 3 sekund, zazní jednou zvukový signál, poté světlo s reflektorem zhasne. Stejným způsobem lze světlo s reflektorem rozsvítit. Upozornění V režimu Holiday nelze teplotu chladničky nastavit. Pokud stisknete tlačítko „D“ (tlačítko Nastavení teploty „-“) nebo tlačítko „E“...
  • Seite 272 Používání Funkce Filtr Po šesti měsících provozu chladničky se rozsvítí indikátor s připomenutím „i“ (funkce Reset filtru), který uživatele upozorní na nutnost výměny filtru za nový. Po výměně filtru podržte tlačítko „I“ (volič funkce Reset filtru) po dobu 3 sekund, abyste připomínku zrušili, časování se vynuluje pomocí zvukového signálu. Indikátor rozsvícený...
  • Seite 273 Používání Upozornění 1. Pokud se rozsvítí indikátor „k“ (funkce Přívod vody), indikátor „I“ (funkce Kostky ledu) a indikátor „m“ (funkce Drcený led) zhasnou. Po stisknutí dávkovací lopatky začne z přívodního otvoru vytékat voda. 2. Jakmile dosáhne doba odběru vody 150 s, chladnička vydá zvukový signál a pokračuje ve výdeji, dokud doba nedosáhne 180 s, následně...
  • Seite 274 Používání Funkce Drcený led V jakémkoli stavu (uzamčeném nebo odemčeném) stiskněte tlačítko „M“ (volič funkce Drcený led), zazní jednou zvukový signál, rozsvítí se indikátor „m“ (funkce Drcený led) a poté se tato funkce zapne. Stiskněte 1krát Indikátor rozsvícený Funkce Drcený led zapnutá Upozornění...
  • Seite 275 Používání Funkce EPP V odemčeném stavu stiskněte nepřerušovaně tlačítko „H“ (volič funkce Super-Freeze) a tlačítko „A“ (volič režimu Auto Set) 5krát (během 5 sekund), zazní jeden zvukový signál a následně se funkce EPP vypne. Stejným způsobem lze funkci EEP zapnout. Alarm otevřených dveří...
  • Seite 276 Používání Pokyny k výrobníku ledu VAROVÁNÍ! Chladničku připojte výhradně k přívodu pitné vody. ► Připojení vodovodního potrubí smí provádět pouze kvalifikovaný instalatér a v souladu s místní ► legislativou a předpisy upravujícími kvalitu vody. Upozornění Na instalaci vodovodního potrubí se nevztahuje záruka na spotřebič. Připojení...
  • Seite 277 Používání Dávkovač ledu a vody Před použitím dávkovače ledu a vody POZOR! Děti by neměly dávkovač ovládat nebo si s ním hrát. Mohly by poškodit ovládacími prvky. ► POZOR! Zlikvidujte několik prvních dávek ledu (asi 20 kostek a 7 šálků vody). Toto je nutné i v případě, že ►...
  • Seite 278 Používání Čištění dávkovače Čištění výstupu ledu a vody Výstup vody (1) nebo výstup ledu (2) často otírejte čistým hadříkem, protože dochází k jejich častému znečištění. Upozornění Na výstupech mohou ulpívat vlákna z látky. Čištění výsuvné přihrádky Celou oblast otřete vlhkým hadříkem. Výsuvná přihrádka může často obsahovat vodu, která...
  • Seite 279 Používání POZOR! Po výměně vodního filtru je mléčná/zakalená voda normální. Toto zakalení vody postupně vymizí, ► nicméně vodu můžete bez obav konzumovat. První vyrobený led a voda mohou obsahovat částice nebo mohou mít zápach z vodovodního ► potrubí nebo z nádržky na vodu. Pokud je vydávaný...
  • Seite 280 Používání 1. Opatrným zatažením za rukojeť otevřete přihrádku na led. 2. Chcete-li zásobník na led umístěný ve dvířkách vyjmout, uchopte přední rukojeť, mírně nadzvedněte spodní část a pomalu zásobník vytáhněte podle obrázku. 3. V opačném pořadí zásobník na led nasaďte na vnitřní stranu dvířek. POZOR! Nedotýkejte se mechanických částí...
  • Seite 281 Používání POZOR! Instalaci neprovádějte, pokud tlak vody přesahuje 827 kPa. Pokud je tlak vody vyšší než 827 kPa, je ► nutné nainstalovat omezovač tlaku. Pokud si nejste jisti, jak zkontrolovat tlak vody, obraťte se na instalatéra. Neinstalujte v místech, kde by mohlo dojít k vodnímu rázu. Pokud existují podmínky pro vznik ►...
  • Seite 282 POZOR! Pokud filtry nevyměníte v požadovaném termínu nebo použijete vodní filtry, které společnost ► Haier neschválila, filtrační vložka nemusí těsnit a může dojít ke škodě na majetku. Vodní filtr Model: Haier HRXWF Systém certifikovaný společností IAPMO R&T podle norem NSF/ANSI 42, 53, 401 a P473, které...
  • Seite 283 Používání Aby výrobek fungoval tak, jak je uvedeno v příručce, je nezbytné provádět instalaci, údržbu a výměnu filtrů dle doporučení výrobce. Informace o záruce naleznete v instalační příručce. Upozornění Testování probíhalo za standardních laboratorních podmínek, skutečný výkon se však může lišit. Náhradní...
  • Seite 284: Vybavení

    Vybavení Vybavení Vícecestný průtok vzduchu Chladnička je vybavena systémem vícecestného průtoku vzduchu, který zajišťuje proudění chladného vzduchu v každé úrovni polic. Pomáhá to udržovat jednotnou teplotu, která zaručí, že potraviny vydrží déle v čerstvém stavu. Nastavitelné police Výšku polic lze upravovat tak, aby vyhovovala vašim požadavkům na ukládání.
  • Seite 285 Vybavení Odnímatelné poličky / držák na láhve umístěné ve dvířkách Police ve dvířkách lze vyjímat za účelem čištění: Uchopte rukama obě strany police, zdvihněte ji nahoru (1) a vytáhněte ji ven (2). Při vkládání dveřní police proveďte výše popsané kroky v opačném pořadí.
  • Seite 286 Vybavení Tipy pro úsporu energie Zajistěte, aby měl spotřebič náležité větrání (viz INSTALACE). ► Neinstalujte spotřebič na přímé sluneční světlo nebo do blízkosti zdrojů tepla (např. sporáků nebo ► ohřívačů). Vyhýbejte se zbytečně nízké teplotě uvnitř spotřebiče. Čím nižší je nastavená teplota ve ►...
  • Seite 287: Čištění A Údržba

    4. V případě, že uvnitř chladničky uvíznou nějaké malé díly nebo součásti (mezi policemi nebo zásuvkami), uvolněte je měkkým kartáčkem. Pokud na nějakou součást nedosáhnete, obraťte se na servis společnosti Haier Opláchněte povrch a vysušte ho měkkou látkou. ►...
  • Seite 288 Čištění a údržba Výměna žárovek LED VAROVÁNÍ! Nevyměňujte žárovku LED vlastními silami, její výměnu musí provést buď výrobce, nebo autorizovaný servisní zástupce. Jako zdroj světla v žárovce se využívají diody LED, které se vyznačují nízkou spotřebou energie a dlouhou životností. Pokud se vyskytne nějaký neobvyklý stav, kontaktujte zákaznický servis. Viz ZÁKAZNICKÝ SERVIS. Vyměnitelný...
  • Seite 289: Řešení Problémů

    Řešení problémů Řešení problém ů Mnoho problémů můžete vyřešit sami bez konkrétních odborných znalostí. V případě nějakého problému zkontrolujte všechny možnosti a řiďte se níže uvedenými pokyny, než se obrátíte na poprodejní servis. Viz ZÁKAZNICKÝ SERVIS. VAROVÁNÍ! Před zahájením údržby vypněte spotřebič a vytáhněte zástrčku napájecího kabelu ze síťové zásuvky. ►...
  • Seite 290 Řešení problémů Problém Možná příčina Možné řešení Uvnitř spotřebiče • Je nastavena příliš vysoká teplota. • Znovu nastavte teplotu. není dostatečně • Bylo uloženo příliš teplé jídlo. • Před uložením vždy nechte jídlo chladno. vychladnout. • Bylo uloženo příliš potravin •...
  • Seite 291 Řešení problémů Problém Možná příčina Možné řešení Spotřebič vydává • Spotřebič nestojí na rovné zemi. • Seřiďte nohy, aby stál spotřebič neobvyklé zvuky. rovně. • Spotřebič se dotýká nějakého • Odstraňte předměty z okolí předmětu v jeho okolí. spotřebiče. Ozývá se slabý zvuk •...
  • Seite 292 Řešení problémů Problém Možná příčina Možné řešení Automatický • Přívodní potrubí vody není připojeno • Připojte přívodní potrubí vody ke výrobník ledu ke spotřebiči, přívodní ventil je spotřebiči a zcela otevřete nevyrábí led nebo ho zavřený. přívodní ventil. vyrábí malé •...
  • Seite 293 Řešení problémů Chcete-li kontaktovat technickou pomoc, navštivte naše webové stránky: https://corporate.haier- europe.com/en/ V části „Website“ zvolte značku vašeho výrobku a vaši zemi. Budete přesměrováni na konkrétní webovou stránku, kde najdete telefonní číslo a kontaktní formulář technické pomoci. Výpadek napájení V případě výpadku napájení by měly potraviny zůstat bezpečně v chladu po dobu asi 5 hodin. Během delšího výpadku napájení...
  • Seite 294: Instalace

    Instalace Instalace Vybalení VAROVÁNÍ! Spotřebič je těžký. Vždy s ním manipulujte alespoň ve dvou osobách. ► Uchovávejte všechny obalové materiály mimo dosah dětí a zlikvidujte je způsobem šetrným ► k životnímu prostředí. Vyjměte spotřebič z obalu. ► Odstraňte všechny obalové materiály. ►...
  • Seite 295 Instalace 3. Stabilitu lze zkontrolovat střídavým kýváním po úhlopříčkách. Mírné kymácení v obou směrech by mělo být stejné. Jinak by se mohl rám zdeformovat, což by mohlo mít za následek, že těsnění dvířek nebude přiléhat. Mírný náklon dozadu usnadňuje zavírání dvířek. Jemné...
  • Seite 296 Instalace Doba čekání V kapsli kompresoru se nachází bezúdržbový mazací olej. V případě naklonění během přepravy se olej může dostat do uzavřeného potrubního systému. Před připojením spotřebiče k napájení musíte počkat 2 hodiny, aby všechen olej natekl zpět do kapsle. Připojení...
  • Seite 297 Instalaci vaší chladničky Ice and Water and Automatic Ice musí provést kvalifikovaný instalatér nebo ► vyškolený a certifikovaný servisní technik společnosti Haier, protože nesprávná instalace může vést k úniku vody. Společnost Haier nepřebírá odpovědnost za škody (včetně škod způsobených vodou) způsobené...
  • Seite 298: Technické Údaje

    Technické údaje Technick é úda je Informační list výrobku podle nařízení EU č. 2019/2016 Značka Haier Haier HCR7918EIMP Název/označení modelu HCR7918EIMB HCR7918ENMP HCR7918EIMP(UK) Kategorie modelu Chladnička-mraznička Chladnička-mraznička Třída energetické účinnosti Roční spotřeba energie (kWh/rok)(1) Celkový objem (l) Objem chladničky (l) Objem mrazicího prostoru (l)
  • Seite 299 Technické údaje Vysvětlení: • Ano, ve výbavě (1) Na základě výsledků zkoušky shody s normami v průběhu 24 hodin. Skutečná spotřeba je závislá na způsobu používání a umístění spotřebiče. (2) Klimatická třída SN: Tento spotřebič je určen k používání při teplotě okolí mezi +10 °C a +32°C Klimatická...
  • Seite 300: Zákaznický Servis

    ► naše Evropské středisko telefonické podpory (viz telefonní čísla uvedená níže) nebo ► část Servis a podpora na stránkách www.haier.com, kde můžete aktivovat požadavek na servis ► a kde najdete také časté dotazy. ► Chcete-li kontaktovat náš servis, ujistěte se, že máte k dispozici následující údaje.
  • Seite 301 Zákaznický servis * Údaje o ostatních zemích najdete na www.haier.com Haier Europe Trading S.r.l Branch UK Westgate House, Westgate, Ealing London, W5 1YY *Doba záruky chladničky: Minimální záruka: 2 roky pro země EU, 3 roky pro Turecko, 1 rok pro Spojené království, 1 rok pro Rusko, 3 roky pro Švédsko, 2 roky pro Srbsko, 5 let pro Norsko, 1 rok pro Maroko, 6 měsíců...
  • Seite 302 Zákaznický servis...
  • Seite 303 Instrukcja obsługi Chłodziarko-zamrażarka HCR7918EIMP HCR7918EIMB HCR7918EIMP(UK) HCR7918ENMP...
  • Seite 304 Dziękujemy Dziękujemy za zakup produktu firmy Haier. Przed użyciem urządzenia należy dokładnie przeczytać niniejsze instrukcje. Instrukcje zawierają ważne informacje, które pomogą możliwie najlepiej wykorzystać funkcje urządzenia, bezpiecznie i prawidłowo je zainstalować, eksploatować oraz konserwować. Niniejszą instrukcję obsługi należy przechowywać w dostępnym miejscu, aby móc z niej zawsze skorzystać...
  • Seite 305 Spis treści Informacje dotyczące bezpieczeństwa ....................4 Opis produktu .............................. 10 Panel sterowania ............................11 Użytkowanie ..............................14 Wyposażenie ............................... 32 Pielęgnacja i czyszczenie ......................... 35 Usuwanie usterek ............................37 Instalacja ............................... 42 Dane techniczne ............................46 Obsługa klienta ............................48 Akcesoria Sprawdź...
  • Seite 306: Informacje Dotyczące Bezpieczeństwa

    Informacje dotyczące bezpieczeństwa Informacje dotyczące bezpiecz eństwa Przed włączeniem urządzenia po raz pierwszy przeczytaj poniższe wskazówki dotyczące bezpieczeństwa! OSTRZEŻENIE! Przed pierwszym użyciem Upewnić się, że nie ma uszkodzeń powstałych podczas transportu. ► Usunąć wszystkie opakowania i przechowywać w miejscu niedostępnym dla dzieci. ►...
  • Seite 307 Informacje dotyczące bezpieczeństwa OSTRZEŻENIE! Dotyczy tylko Wielkiej Brytanii: Kabel zasilający urządzenie jest wyposażony ► we wtyczkę z 3 bolcami (z uziemieniem), która pasuje do standardowego gniazda z 3 przewodami (z uziemieniem). Nigdy nie odcinaj ani nie demontuj trzeciego bolca (z uziemieniem). Po zainstalowaniu urządzenia wtyczka powinna być łatwo dostępna.
  • Seite 308 Informacje dotyczące bezpieczeństwa OSTRZEŻENIE! Aby uniknąć zanieczyszczenia żywności, należy przestrzegać następujących ► instrukcji: - Otwieranie drzwi na długi czas może spowodować znaczny wzrost temperatury ► w komorach urządzenia. - Regularnie czyść powierzchnie, które mogą mieć kontakt z żywnością oraz ► dostępne systemy odwadniające.
  • Seite 309 Informacje dotyczące bezpieczeństwa OSTRZEŻENIE! Odłącz urządzenie w przypadku przerwy w zasilaniu lub przed czyszczeniem. Nie ► uruchamiaj ponownie urządzenia przez co najmniej 7 minut, ponieważ szybkie włączenie może doprowadzić do uszkodzenia sprężarki. OSTRZEŻENIE: Nie używaj urządzeń elektrycznych wewnątrz komór do przecho- ►...
  • Seite 310 Informacje dotyczące bezpieczeństwa OSTRZEŻENIE! Nie używaj aerozolu ani nie przepłukuj urządzenia podczas czyszczenia. ► Nie używaj wody lub pary do czyszczenia urządzenia. ► Nie czyścić zimnych szklanych półek lub drzwi gorącą wodą. Nagła zmiana ► temperatury może spowodować pęknięcie szkła. Jeśli urządzenie nie będzie używane przez dłuższy czas, należy pozostawić...
  • Seite 311: Normy I Dyrektywy

    Informacje dotyczące bezpieczeństwa Przeznaczenie To urządzenie jest przeznaczone do chłodzenia i zamrażania żywności. Zaprojektowano je wyłącznie z myślą o użytku w gospodarstwach domowych i podobnych zasto- sowaniach, takich jak pomieszczenia kuchenne dla personelu w sklepach, biurach i innych środowiskach pracy; w gospodarstwach rolnych oraz przez klientów w hotelach, motelach i innych obiektach mieszkalnych, a także w pensjonatach i gastronomii.
  • Seite 312: Opis Produktu

    Opis produktu Opis produktu Uwaga Z powodu zmian technicznych i różnych modeli, niektóre ilustracje w tej instrukcji mogą się różnić od Twojego modelu. Model (HCR7918EIMP/HCR7918EIMB/HCR7918EIMP(UK)) (Z kostkarką do lodu w drzwiach) A: Komora lodówki Szuflada My Zone Panel sterowania Lampka zamrażarki/strefy Switch Zone Łopatka dozownika B: Komora zamrażarki Taca ociekowa...
  • Seite 313: Panel Sterowania

    Panel sterowania Panel sterowa nia Panel sterowania (HCR7918EIMP/HCR7918EIMB/HCR7918EIMP(UK)) Przyciski: Wskaźniki: A Przełącznik trybu Auto Set a Tryb Auto Set B Przełącznik trybu Holiday b Tryb Holiday C Przełącznik szuflady My Zone c1 Tryb Fruit & Vegetable D Przycisk regulacji temperatury „-” c2 Tryb Quick Cool E Przycisk regulacji temperatury „+”...
  • Seite 314 Panel sterowania Uwaga Z powodu zmian technicznych i różnych modeli, niektóre ilustracje w tej instrukcji mogą się różnić od Twojego modelu. Model (HCR7918ENMP) (Bez kostkarki w drzwiach) A: Komora lodówki B: Komora zamrażarki Belka pionowa Taca przesuwna Panel sterowania Pojemnik na wodę Szklane półki Kanał...
  • Seite 315 Panel sterowania Panel sterowania (HCR7918ENMP) Przyciski: A Przełącznik trybu Auto Set B Przełącznik trybu Holiday C1 Przełącznik funkcji Fruit & Vegetable C2 Przełącznik funkcji Quick Cool C3 Przełącznik funkcji 0° C Fresh D Przycisk regulacji temperatury „-” E Przycisk regulacji temperatury „+” F Przełącznik stref G Przełącznik funkcji Super-Cool H Przełącznik funkcji Super-Freeze...
  • Seite 316: Użytkowanie

    Użytkowanie Użytkowanie Klawisze czujnika Przyciski na panelu sterowania są klawiszami czujników, które reagują przy delikatnym dotknięciu palcem. Włącz/Wyłącz urządzenie Urządzenie zacznie pracę, gdy tylko zostanie podłączone do źródła energii. Gdy lodówka jest włączana po raz pierwszy, zapala się wskaźnik „d” (wyświetlacz temperatury). Temperatura lodówki, temperatura strefy S-Zone i temperatura zamrażarki są...
  • Seite 317 Użytkowanie Wyreguluj temperaturę lodówki 1. Gdy ekran wyświetlacza jest odblokowany, naciśnij przycisk „F” (przełącznik strefy). Brzęczyk dzwoni raz, kontrolka „f1” (wskaźnik lodówki) miga, a potem pojawia się tryb ustawiania temperatury lodówki. 2. Naciśnij przycisk „D” (przycisk regulacji temperatury „-”). Brzęczyk zadzwoni jeden raz, a ustawiona temperatura lodówki zostanie zmniejszona o 1.
  • Seite 318 Użytkowanie Uwaga Po ustawieniu temperatury, jeśli w ciągu 5 sekund nie zostanie wykonana żadna operacja, system automatycznie zapisze ustawioną temperaturę. Wyregulować temperaturę dla strefy Switch Zone (S-Zone) Gdy ekran wyświetlacza jest odblokowany, naciśnij przycisk „F” (przełącznik strefy). Brzęczyk dzwoni raz, kontrolka „f3”...
  • Seite 319 Użytkowanie Uwaga W trybie Super-Cool nie można regulować temperatury lodówki. Jeśli przycisk „D” (przycisk regulacji temperatury „-”) lub przycisk „E” (przycisk regulacji temperatury „+”) zostanie naciśnięty w celu regulacji temperatury lodówki, wskaźnik „f1” (wskaźnik lodówki) będzie migać i rozlegnie się dźwięk wskazujący, że nie można wykonać...
  • Seite 320 Użytkowanie Tryb Auto Set 1. Gdy ekran wyświetlacza jest odblokowany, naciśnij przycisk „A” (przełącznik trybu Auto Set), brzęczyk zadzwoni jeden raz, wskaźnik „a” (tryb Auto Set) zaświeci się, a następnie funkcja Auto Set zostanie włączona. 2. Gdy zaświeci się wskaźnik „a” (tryb Auto Set), naciśnij przycisk „A” (przełącznik trybu Auto Set), brzęczyk zadzwoni raz, wskaźnik „a”...
  • Seite 321 Użytkowanie 3. W stanie odblokowanym przytrzymaj przycisk „B” (wybór trybu Holiday) przez 3 sekundy; brzęczyk zadzwoni raz, a następnie podświetlenie zostanie wyłączone. Funkcję podświetlenia można również włączyć za pomocą tej samej operacji. Uwaga W trybie Holiday nie można regulować temperatury lodówki. Jeśli przycisk „D” (przycisk regulacji temperatury „-”) lub przycisk „E”...
  • Seite 322 Użytkowanie Funkcja filtrowania Gdy lodówka działa przez sześć miesięcy, wskaźnik przypomnienia „i” (funkcja resetowania filtra) zaświeci się, aby przypomnieć użytkownikom o konieczności wymiany filtra. Po wymianie filtra przytrzymaj przycisk „I” (przełącznik funkcji resetowania filtra) przez 3 sekundy, aby anulować przypomnienie; odliczanie czasu zostanie zresetowane i rozlegnie się...
  • Seite 323 Użytkowanie Uwaga 1. Gdy zaświeci się wskaźnik „k” (funkcja dopływu wody), wskaźnik „I” (funkcja lodu w kostkach) i wskaźnik „m” (funkcja kruszonego lodu) zgasną. Po naciśnięciu łopatki dozownika woda wypłynie z portu wlotowego. 2. Gdy czas dopływu wody osiągnie 150 sekund, lodówka wyda sygnał dźwiękowy i woda będzie płynąć do momentu, gdy czas dopływu wyniesie 180 sekund;...
  • Seite 324 Użytkowanie Funkcja kruszonego lodu Niezależnie od stanu (zablokowane lub odblokowane), naciśnij przycisk „L” (przełącznik funkcji kruszonego lodu), brzęczyk zadzwoni raz, wskaźnik „l” (funkcja kruszonego lodu) zapali się, a następnie funkcja kruszonego lodu zostanie włączona. Naciśnij 1 raz Wskaźnik włączonej funkcji kruszonego lodu Uwaga 1.
  • Seite 325 Użytkowanie Funkcja EPP W stanie odblokowanym naciśnij przycisk „H” (przełącznik Super-Freeze) i przycisk „A” (przełącznik trybu Auto Set) 5 razy (w ciągu 5 sekund); brzęczyk zadzwoni raz, a następnie funkcja EPP zostanie wyłączona. Funkcję EPP można również włączyć w tej samej operacji. Alarm otwarcia drzwi Jeśli drzwi pozostają...
  • Seite 326 Użytkowanie Instrukcje dotyczące kostkarki do lodu OSTRZEŻENIE! Podłącz tylko do zasilania wodą pitną. ► Podłączenie instalacji wodnej może wykonać wyłącznie wykwalifikowany hydraulik zgodnie z lokalnymi ► przepisami i regulacjami dotyczącymi jakości wody. Uwaga Ta instalacja wodna nie jest objęta gwarancją urządzenia. Podłączanie wody do urządzenia 1.
  • Seite 327 Użytkowanie Dozownik lodu i wody Przed użyciem dozownika lodu i wody OSTROŻNIE! Nie pozwalaj dzieciom na korzystanie z dozownika ani bawienie się z nim, ponieważ mogą go ► uszkodzić. OSTROŻNIE! Wyrzuć kilka pierwszych partii lodu (około 20 kostek i 7 szklanek wody). Jest to również konieczne, ►...
  • Seite 328 Użytkowanie Czyszczenie dozownika Czyszczenie wylotu lodu i wody Wylot wody (1) lub wylot lodu (2) należy często wycierać czystą szmatką, ponieważ może się łatwo zabrudzić. Uwaga Do wylotu mogą przywierać kłaczki z tkaniny. Czyszczenie tacy dozownika Przetrzyj cały obszar wilgotną szmatką. Taca dozownika może łatwo zamoczyć...
  • Seite 329 Użytkowanie OSTROŻNIE! To normalne, że po wymianie filtra pobierana woda jest biaława lub mętna. Powietrze zawarte ► w wodzie zostanie po pewnym czasie usunięte. Taką wodę można bezpiecznie pić. Pierwszy dozowany lód i woda mogą zawierać drobiny lub zapach z systemu dostarczania wody lub ►...
  • Seite 330 Użytkowanie 1. Delikatnie pociągnij za uchwyt, aby otwo- rzyć komorę na lód. 2. Aby wyjąć wewnętrzny pojemnik na lód, chwyć za przedni uchwyt, lekko unieś dolną część i powoli wysuń pojemnik w sposób pokazany na ilustracji. 3. Zamontuj wewnętrzny pojemnik na lód, wykonując powyższe czynności w odwrot- nej kolejności.
  • Seite 331 Użytkowanie OSTROŻNIE! Nie instaluj produktu, jeśli ciśnienie wody przekracza 827 kPa. Jeśli ciśnienie wody przekracza 827 kPa, ► należy zainstalować zawór ograniczający ciśnienie. Skontaktuj się z instalatorem, jeśli nie masz pewności, jak zmierzyć ciśnienie wody. Nie instaluj w miejscach, w których mogą wystąpić uderzenia hydrauliczne. Jeśli istnieje ryzyko ►...
  • Seite 332 6. Pobieraj wodę przez około 5 minut, aby usunąć uwięzione powietrze i zanieczyszczenia. OSTROŻNIE! Niedokonanie wymiany filtrów, gdy jest to konieczne, lub stosowanie filtrów do wody nieza- ► twierdzonych przez firmę Haier może spowodować wyciekanie wody z wkładu filtra i uszkodzenie mienia. Filtr wody Model: Haier HRXWF System certyfikowany przez IAPMO R&T zgodnie ze standardami NSF/ANSI 42, 53, 401 i P473 w celu...
  • Seite 333 Użytkowanie Aby produkt działał zgodnie z deklaracją producenta, konieczne jest spełnienie wymagań dotyczących instalacji, konserwacji i wymiany filtrów. Informacje o gwarancji można znaleźć w instrukcji instalacji. Uwaga Chociaż testy przeprowadzono w standardowych warunkach laboratoryjnych, rzeczywista wydajność może się różnić. Wkład wymienny: HRXWF Szacunkowe koszty wymiany elementów można znaleźć na naszej stronie internetowej www.haierspares.eu .
  • Seite 334: Wyposażenie

    Wyposażenie Wyposażenie System obiegu powietrza Lodówka jest wyposażona w system obiegu powietrza, dzięki któremu chłodne strumienie powietrza znajdują się na każdym poziomie półki. Pomaga to utrzymać jednolitą temperaturę, dzięki czemu żywność jest dłużej świeża. Regulowane półki Wysokość półek można dostosować do potrzeb dotyczących przechowywania.
  • Seite 335 Wyposażenie Zdejmowane półki na drzwiach/uchwyt na butelki Półki na drzwiach można zdemontować w celu czyszczenia: Połóż dłonie po obu stronach półki, podnieś ją do góry (1) i wyciągnij (2). W celu ponownego zamontowania pólek powyższe czynności wykonuje się w odwrotnej kolejności. OPCJONALNIE: OK-wskaźnik temperatury Wskaźnik temperatury OK może być...
  • Seite 336 Wyposażenie Wskazówki dotyczące oszczędzania energii Upewnij się, że urządzenie jest właściwie wentylowane (patrz MONTAŻ). ► Nie należy instalować urządzenia w bezpośrednim świetle słonecznym lub w pobliżu źródeł ciepła ► (np. pieców, grzejników). Unikaj niepotrzebnie niskiej temperatury w urządzeniu. Zużycie energii zwiększa się wraz z ustawieniem ►...
  • Seite 337: Pielęgnacja I Czyszczenie

    4. W przypadku, gdy jakaś mała część lub element dostanie się do wnętrza lodówki (pomiędzy półki lub szuflady), użyć małego miękkiego pędzelka, aby go wyciągnąć. Jeśli nie udało się dotrzeć do tego elementu, prosimy o kontakt z serwisem Haier. Spłucz i wysusz miękką ściereczką.
  • Seite 338 Pielęgnacja i czyszczenie Wymiana lampek LED OSTRZEŻENIE! Nie wolno samodzielnie wymieniać lampy LED, może to zrobić tylko producent lub autoryzowany serwis. Jako źródło światła lampy wykorzystują diody LED, charakteryzujące się niskim zużyciem energii i długą żywotnością. W przypadku wystąpienia jakichkolwiek nieprawidłowości prosimy o kontakt z działem obsługi klienta.
  • Seite 339: Usuwanie Usterek

    Usuwanie usterek Usuwa nie usterek Wiele problemów można rozwiązać samodzielnie, bez specjalistycznej wiedzy. W przypadku problemów prosimy sprawdzić wszystkie pokazane możliwości i postępować zgodnie z poniższymi instrukcjami przed skontaktowaniem się z obsługą posprzedażową. Zob. OBSŁUGA KLIENTA. OSTRZEŻENIE! Przed przystąpieniem do konserwacji wyłącz urządzenie i wyjmij wtyczkę z gniazdka sieciowego. ►...
  • Seite 340 Usuwanie usterek Problem Potencjalna przyczyna Możliwe rozwiązanie Wewnątrz • Ustawiona temperatura jest za • Ponownie ustaw temperaturę. urządzenia nie jest wysoka. wystarczająco • Była przechowywana zbyt ciepła • Zawsze schładzaj żywność przed zimno. żywność. jej przechowywaniem. • W lodówce umieszczono zbyt dużą •...
  • Seite 341 Usuwanie usterek Problem Potencjalna przyczyna Możliwe rozwiązanie Urządzenie wydaje • Urządzenie nie znajduje się na • Wyreguluj nóżki, aby dziwne dźwięki. wypoziomowanym podłożu. wypoziomować urządzenie. • Urządzenie dotyka jakiegoś obiektu. • Usuń obiekty znajdujące się w pobliżu urządzenia. Słychać delikatny •...
  • Seite 342 Usuwanie usterek Problem Potencjalna przyczyna Możliwe rozwiązanie Automatyczna • Nie podłączaj przewodu • Podłącz przewód kostkarka do lodu nie doprowadzającego wodę do doprowadzający wodę do wytwarza lodu lub urządzenia i otwórz zawór urządzenia i całkowicie otwórz wytwarza niewielką doprowadzający. zawór doprowadzający. ilość...
  • Seite 343 W sekcji „strona internetowa" wybierz markę swojego produktu i swój kraj. Zostaniesz przekierowany/a na konkretną stronę internetową, na której znajdziesz numer telefonu i formularz do kontaktu z pomocą techniczną. Przerwa w zasilaniu W przypadku przerwy w dostawie prądu żywność powinna zachować bezpieczną temperaturę przez około 5 godzin.
  • Seite 344: Instalacja

    Instalacja Instalacja Rozpakowanie OSTRZEŻENIE! Urządzenie jest ciężkie. Prace powinny być wykonywane przez co najmniej dwie osoby. ► Wszystkie materiały opakowaniowe należy przechowywać poza zasięgiem dzieci i utylizować ► w sposób przyjazny dla środowiska. Wyjmij urządzenie z opakowania. ► Usuń całe opakowanie. ►...
  • Seite 345 Instalacja 3. Stabilność można sprawdzić, popychając urządzenie naprze- miennie w linii przekątnych. Lekkie kołysanie powinno być takie same w obu kierunkach. W przeciwnym razie rama może się wykrzywić; w rezultacie może dojść do roz- szczelnienia drzwi. Niewielki przechył do tyłu pomaga przy zamykaniu drzwi.
  • Seite 346 Instalacja Czas oczekiwania W zbiorniku sprężarki znajduje się olej bezobsługowy. Olej ten może przedostać się poprzez zamknięty system rur podczas transportu w pozycji przechylonej. Przed podłączeniem urządzenia do zasilania trzeba odczekać co najmniej 2 godziny, aby olej spłynął z powrotem do zbiornika. Podłączenie do prądu Przed każdym podłączeniem sprawdź, czy: zasilacz, gniazdo i bezpieczniki odpowiadają...
  • Seite 347 Lodówka Ice and Water oraz Automatic Ice musi zostać zamontowana przez wykwalifikowanego ► hydraulika lub technika serwisu przeszkolonego i autoryzowanego przez firmę Haier, ponieważ nieprawidłowe podłączenie może prowadzić do wycieków wody. Firma Haier nie odpowiada za szkody (w tym zalanie) spowodowane nieprawidłową instalacją lub ► podłączeniem hydraulicznym. Uwaga Wyjmij pojemniki na drzwiach z pozycji A i zainstaluj w pozycji B przed pierwszym użyciem.
  • Seite 348: Dane Techniczne

    Dane techniczne Dane t echnicz ne Karta produktu, zgodnie z rozporządzeniem UE nr 2019/2016 Marka Haier Haier HCR7918EIMP Nazwa modelu / identyfikator HCR7918EIMB HCR7918ENMP HCR7918EIMP(UK) Chłodziarko- Kategoria modelu Chłodziarko-zamrażarka zamrażarka Klasa efektywności energetycznej Roczne zużycie energii (kWh/rok)(1) Całkowita pojemność (l) Pojemność...
  • Seite 349 Dane techniczne Objaśnienie: • Tak, wyróżnione (1) Na podstawie wyników badania zgodności norm w ciągu 24 godzin. Rzeczywiste zużycie zależy od użytkowania i lokalizacji urządzenia. (2) Klasa klimatyczna SN: To urządzenie jest przeznaczone do użytku w temperaturze otoczenia od +10°C do +32°C Klasa klimatyczna N: To urządzenie jest przeznaczone do użytku w temperaturze otoczenia od +16°C do +32°C Klasa klimatyczna ST: To urządzenie jest przeznaczone do użytku w temperaturze otoczenia od...
  • Seite 350: Obsługa Klienta

    Obsługa klienta Obsługa klienta Polecamy nasz system Obsługi Klienta Haier i stosowanie oryginalnych części zamiennych. Jeśli masz problem z urządzeniem, najpierw sprawdź sekcję ROZWIĄZYWANIE PROBLEMÓW. Jeżeli nie możesz znaleźć rozwiązania, prosimy o kontakt z lokalnym sprzedawcą lub ► naszym Europejskim Centrum Obsługi Klienta (zob. poniżej wymienione numery telefonów) lub ►...
  • Seite 351 Obsługa klienta * Numery innych krajów można znaleźć na stronie www.haier.com Haier Europe Trading S.r.l Oddział Wielka Brytania Westgate House, Westgate, Ealing Londyn, W5 1YY *Okres gwarancji na urządzenie chłodnicze: Minimalna gwarancja wynosi: 2 lata dla krajów UE, 3 lata dla Turcji, 1 rok dla Wielkiej Brytanii, 1 rok dla Rosji, 3 lata dla Szwecji, 2 lata dla Serbii, 5 lat dla Norwegii, 1 rok dla Maroka, 6 miesięcy dla Algierii,...
  • Seite 352 Obsługa klienta...
  • Seite 353 Príručka používateľa Chladnička s mrazničkou HCR7918EIMP HCR7918EIMB HCR7918EIMP(UK) HCR7918ENMP...
  • Seite 354 Ďakujeme Ďakujeme za zakúpenie produktu Haier. Pred použitím tohto spotrebiča si pozorne prečítajte tieto pokyny. Pokyny obsahujú dôležité informácie, ktoré vám pomôžu vyťažiť zo spotrebiča maximum a zaistia bezpečnú a správnu inštaláciu, používanie a údržbu. Túto príručku uschovajte na vhodnom mieste, aby ste si mohli kedykoľvek prečítať pokyny na bezpečné...
  • Seite 355 Obsah Bezpečnostné informácie ..................4 Opis produktu ....................... 10 Ovládací panel ....................... 11 Použitie ........................14 Vybavenie ....................... 32 Starostlivosť a čistenie..................35 Riešenie problémov ..................... 37 Inštalácia ......................... 42 Technické údaje ....................46 Zákaznícky servis ....................48 Príslušenstvo Skontrolujte príslušenstvo a dokumentáciu podľa tohto zoznamu: *Vodná...
  • Seite 356: Bezpečnostné Informácie

    Bezpečnostné informácie Bezpečnostné informácie Pred prvým zapnutím spotrebiča si prečítajte nasledujúce bezpečnostné pokyny! VAROVANIE! Pred prvým použitím Uistite sa, že sa spotrebič pri preprave nepoškodil. ► Odstráňte všetky obaly a uložte ich mimo dosahu detí. ► Pred inštaláciou spotrebiča počkajte najmenej dve hodiny, ►...
  • Seite 357 Bezpečnostné informácie VAROVANIE! štandardnú 3-vodičovú (uzemnenú) zásuvku. Tretí kolík (uzemnenie) nikdy neodrezávajte ani neodstraňujte. Po inštalácii spotrebiča musí byť zástrčka prístupná. VAROVANIE: Nepoškoďte chladiaci okruh. ► Každodenné použitie Deti staršie ako 8 rokov a osoby s obmedzenými fyzickými, ► zmyslovými alebo duševnými schopnosťami alebo nedostatkom skúseností...
  • Seite 358 Bezpečnostné informácie VAROVANIE! - Ponechanie dverí otvorených dlhšiu dobu môže spôsobiť výrazné ► zvýšenie teploty v priehradkách spotrebiča. - Pravidelne čistite povrchy, ktoré môžu prísť do styku s potravinami, ► a dostupné systémy vypúšťania. - Nádrže na čistú vodu vyčistite, ak sa nepoužívali 48 hodín; ►...
  • Seite 359 Bezpečnostné informácie VAROVANIE! V prípade prerušenia napájania alebo pred čistením odpojte spotrebič ► zo zásuvky. Pred opätovným zapnutím spotrebiča počkajte najmenej 7 minút, pretože časté štartovanie môže poškodiť kompresor. VAROVANIE: V priestoroch spotrebiča, ktoré slúžia na skladovanie ► potravín, nepoužívajte elektrické spotrebiče, pokiaľ ich používanie neschválil výrobca.
  • Seite 360 Bezpečnostné informácie VAROVANIE! Na čistenie zariadenia nepoužívajte rozprašovanú vodu ani paru. ► Studené sklenené poličky alebo sklenené dvere neumývajte horúcou ► vodou. Náhla zmena teploty môže spôsobiť rozbitie skla. Ak spotrebič nebudete dlhšiu dobu používať, nechajte ho otvorený, ► aby sa vo vnútri nehromadil zápach a nepríjemné pachy. Informácie o chladiacom plyne VAROVANIE! VAROVANIE! Zariadenie obsahuje horľavé...
  • Seite 361: Určené Použitie

    Bezpečnostné informácie Určené použitie Tento spotrebič je určený na chladenie a mrazenie potravín. Bol navrhnutý výhradne na použitie v domácnostiach a podobných aplikáciách, ako sú kuchynské priestory pre zamestnancov v obchodoch, kanceláriách a iných pracovných prostrediach; vo farmárskych domoch, pre zákazníkov v hoteloch, moteloch a iných obytných priestoroch, ako aj pre zákazníkov ubytovacích a stravovacích služieb.
  • Seite 362: Opis Produktu

    Opis produktu Opis produktu Upozornenie Z dôvodu technických zmien a rôznych modelov sa môžu niektoré ilustrácie v tejto príručke líšiť od vášho modelu. Model (HCR7918EIMP/HCR7918EIMB/HCR7918EIMP(UK)) (S výrobníkom ľadu vo dverách) A: Chladiaci priestor 14 Zásuvka My Zone 1 Ovládací panel 15 Svietidlo mrazničky/Switch Zone 2 Páka dávkovača B: Mraziaci priestor...
  • Seite 363: Ovládací Panel

    Ovládací panel Ovládací panel Ovládací panel [HCR7918EIMP/HCR7918EIMB/HCR7918EIMP(UK)] Tlačidlá: Indikátory: A Volič režimu Auto Set a Režim Auto Set B Volič režimu Holiday b Režim Holiday C Volič zásuvky My Zone c1 Režim Fruit & Vegetable D Tlačidlo na úpravu teploty „-“ c2 Režim Quick Cool E Tlačidlo na úpravu teploty „+“...
  • Seite 364 Ovládací panel Poznámka Z dôvodu technických zmien a rôznych modelov sa môžu niektoré ilustrácie v tejto príručke líšiť od vášho modelu. Model (HCR7918ENMP) (Bez výrobníka ľadu vo dverách) A: Chladiaci priestor B: Mraziaci priestor 1 Zvislý nosník 14 Posuvný zásobník 2 Ovládací...
  • Seite 365 Ovládací panel Ovládací panel (HCR7918ENMP) Tlačidlá: A Volič režimu Auto Set B Volič režimu Holiday C1 Volič funkcie Fruit & Vegetable C2 Volič funkcie Quick Cool C3 Volič funkcie 0° C Fresh D Tlačidlo na úpravu teploty „-“ E Tlačidlo na úpravu teploty „+“ F Volič...
  • Seite 366: Použitie

    Použitie Použitie Tlačidlá snímača Tlačidlá na ovládacom paneli sú dotykové tlačidlá, ktoré reagujú na ľahký dotyk prsta. Zapnutie a vypnutie spotrebiča Spotrebič sa zapne ihneď po pripojení k zdroju elektrického napájania. Pri prvom zapnutí chladničky sa rozsvieti indikátor „d“ (displej teploty). Teplota chladničky, teplota S-Zone a teplota mrazničky sú...
  • Seite 367 Použitie Regulácia teploty chladničky 1. Po odomknutí obrazovky displeja stlačte tlačidlo „F“ (volič zóny). Raz zazvoní bzučiak, bliká indikátor „f1“ (indikátor chladničky) a sprístupní sa režim regulácie teploty chladničky. 2. Stláčajte tlačidlo „D“ (tlačidlo regulácie teploty „-“), pri každom stlačení zaznie bzučiak a nastavená...
  • Seite 368 Použitie Poznámka Ak po nastavení teploty neurobíte do 5 sekúnd žiadny úkon, systém automaticky prijme a uloží nastavenú teplotu. Regulácia teploty pre Switch Zone (S-Zone) Po odomknutí obrazovky displeja stlačte tlačidlo „F“ (volič zóny). Raz zazvoní bzučiak, bliká indikátor „f3“ (indikátor S-Zone) a sprístupní sa režim regulácie teploty pre S-zone. 1.
  • Seite 369 Použitie Poznámka V stave Super-Cool sa teplota chladničky nedá upravovať. Ak stlačíte tlačidlo „D“ (tlačidlo na úpravu teploty „-“) alebo tlačidlo „E“ (tlačidlo na úpravu teploty „+“) na reguláciu teploty chladničky, indikátor „f1“ (indikátor chladničky) začne blikať a zaznie výstražné znamenie, ktoré signalizuje, že tento úkon sa nedá vykonať. V stave funkcie Super-Cool nie je možné...
  • Seite 370 Použitie Režim Auto Set 1. Po odomknutí obrazovky displeja stlačte tlačidlo „A“ (volič Auto Set), raz zazvoní bzučiak, rozsvieti sa indikátor „a“ (režim Auto Set) a zapne sa funkcia Auto Set. 2. Keď sa rozsvieti indikátor „a“ (režim Auto Set), stlačte tlačidlo „A“ (volič Auto Set), bzučiak zazvoní...
  • Seite 371 Použitie 3. V odomknutom stave podržte tlačidlo „B“ (volič režimu Holiday) 3 sekundy, raz zazvoní bzučiak a funkcia projekčnej lampy sa vypne. Funkcia projekčnej lampy sa môže zapnúť rovnakým postupom. Poznámka V stave Holiday sa teplota chladničky nedá upravovať. Ak stlačíte tlačidlo „D“ (tlačidlo na úpravu teploty „-“) alebo tlačidlo „E“...
  • Seite 372 Použitie Funkcia filtra Po šiestich mesiacoch prevádzky sa rozsvieti kontrolka pripomenutia „i“ (funkcia Reset filtra), ktorá používateľom, že filter treba vymeniť za nový. Pri výmene filtra podržte tlačidlo „I“ (volič funkcie Reset filtra) 3 sekundy, aby sa zrušila pripomienka, načasovanie sa resetuje za zvuku bzučiaka.
  • Seite 373 Použitie Poznámka 1. Keď sa rozsvieti indikátor „k“ (funkcia Výdaj vody), indikátor „l“ (funkcia Cubed ice) a indikátor „m“ (funkcia Crushed ice) zhasnú. Po stlačení dávkovacej páčky začne z otvoru na výdaj vytekať voda. 2. Keď výdaj vody dosiahne dobu 150 s, chladnička pípne a výdaj vody zadrží, kým sa nedosiahne doba 180 s, voda sa zastaví...
  • Seite 374 Použitie Funkcia drveného ľadu (Crushed ice) Keď v akomkoľvek stave (uzamknutý alebo odomknutý) stlačíte tlačidlo „M“ (volič funkcie drveného ľadu Crushed ice), raz zazvoní bzučiak, rozsvieti sa indikátor „m“ (funkcia Crushed ice) a potom sa zapne funkcia drveného ľadu Crushed ice. Stlačte 1-krát Indikátor zapnutý...
  • Seite 375 Použitie Funkcia EPP V odomknutom stave podržte stlačené tlačidlo „H“ (volič Super-Freeze) a tlačidlo „A“ (volič režimu Auto Set) stlačte 5-krát (do 5 sekúnd), bzučiak zazvoní raz, funkcia EPP sa potom vypne. Funkcia EPP sa môže zapnúť rovnakým postupom. Alarm otvorenia dverí Ak niektoré...
  • Seite 376 Použitie Pokyny pre výrobník ľadu VAROVANIE! Pripojte iba k zdroju pitnej vody. ► Pripojenie vodovodného potrubia smie nainštalovať len kvalifikovaný inštalatér ► a v súlade s miestnou legislatívou a predpismi upravujúcimi kvalitu vody. Poznámka Na túto inštaláciu vodovodného potrubia sa nevzťahuje záruka na spotrebič. Pripojenie vody k spotrebiču Z ventilu prívodu vody vyberte gumovú...
  • Seite 377 Použitie Dávkovač ľadu a vody Pred použitím dávkovača ľadu a vody POZOR! Uchovávajte deti mimo dosahu dávkovača, aby sa nehrali s ovládačmi alebo ich nepoškodzovali. POZOR! Niekoľko prvých dávok ľadu vyhoďte (asi 20 kociek a 7 šálok vody). Je to potrebné ►...
  • Seite 378 Použitie Čistenie dávkovača Čistenie výstupu ľadu a vody Výstup vody (1) alebo ľadu (2) často utierajte čistou handričkou, pretože sa môže ľahko zašpiniť. Poznámka Na vývodoch sa môžu zachytiť vlákna z utierky. Čistenie podnosu dávkovača Celú oblasť utrite vlhkou handričkou. Dávkovač sa môže ľahko namočiť...
  • Seite 379 Použitie POZOR! Je normálne, že po výmene vodného filtra vyteká z dávkovala mliečna alebo ► zakalená voda. Tento vzduch z vody unikne a voda je po výdaji vhodná na pitie. Prvý vydaný ľad a voda môžu obsahovať častice alebo zápach z prívodného potrubia ►...
  • Seite 380 Použitie Jemne potiahnite rukoväť, aby ste otvorili priehradku na ľad. Ak chcete vybrať nádobu na ľad zo dverí, uchopte prednú rukoväť, mierne zdvihnite spodnú časť a nádobu pomaly vytiahnite ako vidno na obrázku. Nádobu na ľad znovu vložte do dverí v opačnom poradí úkonov. POZOR! Nedotýkajte sa mechanických dielov výrobníka ľadu rukou ani žiadnym mechanickým ►...
  • Seite 381 Použitie POZOR! Neinštalujte, ak tlak vody presahuje 827 kPa. Ak tlak vody v domácnosti presiahne ► 827 kPa, musíte nainštalovať ventil na redukciu tlaku. Ak máte pochybnosti o kontrole tlaku vody, požiadajte o pomoc inštalatéra. Spotrebič neinštalujte tam, kde sa môžu vyskytnúť nárazy a veľké výkyvy tlaku. ►...
  • Seite 382 POZOR! Ak filtre nevymeníte, keď sa to vyžaduje, alebo ak sa použijú nepovolené vodné filtre ► Haier, môže to spôsobiť úniky na filtračnej kazete a poškodenie majetku. Vodný filter Model: Haier HRXWF Systém certifikovaný spoločnosťou IAPMO R&T podľa noriem NSF/ANSI 42, 53, ►...
  • Seite 383 Použitie Aby spotrebič fungoval podľa opisu, je nevyhnutné, aby boli dodržané požiadavky výrobcu na inštaláciu, údržbu a výmenu filtra. Informácie o záruke nájdete v návode na inštaláciu. Poznámka Zatiaľ čo sa testovanie vykonávalo v štandardných laboratórnych podmienkach, skutočný výkon sa môže líšiť. Náhradná kazeta: HRXWF Odhadované náklady na náhradné...
  • Seite 384: Vybavenie

    Vybavenie Vybavenie Viacnásobné prúdenie vzduchu Chladnička je vybavená systémom s viacnásobným prúdením vzduchu, v ktorom sú prívody chladného vzduchu umiestnené na každej úrovni police. To pomáha udržiavať rovnomernú teplotu, aby sa vaše jedlo udržalo dlhšie čerstvé. Nastaviteľné police Výška políc sa môže nastaviť tak, aby vyhovovala vašim potrebám skladovania.
  • Seite 385 Vybavenie Priestor Switch Zone Spotrebič je vybavený priestorom Switch Zone. V závislosti od účelu môžete zvoliť iné stupne teploty. Teplota sa môže nastaviť v rozsahu -18 °C až +5 °C. Vyberateľné stojany na dverách/držiak na fľaše Poličky na dverách sa dajú vybrať na čistenie: Uchopte poličku oboma rukami, nadvihnite ju (1) a vytiahnite (2).
  • Seite 386 Vybavenie Uloženie veľkých predmetov Veľké predmety, napr. mrazené potraviny, sa môžu skladovať: po vybratí horného podnosu na zmrazovanie alebo ► po vybratí oboch horných podnosom na ► zmrazovanie, ako aj strednej mraziacej zásuvky a po uskladnení potravín priamo na spodných podnosoch zmrazovania.
  • Seite 387: Starostlivosť A Čistenie

    4. V prípade, že v chladničke (medzi policami alebo zásuvkami) ostane nejaká malá usadenina alebo komponent, použite na uvoľnenie mäkkú kefku. Ak sa k tejto časti nedostanete, kontaktujte servis Haier. Opláchnite a osušte mäkkou handričkou. ►...
  • Seite 388 Starostlivosť a čistenie Výmena LED žiaroviek VAROVANIE! LED žiarovku nevymieňajte sami, musí ju vymeniť iba výrobca alebo autorizovaný servisný pracovník. Osvetlenie využíva ako zdroj svetla LED, ktoré sa vyznačujú nízkou spotrebou energie a dlhou životnosťou. Ak sa vyskytnú nejaké abnormality, kontaktujte zákaznícky servis. Pozrite časť...
  • Seite 389: Riešenie Problémov

    Riešenie problémov Riešenie problémov Mnoho vyskytujúcich sa problémov môžete vyriešiť sami bez osobitných odborných znalostí. V prípade problému skontrolujte všetky zobrazené možnosti a pred kontaktovaním popredajného servisu postupujte podľa nasledujúcich pokynov. Pozrite časť ZÁKAZNÍCKY SERVIS VAROVANIE! Pred údržbou spotrebič vypnite a vytiahnite zástrčku zo zásuvky. ►...
  • Seite 390 Riešenie problémov Problém Možná príčina Možné riešenie V spotrebiči nie je • Nastavená teplota je príliš vysoká. • Resetujte teplotu. dostatočne nízka • Do spotrebiča ste vložili príliš teplé • Pred uložením potraviny a jedlá teplota. potraviny a jedlá. vždy ochlaďte. •...
  • Seite 391 Riešenie problémov Problém Možná príčina Možné riešenie Spotrebič vydáva • Spotrebič nie je umiestnený na • Nastavte nožičky a vyrovnajte neobvyklé zvuky. rovnom povrchu. spotrebič do vodorovnej polohy. • Spotrebič sa dotýka nejakého • Odstráňte predmety v okolí predmetu v jeho okolí. spotrebiča.
  • Seite 392 Riešenie problémov Problém Možná príčina Možné riešenie Automatický • Nepripájajte prívodnú hadicu vody k • Pripojte prívodnú hadicu vody výrobník ľadu spotrebiču a otvorte prívodný ventil. k spotrebiču a úplne otvorte nevytvára ľad alebo • Hadica prívodu vody je zalomená. prívodný...
  • Seite 393 Riešenie problémov Ak chcete kontaktovať technickú pomoc, navštívte našu webovú stránku: https://corporate.haier-europe.com/en/ V sekcii „webová stránka“ vyberte značku svojho výrobku a svoju krajinu. Stránka vás presmeruje na konkrétnu webovú stránku, kde nájdete telefónne číslo a formulár na kontaktovanie technickej pomoci.
  • Seite 394: Inštalácia

    Inštalácia Inštalácia Vybalenie VAROVANIE! Spotrebič je ťažký. Musia s ním vždy manipulovať dve osoby. ► Všetky obalové materiály udržujte mimo dosahu detí a zlikvidujte ich spôsobom, ► ktorý je šetrný k životnému prostrediu. Vyberte spotrebič z obalu. ► Odstráňte všetok obalový materiál. ►...
  • Seite 395 Inštalácia Stabilitu môžete skontrolovať striedavým potlačením v smere uhlopriečky. Spotrebič sa môže mierne vykloniť v oboch smeroch. V opačnom prípade môže dôjsť k zdeformovaniu rámu, výsledkom čoho môže byť aj nedostatočné tesnenie dverí. Mierne naklonenia dozadu uľahčuje zatváranie dverí. Jemné doladenie dverí Ak sa dvere nenachádzajú...
  • Seite 396: Elektrické Pripojenie

    Inštalácia Čakacia doba V puzdre kompresora sa nachádza bezúdržbový mazací olej. Pri nakláňaní spotrebiča počas prevozu sa tento olej môže dostať cez uzatvorený systém rúrok. Pred pripojením spotrebiča ku zdroju napájania musíte počkať aspoň 2 hodiny, aby olej stiekol späť do puzdra. Elektrické...
  • Seite 397 Modely Ice and Water a Automatic Ice Chladničku Ice and Water a Automatic Ice musí nainštalovať kvalifikovaný inštalatér ► alebo vyškolený servisný technik spoločnosti Haier, pretože nesprávne inštalovanie môže viesť k úniku vody. Spoločnosť Haier nepreberá zodpovednosť za škody (vrátane poškodenia vodou) ►...
  • Seite 398: Technické Údaje

    Technické údaje Technické údaje Špecifikácie výrobku podľa nariadenia EÚ č. 2019/2016 Značka Haier Haier HCR7918EIMP Názov/identifikačný kód modelu HCR7918EIMB HCR7918ENMP HCR7918EIMP(UK) Chladnička s Chladnička s Kategória modelu mrazničkou mrazničkou Trieda energetickej účinnosti Ročná spotreba energie (kWh/rok)(1) Celkový objem (l) Objem chladničky (l) Objem mrazničky (l)
  • Seite 399 Technické údaje Vysvetlenie: • Áno, odporúčané (1) Na základe výsledkov skúšky zhody noriem počas 24 hodín. Skutočná spotreba závisí od použitia a umiestnenia spotrebiča. (2) Klimatická trieda SN: Tento spotrebič je určený na použitie pri teplote okolia v rozsahu + 10 °C až +32 °C. Klimatická...
  • Seite 400: Zákaznícky Servis

    ► naše európske stredisko European Call Service-Center (pozri nižšie uvedené ► telefónne čísla) alebo oblasť Service & Support na stránke www.haier.com, kde môžete požiadať o servis ► a nájsť odpovede na najčastejšie otázky. ► Ak chcete kontaktovať náš servis, uistite sa, že máte k dispozícii nasledujúce údaje.
  • Seite 401 Zákaznícky servis * Ďalšie krajiny nájdete na stránke www.haier.com Haier Europe Trading S.r.l Pobočka UK Westgate House, Westgate, Ealing London, W5 1YY *Trvanie záruky na chladiaci spotrebič: Minimálna záruka je: 2 roky pre krajiny EÚ, 3 roky pre Turecko, 1 rok pre Spojené...
  • Seite 402 Zákaznícky servis...
  • Seite 403 Gebruikershandleiding Koelvriescombinatie HCR7918EIMP HCR7918EIMB HCR7918EIMP(UK) HCR7918ENMP...
  • Seite 404 Bedankt Bedankt voor de aankoop van dit Haier-product. Lees deze instructies zorgvuldig door voordat u dit apparaat gebruikt. De instructies bevatten belangrijke informatie die u helpt het beste uit het apparaat te halen en veilige en correcte installatie, gebruik en onderhoud te waarborgen.
  • Seite 405 Inhoud Veiligheidsinformatie ........................... 4 Productbeschrijving .......................... 10 Bedieningspaneel ..........................11 Gebruik ..............................14 Apparatuur ............................31 Onderhoud en reiniging ........................35 Problemen oplossen ......................... 36 Installatie .............................. 42 Technische gegevens ........................46 Klantenservice ............................ 48 Accessoires Controleer de accessoires en literatuur in overeenstemming met deze lijst: *Waterpijp *Wateraansluiting Energielabel Garantiekaart...
  • Seite 406: Veiligheidsinformatie

    Veiligheidsinformatie Lees voordat u het apparaat voor het eerst inschakelt de volgende Veiligheidsinformatie veiligheidstips: WAARSCHUWING! Vóór het eerste gebruik Controleer of er geen transportschade is. ► Verwijder alle verpakkingsmaterialen en houd ze buiten het bereik ► van kinderen. Wacht ten minste twee uur voordat u het apparaat installeert, ►...
  • Seite 407 Veiligheidsinformatie WAARSCHUWING! Alleen voor Groot-Brittannië: Het netsnoer van het apparaat ► is voorzien van een 3-aderige (geaarde) stekker die past op een standaard 3-aderig (geaard) stopcontact. De derde pin (aarding) mag nooit worden afgesneden of gedemonteerd. Nadat het apparaat is geïnstalleerd, moet de stekker bereikbaar zijn. WAARSCHUWING: Beschadig het koelcircuit niet.
  • Seite 408 Veiligheidsinformatie WAARSCHUWING! de deuren van de koelvriescombinatie alleen als er geen kinderen zijn die zich binnen het bewegingsbereik van de deur bevinden. Volg de volgende instructies om besmetting van voedsel te voorkomen: ► - Het langere tijd open houden van de deur kan leiden tot een aanzienlijke ►...
  • Seite 409 Veiligheidsinformatie WAARSCHUWING! Haal de stekker van het apparaat uit het stopcontact wanneer er een ► stroomonderbreking optreedt of voordat u het schoonmaakt. Laat het apparaat minstens 7 minuten rusten voordat u het opnieuw opstart, omdat vaak starten de compressor kan beschadigen. WAARSCHUWING: Gebruik geen elektrische apparaten ►...
  • Seite 410 Veiligheidsinformatie WAARSCHUWING! Verwijder het stof aan de achterkant van het toestel ten minste ► eenmaal per jaar om brandgevaar en een verhoogd energieverbruik te voorkomen. Spuit niet op het apparaat en spoel het niet af tijdens het reinigen. ► Gebruik geen waterstraal of stoom om het apparaat schoon te maken. ►...
  • Seite 411 Veiligheidsinformatie Beoogd gebruik Dit apparaat is bedoeld voor het koelen en invriezen van voedsel. Het is uitsluitend ontworpen voor gebruik in huishoudelijke en soortgelijke toepassingen, zoals personeelskeukens in winkels, kantoren en andere werkomgevingen; op boerderijen en door gasten in hotels, motels en andere woonomgevingen, maar...
  • Seite 412: Productbeschrijving

    Productbeschrijving Productbeschrijving Let op Door technische wijzigingen en verschillende modellen kunnen sommige afbeeldingen in deze handleiding afwijken van uw model. Model (HCR7918EIMP/HCR7918EIMB/HCR7918EIMP(UK)) (Met ijsmaker in de deur) A: Koelkastgedeelte My Zone-lade 1 Bedieningspaneel Lamp vriezer/Switch Zone 2 Dispenserplaat B: Vriezergedeelte 3 Druppelbak Schuifplateau 4 Verticale balk...
  • Seite 413: Bedieningspaneel

    Bedieningspaneel Bedieningspaneel Bedieningspaneel (HCR7918EIMP/HCR7918EIMB/HCR7918EIMP(UK)) Toetsen: Indicatoren: A Keuzetoets Auto Set-modus a Auto Set-modus B Keuzetoets Holiday-modus b Holiday-modus C Keuzetoets My Zone-lade c1 Fruit & Vegetable-modus D Temperatuurinsteltoets ‘-’ c2 Quick Cool-modus E Temperatuurinsteltoets ‘+’ c3 0°C Fresh-modus Keuzetoets zone d Temperatuurweergave G Keuzetoets Super-Cool e1 Graden Fahrenheit...
  • Seite 414 Bedieningspaneel Let op Door technische wijzigingen en verschillende modellen kunnen sommige afbeeldingen in deze handleiding afwijken van uw model. Model (HCR7918ENMP) (Zonder ijsmaker in de deur) A: Koelkastgedeelte B: Vriezergedeelte Verticale balk Schuifplateau Bedieningspaneel Waterbak Glazen planken Luchtkanaal Fleshouder/Deurrek IJsmaker Humidity zone-lade Vriezerlades Opberglade...
  • Seite 415 Bedieningspaneel Bedieningspaneel (HCR7918ENMP) Toetsen: A Keuzetoets Auto Set-modus B Keuzetoets Holiday-modus C1 Keuzetoets Fruit & Vegetable-functie C2 Keuzetoets Quick Cool-functie C3 Keuzetoets 0°C Fresh-functie D Temperatuurinsteltoets ‘-’ E Temperatuurinsteltoets ‘+’ F Keuzetoets zone G Keuzetoets Super-Cool H Keuzetoets Super-Freeze N Keuzetoets Paneelvergrendeling Indicatoren: a Auto Set-modus b Holiday-modus...
  • Seite 416: Gebruik

    Gebruik Gebruik Sensortoetsen De toetsen op het bedieningspaneel zijn sensortoetsen, die al reageren als ze licht met de vinger worden aangeraakt. Het apparaat aan-/uitschakelen Het apparaat werkt zodra het op de voeding is aangesloten. Wanneer de koelkast voor het eerst wordt ingeschakeld, licht de indicator ‘d’...
  • Seite 417 Gebruik De koelkasttemperatuur aanpassen 1. Wanneer het scherm is ontgrendeld, drukt u op de toets ‘F’ (Keuzetoets zone). De zoemer klinkt eenmaal, de indicator ‘f1’ (Koelkastindicator) knippert en dan verschijnt de temperatuurinstelmodus van de koelkast. 2. Druk herhaaldelijk op de toets ‘D’ (Temperatuurinsteltoets ‘-’), elke keer klinkt de zoemer eenmaal en wordt de ingestelde temperatuur van de koelkast verlaagd met 1 graad.
  • Seite 418 Gebruik Let op Na het instellen van de temperatuur, als er binnen 5 seconden geen handeling plaatsvindt, wordt het systeem automatisch bepaald en de ingestelde temperatuur opgeslagen. De temperatuur voor de Switch Zone (S-Zone) aanpassen Wanneer het scherm is ontgrendeld, drukt u op de toets ‘F’ (Keuzetoets zone). De zoemer klinkt eenmaal, de indicator ‘f3’...
  • Seite 419 Gebruik Let op In de Super-Cool-toestand kan de koelkasttemperatuur niet worden aangepast. Als de toets ‘D’ (Temperatuurinsteltoets ‘-’) of toets ‘E’ (Temperatuurinsteltoets ‘+’) wordt ingedrukt om de temperatuur van de koelkast aan te passen, knippert de indicator ‘f1’ (Koelkastindicator) met een snel geluid om aan te geven dat deze handeling niet kan worden uitgevoerd.
  • Seite 420 Gebruik De Auto Set-modus (Automatische instelmodus) Wanneer het display is ontgrendeld, drukt u op de toets ‘A’ (Keuzetoets Auto Set-modus). De zoemer klinkt eenmaal, de indicator ‘a’ (Auto Set-modus) gaat branden en de Auto Set-functie wordt ingeschakeld. Wanneer de indicator ‘h’ (Auto Set-modus) brandt, drukt u op de toets ‘A’ (Keuzetoets Auto Set-modus).
  • Seite 421 Gebruik Houd in ontgrendelde toestand de toets ‘B’ (Keuzetoets Holiday-modus) 3 seconden ingedrukt. De zoemer klinkt eenmaal, waarna de projectielamp wordt uitgeschakeld. De projectielampfunctie kan met dezelfde handeling ook worden ingeschakeld. Let op In de Holiday-toestand kan de koelkasttemperatuur niet worden aangepast. Als de toets ‘D’...
  • Seite 422 Gebruik De filterfunctie Wanneer de koelkast zes maanden in werking is, zal de herinneringsindicator ‘i’ (Filter Reset functie) gaan branden om gebruikers eraan te herinneren het filter te vervangen door een nieuwe. Houd als het filter is vervangen de toets ‘I’ (Keuzetoets Filter Reset-functie) 3 seconden ingedrukt om de herinnering te annuleren.
  • Seite 423 Gebruik Let op Wanneer de indicator ‘k’ (Waterinlaatfunctie) brandt, gaan de indicator ‘I’ (IJsblokjesfunctie) en de indicator ‘m’ (IJsschilferfunctie) uit. Nadat de dispenserplaat is ingedrukt, stroomt het water uit de inlaatpoort. Wanneer de toevoertijd van het water 150 sec. bereikt, zal de koelkast piepen en water blijven opnemen tot de tijd 180 sec.
  • Seite 424 Gebruik De ijsschilferfunctie Druk in willekeurige toestand op de toets ‘NM’ (Keuzetoets IJsschilferfunctie). De zoemer klinkt eenmaal, de indicator ‘m’ (IJsschilferfunctie) gaat branden en de ijsschilferfunctie wordt ingeschakeld. Druk 1 keer Indicator aan -IJsschilferfunctie aan Let op Wanneer de indicator ‘m’ (IJsschilferfunctie) brandt, gaan de indicator ‘k’...
  • Seite 425 Gebruik De EPP-functie Druk in de ontgrendelde toestand 5 keer (binnen 5 seconden) op de toets ‘H’ (Keuzetoets Super-Freeze) en de toets ‘A’ (Keuzetoets Auto Set-modus). De zoemer klinkt eenmaal en de EPP-functie wordt uitgeschakeld. De EPP-functie kan met dezelfde handeling ook worden ingeschakeld.
  • Seite 426 Gebruik Instructies voor de ijsmaker WAARSCHUWING! Alleen aansluiten op de drinkwatervoorziening. ► Het aansluiten van de waterleiding mag alleen worden gedaan door een ► gekwalificeerd loodgieter en in overeenstemming met de plaatselijke wetgeving en voorschriften inzake de waterkwaliteit. Let op Deze waterleidinginstallatie valt niet onder de garantie van het apparaat.
  • Seite 427 Gebruik De ijs- en waterdispenser Voordat u de ijs- en waterdispenser gebruikt VOORZICHTIG! Houd kinderen uit de buurt van de dispenser om te voorkomen dat kinderen spelen ► met de bedieningselementen of deze beschadigen. VOORZICHTIG! Gooi de eerste paar partijen ijs weg (ongeveer 20 blokjes en 7 kopjes water). ►...
  • Seite 428 Gebruik De dispenser reinigen De ijs- en wateropening reinigen Veeg de wateropening (1) of ijsopening (2) regelmatig schoon met een schone doek, aangezien deze snel vies kunnen worden. Let op Pluis van een doek kan gaan vastzitten aan de openingen. Het dispenserbakje reinigen Veeg het hele gebied schoon met een vochtige doek.
  • Seite 429 Gebruik VOORZICHTIG! Het is normaal dat melkachtig of troebel water wordt afgegeven na het vervangen ► van het waterfilter. Deze lucht in het water zal uiteindelijk wegtrekken en het water is veilig te drinken. Het eerste ijs en water dat wordt afgegeven kunnen deeltjes of geur ►...
  • Seite 430 Gebruik Trek voorzichtig aan de handgreep om het ijscompartiment te openen. Pak om de ijsbak in de deur te verwijderen de handgreep aan de voorkant vast, til het onderste deel lichtjes op en trek de bak langzaam naar buiten, zoals afgebeeld. Plaats de ijsbak in de deur in omgekeerde volgorde van het verwijderen terug.
  • Seite 431: Het Waterfilter Vervangen

    Gebruik VOORZICHTIG! Installeer het apparaat niet als de waterdruk hoger is dan 827 kPa. Als uw waterdruk ► hoger is dan 827 kPa, moet u een drukbegrenzer installeren. Neem contact op met een deskundig loodgieter als u niet zeker weet hoe u uw waterdruk kunt controleren. Niet installeren waar waterslagomstandigheden kunnen voorkomen.
  • Seite 432 5 minuten lang water af om ingesloten lucht en verontreinigingen te verwijderen. VOORZICHTIG! Als de filters niet worden vervangen wanneer het nodig is of als geen door Haier ► toegestane waterfilters worden gebruikt, dan kan het filterpatroon gaan lekken en schade veroorzaken.
  • Seite 433: Apparatuur

    Apparatuur Het is van essentieel belang dat de door de fabrikant aanbevolen eisen inzake installatie, onderhoud filtervervanging worden uitgevoerd zoals aangeprezen. Raadpleeg de installatiehandleiding voor informatie over de garantie. Let op Hoewel de testen werden uitgevoerd onder standaard laboratoriumomstandigheden, kan de werkelijke prestatie afwijken. Vervangend patroon: HRXWF. Voor de geschatte kosten van vervangende elementen kunt u terecht op onze website op www.haierspares.eu WAARSCHUWING!
  • Seite 434 Apparatuur Meervoudige luchtstroom De koelkast is uitgerust met een meervoudige- luchtstroomsysteem, waarmee er op elke plank koele luchtstromen zijn. Dit helpt om een gelijkmatige temperatuur te handhaven om ervoor te zorgen dat uw voedsel langer vers blijft. Verstelbare planken De hoogte van de planken kan worden aangepast aan uw opslagbehoeften.
  • Seite 435 Apparatuur Verwijderbare deurrekken/fleshouder De deurrekken kunnen worden verwijderd om te worden schoongemaakt: Plaats uw handen aan beide kanten van het rek, til het omhoog (1) en trek het eruit (2). Voer de bovenstaande stappen in omgekeerde volgorde uit om het deurrek weer terug te plaatsen. OPTIONEEL: OK-temperatuurindicator De OK-temperatuurindicator kan worden gebruikt om temperaturen onder +4°C vast te stellen.
  • Seite 436: Tips Voor Energiebesparing

    Apparatuur Tips voor energiebesparing Zorg ervoor dat het apparaat goed wordt geventileerd (raadpleeg INSTALLATIE). ► Installeer het apparaat niet in direct zonlicht of in de buurt van warmtebronnen ► (bijv. kachels, verwarmingstoestellen). Vermijd onnodig lage temperaturen in het apparaat. Het energieverbruik neemt toe ►...
  • Seite 437: Onderhoud En Reiniging

    Als een klein deeltje of onderdeel vast komt te zitten in de koelkast (tussen planken laden), gebruik dan een klein, zacht borsteltje om het weg te halen. Als u het onderdeel niet kan bereiken, neem dan contact op met de klantenservice van Haier. Spoel af en droog af met een zachte doek.
  • Seite 438: Problemen Oplossen

    Problemen oplossen De ledlampjes vervangen WAARSCHUWING! Vervang de ledlamp niet zelf, deze mag alleen worden vervangen door de fabrikant of door de erkende servicevertegenwoordiger. De lamp heeft een led als lichtbron, met een laag energieverbruik en een lange levensduur. Als er sprake is van een afwijking, neem dan contact op met de klantenservice. Zie KLANTENSERVICE.
  • Seite 439 Problemen oplossen Veel problemen kunnen door uzelf worden opgelost zonder specifieke expertise. Raadpleeg in geval van een probleem alle getoonde mogelijkheden en volg de onderstaande instructies voordat u contact opneemt met de klantenservice. Zie KLANTENSERVICE. WAARSCHUWING! Schakel het apparaat uit voordat u onderhoud uitvoert en haal de stekker uit het ►...
  • Seite 440 Problemen oplossen Probleem Mogelijke oorzaak Mogelijke oplossing Het is niet koud De temperatuur is te hoog ingesteld. Stel de temperatuur opnieuw in.   genoeg in het Er zijn te warme producten Koel de producten altijd   apparaat. opgeslagen. af voordat u ze opbergt.
  • Seite 441 Problemen oplossen Probleem Mogelijke oorzaak Mogelijke oplossing Het apparaat maakt Het apparaat staat niet op een vlakke Stel de pootjes af om het   afwijkende geluiden. ondergrond. apparaat waterpas te zetten. Het apparaat raakt voorwerpen Verwijder voorwerpen rondom  ...
  • Seite 442 Problemen oplossen Probleem Mogelijke oorzaak Mogelijke oplossing De automatische De waterleiding is niet aangesloten Sluit de waterleiding aan op het   ijsmaker produceert op het apparaat of de toevoerkraan apparaat en open de geen ijs of produceert is niet open. toevoerkraan volledig.
  • Seite 443 Problemen oplossen Bezoek onze website om contact op te nemen met de technische dienst: https://corporate.haier-europe.com/en. Kies onder het gedeelte ‘website’ het merk van uw product en uw land. U wordt doorgestuurd naar de specifieke website waar u het telefoonnummer kunt vinden en contact kunt opnemen met de technische dienst.
  • Seite 444: Installatie

    Installatie Installatie Uitpakken WAARSCHUWING! Het apparaat is zwaar. Altijd hanteren met ten minste twee personen. ► Houd alle verpakkingsmaterialen buiten bereik van kinderen en gooi ► ze op een milieuvriendelijke manier weg. Haal het apparaat uit de verpakking. ► Verwijder al het verpakkingsmateriaal. ►...
  • Seite 445 Installatie De stabiliteit kan worden gecontroleerd door afwisselend op de diagonalen te duwen. De lichte slingering moet in beide richtingen hetzelfde zijn. Anders kan het frame kromtrekken; mogelijk lekkende deurafdichtingen zijn het resultaat. Een kleine helling naar achteren vergemakkelijkt het sluiten van de deuren.
  • Seite 446 Installatie Wachttijd De onderhoudsvrije smeerolie bevindt zich in de behuizing van de compressor. Deze olie kan door het gesloten buissysteem komen bij liggend transport. Voordat u het apparaat op de voeding aansluit, moet u ten minste 2 uur wachten zodat de olie weer in de behuizing loopt. 2 uur Elektrische aansluiting Controleer vóór elke aansluiting of:...
  • Seite 447 Modellen met ijs en water en modellen met automatisch ijs Uw koelkast met ijs en water of uw koelkast met automatisch ijs moet worden ► geïnstalleerd door een gekwalificeerde loodgieter of een door Haier getrainde en ondersteunde servicemonteur omdat onjuiste watertechnische installatie kan leiden tot waterlekkage.
  • Seite 448: Technische Gegevens

    Technische gegevens Technische gegevens Productkaart volgens de verordening EU nr. 2019/2016 Merk Haier Haier HCR7918EIMP Modelnaam/identificatie HCR7918EIMB HCR7918ENMP HCR7918EIMP(UK) Categorie van het model Koelvriescombinatie Koelvriescombinatie Energie-efficiëntieklasse Jaarlijks energieverbruik (kWh/jaar)(1) Totaal volume (liter) Volume koelkast (liter) Volume vriezer (liter) Volume variabele...
  • Seite 449 Technische gegevens Uitleg: • Ja, aanwezig (1) Op basis van de resultaten van de normenconformiteitstest gedurende 24 uur. Het werkelijke verbruik is afhankelijk van het gebruik en de locatie van het apparaat. (2) Klimaatklasse SN: Dit apparaat is bedoeld voor gebruik bij een omgevingstemperatuur tussen +10°C en +32°C.
  • Seite 450: Klantenservice

    Klantenservice Klantenservice Wij adviseren onze Haier klantenservice en het gebruik van originele onderdelen. Als u een probleem hebt met uw apparaat, controleer dan eerst het hoofdstuk PROBLEMEN OPLOSSEN. Als u daar geen oplossing kunt vinden, neem dan contact op met uw plaatselijke dealer;...
  • Seite 451 Klantenservice * Voor andere landen verwijzen wij u naar www.haier.com Haier Europe Trading S.r.l Branch UK Westgate House, Westgate, Ealing London, W5 1YY, Verenigd Koninkrijk *Duur van de garantie van het koelapparaat: De minimumgarantie is: 2 jaar voor EU-landen, 3 jaar voor Turkije, 1 jaar voor het Verenigd Koninkrijk, 1 jaar voor Rusland, 3 jaar voor Zweden, 2 jaar voor Servië, 5 jaar voor...
  • Seite 452 Klantenservice...

Inhaltsverzeichnis