G&D CompactCenter X2 Installationsanleitung

Verwandte Anleitungen für G&D CompactCenter X2

Inhaltszusammenfassung für G&D CompactCenter X2
- Seite 1 Guntermann & Drunck GmbH www.gdsys.de G&D CompactCenter X2 Installationsanleitung Installation Guide A9100128-1.10...
-
Seite 2: Zu Dieser Dokumentation
© Guntermann & Drunck GmbH 2010. Alle Rechte vorbehalten. Version 1.10 – 07.05.2010 Firmware: 1.1.003 (00167) Guntermann & Drunck GmbH Obere Leimbach 9 57074 Siegen Germany Telefon +49 (0) 271 23872-0 Telefax +49 (0) 271 23872-120 http://www.gdsys.de sales@gdsys.de i · G&D CompactCenter X2... -
Seite 3: Inhaltsverzeichnis
Target-Modul »CATpro2-USB« ............... 15 Verfügbare Varianten ..................15 Lieferumfang ....................15 Installation ...................... 16 Erforderliches Zubehör ................16 Anschluss des Target-Computers ..............16 Verbindung zum Matrixswitch ..............16 Statusanzeigen ....................17 Technische Daten .................... 17 G&D CompactCenter X2 · ii... - Seite 4 Target-Modul »CATpro2-VT100« ..............33 Lieferumfang ....................33 Installation ....................... 34 Erforderliches Zubehör ................34 Schnittstellen an der Frontseite ..............34 Schnittstellen an der Rückseite ..............34 Inbetriebnahme ....................34 Statusanzeigen ....................35 Technische Daten .................... 36 iii · G&D CompactCenter X2...
-
Seite 5: Sicherheitshinweise
Betreiben Sie dieses Gerät nur mit dem mitgelieferten oder in der Bedienungs- anleitung aufgeführten Netzteil. ! Betreiben Sie das Gerät ausschließlich im vorgesehenen Einsatzbereich Die Geräte sind für eine Verwendung im Innenbereich ausgelegt. Vermeiden Sie extreme Kälte, Hitze oder Feuchtigkeit. G&D CompactCenter X2 · 1... -
Seite 6: Der Matrixswitch
Der Matrixswitch Der Matrixswitch CompactCenter X2 ist das zentrale Gerät des KVM-Matrixsystems. An den Matrixswitch werden sowohl die zu bedienenden Target-Computer als auch der lokale Arbeitsplatz des Systems angeschlossen. Die Target-Computer können anschließend über den lokalen oder den IP-Arbeitsplatz des Systems bedient werden. -
Seite 7: Systemkomponenten
Matrixswitch » Systemkomponenten Systemkomponenten An den Matrixswitch CompactCenter X2 werden sowohl die zu bedienenden Target- Computer als auch der lokale Arbeitsplatz des Systems angeschlossen: Die Target-Computer werden über Target-Module der CATpro2-Serie an den Matrixswitch angeschlossen. Der Anschluss erfolgt mit Twisted-Pair-Kabeln der Kategorie 5 (oder höher). -
Seite 8: Installation
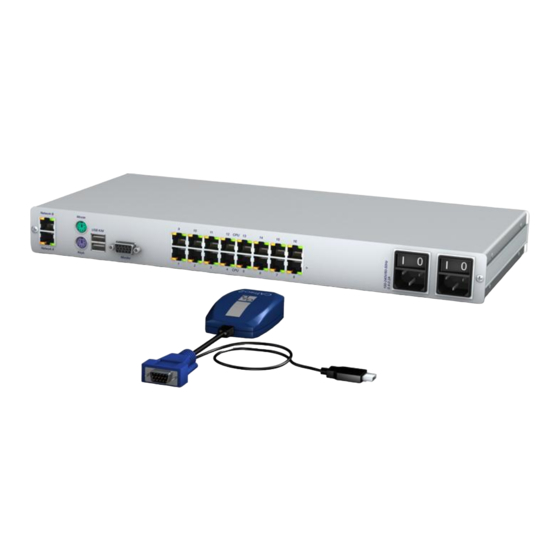
Mouse Network A Keyb. USB K/M Monitor Abbildung 1: »CPU«-Schnittstellen am Matrixswitch WICHTIG: Das Target-Modul CATpro2-DVI-Audio ist mit zwei Trans.-Schnittstellen ausgestattet. Verbinden Sie ausschließlich eine Trans.-Schnittstelle des Target- Moduls (s. Seite 25) mit diesem Matrixswitch! 4 · G&D CompactCenter X2... -
Seite 9: Anschluss Des Lokalen Arbeitsplatzes
Eine USB-Maus hat bei der Eingabe Vorrang vor einer gleichzeitig angeschlossenen PS/2-Maus. Dies gilt in gleicher Weise für Tastaturen. Ein gemischter Betrieb, beispielsweise der Anschluss einer USB-Maus und einer PS/2-Tastatur wird ebenfalls unterstützt. Monitor: Schließen Sie den Monitor des lokalen Arbeitsplatzes an. G&D CompactCenter X2 · 5... -
Seite 10: Netzwerkschnittstellen
Das andere Ende des Kabels ist mit einer Netzwerkschnittstelle eines lokalen Netz- werks zu verbinden. Stromversorgung Main Power: Schließen Sie ein mitgeliefertes Stromversorgungskabel an. Schließen Sie ein mitgeliefertes Stromversorgungskabel ein. Red. Power: Inbetriebnahme Schalten Sie den Matrixswitch am Power-Schalter an der Rückseite ein. 6 · G&D CompactCenter X2... -
Seite 11: Konfiguration Des Matrixswitches
3. Betätigen Sie die , um die Anmeldung durchzuführen und das On- Eingabetaste Screen-Display zu öffnen. 4. Betätigen Sie die -Taste zum Aufruf des -Menüs. Configuration 5. Wählen Sie die Zeile Network und betätigen Sie die Eingabetaste G&D CompactCenter X2 · 7... -
Seite 12: Konfiguration Der Globalen Netzwerkeinstellungen
Geben Sie die IP-Adresse des Gateways an. DNS Server 1: Geben Sie die IP-Adresse des DNS-Servers an. DNS Server 2: Geben Sie optional die IP-Adresse eines weiteren DNS-Servers an. 5. Betätigen Sie die -Taste zur Speicherung der durchgeführten Änderungen. 8 · G&D CompactCenter X2... -
Seite 13: Statusanzeigen
Das Netzteil ist ausgeschaltet oder die Verbindung mit dem Stromnetz nicht hergestellt. Status Ready blinkt Das Netzwerk-Subsystem arbeitet einwandfrei. Es wird keine Netzwerkfunktionalität unterstützt. Switch blinkt Matrixswitch betriebsbereit. Tabelle 1: Statusanzeigen an der Front des Matrixswitches G&D CompactCenter X2 · 9... -
Seite 14: Leds An Der Rückseite
10 oder 100 Mbit/s Verbindung aktiv. gelb Port ist aktuell durch einen Benutzer belegt. Der Port ist frei verfügbar. grün Verbindung zum Target-Modul hergestellt. Das Target-Modul ist derzeit nicht aufgeschaltet. Tabelle 2: Statusanzeigen an den RJ45-Schnittstellen des Matrixswitches 10 · G&D CompactCenter X2... -
Seite 15: Technische Daten
Gehäuse Material: Aluminium eloxiert Dimensionen (B × H × T): 19“ × 1 HE × 286 mm Gewicht: ca. 3 kg Einsatzumgebung Temperatur: +5 bis +45 °C Luftfeuchte: < 85%, nicht kondensierend Konformität CE, RoHs G&D CompactCenter X2 · 11... -
Seite 16: Die Target-Module
Detaillierte Informationen zu den anschließbaren Target-Modulen finden Sie in folgenden Abschnitten dieses Handbuchs: CATpro2-PS2 ..................Seite 13 CATpro2-USB ..................Seite 15 CATpro2-Audio-PS2................Seite 18 CATpro2-Audio-USB ................Seite 21 CATpro2-DVI-Audio ................Seite 23 CATpro2-VT100 ................... Seite 33 12 · G&D CompactCenter X2... -
Seite 17: Target-Modul »Catpro2-Ps/2
Stecken Sie den PS/2-Stecker in die PS/2-Maus-Schnittstelle des Tar- get-Computers. Verbindung zum Matrixswitch Transmission: Verbinden Sie diese Schnittstelle mit einer CPU-Schnittstelle des CompactCenter-Systems (s. Abbildung auf Seite 4). Verwenden Sie hierzu eine Twisted-Pair-Verkabelung der Kategorie 5 (oder höher). G&D CompactCenter X2 · 13... -
Seite 18: Statusanzeigen
Spannung: +5VDC Gehäuse Material: Kunststoff Maße (B × H × T): 45 × 20,7 × 65 mm Gewicht: ca. 140 g Einsatzumgebung Temperatur: +5 bis +40 °C Luftfeuchte: < 80%, nicht kondensierend Konformität CE, RoHs 14 · G&D CompactCenter X2... -
Seite 19: Target-Modul »Catpro2-Usb
Variante zum Anschluss eines Computers von Sun Microsystems mit amerikanischem Tastaturlayout HINWEIS: Die Installation des Target-Moduls erfolgt bei allen oben genannten Varianten nach den Anweisungen auf der folgenden Seite. Lieferumfang 1 × Target-Modul CATpro2-USB G&D CompactCenter X2 · 15... -
Seite 20: Installation
Stecken Sie den USB-A-Stecker in eine freie USB-Schnittstelle des Target- USB: Computers. Verbindung zum Matrixswitch Transmission: Verbinden Sie diese Schnittstelle mit einer CPU-Schnittstelle des CompactCenter-Systems (s. Abbildung auf Seite 4). Verwenden Sie hierzu eine Twisted-Pair-Verkabelung der Kategorie 5 (oder höher). 16 · G&D CompactCenter X2... -
Seite 21: Statusanzeigen
Spannung: +5VDC Gehäuse Material: Kunststoff Maße (B × H × T): 45 × 20,7 × 65 mm Gewicht: ca. 120 g Einsatzumgebung Temperatur: +5 bis +40 °C Luftfeuchte: < 80%, nicht kondensierend Konformität CE, RoHs G&D CompactCenter X2 · 17... -
Seite 22: Target-Modul "Catpro2-Audio-Ps/2
PS/2 Keyboard: Stecken Sie den PS/2-Stecker in die PS/2-Tastatur-Schnittstelle des Target-Computers. Stecken Sie den PS/2-Stecker in die PS/2-Maus-Schnittstelle des Tar- PS/2 Mouse: get-Computers. Stecken Sie den Klinkenstecker in die Speaker-Schnittstelle des Target- Speaker: Computers. 18 · G&D CompactCenter X2... -
Seite 23: Statusanzeigen
Überprüfen Sie die korrekte Verkablung des Target-Moduls mit dem KVM-Matrixsystem. Verbindung zum KVM-Matrixsystem hergestellt. Es ist kein Arbeitsplatzmodul aufgeschaltet. Verbindung zum KVM-Matrixsystem hergestellt. Ein Arbeitsplatzmodul ist aufgeschaltet. Verbindung zum KVM-Matrixsystem hergestellt. [flackert] Ein Arbeitsplatzmodul ist aufgeschaltet und Tastatur- und/oder Mausdaten werden empfangen. G&D CompactCenter X2 · 19... -
Seite 24: Technische Daten
Spannung: +5VDC Gehäuse Material: Kunststoff Maße (B × H × T): 45 × 20,7 × 70 mm Gewicht: ca. 140 g Einsatzumgebung Temperatur: +5 bis +40 °C Luftfeuchte: < 80%, nicht kondensierend Konformität CE, RoHs 20 · G&D CompactCenter X2... -
Seite 25: Target-Modul »Catpro2-Audio-Usb
Stecken Sie den Klinkenstecker in die Speaker-Schnittstelle des Target- Speaker: Computers. Verbindung zum Matrixswitch Transmission: Verbinden Sie diese Schnittstelle mit einer CPU-Schnittstelle des CompactCenter-Systems. Verwenden Sie hierzu eine Twisted-Pair-Verkabelung der Kategorie 5 (oder höher). G&D CompactCenter X2 · 21... -
Seite 26: Statusanzeigen
über USB-Schnittstelle des Target-Computers Anschluss: Spannung: +5VDC Gehäuse Material: Kunststoff × × × × Maße (B 20,7 70 mm Gewicht: ca. 120 g Einsatzumgebung Temperatur: +5 bis +40 °C Luftfeuchte: < 80%, nicht kondensierend Konformität CE, RoHs 22 · G&D CompactCenter X2... -
Seite 27: Target-Modul »Catpro2-Dvi-Audio
Variante zum Anschluss eines Computer von Sun Microsystems mit amerikanischem Tastaturlayout Lieferumfang 1 × Target-Modul der CATpro2-DVI-Audio-Serie 1 × DVI-D-Videokabel (DVI-D-SL-M/M-2) 1 × Audiokabel (Audio-M/M-2 mit Ferrit) 2 × USB-Kabel (USB-AM/BM-2) G&D CompactCenter X2 · 23... -
Seite 28: Installation
Verbinden Sie eine (weitere) USB-Schnittstelle des Computers mit dieser Schnitt- stelle. Verwenden Sie hierzu das Kabel USB-AM/BM-2. Schließen Sie hier das mitgelieferte DVI-D-Videokabel (DVI-D-SL-M/M-2) DVI-D CPU: an und verbinden Sie dieses mit dem Grafikausgang des Computers. 24 · G&D CompactCenter X2... -
Seite 29: Schnittstellen An Der Rückseite
Die Stromversorgung des Target-Moduls über zwei USB-Schnittstellen ist bei Verwendung des Tischnetzteils oder eines Power Loop-Kabels nicht erforderlich. TIPP: Um die redundante Stromversorgung des Target-Moduls zu erreichen, ist zusätzlich die parallele Stromversorgung über die Schnittstellen USB Pwr und USB CPU möglich. G&D CompactCenter X2 · 25... -
Seite 30: Statusanzeigen
Die Schnittstelle »USB CPU« ist nicht mit dem Computer verbunden oder der Gerätetreiber wird gerade aktiviert. Es wurde eine Verbindung zum KVM-Matrixswitch hergestellt. Ein Benutzer ist auf das Target-Modul aufgeschaltet. Tabelle 1: Statusanzeigen am Target-Modul 26 · G&D CompactCenter X2... - Seite 31 Gelbe LED Grüne LED Zeit in Sekunden Der DDC-Drehschalter befindet sich in der Stellung »Learn«. Es wurde (noch) keine DDC-Information eingelesen. Die DDC-Information eines Monitors [Aus] wurde erfolgreich eingelesen. Tabelle 1: Statusanzeigen am Target-Modul (Fortsetzung) G&D CompactCenter X2 · 27...
-
Seite 32: Auswahl Der Ddc-Information
1920 × 1200 Bildpunkte, 60 Hz (VESA-CVT-RB) 1360 × 768 Bildpunkte, 60 Hz (VESA-CVT) 1680 × 1050 Bildpunkte, 60 Hz (VESA-CVT) 1440 × 900 Bildpunkte, 60 Hz (VESA-CVT) User Verwendung der ausgelesenen DDC-Information des Monitors Learn DDC-Information des Monitors auslesen 28 · G&D CompactCenter X2... -
Seite 33: Ddc-Information Eines Monitors Auslesen
Die eingelesene DDC-Information wird dem angeschlossenen Def. User Computer bereitgestellt. Learn 5. Entfernen Sie das Monitorkabel aus der Schnittstelle DVI-D CPU. 6. Stecken Sie das mit dem Computer verbundene DVI-D-Videokabel in die Schnittstelle DVI-D CPU. G&D CompactCenter X2 · 29... -
Seite 34: Unterstützte Grafikauflösungen
Timings. Derartige Timings weichen von den Vorgaben des Bild- schirms ab, um die Frequenzen der digitalen Signale zu reduzieren. Analog am Arbeitsplatzmodul angeschlossene Bildschirme können aufgrund des nicht- standardisierten Timings die Bildgröße und die Bildlage möglicherweise nicht korrekt wiedergeben. 30 · G&D CompactCenter X2... -
Seite 35: Power Loop-Stromversorgung
Power In Def. User Learn Trans. 1 Trans. 2 Power Loop Power In Def. User Learn Trans. 1 Trans. 2 Power Loop Power In Abbildung 8: Power-Loop-Stromversorgung von vier Geräten über ein Tischnetzteil G&D CompactCenter X2 · 31... -
Seite 36: Technische Daten
3,4 W@2 × 5 V-USB; 3,8 W@12 V Gehäuse Material: Aluminium eloxiert Maße (B × H × T): 105 × 26 × 84 mm Gewicht: ca. 210 g Einsatzumgebung Temperatur: +5 bis +45 °C Luftfeuchte: < 80%, nicht kondensierend 32 · G&D CompactCenter X2... -
Seite 37: Target-Modul »Catpro2-Vt100
Falls an diesen eine Maus angeschlossen ist, kann die Benutzeroberfläche komfortabel mit dieser bedient werden. Lieferumfang 1 × Target-Modul CATpro2-VT100 1 × Tischnetzteil (12V/24W) 1 × Kaltgerätekabel 1 × serielles Anschlusskabel G&D CompactCenter X2 · 33... -
Seite 38: Installation
Die Service-Schnittstelle wird ausschließlich für Software-Updates und Diagnosefunktion durch das Support-Team verwendet. Inbetriebnahme Nach der ordnungsgemäßen Installation des Target-Moduls, verbinden Sie das Kaltgeräte-Netzkabel mit dem Netzteil und einer Netzsteckdose. Das Gerät ist jetzt betriebsbereit. 34 · G&D CompactCenter X2... -
Seite 39: Statusanzeigen
Das Gerät ist betriebsbereit. Das Target-Modul konnte (noch) nicht initialisiert werden. Status Das Netzteil ist angeschlossen und die erforderliche Betriebsspannung ist verfügbar. Das Netzteil ist nicht angeschlossen oder die Verbindung des Netzteils mit dem Stromnetz nicht hergestellt. G&D CompactCenter X2 · 35... -
Seite 40: Technische Daten
Tischnetzteil Anschluss: miniDIN-4 Power-Buchse Spannung: AC100-240V/60-50Hz Gehäuse Abmessungen: 104 × 26 × 84 mm (B × H × T) Gewicht ca. 210 g Einsatzumgebung Temperatur: +5 bis +45 °C Luftfeuchte: 20 - 80%, nicht kondensierend 36 · G&D CompactCenter X2... - Seite 41 NOTIZEN...
- Seite 80 NOTES...
- Seite 81 NOTES...
- Seite 82 NOTES...
- Seite 83 NOTES...
- Seite 84 Das Handbuch wird fortlaufend aktualisiert und im Internet veröffentlicht. The manual is constantly updated and available on our website. http://gdsys.de/A9100128 Guntermann & Drunck GmbH Obere Leimbach 9 57074 Siegen Germany http://www.gdsys.de sales@gdsys.de...