Herunterladen Inhalt Inhalt Diese Seite drucken

Technaxx TX-103 Bedienungsanleitung

Nostalgie bluetooth all-in-one plattendigitalisierer
Vorschau ausblenden Andere Handbücher für TX-103:
Inhaltsverzeichnis

Werbung

Verfügbare Sprachen
  • DE

Verfügbare Sprachen

  • DEUTSCH, seite 24
All-in-One Record Converter TX-103
The manufacturer Technaxx Deutschland GmbH & Co.KG hereby declares that this
device, to which this user manual belongs, complies with the essential requirements
of the standards referred to the Directive RED 2014/53/EU. The Declaration of
Conformity you find here: www.technaxx.de/ (in bar at the bottom
"Konformitätserklärung"). Before using the device the first time, read the user
Service phone No. for technical support: 01805 012643 (14 cent/minute from
German fixed-line and 42 cent/minute from mobile networks).
Keep this user manual for future reference or product sharing carefully. Do the same
with the original accessories for this product. In case of warranty, please contact the
dealer or the store where you bought this product. Warranty 2 years

Features

 Digitizing vinyl records/cassette/CD or AUX–IN to USB or SD card
up to 32GB  Music playback & recording via Bluetooth 2.1
Playback of MP3/WMA music files from USB/CD/SD/Bluetooth
devices  Recording of MP3 music files on USB or SD card up to
32GB  No computer/notebook required  RCA output for
connection to HiFi systems  Record player with automatic/manual
stop & 3 speeds: 33, 45, 78rpm  Built-in stereo loudspeakers
Built-in cassette & CD players  Built-in FM radio  3.5mm
AUX–IN & 3.5mm headphone jack  High quality nostalgia design
with functional handling
Technaxx
Nostalgia Bluetooth
manual carefully.
Free Email: support@technaxx.de
®
* User Manual
1

Werbung

Inhaltsverzeichnis
loading

Inhaltszusammenfassung für Technaxx TX-103

  • Seite 1: Features

    Nostalgia Bluetooth All-in-One Record Converter TX-103 The manufacturer Technaxx Deutschland GmbH & Co.KG hereby declares that this device, to which this user manual belongs, complies with the essential requirements of the standards referred to the Directive RED 2014/53/EU. The Declaration of Conformity you find here: www.technaxx.de/ (in bar at the bottom...
  • Seite 2: Inhaltsverzeichnis

    Contents Features 1 Contents 2 Technical specifications 3 Product Overview 5 First start 8 CD Mode 13 USB/SD Mode 16 Bluetooth Mode 18 Tape Mode 19 AUX Mode 20 Radio Mode 21 Stand-by function 22 FAQ’s 22 Before usage  Choose the installation location of your unit carefully. Avoid placing it in direct sunlight or close to a source of heat.
  • Seite 3: Technical Specifications

    Technical specifications Bluetooth V2.1; profil A2DP,EDR & HFP; distance ~8m open areas Bluetooth transmitting frequency 2.4GHz Radiated output power max. 2.5mW Phono, Cassette, CD, USB, Bluetooth, SD, AUX–IN, FM Mode radio 2x 4W stereo loudspeakers (10x10x2cm), input ≦ Speakers 60mV/30kΩ, impedance 4Ω, frequency...
  • Seite 4 SD, SDHC, Micro SD, Micro SDHC, corresponding SD card memory class 10 Package Contents Nostalgia Bluetooth All-in-One LP Converter TX-103, 45rpm single Puck adapter, power adapter, User Manual Hints for Environment Protection: Packages materials are raw materials and can be recycled. Do not disposal old devices or batteries into the domestic waste.
  • Seite 5: Product Overview

    Product Overview Front View and Top View Display Panel Stop: Stop playback in CD/USB/SD modes; stop recording. CD/USB/SD: Switch to USB, SD card or CD mode Record/Delete Repeat/Program Stereo speakers (one on each side, 2x4W)
  • Seite 6 Function Knob: Rotate the knob to select Phono, CD (USB/SD), AUX/Tape or Radio/BT Power Compact Disc Tray Slide switch: Tuning Knob: Tune to a radio Select FM/BT station in RADIO mode RADIO mode 11 3.5mm Earphone 3.5mm AUX-IN jack jack 13 Volume knob Open/Close CD tray 15 “...
  • Seite 7 Before use, detach stylus guard (white plastic cover) by pulling it straight off the front of the cartridge in the direction of the arrow. 23 Turntable 45 RMP adapter 25 Tone arm Cue-Lever: Use this lever to lift the tone arm 27 Auto switch Speed selector (stopp for records)
  • Seite 8: First Start

    First start Carefully read the manual. Plug the power adapter into a 100-240V AC outlet and the other end into the TX-103 (33). Be reminded: “Non-connected devices always work faulty”. Power on the device by pressing the Power button (7). After that start the mode you like to...
  • Seite 9 Phono mode (Vinyl) Open the Turntable Cover  Lift the Turntable cover all the way up until it stops.  Lower the cover slowly until the latch engages. If the latch does not engage, pull the lower bar by hand. ...
  • Seite 10 1 Label / 2 Grooves / 3 Edge Playing a record ( ! IMPORTANT ! ) When using the turntable, make sure to remove the stylus protector (2). It should easily slide off the cartridge stylus assembly (1). Furthermore make sure to unclip the tone arm lock before use and to secure it again after use.
  • Seite 11  Set the auto/manual stop control: Set the Auto Stop switch to ON to stop the turntable turning when the record is finished. If the switch is set to OFF, the turntable will continue turning.  Remove the stylus guard and unlock the tone arm lock. ...
  • Seite 12 1 Tone Arm / 2 Cue Lever Replacing the Stylus It is recommended that the stylus is replaced as soon as you notice a change in the sound quality. Prolonged use of a worn-out stylus may damage the record. Wear and tear on the stylus will be accelerated when playing 78 RPM records.
  • Seite 13: Cd Mode

    Caution  Do not bend the stylus.  To avoid injury, do not touch the needle.  Turn off the unit‟s power before you replace the stylus.  Keep out of reach of children.  Handle with care as the stylus is delicate. Use of a bent or broken stylus may damage the record and cause malfunction.
  • Seite 14  Printable discs are not recommended for use with this unit as the label side may be sticky and damage the unit.  Do not use protective coating spray on the discs.  Do not write on discs with ball point or hard tipped pens. Only use oil-based felt tipped pens.  Do not use stabilizers.
  • Seite 15  Do not force the tray by hand when it is opening and closing.  Press the OPEN/CLOSE button (▲) to close the tray.  The total number of tracks will appear on the display screen.  The system will start playback automatically after several seconds, or press the PLAY/PAUSE button (▶‖) to start playback.
  • Seite 16: Usb/Sd Mode

    Repeat Function  During playback, press the REPEAT button once to repeat a single track. The “REP” LED indicator light will blink.  During playback, press the REPEAT button one more time to repeat all tracks. The “REP” LED indicator light will stay lit. Program Function ...
  • Seite 17 Playback controls  To pause playback, press the PLAY/PAUSE (▶‖) button once to halt playing. Press it again to continue playback.  To play the previous track, press ◀◀ once or hold down continuously to rapidly progress through previous tracks. ...
  • Seite 18: Bluetooth Mode

    Then you should turn on your phone or other media device and start the Bluetooth searching function, receive carrier will receive the Bluetooth identification number for: “Technaxx TX-103”, when your Bluetooth device is connected, the speaker will beep. And at the same time, select the ▶▶ or ◀◀ or ▶‖ or ■, which can make you pause, interrupt or stop the songs.
  • Seite 19: Tape Mode

    Tape Mode Cassette Tape hints  Metal and Chrome (cobalt) tapes have identification holes.  Use your finger or a pencil to turn the cassette tape‟s hub and take up any slack tape.  Avoid touching the tape. Finger prints attract dust and dirt. ...
  • Seite 20: Aux Mode

    NOTE:  To fast forward the cassette tape, press the Tape Operations button halfway down while the cassette is playing.  To resume normal playback, release the Tape operations button.  To stop playback, press the Tape Operations button completely. Playback will be stopped and the cassette will be ejected.
  • Seite 21: Radio Mode

     Plug one end of the Red and White RCA jacks into the LINE OUT ports at the back of the TX-103 and the other end into R (red) and L (white) sockets at the back of the amplifier or external speakers.
  • Seite 22: Stand-By Function

    Stand-by function  When the deive is not playing music on Phono, CD, USB, SD, AUX, Tape, long press “REP/PROG/STBY” button for 4 seconds, the unit will enter into standby mode. Then short press “▶‖” button, it will work again. ...
  • Seite 23 Important Hints  Unpacking and handling: Open the carton carefully and remove the packing. Remove the poly-bag and retain all packaging for future use. Keep all packaging away from small children and animals.  Positioning the music centre: Place the equipment on a stable surface, away from any heat sources, and ensuring adequate ventilation around the music centre.
  • Seite 24: Nostalgie Bluetooth All-In-One Plattendigitalisierer Tx

    * Gebrauchsanleitung Nostalgie Bluetooth All-in-One Plattendigitalisierer TX-103 Hiermit erklärt der Hersteller Technaxx Deutschland GmbH & Co.KG, dass sich dieses Gerät, zu dem diese Bedienungsanleitung gehört, in Übereinstimmung mit den grundlegenden Anforderungen der Normen gemäß Richtlinie RED 2014/53/EU. Hier finden Sie die Konformitätserklärung: www.technaxx.de/ (in der unteren Leiste unter “Konformitätserklärung”).
  • Seite 25: Inhalt

    Inhalt Besonderheiten 24 Inhalt 25 Technische Daten 26 Produktübersicht 28 Inbetriebnahme 31 CD-Modus 36 USB-/SD-Modus 39 Bluetooth-Modus 41 Kassettenmodus 42 AUX-Modus 43 Radio-Modus 44 Stand-by-Funktion 45 Häufig gestellte Fragen (FAQs) 45 Vor dem Gebrauch  Wählen Sie den Standort Ihres Geräts sorgsam aus. Setzen Sie das Gerät keiner direkten Sonneneinstrahlung aus, und platzieren Sie es nicht in der Nähe von Wärmequellen.
  • Seite 26: Technische Daten

    Technische Daten Bluetooth V2.1; Profil A2DP, EDR & HFP; ~8m offene Bereiche Bluetooth Übertragungsfrequenz 2,4GHz Abgestrahlte Ausgangsleistung max. 2,5mW Modus LP, Kassette, CD, USB, BT, SD, AUX–IN, FM-Radio 2x 4W Stereolautsprecher (10x10x2cm); Eingang ≦ 60mV/30kΩ; Impedanz 4Ω; Lautsprecher Frequenzbereich 60Hz–16kHz Radio 88-108MHz (FM);...
  • Seite 27 Aufnahmezeit 65 Stunden Aufnahmezeit SD-Kartenspeicher SD, SDHC, Micro SD, Micro SDHC, Klasse 10 Verpackungsinhalt Nostalgie Bluetooth All-in-One Plattendigitalisierer TX-103, Adapter für Singleschallplatten mit 45 U/min., Netzteil, Gebrauchsanleitung Hinweise zum Umweltschutz: Verpackungen sind recycelbares Rohmaterial. Alte Geräte nicht im Hausmüll entsorgen.
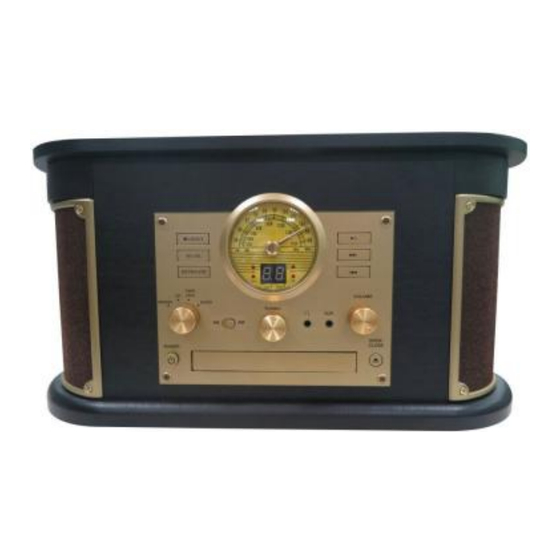
  • Seite 28: Produktübersicht

    Produktübersicht Vorderansicht und Draufsicht Anzeigedisplay Stop: Unterbrechung der Wiedergabe in CD-/USB-/SD-Modus; stoppt Aufnahme. CD/USB/SD: Wechsel zu USB-, SD-Karten- oder CD-Modus Aufnahme/Löschen Wiederholen/Programmieren...
  • Seite 29 Stereo-Lautsprecher (einer auf jeder Seite, 2x 4W) Funktionsdrehknopf: Den Drehknopf zur Auswahl von Schallplatte, CD (USB/SD), AUX/Kassette oder Radio/BT Einschalttaste CD-Fach Schiebeschalter: 10 Einstellknopf: Anpassen Auswahl von FM/BT im Radiofrequenz RADIO-Modus RADIO-Modus. 11 Kopfhöreranschluss 12 AUX–IN Anschluss (3,5 mm) (3,5 mm) 13 Lautstärkeregler 14 CD-Fach öffnen/schließen 15 "<<"...
  • Seite 30 Vor Gebrauch den Nadelschutz (weißen Plastikschutz) abziehen, indem er gerade von der Vorderseite des Tonkopfs in Richtung des Pfeils abgezogen wird. 23 Plattenteller 24 Adapter für 45 U/min. 25 Tonarm 26 Hubhebel: Verwenden Sie diesen Hebel, Tonarm anzuheben 27 Automatischer Stopp für 28 Geschwindigkeitswahlsch alter 29 Tonarmsperre...
  • Seite 31: Inbetriebnahme

    Lesen Sie das Handbuch sorgfältig durch. Stecken Sie den Netzadapter in eine 100-240-V-Steckdose und das andere Ende in den TX-103 (33). Denken Sie daran: "Nicht angeschlossene Geräte funktionieren immer fehlerhaft!" Schalten Sie das Gerät ein, indem Sie die Taste Power (Einschalttaste) (7) drücken. Danach aktivieren...
  • Seite 32 Schallplatten-Modus (Phono) Schallplattendeckel öffnen  Den Schallplattendeckel bis zum Anschlag anheben.  Den Deckel langsam abheben, bis die Verriegelung einrastet. Wenn die Verriegelung nicht einrastet, ziehen Sie den unteren Stift von Hand heraus.  Der Deckel bleibt nun offen. Plattenspielerdeckel schließen ...
  • Seite 33 1 Etikett / 2 Rillen / 3 Ränder Eine Schallplatte abspielen ( ! WICHTIG ! ) Bei Nutzung des Plattenspielers darauf achten, den Nadelschutz (2) zu entfernen. (Er sollte leicht vom Tonabnehmer abgleiten.) Achten Sie darauf, die Tonarmverriegelung vor Gebrauch zu entriegeln und nach Gebrauch wieder zu sichern.
  • Seite 34  Einstellen der automatischen/manuellen Stoppsteuerung: Stellen Sie den automatischen Stoppsteuerungsschalter auf ON (EIN), damit Plattenspieler aufhört sich zu drehen, sobald die Schallplatte am Ende angelangt ist. Ist der Schalter auf OFF (AUS) gestellt, dreht sich der Plattenspieler weiter.  Die Tonkopf-Sperre entfernen und die Tonarmverriegelung entriegeln.
  • Seite 35 1 Tonarm / 2 Hubhebel Austausch der Nadel Ersetzen Sie die Nadel, sobald Sie eine Änderung der Klangqualität bemerken. Eine längere Verwendung einer abgenutzten Nadel kann die Schallplatte beschädigen. Die Abnutzung der Nadel wird bei der Wiedergabe von Schallplatten mit 78 U/min. beschleunigt. A: Entfernen der Nadel aus dem Tonkopf Legen Sie einen Schraubenzieher an die Spitze des Nadelkopfes und drücken Sie nach unten in die auf Zeichnung "A"...
  • Seite 36: Cd-Modus

    Achtung  Die Nadel nicht verbiegen.  Um Verletzungen zu vermeiden, die Nadel nicht berühren.  Schalten Sie die Stromversorgung des Gerätes aus, bevor Sie die Nadel auswechseln.  Außerhalb der Reichweite von Kindern aufbewahren.  Mit Vorsicht handhaben, da die Nadel zerbrechlich ist.
  • Seite 37  Setzen Sie die CDs nicht über längere Zeit direktem Sonnenlicht oder hohen Temperaturen aus. Eine lange Belichtung bei hohen Temperaturen wird die CD verziehen.  Das Abspielen von verzogenen CDs kann das Gerät beschädigen.  Bedruckbare CDs werden nicht für die Verwendung mit diesem Gerät empfohlen, da die Etikettseite klebrig sein und das Gerät beschädigen kann.
  • Seite 38 CD nach Schließen des Fachs blockiert werden.  Das Fach nicht mit Gewalt von Hand bewegen, wenn es sich öffnet oder schließt. Die Taste ÖFFNEN/SCHLIESSEN (▲) drücken, um das Fach zu schließen.  Die Gesamtanzahl der Titel erscheint auf dem Display.
  • Seite 39: Usb-/Sd-Modus

    Wiederholungsfunktion  Während der Wiedergabe die Taste REPEAT (WIEDERHOLEN) einmal drücken, um einen einzelnen Titel zu wiederholen. Die “REP”-LED-Anzeige blinkt.  Während der Wiedergabe die Taste WIEDERHOLEN erneut drücken, um alle Titel zu wiederholen. Die “REP”-LED-Anzeige leuchtet dauerhaft. Programmfunktion  Im STOPP-Modus die PROGRAMM-Taste drücken. Auf dem Display erscheint "01".
  • Seite 40 Wiedergabesteuerung:  Um die Wiedergabe zu pausieren, drücken Sie die Taste WIEDERGABE/PAUSE (▶‖). Drücken Sie die Taste erneut, um die Wiedergabe fortzusetzen.  Um den vorherigen Titel abzuspielen, die Taste ◀◀ für den Schnellrücklauf entsprechend lange gedrückt halten.  Um den nächsten Titel abzuspielen, die Taste ▶▶ für den Schnellvorlauf entsprechend lange gedrückt halten.
  • Seite 41: Bluetooth-Modus

    Bluetooth-Suchfunktion auf, Empfänger erhält Bluetooth-Identifikationsnummer für: "Technaxx TX-103". Wenn Ihr Bluetooth-Gerät verbunden ist, gibt der Lautsprecher einen Signalton ab. Mit den Tasten ▶▶ oder ◀◀ oder ▶‖ oder ■ können Sie über das Gerät Titel auf Ihrem Bluetooth Gerät pausieren, unterbrechen oder stoppen.
  • Seite 42: Kassettenmodus

    Kassettenmodus Hinweise für den Gebrauch von Kassetten  Metall- Chrom- (Kobalt-)Kassettenbänder haben Identifizierungslöcher.  Benutzen Sie Ihren Finger oder einen Bleistift, um das Kassettenband zu drehen und durchhängendes Bandmaterial aufzuwickeln.  Das Berühren des Kassettenbands vermeiden. Fingerabdrücke ziehen Staub und Schmutz an.  Die Kassetten nicht fallenlassen und keinen starken Stößen oder Druck aussetzen.
  • Seite 43: Aux-Modus

    HINWEIS:  Um die Kassette vorzuspulen, drücken Sie die Kassetten-Bedienungstaste während der Wiedergabe halb herunter.  Um die normale Wiedergabe fortzusetzen, lassen Sie die Kassetten-Bedienungstaste los.  Um die Wiedergabe zu stoppen, drücken Sie Kassetten-Bedienungstaste vollständig ein. Die Wiedergabe wird gestoppt und die Kassette wird ausgeworfen. AUX-Modus Musik von einem AUX-Eingang abspielen ...
  • Seite 44: Radio-Modus

    Lieferumfang enthalten).  Stecken Sie ein Ende der roten und weißen Cinchstecker in die LINE-OUT-Anschlüsse an der Rückseite des TX-103 und das andere Ende in die Buchsen R (rot) und L (weiß) an der Rückseite des Verstärkers oder der externen Lautsprecher.
  • Seite 45: Stand-By-Funktion

    Stand-by-Funktion  Wenn das Gerät keine Musik im Phono, CD, USB, SD, AUX, Kassetten-Modus abspielt, die Taste "REP/PROG/STBY" 4 Sek. lang gedrückt halten. Dadurch geht Gerät Standby-Modus über. Dann kurz Taste "▶‖" drücken, um es wieder zu aktivieren.  Spielt das Gerät keine Musik ab, wechselt es nach ca.
  • Seite 46 Wichtige Hinweise  Auspacken und Handhabung: Öffnen Sie vorsichtig die Verpackung und nehmen Sie das Gerät heraus. Die Verpackungsfolie entfernen und zur späteren Verwendung aufbewahren. Halten Sie die Verpackung von Kleinkindern und Tieren fern.  Positionierung des Musikgerätes: Stellen Sie das Gerät auf eine stabile Oberfläche, weg von Wärmequellen und sorgen Sie für ausreichende Belüftung um das Gerät herum.
  • Seite 47: Caractéristiques

    Nostalgique Bluetooth Numériseur de tourne-disque All-in-One TX-103 Par la présente, le fabricant Technaxx Deutschland GmbH & Co.KG déclare, que cet appareil, à laquelle ces manuel d‟utilisation se rapportent, est conforme avec les normes essentielles référencées de la Directive RED 2014/53/UE. Veuillez trouver ici la Déclaration de Conformité: www.technaxx.de/ (sur la barre inférieure “Konformitätserklärung”).
  • Seite 48: Table Des Matières

    Table des matières Caractéristiques 47 Table des matières 48 Caractéristiques techniques 49 Présentation du produit 51 Première mise en marche 54 Mode CD 59 Mode USB/SD 62 Mode Bluetooth 64 Mode Cassette 65 Mode AUX 66 Mode Radio 67 Fonction de veille 68 FAQ 68 Avant utilisation ...
  • Seite 49: Caractéristiques Techniques

    Caractéristiques techniques V2.1; profil A2DP, EDR & HFP; distance ~8m zones Bluetooth ouvertes Bluetooth fréquence de transmission 2,4GHz Puissance de sortie rayonnée max. 2,5mW Phono, Cassette, CD, USB, Bluetooth, SD, AUX–IN, FM Mode radio 2x 4W stéréo (10x10x2cm), SNR ≦60mV / 30kΩ; Haut- parleurs impédance 4Ω;...
  • Seite 50 999 maximum Temps d'enregistrement ~65 heures max. en utilisant 4Go SD, SDHC, Micro SD, Micro SDHC, Carte mémoire SD classe10 Contenu de l’emballage Nostalgique Bluetooth Numériseur de tourne-disque All-in-One TX-103, Adaptateur tours/min.disque, adaptateur secteur, Manuel d'utilisation Conseils pour le respect de l'environnement: Matériaux packages sont des matières premières et...
  • Seite 51: Présentation Du Produit

    Présentation du produit Vue de face et vue de haut Tableau d'affichage Arrêt: Arrêter la lecture en modes CD/USB/SD ; arrêter d‟enregistrer. CD/USB/SD: Passer au mode CD, carte SD ou Enregistrer/Supprimer) Répéter/Programmation...
  • Seite 52 Haut-parleurs stéréo (un de chaque côté, 2x 4W) Bouton de fonction: Tourner le bouton pour sélectionner Phono, CD (USB/SD), AUX/Tape (AUX/Cassette) ou Radio/BT Alimentation Plateau CD Interrupteur à Bouton de réglage: Régler glissière: Sélec- tionner une station de radio en mode FM/BT en mode RADIO RADIO 11 Prise Casque 3,5mm...
  • Seite 53 Avant utilisation, détachez le cache de la pointe de lecture (couvercle en plastique blanc) en le retirant de l’avant de la cartouche dans le sens de la flèche. Tourne-disque Adaptateur pour 45 tours Bras de lecture Relève-bras: Utiliser levier pour lever le bras de lecture Bouton automatique Sélecteur de vitesse...
  • Seite 54: Première Mise En Marche

    Première mise en marche Lisez attentivement le manuel. Branchez l'adaptateur secteur sur une prise secteur 100-240V et l'autre extrémité sur le TX-103 (33). À titre de rappel : « Des appareils non branchés fonctionnent toujours mal ». Allumez l‟appareil en appuyant sur le bouton Power...
  • Seite 55 Mode Phono (vinyle) Ouvrir le couvercle du tourne-disque  Soulevez le couvercle du tourne-disque à fond jusqu‟à ce qu‟il s‟arrête.  Abaissez lentement le couvercle jusqu‟à ce que le verrou s‟enclenche. Si le verrou ne s‟enclenche pas, tirez la barre du bas à la main.
  • Seite 56 1 Étiquette / 2 Cannelures / 3 Bord Écouter un disque ( ! IMPORTANT !) En cas d‟utilisation du tourne-disque, veillez à retirer la protection de la pointe de lecture (2). Elle devrait facilement glisser de l‟ensemble de la pointe de lecture de la cartouche (1). Assurez-vous en outre de détacher le verrou du bras de lecture avant utilisation et de le fixer à...
  • Seite 57  Réglez la commande d‟arrêt automatique/manuel: Réglez le bouton d‟arrêt automatique sur ON (MARCHE) que le tourne-disque arrête de tourner à la fin du disque. Si le bouton est réglé sur OFF(ARRÊT), le tourne-disque continuera de tourner.  Enlevez la protection de la pointe de lecture et débloquez le verrou du bras de lecture.
  • Seite 58 1 Bras de lecture / 2 Relève-bras Remplacer la pointe de lecture Il est recommandé de remplacer la pointe de lecture dès tout changement constaté au niveau de la qualité du son. L'utilisation prolongée d'une pointe de lecture usée peut endommager le disque. L'usure et la détérioration de la pointe de lecture s‟accéléreront en cas de lecture de 78 tours.
  • Seite 59: Mode Cd

    Attention  Ne pliez pas la pointe de lecture.  Ne touchez pas l‟aiguille pour éviter tout risque de blessures.  Éteignez l‟appareil avant de remplacer la pointe de lecture.  Tenez hors de portée des enfants.  Manipulez avec soin car la pointe de lecture est sensible. L'utilisation d'une pointe de lecture pliée ou cassée peut endommager le disque et entraîner un dysfonctionnement.
  • Seite 60  N'exposez pas les disques aux rayons directs du soleil ou à des températures élevées pendant des périodes prolongées. Une longue exposition à des températures élevées déformera le disque.  L‟écoute de disques déformés peut endommager l‟appareil.  Les disques imprimables ne sont pas recommandés pour cet appareil car la face étiquetée peut être collante et endommager l‟appareil.
  • Seite 61  Ne forcez pas l‟ouverture et la fermeture du plateau.  Appuyez sur le bouton OUVRIR/FERMER (▲) pour fermer le plateau.  Le nombre total de titres s‟affichera sur l‟écran.  La chaîne commencera la lecture automatiquement après plusieurs secondes, ou appuyez sur le bouton LECTURE/PAUSE (▶‖) pour commencer la lecture.
  • Seite 62: Mode Usb/Sd

    Fonction Répéter  Pendant la lecture, appuyez une fois sur le bouton RÉPÉTER pour répéter un seul titre. Le témoin LED «RÉP» clignotera.  Pendant la lecture, appuyez une nouvelle fois sur le bouton RÉPÉTER pour répéter tous les titres. Le témoin LED «RÉP» restera allumé.
  • Seite 63 Commandes de lecture  Pour mettre la lecture en pause, appuyez une fois sur le bouton LECTURE/PAUSE ( ▶ ‖) pour interrompre la lecture. Appuyez à nouveau sur ce bouton pour la reprendre.  Pour écouter le titre précédent, appuyez une fois sur ◀ ◀ ou maintenez ce bouton enfoncé...
  • Seite 64: Mode Bluetooth

    Bluetooth: « Technaxx TX-103 », une fois votre dispositif Bluetooth connecté, le haut-parleur émettra un son. Au même moment, sélectionnez ▶▶ ou ◀◀ ou ▶‖ ou ■, pour pause, interrompre ou arrêter la lecture de chansons. Pour quitter la fonction, réglez le commutateur à glissière de Bluetooth sur FM ou tournez simplement le commutateur de fonction.
  • Seite 65: Mode Cassette

    Mode Cassette Conseils sur les cassettes  Les cassettes au chrome (cobalt) et en métal disposent d‟orifices d‟identification.  Utilisez votre doigt ou un crayon pour tourner le moyeu de la bande de la cassette et tendre la bande.  Évitez de toucher la bande.
  • Seite 66: Mode Aux

    REMARQUE: Une extrémité de la bande restera visible.  Pour effectuer une avance rapide de la bande, appuyez sur le bouton Fonction de cassette à mi-course pendant la lecture de la cassette.  Pour reprendre la lecture normale, relâchez le bouton Fonction de cassette.
  • Seite 67: Mode Radio

    établir cette connexion (non inclus).  Insérez une extrémité des connecteurs RCA blanc et rouge dans les ports SORTIE DE LIGNE à l‟arrière de l‟appareil (TX-103), et l‟autre extrémité aux prises B (blanche) et R (rouge) à l‟arrière de l‟amplificateur ou des haut-parleurs externes.
  • Seite 68: Fonction De Veille

    Fonction de veille  Si l‟appareil ne lit pas la musique en mode Phono, CD, USB, SD, AUX, Cassette, appuyez sur le bouton «REP/PROG/VEILLE» pendant 4 sec., et l‟appareil passera en mode veille. Puis, appuyez brièvement sur le bouton « ▶‖ », et la lecture reprendra.  L'appareil passera automatiquement en mode veille après environ 15 minutes si l‟appareil ne lit pas la musique.
  • Seite 69 Conseils importants  Déballage et assemblage: Ouvrez le carton avec précautions et retirez l'emballage. Retirez le sachet plastique et conservez-le pour utilisation future. Veillez à ne laisser aucun élément d'emballage à portée des petits enfants ou des animaux.  Positionnement du système musical: Placez l'équipement sur une surface stable, hors de portée des sources de chaleur, en veillant à...
  • Seite 70: Características

    Nostálgico Bluetooth Digitalizador para disco de vinilo All-in-One TX-103 Por la presente el fabricante Technaxx Deutschland GmbH & Co.KG declara que este dispositivo, al que se refiere esta manual de usuario, cumple con los requisitos esenciales de las normativas a las que hace referencia la Directiva RED 2014/53/UE. Aquí encontrará...
  • Seite 71: Contenido

    Contenido Características 70 Contenido 71 Especificaciones técnicas 72 Visión general del producto 74 Primer inicio 77 Modo CD 82 Modo USB/SD 85 Modo Bluetooth 87 Modo casete 88 Modo AUX 89 Modo de radio 90 Función en espera 91 Preguntas frecuentes 91 Antes de usar ...
  • Seite 72: Especificaciones Técnicas

    Especificaciones técnicas Bluetooth V2.2; perfil A2DP, EDR & HFP; distancia ~8m áreas abiertas Bluetooth frecuencia de transmisión 2,4GHz Potencia de salida radiada máx. 2,5mW Fonógrafo, cassette, CD, USB, Bluetooth, SD, AUX–IN, Modos radio FM 2x 4W altavoces estéreo (10x10x2cm); SNR ≦60mV/30kΩ; Altavoces impedancia 4Ω;...
  • Seite 73 SD, SDHC, MicroSD, MicroSDHC, clase 10 Contenido del paquete Nostálgico Bluetooth Digitalizador para disco de vinilo All-in-One TX-103, Adaptador de discos 45 rev./min., adaptador de corriente, Manual del usuario Consejos para la protección del medio ambiente: No elimine los dispositivos antiguos junto con los residuos domésticos.
  • Seite 74: Visión General Del Producto

    Visión general del producto Vista frontal y vista superior Pantalla Parar: Detener reproducción en modos CD/USB/SD; detener grabación. CD/USB/SD: Cambiar a modos USB, tarjeta SD o Grabar/Borrar Repetir/Programa...
  • Seite 75 Altavoces estéreo (uno a cada lado, 2x 4W) Mando multifunción: Girar el mando para seleccionar Phono (Fonógrafo), CD (USB/SD), AUX/Tape (Casete) o Radio/BT. Alimentación Bandeja de disco compacto Interruptor deslizante: 10 Sintonizador: Girar para Seleccionar FM/BT sintonizar emisoras de radio modo RADIO en modo RADIO 11 Toma: auricular 3.5mm...
  • Seite 76 Antes de usar, retirar el protector de la aguja (cubierta de plástico blanco) tirando recto por la parte frontal del cartucho en dirección de la flecha. Tocadiscos Adaptador de 45RPM Brazo reproductor Palanca: Utilizar esta palanca para elevar brazo reproductor Interruptor automático Selector de velocidad (detener...
  • Seite 77: Primer Inicio

    Lea atentamente el manual. Enchufe el adaptador de corriente en una toma de corriente de 100-240V CA y el otro extremo en el TX-103 (33). Recuerde: “Los dispositivos no conectados siempre funcionan mal”. Encender el dispositivo pulsando el botón Power...
  • Seite 78 Modo Fonógrado (Vinilo) Abrir la tapa del tocadiscos  Levantar la tapa del tocadiscos hasta arriba del todo hasta que se detenga.  Bajar la cubierta lentamente hasta que se active el cierre de enganche. Si el cierre no se engancha, tire manualmente de la barra para enderezarla.
  • Seite 79 1 Sello / 2 Surcos / 3 Borde Reproducir un disco ( ¡ IMPORTANTE ! ) Cuando use el tocadiscos, asegúrese de quitar el protector de la aguja (2). Deberá salir fácilmente del soporte para el cartucho de la aguja (1). Además asegurarse de desenganchar el cierre del brazo reproductor antes de usarlo y engancharlo después de usarlo.
  • Seite 80  Configurar el control automático/manual de parada: Configurar el interruptor de parada automática en ON (Encendido) que el tocadiscos deje de girar cuando termine el disco. Si el interruptor se configura en OFF (Apagado), el tocadiscos seguirá girando. Quitar el protector de la aguja y abrir el cierre del brazo reproductor.  Pulsar la palanca para elevar el brazo reproductor y luego muévalo suavemente sobre la posición deseada del disco.
  • Seite 81 1 Brazo reproductor / 2 Palanca Cambiar la aguja Se recomienda cambiar la aguja en cuanto detecte un cambio en la calidad del sonido. El uso prolongado de una aguja desgastada puede dañar el disco. El desgaste de la aguja se acelerará cuando se reproduzcan discos a 78 RPM.
  • Seite 82: Modo Cd

    Precaución  No doblar la aguja.  Para evitar lesiones, no toca la aguja.  Apagar la unidad antes de cambiar la aguja.  Mantener fuera del alcance de los niños.  Manejar con cuidado puesto que la aguja es frágil.
  • Seite 83 temperaturas altas doblaría el disco.  Reproducir discos doblados puede averiar la unidad.  Los discos imprimibles no están recomendados con esta unidad puesto que el lado de la etiqueta puede estar pegajoso y averiar la unidad.  No utilizar spray para dar una capa protectora a los discos.
  • Seite 84  No forzar la bandeja con la mano cuando se esté abriendo y cerrando.  Pulsar el botón ABRIR/CERRAR (▲) para cerrar la bandeja.  El número total de pistas aparecerá en la pantalla.  El sistema empezará a reproducir automáticamente después de varios segundos, o pulsar el botón REPRODUCIR/PAUSA ( ▶...
  • Seite 85: Modo Usb/Sd

    Función para repetir  Durante la reproducción, pulsar el botón REPETIR una vez para repetir una sola pista. El indicador LED “REP” parpadeará.  Durante la reproducción, pulsar el botón REPEAT (REPETIR) una vez más para repetir todas las pistas. El indicador LED “REP” se quedará...
  • Seite 86 Controles de reproducción:  Para pausar reproducción, pulse botón REPRODUCIR/PAUSA (▶‖) una vez. Pulse de nuevo para seguir reproduciendo.  Para reproducir la pista anterior, pulsar ◀◀ una vez o dejar pisado continuamente para avanzar rápidamente por pistas anteriores.  Para reproducir la pista siguiente, pulsar ▶▶ una vez o dejar pisado continuamente para avanzar rápidamente por pistas.
  • Seite 87: Modo Bluetooth

    Bluetooth. El dispositivo recibirá el número de identificación: “Technaxx TX-103”. Cuando el dispositivo Bluetooth esté conectado el altavoz pitará. Al mismo tiempo, seleccione ▶▶ o ◀ ◀ o ▶ ‖ o ■, que le permite pausar, interrumpir o parar las canciones.
  • Seite 88: Modo Casete

    Modo casete Consejos para cintas de casete  Las cintas metálicas y de cromo (cobalto) tienen orificios de identificación.  Utilice el dedo o un lápiz para girar los ejes de la cinta y recoger cinta suelta.  Evite tocar la cinta. Las huellas de los dedos coger polvo y suciedad.
  • Seite 89: Modo Aux

    Nota:  Para avanzar rápidamente la cinta de casete, pulsar el botón de funcionamiento de casete hacia abajo, a mitad de recorrido, mientras se reproduce el casete.  Para continuar con la reproducción normal, soltar el botón de funcionamiento de casete.  Para parar la reproducción, pulsar el botón de funcionamiento de casete completamente.
  • Seite 90: Modo De Radio

    Conectar auriculares  Ajuste el volumen a un nivel adecuado antes de ponerse los auriculares.  Conecte su toma de auricular de 3.5mm a la toma de auriculares. Conectar a un amplificador externo  Esta opción le permite reproducir música de tocadiscos con amplificador o altavoces externos.
  • Seite 91: Función En Espera

    Función en espera  Cuando el dispositivo no está reproduciendo música en Phono (Fonógrafo), CD, USB, SD, AUX, Casete, mantener pulsado el botón “REPETIR/PROGRAMA/ESPERA” durante 4 seg. para que la unidad pase a modo de espera. Luego hay que volver a pulsar “▶‖” brevemente para que se reactive.
  • Seite 92 Consejos importantes  Desembalaje y manipulación: Abra el paquete con cuidado y retire el embalaje. Extraiga la bolsa de plástico y conserve el embalaje para usos futuros. Mantenga alejado el embalaje de los niños pequeños y animales.  Posición del centro musical: Coloque el equipo en una superficie estable, alejada de toda fuente de calor y asegúrese de que el centro musical tiene una ventilación adecuada.
  • Seite 93: Cechy

    Technaxx Nostalgiczny Bluetooth Konwerter dla płyta All-in-One TX-103 Niniejszym producenta Technaxx Deutschland GmbH & Co.KG oświadcza, że to urządzenie, do którego odnoszą się instrukcja obsługi, jest zgodny z zasadniczymi wymaganiami norm określonych dyrektywą Rady RED 2014/53/UE. Deklarację zgodności odnajdziesz na stronie: www.technaxx.de/ (w pasku na dole "Konformitätserklärung").
  • Seite 94: Zawartość

    Zawartość Cechy 93 Zawartość 94 Dane techniczne 95 Przegląd produktu 97 Pierwsze uruchomienie 100 Tryb CD 105 Tryb USB/SD 108 Tryb Bluetooth 110 Tryb taśmy magnetofonowej 111 Tryb AUX 112 Tryb radia 113 Funkcja pogotowia 114 FAQ (często zadawane pytania) 114 Przed użyciem ...
  • Seite 95: Dane Techniczne

    Dane techniczne V2.1; profil A2DP, EDR & HFP; ~8m zasięg transmisji Bluetooth (zakres otwarty) Bluetooth częstotliwość transmisji 2,4GHz Promieniowana moc wyjściowa maks. 2,5mW Płyt winylowych, kaseta, CD, USB, Bluetooth, SD, AUX–IN, Tryb radio FM 2x 4W głośników stereo (10x10x2cm); SNR ≦60mV/30kΩ; Głośniki impedancja 4Ω;...
  • Seite 96 SD do 4GB SD, SDHC, Micro SD, Micro SDHC, klasa 10 Zawartość opakowania Nostalgiczny Bluetooth Konwerter dla płyta All-in-One TX-103, Adapter do płyt 45 obr./min., napájecí adaptér, Instrukcja obsługi Wskazówki dotyczące ochrony środowiska: Materiały opakowania utworzono z surowców wtórnych imożna poddać...
  • Seite 97: Przegląd Produktu

    Przegląd produktu Widok od przodu i z góry Panel wyświetlacza Stop: Zatrzymanie odtwarzania w trybach CD/USB/SD; zatrzymanie nagrywania. CD/USB/SD: Przełącznik na tryb USB, kartę SD czy CD Nagrywanie/Usuwanie 4 Powtórz/Program...
  • Seite 98 Głośniki stereofoniczne (1 z każdej strony, 2x 4W) Pokrętło ustawiania funkcji: Obrócić pokrętłem w celu wyboru trybu Phono, CD (USB/SD), AUX/Tape czy Radio/BT Zasilanie Szuflada na CD Posuvný spínač: Wybrać 10 Pokrętło strojenia FM/BT w trybie RADIO Dostrojenie fali stacji radiowej w trybie RADIO 11 Gniazdko słuch.
  • Seite 99 Przed użyciem zdjąć osłonę igły gramofonowej (biała plastikowa pokrywka) poprzez wyciągnięcie przodu wkładki, zgodnie z kierunkiem strzałki. 24 45 Łącznik RMP 23 Talerz obrotowy 25 Ramię gramofonu 26 Dźwigniaramienia-gramofonu: Służy podnoszeniaramienia gramofonu 27 Przełącznik auto 28 Przełącznik wyboru prędkości (stopp rekordów) ramienia 30 Wkładka z igłą...
  • Seite 100: Pierwsze Uruchomienie

    32 Wyjście RCA (lewe i prawe) 31 Antena FM 33 Dutá zásuvka (DC12V/2A) Pierwsze uruchomienie Z uwagą przeczytać indtrukcję. Zapojte napájecí adaptér do zásuvky 100-240V AC a druhý konec do TX-103 (33). Należy pamiętać: „Niepodłączone do takiej sieci elektrycznej urządzenia zawsze działają wadliwie". Włączyć...
  • Seite 101 Tryb Fono (płyta winylowa) Otwieranie pokrywy gramofonu  Całkowicie otworzyć pokrywę gramofonu, aż do oporu.  Następnie obniżyć pokrywę aż załączy się zatrzask. Jeśli zatrzask nie załącza się, ręką pociągnąć dolną podporę.  Tera pokrywa pozostanie otwarta. Zamykanie pokrywy gramofonu ...
  • Seite 102 1 Etykieta / 2 Rowki / 3 Brzeg Odtwarzanie zapisu z płyty ( ! WAŻNE ! ) Uruchamiając gramofon, upewnić się o zdjęciu osłony igły (2). Powinna się łatwo zsunąć z zespołu wkładki gramofonowej (1). Ponadto należy pamiętać aby przed użyciem odłączyć blokadę ramienia i zabezpieczyć...
  • Seite 103  Ustawić tryb zatrzymywania automatycznego/ręcznego: Ustawić przełącznik Auto Stop w pozycji ON (WŁ), aby płyta przestała się obracać po zakończeniu odtwarzania. Jeśli ten przełącznik jest wyłączony OFF (WYŁ.)., talerz gramofonu będzie nadal się obracał po zakończeniu odtwarzania.  Zdjąć osłonę igły i odblokować blokadę...
  • Seite 104 1 Ramię gramofonu /2Dźwignia podnoszenia Wymiana igły gramofonowej Zaleca się wymianę igły gramofonowej z chwilą zauważenia pogorszenia się jakości dźwięku. Zbyt długie użytkowanie zużytej igły może uszkadzać odtwarzane płyty. Szybkość zużywania się igły będzie większa przy odtwarzaniu płyt 78 obr/min. A: Wyjmowanie igły z obudowy Umieścić...
  • Seite 105: Tryb Cd

    Ostrzeżenia  Nie wolno zginać igły.  Aby uniknąć skaleczenia, nie dotykać igły.  Przed wymianą igły wyłączyć zasilanie urządzenia.  Przecho- wywać w miejscu niedostępnym dla dzieci.  Obchodzić się ostrożnie, gdyż igła jest delikatna. Używanie zgiętej lub uszkodzonej igły może uszkadzać...
  • Seite 106  Odtwarzanie płyt zdeformowanych może uszkodzić urządzenie. Nie zaleca się odtwarzania nagrywalnych płyt SD na tym urządzeniu, gdyż strona etykietowa CD może być lepka, co może uszkodzić urządzenie.  Nie stosować powłok ochronnych na płytach CD.  Nie pisać na płytach długopisem ani zaostrzonymi ołówkami.
  • Seite 107  Nie wywierać na szufladę siły podczas jej wysuwania czy  zamknąć szufladę, nacisnąć przycisk zamykania. OTWÓRZ/ZAMKNIJ (▲).  Na ekranie wyświetli się łączna liczba ścieżek.  Po kilku sekundach system automatycznie rozpocznie odtwarzanie, lub wcisnąć przycisk ODTWARZANIE/PAUZA (▶‖) w celu uruchomienia odtwarzania.
  • Seite 108: Tryb Usb/Sd

    Funkcja powtarzania (REPEAT)  Podczas odtwarzania nacisnąć jeden przycisk REPEAT(POWTÓRZ) w celu powtórzenia pojedynczej ścieżki. Zamiga kontrolka LED „REP”.  Podczas odtwarzania nacisnąć przycisk REPEAT(POWTÓRZ) jeszcze jeden raz, aby powtórzyć wszystkie ścieżki. Kontrolka LED „REP” zaświeci światłem ciągłym. Funkcja PROGRAM ...
  • Seite 109 Przyciski sterowania odtwarzaniem:  wstrzymać odtwarzanie, nacisnąć przycisk ODTWARZANIE/PAUZA (▶‖), aby zatrzymać odtwarzanie. Nacisnąć go ponownie, aby kontynuować odtwarzanie.  Aby odtworzyć poprzednią ścieżkę, nacisnąć raz przycisk ◀◀ lub przytrzymać stale w celu szybkiego przejścia przez poprzednie ścieżki.  Aby odtworzyć następną ścieżkę, nacisnąć raz przycisk ▶▶ lub przytrzymać...
  • Seite 110: Tryb Bluetooth

    Bluetooth: nośnik odbiorczy otrzyma numer identyfikacyjny Bluetooth dla: „Technaxx TX-103”; w momencie uzyskania połączenia z urządzeniem Bluetooth, głośnik wyda dźwięk. Jednocześnie wybrać ▶▶lub ◀◀ lub ▶‖ czy ■, co może wstrzymać, przerwać...
  • Seite 111: Tryb Taśmy Magnetofonowej

    Tryb taśmy magnetofonowej Wskazówki dotyczące taśmy magnetofonowej  Taśmy metalowe i chromowane (kobaltowe) posiadają przerwy identyfikacyjne.  Palcem lub ołówkiem obrócić piastą kasety magnetofonowej w celu usunięcia luzu taśmy w kasecie.  Unikać dotykania taśmy. Odciski palców przyciągają kurz i brud.  Unikać upuszczania czy poddawania kasety nadmiernym uderzeniom czy działaniu siły.
  • Seite 112: Tryb Aux

    UWAGA:  Aby taśmę kasety przewijać do przodu, nacisnąć przycisk Tape Operations/Operacje taśmą do połowy w trakcie odtwarzania kasety.  Aby wznowić normalne odtwarzanie, należy zwolnić przycisk operacji taśmą.  Aby zatrzymać odtwarzanie, należy całkowicie wcisnąć przycisk Tape Operations/Operacji taśmą. Odtwarzanie zostanie zatrzymane, a kaseta zostanie wyrzucona.
  • Seite 113: Tryb Radia

    Podłączanie słuchawek  Ustawić głośność na odpowiedni poziom przed założeniem słuchawek.  Podłączyć wtyk słuchawek 3,5mm do gniazda słuchawkowego. Podłączenie do zewnętrznego wzmacniacza  Ta właściwość umożliwia odtwarzanie muzyki z gramofonu poprzez wzmacniacz czy zewnętrzne głośniki. Aby wykonać to połączenie potrzebny jest przewód RCA (poza zestawem). ...
  • Seite 114: Funkcja Pogotowia

    Funkcja pogotowia (Stand-by)  Gdy urządzenie nie gra w ustawieniu Phono, CD, USB, SD, AUX, Tape, nacisnąć i przytrzymać przycisk „REP/PROG/STBY” przez ok. 4 sekundy; urządzenie przejdzie do trybu standby (pogotowie). Następnie krótko nacisnąć przycisk „ ▶ ‖", urządzenie ponownie zacznie pracować.
  • Seite 115 Ważne wskazówki  Rozpakowanie i obsługa: Otwórz opakowanie ostrożnie i wyciagnij radio. Usuń folie z radia i zachowaj wszystkie opakowania w celu późniejszego wykorzystania. Umieść opakowanie z dala od małych dzieci i zwierząt.  Pozycjonowanie centrum muzycznego: Urządzenia należy umieścić na stabilnej powierzchni, z dala od źródeł...
  • Seite 116: Bijzonderheden

    * Gebruiksaanwijzing Nostalgische Bluetooth Platendigitalisierer All-in-One TX-103 Hierbij de fabrikant Technaxx Deutschland GmbH & Co.KG verklaart, dat dit product, waarop deze gebruiksaanwijzing betrekking hebben, is in overeenstemming met de voorschriften die zijn vermeld in Richtlijn RED 2014/53/EU. De Conformiteitsverklaring is te raadplegen op: www.technaxx.de/ (in de onderste balk “Konformitätserklärung”).
  • Seite 117: Inhoud

    Inhoud Bijzonderheden 116 Inhoud 117 Technische specificaties 118 Productoverzicht 120 Eerste keer gebruiken 123 CD Modus 128 USB/SD modus 131 Bluetooth modus 133 Cassette modus 134 AUX modus 135 Radio modus 136 Stand-by functie 137 Veelgestelde vragen 137 Voor gebruik ...
  • Seite 118: Technische Specificaties

    Technische specificaties V2.1; profiel A2DP, EDR & HFP; ~8m zendbereik open Bluetooth gebieden Bluetooth-zendfrequentie 2,4GHz Uitgestraalde uitgangsvermogen max. 2,5mW Platen, Cassette, CD, USB, Bluetooth, SD, AUX–IN, Modus FM-radio 2x 4W stereo luidsprekers (10x10x2cm); SNR ≦ Luidsprekers 60mV/30kΩ; impedantie 4Ω; frequentiebereik 60Hz–16kHz Radio 88-108MHz (FM);...
  • Seite 119 Reinig het toestel uitsluitend met een zachte doek. Vermijd het gebruik van ruwe of schurende materialen. Gebruik GEEN oplosmiddelen of andere agressieve schoonmaak- middelen. Veeg het toestel na het reinigen zorgvuldig af. Distributeur: Technaxx Deutschland GmbH & Co.KG, Kruppstr. 105, 60388 Frankfurt a.M., Duitsland...
  • Seite 120: Productoverzicht

    Productoverzicht Voor- en bovenaanzicht Display Stop: Stop afspelen in CD/USB/SD modi; stop opname. CD/USB/SD: Schakel naar USB, SD kaart of CD modi Opnemen/Wissen Herhalen/Programmeren Stereo luidsprekers (een aan elke kant, 2x 4W)
  • Seite 121 Functieknop: Draai de knop om Platenspeler, CD (USB/SD), AUX/Cassette of Radio/BT te kiezen Voeding CD lade Schuif schakelaar: 10 Afstemknop: Stem af op een Kies FM/BT in RADIO radiostation in RADIO modus modus 11 3,5mm koptelefoon 12 3,5mm AUX-IN aansluiting aansluiting 13 Volumeknop 14 Open/Sluit CD lade...
  • Seite 122 Verwijder voor gebruik beschermkapje (wit plastic kapje) van de naald door het recht van de voorkant van het element te trekken in de richting van de pijl. 23 Draaitafel 24 45 rpm adapter 25 Pick-up arm 26 Hendel: Gebruik deze om de arm van de platenspeler omhoog te bewegen 27 Automatisch schakelaar...
  • Seite 123: Eerste Keer Gebruiken

    Eerste keer gebruiken Lees de handleiding zorgvuldig. Sluit de voedingsadapter aan op een 100-240V stopcontact en het andere uiteinde op de TX-103 (33). Onthoud: “Niet aangesloten apparaten werken nooit goed”. Zet het apparaat aan door op de Power (aan/uit) knop (7) te drukken. Start...
  • Seite 124 Platenspeler modus (Vinyl) Open het deksel van de platenspeler  Til het deksel van de platenspeler helemaal omhoog tot hij niet verder kan.  Laat het deksel langzaam zakken tot deze vergrendelt. Als deze niet vergrendelt, trek de onderste staaf dan met de hand omlaag.
  • Seite 125 1 Label / 2 Groeven / 3 Rand Een plaat afspelen ( ! BELANGRIJK ! ) Zorg dat u bij het gebruik van de draaitafel de bescherming van de naald (2) verwijdert. Deze dient eenvoudig van het element (1) te glijden.
  • Seite 126  Stel de auto/handmatig stop regelaar in: Stel de auto stop regelaar in op ON (AAN) u wilt dat de draaitafel stopt met draaien wanneer het eind van de plaat bereikt is. Als de schakelaar op OFF (UIT) staat zal de draaitafel doorgaan met draaien.  Verwijder de bescherming van de naald en ontgrendel de arm.
  • Seite 127 1 Pick-up arm / 2 Hendel De naald vervangen Wij raden aan dat de naald vervangen wordt zodra u een verandering in de geluidskwaliteit opmerkt. Langer gebruik van een versleten naald kan de plaat beschadigen. Slijtage van de naald gaat sneller bij het spelen van 78 rpm platen. A: De naald verwijderen uit het element Zet een schroevendraaier op de voorkant van de naaldhouder en druk omlaag in de in afbeelding “A”...
  • Seite 128: Cd Modus

    Opgelet  Buig de naald niet.  Om verwondingen te voorkomen dient u de naald niet aan te raken.  Zet het apparaat uit voordat u de naald vervangt.  Buiten het bereik van kinderen houden.  Voorzichtig behandelen omdat de naald kwetsbaar is. Gebruik van een verbogen of kapotte naald kan de plaat beschadigen en storingen veroorzaken.
  • Seite 129: Als U Twijfels

    gedurende langere tijd. Lange blootstelling aan hoge temperaturen vervormt het schijfje.  Het afspelen van vervormde schijfjes kan het apparaat beschadigen.  Bedrukbare schijfjes worden niet aangeraden voor gebruik in dit apparaat omdat de kant met het label kleverig kan zijn en het apparaat dus kan beschadigen.  Gebruik geen beschermde coating spray op de schijfjes.
  • Seite 130  Forceer de lade niet met de hand als deze open of dicht gaat. Druk op de OPEN/SLUITEN knop (▲) om de lade te sluiten.  Het totaal aantal nummers zal op het display verschijnen.  Het systeem start na een paar seconden automatisch met afspelen, of druk op de AFSPELEN/PAUZE knop (▶‖) om het afspelen te starten.
  • Seite 131: Usb/Sd Modus

    Herhaal functie  Druk tijdens het afspelen eenmaal op de REPEAT (HERHALEN) knop om een enkel nummer te herhalen. Het LED indicatielampje “REP” (HERH) gaat knipperen.  Druk tijdens het afspelen nog eens op de HERHALEN knop om alle nummers te herhalen. Het LED indicatielampje “REP” (HERH) gaat constant branden.
  • Seite 132 Afspelen:  Om het afspelen te pauzeren, drukt u eenmaal op de AFSPELEN/PAUZE (▶‖) knop. Druk opnieuw in om te hervatten. Om het vorige nummer af te spelen drukt u eenmaal op ◀◀ of u houdt deze ingedrukt om snel door de vorige nummers te bladeren. ...
  • Seite 133: Bluetooth Modus

    Bluetooth zoekfunctie starten. het toestel ontvangt het Bluetooth identificatienummer voor: “Technaxx TX-103”, wanneer uw Bluetooth apparaat is verbonden, zal de luidspreker een pieptoon geven. Tegelijkertijd kiest u de ▶▶ of ◀◀ of ▶‖ of ■ waarmee u de muziek kunt pauzeren, onderbreken of stoppen.
  • Seite 134: Cassette Modus

    Cassette modus Hints voor cassettes  Metal Chrome (kobalt) cassettes hebben identificatieopeningen.  Gebruik een vinger of potlood om de wieltjes van de cassette te draaien en loszittende tape op te draaien.  Voorkom aanraken van de tape. Vingerafdrukken trekken stof en vuil aan.
  • Seite 135: Aux Modus

    OPMERKING:  Om de tape snel vooruit te spoelen, drukt u de bedieningsknop voor tape half in terwijl de cassette speelt.  Om het normale afspelen te hervatten, laat u de knop weer los.  Om het afspelen te stoppen, drukt u de bedieningsknop voor tape helemaal in.
  • Seite 136: Radio Modus

    De hoofdtelefoon aansluiten  Zet het volume op een geschikt niveau voor u de hoofdtelefoon op zet.  Sluit uw 3,5mm hoofdtelefoonstekker aan op de hoofdtelefoonaansluiting. Aansluiten op een externe versterker  Met deze mogelijkheid kunt u muziek van uw platenspeler afspelen via een versterker of externe luidsprekers.
  • Seite 137: Stand-By Functie

    Stand-by functie  Als het apparaat geen muziek afspeelt via Phono (Platenspeler), CD, USB, SD, AUX, Cassette, druk dan op de “REP/PROG/STBY” (HERH/PROG/STBY) knop gedurende 4 seconden. Het apparaat gaat dan in stand-by modus. Druk dan kort op de “▶‖” knop en het apparaat schakelt weer in.
  • Seite 138 Belangrijke Tips  Uitpakken en hanteren: Open de doos zorgvuldig en verwijder de verpakking. Verwijder de polybag en houd alle verpakkingen voor toekomstig gebruik. Houd alle verpakkingen weg van kleine kinderen en dieren.  Het digitalisierer plaatsen: Plaats de digitalisierer op een stabiel oppervlak, weg van warmtebronnen en zorg voor voldoende ventilatie in het digitalisierer.
  • Seite 139: Vlastnosti

    Nostalgická Bluetooth Digitizér pro vinylowé desky All-in-One TX-103 Tímto výrobcem Technaxx Deutschland GmbH & Co.KG prohlańuje, ņe tento výrobek , ke kterému se tyto návod k obsluze, splňuje poņadavky základními norem uvedených ve směrnici Rady RED 2014/53/EU. Prohláńení o shodě naleznete zde: www.technaxx.de/ (v lińtě...
  • Seite 140: Obsah

    Obsah Vlastnosti 139 Obsah 140 Technické údaje Přehled součástí výrobku: První spuštění 146 Režim CD 151 Režim USB/SD Režim Bluetooth 156 Režim kazetový magnetofon 157 Režim AUX Režim rádio Funkce pohotovostní režim 160 Často kladené otázky 160 Před použitím  Pečlivě zvolte místo pro instalaci vańeho zařízení. Neumísťujte je na přímé sluneční...
  • Seite 141: Technické Údaje

    Technické údaje V2.1; perfil A2DP, EDR & HFP; vzdálenost ~8m otevřené Bluetooth plochy Bluetooth vysílací frekvence 2,4GHz Vyzářený vysílaný výstupní výkon max. 2,5mW Gramofon, kazeta, CD, USB, Bluetooth, SD, AUX–IN, Reņim FM rádio 2x 4W stereo reproduktory (10x10x2cm); SNR ≦ frekvenční...
  • Seite 142 Formáty SD karet třída 10 Obsah balení Nostalgická Bluetooth Digitizér pro vinylowé desky All-in-One TX-103, Adaptér pro singly 45 otá./min., Zasilacz, Návod k obsluze Pokyny pro ochranu životního prostředí: Obalové materiály jsou suroviny a lze je opět pouņít. Obaly oddělit podle jejich druhu a v zájmu ochrany ņivotního prostředí...
  • Seite 143: Přehled Součástí Výrobku

    Přehled součástí výrobku: Pohled zepředu a shora Zobrazovací panel Stop (zastavit): Zastavit přehrávání v reņimech CD/USB/SD; zastavit nahrávání. CD/USB/SD: Přepnutí na reņimy SB, SD karta nebo CD Nnahrát/Smazat Opakovat/Naprogramovat...
  • Seite 144 Stereo reproduktory (na každé straně jeden, 2x 4W) Knoflík funkcí: Otáčejte knoflíkem pro výběr Gramofon, CD (USB/SD), AUX/Kazeta nebo Rádio/BT Nosič disku Power (napájení) Przełącznik suwakowy: 10 Ladicí knoflík: Nalaďte reņimu radiovou stanici v reņimu Vyberte FM/BT RÁDIO RÁDIO 11 3,5mm zdířka na sluchátka 12 3,5 mm zdířka AUX-IN 14 Otevřít/zavřít nosič...
  • Seite 145 Před použitím sundejte kryt jehly (bílý plastový kryt) stáhnutím přímo dopředu z vložky ve směru znázorněném šipkou. 23 Otočný talíř 24 Adaptér na 45 otáček 25 Raménko přenosky 26 Zvedákraménka přenosky: Tuto páčku pouņijte zvednutí raménka přenosky 27 Automatický přepínač 28 Volič...
  • Seite 146: První Spuštění

    První spuštění Pečlivě si přečtěte návod k obsluze. Podłącz zasilacz do gniazdka 100-240 V AC, a drugi koniec do TX-103 (33). Mějte na paměti: „Nepřipojená zařízení vņdy fungují ńpatně“. Zařízení zapněte stisknutím tlačítka Power (napájení) (7). Potom spusťte reņim, který...
  • Seite 147 Režim gramofon (vinylová deska) Otevření víka gramofonu  Otevírejte víko gramofonu, dokud se nezastaví.  Víko pomalu spouńtějte, dokud západka nezapadne. Pokud západka nezapadne, stáhněte spodní lińtu rukou.  Víko nyní zůstane otevřené. Zavřené víka gramofonu  Otevírejte víko gramofonu, dokud se nezastaví.
  • Seite 148 1 etiketa/2 drážky/3 okraje Přehrávání desky ( ! DŮLEŽITÉ! ) Aņ budete pouņívat gramofon, ujistěte se, ņe jste sundali kryt jehly (2). Měl by lehce sklouznout z mechanismu vloņky s jehlou (1). Dále se ujistěte, ņe jste raménko přenosky sundali z opěrky a po pouņití jej ni zase poloņili.
  • Seite 149  Nastavte ovladač automatického/ručního zastavení: Ovladač automatického zastavení nastavte na ON (ZAP), pokud budete chtít, aby se otočný talíř zastavil, aņ deska skončí. Pokud bude spínač nastaven na OFF (VYP), otočný talíř se bude dál otáčet.  Sundejte kryt jehly a odemkněte zámek raménka přenosky. ...
  • Seite 150 1 raménko přenosky/2 páčka zvedáku Výměna jehly Doporučujeme jehlu vyměnit hned, jak si vńimnete změny v kvalitě zvuku. Dlouhotrvající pouņívání opotřebované jehly můņe desku pońkodit. Opotřebení jehly bude rychlejńí při přehrávání desek na 78 otáček. A: Vyjmutí jehly z vložky Přiloņte ńroubovák na ńpičku konce hlavy s jehlou a zatlačte dolů...
  • Seite 151: Režim Cd

    Upozornění  Jehlu neohýbejte.  Z důvodu prevence zranění se nedotýkejte jehly.  Před výměnou jehly zařízení odpojte od elektrické sítě.  Uchovávejte mimo dosah dětí.  Při manipulaci buďte opatrní, jelikoņ jehla je citlivá. Pouņití ohnuté nebo zlomené jehly můņe pońkodit desku a způsobit ńpatné...
  • Seite 152  Přehrávání zvlněných disků můņe zařízení pońkodit.  Disky s podomácku potińtěným povrchem nedoporučujeme pouņívat v tomto zařízení, protoņe povrch etikety můņe lepit a zařízení pońkodit.  Na disky nepouņívejte spreje, které vytváří ochrannou vrstvu.  Disky nepopisujte perem s kuličkovým hrotem či tvrdou ńpičkou. Pouņívejte pouze popisovače na bázi oleje.
  • Seite 153  Při otevírání a zavírání nosiče mu nepomáhejte rukou.  Stiskněte tlačítko OTEVŘÍT/ZAVŘÍT (▲) pro uzavření nosiče.  Na displeji obrazovky se objeví počet skladeb.  Zařízení začne automaticky přehrávat za několik sekund nebo stiskněte tlačítko PŘEHRÁT/PAUZA (▶‖) pro zahájení přehrávání. ...
  • Seite 154: Režim Usb/Sd

    Funkce opakovat  Během přehrávání jednou stiskněte tlačítko REPEAT (OPAKOVAT) pro opakování jedné skladby. LED-diodová kontrolka “REP” (OPAK) LED bude blikat.  Během přehrávání stiskněte tlačítko OPAKOVAT jeńtě jednou pro opakování vńech skladeb. LED-diodová kontrolka „“REP” (OPAK) LED zůstane svítit. Funkce programování...
  • Seite 155 Ovladače přehrávání:  Pro dočasné pozastavení přehrávání jednou stiskněte tlačítko PŘEHRÁT/PAUZA ( ▶ ‖), abyste dočasně přeruńili přehrávání. Stiskněte jej znovu pro pokračování přehrávání.  Pro přehrání předchozí skladby jednou stiskněte ◀◀ nebo jej mějte nepřetrņitě stisknuté pro rychlé přetáčení předchozími nahrávkami.  Pro přehrání...
  • Seite 156: Režim Bluetooth

    či jiném zařízení s médii a začít hledat Bluetooth, nositel příjmu obdrņí identifikační číslo pro: “Technaxx TX-103”, a aņ se vańe Bluetooth zařízení připojí, reproduktor pípne. Současně vyberte ▶▶ nebo ◀◀ nebo ▶‖ nebo ■, coņ vás moņná...
  • Seite 157: Režim Kazetový Magnetofon

    Režim kazetový magnetofon Rady ohledně kazetového magnetofonu  Kovové a chromované (kobaltové) pásky mají identifikační otvory.  Pouņijte prst nebo tuņku pro otočení středem kazety a namotat jakýkoli uvolněný pásek  Vyhněte se dotýkání pásku. Otisky prstů přitahují prach a ńpínu.  Kazetu neupusťte na zem ani ji nevystavujte přílińným otřesům či tlaku.
  • Seite 158: Režim Aux

    POZN.:  Pro rychlé přetočení kazety vpřed stiskněte tlačítko Tape Operations (funkce kazety) do půlky během přehrávání kazety.  Pro znovu zahájení normálního přehrávání tlačítko Tape Operations (funkce kazety) uvolněte.  Pro zastavení přehrávání úplně stiskněte tlačítko Tape Operations (funkce kazety). Přehrávání se zastaví...
  • Seite 159: Režim Rádio

    Připojení sluchátek  Nastavte hlasitost na vhodnou úroveň předtím, neņ si nasadíte sluchátka.  Připojte 3,5mm konektor sluchátek do zdířky na sluchátka. Připojení externího zesilovače  Tato funkce vám umoņní přehrávat hudbu z gramofonu prostřednictvím zesilovače nebo externích reproduktorů. K tomuto připojení...
  • Seite 160: Funkce Pohotovostní Režim

    Funkce pohotovostní režim  Aņ zařízení nebude přehrávat hudbu na Phono (gramofonu), CD, USB, SD, AUX, Tape (kazetovém magnetofonu), tak dlouze stiskněte tlačítko “REP/PROG/STBY” na 4 sekundy a zařízení se přepne do pohotovostního reņimu. Potom krátce stiskněte tlačítko “▶‖” a zařízení bude znovu fungovat. ...
  • Seite 161 Důležitá opatření  Vybalení a manipulace: Opatrně otevřete krabici a odstraňte obal. Odstraňte plastový sáček a uchovejte veńkerý obalový materiál pro budoucí pouņití. Udrņujte veńkerý obalový materiál mimo dosah dětí a domácích zvířat.  Umístění audioaparatury: Poloņte zařízení na stabilní povrch, mimo jakékoliv zdroje tepla a zajistěte odpovídající...

Inhaltsverzeichnis