Inhaltsverzeichnis
Werbung
Verfügbare Sprachen
Verfügbare Sprachen
Quicklinks
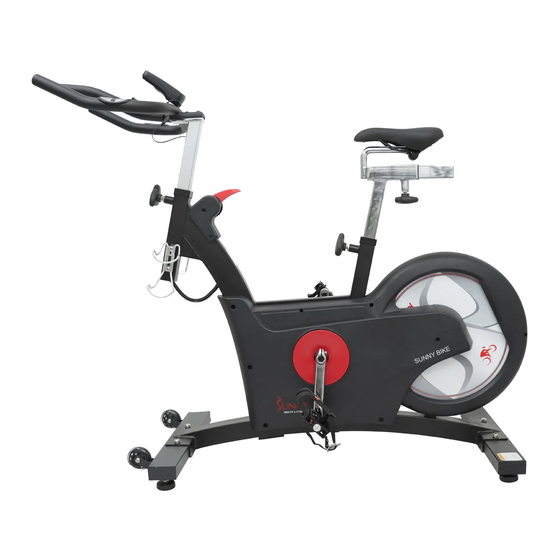
PREMIUM KINETIC FLYWHEEL REAR
IMPORTANT! Please retain owner's manual for maintenance and adjustment instructions. Your satisfaction is very
English, Page 12~22
important
support@sunnyhealthfitness.com or 1-877-90SUNNY (877-907-8669).
Español, Page 23~33
¡ IMPORTANTE! Por favor, conserve el manual del usuario para las instrucciones de mantenimiento y ajuste. Su
satisfacció n es muy importante para nosotros, SI AL PRODUCTO LE HACE FALTA PARTES, POR FAVOR NO LO
DEVUELVA HASTA TENER CONTACTO CON NOSOTROS: support@sunnyhealthfitness.com o al 1-877-
90SUNNY (877-907-8669).
IMPORTANT! Veuillez conserver le manuel du propriétaire pour les instructions de réglage et d'entretien. Votre
Franç ais, Page 34~44
satisfaction est trè s importante pour nous, VEUILLEZ NE PAS EFFECTUER DE RETOUR AVANT DE NOUS AVOIR
CONTACTÉ: support@sunnyhealthfitness.com ou 1-877-90SUNNY (877-907-8669).
Deutsch, Seite 45~55
WICHTIG! Bitte bewahren Sie das Benutzerhandbuch für Wartungs- und Einstellanweisungen auf. Ihre Zufriedenheit
ist besonders wichtig für uns, BITTE SCHICKEN SIE DAS PRODUKT NICHT ZURÜCK, BEVOR SIE SICH MIT UNS
IN VERBINDUNG GESETZT HABEN: support@sunnyhealthfitness.com oder 1-877-90SUNNY (877-907-8669).
DRIVE CYCLE
SF-B1852
USER MANUAL
to
us,
PLEASE
DO
NOT
RETURN
UNTIL
YOU
HAVE
CONTACTED
US:
Werbung
Inhaltsverzeichnis

Verwandte Anleitungen für Sunny Health & Fitness PREMIUM KINETIC FLYWHEEL REAR DRIVE CYCLE


Inhaltszusammenfassung für Sunny Health & Fitness PREMIUM KINETIC FLYWHEEL REAR DRIVE CYCLE
- Seite 1 PREMIUM KINETIC FLYWHEEL REAR DRIVE CYCLE SF-B1852 USER MANUAL IMPORTANT! Please retain owner’s manual for maintenance and adjustment instructions. Your satisfaction is very English, Page 12~22 important PLEASE RETURN UNTIL HAVE CONTACTED support@sunnyhealthfitness.com or 1-877-90SUNNY (877-907-8669). Español, Page 23~33 ¡ IMPORTANTE! Por favor, conserve el manual del usuario para las instrucciones de mantenimiento y ajuste. Su satisfacció...
- Seite 3 INFORMATIONS DE SÉCURITÉ IMPORTANTES Nous vous remercions d’avoir choisi notre produit. Pour votre santé et votre sécurité , veuillez utiliser correctement cet appareil. Il est important de lire entièrement le présent manuel avant d’assembler l’appareil et de l’utiliser. L’utilisation sûre et efficace n’est possible que si l’appareil est correctement assemblé, entretenu et utilisé.
-
Seite 4: Exploded Diagram
EXPLODED DIAGRAM 1... - Seite 5 EXPLODED DIAGRAM 2...
- Seite 10 TEILELISTE Bezeichnung Spezif. Menge Bezeichnung Spezif. Menge Hauptrahmen Kettenbolzeneinsteller Stabilisator Vorne Kettenbolzeneinsteller Sechskantmutter Nylonmutter Federscheibe Sechskantschraube M12x1,0 Einstell-Fußpolster Hülse Bolzen M10x25 Kugellager D10xФ20 x 2 Unterlegscheibe Schwungradachse Bolzen M8x30 Schwungrad Bolzen M6x12 Komprimierte Feder Quadratischer Stecker Platinenachse Transportrad Vierkant-Magnet Stabilisator Hinten Bolzen M6x15 Sensordraht...
- Seite 11 Spannungssteuerungs Schraube ST4,2x16 draht 70L/R Dekorative Abdeckung 1 Paar Schraube M5x12 Bremshebel Schraube ST4,2x18 Begrenzter Block Inbusschlüssel Komprimierte Feder – Schraubenschlüssel S13,15 begrenzter Block Kugel Schraubenschlüssel S17,19 S10,13,14,15 Block Schraubenschlüssel Hülse 85L/R Nylonmutter 9/16x20 1 Paar Schraube ST4,2x12 Verbindungskabel HARDWARE PACKAGE #21 M10X25 2PCS #30 M5X8 4PCS #81 S6 1PC...
- Seite 12 Ordering Replacement Parts (U.S. and Canadian Customers only) Please provide the following information in order for us to accurately identify the part(s) needed: ✓ The model number (found on cover of manual) ✓ The product name (found on cover of manual) ✓...
- Seite 46 MONTAGEANLEITUNG Wir schä tzen Ihre Erfahrung im Umgang mit den Produkten von Sunny Health and Fitness. Für Fragen Teilen oder Hilfe Fehlerbehebung kontaktieren bitte unter support@sunnyhealthfitness.com oder 1-877-90SUNNY (877-907-8669). SCHRITT 1: Schrauben Sie 4 Einstell-Fußpolster (Nr. 5) und 4 Sechskantmuttern (Nr. 3) an den Vorderen und Hinteren Stabilisator (Nr.
- Seite 47 Wir schätzen Ihre Erfahrung im Umgang mit den Produkten von Sunny Health and Fitness. Für Fragen Teilen oder Hilfe Fehlerbehebung kontaktieren bitte unter support@sunnyhealthfitness.com oder 1-877-90SUNNY (877-907-8669). SCHRITT 2: WICHTIG! Lesen Sie die Anweisungen sorgfältig durch, da eine Nichtbeachtung dauerhaften Schäden Fahrrad führen kann.
- Seite 48 Wir schätzen Ihre Erfahrung im Umgang mit den Produkten von Sunny Health and Fitness. Für Fragen Teilen oder Hilfe Fehlerbehebung kontaktieren bitte unter support@sunnyhealthfitness.com oder 1-877-90SUNNY (877-907-8669). SCHRITT 3: Lösen Sie den T-Form-Knopf (Nr. 14) und ziehen Sie ihn aus dem Hauptrahmen (Nr. 1) heraus.
-
Seite 49: Einstellen Der Federspannung Der Bindung
SPD – TECHNISCHE SERVICEANLEITUNG Vorsicht! Lesen Sie vor der Benutzung diese Anleitung sorgfältig durch. • Üben Sie vor Inbetriebnahme mehrmals im Stand das Ein- und Aussteigen in/aus die/den Pedale(n)- • Schmieren Sie vor der Verwendung den konkaven Bereich der Klemmen. •... -
Seite 50: Einstellungsanleitung
EINSTELLUNGSANLEITUNG EINSTELLEN DER BALANCE Um eine gleichmäßige und komfortable Bewegung zu erreichen, müssen Sie sicherstellen, dass die Standsicherheit des Fahrrads gewährleistet ist. Wenn Sie feststellen, dass das Fahrrad während des Gebrauchs nicht im Gleichgewicht ist, sollten Sie die Fußnivellierer unterhalb der Vorderen und Hinteren Stabilisatoren (Nr. -
Seite 51: Einstellen Der Lenkstange
EINSTELLEN DER LENKSTANGE Lösen und ziehen Sie den T-Form-Knopf (Nr. 14) heraus, um die Lenkstange (Nr. 26) in die gewünschte Position zu heben oder zu senken. Vergewissern Sie sich, dass der T-Form- Knopf (Nr. 14) in das gewünschte Loch einrastet und fixieren Sie ihn durch Drehen im Uhrzeigersinn. -
Seite 52: Wartung Und Pflege
WARTUNG UND PFLEGE Hier finden Sie allgemeine Informationen für die tägliche, wöchentliche und monatliche Wartung Ihres Fahrrads. TÄGLICHE WARTUNG MONATLICHE WARTUNG Wischen Sie nach jeder Trainingseinheit alle Teile des 1. Überprüfen Sie, ob alle Hardwareteile sicher Gerätes ab: Sitz, Rahmen und Lenkstangen. Achten sind, z. -
Seite 53: Hinweise Zu Den Batterien
HINWEISE ZU DEN BATTERIEN EINLEGEN DER BATTERIEN Das Messgerät verwendet 2 AAA-Batterien. Öffnen Sie die Batterieabdeckung von der Rückseite des Zä hlers aus und legen Sie dann 2 Batterien in das Batteriefach ein. Vergewissern Sie sich, dass die Enden (+) und (-) der Batterien in der richtigen Position sind. Setzen Sie die Batterieabdeckung wieder ein. - Seite 54 TRAININGSZÄHLER FUNKTIONSTASTEN MODE: Drücken Sie, um die angezeigte Funktion auszuwählen oder während des Einstellmodus. Halten Sie die Taste 2 Sekunden lang gedrückt, um die RACE MODE-Schnittstelle im Stoppmodus aufzurufen. SET: Zum Einstellen des Zielwertes von TARGET, TIME, DIST, CAL. Halten Sie die Taste 2 Sekunden lang gedrückt, um das Inkrement im Stopp-Modus zu beschleunigen.
-
Seite 55: Meilen- Oder Kilometer-Einstellung
TARGET TIME: Der Benutzer kann die Zeit im TARGET-MODUS voreinstellen. PULSE: Zeigt die aktuelle Pulsfrequenz an. MEILEN- ODER KILOMETER-EINSTELLUNG: Die Standardeinstellung ist Meilen. Halten Sie SET und MODE 2 Sekunden lang gedrü ckt, um zu Kilometern zu wechseln. EINSTELLEN VON ZIELWERTEN: 1. - Seite 56 Wenn die aktuelle CADENCE kleiner als die Ziel- CADENCE ist, wird der Aufwärts-Pfeil neben dem Fahrrad angezeigt. Jeder Pfeil entspricht 10 CADENCES (1-10 CADENCES zeigt einen Pfeil, 11-20 zeigt zwei). Die maximal angezeigten Pfeile sind 12. Dieser Abwärtspfeil neben dem Fahrradsymbol wird angezeigt, wenn die aktuelle CADENCE größer ist als die TARGET CADENCE.