bbluv Cäm Bedienungsanleitung
Hd video babykamera und monitor
Inhaltsverzeichnis
Verfügbare Sprachen
Verfügbare Sprachen
Quicklinks
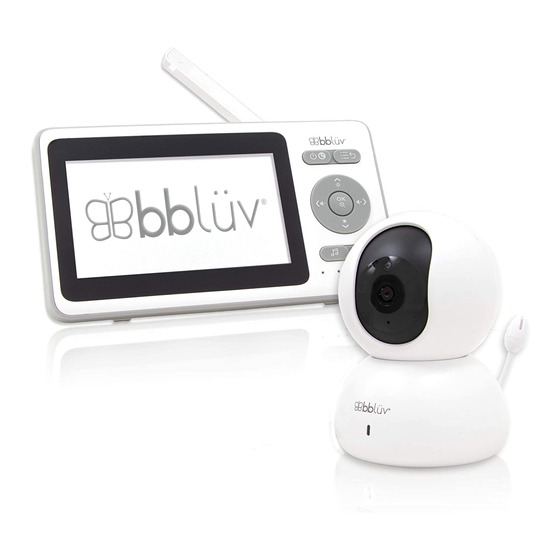
Cäm
HD Video Baby Camera and Monitor
EN
Caméra et Moniteur HD pour bébé
FR
Monitor y cámara de vídeo HD para bebé
ES
Videocamera e baby monitor HD
IT
HD video babykamera und monitor
DE
Câmara e monitor de vídeo HD para bebé
PT
Please read the instruction manual carefully before use.
Veuillez lire attentivement le manuel d'instructions avant l'utilisation.
Lea atentamente el manual de instrucciones antes de usar.
Leggere attentamente il manuale d'istruzioni prima dell'uso.
Vor Gebrauch bitte die Bedienungsanleitung sorgfältig durchlesen.
Leia o manual de instruções com atenção antes de utilizar.
Inhaltsverzeichnis

Verwandte Anleitungen für bbluv Cäm

Inhaltszusammenfassung für bbluv Cäm
- Seite 1 Cäm HD Video Baby Camera and Monitor Caméra et Moniteur HD pour bébé Monitor y cámara de vídeo HD para bebé Videocamera e baby monitor HD HD video babykamera und monitor Câmara e monitor de vídeo HD para bebé Please read the instruction manual carefully before use. Veuillez lire attentivement le manuel d’instructions avant l’utilisation.
- Seite 2 Cäm Cäm HD Video Baby Camera and Monitor Caméra et Moniteur HD pour bébé Monitor y cámara de vídeo HD para bebé Videocamera e baby monitor HD HD video babykamera und monitor Câmara e monitor de vídeo HD para bebé Please read the instruction manual carefully before use.
- Seite 3 Cäm Photosensitive sensor Status indicator SET button Détecteur photosensible Indicateur d’état Bouton RÉGLAGE Sensor foto sensible Indicador de estado Botón AJUSTE Sensore fotosensibile Indicatore di stato Pulsante SET Lichtempfindlicher Sensor Statusanzeige SET-Taste Sensor foto-sensível Indicador de estado Botão SET Lens Power socket Lentille Prise d’alimentation...
- Seite 4 Cäm...
- Seite 6 Cäm No signal connection between the monitor and the camera. Aucun signal de connexion entre le moniteur et la caméra. No hay señal de conexión entre el monitor y la cámara. Indica l’assenza di collegamento del segnale tra il monitor e la videocamera. Keine Signalverbindung zwischen dem Monitor und der Kamera.
- Seite 7 Cäm The Feeding reminder has been turned on. Le rappel Repas est allumé. El recordatorio de toma se ha activado. Indica che la funzione Biberon, che ricorda che è l’ora di far mangiare il bambino, è attiva. Die Erinnerung für Mahlzeiten wurde eingeschaltet. O lembrete de alimentação foi ligado.
- Seite 8 Cäm The microphone is activated. You can talk to your baby. Le microphone est activé. Vous pouvez parler à votre bébé. El micrófono está activado. Puede hablar a su bebé. Indica che il microfono è attivo. È possibile parlare col bambino. Das Mikrofon ist aktiviert.
-
Seite 72: Einrichten Der Kamera
DEUTSCH Cäm EINRICHTEN DER KAMERA Stellen Sie die Kameraeinheit an einem sicheren und praktischen Ort auf, z. B. auf einem Nachttisch, in einem Regal, oder hängen Sie sie an der Wand auf. HINWEIS Bringen Sie den Monitor nicht in die Reichweite des Babys. Wenn Bild- oder Tonstörungen auftreten, versuchen Sie, das Gerät woanders aufzustellen, und vergewissern Sie sich, dass es sich nicht in der Nähe anderer elektrischer Geräte befindet. - Seite 73 DEUTSCH Cäm FUNKTIONSEINSTELLUNGEN DES MONITORS ZUGRIFF AUF DAS MENÜ Wenn der Monitor auf Live-Übertragung geschaltet ist, drücken Sie die MENÜ- Taste, und die Menüliste wird auf dem Bildschirm angezeigt. Um zur Live- Übertragung zurückzukehren, drücken Sie erneut auf die MENÜ-Taste KAMERAEINSTELLUNGEN HINZUFÜGEN EINER KAMERA 1.
-
Seite 74: Entfernen Einer Kamera
DEUTSCH Cäm 5. Wenn das Gerät Sie auffordert Start pairing (Kopplung starten), drücken Sie bitte die SET-Taste, die sich hinter der Kamera befindet. Halten Sie die Taste gedrückt, bis die Kopplung erfolgreich ist, und der Bildschirm automatisch zur Live-Übertragung wechselt. ENTFERNEN EINER KAMERA 1. - Seite 75 DEUTSCH Cäm SCHLAFLIEDER WIE WÄHLEN SIE EIN SCHLAFLIED ODER DEN TON AUS 1. Wenn der Monitor auf Live-Übertragung geschaltet ist, drücken Sie die MENU-Taste und die Menüliste wird auf dem Bildschirm angezeigt. auf dem Bildschirm und drücken Sie OK. 2. Wählen Sie das Musiksymbol 3.
-
Seite 76: Einstellungen Für Temperaturwarnungen
DEUTSCH Cäm 3. Wählen Sie das Symbol zum Einstellen der Geräuschempfindlichkeit . Wählen Sie die gewünschte Option, Low, Middle, High (Niedrig, Mittel, Hoch), oder Off (Aus) und drücken Sie OK. Nachdem Sie Ihre Auswahl getroffen haben, drücken Sie die MENÜ-Taste, um zum Hauptmenü... - Seite 77 DEUTSCH Cäm 3. Wählen Sie das Symbol zum Einstellen der Temperaturwarnung Wählen Sie entsprechend Ihrer Präferenz ° C oder ° F mit den Pfeiltasten und drücken Sie OK zur Bestätigung. nach oben oder unten aus Verwenden Sie den Pfeil nach rechts , um den Alarm zu ändern. Wählen Sie entsprechend Alarm ON (EIN) oder OFF (AUS).
-
Seite 78: Einstellungen Der Warnungen Für Mahlzeiten
DEUTSCH Cäm Nachdem Sie Ihre Auswahl getroffen haben, drücken Sie die MENÜ-Taste, um zum Hauptmenü zu gelangen. Drücken Sie die MENU-Taste erneut, um zur Live-Übertragung zurückzukehren. EINSTELLUNGEN DER WARNUNGEN FÜR MAHLZEITEN Der Monitor gibt eine Warnung aus, wenn es Zeit für eine Mahlzeit für das Baby ist. - Seite 79 DEUTSCH Cäm 4. Wählen Sie mit dem Pfeil nach oben oder unten die Stunde aus. Verwenden Sie den Pfeil nach rechts , um die Minuten einzustellen. Wählen Sie mit dem Pfeil nach oben oder unten die Minuten aus. Verwenden Sie den Pfeil nach rechts , um ON/OFF (EIN/AUS) zu wählen. Wählen Sie , um den Alarm ON (EIN) oder mit dem Pfeil nach oben oder unten OFF (AUS) zu schalten.
-
Seite 80: Spracheinstellungen
DEUTSCH Cäm . Drücken Sie OK. Wählen 3. Wählen Sie das Symbol für Zeiteinstellungen ON (EIN) oder OFF (AUS) Sie mit dem Pfeil nach oben oder unten und benutzen Sie den Pfeil nach rechts , um das Datum zu ändern. Wählen Sie mit den Pfeiltasten nach oben oder unten , um das richtige Datum einzustellen. - Seite 81 DEUTSCH Cäm 3. Wählen Sie das Symbol zum Einstellen des Alarmtons aus . Drücken Sie OK. Wählen Sie mit dem Pfeil nach oben oder unten , um ON (EIN) oder OFF (AUS) auszuwählen. Drücken Sie OK zur Bestätigung. Drücken Sie nach dem Einrichten dreimal die MENÜ-Taste , um zur Live-Übertragung zurückzukehren.
-
Seite 82: Standardeinstellungen Wiederherstellen
DEUTSCH Cäm STANDARDEINSTELLUNGEN WIEDERHERSTELLEN Wiederherstellen der Werkseinstellungen des Monitors. 1. Wenn der Monitor auf Live-Übertragung geschaltet ist, drücken Sie die MENU-Taste und die Menüliste wird auf dem Bildschirm angezeigt. 2. Wählen Sie das Symbol für Einstellungen auf dem Bildschirm und drücken Sie OK um zur Einstellungsseite zu gelangen. -
Seite 83: Lautstärke Und Bildschirmhelligkeit
DEUTSCH Cäm LAUTSTÄRKE UND BILDSCHIRMHELLIGKEIT Drücken Sie die Taste Sprechen/Einstellen , um auf die Lautstärke und Bildschirmhelligkeit zuzugreifen. Wählen Sie mit den Pfeilen nach oben und unten , um die Helligkeit des Bildschirms einzustellen. Wählen Sie mit den Pfeilen rechts und links , um die Lautstärke des Bildschirms einzustellen. -
Seite 84: Warnhinweise
DEUTSCH Cäm FEHLERBEHEBUNG PROBLEM LÖSUNG 1. Stellen Sie sicher, dass Kamera und Monitor in Betriebsreichweite sind. Kein Bild 2. Prüfen Sie, ob die Kamera- und Monitorakkus vollständig geladen oder gut an die Stromver- sorgung angeschlossen sind. Prüfen Sie, ob einer der folgenden Warnungen/Alarme aktiv ist: 1. -
Seite 85: Sicherheitshinweis
DEUTSCH Cäm VORSICHT • Um die Cäm richtig einzusetzen, lesen Sie bitte die Bedienungsanleitung sorgfältig durch. • Verwenden Sie zu Ihrer Sicherheit nur den mitgelieferten AC-Konverter und den wiederaufladbaren Akku. • Verwenden Sie nur Steckdosen, die zum AC-Konverter passen. Die Verwendung einer ungeeigneten Steckdose kann zu elektrischen und Brandschäden führen. -
Seite 86: Technische Daten
DEUTSCH Cäm TECHNISCHE DATEN KAMERA Bildsensor 1/ 6,5 Zoll CMOS Videoauflösung 640*480 P Betrachtungswinkel 45 ± 5 ° Drehwinkel Schwenk: 350 ° Neigung: 55 ° Nachtsichtbereich Stromversorgung GLEICHSTROM 5V/1A Temperaturbereich 0 °C~40 °C Lagerungstemperatur -20 °C~60 °C Luftfeuchtigkeit 15~85 % RH Abmessungen (B*T*H) 75 x 75 x 109 mm... - Seite 87 DEUTSCH Cäm TECHNISCHE DATEN MONITOR 4,3 Zoll TFT-LCD-Bildschirm Anzahl der Pixel 480*272 P Drahtlose Übertragung 2,4 GHz FHSS Stromversorgung GLEICHSTROM 5V/1A Temperaturbereich 0 °C~40 °C Lagerungstemperatur -20 °C~60 °C Luftfeuchtigkeit 15~85 % RH Abmessungen (B*T*H) 158 x 19 x 88 mm HINWEIS: Alle technischen Daten können geringfügige Abweichungen aufweisen.