Inhaltsverzeichnis
Werbung
Verfügbare Sprachen
Verfügbare Sprachen
Quicklinks
Model: DIR-270WD
User manual – Internet Radio with DAB+, FM, CD player and Bluetooth
Gebruikershandleiding – Internetradio met DAB+, FM, cd-speler en Bluetooth
Bedienungsanleitung – Internetradio mit DAB+, FM, CD-Player und Bluetooth
Mode d'emploi – Radio Internet avec DAB+, FM, lecteur CD et Bluetooth
Manual de usuario – Radio por Internet con DAB+, FM, reproductor de CD y Bluetooth
1
Werbung
Inhaltsverzeichnis

Verwandte Anleitungen für LENCO DIR-270WD


Inhaltszusammenfassung für LENCO DIR-270WD
- Seite 1 Model: DIR-270WD User manual – Internet Radio with DAB+, FM, CD player and Bluetooth Gebruikershandleiding – Internetradio met DAB+, FM, cd-speler en Bluetooth Bedienungsanleitung – Internetradio mit DAB+, FM, CD-Player und Bluetooth Mode d’emploi – Radio Internet avec DAB+, FM, lecteur CD et Bluetooth...
- Seite 2 Index English ............................... 3 Nederlands ............................28 Deutsch ............................57 Français ............................88 Español ............................117 Version 1.0...
-
Seite 3: Precautions Before Use
English DIR-270WD CAUTION: Usage of controls or adjustments or performance of procedures other than those specified herein may result in hazardous radiation exposure. PRECAUTIONS BEFORE USE KEEP THESE INSTRUCTIONS IN MIND: Do not cover or block any ventilation openings. When placing the device on a shelf, leave 5 cm (2”) free space around the whole device. - Seite 4 22. Never place this device on other electrical equipment. 23. Do not allow children access to plastic bags. 24. Only use attachments/accessories specified by the manufacturer. 25. Refer all servicing to qualified service personnel. Servicing is required when the device has been damaged in any way, such as the power supply cord or the plug, when liquid has been spilled or objects have fallen into the device, when the device has been exposed to rain or moisture, does not operate normally, or has been dropped.
- Seite 5 • Do not connect the unit to the mains before checking the mains voltage and before all other connections have been made. * These instructions are related only to products using power cable or AC power adaptor. WARNING Class 1 Laser Product Warning: Do not touch the lens.
-
Seite 6: Product Overview
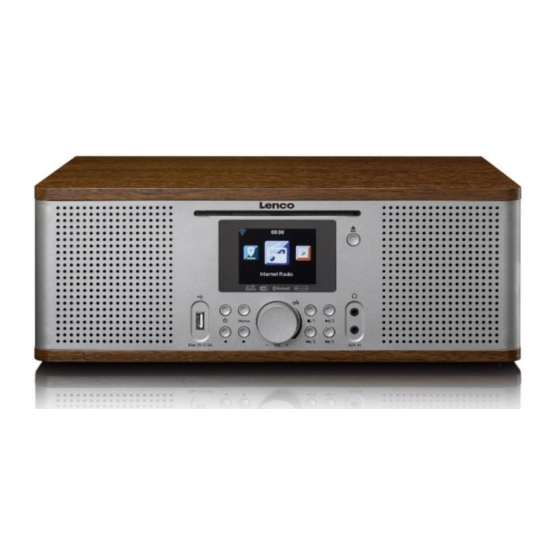
Product Overview 1. CD Slot 10. Stop on CD mode/Preset 1 2. USB port 11. Fast Forward on CD mode/Preset 4 3. Standby button 12. Play & Pause/Preset 2 4. Previous button 13. Aux In 5. Home button 14. Earphone jack 6. -
Seite 7: Remote Control
Remote Control 1. Standby button 2. Navigate Up button 3. OK/Play & Pause button 4. Navigate Left button 5. Navigate Down button 6. Home button 7. Sleep button 8. Rewind 9. EQ set tone 10. Eject Disc 11. Vol+ button 12. -
Seite 8: Initial Setup
INITIAL SETUP Before operation, please make sure that the voltage mentioned on the power supply is the same as the voltage of your local area. Use the supplied mains adaptor to connect the device to your household mains socket. Switch the ‘OFF/ON’ (16) button to ‘ON’ on the back to power up. The system will ask you to set the units Language. - Seite 9 1. Select YES if you want to continue and connect to your WIFI network using the standard method. Press the Navigation (8) wheel to confirm. Continue reading ‘network configuration’ option 1. 2. Select YES(WPS) if you would like to set up with the WPS (WIFI PROTECTED SETUP) function of your router (please verify with your router’s manual if it’s available).
-
Seite 10: Internetradio
Enter your password by pressing the numeric keys (20) on the remote control, followed by the Navigation right (12) button (NOTE: you have to press the navigation right (12) after every character). To make a correction, press the Navigation Left (4) to go backwards and delete the last character at the same time. - Seite 11 Now you can use the Navigation wheel (8) again to scroll through the different menu options and select the desired option by pressing the Navigation wheel (8) Press to return to the previous menu. After successfully connecting to a radio station, the station information will be shown. This information can be changed by pressing the button.
-
Seite 12: Media Center
Radio Station/Music Radio Stations are categorized into subcatagories Global Top 20, Genre, Country/Location (Africa, Asia, Europe, Middle East, North America, Oceania/Pacific and South America) and Highlight. Press the navigation wheel (8) or ‘OK’ (3) on the remote, to select the subcategories and choose a station to listen to. - Seite 13 Insert an USB memory stick into the USB socket (2) then select USB from the MEDIA CENTER. The DIR-270 will read the contents of the USB memory stick. Browse folders/files with the Navigation wheel (8) or direction keys on the remote control. The display shows folder and file names (not necessarily track names).
-
Seite 14: Information Center
My mediaU Display and playback your own mediaU station list on the mediaU server. Set your account first. To activate your own station list, follow the steps below: Access http://www.mediayou.net/. Join my mediaU membership. Login to the website; Enter the wireless MAC addresss of Radio to the mediaU website. This information can be obtained in themenu ->... - Seite 15 The device is able to display the weather information in the standby mode. On the weather information page, press OK to set the city to show in the standby mode.Then turn on the weather display. Financial Information View the stock index System Information Here you can view the details of your DIR-270 unit, find the software version and the WIFI information.
-
Seite 16: Configuration
CONFIGURATION Time Display Analog/Digital Manage When it is enabled, my mediaU will show on the main menu. If various mediaU accounts exist in the Radio, Select the default login account in here. my mediaU Network Wireless Network Configuration: Enable/disable WiFi network. When you enable the WiFi network, the system will automatically select the required AP. - Seite 17 Alarm There are 3 independent Alarms which can be set. 2 different Alarms (Alarm 1, Alarm 2) and one NAP alarm which is a countdown alarm which can be used when doing a quick sleep. Press the Alarm button on the remote control to enter the alarm settings menu directly and follow the following steps.
- Seite 18 Timer Countdown timer (max. 100min) Scheduled Playing Allow you to set a time for when the device switches on ⚫ Turn On Select Repeat: Everyday, Once or Mon to Sun Select Time: HH:MM Select Sound: Internet Radio, FM, DAB/DAB+ ⚫ Turn Off Language English/Deutsch/Espanol/Francais/Portugese/Nederlands/Italiano/Pyccknn/...
- Seite 19 Local Radio Setup There is a shortcut Local Radio from the Internet Radio menu so that you can easily go to the station list of your location. You can setup your location manually or let the system detect your current location. If you choose to automatically detect your location, the system will detect the location according to the IP address of your connected network.
- Seite 20 ⚫ UPnP Connect your PC to the network. Ensure the Radio is powered on and connected to the same network. Open the UPnP platform Windows Media Player (11 or later), other platforms or servers such as Windows Media Connection may be used. Allow to share your media to the DIR-270.
- Seite 21 Activate the Bluetooth pairing mode of your phone/tablet and search the for the name Lenco DIR-270 on your phone/tablet. Then click it to pair. When successfully connected, it will make a connected sound. You now can play music via Bluetooth...
- Seite 22 FM (RADIO) Select ‘FM mode’ from the main menu by using the navigation wheel (8) or with the navigation buttons on the remote. Press the navigation wheel (8) to enter the FM radio mode. The FM mode will start on 87.5MHz.
- Seite 23 DAB+ (DIGITAL RADIO) Select ‘DAB/DAB+’ on the main display screen by turning the knob and pressing the navigation knob or with the remote OK button. On first use of the DAB on your radio, your radio will begin scanning for DAB stations and will show’ Scanning’...
-
Seite 24: Cd-Player
CD PLAYER Select ‘CD’ on the main display screen by turning the dial and pressing the navigation wheel (8) or with the remote navigation buttons. The display screen for the CD function will now show “Reading…” followed by “No Disc”. Select the Eject Disc (15) CD function on the radio or the remote. -
Seite 25: Spotify Connect
4. Select your device (DIR-270WD) and start listening. Note: your DIR-270 can be in the standby state to use Spotify connect. When the DIR-270WD is selected from the spotify app, it will wake up automatically. But you have to be sure it is... - Seite 26 Use only the power supply listed in these user instructions. GUARANTEE Lenco offers service and warranty in accordance with the European law, which means that in case of repairs (both during and after the warranty period) you should contact your local dealer.
-
Seite 27: Disposal Of The Old Device
Important note: It is not possible to send products that need repairs to Lenco directly. Important note: If this unit is opened or accessed by a non-official service center in any way, the warranty expires. This device is not suitable for professional use. In case of professional use, all warranty obligations of the manufacturer will be voided. -
Seite 28: Voorzorgsmaatregelen Voor Gebruik
Nederlands DIR-270WD LET OP: Gebruik van bedieningen of afstellingen of uitvoer van procedures anders dan gespecificeerd in deze documentatie kan leiden tot blootstelling aan schadelijke straling. VOORZORGSMAATREGELEN VOOR GEBRUIK ONTHOUD DE VOLGENDE INSTRUCTIES: Bedek of blokkeer de ventilatieopeningen niet. Wanneer u het apparaat op een schap plaatst, dient u 5 cm (2”) vrije ruimte rondom het gehele apparaat te behouden. - Seite 29 18. Dit apparaat is niet bestemd voor gebruik door mensen (inclusief kinderen) met fysieke, zintuiglijke of geestelijke gebreken of gebrek aan kennis en ervaring, tenzij zij onder toezicht staan of instructies hebben over het juiste gebruik van het apparaat hebben gekregen van de persoon die verantwoordelijk is voor hun veiligheid.
- Seite 30 ⚫ Stel de batterij niet bloot aan extreem hoge of lage temperaturen of een lage luchtdruk op grote hoogte tijdens gebruik, opslag of transport. ⚫ Vervanging van een batterij door een incorrect type kan leiden tot een ontploffing of de lekkage van ontvlambare vloeistoffen of gas.
- Seite 31 Waarschuwing: Raak de lens niet aan. Inbegrepen toebehoren: Handleiding Afstandsbediening Voedingsadapter...
-
Seite 32: Productoverzicht
Productoverzicht 1. CD-sleuf 10. Stoppen in CD-modus/Voorkeursinstelling 2. USB-poort 11. Vooruitspoelen in CD- modus/Voorkeursinstelling 4 3. Stand-by-toets 12. Afspelen en pauzeren/Voorkeursinstelling 4. Vorige-toets 13. Aux in 5. Home-toets 14. Hoofdtelefoonuitgang 6. Volgende-toets 15. Schijf uitwerpen 7. Display 16. Toets UIT/AAN 8. - Seite 33 Afstandsbediening 1. Stand-by-toets 2. Navigatietoets Omhoog 3. OK/Toets afspelen en pauzeren 4. Navigatietoets Links 5. Navigatietoets Omlaag 6. Home-toets 7. Slaap-toets 8. Terugspoelen 9. EQ Voor het instellen van de toon 10. Schijf uitwerpen 11. Vol+ toets 12. Navigatietoets Rechts 13.
- Seite 34 English Nederlands Gebruik het navigatiewiel (8) om de gewenste taal te selecteren en druk vervolgens op het navigatiewiel (8) om te bevestigen. Wilt u de beschikbaarheid van WiFi-netwerken controleren wanneer het apparaat wordt ingeschakeld? Gebruik het navigatiewiel (8) om de gewenste optie te selecteren en druk op het navigatiewiel (8) om te bevestigen.
- Seite 35 Would you like to configure Network now? Wilt u het netwerk nu configureren? Yes(WPS) Ja (WPS) 1. Selecteer YES (Ja) als u verder wilt gaan en verbinding wilt maken met uw WiFi-netwerk op de gebruikelijke wijze. Druk op het navigatiewiel (8) om te bevestigen. Lees ‘netwerkconfiguratie’...
- Seite 36 Scanning for Wireless Network... Zoeken naar draadloos netwerk… De display zal de gevonden netwerken weergeven. Trebs Guest Trebs gast Trebs Lenco Trebs-Lenco TREBS-LENCO-TD TREBS-LENCO-TD Selecteer uw WiFi-netwerk door aan het navigatiewiel/OK (8) te draaien en bevestig door op het navigatiewiel/OK (8) te drukken.
-
Seite 37: Internetradio
Als u het wachtwoord direct op het voorpaneel van de DIR-270 wilt invoeren, dan kunt u het Navigatiewieltje (8) draaien om het eerste karakter te selecteren en vervolgens op de toets (6) drukken om verder te gaan naar het volgende karakter. Om een correctie door te voeren, druk op de toets (4) om terug te gaan en verwijder tegelijkertijd het laatste teken. - Seite 38 U kunt favorieten toevoegen terwijl het station dat u als favoriet wilt opslaan wordt afgespeeld of u kunt favorieten direct toevoegen uit de lijst ‘Radio Station/Music’ (Radiostation/Muziek). Houd de toets “FAV” op de afstandsbediening ingedrukt om het op te slaan. My Favorite Mijn favorieten Radio Station/Music...
- Seite 39 subcategorie te selecteren en het station te kiezen waar u naar wilt luisteren. Druk voor elk station op het Navigatiewieltje (8) op het apparaat of op ‘OK’ (3) op de afstandsbediening om direct af te spelen. Druk op om het submenu te openen. Als u Auto Scan kiest, wordt elk station in deze subcategorie gedurende 30 seconden afgespeeld totdat alle stations zijn afgespeeld.
- Seite 40 Service: Radiostation zoeken: Voer een stationsnaam/trefwoord in om door de lijst met alle radiostations te zoeken. Nieuw radiostation toevoegen: het toegevoegde station zal worden opgeslagen in de lijst ‘My Favorite’ (Mijn Favoriet) door een IP-adres/webadres te gebruiken. App: scan de QR-code om de AirMusic Control-app te downloaden Merk op dat 250 tekens het maximale aantal tekens van de naam van het station is.
- Seite 41 UPnP Als u gedeelde media in uw netwerk hebt ingesteld, dan zou u deze moeten zien door UPnP te kiezen. Als u meer dan één computer gebruikt die media deelt, dan zullen deze ook worden weergegeven. Selecteer de gedeelde media die u wilt afspelen. Gebruik Play (Afspelen)/Pause (Pauzeren), Next (Volgende)/Prev (Vorige) en Stop.
- Seite 42 Android: Android: Apple iOS: Apple iOS: Locale Station Lokaal station Internet Radio Internetradio Media-Center Mediacentrum Mijn MediaU Weergave en afspelen van uw eigen mediaU-stationslijst op de mediaU-server. Stel eerst uw account in. Ga als volgt te werk om uw eigen stationslijst te activeren: Ga naar http://www.mediayou.net/.
- Seite 43 INFORMATIECENTRUM Weersinformatie Er zijn weersinformatie en -prognoses voor 2000 steden. Selecteer het land en daarna de stad voor de weerdetails. Druk op om de weersvoorspelling te zien. Het apparaat kan de weersinformatie weergeven wanneer op stand-by geschakeld. Druk op de pagina weersinformatie op OK om de stad in de stand-bymodus weer te geven.
- Seite 44 CONFIGURATIE Tijdweergave Analoog/digitaal Beheren Wanneer ingeschakeld, dan zal Mijn MediaU in het hoofdmenu worden weergegeven. Als meerdere MediaU accounts bestaan in de radio, selecteer Mijn MediaU dan hier het standaard aanmeldaccount. Netwerk Draadloze netwerkconfiguratie: In-/uitschakelen wifi-netwerk. Wanneer u het WiFi-netwerk inschakelt, dan zal het systeem automatisch het vereiste toegangspunt selecteren.
- Seite 45 Alarm U kunt 3 onafhankelijke Alarmen instellen. Twee verschillende Alarmen (Alarm 1, Alarm 2) en één NAP alarm (DUTJE-alarm), wat een alarm met aftelling is en kan worden gebruikt wanneer u eventjes kort wilt slapen. Druk op de Alarmtoets op de afstandsbediening om het menu met de alarminstellingen direct te openen en voer de volgende stappen uit.
- Seite 46 Wanneer het DUJT-alarm is geactiveerd, dan zult u rechtsonder in de hoek een klokicoontje zien met de resterende tijd. Timer Afteller (max. 100min) Gepland afspelen Hiermee kunt u een tijd instellen wanneer het apparaat moet worden ingeschakeld ⚫ Inschakelen Selecteer Repeat (Herhalen): Elke dag, een keer of maandag tot zondag Selecteer Time (Tijd): UU:MM Selecteer Sound (Geluid): Internet Radio, FM, DAB/DAB+ ⚫...
- Seite 47 weersverwachting afwisselend met de klokweergave worden weergegeven op het stand-by-scherm (dit verandert elke 10 sec.). ⚫ Instellen DAB/FM FM-modus: Mono of stereo instellen ⚫ FM-drempel: Drempel zoeken: Sterk, Standaard of Zwak Drempel stereo: Sterk, Standaard of Zwak ⚫ DAB-drempel: Sterk, Standaard of Zwak ⚫...
- Seite 48 Terugzetten naar De standaard instellingen herstellen. Nadat het apparaat is gereset, dan zal standaard het systeem het taalmenu weergeven. Kies de gewenste taal en druk op het Navigatiewiel (8) DLNA/UPnP U kunt de standaard DLNA-naam naar wens aanpassen. De informatie hieronder betreft de instellingen voor media streaming via een PC of andere mediaserver.
- Seite 49 Control Panel (controlepanel) > Network and Internet (netwerk en internet) > Network and Sharing Center (netwerk en deelcentrum) > Change advanced sharing settings (Geavanceerde deelinstellingen wijzigen) > Media streaming options (opties mediastreaming). Open Windows Media Player om Allow remote control of my Player (Sta afstandsbediening vanaf mijn speler toe) in te schakelen.
- Seite 50 Er zal een geluid klinken om aan te geven dat de paringmodus actief is. Activeer de Bluetooth-paringmodus van uw telefoon/tablet en zoek op uw telefoon/tablet naar de naam Lenco DIR-270. Klik vervolgens op deze naam om te paren. Er zal na een geslaagde verbinding een verbindingsgeluid klinken.
- Seite 51 en selecteer het voorkeuzenummer waar u het station wilt opslaan door op het Navigatiewieltje (8) te drukken. FM-voorkeuzestations herroepen Bekijk uw favoriete FM-stations in de FM-modus door simpelweg de toets ‘FAV’ op de afstandsbediening te selecteren en door de opgeslagen stations te bladeren. DAB+ (DIGITALE RADIO) Selecteer ‘DAB/DAB+’...
- Seite 52 Als alternatief kunt u in het lijstscherm met DAB-stations het gekozen station markeren en de toets “FAV” op de afstandsbediening ingedrukt houden om naar het scherm “Add to my Favorites (Toevoegen aan mijn favorieten)” te gaan. DAB/DAB+ voorkeuzestations herroepen Bekijk uw favoriete DAB/DAB+ stations in de DAB-modus door op de toets ‘Fav’ te drukken en de opgeslagen stations te doorlopen.
- Seite 53 Wanneer programma afspelen is geactiveerd, drukt u tweemaal op de toets "Uitwerpen" of "Stop", waarna het de modus programma afspelen zal verlaten. Spotify Connect Met Spotify Connect kunt u Spotify-muziek rechtstreeks op uw Lenco DIR-270 afspelen. Opmerking: om deze functionaliteit te gebruiken, dient u een Spotify Premium-account te hebben Druk op de toets ‘Home’...
- Seite 54 (4) om de functie Spotify Connect te selecteren en bevestig door op OK/Pauze (3) te drukken. Listen out loud met Spotify Connect 1. Indien u nog niet bent verbonden, verbind uw apparaat (DIR-270WD) met uw WiFi-thuisnetwerk (raadpleeg Netwerkconfiguratie) 2. Open de Spotify-app op uw telefoon, tablet of laptop met hetzelfde wifi-netwerk 3.
- Seite 55 Gebruik uitsluitend de voeding gespecificeerd in deze gebruikersaanwijzingen. GARANTIE Lenco biedt service en garantie aan overeenkomstig met de Europese wetgeving. Dit houdt in dat u, in het geval van reparaties (zowel tijdens als na de garantieperiode), contact moet opnemen met uw lokale handelaar.
-
Seite 56: Afvoer Van Het Oude Apparaat
(Afgedankte Elektrische en Elektronische Apparatuur). SERVICE Bezoek voor meer informatie en helpdeskondersteuning www.lenco.com Lenco Benelux BV, Thermiekstraat 1a, 6361 HB, Nuth, Nederland. - Seite 57 Deutsch DIR-270WD ACHTUNG: Eine andere als die hier beschriebene Bedienung, Einstellung oder Verwendung der Funktionen kann zu gefährlicher Strahlenbelastung führen. VORSICHTSMASSNAHMEN VOR DER BENUTZUNG BEFOLGEN SIE IMMER FOLGENDE ANWEISUNGEN: Blockieren oder bedecken Sie keine Lüftungsöffnungen. Wenn Sie das Gerät auf ein Regal stellen, lassen Sie um das gesamte Gerät 5 cm (2”) freien Platz.
- Seite 58 18. Dieses Gerät ist nicht zur Benutzung durch Personen (einschließlich Kinder) mit physischen, sensorischen oder mentalen Beeinträchtigungen oder ohne ausreichender Erfahrung vorgesehen, es sei denn, sie werden durch eine verantwortliche Person beaufsichtigt oder wurden in die ordnungsgemäße Bedienung des Gerätes durch eine für ihre Sicherheit verantwortlichen Person eingewiesen.
- Seite 59 29. Warnhinweise bzgl. der Verwendung von Batterien: ⚫ Es besteht Explosionsgefahr, wenn die Batterien nicht ordnungsgemäß ersetzt wird. Tauschen Sie die Batterie nur gegen eine Batterie des gleichen Typs aus. ⚫ Die Batterie darf während der Benutzung, Aufbewahrung oder des Transports weder sehr hohen oder sehr niedrigen Temperaturen noch niedrigem Luftdruck in großen Höhenlagen ausgesetzt werden.
- Seite 60 Warnung: Berühren Sie die Linse nicht. Im Lieferumfang enthaltene Zubehörteile: Bedienungsanleitung Fernbedienung Netzadapter...
-
Seite 61: Produktübersicht
Produktübersicht 1. CD-Einzug 10. Senderspeicherplatz 1 und im CD-Modus Stopp 2. USB-Port 11. Senderspeicherplatz 4 und im CD-Modus Vorspulen 3. Standby-Taste Senderspeicherplatz 2 und Wiedergabe/Pause 4. Zurück-Taste 13. Aux-In 5. Startseite-Taste 14. Kopfhörerbuchse 6. Vor-Taste 15. CD-auswerfen-Taste 7. Display EIN/AUS-Taste 8. -
Seite 62: Fernbedienung
Fernbedienung 1. Standby-Taste 2. Nach-oben-Navigationstaste 3. OK und Wiedergabe/Pause 4. Nach-links-Navigationstaste 5. Nach-unten-Navigationstaste 6. Startseite-Taste 7. Abschaltautomatik-Taste 8. Schnelles Rückspulen 9. EQ-Auswahltaste 10. CD-auswerfen-Taste 11. Lautstärke+-Taste 12. Nach-rechts-Navigationstaste 13. Lautstärke–-Taste 14. Lokalradio-Taste 15. Stummschaltungs-Taste 16. Wecker-Taste 17. Programmiertaste 18. Stopp-Taste 19. - Seite 63 INBETRIEBNAHME Versichern Sie sich vor Inbetriebnahme des Geräts, das die auf dem Typenschild angegebene Spannung mit der Spannung vor Ort übereinstimmt. Verwenden Sie zum Anschluss des Geräts an Ihre Haussteckdose das mitgelieferte Netzteil. Schieben Sie die EIN/AUS-Taste (16) auf der Rückseite des Geräts auf ON, um das Gerät einzuschalten.
- Seite 64 Jetzt können Sie das WLAN einrichten. Would you like to configure Network now? Möchten Sie das Netzwerk jetzt konfigurieren? Yes(WPS) Ja (WPS) NEIN...
-
Seite 65: Netzwerkkonfiguration
1. Wählen Sie YES (JA), wenn Sie fortsetzen und die Verbindung mit Ihrem WLAN über die Standardmethode durchführen möchten. Drücken Sie den Navigationsdrehknopf (8), um Ihre Auswahl zu bestätigen. Setzen Sie mit der angezeigten Option 1 von «network configuration» (Netzwerkeinrichtung) fort. 2. - Seite 66 Trebs Guest Trebs-Gast Trebs Lenco Trebs-Lenco TREBS-LENCO-TD TREBS-LENCO-TD Wählen Sie durch Drehen des Navigationsdrehknopfes (8) das gewünschte WLAN aus und bestätigen Sie anschließend Ihre Auswahl durch Drücken des Navigationsdrehknopfes (8). Wenn das von Ihnen gewählte WLAN ein Passwort erfordert, dann können Sie dies im nächsten Bildschirm eingeben.
- Seite 67 Hinweis: Sie können folgende Zeichen benutzen: Ziffern (von 0 bis 9) Englische Buchstaben (von A bis Z bzw. von a bis z) Sonderzeichen (DEL, @, Leerzeichen, !, “, #, $, %, &, *, ’, + und (,) 2. WPS-PBC-Netzwerkkonfiguration Sie können ganz einfach eine Verbindung durch Drücken der WPS-Taste Ihres Routers herstellen, wenn Sie anschließend bei Ihrem DIR-270 innerhalb von 120 s YES (WPS) (JA (WPS)) auswählen.
- Seite 68 My Favorite Favoriten Radio Station/Music Radiosender/Musik Sleep Radio Schlafradio History Verlauf Sie können bereits gespeicherte Favoriten mit einem neuen Favoriten überschreiben. Sie können einen Radiosender nur einmal in der Favoritenliste speichern. Die gespeicherten Radiosender können Sie sich durch Auswahl dieses Menü anzeigen lassen. Sie können auch die FAV- Taste auf der Fernbedienung drücken, um zur Liste mit den gespeicherten Radiosendern zu gelangen.
- Seite 69 können jeden Radiosender durch Drücken des Navigationsdrehknopfes (8) am Gerät oder der OK- Taste (3) auf der Fernbedienung direkt wiedergeben lassen. Drücken Sie die -Taste, um zur Unterkategorie zu gelangen. Wenn Sie „Auto Scan“ (Automatisch Scannen) auswählen, dann werden alle Radiosender dieser Unterkategorie 30 s lang solange angespielt, bis alle Radiosender einmal angespielt wurden.
- Seite 70 Schließen Sie ein USB-Speichergerät am USB-Port (2) an und wählen Sie dann im Mediencenter USB aus. Das DIR-270 liest daraufhin den Inhalt des USB-Datenträgers ein. Durchsuchen Sie mit Hilfe des Navigationsdrehknopfes (8) am Gerät oder den Navigationstasten auf der Fernbedienung die Verzeichnisse/Dateien auf dem USB-Datenträger. Auf der Anzeige erscheinen die Verzeichnisse und Dateinamen (nicht unbedingt die Titelnamen).
- Seite 71 Wiedergabeliste löschen Bitte wählen Sie diese Option aus, wenn Sie die Wiedergabeliste leeren möchten. Bitte bestätigen Sie hierfür die eingeblendeten Sicherheitsfragen. Die App AirMusic Sie können die App AirMusic Control benutzen, um mit Ihrem Smartphone oder Tablet-PC Ihr DIR- 270 so zu bedienen, als würden Sie eine Fernbedienung benutzen. Sie können die App AirMusic vom Android oder Apple Store über nachstehende QR-Codes herunterladen.
- Seite 72 Geben Sie die Drahtlos-MAC-Adresse des Radios auf der mediaU-Webseite ein. Die MAC-Adresse finden Sie im Menü unter Information Center (Informationszentrum) > System Information (Systeminformationen) > Wireless Info (WLAN-Informationen). Wenn die Konfiguration erfolgreich abgeschlossen wurde, dann können Sie Ihre eigene(n) mediaU- Radiosenderwiedergabeliste(n) anzeigen lassen und speichern.
-
Seite 73: Konfiguration
KONFIGURATION Zeitanzeige Analog/Digital Manage (Verwalten von) Bei Aktivierung wird my mediaU im Hauptmenü angezeigt. Wenn im Radio verschiedene mediaU-Konten vorhanden sind, wählen Sie hier das My mediaU Standard-Anmeldekonto aus. Netzwerk Funknetzwerkkonfiguration: Aktivieren/Deaktivieren des Drahtlosnetzwerkes. Wenn Sie WLAN aktivieren, wählt das System automatisch den erforderlichen AP aus. - Seite 74 Weckruf Es gibt 3 voneinander unabhängig einstellbare Wecker. Sie können 2 unterschiedliche Wecker (Alarm 1, Alarm 2 (Wecker 1, Wecker 2)) und einen Nap alarm (Kurzschlafwecker) einstellen, wobei der Kurzschlafwecker ein Countdown-Wecker ist, den Sie für kurze Nickerchen benutzen können. Drücken Sie auf der Fernbedienung die Taste Alarm, um direkt zum Weckereinstellmenü...
- Seite 75 Einstellen des Kurzschlafweckers Drücken Sie die Alarm-Taste auf der Fernbedienung Wählen Sie NAP alarm (Kurzschlafwecker) aus. Wählen Sie mit Hilfe der nach-oben- und nach-unten-Taste die gewünschten Minuten aus. Ihnen stehen die Auswahlen 5, 10, 20, 30, 60, 90 und 120 Minuten zur Verfügung. Bestätigen Sie Ihre Auswahl mit der OK-Taste.
- Seite 76 Bettsymbol mit der Anzeige der noch verbleibenden Zeit, nach deren Ablauf das Gerät in den Standby-Modus wechselt. (Für diese Funktion können Sie auch die Sleep-Taste der Fernbedienung benutzen) ⚫ Internetradio Buffer (Puffer): Konfigurierung der zwischengespeicherten Wiedergabezeit; mögliche Einstellungen sind 2, 4 oder 8 Sekunden ⚫...
- Seite 77 Equalizer Die Standardeinstellung des Equalizers ist „normal“ (Normal), jedoch können Sie diese auf „Flat (flach), Jazz, Rock, Soundtracks, Classical (klassisch), Pop oder News (Nachrichten) oder my EQ (benutzerdef. EQ)“ ändern. Drücken Sie die EQ-Taste auf der Fernbedienung, um den EQ-Modus schnell zu ändern. Fortsetzen, wenn eingeschaltet Die Standardeinstellung des Systems ist die Wiederherstellung der Internetradiowiedergabe, wenn Sie vor dem Ausschalten des Geräts...
- Seite 78 Sie können ebenfalls Musikstreams von anderen Musikservern wie beispielsweise von einem Smartphone (Android-Plattform) genießen.
- Seite 79 Verbinden Sie Ihr Mobilgerät mit dem Netzwerk Suchen Sie auf Google Play Mediensharing-Apps und installieren Sie eine von ihnen. Fügen Sie die Audiodateien Ihres Mobilgerätes hinzu, welche Sie gemeinsam nutzen möchten. Wählen Sie nach erfolgter Einrichtung des freigebenden Servers die gewünschten Audiodateien aus und steuern Sie die Wiedergabe über Ihr DIR-270.
- Seite 80 Bluetooth über das Hauptmenü aus. Es ertönt ein Klang, der bedeutet, dass der Kopplungsmodus aktiviert wurde. Aktivieren Sie nun den Bluetooth-Kopplungsmodus Ihres Telefons/Tablet-PCs und suchen Sie in der Liste gefundener Geräte Ihres Telefons/Tablet-PCs nach dem Namen Lenco DIR-270. Klicken Sie ihn an, um zu koppeln. Es ertönt der Verbunden-Klang, wenn die Verbindung...
- Seite 81 erfolgreich war. Nun können Sie über Bluetooth Audio wiedergeben lassen und die Wiedergabelautstärke am DIR-270 oder über das verbundene Gerät einstellen. FM-Radio Wählen Sie mit Hilfe des Navigationsdrehknopfes (8) am Gerät oder den Navigationstasten auf der Fernbedienung Hauptmenü „FM Mode“ (FM-Modus) aus.
- Seite 82 DAB+ (DIGITALRADIO) Wählen Sie durch Drehen des Navigationsdrehknopfes am Gerät oder durch Drücken der Navigationstasten auf der Fernbedienung auf dem Hauptbildschirm „DAB/DAB+“ aus und bestätigen Sie Ihre Auswahl durch Drücken des Navigationsdrehknopfes am Gerät oder der OK-Taste auf der Fernbedienung. Bei der erstmaligen Benutzung von DAB auf Ihren Radio beginnt das Radio damit, nach DAB- Radiosendern zu scannen, wobei im Display „Scanning“...
- Seite 83 Abruf gespeicherter DAB/DAB+-Radiosender Lassen Sie sich zuerst im DAB-Modus Ihre favorisierten DAB/DAB+-Radiosender anzeigen, indem Sie die Taste „Fav“ drücken, woraufhin Sie sich durch die Liste der gespeicherten Radiosender bewegen können. CD-Player Wählen Sie durch Drehen des Navigationsdrehknopfes (8) am Gerät oder durch Drücken der Navigationstasten auf der Fernbedienung auf dem Hauptbildschirm „CD“...
-
Seite 84: Spotify Connect
Drücken Sie während der programmierten Wiedergabe die CD-auswerfen-Taste oder zweimal die Stopptaste, um die programmierte Wiedergabe zu beenden. Spotify Connect Mit Spotify Connect können Sie auf Ihrem Lenco DIR-270 Spotify-Musikdateien direkt wiedergeben lassen. Hinweis: Wenn Sie diese Funktion benutzen möchten, dann sollten Sie ein Spotify... - Seite 85 OK/Wiedergabe/Pause-Taste (3). Mit Spotify Connect Musik hören 1. Wenn Sie Ihr Gerät (DIR-270WD) noch nicht mit Ihrem WLAN verbunden haben, dann verbinden Sie es jetzt mit Ihrem WLAN (siehe Netzwerkkonfiguration). 2. Öffnen Sie auf dem mit demselben WLAN verbundenen Mobiltelefon, Tablet-PC oder Laptop die App Spotify.
- Seite 86 Reparaturen (sowohl während als auch nach Ablauf der Garantiezeit) sollten Sie deshalb Ihren Einzelhändler kontaktieren. Wichtiger Hinweis: Es ist nicht möglich, Produkte für Reparaturen direkt an Lenco zu schicken. Wichtiger Hinweis: Wenn dieses Gerät für welchen Grund auch immer durch ein nicht offizielles Servicezentrum geöffnet wurde oder durch dieses Servicezentrum darauf zugegriffen wurde, erlischt...
-
Seite 87: Haftungsausschluss
Umweltschutzstandards zur Verwertung und Entsorgung von Altgeräten aufrecht zu halten (Richtlinie über Entsorgung Elektrischer und Elektronischer Altgeräte). SERVICE Besuchen Sie bitte für weitere Informationen und unseren Kundendienst unsere Homepage www.lenco.com Lenco Benelux BV, Thermiekstraat 1a, 6361 HB Nuth, The Netherlands. -
Seite 88: Précautions Avant Utilisation
Français DIR-270WD ATTENTION : L’utilisation de commandes ou de réglages ou l’exécution de procédures autres que celles spécifiées dans ce manuel peut entraîner une exposition à des rayonnements dangereux. PRÉCAUTIONS AVANT UTILISATION GARDEZ CES INSTRUCTIONS À L’ESPRIT : Ne couvrez pas et n’obturez pas les ouvertures de ventilation. Lorsque vous placez l’appareil sur une étagère, laissez 5 cm (2”) d’espace libre tout autour de l’appareil. - Seite 89 18. Cet appareil ne doit pas être utilisé par des personnes (enfants compris) souffrant de handicaps physiques, sensoriels ou mentaux, ou manquant d’expérience et de connaissances, sauf si elles sont sous surveillance ou ont reçu des instructions sur l’utilisation correcte de l’appareil par la personne qui est responsable de leur sécurité.
- Seite 90 ⚫ Le remplacement d’une pile par une autre de type incorrect peut entraîner une explosion ou une fuite de liquide ou de gaz inflammable. ⚫ L’introduction d’une pile dans le feu ou dans un four chaud, l’écrasement ou le découpage mécanique peut entraîner une explosion. ⚫...
- Seite 91 Avertissement : Ne touchez pas la lentille du laser. Accessoires fournis : Mode d’emploi Télécommande Adaptateur de puissance...
-
Seite 92: Présentation Du Produit
Présentation du produit 1. Fente pour CD 10. Stop en mode CD/Préréglage 1 2. Fente pour CD 11. Avance rapide en mode CD/Préréglage 4 3. Bouton veille 12. Lecture/Pause/Préréglage 2 4. Bouton Précédent 13. Entrée auxiliaire 5. Bouton Accueil 14. Sortie casque 6. - Seite 93 Télécommande 1. Bouton veille 2. Bouton de navigation Haut 3. Bouton OK/Lecture/pause 4. Bouton de navigation Gauche 5. Bouton de navigation Bas 6. Bouton Accueil 7. Bouton Sleep 8. Rembobinage 9. Réglage de la tonalité de l’égaliseur 10. Éjecter le disque 11.
-
Seite 94: Paramétrage Initial
PARAMÉTRAGE INITIAL Avant l’utilisation, vérifiez que la tension mentionnée sur l’étiquette de l’alimentation électrique correspond à celle de votre secteur. Utilisez l’adaptateur secteur fourni pour brancher votre appareil à une prise secteur. Mettez le bouton « OFF/ON » (16) à l’arrière de l’appareil sur « ON » pour le mettre en marche. Le système vous demandera de régler la langue de l’appareil. - Seite 95 Vous pouvez maintenant configurer le réseau sans fil. Would you like to configure Network now? souhaitez-vous configurer le réseau maintenant ? Yes(WPS) Oui(WPS) 1. Sélectionnez YES « Oui » si vous souhaitez continuer et vous connecter au réseau Wi-Fi en utilisant la méthode standard.
- Seite 96 Scanning for Wireless Network... Recherche d'un réseau sans fil... Les réseaux trouvés s’afficheront. Trebs Guest Trebs Guest Trebs Lenco Trebs-Lenco TREBS-LENCO-TD TREBS-LENCO-TD Sélectionnez votre réseau WIFI en tournant la molette Navigation/OK (8) et confirmez en appuyant sur la molette Navigation/OK (8).
- Seite 97 Saisissez votre mot de passe en appuyant sur les touches numériques (20) de la télécommande, puis sur le bouton Droite (12). (Remarque : il faut appuyer sur le bouton Droite (12) après chaque caractère.) Pour faire une correction, appuyez sur le bouton Gauche (4) pour revenir en arrière et effacer le dernier caractère en même temps.
-
Seite 98: Radio Internet
2. Configuration de réseau WPS PBC Vous pouvez vous connecter facilement en appuyant sur le bouton WPS sur votre routeur puis en sélectionnant « YES (WPS) » (Oui (WPS)) sur votre DIR-270 dans les 120 secondes. La connexion entre le routeur et le DIR-270 sera configurée automatiquement. RADIO INTERNET Dans le menu principal, utilisez la molette de navigation (8) pour sélectionner INTERNET RADIO et appuyez sur la molette de navigation (8) pour démarrer. - Seite 99 My Favorite Mes favoris Radio Station/Music Station radio/Musique Sleep Radio Radio de sommeil History Historique Vous pouvez remplacer des favoris déjà enregistrés par de nouvelles stations favorites. Les stations de radio favorites ne peuvent pas être enregistrées deux fois. Vous pouvez afficher les stations enregistrées en sélectionnant ce menu.
-
Seite 100: Centre Multimédia
Appurez sur pour accéder au sous-menu. Lorsque vous choisissez Auto Scan (Balayage automatique), chaque station de cette sous-catégorie est diffusée pendant 30 secondes jusqu’à ce que toutes les stations aient été diffusées. Vous pouvez annuler la fonction de balayage automatique en appuyant sur « OK ». (3).Appuyez sur le bouton pour afficher les informations sur la station de radio active. - Seite 101 USB : Branchez une clé USB dans le port USB (2), puis sélectionnez USB dans MEDIA CENTER (centre multimédia). Le DIR-270 lira le contenu de la clé USB. Parcourez les dossiers/fichiers grâce à la molette de navigation (8) ou les touches directionnelles de la télécommande.
- Seite 102 Application Air Music Vous pouvez utiliser l’application Air Music Control pour contrôler votre DIR-270 via votre smartphone ou votre tablette comme vous le feriez avec la télécommande. Vous pouvez télécharger l’application Air Music. Depuis Android ou Apple store comme suit. Android: Android : Apple iOS:...
-
Seite 103: Centre D'informations
S’il y avait différents appareils enregistrés dans votre compte MediaU, vous pouvez choisir celui que vous utilisez actuellement dans le menu Configuration. Sur le site Web, vous pouvez sauvegarder des stations dans Favorite Station (Station favorite), set Favorite Location/Genr (régler l’Emplacement favori/le Genre) et My Local City (Ma ville locale), ou ajouter des stations manuellement. - Seite 104 CONFIGURATION Affichage de l'heure Analogique/numérique Gérer Quand my mediaU est activé, il s’affiche dans le menu d’accueil. Si plusieurs comptes mediaU existent dans la radio, sélectionnez le compte My mediaU d’identification par défaut ici. Réseau Configuration du réseau sans fil : Activez/désactivez le réseau WiFi. Si vous activez le réseau Wi-Fi, le système sélectionnera automatiquement l'AP requise.
- Seite 105 Alarme 3 alarmes indépendantes peuvent être réglées. 2 alarmes différentes (Alarm 1, Alarm 2 (Alarme 1, Alarme 2)) et une NAP alarm (Alarme de sieste) qui est une alarme de compte à rebours qui peut être utilisée lors d’une courte sieste. Appuyez sur la touche Alarm de la télécommande pour accéder directement au menu des paramètres d’alarme et suivez les étapes suivantes.
- Seite 106 Minuteur Compte à rebours (max. 100 min) Lecture Vous permet de fixer une heure pour la mise en marche de l’appareil programmée ⚫ Allumer Sélectionner Repeat: (Répéter :) Tous les jours, une fois ou du lundi au dimanche Sélectionnez Time (Heure) : HH:MM Sélectionner un son : Internet Radio, FM, DAB/DAB+ ⚫...
- Seite 107 ⚫ Configuration Mode FM : Régler sur Mono ou Stéreo ⚫ DAB/FM Seuil FM Rechercher un seuil : Strong, Default or Week (fort, par défaut, ou faible) Seuil stéreo : Strong, Default or Week (fort, par défaut, ou faible) ⚫ Seuil DAB : Strong, Default or Week (fort, par défaut, ou faible) ⚫...
- Seite 108 Réinitialiser aux Pour rétablir les paramètres par défaut. Après que le système est réinitialisé, valeurs par défaut le menu de langue s’affichera. Choisissez la langue de votre choix et appuyez sur la molette de navigation(8) DLNA/UPnP Vous pouvez renommer le DLNA par défaut à votre guise. Les informations ci-dessous présentent la méthode de configuration du flux de musique en continu à...
- Seite 109 La configuration requise du PC pour l’utilisation de DLNA est Windows 7 et Windows Media Player version 12. Configuration comme ci-dessous : Partagez d’abord les fichiers multimédia sur votre PC vers le DIR-270. Control Panel (Panneau de configuration) > Network and Internet (Réseau et Internet) > Network and Sharing Center (Centre réseau et partage) >...
- Seite 110 Vous entendrez un son signifiant que le mode d’appariement est actif. Activez le mode d’appariement Bluetooth de votre téléphone/tablette et recherchez le nom Lenco DIR-270 sur votre téléphone/tablette. Ensuite, cliquez ici pour l’apparier. Quand la connexion est établie, un son indiquera que l’appareil est connecté.
- Seite 111 Vous pourrez ensuite naviguer parmi ces stations mémorisées en maintenant les boutons « < » ou « > » enfoncés pour basculer entre les stations mémorisées. Pour naviguer manuellement sur la fréquence FM, appuyez simplement sur les boutons « < » ou « > » pour reculer ou avancer sur l’onde de fréquence.
- Seite 112 Pour revenir à la liste afin de la faire défiler manuellement, appuyez sur le bouton « < » pour revenir en arrière. Pour recommencer la recherche des stations, allez à la page de la liste principale pour les stations DAB et il y aura un message de rappel « Delete station list? » (Supprimer la liste des stations ?).
- Seite 113 Fonction CD Pour passer d’une chanson à l’autre, utilisez les boutons « < » (2) ou « > » (5) de la télécommande. Pause/Lecture (3) à l’aide du bouton de la radio ou de la télécommande. Pour rembobiner ou avancer dans une chanson en cours de lecture, appuyez sur les boutons « << » (9) ou «...
- Seite 114 « OK/Pause » (3). Écoutez à volume élevé avec Spotify Connect 1. si vous n’êtes pas déjà connecté, connectez votre appareil (DIR-270WD) à votre réseau Wi-Fi domestique (voir Configuration du réseau) 2. Ouvrez l’application Spotify sur votre téléphone, tablette ou ordinateur portable en utilisant le même réseau wifi...
-
Seite 115: Caractéristiques Techniques
Le logiciel Spotify est distribué sous licence tierce comme indiqué à l’adresse suivante : www.spotify.com/connect/third-party-licenses. Caractéristiques techniques Réseau 802.11b/g/n (WLAN) Chiffrement : WEP, WPA, WPA 2(PSK), WPS Flux continu UPnP, DLNA Types de fichier pris en WMA,MP3,WAV,FLAC,AAC,AAC+ charge Connexions CC, USB, entrée auxiliaire (AUX IN) de 3,5 mm, sortie de ligne (Line- Out) de 3,5 mm Entrée 100-240 V ~ 50/60 Hz, 1 A max. -
Seite 116: Clause De Non-Responsabilité
Lenco propose un service et une garantie conformément à la législation européenne, ce qui signifie qu’en cas de besoin de réparation (aussi bien pendant et après la période de garantie), vous pouvez contacter votre revendeur le plus proche. Remarque importante : Il n’est pas possible de renvoyer l’appareil pour réparation directement à... - Seite 117 Español DIR-270WD PRECAUCIÓN: El uso de los controles o ajustes o el funcionamiento de los procedimientos excepto a aquellos especificados aquí pueden provocar una exposición peligrosa a la radiación. PRECAUCIONES PREVIAS AL USO TENGA ESTAS INSTRUCCIONES EN MENTE: No cubra o bloquee ninguna apertura de ventilación. Cuando coloque el dispositivo en una estantería, deje 5 cm (2”) de espacio libre alrededor de todo el dispositivo.
- Seite 118 18. Este aparato no está diseñado para su uso por personas (incluyendo niños) con discapacidades físicas, sensoriales o mentales o con falta de experiencia o conocimientos, salvo que estén bajo la supervisión o hayan recibido formación sobre el uso correcto del dispositivo por parte de una persona responsable de su seguridad.
- Seite 119 ⚫ Si cambia las pilas por otras que no son las correctas, se puede producir una explosión o la fuga de líquidos o gases inflamables. ⚫ Si arroja las pilas al fuego o a un horno caliente, o aplasta o cortar mecánicamente una pila, podría provocar una explosión.
- Seite 120 Advertencia: No toque la lente. Accesorios incluidos: Manual del usuario Mando a distancia Adaptador de corriente...
-
Seite 121: Descripción General Del Producto
Descripción general del producto 1. Ranura del CD 10. Detenerse en modo CD/Presintonía 1 2. Puerto USB 11. Avanzar rápido en modo CD /Presintonía 3. Botón de modo de espera 12. Reproducción y pausa/Presintonía 2 4. Botón anterior 13. Entrada AUX 5. -
Seite 122: Mando A Distancia
Mando a distancia 1. Botón de modo de espera 2. Botón navegar hacia arriba 3. Botón OK/Reproducción y pausa 4. Botón navegar hacia la izquierda 5. Botón navegar hacia abajo 6. Botón de inicio 7. Botón de apagado automático 8. Rebobinar 9. -
Seite 123: Configuración Inicial
CONFIGURACIÓN INICIAL Antes de ponerlo en funcionamiento, asegúrese de que la tensión que se menciona en la alimentación es la misma que la tensión en su área local. Use el adaptador de corriente que se suministra para conectar el dispositivo a la toma de corriente doméstica. - Seite 124 Ahora puede configurar la red inalámbrica. Would you like to configure Network now? ¿Desea configurar la red ahora? Yes(WPS) Sí (WPS) 1. Seleccione YES (Si) si desea continuar y conectarse a su red WIFI usando el método estándar. Pulse la rueda de navegación (8) para confirmarlo. Continúe leyendo la opción 1 “network configuration”...
- Seite 125 Scanning for Wireless Network... Buscando red inalámbrica… La pantalla mostrará las redes que encuentre. Trebs Guest Trebs Invitado Trebs Lenco Trebs-Lenco TREBS-LENCO-TD TREBS-LENCO-TD...
- Seite 126 Seleccione la red WIFI girando la rueda de navegación/OK (8) y confirmándolo pulsando la rueda de navegación/OK (8). Si la red WIFI seleccionada requiere una contraseña, puede introducirla en la siguiente pantalla. Enter Password Introducir la contraseña Input: Entrada: Move Mov.
-
Seite 127: Radio Por Internet
2. Configuración de red PBC WPS Puede conectarse fácilmente pulsando el botón WPS de su router y posteriormente seleccionando YES (SI) (WPS) en el DIR-270 en 120 segundos. La conexión entre el router y el DIR-270 se configurará automáticamente. RADIO POR INTERNET Desde el menú... - Seite 128 My Favorite Mis favoritos Radio Station/Music Emisora de radio/música Sleep Radio Retardo de la radio History Historial Puede sustituir favoritos ya guardados por una nueva emisora favorita. No se pueden guardar dos veces las emisoras de radio favoritas. Las emisoras guardadas se muestran seleccionando este menú.
-
Seite 129: Centro Multimedia
Pulse para entrar en el submenú. Cuando elija Búsqueda automática, reproduce cada emisora en esta subcategoría durante 30 segundos hasta que se han reproducido todas las emisoras. Puede cancelar la función de búsqueda automática pulsando “OK” (3). Pulse el botón para ver información sobre la emisora de radio activa. - Seite 130 USB: Inserte una memoria USB en la toma (2) y posteriormente seleccione USB del MEDIA CENTER (Centro multimedia). El DIR-270 leerá los contenidos de la memoria USB. Navegue por carpetas / archivos con el dial de navegación (8) o las teclas de dirección del mando a distancia.
- Seite 131 Aplicación Air Music Puede usar la aplicación de control Air Music para controlar el DIR-270 con el smartphone o tablet como lo haría con el mando a distancia. Puede descargar la aplicación Air Music. desde Android o Apple store tal y como aparece debajo. Android: Android: Apple iOS:...
-
Seite 132: Centro De Información
Si existen diferentes dispositivos guardados en su cuenta de MediaU, puede elegir el que use actualmente bajo el menú de Configuration (configuración). En la página web podrá guardar emisoras en Favorite Station (Emisora favorita), configurar Favorite Location/Genre (Ubicación/Género favorito) y My Local City (Mi ciudad local), o añadir manualmente las emisoras. Es posible ver las emisoras desde el modo My Media (Mis medios) en la radio. -
Seite 133: Configuración
CONFIGURACIÓN Mostrar hora Analógica/Digital Organización Cuando esté activada, aparecerá my mediaU (Mis mediosU) en el menú principal. Si existen varias cuentas mediaU en la Radio, seleccione la cuenta Mis mediosU de inicio de sesión por defecto aquí. Configuración de red inalámbrica: Activar/desactivar la red WiFi. Cuando active la red WiFi, el sistema seleccionará... - Seite 134 Alarma Se pueden establecer 3 alarmas independientes. 2 alarmas diferentes (Alarm 1, Alarm 2 (Alarma 1, Alarma 2)) y una NAP alarm (Alarma NAP) que es una alarma de cuenta atrás que se puede utilizar cuando se hecha una cabezadita. Pulse el botón de Alarma en el mando a distancia para ir directamente al menú...
- Seite 135 Temporizador Temporizador con cuenta atrás (máx. 100 min) Reproducción Le permite configurar una hora en la que el dispositivo se conecta programada ⚫ Conexión Seleccione Repeat (Repetir): Cada día, una vez o Lun a Dom Seleccione Time (Hora): HH:MM Seleccione Sound (Sonido): Radio por Internet, FM, DAB/DAB+ ⚫...
- Seite 136 ⚫ Servicio siguiendo (FM-IR): Habilitar o deshabilitar ⚫ Servicio siguiendo (DAB-IR): Habilitar o deshabilitar Configuración de Existe un atajo de teclado para la radio local desde el menú de Internet Radio radio local (radio por Internet) de forma que puede ir con facilidad a la lista de emisoras de su ubicación.
- Seite 137 DLNA/UPnP Puede cambiar el nombre predeterminado del DLNA por el que desee. La información que aparece debajo es la introducción a cómo configurar la reproducción multimedia desde un PC u otro servidor multimedia. Estudie las propias ilustraciones del software o aplicaciones que use para la reproducción de música.
- Seite 138 Control Panel (Panel de control)> Network and Internet (Red e Internet) > Network and Sharing Center (Red y Centro de archivos compartidos) > Change advanced sharing settings (Cambiar configuración avanzada de archivos compartidos) > Media streaming options (Opciones de reproducción multimedia). Abra Windows Media Player para habilitar Allow remote control of my Player (Permitir el control remoto de mi reproductor).
- Seite 139 Oirá un sonido, lo que significa que el modo de emparejamiento está activo. Active el modo de emparejamiento Bluetooth de su teléfono / tableta y busque el nombre de Lenco DIR-270 en su teléfono / tableta. Posteriormente, haga clic para emparejarlo. Cuando se haya conectado correctamente, hará...
- Seite 140 Mantenga pulsado el botón “FAV” del mando a distancia durante 1-2 segundos y se mostrará el número "01" en la pantalla. Use el dial de navegación para navegar por los números de las presintonías (hasta 99) y seleccione el número de presintonía elegido que desee guardar girando el dial de navegación (8).
- Seite 141 Gire el dial de navegación (8) para elegir el número de presintonía (hasta 99) y seleccione su opción girando el dial de navegación (8) De forma alternativa, cuando esté en la pantalla de la lista de las emisoras DAB puede resaltar la emisora que haya elegido y mantener pulsado “FAV”...
- Seite 142 Spotify Connect Con spotify connect puede reproducir música de spotify directamente en el Lenco DIR-270. Nota: para usar esta funcionalidad, debe disponer de una cuenta spotify premium Pulse el botón "Home" (5) y gire la rueda de navegación/OK (8) a la función de Spotify Connect y confírmelo pulsando la rueda de navegación/OK (8).
- Seite 143 Escuchar alto con Spotify Connect 1. Si todavía no está conectado, conecte el dispositivo (DIR-270WD) a la red Wi-Fi doméstica (remítase a Configuración de red) 2. Abra la aplicación Spotify del teléfono, tablet u ordenador portátil usando la misma red wifi...
- Seite 144 Use únicamente la alimentación que se enumera en estas instrucciones de usuario. GARANTÍA Lenco ofrece servicio y garantía en cumplimiento con las leyes de la Unión Europea, lo cual implica que, en caso de que su producto precise ser reparado (tanto durante como después del periodo de garantía), deberá...
-
Seite 145: Exención De Responsabilidad
(Directiva sobre la Eliminación de Equipos Eléctricos y Electrónicos). SERVICIO TÉCNICO Para obtener más información y soporte del departamento técnico, por favor, visite la página web www.lenco.com Lenco Benelux BV, Thermiekstraat 1a, 6361 HB, Nuth, Países Bajos.