Thule Easy-fit Instructions
Quicklinks

Verwandte Anleitungen für Thule Easy-fit


Inhaltszusammenfassung für Thule Easy-fit
- Seite 1 Thule Easy-fit Instructions C.20120415 20 19 800 388...
- Seite 2 CHAIN PRESET To avoid scratches on alloy wheels, install nylon bumpers. Per evitare di rovinare i cerchi in lega applicare i bottoni proteggi cerchio. Um zu vermeiden, dass die Alufelgen beschädigt werden, sollten die Kunsto bumper verwendet werden. Appliquer les boutons de protection anti-gri ure pour prévenir tout frottement des jantes en alliage.
- Seite 3 FITTING Grab the two red hand-grips and open the arch until the maximum extension. Impugnare le due estremità rosse e divaricare l'arco rigido fino alla massima estensione. Beide roten Enden ergreifen, und den starren Bogen bis zur max. Spannung ö nen. Saisissez les deux poignées, rouge et ouvrez l'arche jusqu'à...
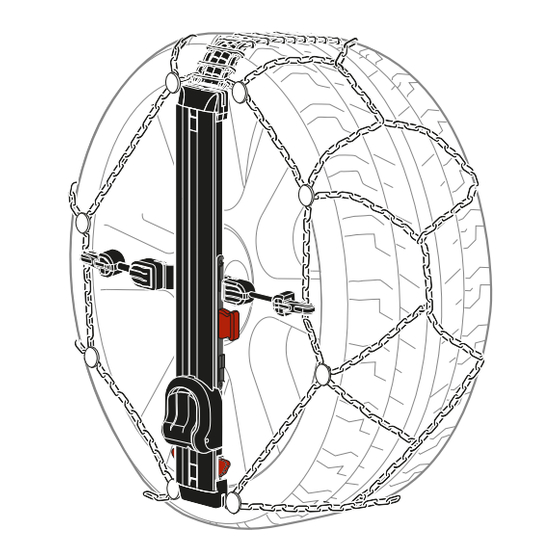
- Seite 4 Bevor die Kette montiert wird, muss darauf geachtet werden, dass die starren Bögen und die Sicherheitsvorrichtung (1) o en sind und die roten Tasten gedrückt sind (2). Nach Beachtung dieser beiden Schritte kann die Thule Easy Fit montiert werden. Avant de monter la chaîne, si l’arche rigide est verrouillée, empêchant l'ouverture des deux extrémités rouges, il est nécessaire pour libérer le dispositif...
- Seite 5 Fit the tyre starting from the upper part and place the arch behind the wheel. Calzare il pneumatico partendo dall'alto, posizionando l'arco dietro la ruota. Die Kette von oben beim Legen des Bogens hinten den Reifen passen. Monter la chaine sur le pneumatique à partir de la partie supérieure et placer l'arche derrière le pneumatique.
- Seite 6 Put the two red hand-grips behind the wheel. Posizionare le due estremità rosse dietro il pneumatico. Beide roten Enden hinten den Reifen positionieren. Mettez les deux poignées rouges derrière le pneumatique. Colocar los dos extemos rojos detrás del neumático.
- Seite 7 Verify that the arch is completely positioned behind the wheel as shown in picture 4. Verificare che l'arco sia posizionato completamente dietro il pneumatico come indicato in fig. 4. Prüfen, dass der Bogen hinten dem Reifen komplett liegt, wie im Bild 4 dargestellt.
- Seite 8 Open the pedal with the hand. Aprire la pedivella con la mano. Das Pedal mit Hand ausklappen. Ouvrez la pédale à la main. Abrir la manivela con la mano.
- Seite 9 Using your foot, push the pedal downwards until the “click”. Con il piede, premere il pedale a fondo corsa fino al “click”. Das Pedal mit dem Fuß nach unten bis ein Klickgeräusch drücken. Avec le pied, appuyer sur la pédale vers le bas jusqu'à entendre le “click” de fermeture.
- Seite 10 Close the pedal and verify the snow chain lays in the correct position. Chiudere la pedivella e verificare che la catena si trovi nella posizione corretta. Das Pedal wiedereinklappen, und prüfen, dass die Kette sich in der richtigen Position befindet. Fermer la pédale et vérifier que la chaîne à...
- Seite 11 Start driving at low speed: the snow chain will tension automatically while driving. Partite con l'auto a velocità ridotta: la catena si tensionerà automaticamente durante la marcia. Fahren Sie mit reduzierter Geschwindigkeit ab: die Kette wird sich beim Fahren automatisch spannen. Commencez à...
- Seite 12 ATTENTION! After having the chain fitted and tightened pushing down the pedal (until the click), don’t remove the chain before moving the vehicle. If you need to remove the chain but there’s no possibility to move the vehicle, pay attention to the quick recall of the pedal upwards: keep the pedal downwards with your hand while unlocking the safety device (1) and pushing the release buttons (2).
- Seite 13 REMOVING The suggested position for dismounting is the one indicated on picture “i”. La posizione consigliata per lo smontaggio è quella indicata in figura “i”. Die empfohlene Position zur Kettedemontage ist die im Bild “i” dargestellt. La position suggérer pour le démontage est celle indiqué sur la photo “i”. La posición recomendada para el desmontaje es la que se muestra en la fig.”i”.
- Seite 14 Deactivate the safety device pulling it towards outside until the “click”. Disattivare il dispositivo di sicurezza tirando verso l'esterno il pulsante rosso fino al “click”. Die Schutzvorrichtung beim Ziehen nach außen des roten Knopfs bis zum Klickgeräusch löschen. Désactiver le dispositif de sécurité en la tirant vers l'extérieur jusqu'à entendre le “click”.
- Seite 15 Push the release buttons to deactivate the tightening. Premere i due pulsanti rossi di sgancio per disattivare il sistema di tensionamento. Die zwei roten Knöpfe drücken, um die Spannvorrichtung zu löschen. Appuyez sur les boutons de déverrouillage pour desserrer la chaine. Presionar los dos botones rojos para desactivar el sistema de tensión.
- Seite 16 During snow chain removing, don't raise the pedal manually, but grab and pull one of the two red hand-grips out of the tyre to obtain the pedal rise-up. Durante lo smontaggio, non alzare manualmente il pedale ma impugnare e tirare una delle due estremità...
- Seite 17 At low speed, move the vehicle forward to remove the chain. A bassa velocità, spostare l'auto per rimuovere la catena. Das Auto mit reduzierter Geschwindigkeit bewegen, um die Kette zu entfernen. À vitesse réduite, déplacer le véhicule vers l'avant et récuperer la chaîne. Despacio, mover el coche para quitar la cadena.
-
Seite 19: Recommendations For Use
Recommendations for use... - Seite 20 ATTENTION: Each tyre dimension has only one snow chain size and it is compulsory to respect it. Check that the tyre dimension of the vehicle matches one of the sizes indicated on the box label and at the end of this booklet. Check the “Usage and Maintenance”...
- Seite 24 Thule S.p.A Viale Lombardia, 8 - 23847 Molteno, ITALY sc.tech.support thule.com...