Little Tikes 3-in-1 Garden to Table Market Montageanleitung

Verwandte Anleitungen für Little Tikes 3-in-1 Garden to Table Market


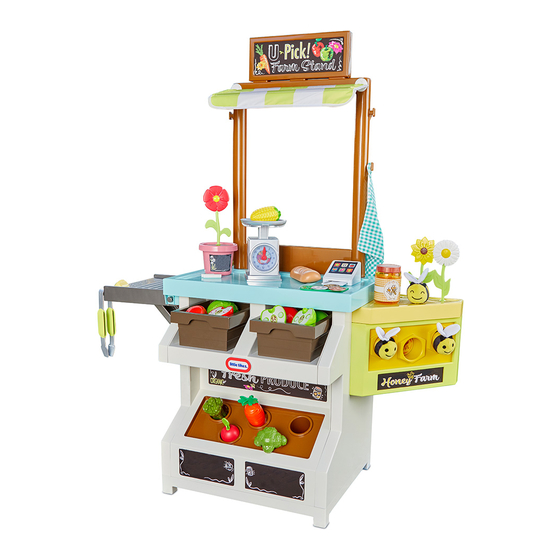
Inhaltszusammenfassung für Little Tikes 3-in-1 Garden to Table Market
- Seite 1 3-in-1 Garden to Table Market ASSEMBLY INSTRUCTIONS #657788M8 Adult assembly required. Approx. assembly time: 25 min. Look for video of assembly at littletikes.com/videoinstructions XIM657788 - 8/21...
- Seite 2 • Clear a flat surface to lay out all the materials so everything is close at hand. • You will need a Phillips head screwdriver (not included) to assemble the 3-in-1 Garden to Table Market. - When installing screws, be sure screws are tightened snugly, but do NOT OVERTIGHTEN.
-
Seite 3: Consumer Service
The Little Tikes Company makes fun, high quality toys. We warrant to the original purchaser that this product is free of defects in materials or workmanship for one year * from the date of purchase (dated sales receipt is required... - Seite 4 BEFORE you begin assembly, make sure you have all the parts listed below. Some packages of hardware may have extras pieces. Questions? We’re here to help. Little Tikes customer service team at 1-800- 321-0183. Shown actual size Tools Required (not included) (18) "...
- Seite 5 Accessories Food scale (1) Card reader (1) Credit card (1) Dollars (2) Coins (3) Honey jar (1) Broccoli (1) Cabbage (1) Corn (1) Carrot (1) Radish (1) Asparagus (1) Red tomato (1) Green apple (1) Red apple (1) Baguette (1) Sunflower (1) Pansy (1) Honey bees (3)
- Seite 6 Ready...batteries first! 1.5V AA/LR06 Tool required (not included) 1.5V AA/LR06 Battery installation MUST be completed by an adult: 1. Using a Phillips screwdriver (not included) remove the screws and battery compartment cover (1) located on the burner module (O). 2. Install three (3) fresh AA alkaline batteries (not included), making sure the (+) and (-) ends face the proper direction as indicated inside the...
- Seite 7 Fit the assembled beehive front to the beehive back (part M). It helps to align the screw holes. Secure using (6) " (0.95 cm) screws - (3) on each side. Tool required (not included) " (0.95 cm) Actual size Snap on the beehive countertop (part J). Apply decal.
- Seite 8 Let’s get bzzzzzzzy! - cont. Lay flat the side base - right (part E). Place the assembled beehive, aligning the "snaps" to the openings in the side. Press down on the "snaps" until you hear a "CLICK". All (4) snaps should be fully installed. Flip the side over and check the snap-fits.
- Seite 9 Two parts make one Insert the dirt (part C) into the BACK of the front base - bottom Tool required (not included) (part B). It helps to align the screw holes. Secure using (6) " (0.95 cm) screws - (3) an each side. "...
- Seite 10 Get in the groove... Slide the assembled front base bottom into the lip on the front base - top (part A). (view from the back) Get snappin’ Snap assembled side base - right (part E) onto the assembled base. IMPORTANT: Be sure you have already attached the assembled beehive!
- Seite 11 Lay it flat... Easier if you lay the side base - left (part D) on a flat surface. Then align the assembled base and press down to snap it into the base. Snap on the bottom Flip the base assembly upright and snap it into the base bottom (part F).
- Seite 12 Time for the countertop..but WAIT! Place the countertop (Part G) onto the assembled base. Rest the countertop halfway onto each snap. Proceed with the other snaps. START WITH THE MIDDLE SNAP! Press down fully until it clicks into place.
- Seite 13 Sign me up! Apply decal to the sign (part I). Then insert the sign (part I) into the top of the backwall (part H) (view of the front) (view of the back) A little shade Slide the canopy fasteners (part P2) into the pockets at each end of the canopy (part P1). Be sure the open end of the fastener is facing inward.
- Seite 14 A little shade - cont. Snap assembled canopy fasteners into the top backwall. Backwall Snap the backwall (part H) into the assembled base.
- Seite 15 Pop it on Pop in the grill support (part X) into the side base - left (part D). Long Short post post (There is a long post and a short post. Insert the long post in first, then the short post.)
- Seite 16 Add a grill Pop-in the grill module (part O) into countertop. (There is a long post and a short post. Insert the long post in first, then the short post.) Short Long post post Swing it up! Swing grill support upward and snap it into the underside of the grill.
-
Seite 17: Instructions De Montage
Montage par un adulte requis. Durée de montage approximative : 25 min. Merci d’avoir choisi l’ensemble Du jardin 3 en un au marché d'alimentation © de Little Tikes . Nous sommes déterminés à fournir un jouet durable et facile à monter, procurant à votre enfant des années de plaisir créatif! •... - Seite 18 Accessoires • Les piles rechargeables doivent être retirées du jouet avant d’être rechargées. Balance alimentaire (1) Radis (1) Serviette (1) • Les piles rechargeables ne doivent être chargées que Lecteur de cartes (1) Brocoli (1) Tournesol (1) par un adulte. Carte de crédit (1) Asperge (1) Pensée (1)
-
Seite 19: Service Consommateurs
à compter de sa date d’achat (le reçu d’achat daté est exigé comme preuve d’achat). Au titre de la présente garantie, la seule responsabilité de The Little Tikes Company et le seul recours se limitent Posez le comptoir à mi-chemin sur chaque agrafe. -
Seite 20: Instrucciones De Montaje
INSTRUCCIONES DE MONTAJE El montaje debe realizarlo un adulto. Tiempo aproximado de montaje: 25 min. © Gracias por elegir Little Tikes Mercado 3 en 1 del huerto a la mesa. Nos esforzamos por crear juguetes perdurables, fáciles de ensamblar y creados para durar, que brindan a sus niños años de diversión fascinante y ocurrente. - Seite 21 (parte X) para aplicar presión en Llame a nuestro equipo de servicio al cliente de cualquier lado del broche. Little Tikes al 1-800-321-0183. Paso 3: Dos partes hacen una Herramientas necesarias (no incluidas): Inserte la tierra (parte C) en la parte TRASERA de la base destornillador de estrella.
-
Seite 22: Servicio Al Cliente
Kanten, entstehen zum Zeitpunkt, wenn das Gerät ausrangiert wird. la compañía Little Tikes, el único remedio disponible bajo esta garantía será el reemplazo de la parte defectuosa del producto o el reemplazo del producto. Esta garantía es válida solamente si el producto Informationen zur Batteriesicherheit. - Seite 23 Dieser Schritt ist einfacher, wenn der linke Seitensockel (Teil D) auf einer • Einige Hardwarepakete enthalten möglicherweise zusätzliche Teile. flachen Oberfläche abgelegt wird. Dann den zusammengebauten Sockel • Fragen? Wir helfen gerne. Wenden Sie sich an Ihren Little Tikes- ausrichten und durch Drücken nach unten im Seitensockel einrasten Kundendienst.
-
Seite 24: Instrukcja Montażu
© The Little Tikes® Company, ein Unternehmen von MGA Entertainment. LITTLE TIKES® ist ein Markenzeichen twarzy. von Little Tikes in den USA und anderen Ländern. Alle Logos, Namen, Gestalten, Abbilder, Images, Slogans und Verpackungsdesigns sind das Eigentum von Little Tikes. Diese Verpackung bitte für mögliche Rückfragen UTYLIZACJA aufbewahren. -
Seite 25: Serwis Konsumenta
© The Little Tikes® Company należy do koncernu MGA Entertainment. LITTLE TIKES® jest znakiem towarowym Krok 2: Oto nasz ul! - c.d. Little Tikes w Stanach Zjednoczonych i innych krajach. Wszystkie logo, nazwy, znaki, wizerunki, obrazy, hasła i Położyć płasko prawą podstawę boczną (część E). Umieścić zmontowany wygląd opakowań... - Seite 26 Bijenkorf,voorpaneel (1) • Vragen? Wij staan voor u klaar om te helpen. Neem contact op met B. Voorkant, onderste deel (1) M. Bijenkorf,achterpaneel (1) de klantenservice van Little Tikes. C. Plantenpaneel (1) N. Bakken (2) D. Linkerzijkant (1) O. Grilmodule (1)
-
Seite 27: Istruzioni Di Montaggio
• Per pulire bene il prodotto usare un panno con sapone delicato e © The Little Tikes Company, onderdeel van MGA Entertainment. LITTLE TIKES® is een handelsmerk van Little Tikes in de V.S. en andere landen. Alle logo’ s , namen, symbolen, gelijkenissen, afbeeldingen, slogans en verpakkingsvormen acqua oppure salviette per la pelle, le mani o il viso. -
Seite 28: Servizio Clienti
Stampato negli Stati Uniti. © The Little Tikes Company, una società di MGA Entertainment. LITTLE TIKES® è un marchio di fabbrica di Little Tikes negli USA e altri Paesi. Tutti i logo, i nomi, i caratteri, le rassomiglianze, le immagini, gli slogan e i tipi di... -
Seite 29: Instruções De Montagem
Informações de segurança das pilhas. É sério! data dell’acquisto (riportata sullo scontrino, che funge da prova di acquisto). A totale discrezione di The Little Tikes Company, questa garanzia prevede come unico rimedio la sostituzione della parte difettosa o del prodotto. -
Seite 30: Serviço Ao Consumidor
Empresso nos E.U.A. 1. Monte a colmeia (parte K) - na colmeia - dianteira (parte L). Fixe usando © The Little Tikes Company, uma companhia da MGA Entertainment. LITTLE TIKES® é uma marca comercial da Little (6) parafusos de 0,95 cm.