Werbung
Verfügbare Sprachen
Verfügbare Sprachen
Quicklinks
Montage MISANO "quick-ship"
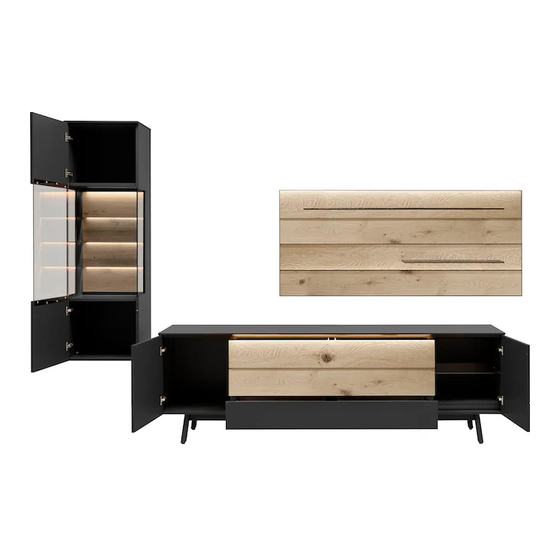
Bild 1 Beispielwände
MI9
Achtung!
Hängeelemente exakt nach Vorgabe montieren!
Alle kippgefährdete Elemente mit den mitgelieferten
Kippsicherungen befestigen!
Bild 2, Kippsicherungen montieren!
+/-
. Montage MISANO_Online allg_DE_EN.xlsx
Rundkopf-
schraube 4x17
Zylinderkopf-
schraube 5,5x70
MI13
Z11-1
Z11-2
Niveliergleiter in die
vorgesehenen Bohrungen
eindrücken und Schränke
ausrichten
MI13
Bitte beachten!
Bei allen U-Schränken 8R, wird ein
Befestigungswinkel mit Metallzapfen als
Kippsicherung montiert. Hierbei wird
Dübel Ø 8mm
eine Senkschraube 5x60mm und ein
Kunststoffdübel Durchm. 8mm
verwendet. Nur bei Schrägmontage
deckt die 13mm Abdeckplatte den
Beschlag ab.
14.07.2020/EFF
qualifiziertes
Fachpersonal
HB1
Seite 1/22
Werbung

Verwandte Anleitungen für GWINNER MISANO "quick-ship"


Inhaltszusammenfassung für GWINNER MISANO "quick-ship"
- Seite 1 Montage MISANO "quick-ship" Bild 1 Beispielwände qualifiziertes Fachpersonal MI13 Achtung! Bitte beachten! Hängeelemente exakt nach Vorgabe montieren! Alle kippgefährdete Elemente mit den mitgelieferten Kippsicherungen befestigen! Bild 2, Kippsicherungen montieren! Rundkopf- schraube 4x17 Bei allen U-Schränken 8R, wird ein Befestigungswinkel mit Metallzapfen als Kippsicherung montiert.
- Seite 2 Bild 3, Glasboden am Wandpaneel befestigen Glasboden Wandpaneel MI109 SW 5 Glasboden festklemmen und Glasboden ins Wand- Neigung einstellen! paneel einschieben WPG4-162L WPG4-162R Bild 4, Wandpaneele+ Hängeschrank bohren 3x Dübel 8mm bohren und Wandhaken eindrehen Zylinderkopfschraube 5,5x70 + Dübel 8mm Die mitgelieferten Dübel sind für folgende Untergründe geeignet: Beton, Vollsteine, Lochsteine, Hohlblocksteine.
- Seite 3 Bild 5, Hängeschrank einhängen, Abdeckplatte befestigen Hängeschrank einhängen obere Justierschraube = Tiefenverstellung untere Justierschraube = Höhenverstellung Abdeck-Kappe, d= 12mm Justierung der Hängeschränke - Befestigung Abdeckplatten Achtung!! Von oben kontrollieren, 13mm an markierten dass alle Beschläge in der Schiene Punkten von innen! eingehängt sind.
- Seite 4 Bild 7, Fußgestell verbinden Gewindemuffe vormontiert MI109 MI13 Maxi-Excenter Bolzen für Maxi-Excenter Pfeilrichtung beachten ! Sechskantschlüssel SW6 4 St. Stellgleiter M8x 20mm eindrehen Bild 8, Fußgestell befestigen MI109 MI13 Gestell mit 12 St. Teller- schrauben 4,5x 60mm an markierten Punkten befestigen! Karton verwenden! Kratzschutz!
- Seite 5 Bild10, Glasboden am Wandpaneel befestigen MI13 Glasboden Wandpaneel SW 5 Glasboden festklemmen und Neigung einstellen! Glasboden ins Wand- paneel einschieben Bild 11, Wandpaneele+ Hängeschrank bohren Achtung: MI13 Andere Einbauhöhen und MI109 breiten der beigefügten Maßsystematik entnehmen 3x Dübel 8mm bohren und Wandhaken eindrehen Die mitgelieferten Dübel sind für folgende Untergründe geeignet: Beton, Vollsteine, Lochsteine, Hohlblocksteine.
- Seite 6 Bild 12, Abdeckplatte befestigen Befestigung Abdeckplatten MI13 13mm an markierten Z11-1 Punkten von innen! Z11-2 Abdeck-Kappe, (Senkschraube 4x 27mm und d= 12mm Abdeck-Kappen in Korpusfarbe) Bild 13, Wandpaneel einhängen MI13 Justierung Wandpaneele Wandpaneel einhängen Neigung Wandpaneel mit Gabelschlüssel SW 8 einstellen .
- Seite 7 Bild 14, Fußgestell verbinden Gewindemuffe vormontiert Maxi-Excenter Pfeilrichtung beachten ! Bolzen für Maxi-Excenter Sechskant- schlüssel SW6 4 St. Stellgleiter M8x 20mm eindrehen Bild 15, Fußgestell befestigen Gestell mit 6 St. Teller- schrauben 4,5x 60mm an markierten Punkten befestigen! Karton verwenden! Kratzschutz! Bild 16, Abdeckplatte montieren, Schrank ausrichten Befestigung...
- Seite 8 Bild 17, Befestigung Kippsicherung Bei allen U-Schränken 8R, wird ein Befestigungswinkel mit Metallzapfen als Kippsicherung montiert. Hierbei wird eine Senkschraube 5x60mm und ein Kunststoffdübel Durchm. 8mm verwendet. Nur bei Schrägmontage deckt die 13mm Abdeckplatte den Beschlag ab. Bild 18, Winkelboard 162cm bohren MI31 WI162G Dübel 8mm bohren und...
- Seite 9 Einstellung Push Push-Beschlag am Schrank montiert, verstellbar mit Magnetzuhaltung Türe öffnet sich durch drücken! Einstellung Frontspalt Türen durch drehen! Ausrichten der Türen durch Nachstellen der Scharniere Banddemontage ausrichten der Tür in senkrechter Richtung Ein- bzw. Ausschalter der Tür- Dämpfung! öffnen Tiefenverstellung Bandabdeckung: Bei gekröpften Bändern,...
- Seite 10 Beleuchtungsplan MISANO Online ohne FKS Wichtiger Hinweis zur LED-Beleuchtung: Anschluß der Leuchten nur an Sicherheits- Achtung, max. Belastung vom Trafo trafos nach EN 61558 (VDE 570), 12 Volt beachten! Eine Überlastung vom Trafo Gleichspannung (DC). verkürzt die Betriebsdauer! Defekt!!! EVG-LED, 10 fach-Verteiler, 12V-DC (weißes Stecksysem), 30 Watt, 230V L.
- Seite 11 Beleuchtungsplan MISANO Online mit FKS4 Wichtiger Hinweis zur LED-Beleuchtung: Anschluß der Leuchten nur an Sicherheits- Achtung, max. Belastung vom Trafo beachten! Eine Überlastung vom Trafo trafos nach EN 61558 (VDE 570), 12 Volt verkürzt die Betriebsdauer! Defekt!!! Gleichspannung (DC). LED-Paneelbeleuchtungen 2m Zuleitung, 12V-DC (weißes Stecksystem) LED-"Miniflex"-Klebeband "LD162"...
- Seite 12 Assembly: MISANO "quick-ship" Image 1 Example walls Qualified specialist personnel MI13 Caution! Please note! Follow the specifications carefully when fitting wall units. Secure any elements that may tip with the anti-tip mechanisms supplied. Image 2 Fitting the anti-tip mechanism 4x17 fillister- head screw On all 8-increment U cabinets, a fixing bracket with metal pins is fitted as an...
- Seite 13 Image 3 Securing the glass shelf to the wall panel Glass shelf Wall panel MI109 Securely fix the glass shelf in place and Slide the glass shelf into adjust the angle. the wall panel WPG4-162L WPG4-162R Image 4 Drilling the wall panels and wall unit Drill three 8-mm wall plugs and screw in the wall hook 5.5x70 cylinder-head screw...
- Seite 14 Image 5 Hanging the wall unit, securing the cover panel Hanging the wall unit Upper adjustment screw = depth adjustment Lower adjustment screw = height adjustment Cover cap, d = 12 mm Adjusting the wall units – Caution! Secure the 13-mm cover panels Check from above that all fittings at the marked have been fitted in the rails.
- Seite 15 Image 7 Connecting the base panel Threaded socket pre-fitted MI109 MI13 maxi eccentric connector Bolts for maxi eccentric connector Note direction of arrow. Hexagon spanner AF6 Screw in four M8x 20 mm adjustable gliders Image 8 Securing the base panel MI109 MI13 Screw base with 12x...
- Seite 16 Image 10 Securing the glass shelf on the wall panel MI13 Glass shelf Wall panel Securely fix the glass shelf in place and adjust the angle. Slide the glass shelf into the wall panel Image 11 Drilling the wall panels and wall unit Caution: MI13 Take other installation heights...
- Seite 17 Image 12 Securing the cover panel Secure the 13-mm cover panels MI13 at the marked Z11-1 points from the inside. Z11-2 Cover cap, (4x27mm countersunk screw and d = 12 mm cover caps in the carcase colour) Image 13 Hanging the wall panel MI13 Adjusting wall panels...
- Seite 18 Image 14 Connecting the base panel Threaded socket pre-fitted Maxi eccentric connector Note direction of arrow. Bolts for maxi eccentric connector Hexagonal spanner AF6 Screw in four M8x 20 mm adjustable gliders Image 15 Securing the base panel Screw base with 6x plate screws 4.5x60 mm at marked points Use cardboard...
- Seite 19 Image 17 Securing the anti-tip mechanism On all 8-increment U cabinets, a fixing bracket with metal pins is fitted as an anti-tip mechanism. A 5x60 mm countersunk screw and an 8-mm-dia. plastic wall plug is used to do so. The 13-mm cover panel only covers the fittings on angled assemblies.
- Seite 20 Adjusting the push mechanism Push fittings fitted to the cabinet, adjustable using the magnetic locking system. Open the doors by pushing them. Adjust the front door gap by turning. Align the doors by adjusting the hinges Fitting the hinge Align the door vertically On/off switch for door...
- Seite 21 MISANO Online lighting plan without radio remote control Important information about LED lighting: Only connect the lights to the safety Caution: Note the maximum transformer transformers in accordance with EN 61558 load. Overloading the transformer (VDE 570) using 12-volt direct current (DC). reduces its service life.
- Seite 22 MISANO Online lighting plan with FKS4 Important information about LED lighting: Only connect the lights to the safety Caution: Note the maximum transformer load. Overloading the transformer transformers in accordance with EN 61558 reduces its service life. Fault! (VDE 570) using 12-volt direct current (DC). LED panel lights 2 m supply cable, 12 V-DC (white plug) LED "Miniflex"...