Technoline WS9470 Bedienungsanleitung
Verfügbare Sprachen
Verfügbare Sprachen
Quicklinks
WS9470 Thermo-Hygrometer - Bedienungsanleitung
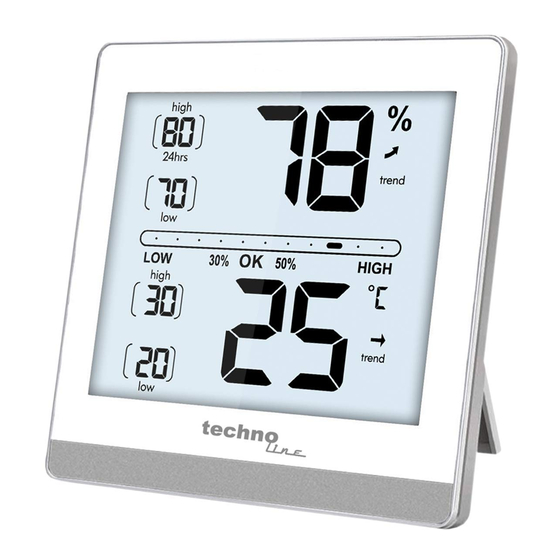
A1 – Höchster gemessener Feuchtigkeitswert
A2 – Niedrigster gemessener Feuchtigkeitswert
A3 – Komfortanzeige
A5 – Niedrigster Temperaturmesswert
A7 - Innenluftfeuchtetrend
A9 - Innentemperaturtrend
B1 – "Set" Taste
B3 – "▼" Taste
C1 – Tischaufsteller
Überblick
A4 – Höchster Temperaturmesswert
A6 - Innenluftfeuchte
A8 - Innentemperatur
B2 – "▲" Taste
B4 – "°C/°F" Taste
DE1

Verwandte Anleitungen für Technoline WS9470


Inhaltszusammenfassung für Technoline WS9470
- Seite 1 WS9470 Thermo-Hygrometer - Bedienungsanleitung Überblick A1 – Höchster gemessener Feuchtigkeitswert A2 – Niedrigster gemessener Feuchtigkeitswert A3 – Komfortanzeige A4 – Höchster Temperaturmesswert A5 – Niedrigster Temperaturmesswert A6 - Innenluftfeuchte A7 - Innenluftfeuchtetrend A8 - Innentemperatur A9 - Innentemperaturtrend B1 – “Set” Taste B2 –...
- Seite 2 Inbetriebnahme Öffnen Sie das Batteriefach. Legen Sie 2x 1,5V AAA-Batterien ein, achten Sie dabei auf die richtige Polarität. Die aktuelle Temperatur und Luftfeuchtigkeit wird auf dem Display angezeigt. Schließen Sie das Batteriefach. Temperaturanzeige Drück Sie die “°C/°F”-Taste um die Temperatureinheit zwischen °C (Celsius) oder °F (Fahrenheit) zu wechseln.
- Seite 3 HIGH: die Umgebung ist zu warm und feucht Maximal- und Minimalwerte Es gibt zwei Speichermodi für die angezeiten Höchst- und Tiefstwerte von Temperatur und Luftfeuchte. Drücken Sie die ▲ oder ▼ Taste im Normalmodus um zwischen den MIN/MAX Werten der letzten 24h oder gesamten Zeit zu wechseln. Allzeitmodus: Sobald die Station aktiv ist, werden die Maximal- und Minimalwerte gespeichert.
- Seite 4 Kalibrierfunktion Das Thermo-Hygrometer ermöglicht es Ihnen, die Anzeige von Temperatur- und Feuchtigkeitsmessungen mit einer anderen Referenzquelle zu kalibrieren. Sie können die Temperatur- und Feuchteanzeigen innerhalb des Messbereichs anpassen. Beim Batteriewechsel werden die kalibrierten Werte automatisch gelöscht. Kalibrierung der Luftfeuchte- und Temperaturanzeige Halten Sie die „SET“-Taste 3 Sekunden lang gedrückt, und die Lufteuchte blinkt.
- Seite 5 Batterieendanzeige Wechseln Sie die Batterien, sobald das Batteriesymbol auf dem Display erscheint. Vorsichtsmaßnahmen Dieses Gerät ist ausschließlich für den Gebrauch in Innenräumen gedacht. Setzen Sie das Gerät nicht extremer Gewalteinwirkung oder Stößen aus. Setzen Sie das Gerät nicht hohen Temperaturen, direktem Sonnenlicht, Staub und Feuchtigkeit aus.
-
Seite 6: Batterie-Sicherheitshinweise
Batterie-Sicherheitshinweise Verwenden Sie nur Alkali-Batterien, keine wiederaufladbaren Batterien. Legen Sie die Batterien unter Beachtung der Polarität (+/-) richtig ein. Ersetzen Sie stets einen vollständigen Batteriesatz. Mischen Sie niemals alte und neue Batterien. Entfernen Sie erschöpfte Batterien sofort. Entfernen Sie die Batterien bei Nichtnutzung. Laden Sie die Batterien nicht auf und werfen Sie sie nicht ins Feuer. - Seite 7 Hinweispflicht nach dem Batteriegesetz Altbatterien gehören nicht in den Hausmüll. Wenn Batterien in die Umwelt gelangen, können diese Umwelt- und Gesundheitsschäden zur Folge haben. Sie können gebrauchte Batterien unentgeltlich bei ihrem Händler und Sammelstellen zurückgeben. Sie sind als Verbraucher zur Rückgabe von Altbatterien gesetzlich verpflichtet! Hinweispflicht nach dem Elektronikgerätegesetz Laut Elektro- und Elektronikgerätegesetz (ElektroG) gehört Elektroschrott...