Herunterladen Inhalt Inhalt Diese Seite drucken

Werbung

Verfügbare Sprachen
  • DE

Verfügbare Sprachen

  • DEUTSCH, seite 1
WT290 – BEDIENUNGSANLEITUNG
Displayanzeige:
Frontansicht:
Seite 1

Werbung

Inhaltsverzeichnis
loading

Inhaltszusammenfassung für Technoline WT290

  • Seite 1 WT290 – BEDIENUNGSANLEITUNG Displayanzeige: Frontansicht: Seite 1...
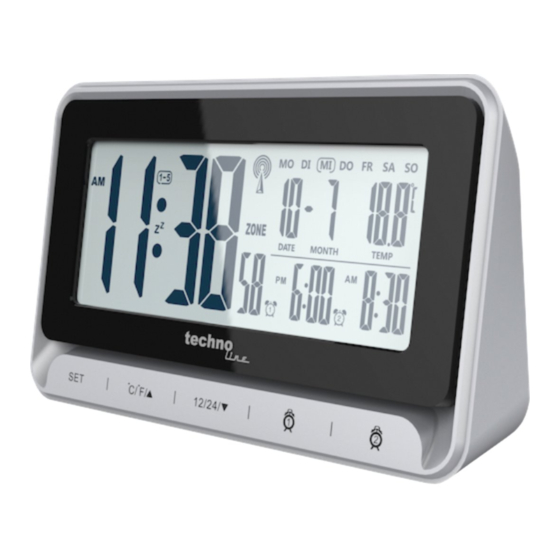
  • Seite 2 Draufsicht: Beschreibung: 1 – AM/PM Symbol (nur im 12 Stunden Modus) 10 – Alarmzeit 2 mit Symbolen 2 – Uhrzeit 11 – SET Taste 3 – Signalempfangssymbol (Funkantenne) 12 – °C/°F / Hoch Taste 4 – Wochentagssymbol 13 – 12/24 / Runter Taste 5 –...
  • Seite 3: Automatischer Empfang

    Schließen Sie die Batterieabdeckung wieder. Die Uhr zeigt alle Anzeigekomponenten an und es ertönt ein Signalton. Nach einigen Sekunden startet die Uhr automatisch den Empfang des DCF77-Zeitsignals. DCF77-SIGNALEMPFANG UND SIGNALANZEIGE Nachdem die Uhr eingeschaltet wurde, beginnt sie, das DCF-Signal zu empfangen. Das Symbol blinkt.
  • Seite 4: Stunden Zeitanzeige

    12 / 24 STUNDEN ZEITANZEIGE Drücken Sie während der Anzeige der Uhrzeitanzeige die 12/24 / runter Taste, um zwischen 12 Stunden und 24 Stunden Zeitanzeige umzuschalten. Bei einer 12-Stunden-Zeitanzeige wird das AM-Symbol in der Zeit vor Mittag und das PM-Symbol in der Zeit nach Mittag angezeigt. UHRZEIT-EINSTELLUNG ...
  • Seite 5: Alarmeinstellungen

    Hinweis:  Das Zeitzonensymbol (ZONE) wird auf dem Display angezeigt, sobald eine Zeitzone eingestellt ist. (außer 0)  Halten Sie die Taste °C/°F / hoch oder 12/24 / runter gedrückt, um den Einstellvorgang zu beschleunigen.  Die Einstellung kehrt automatisch in die Uhrzeitanzeige zurück, wenn 30 Sekunden lang keine Taste betätigt wird.
  • Seite 6: Hintergrundbeleuchtung

     Die Einstellung kehrt automatisch in den Uhrzeitanzeige zurück, wenn 30 Sekunden lang keine Taste betätigt wird.  Drücken Sie eine beliebige Taste außer der SNOOOZE-Taste während des aktiven Alarmtons, um den Alarm zu stoppen, und der Alarm ertönt am nächsten Tag zur gleichen Zeit erneut. ...
  • Seite 7 Wenn Ihre Uhr eine irrelevante Zeit anzeigt oder nicht richtig funktioniert, was möglicherweise durch elektrostatische Entladung oder andere Störungen verursacht wird, öffnen Sie die Batterieabdeckung, entnehmen Sie die Batterien und legen Sie sie unter Beachtung der korrekten +/- Polarität wieder ein. Ihr Gerät wird auf die Standardeinstellungen zurückgesetzt und Sie müssen es erneut einstellen.
  • Seite 8 aus.  Tauchen Sie das Gerät nicht in Wasser.  Vermeiden Sie den Kontakt mit ätzenden Materialien.  Werfen Sie das Gerät nicht ins Feuer. Es könnte explodieren.  Öffnen Sie nicht das Gehäuse und manipulieren Sie nicht bauliche Bestandteile des Geräts. Batterie-Sicherheitshinweise ...
  • Seite 9 Hinweispflicht nach dem Elektronikgerätegesetz Laut Elektro- und Elektronikgerätegesetz (ElektroG) gehört Elektroschrott nicht in den Hausmüll, sondern ist zu recyceln oder umweltfreundlich zu entsorgen. Entsorgen Sie ihr Gerät in einen Recycling Container oder an eine lokale Abfallsammelstelle. Seite 9...
  • Seite 10 WT290 – INSTRUCTION MANUAL Display overview: Front view: Page 1...
  • Seite 11: Initial Operation

    Top view: Description: 1 – AM/PM icons (only in 12 hour mode) 10 – Time of alarm 2 with icon 2 – Time 11 – SET button 3 – Signal reception icon (radio antenna) 12 – °C/°F / UP button 4 –...
  • Seite 12 Slide on to replace the battery cover. The clock will show all display components and a signal tone is heard. After few seconds, the clock will automatically start reception of DCF77 time signal. DCF77 SIGNAL RECEPTION AND SIGNAL INDICATOR After your clock is powered up, it starts to receive DCF signal. The icon flashes.
  • Seite 13: Time Setting

    hour time display. In 12 hour time display the AM icon will be displayed in the time before noon and the PM icon will be displayed in the time after noon. TIME SETTING While viewing normal time display, hold the SET button to enter the time setting and the hour digits flash.
  • Seite 14: Alarm Settings

    ALARM SETTINGS Press the ALARM 1 button to turn on/off alarm 1. The alarm 1 icon is displayed when alarm 1 is active and is not displayed while alarm 1 is not active. Hold the ALARM 1 button to enter into alarm 1 setting and the hour digits flash. Press the °C/°F / UP or the 12/24 / DOWN button to set the hour of alarm 1.
  • Seite 15: Low Battery Indicator

    BACKLIGHT Press the SNOOZE/LIGHT button to turn on backlight for 5 seconds. TEMPERATURE IN °C OR °F Under normal display mode, press °C/°F / UP button to set °C or °F as temperature unit. Note: the temperature range displayed is from 0°C to +50°C LOW BATTERY INDICATOR The low battery indicator icon is displayed once the batteries are low on energy.
  • Seite 16: Battery Safety Warnings

    near freeway, railway, airports, high voltage cable etc. near construction site among tall buildings inside concrete buildings near electrical appliances (computers, TV’s, etc) and metallic structures inside moving vehicles Place the clock at a location with optimal signal, i.e. close to a window and away from metal surfaces or electrical appliances.
  • Seite 17 Do not recharge and do not dispose of batteries in fire as the batteries may explode. Ensure batteries are stored away from metal objects as contact may cause a short circuit. Avoid exposing batteries to extreme temperature or humidity or direct sunlight. Keep all batteries out of reach from children.
  • Seite 18 WT290 – MODE D’EMPLOI Vue d’ensemble de l’affichage : Vue avant : Page 1...
  • Seite 19: Première Utilisation

    Vue de dessus : Description : Icônes AM-PM (uniquement en mode 10 - Heure de l’alarme 2 avec icône 12 heures) Heure 11 - Touche « SET » Icône de réception de signal (antenne 12 - Touche °C/°F/HAUT radio) Icônes des jours de la semaine 13 - Touche 12/24/BAS Date et mois...
  • Seite 20 Enlevez le couvercle du compartiment à pile à l’arrière du réveil. Insérez 3 piles AAA neuves dans le compartiment à piles en respectant les signes « + » et « - ». Faites glisser le couvercle pour le remettre en place. L’horloge montre toutes les composantes de l’affichage et un signal sonore retentit.
  • Seite 21: Réglage De L'heure

    12/24/BAS à nouveau pour arrêter la réception DCF77, l’icône de l’antenne radio cesse alors d’être affichée. AFFICHAGE DE L’HEURE AU FORMAT 12/24 HEURES Lors de l’affichage normal de l’heure, appuyez sur la touche12/24/BAS pour alterner entre les formats d’affichage12 et 24 heures. Avec le format d’affichage 12 heures, l’icône AM avant midi et l’icône PM l’après-midi.
  • Seite 22: Réglage De L'alarme

    +12 heures. Par exemple, +0 est utilisé pour l’Allemagne et -1 est utilisé pour le Royaume-Uni • Appuyez sur la touche SET pour confirmer et sortir du réglage de l’heure. Remarques : • L’icône du fuseau horaire (ZONE) est affichée à l’écran une fois qu’un fuseau horaire est réglé (autre que 0) •...
  • Seite 23 enfoncée pendant 30 secondes. • Appuyez sur n’importe quelle touche sauf la touche SNOOZE quand l’alarme active retentit pour l’arrêter et celle-ci retentira à nouveau le jour suivant à la même heure. • L’alarme retentit pendant 2 minutes et sa fréquence augmente le temps qu’elle sonne. FONCTION DE RAPPEL D’ALARME Lorsque l’alarme retentit, appuyez sur la touche SNOOZE/LIGHT pour entrer en mode de rapper d’alarme et l’icône Zz et l’icône de l’alarme clignotent.
  • Seite 24: En Cas De Panne

    EN CAS DE PANNE Si votre radioréveil affiche une heure non pertinente ou ne fonctionne pas correctement, ce qui peut être causé par une décharge électrostatique ou toute autre interférence, faites glisser le couvercle du compartiment à piles, retirez les piles et réinstallez-les en respectant la polarité +/- correcte. Les réglages par défaut de l'horloge seront rétablis mais vous devez effectuer à...
  • Seite 25 PRÉCAUTIONS • Cet appareil n’est destiné qu’à une utilisation intérieure. • Ne soumettez pas l’appareil à une force ou à un choc excessif. • N’exposez pas l’appareil à la lumière directe du soleil, à des températures extrêmes, à l’humidité ou à la poussière. •...
  • Seite 26 soleil. • Conservez vos piles hors de la portée des enfants. Elles présentent un risque d’étouffement. N’utilisez cet appareil que pour l’usage auquel il est destiné ! Obligation légale concernant la mise au rebut des piles Ne jetez pas les piles usagées avec les ordures ménagères, car elles sont nuisibles à...
  • Seite 27 WT290 – MANUAL DE INSTRUCCIONES Vista general de la pantalla: Vista delantera: Página 1...
  • Seite 28 Vista sARRIBAerior: Descripción: Iconos AM/PM (solo en modo 12 10 - Hora de la alarma 2 con icono horas) Hora 11 - Botón “SET” Icono de recepción de señal (antena 12 - Botón °C/°F/ARRIBA de radio) Iconos de días de la semana 13 - Botón 12/24/ABAJO Fecha y mes...
  • Seite 29 FUNCIONAMIENTO INICIAL Abra la cubierta de las pilas situada en la parte posterior del reloj. Coloque 3 pilas AAA nuevas en el compartimiento de las pilas de acuerdo con la polaridad “+” y “-” indicada. Deslícela para volver a colocar la cubierta de las pilas. El reloj mostrará todos los componentes de la pantalla y se oye un tono de señal.
  • Seite 30: Configuración De La Hora

    la recepción DCF77 y el icono de la antena de la radio parpadeará. Vuelva a mantener pulsado el botón 12/24/ABAJO para detener la recepción DCF77 y ya no se mostrará el icono de la antena de la radio. PANTALLA HORARIA DE 12/24 HORAS Mientras se visiona la pantalla horaria normal, pulse el botón 12/24/ABAJO para cambiar entre la pantalla horaria de 12 horas y de 24 horas.
  • Seite 31: Configuración De La Alarma

    Pulse el botón °C/°F/ARRIBA o el botón 12/24/ABAJO para configurar el valor de la zona horaria entre -12 y +12 horas. Por ejemplo, + 0 se usa para Alemania y -1 se usa para el Reino Unido. • Pulse el botón SET para confirmarlo y salir de la configuración horaria. Notas: •...
  • Seite 32: Iluminación De Fondo

    • Mantenga pulsado el botón °C/°F/ARRIBA o el botón 12/24/ABAJO para acelerar el proceso de configuración. • La configuración volverá automáticamente al modo de pantalla horaria si no se usa ningún botón durante 30 segundos. • Pulse cualquier botón excepto el botón SNOOZE durante el sonido active de la alarma para detener la alarma y la alarma volverá...
  • Seite 33: Solución De Problemas

    INDICADOR DE BATERÍA BAJA El icono del indicador de batería baja se muestra una vez que las pilas presentan poca energía. Cambie pronto a un juego de pilas nuevo. SOLUCIÓN DE PROBLEMAS Si el reloj muestra una hora irrelevante o no funciona bien, que puede estar causado por descargas electroestáticas u otras interferencias, abra l cubierta de las pilas, extraiga las pilas y vuelva a instalarlas cumpliendo con la polaridad correcta +/-.
  • Seite 34 Coloque el reloj en una posición donde obtenga una señal óptima, p.ej. cerca de una ventana y lejos de sARRIBAerficies metálicas o aparatos eléctricos. PRECAUCIONES • Este reloj está diseñado para usarse únicamente en el interior. • No golpee la unidad ni la someta a una fuerza excesiva. •...
  • Seite 35 • Evite exponer las pilas a temperaturas extremas, a la humedad o a los rayos directos del sol. • Mantenga todas las pilas lejos del alcance de los niños. Constituyen peligro de asfixia. ¡Use el producto únicamente para la finalidad prevista! Consideración de obligaciones según la ley sobre pilas No debe tirar las pilas usadas a la basura de su hogar, ya que pueden causar daños a la salud y al medio ambiente.
  • Seite 36 WT290 – NÁVOD K OBSLUZE Přehled displeje: Pohled zepředu: Strana 1...
  • Seite 37: První Použití

    Pohled shora: Popis: Ikony AM/PM (pouze ve 12hodinovém 10 - Čas budíku 2 s ikonou režimu) Čas 11 - Tlačítko SET Ikona příjmu signálu (rádiový stožár) 12 - Tlačítko °C/°F/NAHORU Ikony dnů v týdnu 13 - Tlačítko 12/24/DOLŮ Datum a měsíc 14 - Tlačítko ALARM 1 Vnitřní...
  • Seite 38 Zasunutím vraťte kryt zpět na své místo. Na displeji budíku se zobrazí všechny hodnoty a ozve se tón signálu. Po několika sekundách budík automaticky spustí příjem časového signálu DCF77. PŘÍJEM SIGNÁLU DCF77 A UKAZATEL SIGNÁLU Budík začne po spuštění přijímat signál DCF. Bliká...
  • Seite 39: Nastavení Času

    Během normálního zobrazení času přepnete mezi 12- a 24hodinovým formátem času stisknutím tlačítka 12/24/DOLŮ. Při zobrazení času ve 12hodinovém formátu se ráno a dopoledne zobrazuje u hodnoty času ikona AM a odpoledne a večer ikona PM. NASTAVENÍ ČASU • Během normálního zobrazení času přejdete do nastavování času stisknutím tlačítka SET. Začnou blikat číslice hodin.
  • Seite 40: Nastavení Budíku

    • Stisknutím tlačítka °C/°F/NAHORU nebo 12/24/DOLŮ a jeho podržením nastavování hodnot zrychlíte. • Pokud nedojde po dobu 30 sekund ke stisknutí žádného tlačítka, nastavení se automaticky vrátí do režimu normálního zobrazení času. NASTAVENÍ BUDÍKU • Stisknutím tlačítka ALARM 1 zapnete nebo vypnete budík 1. Je-li budík 1 aktivní, zobrazí se ikona budíku 1.
  • Seite 41: Řešení Problémů

    FUNKCE OPAKOVANÉHO BUZENÍ Zvoní-li budík, přejdete stisknutím tlačítka SNOOZE/LIGHT do režimu opakovaného buzení. Zobrazí se ikona Zz a bude blikat ikona budíku. Budík se znovu spustí za 5 minut. Zvoní-li budík, zastavíte jej stisknutím jakéhokoli tlačítka kromě tlačítka SNOOZE. Budík se spustí automaticky další den ve stejný čas.
  • Seite 42: Bezpečnostní Opatření

    a znovu je vložte, dodržujte správnou polaritu +/−. Budík se resetuje na výchozí nastavení a bude nutné jej znovu nastavit. VLIVY PROSTŘEDÍ NA PŘÍJEM SIGNÁLU Budík získává přesný čas pomocí bezdrátové technologie. Stejně jako u jiných bezdrátových zařízení může být příjem negativně ovlivněn následujícími podmínkami: •...
  • Seite 43 • Vyhněte se kontaktu s jakýmkoliv korozivním materiálem. • Nevhazujte zařízení do ohně, hrozí nebezpečí exploze. • Neotevírejte vnitřní kryt a nemanipulujte s žádnými součástkami tohoto zařízení. BEZPEČNOSTNÍ VAROVÁNÍ TÝKAJÍCÍ SE BATERIÍ • Používejte pouze alkalické baterie, nikdy ne dobíjecí baterie. •...
  • Seite 44 Povinnosti dle zákona o elektrických zařízeních Tento symbol znamená, že elektrická zařízení na konci jejich životnosti je třeba likvidovat odděleně od běžného domácího odpadu. Zařízení vraťte do místního sběrného místa nebo centra pro recyklaci. To platí pro všechny země Evropské unie a ostatní...
  • Seite 45 WT290 – MANUALE DI ISTRUZIONI Panoramica display: Vista anteriore: Pag. 1...
  • Seite 46: Funzionamento Iniziale

    Vista dall'alto: Descrizione: Icone AM/PM (solo in modalità 12 ore) 10 - Orario della sveglia 2 con icona 11 - Tasto “SET” Icona ricezione segnale (antenna 12 - Pulsante °C/°F/SU radio) Icone giorno della settimana 13 - Pulsante 12/24/GIÙ Data e mese 14 - Pulsante ALARM 1 Temperatura interna...
  • Seite 47 Far scorrere e riposizionare il coperchio della batteria. L'orologio mostrerà tutti i componenti di visualizzazione e viene udito un segnale acustico. Dopo alcuni secondi, l'orologio inizia automaticamente la ricezione del segnale orario DCF77. RICEZIONE SEGNALE DCF77 E INDICATORE SEGNALE Dopo aver acceso l'orologio, esso inizia a ricevere il segnale DCF. L'icona lampeggia.
  • Seite 48: Impostazione Orario

    più visualizzata. VISUALIZZAZIONE ORARIO 12/24 ORE Durante la visualizzazione dell'orario in tempo reale, premere il pulsante 12/24/GIÙ per commutare tra la visualizzazione dell'orario in 12 e 24 ore. Nella visualizzazione dell'orario 12 ore, l'icona AM sarà visualizzata nell'orario prima di mezzogiorno e l'icona PM sarà visualizzata nell'orario di pomeriggio. IMPOSTAZIONE ORARIO •...
  • Seite 49: Impostazioni Allarme

    • Premere il pulsante SET per confermare e uscire dall'impostazione dell'orario. Note: • L'icona del fuso orario (ZONE) è mostrata sul display quando il fuso orario è impostato (accanto 0) • Premere e tenere premuto il pulsante °C/°F/SU o 12/24/GIÙ per accelerare il processo di impostazione.
  • Seite 50: Funzione Snooze

    pulsante è usato per 30 secondi. • Premere qualsiasi pulsante eccetto SNOOZE durante il suono della sveglia attivo per arrestare la sveglia e la sveglia suonerà nuovamente il giorno successivo alla stessa ora. • La durata del suono della sveglia è 2 minuti e la velocità del suono della sveglia aumenta durante la durata FUNZIONE SNOOZE Quando il suono della sveglia è...
  • Seite 51: Risoluzione Dei Problemi

    Sostituire con un nuovo set di batterie quanto prima. RISOLUZIONE DEI PROBLEMI Se l'orologio mostra orario non preciso o non funziona correttamente, cosa che potrebbe essere causata da scarica elettrostatica o altra interferenza, aprire il coperchio della batteria facendolo scorrere, estrarre le batterie e reinstallarle osservando la corretta polarità +/-. L’unità tornerà alle impostazioni predefinite e bisognerà...
  • Seite 52 PRECAUZIONI • Questo orologio è inteso solo per uso in interni. • Non esporre l'unità a forza eccessiva o shock. • Non esporre l'unità a temperature estreme, raggi solari diretti, polvere o umidità. • Non immergere in acqua. • Evitare il contatto con qualsiasi materiale corrosivo. •...
  • Seite 53 Utilizzare il prodotto solo per lo scopo previsto. Obblighi in base alla normativa sulle batterie Le batterie vecchie non appartengono ai rifiuti domestici in quanto possono causare danni alla salute e all'ambiente. È possibile consegnare le batterie usate gratuitamente al proprio rivenditore e punti di raccolta. L'utente finale è obbligato per legge a portare le batterie esauste ai distributori e agli altri punti di raccolta! Considerare il carico in base alla normativa sui dispositivi elettrici...
  • Seite 54 WT290 – GEBRUIKSHANDLEIDING Overzicht display: Vooraanzicht: Blad 1...
  • Seite 55: Inbedrijfstelling

    Bovenaanzicht: Beschrijving: AM/PM pictogrammen (alleen in de 12 10 - Tijd van alarm 2 met pictogram uurs-modus) Tijd 11 - Toets SET Signaalontvangstpictogram 12 - °C/°F/OMHOOG toets (radio-antenne) Weekdag pictogrammen 13 - 12/24/OMLAAG toets Datum en maand 14 - ALARM 1-toets Binnentemperatuur 15 - ALARM 2-toets...
  • Seite 56: Automatische Ontvangst

    Installeer 3 x nieuwe AAA batterijen in de batterijhouder en let daarbij op de juiste “+” en “-” polariteit. Schuif de batterijcover terug op zijn plaats. De klok toont alle display-onderdelen en er klinkt een signaaltoon. Na enkele seconden start de klok automatisch met de ontvangst van het DCF77-tijdsignaal. DCF77 SIGNAALONTVANGST EN SIGNAALINDICATOR Zodra uw klok is ingeschakeld, start het de ontvangst van het DCF-signaal.
  • Seite 57 niet langer zichtbaar. 12/24 UUR TIJDWEERGAVE Druk terwijl u de normale tijdweergave ziet op de toets 12/24/OMLAAG om over te schakelen tussen de 12- en de 24-uurs weergave. In de 12-uurs tijdweergave wordt het AM-pictogram weergegeven in de tijd vóór de middag en het PM-pictogram in de tijd na de middag. TIJDINSTELLING •...
  • Seite 58 • Druk op de toets SET om te bevestigen en de tijdinstelling te verlaten. Opmerkingen: • De tijdzone-pictogram (ZONE) wordt zichtbaar op het display van zodra een tijdzone ingesteld werd (andere dan 0) • Hou de toets °C/°F/OMHOOG of 12/24/OMLAAG ingedrukt om het instelproces te versnellen. •...
  • Seite 59: Achterverlichting

    • Druk op een willekeurige toets behalve de toets SNOOZE terwijl het alarm afgaat om het alarm te stoppen; het alarm zal de volgende dag op dezelfde tijd weer afgaan. • De duur van het alarm is 2 minuten, en het alarmgeluid wordt sterker tijdens het alarm SNOOZE-FUNCTIE Druk terwijl het alarm afgaat op de toets SNOOZE/LIGHT om naar de sluimerfunctie te gaan;...
  • Seite 60: Probleemoplossing

    PROBLEEMOPLOSSING Als uw klok onjuiste tijd weergeeft of niet goed functioneert vanwege elektrostatische ontlading of andere storingen, schuift u het batterijklepje open, haalt u de batterijen eruit en plaatst u deze terug volgens de juiste +/- polariteit. Uw apparaat zal nu zijn teruggesteld op de standaard instellingen en moet opnieuw worden ingesteld.
  • Seite 61 • Stel het apparaat niet bloot aan overmatige krachten of schokken. • Stel het apparaat niet bloot aan extreme temperaturen, direct zonlicht, stof of vochtigheid. • Dompel het apparaat niet onder in water. • Laat het niet in contact komen met bijtende materialen. •...
  • Seite 62 Oude batterijen behoren niet tot huishoudelijk afval, omdat deze schadelijk zijn voor de volksgezondheid en het milieu. U kunt gebruikte batterijen kosteloos inleveren bij uw dealer of inzamelpunten. U bent als eindgebruiker wettelijk verplicht verbruikte batterijen in te leveren bij distributeurs of andere inzamelpunten! Houd rekening met heffingen in het kader van wetgeving m.b.t.
  • Seite 63 WT290 – INSTRUKCJA OBSŁUGI Wyświetlacz: Widok z przodu: Strona 1...
  • Seite 64: Czynności Wstępne

    Widok z góry: Opis: Ikony AM/PM (tylko w trybie 10 - Czas budzika 2 i ikona 12-godzinnym) Godzina 11 - Przycisk „SET” Ikona odbioru sygnału (antena 12 - Przycisk °C/°F/W GÓRĘ radiowa) Ikony dni tygodnia 13 - Przycisk 12/24/W DÓŁ Data i miesiąc 14 - Przycisk ALARM 1...
  • Seite 65 Umieść w komorze 3 nowe baterie AAA, przestrzegając prawidłowego zorientowania biegunów „+” oraz „-”. Nasuń pokrywę, aby zamknąć komorę baterii. Zegar wyświetli równocześnie wszystkie wskazania i wyemituje sygnał dźwiękowy. Po kilku sekundach zegar rozpocznie automatyczny odbiór sygnału DCF77. ODBIÓR SYGNAŁU I WSKAŹNIK SYGNAŁU DCF77 Po podłączeniu zasilania do zegara zacznie on odbierać...
  • Seite 66: Ustawianie Czasu

    zniknie. WYŚWIETLANIE CZASU W FORMACIE 12/24-GODZINNYM Gdy na wyświetlaczu wyświetlany jest zwykły tryb czasu, naciśnij przycisk 12/24/W DÓŁ, aby zmienić format wyświetlania czasu na 12 lub 24-godzinny. W 12-godzinnym formacie wyświetlania czasu dla godzin przed południem wyświetlana jest ikona AM, zaś dla godzin popołudniowych wyświetlana jest ikona PM.
  • Seite 67: Ustawianie Budzika

    przycisk 12/24/W DÓŁ. Na przykład dla Niemiec ustaw wartość + 0, a dla Wielkiej Brytanii -1 • Naciśnij przycisk SET, aby potwierdzić i zakończyć konfigurację czasu. Uwagi: • Ikona strefy czasowej (ZONE) jest wyświetlana po skonfigurowaniu strefy czasowej (jeżeli wartość ustawienia jest inna niż...
  • Seite 68: Funkcja Drzemki

    tempo zmiany wartości. • Jeżeli nie naciśniesz żadnego przycisku w ciągu 30 sekund, na wyświetlaczu automatycznie pojawi się tryb wyświetlania czasu. • Aby wyłączyć wybrzmiewający sygnał budzika, naciśnij dowolny przycisk inny niż przycisk SNOOZE. Budzik uruchomi się ponownie o tej samej porze kolejnego dnia. •...
  • Seite 69: Rozwiązywanie Problemów

    Gdy poziom naładowania baterii jest niski, wyświetlony zostanie wskaźnik rozładowania baterii Jak najszybciej wymień baterie na nowe. ROZWIĄZYWANIE PROBLEMÓW Jeśli zegar wskazuje nieodpowiedni czas lub nie działa prawidłowo, co może być powodem wyładowania elektrostatycznego lub innego interfejsu, otworzyć komorę baterii, wyjąć baterie i ponownie je włożyć, przestrzegając prawidłowej biegunowości +/-.
  • Seite 70: Środki Ostrożności

    Zegar najlepiej jest ustawić w miejscu, gdzie uzyska on najlepszy zasięg sygnału, tj. blisko okna i z dala od metalowych powierzchni czy urządzeń elektrycznych. ŚRODKI OSTROŻNOŚCI • Niniejszy zegar może być użytkowany wyłącznie wewnątrz pomieszczeń. • Nie stosować nadmiernej siły i nie potrząsać urządzeniem podczas korzystania. •...
  • Seite 71 zetknięcie z nimi może spowodować zwarcie. • Unikać wystawiania baterii na działanie ekstremalnych temperatur, wilgoć czy światło słoneczne. • Baterie należy trzymać w miejscu niedostępnym dla dzieci. Stwarzają one zagrożenie udławienia się. Produkt należy używać tylko zgodnie z przeznaczeniem! Zobowiązania według przepisów prawa dotyczących baterii Stare baterie nie należą...

Inhaltsverzeichnis