
Verwandte Anleitungen für Sonia IZAR


Inhaltszusammenfassung für Sonia IZAR
- Seite 1 H1106 IZAR Digital Facial Steamer / Vaporizador facial digital / Vapozone visage digital / Vaporizzatore viso digitale / Digitaler Gesichtsbedampfer...
- Seite 2 ● Always pull out the actual plug and not the mains cable. DDUUEETT EUROPE would like to thank you for choosing Sonia products. We hope that this instruction manual will ● Never tamper with any electrical component or open up/ help you get the most out of this product.
-
Seite 3: Technical Specifications
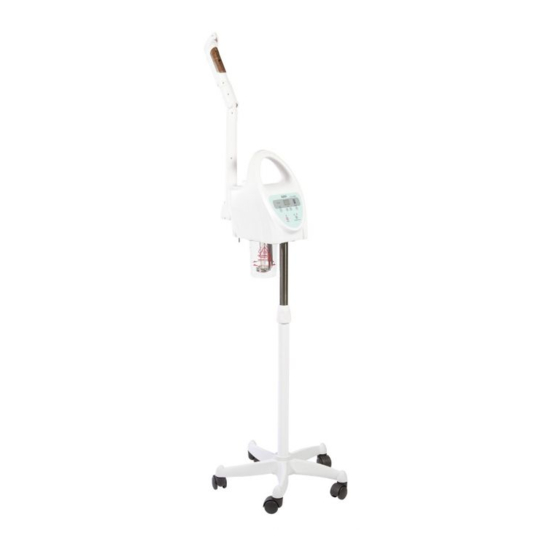
TECHNICAL SPECIFICATIONS ● Main unit Product Digital Facial Steamer Filler cap Control panel Reference H1106 Water filling hole Voltage AC 220-240 V~ Water tank Input frequency 50/60 Hz Heating resistor Power 800 W UV light starter Net weight 5,2 Kg Fuse Power supply cable COMPONENTS... -
Seite 4: Control Panel
- Never add essential oils directly into the water tank. - Step : Insert the “conical part” at the bottom of the “extendable column”. Then place everything onto the “base for the 5 feet” and press down until properly fitted. Finish this step by screwing in the “base clamping plate”... -
Seite 5: Configuration And Operation
CONFIGURATION AND OPERATION immediately. Any locked functions will be unlocked as the water ● Connect the power cable to the mains. level returns between “MAX” and “MIN”. Press resume operation. - The water level inside the tank must stand between the “MIN”... -
Seite 6: Uso Correcto Del Aparato
Desde DDUUEETT EUROPE SL le agradecemos su confianza corriente debidamente instalada. La tensión de red local por comprar productos Sonia. Esperamos que este manual debe corresponderse con los datos técnicos del aparato. de instrucciones le sea de ayuda para sacar el máximo ●... -
Seite 7: Características Técnicas
● Unidad principal Algodón para aceite 1 kit esencial Tapa de llenado Pieza cónica Panel de control Orificio para llenado de agua Manual de Depósito de agua instrucciones Resistencia de calentamiento Arrancador del CARACTERÍSTICAS TÉCNICAS fluorescente UV Producto Vaporizador facial digital Fusible Cable de alimentación Referencia... -
Seite 8: Panel De Control
- Nunca añada aceites esenciales directamente en el - Paso : Inserte la “pieza cónica” en la parte inferior depósito de agua. de la “columna extensible”. A continuación, encaje el conjunto en la “base para los 5 pies” y presione hacia abajo hasta que quede correctamente encajado. -
Seite 9: Configuración Y Funcionamiento
CONFIGURACIÓN Y FUNCIONAMIENTO • El indicador de función de ozono únicamente se iluminará en verde cuando se haya seleccionado la ● Conecte el cable de alimentación eléctrica a una toma de función vaporización. corriente. • Si utilizando las funciones calentamiento o - El nivel de agua dentro el depósito debe encontrarse vaporización aparece “E2”... -
Seite 10: Précautions Et Consignes De Sécurité
● La prise de courant doit être accessible au cas où vous De la part de DDUUEETT EUROPE SL, nous vous remercions de votre confiance dans l’achat des produits Sonia. Nous devriez débrancher l’appareil rapidement et à tout espérons que ce manuel d’instructions vous aidera à tirer le moment. -
Seite 11: Caractéristiques Techniques
● Unité principale Pièce conique Bouchon de remplissage Panneau de commande Manuel d’instruction Trou de remplissage d’eau Réservoir d’eau CARACTÉRISTIQUES TECHNIQUES Résistance de Produit Vapozone visage digital chauffage Démarreur du Référence H1106 fluorescent UV Tension AC 220-240 V~ Fusible Fréquence d’entrée 50/60 Hz Câble d’alimentation électrique... -
Seite 12: Panneau De Controle
qu›il soit correctement installé. - N’ajoutez jamais d’huiles essentielles directement dans Terminez cette étape en vissant la « plaque de serrage le réservoir d’eau. du socle » avec le « kit de fixation ». - Étape : placez « l›unité principale » sur le « support d›ancrage de colonne » pour terminer l›assemblage. - Déverrouillez le bras du vaporisateur : lorsque vous retirez le vaporisateur de la boîte, le bras est bloqué. -
Seite 13: Configuration Et Fonctionnement
CONFIGURATION ET FONCTIONNEMENT vaporisation. • L’indicateur de la fonction ozone s’allumera en vert ● Branchez le cordon d’alimentation sur une prise uniquement lorsque la fonction de vaporisation est électrique. sélectionnée. - Le niveau d’eau à l’intérieur du réservoir doit être •... -
Seite 14: Contenuto Della Confezione
● Il dispositivo e gli accessori devono essere tenuti lontano DDUUEETT EUROPE SL vi ringrazia per la fiducia riposta nell’acquisto dei prodotti Sonia. Ci auguriamo che questo dalla portata dei bambini. manuale di istruzioni vi aiuti a trarre il massimo beneficio da ●... -
Seite 15: Caratteristiche Tecniche
Braccio Piastra di fissaggio Cotone per olio essenziale della base Supporto in cotone Kit di fissaggio 1 kit Coperchio scorrevole Erogazione del vapore Strumento di serraggio Cotone per olio 1 kit ● Unità principale essenziale Parte conica Tappo di riempimento Pannello di controllo Foro di riempimento Manuale di istruzioni... - Seite 16 ISTRUZIONI DI MONTAGGIO E MESSA IN - Riempire il serbatoio dell’acqua, aprendo il tappo del serbatoio del vaporizzatore e introducendo acqua SERVIZIO distillata. Il livello dell’acqua deve trovarsi tra le ● Assemblaggio linee “MIN” e “MAX”. Una volta riempito, sostituire il coperchio.
-
Seite 17: Pannello Di Controllo
PANNELLO DI CONTROLLO • Imposti il timer utilizzando i pulsanti stabilire il tempo di funzionamento delle diverse funzioni. - Per la funzione riscaldamento c’è un intervallo tra 5 e 90 min. - Per la funzione vaporizzazione c’è un intervallo tra 1 e 30 min. -
Seite 18: Pulizia E Manutenzione
un intervallo da 0 a 9, partendo dal volume 0 per accrescere il volume fino a raggiungere il massimo a 9. A questo punto il valore selezionato lampeggerà e verrà salvato automaticamente. PULIZIA E MANUTENZIONE ● Prima di procedere alla pulizia del dispositivo, scollegatelo dalla rete elettrica. -
Seite 19: Korrekte Nutzung Des Geräts
Wir von DDUUEETT EUROPE S. L. danken Ihnen für Ihr spezialisierten Techniker. Vertrauen beim Kauf von Sonia-Produkten. Wir hoffen, ● Das Gerät und das Zubehör müssen außerhalb der dass diese Bedienungsanleitung Ihnen hilft, dieses Produkt Reichweite von Kindern aufbewahrt werden. -
Seite 20: Technische Merkmale
● Dampfarm Grundplatte für die 5 Füße Platine für die Befestigung der Grundplatte Befestigungsset 1 kit Werkzeug zum Anziehen Baumwolle für das 1 kit ätherische Öl Kegelförmiges Teil Baumwolle für das ätherische Öl Halterung für die Baumwolle Bedienungsanleitung Schiebedeckel Dampfventil TECHNISCHE MERKMALE ●... - Seite 21 MONTAGEANLEITUNG UND ● Inbetriebnahme INBETRIEBNAHME ● Montage - Befüllen Sie den Wasserbehälter. Öffnen Sie dazu den Einfülldeckel des Dampfers und füllen Sie destilliertes Wasser ein. Der Wasserstand muss zwischen den Markierungen „MIN“ und „MAX“ liegen. Schrauben Sie - Schritt : Setzen Sie die 5 Baugruppen „Fuß + Rad“ den Deckel wieder rauf, sobald alles befüllt ist.
-
Seite 22: Konfiguration Und Betrieb
- Der Sprühkopf des Verdampferarms kann um 60° nach nach und nach verringern. vorne oder hinten verstellt werden und um 360° gedreht Nach einigen Minuten tritt Dampf aus Düse des werden. Armkopfes aus. • Stellen Sie den Timer mit den Drucktasten ein, um die Betriebszeit der verschiedenen Funktionen BEDIENFELD festzulegen. -
Seite 23: Reinigung Und Wartung
• Stellen Sie die Lautstärke der akustischen Signale vom Dampfer ein: Halten Sie bei ausgeschaltetem Gerät die Taste „ENERGY“ gedrückt, bis auf dem Timer 5 angezeigt wird. Dies ist der Wert der Standardlautstärke, den Sie mit in einem Bereich von 0 bis 9 und von der Lautstärke 0 bis zu maximalen Lautstärke 9 einstellen können. - Seite 24 C Font de la Ventaiola, 1–3 · 08670 Navàs · Barcelona T +34 937378102 www.dduueett.com...