DJI ROBOMASTER EP CORE Kurzanleitung
Vorschau ausblenden
Andere Handbücher für ROBOMASTER EP CORE:
- Benutzerhandbuch (65 Seiten) ,
- Kurzanleitung (77 Seiten)

Verwandte Anleitungen für DJI ROBOMASTER EP CORE


Inhaltszusammenfassung für DJI ROBOMASTER EP CORE
- Seite 1 EP CORE Quick Start Guide Kurzanleitung Guide de démarrage rapide Guida rapida Snelstartgids Guia de início rápido Краткое руководство دليل البدء الرسيع v1.0...
-
Seite 2: Specifications
The RoboMaster app supports iOS 10.0.2 or later or Android 5.0 or later. Users can also download the RoboMaster software for Windows or Mac from the official DJI website on a computer to control the robot with a keyboard and mouse. https://www.dji.com/robomaster_app. After assembly, use your DJI account to activate the robot in the RoboMaster app. Activation requires an internet connection. Internet Specifications... -
Seite 3: Die Robomaster App Herunterladen Und Video-Tutorials Anschauen
Benutzer können auch die RoboMaster-Software für Windows oder Mac von der offiziellen DJI-Website auf einen Computer herunterladen, um den Roboter mit einer Tastatur und Maus zu steuern. https://www.dji.com/robomaster_app. Verwenden Sie nach dem Zusammenbauen Ihr DJI-Konto, um den Roboter in der RoboMaster App zu aktivieren. Für die Aktivierung wird eine Internetverbindung benötigt. -
Seite 4: Caractéristiques Techniques
L’application RoboMaster requiert iOS 10.0.2 ou version ultérieure et Android 5.0 ou version ultérieure. Les utilisateurs peuvent télécharger le logiciel RoboMaster pour Windows ou Mac depuis le site Web officiel de DJI sur un ordinateur pour contrôler le robot à l’aide du clavier et de la souris. https://www.dji.com/robomaster_app Une fois l’assemblage terminé, utilisez votre compte DJI pour activer le robot dans l’application RoboMaster. -
Seite 5: Caratteristiche Principali
L’app RoboMaster supporta iOS 10.0.2 o versioni successive, oppure Android 5.0 o versioni successive. Dal sito ufficiale di DJI è anche scaricabile il software RoboMaster per Windows o Mac, che consente di controllare il robot da un computer tramite tastiera e mouse. https://www.dji.com/robomaster_app. Dopo l’assemblaggio, utilizzare il proprio account DJI per attivare il robot nell’app RoboMaster. L’attivazione richiede l’uso della connessione internet. Internet... -
Seite 6: Technische Gegevens
De RoboMaster-app ondersteunt iOS 10.0.2 of hoger, of Android 5.0 of hoger. Gebruikers kunnen ook de RoboMaster-software voor Windows of Mac downloaden van de officiële DJI-website om de robot vanaf een computer met een toetsenbord en muis te bedienen. https://www.dji.com/robomaster_app. Gebruik na montage uw DJI-account om de robot in de RoboMaster-app te activeren. Activering vereist een internetverbinding. Internet Technische gegevens... - Seite 7 A aplicação RoboMaster é compatível com iOS 10.0.2, ou posterior, ou Android 5.0, ou posterior. Os utilizadores podem transferir o software RoboMaster para Windows ou Mac a partir do website oficial DJI num computador para controlar o robô com um teclado e rato. https://www.dji.com/robomaster_app. Após a montagem, utilize a sua conta DJI para ativar o robô na aplicação RoboMaster. A ativação requer uma ligação à Internet. Internet Especificações...
-
Seite 8: Технические Характеристики
Пользователи также могут загрузить программное обеспечение RoboMaster для Windows или Mac с официального сайта DJI на компьютер, чтобы управлять роботом с помощью клавиатуры и мыши: https://www.dji.com/robomaster_app. После сборки робота активируйте его при помощи учетной записи DJI в приложении RoboMaster. Для этого потребуется соединение с интернетом. - Seite 9 . 0.5 أو اإلصدارات األحدثAndroid 2.0.01 أو اإلصدارات األحدث أوiOS نظامRoboMaster ي ُ د ّ عم تطبيق . الرسمي عىل جهاز كمبيوتر للتحكم يف الروبوت باستخدام لوحة مفاتيح وماوسDJI من موقعMac أوWindows لنظام التشغيلRoboMaster بإمكان املستخدمني أيضً ا تنزيل برنامج...
- Seite 10 Убедитесь, что в вашем комплекте поставки имеются все нижеперечисленные предметы. Если какой-либо предмет отсутствует, свяжитесь с компанией DJI или местным представителем. . أو املوزع املحيل لديكDJI تحقق من وجود جميع العنارص التالية يف العبوة الخاصة بك. يف حالة فقدان أي عنرص، فري ُ جى االتصال برشكة First Layer:...
- Seite 11 ×7 Manuals ×48 (+2)* ×4 · Quick Start Guide · Disclaimer and Safety Guidelines - At a Glance Produktdokumentation Vision Marker · Kurzanleitung Mecanum Wheel Roller M3508I Brushless Motor and ESC Sichtmarkierungen · Haftungsausschluss und Sicherheitsvorschriften – Überblick Manuels Rollen für das Mecanum-Rad Bürstenloser Motor und ESC M3508I Marqueurs visuels ·...
- Seite 12 ×1 ×1 ×1 Camera Front Axle Cover Front Axle Module Base Kamera Frontachsenabdeckung des Frontachsenmodulrahmen Fahrgestells Caméra Base du module d’essieu avant Couvercle d’essieu avant Videocamera Base del modulo asse anteriore Copertura asse anteriore Camera Modulebasis vooras Afdekking vooras Câmara Base do módulo do eixo Cobertura do eixo dianteiro dianteiro...
- Seite 13 ×2 ×2 ×2 ×2 Left-Threaded Inner Hub Left-Threaded Outer Hub Right-Threaded Inner Hub Right-Threaded Outer Hub Linksläufige innere Nabenhälfte Linksläufige äußere Nabenhälfte Rechtsläufige innere Nabenhälfte Rechtsläufige äußere Nabenhälfte Jante intérieure à axe diagonal Jante extérieure à axe diagonal Jante intérieure à axe diagonal gauche gauche droit Jante extérieure à axe diagonal droit Mozzo interno (verso sinistro) Mozzo esterno (verso sinistro)
- Seite 14 ×1 ×1 ×1 Chassis Left Armor Chassis Right Armor AC Power Cable Varies by region. Fahrgestellpanzerung (links) Fahrgestellpanzerung (rechts) AC-Netzkabel Armure gauche du châssis Armure droite du châssis Nach Region unterschiedlich. Corazza sinistra Corazza destra Câble d’alimentation CA Linkerpantser chassis Rechterpantser chassis Varie selon les zones géographiques.
- Seite 15 ×1 ×1 ×1 ×1 ×1 Motion Controller X-Shaped Front Shaft Cable Retainer Mecanum Wheel Mounting Grease Cover Plate Schmierfett Bewegungssteuereinheit Kabelhalterung X-förmige vordere Befestigungsplatte für das Graisse Contrôleur de mouvement Dispositif de retenue de Getriebeabdeckung Mecanum-Rad câbles Olio lubrificante Scheda di controllo Couvercle d’arbre avant Support de montage de Massa lubrificante...
- Seite 16 23 cm 12 cm 35 cm ×1 ×1 ×2 ×4 Masking Tape Data Cables Data Cables Data Cables Kreppband Datenkabel Datenkabel Datenkabel Ruban-cache Câble de transfert des Câbles de transfert des Câbles de transfert des adhésif données données données Nastro adesivo Cavi dati Cavi dati Cavi dati...
- Seite 17 The screw box B includes the following items: Der Schraubensatz B enthält folgende Elemente: La boîte à vis B comprend les éléments suivants : De schroevendoos B bevat de volgende items: A caixa de parafusos B inclui os seguintes itens: Составляющие...
- Seite 18 ×1 ×1 ×1 ×1 ×1 Robotic Arm Connecting Robotic Arm Connecting Robotic Arm Connecting Power Connector Module Front Axle Extension Rod #1 Rod #2 Rod #3 Platform Stromanschlussmodul Roboterarm- Roboterarm- Roboterarm- Verlängerungsplattform für Module de connexion de Verbindungsstange Nr.1 Verbindungsstange Nr.2 Verbindungsstange Nr.3 Vorderachse l’alimentation Barre de connexion du...
- Seite 19 ×1 ×1 ×1 ×1 ×1 Robotic Arm Limit Block Robotic Arm Support Robotic Arm Cable Fixer Robotic Arm Triangle Link TOF Mounting Bracket Base Roboterarm-Klemmstück Roboterarm-Kabelbinder Roboterarm- TOF-Montagehalterung (Roboterarm- Roboterarmträgerrahmen Dreiecksverbindung Support de fixation ToF Fixation de câble du bras Begrenzungsblock) Base de soutien du bras Lien triangulaire du bras robotique Staffa di montaggio del ...
- Seite 20 14 cm ×3 ×1 ×1 ×1 Camera Extension Cable Y-Cable Data Cables Extension Cable Kameraverlängerungska- Y-Kabel Datenkabel Verlängerungskabel Câble d’extension Câble Y Câbles de transfert des Câble d’extension pour données Prolunga Cavo a Y caméra Cavi dati Verlengkabel Y-kabel Prolunga della fotocamera Datakabels Cabo de extensão Cabo Y...
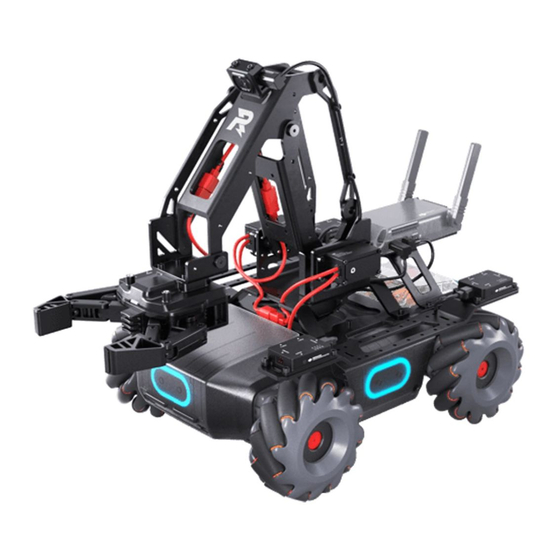
- Seite 22 Overview 1. Robotic Arm Triangle Link 11. Cable Clamp 24. Gripper 35. Chassis Right Armor 2. Robotic Arm (1 of 2) 12. Intelligent Controller 25. Chassis Extension 36. Chassis Rear Armor Platform 3. Robotic Arm Connecting 13. Rear Extension Platform 37.
-
Seite 23: Vue D'ensemble
Vue d’ensemble 1. Lien triangulaire du bras 13. Plateforme d’extension 25. Plateforme d’extension 35. Armure droite du robotique arrière du châssis châssis 2. Bras robotique (1 sur 2) 14. Servo 26. Roue Mecanum à axe 36. Armure arrière du diagonal gauche châssis 3. -
Seite 24: Visão Geral
Overzicht 1. Driehoeksverbinding 12. Intelligente controller 25. Chassisuitbreidings- 37. Trefferdetectoren robotarm platform 13. Uitschuifplatform ach- 38. Voorpantser chassis 2. Robotarm (1 van 2) terzijde 26. Mecanum-wielen met 39. M3508I borstelloze linkse schroefdraad 3. Verbindingsstang 14. Servo motoren en ESC’s robotarm #1 27. - Seite 25 Обзор 10. Соединительный стер- 1. Треугольный соедини- 21. Основание роботизиро- 33. Контроллер движения жень роботизирован- тель роботизированной 34. Левая броня шасси ванной руки ной руки №3 руки 22. Динамик 35. Правая броня шасси 11. Зажим для кабеля 2. Роботизированная рука 23.
-
Seite 26: Charging The Battery
Preparation 1. Charging the Battery 3. Legend Refers to the accessories required including such information as the screw model and quantity. For ×6 example, the description in this (M3-A) illustration indicates that six screws of the M3-A model are required. Indicates that the bottom of the Charge the battery to bring it out of hibernation robot is displayed. -
Seite 27: Laden Des Akkus
Vorbereitung 1. Laden des Akkus 3. Legende Bezieht sich auf das erforderliche Zubehör, einschließlich Informationen wie Schraubenmodell ×6 und Menge. Die Beschreibung in (M3-A) dieser Abbildung gibt beispielsweise an, dass sechs Schrauben des M3- A-Modells erforderlich sind. Laden Sie den Akku auf, um seinen Ruhezustand zu beenden, bevor Sie ihn zum ersten Mal verwenden. -
Seite 28: Recharger La Batterie
Préparation 1. Recharger la batterie 3. Légende Se réfère aux accessoires requis et inclut des informations telles que la quantité et le modèle de vis. Par exemple, la description dans cette (M3-A) illustration indique que six vis du modèle M3-A sont requises. Indique que c’est le dessous du Chargez la batterie pour la faire sortir de son robot qui est présenté. -
Seite 29: Ricarica Della Batteria
Preparazione 1. Ricarica della batteria 3. Legenda Indica gli accessori richiesti, comprese le informazioni su modello e quantità delle viti richieste. Ad ×6 esempio, la descrizione in questa (M3-A) illustrazione indica che sono necessarie sei viti modello M3-A. Indica la vista del robot dal basso. Ricaricare la batteria ibernata per il primo utilizzo. -
Seite 30: De Accu Opladen
Voorbereiding 1. De accu opladen 3. Legenda Verwijst naar alle benodigde accessoires, zoals het schroefmodel en de hoeveelheid. De beschrijving ×6 in deze afbeelding geeft bijvoorbeeld (M3-A) aan dat er zes schroeven van het M3-A-model nodig zijn. Geeft aan dat de onderkant van de Laad de accu op om hem uit de slaapstand te robot wordt weergegeven. -
Seite 31: Carregamento Da Bateria
Preparação de parafusos B, sendo que a extremidade maior não 1. Carregamento da bateria é usada. Certifique-se de que vai usar parafusos com uma ponta de cabeça adequada. 3. Legenda Refere-se aos acessórios necessários, incluindo informações Carregue a bateria para retirá-la da hibernação sobre modelo e quantidade antes de a utilizar pela primeira vez. ×6 de parafusos. - Seite 32 Подготовка 1. Зарядка аккумулятора 3. Условные обозначения Относится к соответствующим аксессуарам и включает такую информацию о модели винтов ×6 и их количестве. Например, описание на этом рисунке (M3-A) указывает, что требуется шесть винтов модели M3-A. Указывает, что отображается Перед первым использованием зарядите нижняя...
- Seite 33 اإلعداد 3. وسيلة اإليضاح 1. شحن البطارية يشري إىل امللحقات املطلوبة مبا يف ذلك معلومات مثل طراز الربغي والكمية. عىل سبيل املثال، يشري الوصف يف هذا الرسم التوضيحي إىل الحاجة إىل ستة براغي من طراز 6× .A-M3 (A-M3) .ي ُ شري إىل أن الجزء السفيل من الروبوت معروض .اشحن...
- Seite 34 Assembly Guide / Montagehilfe / Guide d’assemblage / Guida all’assemblaggio/ Montagegids / Guia de montagem / Руководство по сборке / دليل التجميع Each item has a code. Refer to the In the Box section and check the corresponding code to find out where each item is located in the package. Jedes Element besitzt einen Code.
- Seite 35 ×10 (T2) ×2...
- Seite 36 Rouge Rosso Rood Vermelho Красный أحمر...
- Seite 37 ×1 ×10 (T2) (T2) ×2...
- Seite 38 ×6 ×4 (T3) (T3)
- Seite 39 ×4 (M3-A) انقر ×2 (M3-A)
- Seite 40 ×2 ×1 (M3-A)
- Seite 41 ×2 ×1 (M3-A) ×2 (M3-A)
- Seite 42 ×2 (M3-A) ×1 ×2 (M3-A)
- Seite 43 ×12 (M3-A) ×4 M3-A Make sure to use the specified screw. Otherwise, the part may be damaged. Sorgen Sie dafür, dass Sie die spezifizierte Schraube verwenden. Sonst kann das Teil beschädigt werden. Veillez à utiliser les vis spécifiées. Si vous ne respectez pas cette consigne, les composants pourraient être endommagés. Accertarsi di usare la vite specificata. In caso contrario, si rischia di danneggiare il componente. Let op dat u de aangegeven schroef gebruikt. Anders kan het onderdeel beschadigd raken. Certifique-se de que usa o parafuso especificado. Caso contrário, a peça pode ficar danificada. Обязательно используйте указанный винт. В противном случае это может вызвать повреждение детали. .تأكد من استخدام الربغي املحدد. وإال فقد تتلف قطعة الغيار...
- Seite 44 ×3 (M3-A)
- Seite 45 ×3 (M3-A)
- Seite 46 ×3 (M3-A)
- Seite 47 ×3 (M3-A)
- Seite 48 ×2 (M4-A) ×2 (M4-A )
- Seite 49 ×2 (M3-A) ×1 ×2 ×2...
- Seite 50 ×2 ×2 (M3-B) (M3-A) M3-A M3-B...
- Seite 51 ×2 ×2 (M3-F) (M3-H)
- Seite 52 ×4 ×4 (M3-C) (M3-G) M3-G M3-C ×2 ×1 (M3-A) (M3-B)
- Seite 53 ×2 ×5 (M3-A) (M3-A) ×4 ×2 (M3-C) (M3-C) M3-C Make sure to use the specified screw. Otherwise, the part may be damaged. Sorgen Sie dafür, dass Sie die spezifizierte Schraube verwenden. Sonst kann das Teil beschädigt werden. Veillez à utiliser les vis spécifiées. Si vous ne respectez pas cette consigne, les composants pourraient être endommagés. Accertarsi di usare la vite specificata. In caso contrario, si rischia di danneggiare il componente. Let op dat u de aangegeven schroef gebruikt. Anders kan het onderdeel beschadigd raken. Certifique-se de que usa o parafuso especificado. Caso contrário, a peça pode ficar danificada. Обязательно используйте указанный винт. В противном случае это может вызвать повреждение детали.
- Seite 54 ×1 ×1 (M3-E) (M3-C) ×1 ×1 ×2 (M3-E) (M3-C) (M3-E) M3-C M3-E...
- Seite 55 ×2 ×2 (M3-E) (M3-E) ×4 ×2 (M3-E) (M3-C)
- Seite 56 ×2 ×5 (M3-C) ×2 (M3-C)
- Seite 58 ×1 ×4 (M3-C) ×2 (M3-C)
- Seite 59 ×4 ×2 ×2 (M3-C) (M3-H) (M3-C) M3-C M3-H M3-C M3-H...
- Seite 60 Powering On and Activating the EP Core / Einschalten und Aktivieren von EP Core / Mise sous tension et activation d’EP Core / Accensione e attivazione di EP Core / EP Core inschakelen en activeren / Ligar e ativar o EP Core / Включение и активация RoboMaster EP Core / EP Core تشغيل وتفعيل...
- Seite 61 Core voor meer informatie over de installatie en het gebruik. Com o módulo do conector de alimentação e adaptador do sensor, o RoboMaster EP Core pode ser ligado a mais sensores. Consulte o Manual do utilizador RoboMaster EP Core para mais informações sobre a instalação e utilização.
- Seite 62 EP Core www.dji.com...