Herunterladen Inhalt Inhalt Diese Seite drucken
Inhaltsverzeichnis

Werbung

Verfügbare Sprachen
  • DE

Verfügbare Sprachen

  • DEUTSCH, seite 31
ri-champion
®
Ver 1.0 2020/06
311-3128000-015
smartPRO & smartPRO+
(TD-3128)
BLOOD PRESSURE MONITORING SYSTEM
OBERARM BLUTDRUCKMESSGERÄT
SYSTÈME DE SURVEILLANCE DE LA PRESSION ARTÉRIELLE
SISTEMA DI MONITORAGGIO DELLA PRESSIONE ARTERIOSA
SISTEMA DE CONTROL DE PRESIÓN SANGUÍNEA
СИСТЕМА МОНИТОРИНГА ДАВЛЕНИЯ КРОВИ
Operation Instruction / Gebrauchsanleitung / Mode
d'emploi / Manuale dell'utente / Instrucciones de
Operación / Инструкция по эксплуатации

Werbung

Inhaltsverzeichnis
loading

Inhaltszusammenfassung für Riester ri-champion smartPRO

  • Seite 1 ri-champion ® Ver 1.0 2020/06 311-3128000-015 smartPRO & smartPRO+ (TD-3128) BLOOD PRESSURE MONITORING SYSTEM OBERARM BLUTDRUCKMESSGERÄT SYSTÈME DE SURVEILLANCE DE LA PRESSION ARTÉRIELLE SISTEMA DI MONITORAGGIO DELLA PRESSIONE ARTERIOSA SISTEMA DE CONTROL DE PRESIÓN SANGUÍNEA СИСТЕМА МОНИТОРИНГА ДАВЛЕНИЯ КРОВИ Operation Instruction / Gebrauchsanleitung / Mode d'emploi / Manuale dell’utente / Instrucciones de Operación / Инструкция...
  • Seite 3: Important Safety Precautions

    Dear ri-champion ® smartPRO/smartPRO+ (TD-3128) owner: Thank you for purchasing the smartPRO/smartPRO+ (TD-3128) Blood Pressure Monitoring System. This manual provides important information to help you to use this system correctly. Before using this product, please read the following contents thoroughly and carefully. With the compact size and easy operation of this smartPRO/smartPRO+ (TD- 3128) Blood Pressure Monitoring System, you can easily monitor your blood pressure by yourself at any time or place.
  • Seite 4 9. Do not use this instrument in close proximity to sources of strong electromagnetic radiation, as these may interfere with the accurate operation. 10. Proper maintenance is essential to the longevity of your device. If you are concerned about your accuracy of measurement, please contact local customer service for help.
  • Seite 5: Inhaltsverzeichnis

    TABLE OF CONTENTS BEFORE YOU BEGIN INTENDED USE TEST PRINCIPLE METER OVERVIEW DISPLAY SCREEN SETTING THE METER USER NUMBER SELECTION TESTING YOUR BLOOD PRESSURE BEFORE MEASUREMENT SELECTING THE CORRECT CUFF FITTING THE CUFF PROPERLY PROPER MEASUREMENT POSITION TAKING MEASUREMENTS AVERAGING MEASUREMENT MODE METER MEMORY REVIEWING TEST RESULTS DOWNLOADING RESULTS...
  • Seite 6: Before You Begin

    BEFORE YOU BEGIN INTENDED USE The smartPRO/smartPRO+ (TD-3128) system is a system designed to measure blood pressure non-invasively. It is intended for use at home and in clinical settings by one with a good understanding of the operation instruction, where the patient may be an operator.
  • Seite 7: Display Screen

    DISPLAY SCREEN Error Warning Pulse Rate Systolic Pressure Value Average Diastolic Pressure Value AC Adaptor Symbol Low Battery Symbol Units of Blood Pressure Movement During Measurement Diastolic Pressure Symbol Memory Mode Symbol Systolic Pressure Symbol Pulse Rate Symbol Time & Date User Number SETTING THE METER Before using your meter for the first time or if you change the meter battery, you...
  • Seite 8: Setting The Date And The Time

    Setting the Date and the Time With the year flashing, press until the correct year appears. Press to set. With the month flashing, press until the correct month appears.Press to set. With the day flashing, press until the correct day appears. Press to set.
  • Seite 9: Setting The Time Format

    With the minute flashing, press until the correct minute appears. Press to set. Setting the Time Format Press to select the desired time format --- 12h or 24h. Press to set. Setting the Unit of Measurement Press to select mmHg or KPa. Press to set.
  • Seite 10: User Number Selection

    Enter the Bluetooth Pairing (ri-champion ® smartPRO+ only) NOTE This step is recommended when the user needs to pair this meter to a Bluetooth receiver for the first time, or when user needs to pair this meter to another new Bluetooth receiver. If you wish to enter the pairing mode, with “PAr OFF”...
  • Seite 11: Testing Your Blood Pressure

    TESTING YOUR BLOOD PRESSURE BEFORE MEASUREMENT • Avoid caffeine, tea, alcohol and tobacco for at least 30 minutes before measure- ment. • Wait 30 minutes after exercising or bathing before measurement. • Sit or lie down for at least 10 minutes before measurement. •...
  • Seite 12: Proper Measurement Position

    3. Stretch your left (right) arm in front of you Pile Side Material Sewn Hook Material with your palm facing up. Slide and place the cuff onto your arm with the air tube and artery mark region toward the lower arm. Wrap and tighten the cuff above your elbow.
  • Seite 13: Taking Measurements

    4. Measurement is in progress. After the meter is turned on, the cuff will begin to inflate automatically. TAKING MEASUREMENTS Always apply the pressure cuff before turning on the meter. 1. Press . All the LCD symbols will appear. Press to select user “...
  • Seite 14: Averaging Measurement Mode

    NOTE • If you press during measurement, the meter will be turned off. • If the pulse rate symbol is shown as “ ” instead of “ ”, this indicates that the meter has detected an irregular heart beat. AVERAGING MEASUREMENT MODE Always apply the pressure cuff before turning on the meter.
  • Seite 15: Meter Memory

    METER MEMORY Your meter stores the 400 most recent blood pressure test results along with respective dates and times in the meter memory. To recall the memory, start with the meter off. REVIEWING TEST RESULTS 1. Press and release . The user symbol “...
  • Seite 16: System Requirement

    How to Install and Update the Healthy Check App You must connect to the internet to download the app. The App Store or Google Play can be accessed by tapping the App Store or Play Store icon on your iOS or Android devices.
  • Seite 17: Maintenance

    MAINTENANCE BATTERY Your meter comes with four (4)1.5V AA size alkaline batteries. Low Battery Signal The meter will display either of the two messages below to alert you when the meter power is getting low. 1. The symbol appears along with display messages: The meter is functional and the result remains accurate, but it is time to change the batteries.
  • Seite 18: Using Ac Adapter (Optional)

    USING AC ADAPTER (optional) Connect AC adapter to the meter. 1. Connect AC adapter plug to DC adapter jack of the meter. 2. Plug AC adapter power plug into an electrical outlet. Press to start the measurement. Remove AC adapter from the meter. 1.
  • Seite 19: Detailed Information

    Cleaning • To clean the meter exterior, wipe it with a cloth moistened with tap water or a mild cleaning agent, then dry the device with a soft dry cloth. Do NOT flush with water. • Do NOT use organic solvents to clean the meter. •...
  • Seite 20: System Troubleshooting

    Source: The European Society of Hypertension and European Society of Cardiology Task Force Members. 2018 ESC/ESH Guidelines for the management of arterial hypertension. Journal of Hypertension: October 2018 - Volume 36 - Issue 10 - p 1953–2041. SYSTEM TROUBLESHOOTING If you follow the recommended action but the problem persists, or error messages other than the ones below appear, please call your local customer service.
  • Seite 21: Troubleshooting

    Batteries are too low. Repeat with new batteries or input AC adapter. Bluetooth transmission errors. Please contact local customer service for help. Appears when systolic or Review the instructions and repeat the test. diastolic blood pressure value If error still remains, contact local customer is above the pre-set range.
  • Seite 22: Symbol Information

    3. If the result is higher/lower than user’s average measurement: POSSIBLE CAUSE WHAT TO DO May not be in correct position while Adjust to the correct position to measuring. measure. Blood pressure naturally varies from Keep in mind for next measurement. time to time.
  • Seite 23: Specifications

    SPECIFICATIONS SYSTEM PERFORMANCE Model no.: TD-3128 Power Source: Four 1.5V AA alkaline batteries Battery Life: 200 times Size of Meter w/o Cuff: 141 (L) x 121 (W) x 72 (H)mm, 350g without batteries Cuff Size: S (small) 15 – 24cm (5.9 – 9.4 inches) with air tube 80 cm W (Wide size) 24 –...
  • Seite 24 Manufacturer’s declaration-electromagnetic immunity The TD-3128 is intended for use in the electromagnetic environment (for home and professional healthcare) specified below. The customer or the user of the TD-3128 should assure that it is used in such an environment. Electromagnetic environment- guidance (for home and IEC 60601 test Compliance...
  • Seite 25 Manufacturer’s declaration-electromagnetic emissions The TD-3128 is intended for use in the electromagnetic environment (for home and professional healthcare) specified below. The customer or the user of the TD-3128 should assure that it is used in such an environment. Electromagnetic environment-guidance (for home Emission test Compliance and professional healthcare environment)
  • Seite 26 Portable and mobile RF Conducted RF 3 Vrms: 3 Vrms: communications IEC 61000-4-6 0,15 MHz – 80 0,15 MHz – 80 equipment should be used no 6 Vrms: 6 Vrms: closer to any part of the TD- 3128 including cables, than the in ISM and in ISM and amateur...
  • Seite 27 Recommended separation distance between portable and mobile RF communications equipment and the TD-3128 The TD-3128 is intended for use in an electromagnetic environment (for home and professional healthcare) in which radiated RF disturbances are controlled. The customer or the user of the TD-3128 can help prevent electromagnetic interference by maintaining a minimum distance between portable and mobile RF communications equipment (transmitters) and the TD-3128 as recommended below, according to the maximum output power of the communications equipment.
  • Seite 28 Manufacturer’s declaration-electromagnetic immunity Test specifications for ENCLOSURE PORT IMMUNITY to RF wireless communications equipment The TD-3128 is intended for use in the electromagnetic environment (for home and professional healthcare) specified below. The customer or the user of the TD-3128 should assure that it is used in such an environment. Compliance LEVEL IMMUNITY...
  • Seite 29 Bluetooth, WLAN, 802.11 b/ Pulse 2400– 2450 g/n, modulation 2570 RFID 217 Hz 2450, LTE Band 7 5240 WLAN Pulse 5100– 5500 802.11 modulation 5800 217 Hz 5785 NOTE If necessary to achieve the IMMUNITY TEST LEVEL, the distance between the transmitting antenna and the ME EQUIPMENT or ME SYSTEM may be reduced to 1 m.
  • Seite 31: Wichtige Sicherheitshinweise

    Sehr geehrter ri-champion ® smartPRO/smartPRO+ (TD-3128) Besitzer: Vielen Dank, dass Sie sich für das smartPRO/smartPRO+ (TD-3128) Blutdruckmessgerät entschieden haben! Bitte lesen Sie vor dem Gebrauch die Gebrauchanweisung sorgfältig durch. Diese befindet sich beim Gerät und. sollte auch dort belassen werden. Achten Sie auf ordnungsgemäße Anwendung und Lagerung.
  • Seite 32: Bewahren Sie Diese Anleitung Auf

    7. Befestigen Sie die Blutdruckmanschette nur an den dafür vorgesehenen Messstellen. 8. Die Verwendung dieses Instruments in trockener Umgebung, insbesondere wenn synthetische Materialien (synthetische Kleidung, Teppiche usw.) vorhanden sind, kann zu schädlichen statischen Entladungen führen, die zu fehlerhaften Ergebnissen führen können. 9.
  • Seite 33 Inhaltsverzeichnis VOR DER ANWENDUNG ANWENDUNGSHINWEISE MESSVERFAHREN BILDSCHIRMÜBERSICHT MONITORANSICHT VOR DER ERSTEN INBETRIEBNAHME BENUTZER WÄHLEN BLUTDRUCK MESSEN VORBEREITUNGEN AUSWAHL DER KORREKTEN MANSCHETTE MANSCHETTE KORREKT ANLEGEN IDEALE MESSPOSITION EINZELMESSUNG INTERVALL MESSUNG GERÄTESPEICHER MESSUNGEN ABRUFEN HERUNTERLADEN VON MESSERGEBNISSEN WARTUNG BATTERIEVERSORGUNG EINSATZ DES NETZSTECKERS (optional) PFLEGEHINWEISE DETAILINFORMATIONEN REFERENZWERTE...
  • Seite 34: Vor Der Anwendung

    VOR DER ANWENDUNG ANWENDUNGSHINWEISE Das smartPRO/smartPRO+ (TD-3128) System ist dafür vorgesehen, den Blutdruck nicht-invasiv zu messen. Es ist für den privaten Einsatz, zu Hause oder aber für klinische Anwendungen konzipiert. Das Gerät ist nicht zur Diagnose oder Überwachung von Diabetes, Bluthochdruck oder zur Anamnese von Neugeborenen vorgesehen.
  • Seite 35: Monitoransicht

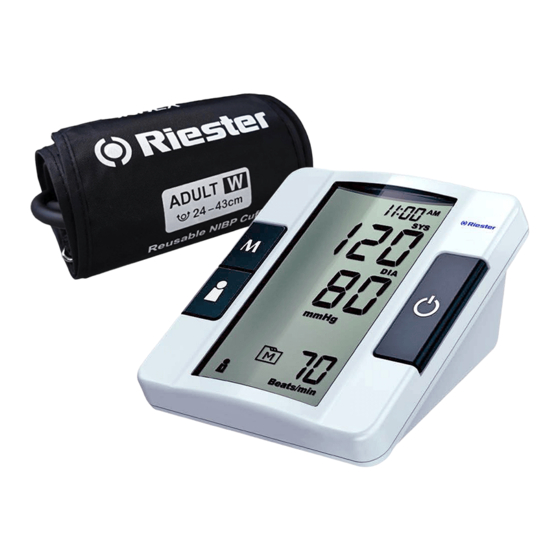
    MONITORANSICHT Fehler, Fehlermeldung Pulsrate Systolischer Messwert Durchschnitt Diastolischer Messwert Netzadapter Symbol Anzeige niederer Batteriestand Maßeinheit des Blutdrucks Bewegung während dem Messen Symbol für diastolischen Druck Speichermodus Symbol Symbol für systolischen Druck Pulsraten Symbol Uhrzeit, Datum Bediener Nummer VOR DER ERSTEN INBETRIEBNAHME Bevor Sie das Gerät das erste Mal benutzen, prüfen und aktualisieren Sie bitte folgende Einstellungen.
  • Seite 36: Datum Und Uhrzeit Einstellen

    Datum Und Uhrzeit Einstellen Wenn das Jahr blinkt, solange drücken, bis das korrekte Jahr erscheint und dann die mit der Taste speichern. Wenn der Monat blinkt, solange drücken, bis der korrekte. Monat erscheint und dann mit der Taste speichern. Wenn der Tag blinkt, solange drücken, bis der korrekte Tag erscheint und dann mit der Taste speichern.
  • Seite 37: Messeinheit Wählen

    Wenn die Minute blinkt, solange drücken, bis die korrekte. Minute erscheint und dann mit der Taste speichern. Uhrzeitformat Wählen Taste drücken bis das gewünschte Zeitformat erscheint und mit der Taste bestätigen. Messeinheit Wählen mmHg oder Kpa wählen und mit der Taste speichern.
  • Seite 38: Bluetooth Kopplung (Nur Ri-Champion ® Smartpro+)

    Bluetooth Kopplung (nur ri-champion ® smartPRO+) HINWEIS Dieser Schritt wird empfohlen, wenn der Benutzer dieses Messgerät zum ersten Mal mit einem Bluetooth-Empfänger koppeln muss oder wenn er dieses Messgerät mit einem anderen neuen Bluetooth-Empfänger koppeln muss. Wenn Sie in den Pairing-Modus wechseln möchten und “PAr OFF”...
  • Seite 39: Blutdruck Messen

    BLUTDRUCK MESSEN VORBEREITUNGEN • Mindestens 30 Minuten vor der Messung keinen Kaffee, Tee, Alkohol oder Tabak konsumieren. • Nach sportlicher Betätigung mindestens 30 Minuten Pause einlegen vor der Messung. • 10 Minuten vor der Messung hinsetzen oder hinlegen. Messen Sie den Blut- druck immer in der gleichen Position.
  • Seite 40: Manschette Korrekt Anlegen

    MANSCHETTE KORREKT ANLEGEN 1. Luftschlauch mit dem dafür vorgesehenen Anschluss am Monitorgehäuse verbinden (Abb.) 2. Oberarmmanschette wie links abgebildet vorbereiten (Abb). Weiche Seite 3. Entweder den linken oder rechten Arm mit Klettverschluß der Innenseite wie abgebildet, ausstrecken. Manschette über den Ellbogen ziehen (ca. 2 –...
  • Seite 41: Einzelmessung

    WARNUNG Befindet sich die Manschette über oder unter dem Herzniveau kann dies den Messwert beeinflussen! Der gemessene Druck stimmt dann nicht mit dem tatsächlichen Wert überein. Eine Höhendifferenz von 15 cm kann bereits eine Fehlmessung von ca. 10 mmHg verursachen. 4.
  • Seite 42: Intervall Messung

    5. Das Messgerät wechselt automatisch in den Bluetooth-Modus. PRO+ (nur ri-champion smart ® ZU BEACHTEN • Wird während der Messung gedrückt, schaltet sich das Gerät aus! • Zeigt die Pulsanzeige anstatt an, weist dies auf einen unregelmäßi- gen Herzschlag hin. INTERVALL MESSUNG Mehrfachmessungen zur Ermittlung des durchschnittlichen Blutdrucks.
  • Seite 43: Gerätespeicher

    3. Nach Abschluss der drei Messungen wird der durchschnittliche Blutdruck resultierend aus den drei Einzelmessungen mit dem DURCH- SCHNITTSSYMBOL angezeigt. GERÄTESPEICHER Das Gerät speichert 400 Messungen inklusive dem Datum und der Uhrzeit. Um den, Gerätespeicher aufzurufen, schalten Sie das Gerät zunächst aus. MESSUNGEN ABRUFEN Drücken und loslassen erscheint.
  • Seite 44: Herunterladen Von Messergebnissen

    4. Um die gespeicherten Messwerte zu verlassen, Drücken. HERUNTERLADEN VON MESSERGEBNISSEN Datenübertragung über Bluetooth (nur ri-champion ® smartPRO+) Sie können Ihre Blutdrucküberwachungsdaten über Bluetooth vom Messgerät auf Ihr Gerät übertragen. Bitte wenden Sie sich an Ihren örtlichen Kundendienst oder Kaufort, um Unterstützung zu erhalten. So installieren und aktualisieren Sie die Healthy Check App Sie müssen eine Verbindung zum Internet herstellen, um die App herunterladen zu können.
  • Seite 45: Wartung

    Bluetooth-Anzeige am Blutdruckmessgerät: BLUETOOTH-ANZEIGE STATUS Blau blinkend Die Bluetooth-Funktion ist aktiviert und wartet auf die Verbindung. Blau leuchtend Die Bluetooth-Verbindung wird hergestellt. HINWEIS • Während sich das Messgerät im Übertragungsmodus befindet, kann keine Blutdruckmessung durchgeführt werden. • Stellen Sie sicher, dass Ihr Gerät Bluetooth Smart Technology unterstützt, Bluetooth aktiviert hat, bevor Sie die Daten übertragen, und dass sich das Messgerät im Empfangsbereich befindet.
  • Seite 46: Ersetzen Der Batterien

    2. E-b signalisiert: Batterien zu schwach. Batterien müssen sofort ausgetauscht werden. ERSETZEN DER BATTERIEN Das Gerät muss zum Wechsel der Batterien ausgeschaltet sein. 1. Batterieabdeckung öffnen. 2. Leere Batterien entfernen und durch vier neue 1.5V AA Alkaline Batterien erset- zen. 3.
  • Seite 47: Pflegehinweise

    2. Netzstecker mit der Stromversorgung verbin- den. Drücken um Messung zu starten. Nach der Messung, Gerät von der Stromversorgung entfernen. 1. Gerät ausschalten und Netzstecker ziehen. 2. Netzstecker vom Gerät entfernen. PFLEGEHINWEISE Vermeiden Sie, dass Schmutz, Staub, Flüssigkeiten oder ähnliches die Bildschirmanzeige bedecken.
  • Seite 48: Detailinformationen

    • Nach Möglichkeit immer in der Originalverpackung aufbewahren. Vor Staub, Schmutz und Flüssigkeiten schützen. • Gerät sorgsam behandeln und nicht auf den Boden fallen lassen. • Direktes Sonnenlicht und hohe Feuchtigkeit vermeiden. DETAILINFORMATIONEN REFERENZWERTE Der menschliche Blutdruck steigt natürlich nach Erreichen des mittleren Alters an. Dieses Symptom ist das Ergebnis einer kontinuierlichen Alterung der Blutgefäße.
  • Seite 49: Fehlersuche/Fehlerbehebung

    FEHLERSUCHE/FEHLERBEHEBUNG Bei Problemen folgen Sie bitte den Anweisungen. Sollten diese keinen Erfolg zeigen oder für Abhilfe sorgen, wenden Sie sich bitte an Ihren Fachhändler. Bitte versuchen Sie keinesfalls selbst, das Gerät zu reparieren oder auseinanderzubauen. FEHLERMELDUNGEN NACHRICHT GRUND WAS ZU TUN IST Manschette bläst nicht auf.
  • Seite 50: Fehlerbehebung

    Bluetooth Übertragungsfehler. Bitte wenden Sie sich an den örtlichen Kundendienst, um Hilfe zu erhalten. Erscheint, wenn der systolische Lesen Sie die Anweisungen und oder diastolische Blutdruck über wiederholen Sie den Test. Wenn der dem voreingestellten Bereich liegt. Fehler weiterhin besteht, wenden Sie sich an den örtlichen Kundendienst.
  • Seite 51: Symbolerklärung

    4. Wenn die Manschette beim Messen nochmals aufgeblasen wird: MÖGLICHE URSACHE WAS ZU TUN IST Manschette ist nicht richtig Manschette öffnen und erneut angeschlossen. schließen. Ist der tatsächliche Blutdruck höher als der Manschettendruck, gleicht sich dieser automatisch an und pumpt weiter auf. SYMBOLERKLÄRUNG Symbol Referent...
  • Seite 52: Leistungsbereich Beim Blutdruckmessen

    Energieversorgung: 4 x 1.5V AA Alkaline Batterien Batterielebensdauer: 200 Messungen SAbmessungen ohne Manschette: 141 (L) x 121 (W) x 72 (H)mm, 350g ohne Batterien Manschettengröße: S (klein) 15 – 24cm (5.9 – 9.4 inches) mit Schlauch 80 cm W (Weitbereich) 24 – 43 cm (9.4 – 16.9 inches) mit Schlauch 80 cm Speicherkapzität: max.
  • Seite 53 Herstellererklärung - elektromagnetische Störfestigkeit Der TD-3128 ist für die Verwendung in der unten angegebenen elektromagnetischen Umgebung (für die häusliche und berufliche Gesundheitsversorgung) vorgesehen. Der Kunde oder der Benutzer des TD-3128 sollte sicherstellen, dass er in einer solchen Umgebung verwendet wird. Anleitung zur elektromagnetischen Prüfstufe IEC...
  • Seite 54 Magnetfeld für 30 A/m 30 A/m Die Leistungsfrequenz- Netzfrequenz 50 Hz oder 60 Hz 50 Hz Magnetfelder des TD-3128 (50, 60 Hz) IEC sollten auf einem Niveau liegen, 61000-4-8 das für einen typischen Ort in einer typischen häuslichen Gesundheitsumgebung charakteristisch ist. Hinweis U ist die AC Netzspannung vor Anlegen des Prüfpegels.
  • Seite 55 Herstellererklärung - elektromagnetische Störfestigkeit Der TD-3128 ist für die Verwendung in der unten angegebenen elektromagnetischen Umgebung (für die häusliche und berufliche Gesundheitsversorgung) vorgesehen. Der Kunde oder der Benutzer des TD-3128 sollte sicherstellen, dass er in einer solchen Umgebung verwendet wird. Anleitung zur elektromagnetischen Prüfstufe IEC...
  • Seite 56 a) Feldstärken von festen Sendern wie Basisstationen für Radio- (Mobilfunk- / Schnurlostelefone) und Landmobilfunkgeräte, Amateurfunk-, AM- und FM-Radiosendungen und Fernsehsendungen können theoretisch nicht genau vorhergesagt werden. Um die elektromagnetische Umgebung aufgrund fester HF-Sender zu bewerten, sollte eine elektromagnetische Standortuntersuchung in Betracht gezogen werden. Wenn die gemessene Feldstärke an dem Ort, an dem der TD-3128 verwendet wird, die oben angegebene HF- Konformitätsstufe überschreitet, sollte der TD-3128 beobachtet werden, um den normalen Betrieb zu überprüfen.
  • Seite 57 Herstellererklärung - elektromagnetische Störfestigkeit Testspezifikationen für ENCLOSURE PORT IMMUNITY für drahtlose HF- Kommunikationsgeräte Der TD-3128 ist für die Verwendung in der unten angegebenen elektromagnetischen Umgebung (für die häusliche und berufliche Gesundheitsversorgung) vorgesehen. Der Kunde oder der Benutzer des TD-3128 sollte sicherstellen, dass er in einer solchen Umgebung verwendet wird.
  • Seite 58 Bluetooth, WLAN, 802.11 b/ Pulsmodu- 2400– 2450 g/n, lation 2570 RFID 217 Hz 2450, LTE Band 7 5240 WLAN Pulsmodu- 5100– 5500 802.11 lation 5800 217 Hz 5785 HINWEIS Falls erforderlich, um den IMMUNITÄTSTESTPEGEL zu erreichen, kann der Abstand zwischen der Sendeantenne und dem ME-GERÄT oder ME-SYSTEM auf 1 m verringert werden.
  • Seite 59: Précautions De Sécurité Importantes

    Cher propriétaire du système smartPRO/ smartPRO+ (TD-3128), Merci d'avoir acheté ce système de surveillance de la pression artérielle smartPRO/smartPRO+ (TD-3128). Ce mode d'emploi comporte des informations importantes qui vous aideront à utiliser correctement ce système. Avant d'utiliser ce produit, veuillez lire attentivement l'intégralité du contenu ci-après. Grâce à...
  • Seite 60 8. L'utilisation de cet instrument dans un environnement sec, en particulier en présence de matériaux synthétiques (vêtements synthétiques, tapis, etc.) peut provoquer des décharges statiques dommageables susceptibles d'entraîner des résultats erronés. 9. N'utilisez pas cet instrument à proximité de sources importantes de radiations électromagnétiques, car celles-ci peuvent nuire à...
  • Seite 61 TABLE DES MATIÈRES AVANT DE COMMENCER UTILISATION PRÉVUE PRINCIPE DE TEST APERÇU DU TENSIOMÈTRE ÉCRAN D'AFFICHAGE PARAMÉTRER LE TENSIOMÈTRE SÉLECTION DU NUMÉRO D'UTILISATEUR TESTER VOTRE PRESSION ARTÉRIELLE AVANT LA MESURE SÉLECTIONNEZ LE BRASSARD APPROPRIÉ INSTALLATION CORRECTE DU BRASSARD POSITION DE MESURE ADAPTÉE PRENDRE DES MESURES MODE MESURE MOYENNE MÉMOIRE DU TENSIOMÈTRE...
  • Seite 62: Avant De Commencer

    AVANT DE COMMENCER UTILISATION PRÉVUE Le système smartPRO/smartPRO+ (TD-3128) est un système conçu pour la mesure non invasive de la pression artérielle. Il est destiné à être utilisé dans un environnement de soins à la maison ou en milieu médical par une personne disposant d'une bonne compréhension des instructions de fonctionnement, le patient pouvant jouer ce rôle.
  • Seite 63: Écran D'affichage

    INDICATEUR BT (ri-champion ® COMPARTIMENT DES PILES smartPRO+ only) PORT ADAPTATEUR SECTEUR Téléchargez les résultats aux Branchement à une alimentation tests depuis une connexion électrique. Bluetooth. ÉCRAN D'AFFICHAGE Avertissement d'erreur Fréquence du pouls Valeur de pression systolique Moyenne Valeur de pression diastolique Symbole de l'adaptateur secteur Symbole de piles faibles Unités de la pression artérielle...
  • Seite 64: Paramétrer Le Tensiomètre

    PARAMÉTRER LE TENSIOMÈTRE Avant d'utiliser le tensiomètre pour la première fois, ou si vous changez les piles du tensiomètre, vous devez vérifier et mettre à jour ces paramètres. Assurez-vous de suivre les étapes ci-dessous et d'enregistrer les paramètres souhaités. Accéder au mode Paramètres Commencez la procédure avec le tensiomètre éteint.
  • Seite 65 Lorsque l'heure clignote, appuyez sur pour sélectionner la bonne heure. Appuyez sur pour valider. Lorsque les minutes clignotent, appuyez sur pour sélectionner la bonne minute. Appuyez sur pour valider. Paramétrer le format de l'heure Appuyez sur pour sélectionner le format de l'heure souhaité...
  • Seite 66 Supprimer la mémoire Lorsque que « dEL » et un symbole clignotant apparaissent à l'écran, si vous ne souhaitez pas supprimer les résultats enregistrés, appuyez sur pour sauter cette étape. Pour supprimer TOUS les résultats, appuyez deux fois sur s'affichent sur le tensiomètre, ce qui confirme que tous les résultats ont été...
  • Seite 67: Sélection Du Numéro D'utilisateur

    SÉLECTION DU NUMÉRO D'UTILISATEUR Ce système peut enregistrer les mesures de pression artérielle de quatre utilisateurs. Les résultats des tests de chaque utilisateur sont stockés séparément sous chaque numéro d'utilisateur. 1. Appuyez sur pour sélectionner le numéro d'utilisateur souhaité. 2. Appuyez sur pour confirmer.
  • Seite 68: Installation Correcte Du Brassard

    W (grande taille) 24 - 43 cm (9,4 - 16,9 pouces) INSTALLATION CORRECTE DU BRASSARD 1. Branchez le connecteur d'air du tube à la prise d'air du tensiomètre. 2. Assemblez le brassard comme illustré. La surface lisse doit être à l'intérieur de la boucle du brassard et l'anneau métallique en D ne doit pas être en contact avec votre peau.
  • Seite 69: Position De Mesure Adaptée

    POSITION DE MESURE ADAPTÉE 1. Asseyez-vous pendant au moins 10 minutes avant la mesure. 2. Placez votre coude sur une surface plane. Détendez votre main, la paume vers le haut. 3. Assurez-vous que le brassard soit à peu près à la même hauteur que votre cœur. Appuyez sur .
  • Seite 70: Mode Mesure Moyenne

    3. Après la mesure, le tensiomètre affiche la pression systolique, diastolique et la fréquence du pouls. 4. Appuyez sur pour éteindre l'appareil, ou il s'éteindra au- tomatiquement après 3 minutes d'inactivité. 5. Le tensiomètre passe automatiquement en mode Bluetooth (ri-champion smartPRO+ only) ®...
  • Seite 71: Mémoire Du Tensiomètre

    2. Une fois la première mesure terminée, le tensiomètre commencera un décompte avant de lancer la deuxième mesure. Le nombre à droite représente le compte à rebours restant entre chaque mesure. Le tensiomètre pren- dra trois (3) mesures consécutives à un intervalle de 20 secondes.
  • Seite 72: Examen Des Résultats De Tests

    EXAMEN DES RÉSULTATS DE TESTS 1. Appuyez sur le bouton et maintenez-le enfoncé. Le symbole utilisateur (numéros de 1 à 4) apparaît en premier, appuyez sur pour sélectionner l'utilisateur utilisé pour le stockage en mémoire. 2. Appuyez de nouveau sur , et la pre- mière mesure que vous verrez correspondra au dernier résultat de la pression artérielle,...
  • Seite 73: Configuration Requise

    Vous devez vous connecter à Internet pour télécharger l'application. Vous pouvez accéder à l'App Store ou à Google Play en appuyant sur l'icône respective de vos appareils iOS ou Android. L'appli est simple et intuitive, et vous permettra de mieux comprendre votre état de santé pour mieux contrôler votre pression artérielle.
  • Seite 74: Entretien

    • La fonctionnalité Bluetooth est implémentée de différentes manières par les différents fabricants d'appareils mobiles, des problèmes de compatibilité peuvent survenir entre votre appareil mobile et le tensiomètre ENTRETIEN PILES Votre tensiomètre est livré avec quatre (4) piles alcalines de 1,5 V AA. Signal de piles faibles Le tensiomètre affichera l'un des deux messages ci-dessous pour vous avertir lorsque les piles du tensiomètre sont faibles.
  • Seite 75: Utilisation D'un Adaptateur Secteur (Facultatif)

    REMARQUE • Le remplacement des piles ne supprime pas les résultats des tests stockés en mémoire. • Comme pour toutes les petites piles, ces piles doivent être tenues à l'écart des jeunes enfants. En cas d'ingestion, consultez immédiatement un méde- cin.
  • Seite 76: Prendre Soin De Votre Compteur

    2. Débranchez le connecteur de l'adaptateur secteur de la prise secteur du tensiomètre. PRENDRE SOIN DE VOTRE COMPTEUR Pour éviter que le tensiomètre n'attire la saleté, la poussière ou d'autres contaminants, lavez-vous et séchez-vous soigneusement les mains avant de l'utiliser. Nettoyage •...
  • Seite 77: Dépannage Du Système

    Catégorie Systolique (mmHg) Diastolique (mmHg) Optimale < 120 < 80 Normale 120–129 et / ou 80–84 Normale haute 130–139 et / ou 85–89 Hypertension de grade 1 140–159 et / ou 90–99 Hypertension de grade 2 160–179 et / ou 100–109 Hypertension de grade 3 ≥...
  • Seite 78 Apparaît lorsque le brassard Veuillez contacter le service client local se dégonfle trop lentement. pour obtenir de l'aide. Apparaît lorsque le brassard se dégonfle trop rapidement. Problèmes avec le Relisez les instructions et répétez le test. tensiomètre. Si le compteur ne fonctionne toujours pas, veuillez contacter votre service client local pour obtenir de l'aide.
  • Seite 79: Dépannage

    DÉPANNAGE 1. Si rien ne s'affiche à l'écran après avoir appuyé sur CAUSE POSSIBLE QUE FAIRE Piles épuisées. Remplacez les piles. Piles mal installées ou absentes. Vérifiez que les piles sont correctement installées. 2. Si la fréquence cardiaque est supérieure ou inférieure à la moyenne de l'utilisateur : CAUSE POSSIBLE QUE FAIRE Mouvement pendant la mesure.
  • Seite 80: Caractéristiques

    Résistant à la pénétration de Numéro de série liquide Limite de température Limites d'humidité Marquage CE Conformité RoHS 0123 Cet appareil ne fait pas partie Précaution des déchets ménagers et doit être retourné à un point Représentant autorisé dans la de collecte de recyclage Communauté...
  • Seite 81: Performance De Mesure De La Pression Artérielle

    Conditions de stockage et de transport : -25 °C à 70 °C (-13 °F à 158 °F), 10 % à 95 % d'humidité relative Entrée d'alimentation : DC + 6 V / 1 A (max) via la prise secteur Classification IP : IP21 Durée de vie attendue : 3 ans PERFORMANCE DE MESURE DE LA PRESSION ARTÉRIELLE...
  • Seite 82 Déclaration du fabricant - immunité électromagnétique Le TD-3128 est conçu pour une utilisation dans l'environnement électromagnétique indiqué ci- dessous (pour les soins à la maison et les soins professionnels). Le client ou l'utilisateur du TD-3128 doit s'assurer que celui-ci est utilisé dans un tel environnement.
  • Seite 83 Champ 30 A/m 30 A/m Les champs magnétiques de la magnétique de 50, 60 Hz 50, 60 Hz fréquence d'alimentation du TD- la fréquence 3128 doivent être à des niveaux d'alimentation caractéristiques d'un emplacement (50, 60 Hz) CEI typique au sein d'un environnement 61000-4-8 de soins à...
  • Seite 84 Déclaration du fabricant - immunité électromagnétique Le TD-3128 est conçu pour une utilisation dans l'environnement électromagnétique indiqué ci- dessous (pour les soins à la maison et les soins professionnels). Le client ou l'utilisateur du TD-3128 doit s'assurer que celui-ci est utilisé dans un tel environnement.
  • Seite 85 a) Les intensités de champ des émetteurs fixes, tels que les stations de base pour les téléphones radio (cellulaires / sans fil) et les radios mobiles terrestres, les radios amateurs, les émissions de radio AM et FM ainsi que les émissions TV ne peuvent pas être prédites théoriquement avec précision.
  • Seite 86 Déclaration du fabricant - immunité électromagnétique Spécifications de test pour l'IMMUNITÉ DES PORTS D'ENVELOPPE aux appareils de communications sans fil à RF Le TD-3128 est conçu pour une utilisation dans l'environnement électromagnétique indiqué ci- dessous (pour les soins à la maison et les soins professionnels). Le client ou l'utilisateur du TD-3128 doit s'assurer que celui-ci est utilisé...
  • Seite 87 1720 1800; CDMA 1900; Modulation 1700– 1845 1900; d'impulsion 1990 DECT; 217 Hz bande 1970 1, 3, 4, 25; UMTS Bluetooth, WLAN, 802.11 b/ Modulation 2400– 2450 g/n, d'impulsion 2570 RFID 217 Hz 2450, LTE bande 7 5240 WLAN Modulation 5100–...
  • Seite 88: Precauciones De Seguridad Importantes

    Estimado propietario del sistema smartPRO/ smartPRO+ (TD-3128): Gracias por adquirir el Sistema de control de presión sanguínea smartPRO/ smartPRO+ (TD-3128). El manual proporciona información importante para ayudarle a usar este sistema de forma correcta. Antes de utilizar este producto, lea el siguiente contenido detenidamente y de forma completa.
  • Seite 89 9. No use este instrumento en estrecha proximidad a fuentes de radiación electromagnética fuerte, ya que estos pueden interferir con el funcionamiento exacto. 10. Un mantenimiento adecuado es esencial para la longevidad del dispositivo. Si usted está preocupado sobre su exactitud de medición, comuníquese con el servicio de atención al cliente para obtener ayuda.
  • Seite 90 TABLA DE CONTENIDO ANTES DE EMPEZAR USO PREVISTO PRINCIPIO DE LA PRUEBA DESCRIPCIÓN DEL MEDIDOR PANTALLA DE VISUALIZACIÓN AJUSTE DEL MEDIDOR SELECCIÓN DEL NÚMERO DE USUARIO PRUEBA DE SU PRESIÓN SANGUÍNEA ANTES DE LA MEDICIÓN SELECCIÓN DEL MANGUITO CORRECTO COLOCACIÓN CORRECTA DEL MANGUITO POSICIÓN DE MEDICIÓN APROPIADA TOMA DE MEDICIONES MODO DE MEDICIÓN PROMEDIO...
  • Seite 91: Antes De Empezar

    ANTES DE EMPEZAR USO PREVISTO El sistema smartPRO/smartPRO+ (TD-3128) es un sistema diseñado para medir la presión sanguínea de manera no invasiva. Está diseñado para usarse en el hogar o en una clínica. El dispositivo no debe usarse para el diagnóstico o el examen de diabetes o para la realización de pruebas en recién nacidos.
  • Seite 92: Pantalla De Visualización

    INDICADOR BT COMPARTIMIENTO DE BATERÍAS (solo ri-champion smartPRO+) ® PUERTO DEL ADAPTADOR DE CC Conéctese a una fuente de alimentación. PANTALLA DE VISUALIZACIÓN Advertencia de error Pulsación Valor de la presión sistólica Promedio Valor de la presión diastólica Símbolo del adaptador de CA Símbolo de batería baja Unidades de presión sanguínea Movimiento durante la medición...
  • Seite 93: Ajuste Del Medidor

    AJUSTE DEL MEDIDOR Antes de usar el medidor por primera vez o si cambia la batería del medidor, debe comprobar y actualizar estos ajustes. Asegúrese de seguir los pasos que se indican a continuación y guarde los ajustes deseados. Entrar al modo de ajuste Empiece con el medidor apagado.
  • Seite 94 Con la hora destellando, pulse hasta que aparezca la hora correcta. Pulse para ajustar. Con el minuto destellando, pulse hasta que aparezca el minuto correcto. Pulse para ajustar. Conguración del formato de hora Pulse para seleccionar el formato de hora deseado -- 12h o 24h.
  • Seite 95: Selección Del Número De Usuario

    Borre la memoria Mientras que “dEL” y el símbolo destellante aparezcan en la pantalla, si no desea eliminar los resultados guardados, pulse para saltar este paso. Para eliminar TODOS los resultados, pulse dos veces. se mostrarán en el medidor, lo que indica que todos los resultados se han eliminado.
  • Seite 96: Prueba De Su Presión Sanguínea

    1. Pulse para seleccionar el número de usuario deseado. 2. Pulse para confirmar. El monitor repetirá el número de usuario seleccionado y luego se apagará automáticamente. PRUEBA DE SU PRESIÓN SANGUÍNEA ANTES DE LA MEDICIÓN • Evite la cafeína, el té, el alcohol y el tabaco durante al menos 30 minutos antes de la medición.
  • Seite 97: Colocación Correcta Del Manguito

    COLOCACIÓN CORRECTA DEL MANGUITO 1. Conecte el enchufe de aire de la tubería al conector de aire del medidor. 2. Monte el manguito como se muestra en la figura. La superficie lisa debe estar dentro del aro del manguito y el anillo en D de metal no debe tocar la piel.
  • Seite 98: Posición De Medición Apropiada

    POSICIÓN DE MEDICIÓN APROPIADA 1. Siéntese durante al menos 10 minutos antes de la medición. 2. Coloque el codo en una superficie plana. Relaje su mano con la palma hacia arriba. 3. Asegúrese de que el manguito esté más o menos a la misma altura que la ubicación del corazón.
  • Seite 99: Modo De Medición Promedio

    4. Pulse para apagar. También se apagará automáticamente después de estar inactivo durante 3 minutos. 5. El medidor ingresará al modo Bluetooth automáticamente (solo ri-champion ® smartPRO+). NOTA • Si pulsa durante la medición, el medidor se apagará. • Si el símbolo de pulsación se muestra como en lugar de , esto indica que el medidor ha detectado latidos cardíacos irregulares.
  • Seite 100: Memoria Del Medidor

    3. Después de tomar tres mediciones, los resultados se promediarán para producir la medición de la presión sanguínea con el sím- bolo de PROMEDIO mostrado en el medidor. Pulse para apagar el medidor. MEMORIA DEL MEDIDOR El medidor almacena los 400 resultados de las pruebas de presión sanguínea más recientes en la memoria del medidor junto con las fechas respectivas y veces en la memoria del medidor.
  • Seite 101: Descarga De Los Resultados

    2. Pulse otra vez, y la primera lectura que verá es el último resultado de la presión sanguínea, junto con la fecha y la hora. 3. Pulse Revise todos los resultados almacenados en el medidor. 4. Salga de la memoria Pulse y el medidor se apagará.
  • Seite 102: Mantenimiento

    Emparejamiento con su dispositivo móvil 1. Active la función Bluetooth en su dispositivo móvil. 2. Comience con el medidor apagado. Presione y sostenga firmemente por 3 segundos hasta que el medidor se encienda. "PCL" aparecerá en el medidor. 3. Siga las instrucciones de la aplicación Healthy Check para emparejar el disposi- tivo.
  • Seite 103: Reemplazo De Las Baterías

    1. El símbolo aparecerá junto con los mensajes de la pantalla: El medidor es funcional y el resultado sigue siendo exacto, pero es momento de cambiar las baterías. 2. El símbolo aparece como E-b: La potencia no es suciente para hacer una prueba. Debe cambiar las baterías de inmediato.
  • Seite 104: Cuidado Del Medidor

    1. Conecte el adaptador de CA al conector del adaptador de CC del medidor. 2. Conecte el enchufe de alimentación del adaptador de CA a una toma eléctrica. Pulse para iniciar la medición. Retiro del adaptador de CA del medidor. 1.
  • Seite 105: Información Detallada

    • NO utilice disolventes orgánicos para limpiar el medidor. • NO lave el manguito de presión. • NO planche el manguito de presión. Almacenaje del medidor • Condición de almacenaje: -25°C a 70°C (-13°F a 158°F), 10% a 95% de hume- dad relativa.
  • Seite 106: Resolución De Problemas Del Sistema

    Directrices ESC / ESH 2018 para el tratamiento de la hipertensión arterial. Revista de hipertensión: Octubre de 2018 - Volumen 36 - Número 10 - p. 1953–2041. RESOLUCIÓN DE PROBLEMAS DEL SISTEMA Si sigue las acciones y recomendaciones pero el problema persiste, o aparecen mensajes de error distintos a los que aparecen a continuación, llame a la oficina local de servicio al cliente.
  • Seite 107: Solución De Problemas

    Las baterías están muy bajas. Repita con baterías nuevas o con un adaptador de entrada CA. Errores de transmisión de Bluetooth. Póngase en contacto con el servicio al cliente local para obtener ayuda. Aparece cuando el valor de la presión Revise las instrucciones y repita arterial sistólica o diastólica está...
  • Seite 108: Información De Símbolos

    3. Si el resultado es superior o inferior al promedio de las mediciones del usuario: CAUSA POSIBLE QUÉ HACER No puede estar en posición correcta Ajústelo a la posición correcta para durante la medición. medir. La presión sanguínea varía Téngalo presente para la medición naturalmente de vez en cuando.
  • Seite 109: Especificaciones

    ESPECIFICACIONES RENDIMIENTO DEL SISTEMA Modelo Nº: TD-3128 Fuente de alimentación: Cuatro baterías alcalinas AA de 1.5V Duración de la batería: 200 veces Tamaño del medidor: 141 (Largo) x 121 (Ancho) x 72 (Alto) mm. 350g sin baterías Sin el manguito: S (pequeña) 15-24 cm (5,9 - 9,4 pulgadas) con tubo de aire 80 cm W (amplia gama) 24-43 cm (9.4-16.9 pulgadas) con tubo de aire de 80 cm Memoria: Máximo de 400 registros de memoria...
  • Seite 110 • IEC60601-1-2 Requisitos para EMC • EN1060-4, Investigación clínica de NIBP • AAMI / ANSI / IEC 80601-2-30, ANSI/AAMI/ISO 81060-2, Requisitos NIBP Declaración del fabricante: inmunidad electromagnética El TD-3128 está diseñado para usarse en el entorno electromagnético (para el cuidado de la salud en el hogar y profesional) especificado a continuación.
  • Seite 111 Frecuencia de 30 A / m 30 A/m Los campos magnéticos de potencia (50, 50 Hz o 60 Hz 50 Hz frecuencia de potencia del TD- 60 Hz) campo 3128 deben estar en niveles magnético IEC característicos de una ubicación 61000-4-8 típica en un entorno de atención médica domiciliaria típico.
  • Seite 112 Declaración del fabricante: inmunidad electromagnética El TD-3128 está diseñado para usarse en el entorno electromagnético (para el cuidado de la salud en el hogar y profesional) especificado a continuación. El cliente o el usuario del TD-3128 debe asegurarse de que se use en tal entorno. Orientación del entorno Prueba de Nivel de prueba...
  • Seite 113 a) Las intensidades de campo de los transmisores fijos, como las estaciones base para teléfonos de radio (celulares / inalámbricos) y radios móviles terrestres, radioaficionados, transmisiones de radio AM y FM y transmisiones de TV no pueden predecirse teóricamente con precisión. Para evaluar el entorno electromagnético debido a los transmisores de RF fijos, se debe considerar un estudio del sitio electromagnético.
  • Seite 114 Declaración del fabricante: inmunidad electromagnética Especificaciones de prueba para INMUNIDAD DE PUERTO DE CERRAMIENTO a equipos de comunicaciones inalámbricas RF El TD-3128 está diseñado para usarse en el entorno electromagnético (para el cuidado de la salud en el hogar y profesional) especificado a continuación. El cliente o el usuario del TD-3128 debe asegurarse de que se use en dicho entorno.
  • Seite 115 Bluetooth, WLAN, 802.11 b/ Modulación 2400– 2450 g/n, de pulso 2570 RFID 217 Hz 2450, LTE Band 7 5240 WLAN Modulación 5100– 5500 802.11 de pulso 5800 217 Hz 5785 NOTA Si es necesario para alcanzar el NIVEL DE PRUEBA DE INMUNIDAD, la distancia entre la antena transmisora y el EQUIPO ME o el SISTEMA ME puede reducirse a 1 m.
  • Seite 116: Importanti Precauzioni Di Sicurezza

    Gentile proprietario del sistema smartPRO/ smartPRO+ (TD-3128), Grazie per aver acquistato il Sistema di monitoraggio della pressione arteriosa smartPRO/smartPRO+ (TD-3128). Il presente manuale contiene informazioni importanti che consentono di utilizzare correttamente questo sistema. La preghiamo di leggere attentamente tutti i contenuti che seguono prima di utilizzare il prodotto.
  • Seite 117: Conservare Queste Istruzioni

    8. L'uso di questo strumento negli ambienti secchi, specialmente in presenza di materiali sintetici (indumenti e/o tappeti sintetici eccetera) può produrre scariche statiche dannose suscettibili di causare errori di lettura. 9. Non utilizzare questo strumento in prossimità di fonti di forte radiazione elettromagnetica in quanto potrebbero interferire con l'accuratezza del funzionamento.
  • Seite 118 SOMMARIO PRIMA DI INIZIARE USO PREVISTO METODO DI MISURAZIONE PANORAMICA DEL MISURATORE DISPLAY IMPOSTARE IL MISURATORE SELEZIONE DEL NUMERO DELL'UTENTE MISURAZIONE DELLA PRESSIONE ARTERIOSA PRIMA DELLA MISURAZIONE SELEZIONARE IL BRACCIALE CORRETTO INDOSSARE CORRETTAMENTE IL BRACCIALE POSIZIONE CORRETTA PER LA MISURAZIONE EFFETTUARE LE MISURAZIONI MODO MISURAZIONE MEDIA MEMORIA DEL MISURATORE...
  • Seite 119: Prima Di Iniziare

    PRIMA DI INIZIARE USO PREVISTO Il sistema smartPRO/smartPRO+ (TD-3128) è un sistema realizzato allo scopo di effettuare la misurazione non invasiva della pressione arteriosa. È destinato all'impiego in ambienti domestici e sanitari da parte di soggetti con buona conoscenza delle istruzioni per l'uso e può essere azionato dal paziente stesso. Il dispositivo non deve essere usato per la diagnosi o lo screening dell'ipertensione, né...
  • Seite 120 INDICATORE BLUETOOTH VANO BATTERIE (ri-champion smartPRO+ only) ® PORTA ADATTATORE AC Scarica i risultati del test Collegare a una fonte di attraverso una connessione alimentazione. Bluetooth. DISPLAY Avviso errore Frequenza cardiaca Valore pressione sistolica Media Valore pressione diastolica Simbolo adattatore AC Simbolo batterie scariche Unità...
  • Seite 121: Impostare Il Misuratore

    IMPOSTARE IL MISURATORE Prima di usare il misuratore per la prima volta o dopo averne sostituito le batterie è necessario controllare e aggiornare queste impostazioni. Seguire le prossime istruzioni e salvare le impostazioni desiderate. Ingresso nel modo Impostaz. Iniziare con il misuratore spento. Tenere premuto per 3 secondi fino all'accensione del misuratore.
  • Seite 122 Quando l'Ora lampeggia, premere fino a visualizzare l'Ora corretta. Premere per impostare. Quando i Minuti lampeggiano, premere fino a visualizzare i Minuti corretti. Premere per impostare. Impostare il formato ora Premere per selezionare il formato ora desiderato -- 12h o 24h. Premere per impostare.
  • Seite 123: Selezione Del Numero Dell'utente

    Eliminare la memoria Quando sul display appaiono “dEL” e una lampeggiante, se non si desidera eliminare le letture salvate premere per saltare questo passaggio. Per eliminare TUTTE le letture, premere due volte. appaiono sul misuratore; questo indica che tutte le letture sono state eliminate.
  • Seite 124: Misurazione Della Pressione Arteriosa

    1. Premere per selezionare il numero utente desiderato. 2. Premere per confermare. Il monitor ripeterà il numero utente selezionato e quindi si spegnerà automaticamente. MISURAZIONE DELLA PRESSIONE ARTERIOSA PRIMA DELLA MISURAZIONE • Evitare caffeina, tè, alcol e tabacco per almeno 30 minuti prima della misura- zione.
  • Seite 125: Indossare Correttamente Il Bracciale

    INDOSSARE CORRETTAMENTE IL BRACCIALE 1. Introdurre la spina aria del tubo nella presa aria del misuratore. 2. Preparare il bracciale come indicato. La superficie liscia deve trovarsi all'interno del giro del bracciale e l'anello a D in metallo non deve toccare la pelle. 3.
  • Seite 126: Posizione Corretta Per La Misurazione

    POSIZIONE CORRETTA PER LA MISURAZIONE 1. Restare seduti per almeno 10 minuti prima della misurazione. 2. Appoggiare il gomito su una superficie piana. Rilassare la mano, con il palmo rivolto verso l'alto. 3. Il bracciale deve trovarsi approssimativa- mente all'altezza del cuore. Premere Durante la misurazione rimanere fermi, non parlare e non muoversi.
  • Seite 127: Modo Misurazione Media

    3. Dopo la misurazione, lo strumento indica la pressione sistolica, la pressione diastolica e la frequenza cardiaca. 4. Premere per spegnere, oppure il misuratore si spegnerà automaticamente dopo 3 minuti di inattività. 5. Il misuratore entrerà automaticamente nel modo Bluetooth. (ri-champion smartPro only) ®...
  • Seite 128: Memoria Del Misuratore

    2. Dopo avere portato a termine la prima mis- urazione, il misuratore eseguirà il conto alla rovescia prima di iniziare la seconda misura- zione. Il numero a destra rappresenta il conto alla rovescia rimanente tra una misurazione e l'altra. Il misuratore eseguirà tre (3) misura- zioni consecutive con intervalli di 20 secondi.
  • Seite 129: Scaricare Le Letture

    2. Premere nuovamente ; la prima lettura che si visualizza è l'ultima effettuata, insieme a data e ora. 3. Premere Visualizzare in anteprima tutte le letture memorizzate. 4. Uscire dalla memoria Premere ; il misuratore si spegne. SCARICARE LE LETTURE Trasmissione dei dati via Bluetooth (ri-champion ®...
  • Seite 130: Manutenzione

    2. Iniziare con il misuratore spento. Tenere premuto per 3 secondi fino all'accensione del misuratore. Sul misuratore apparirà "PCL". 3. Seguire le istruzioni dell'app Healthy Check per associare il dispositivo. (Per esempio, individuare il misuratore, quindi aggiungerlo nell'app.) 4. Dopo aver associato correttamente l'app al dispositivo, per trasmettere dati all'app Healthy Check la funzione Bluetooth del misuratore deve essere attiva.
  • Seite 131: Sostituzione Delle Batterie

    1. Il simbolo appare insieme ai messaggi sul display: Il misuratore funziona e il risultato continua a essere accurato, ma è il momento di sostituire le batterie. 2. Il simbolo appare con E-b: La carica non è sufficiente per eseguire una misurazione. È necessario sostituire immediatamente le batterie.
  • Seite 132: Cura Del Misuratore

    1. Collegare la spina dell'adattatore AC alla presa dell'adattatore DC del misuratore. 2. Introdurre la spina dell'adattatore AC in una presa elettrica. Premere per avviare il misuratore. Rimuovere l'adattatore AC dal misuratore. 1. Quando il misuratore è spento, rimuovere la spina dell'adattatore AC dalla presa elettrica.
  • Seite 133: Informazioni Dettagliate

    • NON utilizzare solventi organici per pulire il misuratore. • NON lavare il bracciale pressorio. • NON stirare il bracciale pressorio. Stoccaggio del misuratore • Condizioni di stoccaggio: da -25 °C a 70 °C (da -13 °F a 158 °F), umidità relativa da 10% a 95%.
  • Seite 134: Risoluzione Dei Problemi Del Sistema

    Fonte: Task force per la diagnosi ed il trattamento dell’ipertensione arteriosa della Società Europea dell’Ipertensione Arteriosa e della Società Europea di Cardiologia. Linee guida ESC-ESH 2018 per il trattamento dell’ipertensione arteriosa. Journal of Hypertension: October 2018 - Volume 36 - Issue 10 - p 1953–2041. RISOLUZIONE DEI PROBLEMI DEL SISTEMA Se si agisce come consigliato ma il problema persiste o appaiono messaggi d'errore diversi da quelli indicati di seguito, rivolgersi al proprio servizio clienti...
  • Seite 135: Risoluzione Dei Problemi

    Le batterie sono troppo Ripetere l'operazione con batterie o scariche. adattatore AC nuovi. Errori di trasmissione via Per ricevere assistenza, contattare il servizio Bluetooth. clienti locale. Appare quando il valore Leggere le istruzioni e ripetere la della pressione sistolica misurazione. Se l'errore persiste, contattare o diastolica è...
  • Seite 136: Informazioni Sui Simboli

    CAUSA POSSIBILE COSA FARE Il bracciale potrebbe non essere Disporre il bracciale nella posizione nella posizione corretta durante la corretta per la misurazione. misurazione. La pressione arteriosa varia Tenere presente per la misurazione naturalmente di volta in volta. successiva. 4. Se bracciale si gonfia di nuovo durante la misurazione: CAUSA POSSIBILE COSA FARE Il bracciale non è...
  • Seite 137: Specifiche

    SPECIFICHE PRESTAZIONI DEL SISTEMA Modello n.: TD-3128 Sorgente di alimentazione: quattro batterie alcaline AA da 1,5 V Durata delle batterie: 200 volte Dimensioni del misuratore senza bracciale: 141 (L) x 121 (P) x 72 (A) mm, 350 g senza batterie Misura del bracciale: S (piccolo) 15 –...
  • Seite 138 • IEC60601-1 Requisiti generali per la sicurezza • IEC60601-1-2 Requisiti di compatibilità elettromagnetica • EN1060-4, indagine clinica NIBP (sfigmomanometri non invasivi) • Requisiti AAMI / ANSI / IEC 80601-2-30, ANSI/AAMI/ISO 81060-2, NIBP (sfig- momanometri non invasivi) Dichiarazione del produttore - immunità elettromagnetica TD-3128 è...
  • Seite 139 Frequenza di 30 A/m 30 A/m I campi magnetici della frequenza rete (50, 60 50, 60 Hz 50, 60 Hz di rete di TD-3128 devono essere Hz) campo ai livelli caratteristici di una magnetico IEC collocazione tipica in un ambiente 61000-4-8 sanitario domiciliare.
  • Seite 140 Gli apparecchi di comunicazione RF condotta 3 Vrms: 3 Vrms: RF portatili e mobili non devono IEC 61000-4- 0,15 MHz – 80 tra 0,15 MHz e 80 MHz essere usati in prossimità di 6 Vrms: 6 Vrms: in nessun componente di TD-3128, in bande di bande di compresi i cavi, a una distanza...
  • Seite 141 Distanza di separazione consigliata fra apparecchiature di comunicazione RF portatili e mobili e TD-3128 TD-3128 è destinato all'uso in un ambiente elettromagnetico (a scopo sanitario domiciliare e professionale) nel quale le interferenze RF irradiate sono tenute sotto controllo. Il cliente o l'utente di TD-3128 possono contribuire a prevenire le interferenze elettromagnetiche mantenendo una distanza minima tra le apparecchiature di comunicazione RF portatili e mobili (trasmettitori) e TD-3128 come consigliato di seguito, in base alla massima potenza di...
  • Seite 142 Dichiarazione del produttore - immunità elettromagnetica Specifiche di prova per IMMUNITÀ PORTA INVOLUCRO verso apparecchiature RF di comunicazione wireless TD-3128 è destinato all'uso nell'ambiente elettromagnetico (uso sanitario domiciliare e professionale) di seguito specificato. Il cliente o l'utente di TD-3128 devono assicurarsi che sia utilizzato in ambienti corrispondenti. LIVELLO DI LIVELLO CONFORMITÀ...
  • Seite 143 Bluetooth, WLAN, 802.11 b/ Modulazione 2400– g/n, 2450 a impulsi 2570 RFID 217 Hz 2450, Banda LTE 7 5240 WLAN Modulazione 5100– 5500 802.11 a impulsi 5800 217 Hz 5785 NOTA Se necessario, per ottenere il LIVELLO DELLA PROVA DI IMMUNITÀ, la distanza fra l'antenna di transito e l'APPARECCHIATURA ME o il SISTEMA ME può...
  • Seite 144: Важные Меры Предосторожности

    Уважаемый владелец тонометра smartPRO/ smartPRO+ (TD-3128), благодарим вас за покупку аппарата для мониторинга артериального давления smartPRO/smartPRO+ (TD-3128) с блютус этом руководстве содержится важная информация, касающаяся его правильного применения. Внимательно изучите нижеследующие инструкции перед использованием устройства. Компактный и простой тонометр smartPRO/smartPRO+ (TD-3128) дает возможность...
  • Seite 145 6. Прибор и его гибкий шнур не должны находиться вблизи горячих поверхностей. 7. Манжету разрешается надевать только на указанные места. 8. Этот аппарат следует использовать в сухом помещении, особенно при наличии синтетических материалов (синтетическая одежда, ковры и т. д.), поскольку в противном случае возможно возникновение статических разрядов, искажающих...
  • Seite 146 ОГЛАВЛЕНИЕ ПЕРЕД НАЧАЛОМ ИСПОЛЬЗОВАНИЕ ПО НАЗНАЧЕНИЮ ПРИНЦИП ДЕЙСТВИЯ ОБЗОР ТОНОМЕТРА ЭКРАН НАСТРОЙКА ТОНОМЕТРА ВЫБОР НОМЕРА ПОЛЬЗОВАТЕЛЯ ИЗМЕРЕНИЕ КРОВЯНОГО ДАВЛЕНИЯ ПЕРЕД ИЗМЕРЕНИЕМ ВЫБОР ПОДХОДЯЩЕЙ МАНЖЕТЫ ПРАВИЛЬНОЕ НАЛОЖЕНИЕ МАНЖЕТЫ ПРАВИЛЬНАЯ ПОЗА ДЛЯ ИЗМЕРЕНИЯ ВЫПОЛНЕНИЕ ИЗМЕРЕНИЙ РЕЖИМ УСРЕДНЕННОГО ИЗМЕРЕНИЯ ПАМЯТЬ ТОНОМЕТРА ПРОСМОТР РЕЗУЛЬТАТОВ ИЗМЕРЕНИЙ ЗАГРУЗКА...
  • Seite 147: Перед Началом

    ПЕРЕД НАЧАЛОМ ИСПОЛЬЗОВАНИЕ ПО НАЗНАЧЕНИЮ Аппарат smartPRO/smartPRO+ (TD-3128) разработан для измерения кровяного давления неинвазивным способом. Она предназначена для домашнего и клинического использования. Не разрешается использовать устройство для диагностики или скрининга диабета и гипертонии, а также для новорожденных. ПРИНЦИП ДЕЙСТВИЯ Артериальное давление измеряется неинвазивно на предплечье осциллометрическим...
  • Seite 148: Экран

    ИНДИКАТОР BT (только для ОТСЕК ДЛЯ БАТАРЕИ ri-champion smartPro+) ® ГНЕЗДО АДАПТЕРА Загрузите результаты теста ПЕРЕМЕННОГО ТОКА через соединение Bluetooth. Подключение источника электропитания. ЭКРАН Предупреждение об ошибке Частота пульса Значение систолического Средний давления Значение диастолического Символ сетевого адаптера давления Единицы артериального Символ...
  • Seite 149: Настройка Тонометра

    НАСТРОЙКА ТОНОМЕТРА Перед первым использованием тонометра или после замены батареи тонометра, необходимо проверить и обновить эти настройки. Выполните нижеследующие шаги и сохраните нужные настройки. Вход в режим настройки Тонометр выключен. Для включения тонометра нажмите и удерживайте кнопку в течение 3 секунд. Установка...
  • Seite 150 Когда цифры часов начнут мигать, нажимайте кнопку до отображения нужного значения. Нажмите для установки. Когда цифры минут начнут мигать, нажимайте кнопку до отображения нужного значения. Нажмите для установки. Установка формата времени Нажмите для выбора нужного формата времени --- 12 ч или 24 ч. Нажмите для...
  • Seite 151: Выбор Номера Пользователя

    Очистить память На экране появится “dEL” и начнет мигать значок Если вы не хотите удалять сохраненные результаты, нажмите кнопку для пропуска этого шага. Для удаления ВСЕХ результатов дважды нажмите кнопку . На тонометре отобразятся и , что означает успешное удаление всех результатов.
  • Seite 152: Измерение Кровяного Давления

    1. Нажмите кнопку, чтобы выбрать нужный номер пользователя. 2. Нажмите для подтверждения. Монитор отобразит выбранный номер пользователя, а затем автоматически отключится. ИЗМЕРЕНИЕ КРОВЯНОГО ДАВЛЕНИЯ ПЕРЕД ИЗМЕРЕНИЕМ • Воздержитесь от употребления кофеина, чая, алкоголя и табака в течение не менее 30 минут перед измерением. •...
  • Seite 153: Правильное Наложение Манжеты

    ПРАВИЛЬНОЕ НАЛОЖЕНИЕ МАНЖЕТЫ 1. Вставьте штекер воздушной трубки в соответствующее гнездо тонометра. 2. Расположите манжету, как показано на рисунке. Гладкая поверхность располагается с внутренней стороны манжеты, а металлическое полукольцо не должно касаться вашей кожи. 3. Вытяните левую (правую) руку перед Материал...
  • Seite 154: Правильная Поза Для Измерения

    ПРАВИЛЬНАЯ ПОЗА ДЛЯ ИЗМЕРЕНИЯ 1. Перед измерением посидите не менее 10 минут. 2. Поместите локоть на ровную поверхность. Расслабьте руку, при этом ладонь должна быть направлена вверх 3. Убедитесь, что манжета находится примерно на высоте вашего сердца. Нажмите . Сохраняйте спокойствие, не двигайтесь...
  • Seite 155: Режим Усредненного Измерения

    3. После измерения на экране тонометра отобразятся значения систолического и диастолического давления, а также частота пульса. 4. Нажмите для выключения. Или аппарат автоматически отключится после бездействия в течение 3 минут. 5. Прибор автоматически перейдет в режим Bluetooth. (только ri-champion smartPRO+) ®...
  • Seite 156: Память Тонометра

    2. По завершении первого измерения тонометр начнет отсчет до начала второго измерения. Цифра справа предназначена для обратного отсчета времени между измерениями. Тонометр последовательно выполнит три (3) измерения с интервалом в 20 секунд. 3. Затем на основании результатов трех измерений вычисляется среднее значение артериального...
  • Seite 157: Загрузка Результатов

    2. Нажмите кнопку еще раз. Первое значение, которое вы увидите, будет результатом последнего измерения артериального давления вместе с датой и временем. 3. Нажмите Просмотрите все результаты измерений, сохраненные в памяти тонометра. 4. Выйдите из памяти Нажмите кнопку, чтобы выключить тонометр. ЗАГРУЗКА...
  • Seite 158: Техобслуживание

    Сопряжение с вашим мобильным устройством 1. Включите функцию Bluetooth на вашем мобильном устройстве. 2. Начните с выключенного счетчика. Нажмите и удерживайте в течение 3 секунд, пока счетчик не включится. «PCL» появится на счетчике. 3. Следуйте инструкциям приложения Healthy Check для сопряжения устройства.
  • Seite 159: Замена Батареи

    1. Значок появится вместе с отображаемыми сообщениями: тонометр работает и обеспечивает точные результаты, но пришло время заменить батарейки. 2. Значок появляется вместе с надписью E-b: недостаточно мощности для проведения измерения. Следует немедленно заменить батарейки. Замена батареи Перед выполнением замены убедитесь, что тонометр выключен. 1.
  • Seite 160: Уход За Тонометром

    Присоединение адаптера переменного тока к тонометру. 1. Вставьте штекер адаптера переменного тока в гнездо адаптера постоянного тока тонометра. 2. Вставьте вилку адаптера переменного тока в электрическую розетку. Нажмите кнопку, чтобы начать измерение. Отсоединение адаптера переменного тока от тонометра. 1. Выключите тонометр, затем извлеките вилку...
  • Seite 161: Подробная Информация

    вытрите устройство насухо с помощью мягкой сухой ткани. ЗАПРЕЩАЕТСЯ промывать водой. • ЗАПРЕЩАЕТСЯ использовать органические растворители для очистки тонометра. • ЗАПРЕЩАЕТСЯ мыть манжету. • ЗАПРЕЩАЕТСЯ обрабатывать манжету утюгом. Хранение тонометра • Условия хранения: от -25 до 70°C (от -13° до 158°F), относительная влажность...
  • Seite 162: Устранение Неисправностей Аппарата

    Изолированная систолическая гипертензия должна классифицироваться (1, 2, 3) в соответствии со значениями систолического артериального давления в указанных диапазонах, при условии, что диастолические значения <90 мм рт. Источник: Европейское общество гипертонии и Европейское общество кардиологов Члены оперативной группы. 2018 ESC / ESH Руководство по лечению артериальной гипертонии. Журнал Гипертонии: Октябрь...
  • Seite 163: Устранение Неисправностей

    Проблемы с тонометром. Еще раз прочитайте инструкции и повторите измерение. Если тонометр по-прежнему не работает, обратитесь в местную службу поддержки. Ошибки передачи по Повторите с новыми батареями или Bluetooth. входным адаптером переменного тока. Bluetooth transmission errors. Пожалуйста, обратитесь в местную службу...
  • Seite 164 2. Если частота сердечных сокращений выше/ниже средних показателей пользователя: ВОЗМОЖНЫЕ ПРИЧИНЫ РЕКОМЕНДОВАННЫЕ ДЕЙСТВИЯ Движение во время измерения. Выполните измерение повторно. Измерение выполнялось после Отдохните не менее 30 минут, а затем физических упражнений. выполните измерение повторно. 3. If the result is higher/lower than user’s average measurement: ВОЗМОЖНЫЕ...
  • Seite 165: Технические Характеристики

    Это устройство не относится предосторожность к бытовым отходам и должно быть возвращено в пункт Уполномоченный сбора для переработки представитель в ЕС электрических и электронных устройств в соответствии с Обратитесь к инструкции местным законодательством. по эксплуатации / Если он содержит батареи, буклету...
  • Seite 166: Измерение Артериального Давления

    ИЗМЕРЕНИЕ АРТЕРИАЛЬНОГО ДАВЛЕНИЯ Диапазон ЧСС: 40 – 199 beat per minute Диапазон измерения систолического давления: 60 mmHg – 255 mmHg Диапазон измерения диастолического давления: 30 mmHg – 195 mmHg Диапазон измерения частоты пульса: 40 – 199 beats / minute Максимальное инфляционное давление: 280 мм рт. Точность...
  • Seite 167 Декларация производителя - электромагнитная устойчивость TD-3128 предназначен для использования в электромагнитной среде (для домашнего и профессионального здравоохранения), указанной ниже. Покупатель или пользователь TD-3128 должен убедиться, что он используется в такой среде. Электромагнитная защита окружающей IEC 60601 Тест на Уровень среды (для домашнего тестовый...
  • Seite 168 Частота 30 А / м 30 А / м Магнитные поля частотной мощности 50 Гц или 60 Гц 50 Гц частоты TD-3128 должны быть (50, 60 Гц) на уровнях, характерных для магнитного типичного местоположения поля МЭК в типичной домашней среде 61000-4-8 здравоохранения.
  • Seite 169 Декларация производителя - электромагнитная устойчивость TD-3128 предназначен для использования в электромагнитной среде (для домашнего и профессионального здравоохранения), указанной ниже. Заказчик или пользователь TD-3128 должен убедиться, что он используется в таких условиях и в окружающей среде. Электромагнитная защита окружающей IEC 60601 Тест...
  • Seite 170 a) Напряженность поля от фиксированных передатчиков, таких как базовые станции для радио (сотовых / беспроводных) телефонов и наземных мобильных радиостанций, любительское радио, радиовещание AM и FM и телевизионное вещание, не может быть предсказано теоретически с точностью. Для оценки электромагнитной обстановки, связанной с фиксированными РЧ передатчиками, следует рассмотреть электромагнитное...
  • Seite 171 Для передатчиков, рассчитанных на максимальную выходную мощность, не указанную выше, рекомендуемое расстояние разнесения d в метрах (м) может быть оценено с использованием уравнения, применимого к частоте передатчика, где p - максимальная выходная мощность передатчика в ваттах ( W) в соответствии с производителем передатчика.
  • Seite 172 800/900, TETRA 800, Импульсная 800– iDEN 820, модуляция CDMA 18 Hz 850, LTE Band 1720 1800; CDMA 1900; Импульсная 1700– 1845 модуляция 1900; 1990 217 Hz DECT; LTE Band 1, 3, 4, 1970 25; UMTS Bluetooth, WLAN, 802.11 b/ Импульсная 2400–...
  • Seite 176 СИСТЕМА МОНИТОРИНГА ДАВЛЕНИЯ КРОВИ Rudolf Riester GmbH Bruckstraße 31, DE-72417 Jungingen, Germany Tel.: +49 7477 9270-0 For further languages, please visit https://www.riester.de/en/ productdetails/d/automated-blood-pressure-monitors/ri-champion-smartpro Hardcopies are available on request. TaiDoc Technology Corporation B1-7F, No. 127, Wugong 2nd Rd.,Wugu Dist., 24888 New Taipei City, Taiwan www.taidoc.com...

Diese Anleitung auch für:

Ri-champion smartpro+Td-3128

Inhaltsverzeichnis