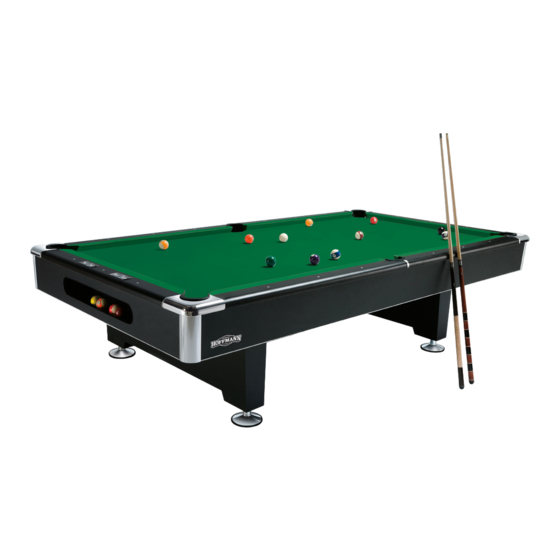
Automaten Hoffmann Club Pro Aufbauanleitung
Billardtisch
Vorschau ausblenden
Andere Handbücher für Club Pro:
- Aufbauanleitung (6 Seiten) ,
- Aufbauanleitung (16 Seiten) ,
- Aufbauanleitung (6 Seiten)

Verwandte Anleitungen für Automaten Hoffmann Club Pro


Inhaltszusammenfassung für Automaten Hoffmann Club Pro
- Seite 1 Automaten Hoffmann Billardtisch „Club Pro“ Automaten Hoffmann Billard Table „Club Pro“ Aufbauanleitung 7ft/8ft Tische Billard Assembly manual: 7ft/8ft tables Sportime · c/o Sport-Thieme GmbH · Helmstedter Straße 40 · 38368 Grasleben, Germany · www.sportime.de...
- Seite 2 Congratulations! Congratulations! Wir hoffen du wirst viel Spaß mit deinem neuen We hope that you receive many years of safe Billardtisch haben! family fun with your new billard table. STOP STOP Bitte bewahre diese Aufbauanleitung auf! Please keep your instructions! •...
-
Seite 3: Stückliste | Parts List
Stückliste | Parts list Bandenrahmen Bandenrahmen Bandenrahmen Lange Seiten- lange Seite kurze Seite (A) kurze Seite (B) verblendung Long top rail End top rail (A) End top rail (B) Long apron Kurze Seiten- Kurze Seiten- Querstrebe Mittlere Querstrebe verblendung (A) verblendung (B) Cross Member Mid Cross Member... - Seite 4 Stückliste | Parts list Hohenverstell- Schraube Unterlegscheibe Mutter barer Ful1 M10X4-1/2‘‘ Bolt 3/8X25mm Washer M10mm Nut Leg leveller Schraube Schraube Unterlegscheibe Schraube M10X180mm Bolt M12X140mm Bolt 13X28mm Washer 5/16‘‘X1-3/4‘‘ Bolt Langes Rahmenteil Unterlegscheibe Schraube Unterlegscheibe 5/16‘‘X23mm Washer 5/16‘‘X35mm Washer 1/4‘‘X1‘‘ Bolt 1/4‘‘X32mm Washer Eckverblendung Schraube...
- Seite 5 Aufbauanleitung ASSEMBLY INSTRUCTIONS: Schritt/Step 1 TIPP a : Hint a : Die Fuß-Teller nicht ganz einschrauben, ca. 1 cm vom Gewinde Do not screw the leg leveller in completely - then you have a solltest Du noch sehen können – dies ermöglicht dir den Tisch better possiblilty for fine adjustment upwards and downwards.
- Seite 6 Schritt/Step 2 Bohrer Drill Bitte ein Loch mit 4 mm Durchmesser vorbohren Please drill a hole with 4 mm diameter TIPP e : Hint e : Bevor Du die Platten montierst, stelle den Tisch an seine finale Prio to the mounting of the panels, put the table (frame) to his Position und richte Ihn mit Hilfe der Wasserwaage aus.
- Seite 7 Schritt/Step 3 TIPP j : Hint j : Bitte zieh die Schrauben nicht zu fest an, da sonst die Do not tighten the screw too hard - the screw could pull down the Metallblende heruntergezogen wird. metal facing. TIPP k : Hint k : Die Bande mit dem kleinen Zählwerk ist der Kopf des Tisches, The board with the small mechanical counter is the top of the...
- Seite 8 Schritt/Step 4 TIPP l : Hint l : Es gibt Ballfangtaschen für die Mitte (kurzer Bogen) und für There are ball pockets for the middle pocket (short curve) and die Ecken (langer Bogen). corner pocket (long curve) TIPP m : Hint m : Achte beim einschieben der Rahmenecken darauf, dass diese Please pay attention to the the frame corners –...
- Seite 9 Montage des Ballrücklaufs (optional) Autoball return assemby (optional) Teileliste: Parts list: Drop pocket A Drop pocket B Drop pocket C Drop pocket D Tasche A Tasche B Tasche C Tasche D Drop pocket E Drop pocket F Plastic pipe Tasche E Tasche F Röhre •...
- Seite 10 Montage des Ballrücklaufs (Forts.) Autoball return assemby (Contin.) Hinter der breiten Öffnung an einer kürzeren Seite befindet sich der Behind the wide opening at one of the short table sides you find sogenannte Ballkasten. Wenn Sie hineingreifen merken Sie, dass the ball return box.