Werbung
Verfügbare Sprachen
Verfügbare Sprachen
ASIA PACIFIC
E-mail: support.jp@vava.com(JP)
JP Importer: 株式会社SUNVALLEY JAPAN
Address: 〒104-0032東京都中央区八丁堀3丁目18-6 PMO京橋東9F
E-mail: support@vava.com
Tel: 1-888-456-8468 (Monday-Friday: 9:00 – 17:00 PST)
US Distributor: SUNVALLEYTEK INTERNATIONAL INC.
Address: 46724 Lakeview Blvd, Fremont, CA 94538
MODEL: VA IH006
BABY MONITOR
User Guide
MADE IN CHINA
VA-IH006_V1.0
Werbung
Kapitel
Fehlerbehebung

Verwandte Anleitungen für Vava VA-IH006

Inhaltszusammenfassung für Vava VA-IH006
- Seite 1 ASIA PACIFIC E-mail: support.jp@vava.com(JP) JP Importer: 株式会社SUNVALLEY JAPAN Address: 〒104-0032東京都中央区八丁堀3丁目18-6 PMO京橋東9F E-mail: support@vava.com Tel: 1-888-456-8468 (Monday-Friday: 9:00 – 17:00 PST) US Distributor: SUNVALLEYTEK INTERNATIONAL INC. Address: 46724 Lakeview Blvd, Fremont, CA 94538 MODEL: VA IH006 BABY MONITOR User Guide MADE IN CHINA...
-
Seite 2: Inhaltsverzeichnis
CONTENTS SAFETY INSTRUCTIONS CAUTION PACKAGE CONTENTS PRODUCT DIAGRAM GETTING STARTED 1. Charging & Powering Baby Monitor 2. Powering Camera 3. Pairing the Baby Monitor & the Camera 4. Placing the Camera 5. Wall Mounting Camera 6. Wide-Angle Lens (Optional) FUNCTIONS & OPERATIONS Monitor Interface Overview 1. -
Seite 3: Safety Instructions
· The lens and lens hood are small parts, keep them out of your baby’s reach at all times. · Baby Monitor & Camera (Model: VA-IH006) · This product is NOT intended to replace the proper supervision of children. · Monitor Adapter with USB-C Charging Cable You MUST check your child’s activity regularly. -
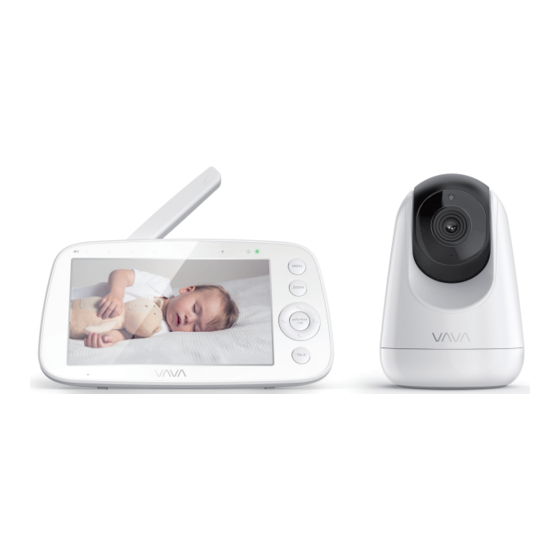
Seite 4: Product Diagram
PRODUCT DIAGRAM Camera Baby Monitor MENU ZOOM AUTO-PILOT / OK TALK Antenna Right Button Volume Indicators OK Button Microphone Down Button Charging Indicator Talk Button Camera Vents Power Switch Power Indicator Power Button Camera Antenna Speaker Menu Button Upgrade Pinholes Micro-USB Port Lens Zoom Button... -
Seite 5: Getting Started
GETTING STARTED 4. Placing the Camera Place the camera 1.5-2m / 4.9-6.6ft away from your baby for safety reason 1. Charging & Powering Baby Monitor and for a better view when in night vision mode. 1) Connect the monitor adapter to the monitor and a power outlet. 2) Unplug the unit when its power indicator turns off, indicating a full charge. -
Seite 6: Wide-Angle Lens (Optional)
FUNCTIONS & OPERATIONS 6. Wide-Angle Lens (Optional) The aluminum lens hood (no special video effects) has been installed when Monitor Interface Overview the camera was manufactured. To install wide-angle lens (sold separately), simply rotate the original lens PM 12:08 hood counterclockwise to remove. Then install the new lens and rotate clockwise to fix in place. -
Seite 7: Monitor Settings
Bottom Menu Brief · To mute the sound during poor monitor-camera connection, please set the system sound volume to mute. Add Camera Max. 4 cameras · When the monitor screen is under sleep mode, the power indicator View Camera Select to view each at a time flashes green slowly while the audio is still on;... -
Seite 8: Pan-N-Tilt
8. Talkback 4. Pan-n-Tilt Press and hold Talk Button to talk to your baby, release it to exit the talking When viewing the camera, press Left / Right / Up / Down Button to view at mode. different angles, 108 degrees vertically and 270 degrees horizontally. When you enter the talking mode, the icon will be shown on the monitor. -
Seite 9: Specifications
SPECIFICATIONS Camera Monitor Cmos 720p (1280x720), 3.0M, 1/4" Model VA-IH006 Connectivity 2.4GHz Sonix IC SN93700 Image Compression h.264 (frame rate = 18fs) Resolution IPS (720 x 1280), PPI=293 Power Input 5V / 1.2A, 2.5m-long Micro-USB cable Connectivity 2.4GHz Pan-n-Tilt 108 degrees vertical (Up=90, Down=18) -
Seite 10: Troubleshooting
TROUBLESHOOTING better signal transfer. · Check that the camera and monitor are turned on. No sound from Check whether the system sound volume is set to “0”. · Check the camera is connected to power properly (it the monitor? It’ll be mute if set so. cannot be charged;... -
Seite 11: Fcc Statement
FCC STATEMENT this standard during product certification for use when properly worn on the body is 0.515 W/kg. changes or modifications not expressly approved by the party responsible for For body operation, this device has been tested and meets FCC RF exposure compliance could void the user’s authority to operate the equipment. -
Seite 12: Ic Statement
IC STATEMENT This device contains licence-exempt transmitter(s)/receiver(s) that comply INHALT with Innovation, Science and Economic Development Canada’s licence-ex- empt RSS(s). Operation is subject to the following two conditions: SICHERHEITSHINWEISE (1) This device may not cause interference. ACHTUNG (2) This device must accept any interference, including interference that may IM LIEFERUMFANG ENTHALTEN cause undesired operation of the device. -
Seite 13: Sicherheitshinweise
· KEIN Spielzeug. Lassen Sie Kinder nicht damit spielen. · Linse und Blende sind Kleinteile, bewahren Sie diese stets außerhalb der Reichweite Ihres Babys auf. · Baby Monitor & Kamera (Modell: VA-IH006) · Dieses Produkt soll eine ordnungsgemäße Beaufsichtigung von Kindern · Monitor-Adapter mit USB-C-Ladekabel NICHT ersetzen. -
Seite 14: Produktabbildung
PRODUKTABBILDUNG Kamera Baby Monitor MENU ZOOM AUTO-PILOT / OK TALK Antenne Rechts-Taste Lautstärkeanzeige OK-Taste Mikrofon Runter-Taste Ladeanzeige Sprech-Taste Kamera-Belüftung Power-Schalter Stromanzeige Power-Taste Kamera-Antenne Lautsprecher Menü-Taste Upgrade-Stiftlöcher Micro-USB-Anschluss Linse Zoom-Taste Ständer Temperatursensor Kopplungstaste Links-Taste Lautsprecher Reset-Stiftloch Halterungsloch Hoch-Taste USB-C-Anschluss... -
Seite 15: Erste Schritte
ERSTE SCHRITTE 4. Aufstellen der Kamera Stellen Sie die Kamera aus Sicherheitsgründen und für bessere Sicht im 1. Laden & Betreiben des Baby Monitors Nachtsichtmodus 1,5-2m / 4.9-6.6ft von Ihrem Baby entfernt auf. 1) Verbinden Sie den Monitor-Adapter mit dem Monitor und einer Steckdose. 2) Wenn die Stromanzeige ausgeht, ist das Gerät vollständig aufgeladen, ziehen Sie das Kabel ab. -
Seite 16: Weitwinkel-Linse (Optional)
FUNKTIONEN & BEDIENUNG 6. Weitwinkel-Linse (Optional) Die Aluminiumblende (keine speziellen Videoeffekte) wurde bei Herstellung Interface-Übersicht des Monitors an der Kamera angebracht. Um eine Weitwinkel-Linse (separat käuflich) anzubringen, drehen Sie die PM 12:08 originale Blende gegen den Uhrzeigersinn, um diese abzunehmen. Montieren Sie dann die neue Linse, indem Sie sie im Uhrzeigersinn drehen und so fixieren. -
Seite 17: Monitoreinstellungen
Menü-Anzeigen unten Kundenservice-Kontakt: Hier finden Sie E-Mail-Adresse, Telefonnummer und Adresse des Kundenservices. Kamera hinzufügen Max. 4 Kameras Kamera ansehen Wählen, um jede einzeln anzusehen · Um den Sound bei schwacher Monitor-Kamera-Verbindung stummzus- Kamera löschen Wählen, um Kameras zu löschen chalten, stellen Sie die Systemsound-Lautstärke bitte auf stumm. -
Seite 18: Schwenken/Neigen
8. Gegensprechfunktion 4. Schwenken/Neigen Halten Sie die Sprech-Taste gedrückt, um mit Ihrem Baby zu sprechen; lassen Drücken Sie beim Betrachten des Kamerabilds die Tasten Links / Rechts / Sie sie los, um den Sprachmodus zu verlassen. Hoch / Runter, um verschiedene Winkel anzeigen zu lassen, 108 Grad vertikal und 270 Grad horizontal. -
Seite 19: Spezifikationen
SPEZIFIKATIONEN Kamera Monitor Cmos 720p (1280x720), 3,0M, 1/4" Modell VA-IH006 Konnektivität 2,4GHz Sonix IC SN93700 Bildkompression h.264 (Bildrate = 18fs) Auflösung IPS (720 x 1280), PPI=293 Stromanschluss 5V / 1,2A, 2,5m langes Micro-USB-Kabel Konnektivität 2,4GHz Schwenken/Neigen 108 Grad vertikal (Hoch=90, Runter=18) Bildverhältnis... -
Seite 20: Problemlösung
PROBLEMLÖSUNG · Überprüfen Sie die Verbindungen zur Kamera (Stromk- abel und Kopplung). · Prüfen Sie, ob Kamera und Monitor eingeschaltet sind. · Überprüfen Sie, ob sich der Bildschirm im Schlafmodus · Überprüfen Sie, ob die Kamera richtig an der Stromver- Wird nichts befindet. -
Seite 21: Fcc-Statement
FCC STATEMENT this standard during product certification for use when properly worn on the body is 0.515 W/kg. changes or modifications not expressly approved by the party responsible for For body operation, this device has been tested and meets FCC RF exposure compliance could void the user’s authority to operate the equipment. -
Seite 22: Ic-Statement
IC STATEMENT This device contains licence-exempt transmitter(s)/receiver(s) that comply with Innovation, Science and Economic Development Canada’s licence-ex- empt RSS(s). Operation is subject to the following two conditions: (1) This device may not cause interference. (2) This device must accept any interference, including interference that may cause undesired operation of the device. - Seite 23 尺寸:120*160mm 装订成册 材质:封面128克铜版纸 内页80克书纸...