Herunterladen Inhalt Inhalt Diese Seite drucken

Werbung

Verfügbare Sprachen
  • DE

Verfügbare Sprachen

  • DEUTSCH, seite 1
Smart H me
VISITOR 1V
Deutsch
English
Español
Italiano
Français
S. 2-21
P. 22-34
P. 35-47
P. 48-60
P. 61-73

Werbung

Inhaltsverzeichnis
loading

Inhaltszusammenfassung für Bea-fon VISITOR 1V

  • Seite 1 Smart H me VISITOR 1V Deutsch English Español Italiano Français S. 2-21 P. 22-34 P. 35-47 P. 48-60 P. 61-73...
  • Seite 2 Smart H me VISITOR 1V Bedienungsanleitung...
  • Seite 3 Lieferumfang VISITOR 1V Reset Pin USB Kabel Klebepads Bedienungsanleitung Schraubendreher B x 3 A x 3 C x 1 Schrauben/Dübel Ladegerät Namensschild Klingel...
  • Seite 4 Überwachungs- und Datenschutzgesetze variieren je nach Gerichtbarkeit. Überprüfen Sie vor der Verwendung dieses Produkts alle relevanten Gesetze in Ihrer Gerichtbarkeit, um Sicherzustellen, dass Ihre Verwendung gegen keine geltenden Gesetze verstößt Die Firma Bea-fon Mobile GmbH übernimmt keine Verantwortung für Folgen, die sich aus der Nutzung ergeben.
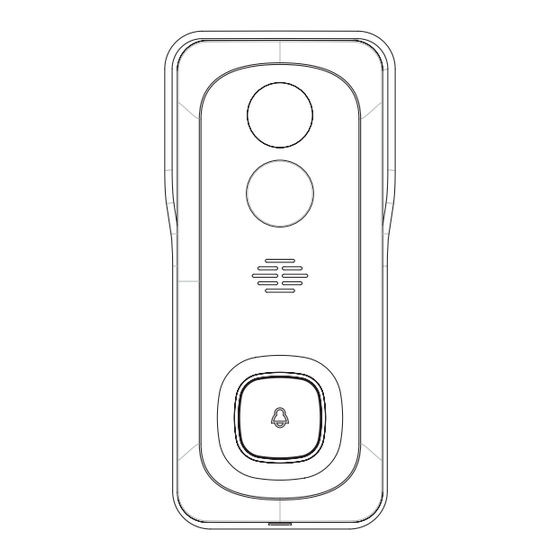
  • Seite 5 Kamera Linse PIR Sensor Lautsprecher Klingel Taste & Status LED Slot für Speicherkarte Ladeanzeige Mikrofon Ladebuchse Reset Taste Beschreibung Strom/Eingang DC 5V +- 10% Klingel Taster Drücken Sie die Taste, um die Türklingel zu aktivieren Status LED • Durchgehend rotes Licht: Die Kamera ist nicht mit dem Netzwerk (Wifi) verbunden •...
  • Seite 6: Installation

    Installation 1. Nehmen Sie die Halterung ab indem Sie von der Rückseite drücken. Bitte entfernen Sie die Schutzfolie von den Batteriekontakten. 2. Montage der Halterung: Befestigen Sie die Halterung mit den im Lieferumfang enthaltenen Schraube, oder entfernen Sie die Schutzfolien der Klebepad‘s und befestigen Sie die Halterung an einer geeigneten Oberfläche.
  • Seite 7 4. Befestigen Sie Ihre Türklingel an der montierten Halterung. Stellen Sie sicher, dass diese ordnungs- gemäß eingerastet ist. Die oberen beiden Zäpfchen verhaken sich in der Vertiefung der Halterung (Klick) 5. Sichern Sie Ihre Türklingel mit der mitgelieferten sternförmigen Sicherheitsschraube und dem Schraubendreher.
  • Seite 8 Verbindung Download Die „Beafon Home“ App ist sowohl für iOS als auch für Android verfügbar. Suchen Sie im App Store oder im Android Play Store Market nach dem Namen „Beafon Home“ oder scannen Sie den QR-Code, um die App herunterzuladen. Unterstützt Router einrichten Der Router muss das Frequenzband 2,4-GHz-WLAN unterstützen...
  • Seite 9 Registrierung Schritt 1 Öffnen Sie die Beafon Home App, klicken Sie auf „registrieren“ und lesen Sie die „Datenschutzrichtlinien“. Um diese zu bestätigen, klicken Sie anschließend auf „zustimmen“. Schritt 2 Geben Sie eine gültige Handynummer oder E-Mail-Adresse ein und klicken Sie auf „Weiter“.
  • Seite 10 Öffnen Sie die Beafon Home App; klicken Sie unter Profil auf „Familienverwaltung“. Unter „Erstellen Sie ein Zuhause“ können Sie den Familiennamen und die zugehörigen Einstellungen anpassen. Schritt 2 Klicken Sie auf „Gerät hinzufügen“ oder „+ Symbol“. Danach auf „Video- überwachung“ und weiters auf „Smart Doorbell“ um die VISITOR 1V Türklingel auszuwählen.
  • Seite 11 Schritt 3 Schalten Sie das Gerät ein und stellen Sie sicher, dass die LED Anzeige blinkt. Setzen Sie ggf. das Gerät zuerst zurück (mittels Reset Knopf). Bestätigen Sie diese Maske durch Anhaken und gehen Sie auf „Weiter“ Wählen Sie ein Netzwerk aus und geben Sie das Passwort ein. Hinweis •...
  • Seite 12 Schritt 4 In der nächsten Oberfläche erscheint ein QR-Code in Ihrem Smartphone. Bitte scannen Sie diesen mit der VISITOR Türklingel aus einer Entfernung von 15 bis 20 cm. Die Kamera signalisiert den Scan mittels „dong dong dong“. Klicken Sie anschließend auf „Signalton gehört“ um den Vorgang abzuschließen. Wenn kein Signalton ertönt klicken Sie auf „Nichts wird gehört“...
  • Seite 13 Schritt 5 Stellen Sie sicher, dass während des Verbindungsaufbaus Router, Smartphone und Türklingel sich so nahe wie möglich befinden. Wenn die VISITOR Türklingel erfolgreich hinzugefügt wurde, klicken Sie auf „Fertigstellung“. Klicken Sie ggf. auf das Stift Symbol um den Namen der Kamera abzuändern (falls gewünscht).
  • Seite 14 Einstellungen Klicken Sie in der Benutzeroberfläche auf „VISITOR 1V“ (oder abgeänderten Namen) um die allgemeinen Funktionen der Kamera festzulegen.
  • Seite 15 F: Die Vorschau der Türklingel Kamera kann nicht richtig angezeigt werden. A: Überprüfen Sie, ob das Netzwerk ordnungsgemäß funktioniert. Platzieren Sie die Türklingel innerhalb des Sendebereichs des Routers. Wenn das Problem immer noch besteht, setzen Sie die Türklingel zurück und koppeln diese erneut. F: Warum ist die Türklingel nach dem Zurücksetzen immer noch in der Liste der Geräte enthalten? A: Der Reset Knopf setzt nur die Netzwerkkonfiguration der Türklingel zurück.
  • Seite 16 Funktionen Ruhemodus Die Türklingel befindet sich im Ruhemodus, um Strom zu sparen. Sie können eine Vorschau in der App starten. 2 Wege-Audio Sie können gleichzeitig sprechen und hören. PIR Sensor Wenn die Türklingel erkennt, dass jemand an der Tür steht, erhalten Sie eine Alarmmeldung an Ihr Smartphone.
  • Seite 17 Externe Türglocke Lautsprecher Reset Knopf USB Stecker Status LED Beschreibung USB Stecker DC 5V +- 10% (Standard USB Ladegerät) Reset Taste Halten Sie die ‚Reset‘ Taste 5 Sekunden lang gedrückt, um das Gerät zurückzusetzen . Drücken Sie die Reset Taste um eine Verbindung mit der Türklingel herzustellen.
  • Seite 18: Verbindung Der Externen Glocke

    Verbindung der externen Glocke PAIRING ÜBER KLINGELTASTE Hinweis: VISITOR und Glocke wurden bei der Produktion bereits konfiguriert. Wenn die Glocke nicht standardmäßig gekoppelt ist, gehen Sie wie folgt vor. USB compatible charger(DC5V) Schritt 1 Stecken Sie die Glocke in ein Standard USB Ladegerät (nicht inkludiert) um eine Stromversorgung zu gewährleisten.
  • Seite 19 PAIRING VIA BEAFON HOME APP Schritt 1 Klicken Sie in der Vorschau auf „ „, wenn Sie Ihre Türklingel bereits in der App hinzugefügt haben. Schritt 2 Drücken Sie auf der Glocke die „Reset Taste“. Das blaue Licht blinkt und wechselt in den Konfigurationsmodus. ...
  • Seite 20 Schritt 5 Drücken Sie unter „Klingelton einstellen“ den blauen Button „EIN PAAR BILDEN“. Die Kopplung ist nach ca. 2 Sekunden angeschlossen. Die LED an der Glocke leuchtet durchgehend blau.  Schritt 6 Wählen Sie den gewünschten Klingelton und stellen Sie die Lautstärke ein.  Schritt 7 Testen Sie den Klingelton durch Betätigen des Klingel-Tasters an der Türglocke.
  • Seite 21: Konformitätserklärung

    Importeur: Bea-fon Mobile GmbH Website: www.beafon.com Modell: Bell 7S / VISITOR 1V / BEASH-1V-B Artikelbeschreibung: IP Camera Shenzhen POCE Technology Co.,Ltd. H Building, Hogfa Science and Technology Park, Tangtou, Shiyan, Bao an District, Shenzhen, China hat folgende EU-Baumusterprüfbescheinigungen (Zertifikat Nr.: POCE191029056RCW) ausgestellt.
  • Seite 22 Smart H me VISITOR 1V Manual...
  • Seite 23: What's In The Box

    What‘s in the box VISITOR 1V USB cabel Double-sided tape Manual Screwdriver B x 3 A x 3 C x 1 Screws (3 kinds) Power adapter N/C Plate Chime...
  • Seite 24 Surveillance and privacy laws vary by jurisdiction. Before using this product, review all relevant laws in your jurisdiction to ensure that your use does not violate any applicable laws Bea-fon Mobile GmbH assumes no responsibility for the consequences of false using.
  • Seite 25 Lens Speaker Doorbell button & Status light SD card slot Charging indicator Microphone Micro USB Reset Description Power Port DC 5V +- 10% Doorbell button Press the button to activate the doorbell Status light • Red light solids on: the camera network is abnormal •...
  • Seite 26 Install 1. Dismount the bracket by pushing from the back of your doorbell. Please remove the insulation film in the battery cell. 2. Bracket installation: Mount the bracket on the wall with screws & anchors or the double-side adhesive tape. 3.
  • Seite 27 4. Mount your doorbell to the fixed bracket. Make sure it reaches the bottom where you can hear a click. 5. Secure your doorbell with the provided star-shape security screw and screw driver. 6. All set,congratulations! Now you can press the doorbell button to try it out.
  • Seite 28 Connect Connect Download Smart Life is available for both iOS and Android OS. Search the name Download 'Smart LIfe in App Store or Google Play, or scan the QR-Code to Beafon Home App is available for both iOS and Android OS. download the App.
  • Seite 29 Q: The camera cannot be previewed properly? A: Check whether the network is normal, you can place the camera close to the router, if not, it is better to reset the camera and add it again. Q: Why is it still in the list of devices after reseting? A: The reseted camera only resets the network configuration of the camera, but cannot change the configuration in the App, remove the camera in your account,need to add again.
  • Seite 30 Functions Remote wake-up The camera will be in a sleep mode to save power; you can have a preview in App. Full-duplex audio You can see and hear the vistor in your App from the camera. When the camera detects someone stopping by, it sends an alarm message to your cell phone.
  • Seite 31 Wireless chime Speaker Reset Power interface Status light Description Mini USB DC 5V +- 10% (USB power supply) Reset Press the RESET for 5s to restore Factory Settings; Click the RESET button to pair the doorbell Status light Blue light blinking: Awaiting for configuration; Blue light solids on: Configuration completed Functions Change Ringtone...
  • Seite 32 Paring the chime PAIR VIA PRESSING RINGING BUTTON Note: Doorbell and Chime have been configured before leaving the factory. If the chime isn’t paired by default, please use the following instructions to pair it manually with the doorbell camera. USB compatible charger(DC5V) Step 1 Supply power to your Chime...
  • Seite 33 PAIR VIA BEAFON HOME APP Pair via App Pair via App Pair via App Pair via App Step 1 Click the „ ••• “ at the preview interface when you have added your doorbell. Step 2 Click the „RESET“ button, the blue light blinks and enter the configuration mode.  Step 3 Enter the „Settings“...
  • Seite 34: Declaration Of Conformity

    Bea-fon Mobile GmbH Website: www.beafon.com Modell: Bell 7S / VISITOR 1V / BEASH-1V-B Artikelbeschreibung: IP Camera Shenzhen POCE Technology Co.,Ltd. H Building, Hogfa Science and Technology Park, Tangtou, Shiyan, Bao an District, Shenzhen, China has issued the following EU-type examination certificates (Zertifikat Nr.: POCE191029056RCW)
  • Seite 35 Smart H me VISITOR 1V Manual...
  • Seite 36 Qué incluye la caja VISITOR 1V Alfiler Cable USB Cinta de doble cara Manual Destornillador B x 3 A x 3 C x 1 Tornillos (3 tipos) Adaptador de corriente Placa de identificación Timbre...
  • Seite 37 Las leyes de vigilancia y protección de datos varían dependiendo de la jurisdicción. Antes de utilizar este producto, compruebe todas las leyes pertinentes en su jurisdicción para asegurarse de que el uso no viole las leyes aplicables. La empresa Bea-fon Mobile GmbH no asume ninguna responsabilidad por las consecuencias derivadas del uso.
  • Seite 38 Lente (infrarrojo pasivo) Altavoz Pulsador del timbre y luz de estado Ranura para la tarjeta SD Indicador de carga Micrófono Micro USB Restablecer Descripción Puerto de 5 V CC +/- 10 % alimentación Pulsador del timbre Pulse el botón para activar el timbre Luz de estado •...
  • Seite 39 Instalar 1. Desmonte el soporte presionando desde la parte posterior del pulsador. Extraiga la película aislante de la celda de la batería. 2. Instalación del soporte: Monte el soporte en la pared con tornillos y fijaciones o usando la cinta adhesiva de doble cara.
  • Seite 40 4. Monte el pulsador timbre en el soporte ya fijado. Asegúrese de que llega hasta el fondo (oirá un clic). 5. Fije el pulsador con un destornillador y el tornillo de seguridad de estrella incluido. 6. ¡Listo! ¡Enhorabuena! Ya puede pulsar el botón del timbre para probarlo.
  • Seite 41 Conectar Descargar La aplicación Beafon Home está disponible tanto para iOS como para Android OS. Busque el nombre "Beafon Home" en App Store o Google Play, o escanee el código QR para descargar la aplicación. Compatible con Añadir dispositivo Inicie sesión en la aplicación Beafon Home App, seleccione "Añadir dispositivo"...
  • Seite 42: Preguntas Frecuentes

    Preguntas frecuentes P: ¿No puede previsualizar la cámara adecuadamente? R: Compruebe que el estado de la red sea normal. En ese caso, puede colocar la cámara cerca del router. En caso contrario, se recomienda reiniciar la cámara y agregarla de nuevo. P: ¿Por qué...
  • Seite 43 Funciones Reactivación remota La cámara estará en modo de suspensión para ahorrar energía; puede obtener una previsualización en la aplicación. Audio dúplex completo Podrá ver y oír a su visitante en la aplicación desde la cámara. PIR (infrarrojo pasivo) Cuando la cámara detecta a alguien que se detiene, envía un mensaje de alarma a su teléfono móvil.
  • Seite 44 Timbre inalámbrico Altavoz Restablecer Interfaz de energía Luz de estado Descripción Mini USB 5 V CC +/- 10 % (alimentación de corriente por USB) Restablecer Pulse REINICIO durante 5 segundos para restablecer los Ajustes de fábrica. Haga clic en el botón REINICIO para vincular el timbre Luz de estado Luz azul parpadeante: A la espera de configuración.
  • Seite 45 Vincular el timbre VINCULACIÓN MEDIANTE EL BOTÓN DEL TIMBRE Nota: El timbre de la puerta y el timbre están configurados de fábrica. Si el timbre no está vinculado por defecto, siga estas instrucciones para vincularlo manualmente con la cámara. Cargador USB USB compatible compatible (5 V CC) charger(DC5V)
  • Seite 46 VINCULAR EN LA APLICACIÓN BEAFON HOME Paso 1 ••• Haga clic en " " en la interfaz de previsualización cuando haya añadido el pulsador del timbre. Paso 2 Haga clic en el botón "REINICIO", la luz azul parpadeará y se iniciará el modo de configuración.
  • Seite 47: Declaración De Conformidad

    Sitio web: www.beafon.com Modelo: Bell 7S / VISITOR 1V / BEASH-1V-B Descripción del artículo: Cámara IP Shenzhen POCE Technology Co., Ltd. H Building, Hogfa Science and Technology Park, Tangtou, Shiyan, Bao an, Shenzhen, China cuenta con los siguientes certificados de examen CE de tipo (N.º...
  • Seite 48 Smart H me VISITOR 1V Manuale...
  • Seite 49: Contenuto Confezione

    Contenuto confezione VISITOR 1V Cavo USB Nastro biadesivo Manuale Cacciavite B x 3 A x 3 C x 1 Viti (di 3 tipi) Adattatore di alimentazione Piastra N/C Cicalino...
  • Seite 50 Le leggi sulla sorveglianza e la protezione dei dati variano a seconda della giurisdizione. Prima di utilizzare questo prodotto, verificare tutte le leggi pertinenti nella propria giurisdizione per assicurarsi che l‘utilizzo non violi le leggi applicabili La società Bea-fon Mobile GmbH non si assume alcuna responsabilità per eventuali conseguenze derivanti dall‘uso.
  • Seite 51 Obiettivo Sensibile alla luce Altoparlante Pulsante campanello e indicatore di stato Alloggiamento scheda SD Indicatore di carica Microfono Micro USB Ripristina Descrizione Porta di alimentazione CC 5 V +/- 10% Pulsante campanello Premere il pulsante per attivare il campanello Indicatore di stato •...
  • Seite 52 Installa 1. Smontare la staffa spingendola dal retro del campanello. Rimuovere la pellicola isolante dalla cella della batteria. 2. Installazione staffa: Montare la staffa sulla parete con le viti e i tasselli oppure tramite il nastro biadesivo. 3. (Opzionale) È possibile montare la targhetta per il nome sulla parte superiore o inferiore del retro della staffa, prima della sua...
  • Seite 53 4. Montare il campanello sulla staffa dopo averla fissata. Assicurarsi di applicare il campanello fino in fondo, quando si udirà uno scatto. 5. Fissare il campanello con la vite di sicurezza a stella in dotazione e un cacciavite. 6. Tutto fatto, congratulazioni! Ora è...
  • Seite 54 Connetti Scarica L'app Beafon Home è disponibile per iOS e Android OS. Cercare il nome "Beafon Home" in App Store o Google Play, o effettuare la scansione del codice QR per scaricare l'app. Supporto Aggiunta dispositivo Accedere all'app Beafon Home, selezionare "Aggiungi dispositivo" e aggiungere il campanello intelligente all'APP seguendo i suggerimenti riportati sullo schermo (avvicinare il campanello al router durante la configurazione).
  • Seite 55 D: Non è possibile ottenere la corretta anteprima della telecamera? R: Controllare che la connessione di rete funzioni normalmente e avvicinare la telecamera al router. Se il problema persiste, è meglio ripristinare la telecamera e ripetere la procedura per aggiungerla. D: Perché...
  • Seite 56 Funzioni Riavvio a distanza La telecamera entrerà in modalità di sospensione per risparmiare la batteria; è possibile ottenere l'anteprima della telecamera dall'app. Audio bidirezionale È possibile visualizzare e ascoltare i visitatori alla porta ripresi dalla tele- camera nell'app. Sensibile alla luce Quando la telecamera individua qualcuno che sosta davanti all'ingresso, il sistema invia un messaggio di allarme al cellulare.
  • Seite 57 Cicalino wireless Altoparlante Ripristina Interfaccia alimentazione Indicatore di stato Descrizione Mini USB CC 5 V +/- 10% (alimentazione USB) Ripristina Premere RESET per 5 secondi per ripristinare le impostazioni di fabbrica; Fare clic sul pulsante RESET per abbinare il campanello Indicatore di stato Luce blu lampeggiante: In attesa di configurazione;...
  • Seite 58 Abbinamento cicalino ABBINAMENTO TRAMITE IL PULSANTE DELLA SUONERIA Nota: Campanello e cicalino sono stati preconfigurati in fabbrica. Se il cicalino non è già abbinato, applicare le seguenti istruzioni per abbinarlo manualmente alla telecamera del campanello. USB compatible Caricabatterie compatibile charger(DC5V) USB (CC 5 V) Passo 1 Alimentazione di cicalino e...
  • Seite 59 ABBINAMENTO TRAMITE APP BEAFON HOME Passo 1 ••• Dopo aver aggiunto il campanello, fare clic su " " nell'interfaccia di anteprima. Passo 2 Facendo clic sul pulsante "RESET", la luce blu lampeggia e il sistema entra in modalità configurazione. Passo 3 Accedere alle "Configurare"...
  • Seite 60: Dichiarazione Di Conformità

    Bea-fon Mobile GmbH Sito web: www.beafon.com Modello: Bell 7S / VISITOR 1V / BEASH-1V-B Descrizione dell'articolo: Telecamera IP Shenzhen POCE Technology Co., Ltd. H Building, Hogfa Science and Technology Park, Tangtou, Shiyan, Bao an District, Shenzhen, Cina ha emesso le seguenti certificazioni di conformità...
  • Seite 61 Smart H me VISITOR 1V Manuel...
  • Seite 62: Contenu De La Boîte

    Contenu de la boîte VISITOR 1V Broche Câble  U SB Ruban adhésif double-face Manuel Tournevis B x 3 A x 3 C x 1 Vis (3 types) Adaptateur d’alimentation Plaque de nom Carillon...
  • Seite 63 Les lois sur la surveillance et la protection des données varient d’une juridiction à l’autre. Avant d’utiliser ce produit, vérifiez toutes les lois pertinentes de votre juridiction pour vous assurer que l’utilisation ne viole pas les lois applicables La société Bea-fon Mobile GmbH n’assume aucune responsabilité pour les conséquences découlant de l’utilisation.
  • Seite 64 Objectif Capteur  P IR Haut-parleur Bouton de sonnette et voyant d’état Logement de carte SD Voyant de charge Microphone Micro  U SB Réinitialiser Description Port d’alimentation 5  V   C C +/-10  % Bouton de sonnette Appuyez sur ce bouton pour activer le carillon de porte Voyant d’état •...
  • Seite 65 Installation 1. Démontez le support en appuyant sur le dos de votre sonnette. Veuillez retirer la pellicule d’isolation de la batterie. 2. Installation du support  : fixez le support au mur à l’aide des vis et des chevilles ou du ruban adhésif double face.
  • Seite 66 4. Montez votre sonnette sur le support que vous avez fixé. Assurez-vous que le bas s’adapte correctement (vous entendrez un déclic). 5. Fixez votre sonnette à l’aide de la vis de sécurité étoilée fournie et d’un tournevis. 6. L’installation est terminée. Félicitations ...
  • Seite 67 Connexion Téléchargement L’application «  B eafon Home  » est disponible pour iOS et Android  O S. Recherchez le nom de l’application «  B eafon  H ome  » dans l’App  S tore ou Google  P lay, ou scannez le code  Q R pour télécharger directement l’application.
  • Seite 68 Q : que faire si les images de la caméra ne s’affichent pas correctement ? R : vérifiez si le réseau fonctionne normalement. Placez la caméra le plus près du routeur. Si ce n’est pas le cas, il est préférable de réinitialiser la caméra et de l’ajouter à...
  • Seite 69 Fonctions Réactivation à distance La caméra passera en mode veille pour économiser l’énergie. L’application permet d’avoir un aperçu des images. Audio en duplex intégral L’application permet de voir et d’entendre le visiteur depuis la caméra. Capteur PIR Si la caméra détecte qu’une personne se tient devant votre porte, elle envoie un message d’alarme sur votre téléphone mobile.
  • Seite 70 Sonnette sans fil Haut-parleur Réinitialiser Port d’alimentation Voyant d’état Description Mini USB 5  V   C C +/-10  % (alimentation  U SB) Réinitialiser Appuyez sur le bouton de RÉINITIALISATION pendant 5  s pour rétablir les réglages d’usine  ; Appuyez sur le bouton de RÉINITIALISATION pour coupler la sonnette Voyant d’état Voyant clignotant en bleu ...
  • Seite 71 Couplage du carillon COUPLAGE À L’AIDE DU BOUTON DE SONNERIE Remarque : la sonnette et le carillon ont été configurés avant de quitter l’usine. Si le carillon n’est pas couplé par défaut, veuillez suivre les instructions pour le faire manuellement avec la caméra de la sonnette. Chargeur ...
  • Seite 72 COUPLAGE À L’AIDE DE L’APPLICATION BEAFON HOME Étape 1 ••• Cliquez sur «    » dans l’interface de l’aperçu une fois la sonnette ajoutée. Étape 2 Cliquez sur le bouton de RÉINITIALISATION pour accéder au mode configuration qui est indiqué par le voyant clignotant en bleu. Étape 3 Accédez aux « ...
  • Seite 73: Déclaration De Conformité

    Déclaration de conformité Fabricant  : Bea-fon Mobile GmbH Enzing  4 , 4722 Peuerbach, Autriche Importateur  : Bea-fon Mobile GmbH Site Internet  : www.beafon.com Modèle  : Bell  7 S/VISITOR  1 V/BEASH-1V-B Description du produit  : Caméra réseau Shenzhen POCE Technology Co., Ltd. H Building, Hogfa Science and Technology Park, Tangtou, Shiyan, Bao an District, Shenzhen, Chine a délivré...

Inhaltsverzeichnis