Herunterladen Inhalt Inhalt Diese Seite drucken
PNI HUNTING 280C Benutzerhandbuch
Vorschau ausblenden Andere Handbücher für HUNTING 280C:

Werbung

Verfügbare Sprachen

Verfügbare Sprachen

PNI HUNTING 280C
Trail camera/Camera de vanatoare
EN
User manual .............................................
DE
Benutzerhandbuch ..................................
RO
Manual de utilizare ...................................
3
18
33

Werbung

Inhaltsverzeichnis
loading

Inhaltszusammenfassung für PNI HUNTING 280C

  • Seite 1 PNI HUNTING 280C Trail camera/Camera de vanatoare User manual ..........Benutzerhandbuch ........Manual de utilizare ........
  • Seite 3: Main Functions

    Main functions • Shutter speed 0.8-1.0 sec. • FOV 52°/PIR angle 60° • Resolutions 24MP/1080P@15FPS • Programmable photo size 12/16/24MP • 40 invisible IR LEDs that offer night visibility up to 20 meters • Excellent quality of images and videos, both during the day and at night •...
  • Seite 4 Bottom view Inside view 1. IR LEDs 2. LED indicator 3. PIR sensor 4. Lens 5. DC-in power supply (12V/1-2A) 6. Mini USB port 7. SD card slot (supports up to 32GB) 8. 2.0 inch color LCD screen 9. Menu key 10.
  • Seite 5: Keys And Functions

    Keys and functions 1. Menu key When the camera is in settings mode, the LCD screen lights up. Press the MENU key to access the camera settings menu. When in the menu, press the MENU key to return to the previous interface or to exit the menu. 2.
  • Seite 6: Basic Instructions

    Basic instructions Battery supply PNI Hunting 280C hunting camera works with 6 or 12 AA alkaline or Ni-MH batteries. We recommend that you do not use Lithium batteries. Insert the 6 or 12 batteries in the dedicated slot in accordance with the polarity indicated on the housing.
  • Seite 7 You can also power the camera with an external 12V/1-2A DC power adapter. When using external power, we recommend that you remove the batteries from the camera to avoid overcharging them. Adapter power is only recommended when using the PNI Hunting 280C security video surveillance camera. SD card selection In order to use the camera, an SD card must be inserted.
  • Seite 8: Usb Connection

    When the card is full, the text appears on the screen Memory full. The table below shows the approximate number of photos and video files that can be saved to a card depending on its capacity. SD card 16GB 32GB Pictures 12MP 1613...
  • Seite 9: Turning The Camera On

    update procedure, in order to eliminate the risk of irreparably damaging the product. • Remove branches or moving objects from the monitored area that may cause false photos to be taken. • place camera near heat-emitting equipment, ventilation equipment, light sources, to avoid taking fake photos. The camera has 40 IR LEDs and a 52°...
  • Seite 10 Menu Note: The default settings are marked in red Setup Auto Modes Language English… Date/Time YYYY/MM/DD HH:MM Hunting ON/OFF Cam Name Password Camera ID OFF/ON OFF/ON Camera Mode Picture/Video/PIC+Video Image Size Multi-Shot Image Setup Security 12MP/16MP/24MP 1P-7P ON/OFF Video Size Video Frame Video Setup FHD/HD/VGA...
  • Seite 11: Delete Files

    Operations Photo/video playback 1. Move the switch to the SETUP position. The camera screen will light up. The camera will enter Test mode. 2. Press ▲ to access the playback interface 3. Press ◄/► to select and the OK key to play the selected photo or video file.
  • Seite 12 Note: In order for some settings (such as Cam ID, Delay, Time Lapse, Password) to be saved and take effect, the user must press the MENU key after pressing the OK key.. Auto Modes/Setup Auto Modes Setting Options Hunting The default camera settings are: multi-shot 3P (continuous shooting 3 photos), photo size 12M, Delay (delay) 5 seconds Security...
  • Seite 13 Setup Setting Option Language English ... Month: Day: Year, Hour: Minutes: Seconds Time/Date Note: We recommend that you set the correct date and time to ensure that some functions work properly. Cam Name - select ON, press OK and enter the 4-digit/letter camera name.
  • Seite 14 High, Middle, Low Higher sensitivity means: - the camera is more sensitive to the movement of small objects - the detection distance is longer - the sensor more easily detects the difference PIR Sensitivity between body heat and air temperature - The camera triggers recording more easily.
  • Seite 15: Technical Specifications

    SD-Cycle Select ON and press OK to activate the cyclic recording. The camera will delete older files when the memory is full. Other Frequency 50Hz/60Hz Incorrect frequency setting may cause the screen to flicker. Select Yes to return the camera to the factory Reset settings About...
  • Seite 16: Troubleshooting

    Trigger speed 0.8 - 1 sec. Trigger interval 5 - 7 sec. Microphone POwer supply Battery 9V/DC 12V Battery 12 x AA External power DC 12V supply Standby 0.15mA consumption 5 - 8 months (with 6 AA batteries or 12 AA Standby battery life batteries) Alkaline batteries: 6.3V...
  • Seite 17 by the wind. Break the branches in the field of view of the camera, because they can be moved by the wind and can trigger photos. 5. At night, the motion detector can detect beyond the IR illumination range. Reduce the distance by adjusting the sensitivity of the sensor. 6.
  • Seite 18: Kamera Beschreibung

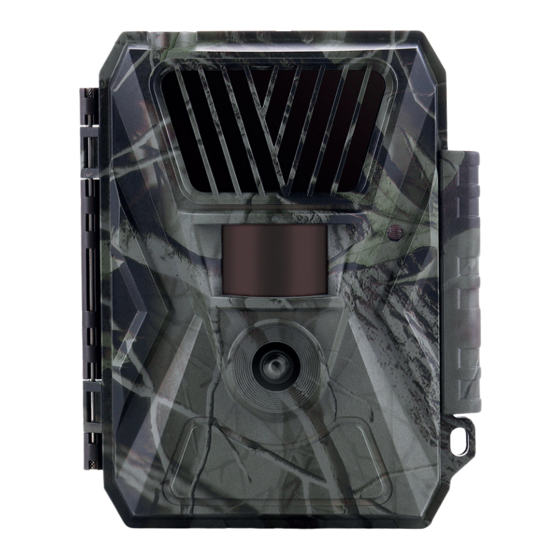
    Hauptfunktionen • Geschwindigkeit Auslöser 0.8-1.0 Sek. • FOV 52°/Winkel PIR 60° • Auflösungen 24MP/1080P@15FPS • Auflösung Foto programmierbar 12/16/24MP • 40 LEDs IR unsichtbar mit Nachtsicht bis zu 20 m • Hohe Bild- und Videoqualität, tags und nachts • kontinuierliches Fotografieren, ein Foto/Sekunde, höchstens 7 Fotos um die komplette Bewegung des Subjekts zu verfolgen •...
  • Seite 19 Vedere de jos Vedere din interior 1. LEDs IR 2. LED Anzeige 3. Sensor PIR 4. Objektiv 5. Versorgung DC-in (12V/1-2A) 6. Port Mini USB 7. Slot Karte SD (es unterstützt höchstens 32GB) 8. Bildschirm LCD 2.0 inch 9. Taste Menü 10.
  • Seite 20: Tasten Und Funktionen

    Tasten und Funktionen 15. Taste Menü Wenn die Kamera in Einstellung-Modus ist, schaltet der LCD Bildschirm ein. Drücken Sie die Taste MENÜ, um die Einstellungen der Kamera abzurufen. Wenn Sie im Menü sind, drücken Sie die Taste MENÜ, um zum vorherigen Interface zurückzukehren oder um das Menü...
  • Seite 21: Anweisungen Versorgung Mit Batterien

    Anweisungen Versorgung mit Batterien Die Jagdkamera PNI Hunting 280C funktioniert mit 6 oder 12 Batterien AA alkalisch oder Ni-MH. Wir empfehlen Ihnen keine Lithium Batterien zu verwenden. Legen Sie die Batterien ein, achten Sie auf die Polarität. Wir empfehlen Ihnen die Batterien zu ersetzen, wenn auf dem Bildschirm das Symbol leere Batterien angezeigt wird.
  • Seite 22: Versorgung Von Sonnenpaddel

    12V/1-2A DC. Wenn Sie die externe Versorgung verwenden, empfehlen wir Ihnen die Batterien herauszunehmen, um deren Überladung zu vermeiden. Die Versorgung mit einem Adapter ist empfohlen, nur wenn Sie die PNI Hunting Kamera 280C für Video Sicherheit-Überwachung verwenden. Auswahl Karte SD Um die Kamera zu verwenden, müssen Sie nur eine SD Karte einlegen.
  • Seite 23: Anschluss Usb

    PNI Hunting 280C unterstützt Karten mit einer Höchstkapazität von 32GB. Schalten Sie die Kamera aus, wenn Sie die Karte einlegen oder herausnehmen, um die gespeicherten Dateien nicht zu verlieren. Wenn die Karte voll ist, wird der Text angezeigt Memory full.
  • Seite 24: Kamera Einschalten

    • Unterbrechen Sie die Versorgung des Gerätes während der Aktualisierung des Softwares nicht, bringen Sie das Gerät zurück zum Verkäufer, wenn die Update nicht erfolgreich ist. Wir empfehlen Ihnen das Produkt an den Verkäufer für ein Update zurückzusenden , so vermeiden Sie das Risiko das Gerät definitiv zu beschädigen.
  • Seite 25 Setup Auto Modes Language English… Date/Time YYYY/MM/DD HH:MM Hunting ON/OFF Cam Name Password Camera ID OFF/ON OFF/ON Camera Mode Picture/Video/PIC+Video Image Size Multi-Shot Image Setup Security 12MP/16MP/24MP 1P-7P ON/OFF Video Size Video Frame Video Setup FHD/HD/VGA 30FPS/15FPS Video Length /SS 05-60s PIR Sensitivity High/Middle/Low Timer...
  • Seite 26: Foto/Video Wiedergabe

    Operationen Foto/Video Wiedergabe 1. Bringen Sie den Schalter auf SETUP. Der Bildschirm der Kamera schaltet ein. Die Kamera kommt in Modus Test. 2. Drücken Sie die Taste ▲, um das Wiedergabe-Interface abzurufen (Playback) 3. Drücken Sie die Taste ◄/►, um auszuwählen und drücken Sie OK um die Foto/Video-Datei wiederzugeben 4.
  • Seite 27: Menü Operationen

    Menü Operationen In Modus Test, drücken Sie die Taste MENÜ, um das Menü abzurufen. Drücken Sie die Tasten ◄, ►, ▲ und ▼ um durch die Einstellungen zu surfen. Drücken Sie OK für Bestätigung. Drücken Sie die Taste MENÜ um zwischen Buchstaben, Zahlen und Symbolen zu wechseln.
  • Seite 28 Setup Einstellung Option Language (Sprache) English ... Monat : Tag : Jahr, Stunde : Minuten : Sekunden Time/Date (Datum/ Hinweis: Wir empfehlen Ihnen das richtige Datum und Uhrzeit) die richtige Uhrzeit einzustellen, so können manche Funktionen richtig laufen. Cam Name (Name Kamera) - wählen Sie ON, drücken Sie OK und geben Sie den Namen der Kamera ein (4 Zahlen/Buchstaben).
  • Seite 29 High (große Sensibilität), Middle (durchschnittliche Sensibilität), Low (niedrige Sensibilität) größere Sensibilität bedeutet: - die Kamera ist sensibel, wenn kleine Gegenstände sich bewegen. PIR Sensitivity - die Detektionstrecke ist größer (Sensibilität Sensor - der Sensor meldet leichter den Unterschied PIR) zwischen Körperwärme und Lufttemperatur - Kamera nimmt einfacher auf.
  • Seite 30: Technische Spezifikationen

    Alkalisch/Ni-MH Battery Type Wählen Sie den richtigen Typ für Batterien damit (Typ Batterie) Ihre Kamera richtig funktioniert. SD-Cycle (zyklische Aufnahmen) Wählen Sie ON aus und drücken Sie OK um die zyklischen Aufnahmen zu aktivieren. Die Kamera löscht ältere Dateien, wenn der Speicherplatz voll Other (andere) ist.
  • Seite 31: Probleme Und Lösungen

    kontinuierliches Ja, höchstens 7 Fotos/Auflösung Fotografieren Trigger 0.8 - 1 sec. Zeitraum Auslöser 5 - 7 sec. Mikrophon Versorgung Batterie 9V/DC 12V Batterien 12 x AA Externe Versorgung DC 12V Verbrauch in 0.15mA standby Dauer Batterien in 5 - 8 Monate (mit 6 Batterien AA oder 12 standby Batterien AA) Schutz gegen...
  • Seite 32 Zweige, die im Sichtfeld der Kamera hängen, diese können vom Wind bewegt werden und können Fotos auslösen. 5. Nachts kann der Bewegungsmelder hinter dem IR Beleuchtungsstrahl (mehr als 20 m) detektieren. Reduzieren Sie die Strecke durch Anpassung der Sensorsensibilität. 6. Der Sonnenaufgang und der Sonnenuntergang können den Sensor auslösen.
  • Seite 33 Functii principale • Viteza de declansare 0.8-1.0 sec. • FOV 52°/unghi PIR 60° • Rezolutii 24MP/1080P@15FPS • Rezolutie foto programabila 12/16/24MP • 40 LED-uri IR invizibile ce ofera vizibilitate nocturna pe o distanta pana la 20 metri • Calitate deosebita a imaginilor si a inregistrarilor video, atat pe timp de zi cat si pe timp de noapte •...
  • Seite 34 Vedere de jos Vedere din interior 1. Leduri IR 2. Indicator led 3. Senzor PIR 4. Obiectiv 5. Alimentare DC-in (12V/1-2A) 6. Port mini USB 7. Slot card SD (suporta maxim 32GB) 8. Ecran color LCD 2.0 inch 9. Tasta Meniu 10.
  • Seite 35: Taste Si Functii

    Taste si functii 1. Tasta Meniu Cand camera este pe modul de setari, ecranul LCD se aprinde. Apasati tasta MENU pentru a accesa meniul de setari al camerei. Cand va aflati in meniu, apasati tasta MENU pentru a va intoarce la interfata anterioara sau pentru a iesi din meniu.
  • Seite 36 Mutati comutatorul pe pozitia OFF. Camera se va opri. Instructiuni de baza Alimentarea cu baterii Camera de vanatoare PNI Hunting 280C functioneaza cu 6 sau 12 baterii AA alcaline sau Ni-MH. Va recomandam sa nu folositi baterii Litiu. Introduceti bateriile in locasul dedicat respectand polaritatea indicata pe carcasa.
  • Seite 37 Please insert memory card. PNI Hunting 280C suporta carduri cu o capacitate maxima de 32GB. Ca sa nu pierdeti fisierele salvate pe card, cand introduceti sau scoateti cardul, opriti mai intai camera.
  • Seite 38 Cand cardul este plin, pe ecran apare textul Memory full. Tabelul de mai jos afiseaza numarul aproximativ de fotografii si de fisiere video care pot fi salvate pe un card in functie de capacitatea acestuia. Card SD 16GB 32GB Foto (numar foto) 12MP 1613 3371...
  • Seite 39 vanzator pentru procedura de actualizare soft, pentru a elimina riscul de a deteriora iremediabil produsul. • Eliminati din zona supravegheata crengi sau obiecte in miscare ce pot cauza efectuarea de fotografii false. • Nu pozitionati camera langa echipamente ce degaja caldura, echipamente de ventilatie, surse de lumina, pentru a evita captarea de fotografii false.
  • Seite 40 Nota: Setarile implicite sunt marcate cu rosu Setup Auto Modes Language English… Date/Time YYYY/MM/DD HH:MM Hunting ON/OFF Cam Name Password Camera ID OFF/ON OFF/ON Camera Mode Picture/Video/PIC+Video Image Size Multi-Shot Image Setup Security 12MP/16MP/24MP 1P-7P ON/OFF Video Size Video Frame Video Setup FHD/HD/VGA 30FPS/15FPS...
  • Seite 41 Redare foto/video 1. Mutati comutatorul pe pozitia SETUP. Ecranul camerei se va aprinde. Camera va intra in modul Test. 2. Apasati tasta ▲ pentru a accesa interfata de redare (Playback) 3. Apasati tasta ◄/► pentru a selecta si tasta OK pentru a reda fisierul foto sau video selectat.
  • Seite 42 Nota: pentru ca unele setari (cum ar fi Cam ID, Delay, Time Lapse, Password) sa se salveze si sa aiba efect, utilizatorul trebuie sa apese tasta MENU dupa ce a apasat tasta OK. Auto Modes/Setup (Moduri automate/Setari) Auto Modes Setare Optiuni Hunting (Vanatoare) Setarile implicite ale camerei sunt: multi-shot 3P (fotografiere continua 3 fotografii), dimensiune...
  • Seite 43 Language (limba) English ... Luna : Zi : An, Ora : Minute : Secunde Time/Date (data/ora) Nota: Va recomandam sa setati data si ora corecte pentru a asigura functionarea corecta a unor functii. Cam Name (nume camera) - selectati ON, apasati OK si introduceti numele camerei format din 4 cifre/litere.
  • Seite 44 Selectati ON si apasati OK pentru a seta ora de Timer pornire si ora de oprire a camerei (ora/minut). Camera va functiona doar in intervalul orar setat. Selectati ON si apasati OK pentru a seta intervalul in care camera va face fotografii si inregistrari. Senzorul PIR al camerei va fi dezactivat.
  • Seite 45: Specificatii Tehnice

    Specificatii tehnice Pixeli reali 2560 x 1920px Mod zi/noapte Distanta IR pana la 20m Setari IR Toate: 40 leduri/Partial: 20 leduri Memorie slot card SD (maxim 32GB) F=3.0, FOV 52° Lentile Auto IR-Cut-Remove (noaptea) Ecran LCD TFT RGB 2.0 inch, 262k Distanta PIR Unghi PIR 60°...
  • Seite 46 Protectie Baterii alcaline: 6.3V tensiune scazuta Acumulator NI-MH: 6.0V (power off voltage) Alimentare DC: 6.5V Porturi Micro USB, slot card SD, port DC Temperatura -26°C ~ +60°C de lucru Clasa de rezistenta IP66 la apa Dimensiuni 118 x 78 x 144 mm Greutate 350 g (fara baterii) Probleme si solutii...
  • Seite 47 Camera nu mai face fotografii sau video 1. Verificati memoria cardului SD. Daca memoria este plina, camera va inceta sa faca fotografii. Goliti cardul sau activati modul ciclic de inregistrare pentru a evita o astfel de problema. 2. Verificati daca bateriile alcaline sau NiMH AA sunt suficient incarcate. 3.
  • Seite 48 EU Simplified Declaration of Conformity SC ONLINESHOP SRL declares that Trail camera PNI Hunting 280C complies with the Directive EMC 2014/30/EU and ROHS 2011/65/EU. The full text of the EU declaration of conformity is available at the following Internet address: https://www.mypni.eu/products/7705/download/certifications...

Inhaltsverzeichnis