Herunterladen Inhalt Inhalt Diese Seite drucken
Inhaltsverzeichnis

Werbung

Verfügbare Sprachen
  • DE

Verfügbare Sprachen

  • DEUTSCH, seite 27
1693
LAS-20
Manuale
Manuale d'uso / User manual / Manuel de l'Utilisateur /
1
Benutzerhandbuch / Manual de usuario

Werbung

Inhaltsverzeichnis
loading

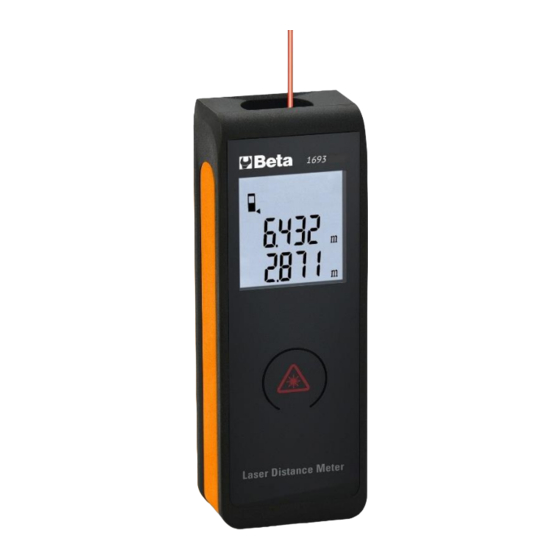
Inhaltszusammenfassung für Beta 1693

  • Seite 1 1693 LAS-20 Manuale Manuale d’uso / User manual / Manuel de l'Utilisateur / Benutzerhandbuch / Manual de usuario...
  • Seite 2 Leggere questo manuale prima di accendere l'unità. Importanti informazioni di sicurezza all'interno. Read this manual before turning on the unit. Important safety information inside. Lisez ce manuel avant d'allumer l'appareil. Informations de sécurité importantes à l'intérieur. Lesen Sie dieses Handbuch, bevor Sie das Gerät einschalten.
  • Seite 3: Inhaltsverzeichnis

    Sommario 1-Istruzioni di sicurezza ........4 1-1.Uso consentito ............. 4 1-2.Uso vietato ............4 1-3.Classificazione Laser ..........4 2-Avvio ............5 2-1.Inserimento / sostituzione di batterie (vedere "Figura A")..5 2-2.Tastiera (Vedi "Figura B"). 2-3.Display LCD (Vedi "Figura C")......... 5 3- Operazione iniziale e impostazione.
  • Seite 4: 1-Istruzioni Di Sicurezza

    1-Istruzioni di sicurezza 1-1. Uso consentito • Misurazione delle distanze 1-2. Uso vietato • Uso dello strumento senza istruzioni. • Uso al di fuori dei limiti indicati. • Disattivazione dei sistemi di sicurezza e rimozione delle etichette esplicative e di pericolo. •...
  • Seite 5: 2-Avvio

    2-Avvio 2-1.Inserimento / sostituzione delle batterie (vedere "Figura A") 1-Rimuovere il coperchio del vano batteria. 2-Inserire le batterie, osservando la corretta polarità. 3-Chiudere nuovamente il vano batteria. • Sostituire le batterie quando il simbolo " " lampeggia permanentemente nel display. •...
  • Seite 6: 3- Operazione Iniziale E Impostazione

    3-Operazioni iniziali e impostazioni 3-1.Accensione e spegnimento Accende lo strumento e il laser. Premere e tenere premuto questo pulsante per 3 secondi per spegnere lo strumento. Lo strumento si spegne automaticamente dopo tre minuti di inattività. 3-2.Impostazione del livello di riferimento (Vedi "Figura D") L'impostazione di riferimento predefinita è...
  • Seite 7: 4- Misurazione

    Misurare 4-1.Misura della distanza singola Premere per attivare il laser. Premere nuovamente per attivare la misurazione della distanza. Il valore misurato è visualizzato immediatamente. 4-2.Misura continua (rilevamento) e misurazione minima (Vedi "Figura E") La funzione di misurazione continua (tracking) viene utilizzata per il trasferimento di misurazioni, ad esempio da piani di costruzione.
  • Seite 8: 4-2.Misura Continua (Tracciamento)

    5- Dati tecnici Specifiche tecniche 0.05 to 20 m*(0.2 in to 66 f t*) Precisione di misurazione fino a 10m Tipicamente: ±1.5 mm** (2 σ, deviazione standard) (± 1/16 in**) m, ft’in” Unità di misura Classe II Classe Laser 650nm, <1mW Tipo di Laser L'unità...
  • Seite 9: 6- Risoluzione Dei Problemi: Cause E Misure Correttive

    Risoluzione dei problemi: cause e misure correttive Codice Causa Misura correttiva Segnale ricevuto troppo debole, Usa la piastra obiettivo tempo di misurazione troppo lungo. Distanza fuori range. Temperatura troppo alta Raffreddare lo strumento Temperatura troppo bassa Strumento di riscaldamento Errore hardware Accendere / spegnere il dispositivo più...
  • Seite 10: 7- Condizioni Di Misurazione

    Condizioni di misurazione 7-1.Campo di misura La gamma è limitata come specifiche tecniche. Di notte o al tramonto e se il bersaglio è in ombra il campo di misura senza la piastra bersaglio viene aumentata. Utilizzare una piastra target per aumentare la misurazione range durante la luce del giorno o se il target ha scarse proprietà...
  • Seite 11 Summary 1- Safety instructions……………………………….…..12 1-1.Permitted use………………………………….….….12 1-2.Prohibited use…………………………………….….12 1-3.Laser classification……………………………….… 12 2- Starting………………………………………………... 13 2-1.Inserting / replacing batteries (see "Figure A").…. 13 2-2. Keypad (See "Figure B")……………………….…. 13 2-3.LCD display (See "Figure C")……………………... 13 3- Initial operations and settings……………….…….…14 3-1.Power On and Off …………..…………………….…14 3-2.
  • Seite 12: 1-Safety Instructions

    1-Safety instructions 1-1. Permitted use • Measurement of distances 1-2. Prohibited use • Use of the tool without instructions. • Use outside the indicated limits. • Deactivation of safety systems and removal of explanatory and danger labels. • Opening the equipment using tools (screwdrivers, etc.), to the extent that they are expressly not allowed in certain cases.
  • Seite 13: 2-Starting

    2-Starting 2-1.Inserting / replacing batteries (see "Figure A") 1- Remove the battery compartment cover. 2- Insert the batteries, observing the correct polarity. 3- Close the battery compartment again. • Replace the batteries when the "" symbol flashes permanently in the display. •...
  • Seite 14: 3-Initial Operations And Settings

    3-Initial operations and settings 3-1.Power On and Off Switches on the instrument and the laser. Press and hold this button for 3 seconds to turn off the instrument. The meter automatically turns off after three minutes of inactivity. 3-2.Setting the reference level (See "Figure D") The default reference setting is from the back of the instrument.
  • Seite 15: 4-Measurement

    4-Measurement 4-1.Measurement of single distance Press to activate the laser. Press again to activate distance measurement. The measured value is displayed immediately. 4-2.Continuous measurement (detection) and minimum measurement (See "Figure E") The continuous measurement function (tracking) is used for transferring measurements, for example from construction plans.
  • Seite 16: 5- Technical Data

    5- Technical data Technical specifications Range 0.05 to 20 m * (0.2 in to 66 f t *) Measurement accuracy up to Typically: ± 1.5 mm ** 10m (2 σ, standard deviation) (± 1/16 in**) Unit of measurement m, ft'in" Laser Class Class II Type of Laser...
  • Seite 17: 6- Troubleshooting: Causes And Corrective Measures

    6- Troubleshooting: causes and corrective measures Code Cause Corrective measure Signal received too Use the target plate weak, measurement time too long. Distance out of range. Temperature too high Cool down the instrument Temperature too low Heating instrument. Hardware error Switch the device on / off several times, if the...
  • Seite 18: 7- Measurement Conditions

    7- Measurement conditions 7-1.Measurement range The range is limited in technical specifications. At night or at sunset and if the target is in shadow the measuring range without the target plate is increased. Use a target plate to increase the range measurement during daylight or if the target has poor reflection properties.
  • Seite 19 Sommaire 1- Consignes de sécurité ………………….…..20 1-1.Utilisation autorisée………………….……..20 1-2.Utilisation interdite …………………………20 1-3.Classification au laser ……………………..20 2- Débùt……. …………………………………...21 2-1.Insertion / remplacement des piles (voir "Figure A")……………………………………..21 2-2. Clavier (Voir "Figure B") ………………….21 2-3.Affichage LCD (Voir "Figure C") ………….21 3- Fonctionnement initial et configuration ……22 3-1.Allumer et éteindre …………………….…..22 3-2.
  • Seite 20: 1-Consignes De Sécurité

    1-Consignes de sécurité 1-1. Utilisation autorisée • Mesure des distances 1-2. Utilisation interdite • Utilisation de l'outil sans instructions. • Utilisez en dehors des limites indiquées. • Désactivation des systèmes de sécurité et retrait des étiquettes explicatives et de danger. •...
  • Seite 21: 2- Débùt

    2-Debùt 2-1.Insertion / remplacement des piles (voir "Figure A") 1- Retirez le couvercle du compartiment des piles. 2- Insérez les piles en respectant la polarité correcte. 3- Fermez à nouveau le compartiment à piles. • Remplacez les piles lorsque le symbole "" clignote en permanence sur l'affichage.
  • Seite 22: 3- Fonctionnement Initial Et Configuration

    3- Fonctionnement initial et configuration 3-1.Allumer et éteindre Allume l'instrument et le laser. Appuyez et maintenez ce bouton pendant 3 secondes pour éteindre l'instrument. Le lecteur s'éteint automatiquement après trois minutes d'inactivité. 3-2.Réglage du niveau de référence (Voir "Figure D") Le réglage de référence par défaut est à...
  • Seite 23: 4- Mesures

    4 Mesures 4-1 Mesure de distance unique Appuyez pour activer le laser. Appuyez à nouveau pour activer la mesure de distance. La valeur mesurée s'affiche immédiatement. 4-2.Mesure continue (détection) et mesure min (Voir "Figure E") La fonction de mesure continue (tracking) est utilisée pour transférer des mesures, par exemple à...
  • Seite 24: Caractéristiques Techniques

    5- Caractéristiques techniques Spécifications techniques Gamme 0,05 à 20 m * (0,2 in à 66 f t *) Précision de mesure jusqu'à 10 Typiquement: ± 1,5 mm ** m (2 σ, écart-type) (± 1/16 po **) Unité de mesure m, ft'in" Classe laser Classe II Type de laser...
  • Seite 25: 6- Dépannage: Causes Et Mesures Correctives

    6- Dépannage: causes et mesures correctives Code Cause Mesure corrective Signal reçu trop faible, Utilisez la plaque temps de mesure trop cible long. Distance hors de portée. Température trop Refroidissez élevée l'instrument Température trop Instrument de basse chauffage Erreur matérielle Allumer / éteindre l'appareil plusieurs fois, si le...
  • Seite 26: 7- Conditions De Mesure

    7- Conditions de mesure 7-1.Plage de mesure La gamme est limitée dans les spécifications techniques. La nuit ou au coucher du soleil et si la cible est dans l'ombre, la plage de mesure sans la plaque cible est augmentée. Utilisez une plaque cible pour augmenter la plage de mesure pendant la lumière du jour ou si la cible a de mauvaises propriétés de réflexion.
  • Seite 27 Zusammenfassung 1- Sicherheitshinweise ………………………..…….… ...28 1-1.Nutzung erlaubt …………………………….….……..28 1-2.Verbotene Verwendung ………………….….………28 1-3.Laser klassifizierung ……………………….…..…… 28 2- Starten …………………………………….………… .. 29 2-1.Batterien einlegen / auswechseln (siehe "Abbildung A")……………………………………………………….…..29 2-2. Tastatur (siehe "Abbildung B") …………….…. ..….29 2-3.LCD-Anzeige (siehe "Abbildung C") …………..……29 3- Inbetriebnahme und Einstellungen…..…………..……30 3-1.
  • Seite 28: 1-Sicherheitshinweise

    1-Sicherheitshinweise 1-1. Nutzung Verwendung • Abstandsmessung 1-2. Verbotene Verwendung • Verwendung des Werkzeugs ohne Anleitung. • Außerhalb der angegebenen Grenzen verwenden. • Deaktivierung von Sicherheitssystemen und Entfernen von Hinweis- und Gefahrzettel. • Öffnen Sie das Gerät mit Werkzeugen (Schraubendreher usw.), soweit dies in bestimmten Fällen ausdrücklich nicht gestattet ist.
  • Seite 29: 2-Starten

    2-Starten 2-1. Batterien einlegen / auswechseln (siehe "Abbildung A") 1- Entfernen Sie den Batteriefachdeckel. 2- Legen Sie die Batterien ein und achten Sie dabei auf die richtige Polarität. 3-Schließen Sie das Batteriefach wieder. • Ersetzen Sie die Batterien, wenn das Symbol "" dauerhaft im Display blinkt.
  • Seite 30: 3-Inbetriebnahme Und Einstellungen

    3-Inbetriebnahme und Einstellungen 3-1. Ein- und Ausschalten Schaltet das Instrument und den Laser ein. Halten Sie diese Taste 3 Sekunden lang gedrückt, um das Instrument auszuschalten. Das Messgerät schaltet sich nach drei Minuten Inaktivität automatisch aus. 3-2. Einstellen des Referenzpegels (siehe "Abbildung D") Die Standardreferenzeinstellung befindet sich auf der Rückseite des Instruments.
  • Seite 31: 4-Messung

    4-Messung 4-1.Messung der einzelnen Entfernung Drücken Sie, um den Laser zu aktivieren. Erneut drücken, um die Distanzmessung zu aktivieren. Der gemessene Wert wird sofort angezeigt. 4-2.Kontinuierliche Messung (Erkennung) und Min.messung (siehe "Abbildung E") Die kontinuierliche Messfunktion (Tracking) dient zur Übertragung von Messungen, beispielsweise aus Bauplänen.
  • Seite 32: 5- Technische Daten

    5- Technische Daten Technische Spezifikationen Reichweite 0,05 bis 20 m * (0.2 in bis 66 f t *) Messgenauigkeit bis zu 10 m Typisch: ± 1,5 mm ** (2 σ, Standardabweichung) (± 1/16 Zoll **) Maßeinheit m, ft'in" Laserklasse Klasse II Lasertyp 650nm <1mW Die kleinste angezeigte Einheit...
  • Seite 33: 6- Fehlersuche: Ursachen Und Abhilfemaßnahmen

    6- Fehlersuche: Ursachen und Abhilfemaßnahmen Code Ursache Korrekturmaßnahme Signal zu schwach Verwenden Sie die empfangen, Messzeit Zielplatte zu lang. Entfernung außerhalb der Reichweite. Temperatur zu hoch Instrument abkühlen lassen Temperatur zu niedrig Heizgerät. Hardwarefehler Schalten Sie das Gerät ein / aus mehrmals, wenn das Symbol immer noch erscheint,...
  • Seite 34: 7- Messbedingungen

    7- Messbedingungen 7-1.Messbereich Das Sortiment ist in technischen Spezifikationen begrenzt. Nachts oder bei Sonnenuntergang und wenn sich das Ziel im Schatten befindet, wird der Messbereich ohne Zielplatte vergrößert. Verwenden Sie eine Zielplatte, um die Entfernungsmessung bei Tageslicht zu erhöhen oder wenn das Ziel schlechte Reflexionseigenschaften aufweist.
  • Seite 35 Resumen 1- Instrucciones de seguridad …………………..………36 1-1.Uso permitido ………………………………..……… 36 1-2. Uso prohibido ………………………………..………36 1-3.Clasificación láser …………………………..……….36 2- Iniciando …………………………………………..……37 2-1.Insertando/reemplazando baterías (ver Figura A)..37 2-2. Teclado (Ver "Figura B") ………………. ….….…. 37 2-3.Pantalla LCD (Ver "Figura C") …………….…….…37 3- Operaciones iniciales y configuración ……….……..38 3-1.Encender y apagar …………...
  • Seite 36: 1-Instrucciones De Seguridad

    1-Instrucciones de seguridad 1-1. Uso permitido • Medición de distancias. 1-2. Uso prohibido • Uso de la herramienta sin instrucciones. • Usar fuera de los límites indicados. • Desactivación de sistemas de seguridad y eliminación de etiquetas explicativas y de peligro. •...
  • Seite 37: 2-Iniciando

    2-Iniciando 2-1.Insertando / reemplazando las baterías (ver "Figura A") 1- Retire la tapa del compartimento de la batería. 2- Inserte las baterías, observando la polaridad correcta. 3-Cierre el compartimento de la batería nuevamente. • Reemplace las baterías cuando el símbolo "" parpadee permanentemente en la pantalla.
  • Seite 38: 3- Operaciones Iniciales Y Configuración

    3-Operaciones iniciales y configuraciones 3-1. Encender y apagar Enciende el instrumento y el láser. Mantenga presionado este botón durante 3 segundos para apagar el instrumento. El medidor se apaga automáticamente después de tres minutos de inactividad. 3-2. Configuración del nivel de referencia (Ver "Figura D") La configuración de referencia predeterminada es desde la parte posterior del instrumento.
  • Seite 39: 4-Medición

    4-Medición 4-1. Medición de distancia única Presione para activar el láser. Presione nuevamente para activar la medición de distancia. El valor medido se muestra inmediatamente. 4-2. Medición continua (detección) y medición mínima (Ver "Figura E") La función de medición continua (seguimiento) se utiliza para transferir mediciones, por ejemplo, desde planos de construcción.
  • Seite 40: 5- Datos Técnicos

    5- Datos técnicos Especificaciones técnicas Rango 0.05 a 20 m * (0.2 in a 66 f t *) Precisión de medición de hasta Típicamente: ± 1.5 mm ** 10 m (2 σ, desviación (± 1/16 in **) estándar) Unidad de medida m, ft'in"...
  • Seite 41: 6- Solución Problemas: Causas Y Medidas Correctivas

    6- Solución de problemas: causas y medidas correctivas Código Porque Medida correctiva Señal recibida Usa la placa demasiado débil, objetivo tiempo de medición demasiado largo. Distancia fuera de rango. Temperatura muy alta Enfriar el instrumento Temperatura muy baja Instrumento de calentamiento Error de hardware Enciende / apaga el...
  • Seite 42: 7- Condiciones De Medición

    7- Condiciones de medición 7-1 Rango de medición El rango es limitado en especificaciones técnicas. Por la noche o al atardecer y si el objetivo está en la sombra, aumenta el rango de medición sin la placa del objetivo. Use una placa de objetivo para aumentar la medición del rango durante el día o si el objetivo tiene malas propiedades de reflexión.
  • Seite 43 Made in P.R.C. INFORMAZIONE AGLI UTENTI / INFORMATION FOR THE USERS / INFORMATIONS POUR LES UTILIZATEURS / INFORMATIONEN FUR DIE BENUTZER / INFORMACION DEL USUARIO I – Il simbolo del cassonetto barrato riportato sull’apparecchiatura indica che il prodotto alla fine della propria vita utile deve essere raccolto separatamente dagli altri rifiuti.

Inhaltsverzeichnis