Herunterladen Inhalt Inhalt Diese Seite drucken
Oregon Scientific BAR933HG Bedienungshandbuch

Oregon Scientific BAR933HG Bedienungshandbuch

Mit mitteilungsdienst
Vorschau ausblenden Andere Handbücher für BAR933HG:
Inhaltsverzeichnis

Werbung

Verfügbare Sprachen
  • DE

Verfügbare Sprachen

  • DEUTSCH, seite 16
Weather Station with Scrolling Message Alerts
Model: BAR933HG / BAR936HG
User Manual
Downloaded from
www.Manualslib.com
manuals search engine

Werbung

Inhaltsverzeichnis
loading

Inhaltszusammenfassung für Oregon Scientific BAR933HG

  • Seite 1 Weather Station with Scrolling Message Alerts Model: BAR933HG / BAR936HG User Manual Downloaded from www.Manualslib.com manuals search engine...
  • Seite 2: Inhaltsverzeichnis

    INTRODUCTION Batteries ..............5 AC Adaptor (Main Unit) .......... 5 Thank you for selecting the Oregon Scientific BAR933HG / BAR936HG Weather Station with Scrolling Change Settings ............ 5 Message Alerts. This powerful device bundles time Remote Sensor ............5 keeping, weather messaging and monitoring, indoor and outdoor temperature and humidity readings, barometric Set Up Thermo / Hygro Sensor (RTGR368N) ..
  • Seite 3: Product Overview

    PRODUCT OVERVIEW FRONT VIEW 1. LCD display 2. MODE: Change settings / display 3. MEMORY: View current, maximum and minimum temperature / humidity / UV readings 4. HISTORY: View historical barometer / temperature / humidity and UV readings 5. MESSAGE: View different messages 6.
  • Seite 4: Lcd Display

    11. Low battery icon for UV sensor LCD DISPLAY 12. UV exposure time for user 13. User no. (for UV Mode) or hour history for UVI / Barometric pressure reading Message Display Area 1. Weather Forecast Area: Animated weather forecast 2.
  • Seite 5: Remote Sensor (Rtgr368N)

    REMOTE SENSOR (RTGR368N) 1. LCD display 2. LED status indicator 3. Ventilation duct 4. Fold-out stand 1. Signal reception 2. Time 3. Channel number 4. Temp / humidity readings 5. Low battery icon 6. Temp (°C or °F) 7. Humidity % 1.
  • Seite 6: Getting Started

    CHANGE SETTINGS GETTING STARTED 1. Press SELECT to switch between Areas. BATTERIES indicates the selected Area. Batteries are supplied with this product: • Main unit 4 x UM-4 (AAA) 1.5V • Remote unit 2 x UM-3 (AA) 1.5V Insert batteries before first use, matching the polarity as shown in the battery compartment.
  • Seite 7: Sensor Data Transmission

    To fold out the stand: To use the wall mount: CLOCK AND CALENDAR This product tracks the time and date based on radio- controlled signals from the RTGR368N remote sensor, or manual settings that you enter. For best results: RADIO-CONTROLLED CLOCK •...
  • Seite 8: Set Clock

    RF clock enabled: ALARM SOUND The alarms can be set to sound either a beeping alarm or a talking alarm. However, the sound you choose i.e. beeping or talking will apply to both the Daily and Pre-Alarm. The beeping alarm will beep for 2 minutes and get louder and faster during this time.
  • Seite 9: Activate Alarm

    (e.g. 2 hours ago, 3 hours ago, e.t.c.). The UVR138 Ultra-Violet Radiation Sensor is included with the BAR986HG and is available as an optional item for the BAR933HG. The UV sensor gives you the following information at your fingertips: •...
  • Seite 10: New Additional Uv Features

    Temperature data is given at the top, humidity is below. NEW ADDITIONAL UV FEATURES UV EXPOSURE TIME COUNTDOWN To set the exposure time countdown you need to set the Skin Type and Sun Protection Factor (SPF) as follows: 1. Press SELECT to navigate to the Barometer Area, then press MODE to select the UV display.
  • Seite 11: Temperature And Humidity Trend

    ENABLE / DISABLE TALK FUNCTION TEMPERATURE AND HUMIDITY TREND To enable or disable the talk function: The trend lines are shown next to the temperature and humidity readings. • Plug or unplug the adaptor. TREND RISING STEADY FALLING TEMPERATURE • Press and hold UP and DOWN for 3 seconds.
  • Seite 12: Safety And Care

    This product is designed to give you years of service if handled properly. Oregon Scientific will not be responsible for any deviations in the usage of the device UV Index Messages (displays only when optional...
  • Seite 13: Specifications

    ABOUT OREGON SCIENTIFIC (-4°F to 140°F) Resolution 0.1°C (0.2°F) Visit our website (www.oregonscientific.com) to learn more about Oregon Scientific products such as digital Comfort 20°C to 25°C cameras; MP3 players; children's electronic learning (68°F to 77°F) products and games; projection clocks; health and...
  • Seite 14: Ec-Declaration Of Conformity

    EC-DECLARATION OF CONFORMITY This product contains the approved transmitter module that complies with the essential requirements of Article 3 of the R&TTE 1999 / 5 / EC Directive, if used as intended and the following standards have been applied: Safety of information technology equipment (Article 3.1.a of the R&TTE Directive) Applied Standard EN 60950-1 : 2000...
  • Seite 15 © 2004 Oregon Scientific. All Rights Reserved. P/N.: 086-003589-019 Downloaded from www.Manualslib.com manuals search engine...
  • Seite 16 • 6 V Netzadapter Weckalarm aktivieren ..........8 • Batterien Schlummerfunktion ..........8 BAR933HG --- BAR933HG Basiseinheit + RTGR368N Barometer ..............8 Funksendeeinheit Barometer-Anzeigefeld .......... 8 Messeinheit auswählen ......... 8 BAR936HG --- BAR936HG Basiseinheit + RTGR368N Funksendeeinheit + UVR138 UV-Funksendeeinheit Luftdruckverlauf anzeigen ........
  • Seite 17: Produktübersicht

    PRODUKTÜBERSICHT VORDERANSICHT 1. LCD-Anzeige 2. MODE: Änderung der Einstellungen / Anzeige 3. MEMORY: Messungen der aktuellen, maximalen und minimalen Temperatur / Luftfeuchtigkeit / UV-Werte anzeigen. 4. HISTORY: Anzeige historischer Daten zu Luftdruck, Temperatur, Feuchtigkeit, UV 5. MESSAGE: Ansicht verschiedener Meldungen 6.
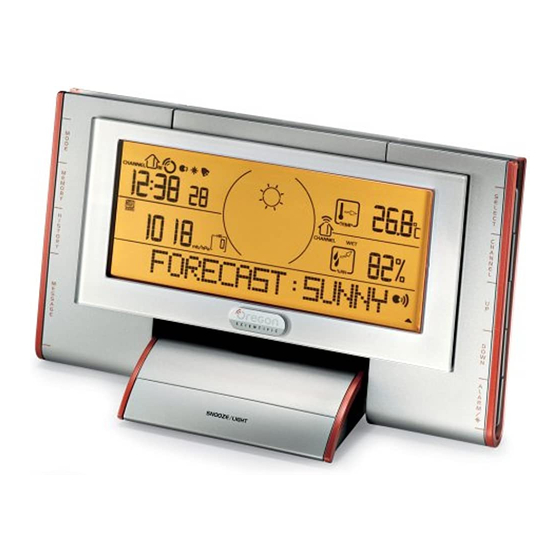
  • Seite 18: Lcd-Anzeige

    11. Anzeige für schwache UV-Sensor-Batterie LCD-ANZEIGE 12. UV-Expositionszeit für den Benutzer 13. Benutzernr. (für UV-Modus) oder zeitliche Entwicklung für UVI- / Luftdruckmessungen. Meldungs-Anzeigefeld 1. Wettervorhersagen-Anzeigefeld: Animierte Wettervorhersage 1. Meldungsanzeige 2. Uhr- / Weckalarm- / Kalender-Anzeigefeld: 2. CAUTION: Erscheint, wenn eine Warnmeldung Funkuhr;...
  • Seite 19: Funksendeeinheit (Rtgr368N)

    FUNKSENDEEINHEIT (RTGR368N) 1. LCD-Anzeige 2. LED-Statusanzeige 3. Belüftungsöffnung 4. Ausklappbarer Tischständer 1. Signalempfang 2. Zeit 3. Kanalnummer 4. Temperatur- / Luftfeuchtigkeitsmessungen 5. Batteriewechselanzeige 6. Temperatur (°C oder °F) 7. Luftfeuchtigkeit % 1. Wandmontageöse 2. EU / UK Funksignalformat-Umschalter 3. SEARCH-Taste 4.
  • Seite 20: Vorbereitung Zum Einsatz

    NETZADAPTER (BASISEINHEIT) VORBEREITUNG ZUM EINSATZ Die Batterien dienen als Ersatzstromversorgung. Für BATTERIEN kontinuierlichen Gebrauch schließen Sie bitte den Batterien sind im Lieferumfang dieses Gerätes enthalten: Netzadapter am Sockel der Basiseinheit an: • Basiseinheit 4 x 1,5 V Micro (AAA, LR03) •...
  • Seite 21: Datenübertragung

    SCHALTER AUSWAHL SYMBOL BESCHREIBUNG Die Basiseinheit sucht nach Channel Wenn Sie mehr als eine Funksendeeinheit einsetzen, Funksendeeinheiten. wählen Sie für jede Mindestens 1 Kanal wurde Funksendeeinheit einen gefunden. anderen Kanal aus. Funksendeeinheit 1 sendet Funksignalformat EU (DCF) / GB (MSF) Daten.
  • Seite 22: Funkuhr Ein- Und Ausschalten

    1. Drücken Sie SELECT, um zum Uhr-Anzeigefeld zu Das Empfangssymbol im Uhranzeigefeld navigieren. wird neben dem Anzeigefeld zeigt 2 Faktoren an: angezeigt. 2. Halten Sie MODE 2 Sekunden lang gedrückt. • Verbindung zwischen der Basis- und der Funksendeeinheit, die die Funksignale ( ) erfasst.
  • Seite 23: Täglichen Weckalarm Einstellen

    HINWEIS Die Weckansage ertönt nur, wenn der WECKALARM AKTIVIEREN Netzadapter angeschlossen ist. Wenn der Adapter nicht Navigieren Sie auf das Uhr-Anzeigefeld und drücken eingesteckt ist, ertönt der Weckton. Sie dann ALARM / , um auf die Anzeige des täglichen Weckalarms oder des Weck-Voralarms umzuschalten. Um den Weckalarm zu aktivieren oder zu deaktivieren, TÄGLICHEN WECKALARM EINSTELLEN drücken Sie auf UP oder DOWN.
  • Seite 24: Wettervorhersage

    Die UV-Strahlen-Funksendeeinheit UVR138 ist MAXIMUM- / MINIMUM-SPEICHERUNG DES UVI Bestandteil von BAR986HG und ist als optionales Gerät Um die Maximum- und Minimum-Speicherung des UVI für BAR933HG erhältlich. Mit einer Fingerberührung anzuzeigen: erhalten Sie von der UV-Funksendeeinheit folgende Informationen. 1. Drücken Sie SELECT, um auf das Barometer- Anzeigefeld zu navigieren.
  • Seite 25: Temperatur Und Luftfeuchtigkeit

    • Um die Aufzeichnungen zu löschen, halten Sie TEMPERATUR UND LUFTFEUCHTIGKEIT 2 Sekunden lang MEMORY gedrückt. Ein Signalton Die Wetterstation kann folgende Informationen von einer ertönt, um die Speicherlöschung zu bestätigen. aus 5 Funksendeeinheiten anzeigen. TEMPERATUR- UND LUFTFEUCHTIGKEITS- • Aktuelle, minimale und maximale Temperaturen und VERLAUF ANZEIGEN die relative Luftfeuchtigkeit in Prozent.
  • Seite 26: Sprechende Uhr

    3. Drücken Sie mehrmals MODE, bis Sie die GEFAHREN- TEMPERATUR Ansageeinstellung erreichen (sie erscheint KATEGORIE °C unmittelbar nach der Anzeigesprache). °F 4. Wählen Sie die 1- oder 24-Stundenansage, die Start- Extreme Gefahr >54,5 >130 und Stoppzeit der Ansage und die Ansagelautstärke Gefahr 40,5-54,4 105-130...
  • Seite 27: Hintergrundbeleuchtung

    UV: Sonne zwischen 10 Uhr 8-10 Sehr hoch Dieses Gerät ist für viele Betriebsjahre vorgesehen, und 16 Uhr meiden sofern es richtig gehandhabt wird. Oregon Scientific UV: Sehr starke Strahlen - im >= 11 Extrem übernimmt keine Verantwortung für beliebige...
  • Seite 28: Technische Daten

    0,1 °C (0,2 °F) Abstufung Besuchen Sie unsere Website (www.oregonscientific.de) 20 °C bis 25 °C Komfort und erfahren Sie mehr über unsere Oregon Scientific- (68 °F bis 77 °F) Produkte wie zum Beispiel Digitalkameras, MP3-Player, Kinderlerncomputer und Spiele, Projektionsfunkuhren, Speicherung Min / Max Produkte für Gesundheit und Fitness, Wetterstationen...
  • Seite 29: Eg-Konformitätserklärung

    EG-KONFORMITÄTSERKLÄRUNG Dieses Produkt enthält das genehmigte Sendemodul, welches bei bestimmungsgemäßer Verwendung den grundlegenden Anforderungen des Artikels 3 der R & TTE 1999 / 5 / EG Richtlinie entspricht. Folgende(r) Standard(s) wurde(n) angewandt: Schutz der Gesundheit und Sicherheit des Benutzers (Artikel 3.1.a der R & TTE Richtlinie) Angewandte(r) Standard(s) EN 60950-1 : 2000 Elektromagnetische Verträglichkeit...
  • Seite 30: Introducción

    El adaptador AC 6V Ajustar la Pre-Alarma ..........7 • Las pilas Activar la Alarma ............ 8 BAR933HG --- Unidad Principal BAR933HG + Sensor Snooze ..............8 Remoto RTGR368N Barómetro ..............8 Visualizar la Zona del Barómetro ......8 BAR936HG --- Unidad Principal BAR936HG + Sensor Remoto RTGR368N + Sensor UVR138 UV Seleccionar las Unidades de Medición ....
  • Seite 31: Descripción Del Producto

    DESCRIPCIÓN DEL PRODUCTO VISIÓN FRONTAL 1. Display LCD 2. MODE: Cambiar la configuración / el display 3. MEMORY: Vsualizar las lecturas de temperatura / humedad / UV actual, máxima y mínima 4. HISTORY: Visualizar el registro histórico de lecturas del barómetro / temperatura / humedad y UV 5.
  • Seite 32: Display Lcd

    11. Icono de pila agotándose para el sensor UV DISPLAY LCD 12. Tiempo de exposición UV para el usuario 13. Nº de usuario (para el Modo UV) o registro histórico de horas para las lecturas del índice UV / Presión barométrica Zona de Display de Mensajes 1.
  • Seite 33: Sensor Remoto (Rtgr368N)

    SENSOR REMOTO (RTGR368N) 1. Display LCD 2. Indicador condición LED 3. Orificios ventilación 4. Soporte plegable 1. Recepción de señal 2. Hora 3. Número de canal 4. Lecturas de temp / humedad 5. Icono de pila agotándose 6. Temp (°C o °F) 7.
  • Seite 34: Preparación

    CAMBIAR LA CONFIGURACIÓN PREPARACIÓN 1. Pulse SELECT para cambiar entre Zonas. PILAS indica la Zona seleccionada. Las pilas se entregan con este producto: • Unidad principal 4 x UM-4 (AAA) 1.5V • Unidad remota 2 x UM-3 (AA) 1.5V Instale las pilas antes de utilizar el producto por primera vez, siguiendo las indicaciones de polaridad mostradas en el compartimento de las pilas.
  • Seite 35: Transmisión De Información Del Sensor

    Para instalar en la pared: Para buscar el sensor UV, pulse SELECT para navegar Para extender el soporte: por la Zona del índice UV / Barómetro. aparecerá mostrado junto a la Zona. A continuación, mantenga pulsado MEMORY y CHANNEL durante 2 segundos. Si todavía no se encuentra el sensor, NOTA compruebe las pilas.
  • Seite 36: Encender / Apagar El Reloj Radio-Controlado

    ENCENDER / APAGAR EL RELOJ RADIO-CONTROLADO ALARMAS Si desea ajustar manualmente el reloj, primero deberá Este producto tiene 2 alarmas: La Alarma Diaria y una desactivar la prestación de radio control. Para realizar Pre-Alarma para los días con nieve. La Alarma Diaria se esto, navegue hasta la Zona del Reloj / Alarma.
  • Seite 37: Activar La Alarma

    HR indica el número de horas última con el BAR986HG y es un artículo opcional del medición (por ejemplo, hace 2 horas, hace 3 horas, etc.). BAR933HG. El sensor UV le ofrece la siguiente información: • Registro del Índice Ultra-Violeta (UV) de las últimas 10 horas.
  • Seite 38: Temperatura Y Humedad

    • Cálculo automático del tiempo de exposición UV TEMPERATURA Y HUMEDAD aceptable según el perfil de usuario configurado La estación meteorológica puede mostrar la siguiente (4 usuarios como máximo). información procedente de cualquiera de los 5 sensores • Aviso de Peligro UV cuando el índice UV alcanza un remotos: nivel peligroso.
  • Seite 39: Visualizar Los Registros Históricos De Temperatura Y Humedad

    Para visualizar el Índice de Calor: VISUALIZAR LOS REGISTROS HISTÓRICOS DE TEMPERATURA Y HUMEDAD 1. Pulse SELECT para navegar hasta la Zona de la Para visualizar los registros de la temperatura y la Temperatura. aparacerá mostrado junto a la Zona. humedad durante las últimas 24 horas, navegue hasta 2.
  • Seite 40: Volumen De La Voz

    Advertencias Meteorológicas: (basado en la VOLUMEN DE LA VOZ información del sensor del canal 1): El icono de la función de voz aparece en la esquina inferior derecha del display LCD. MENSAJE DEFINICIÓN ICONO NIVEL DE VOLUMEN Punto de Rocío y Peligro de Congelación: Temperatura Actual Vigile las tuberías y cubra...
  • Seite 41: Resolución De Problemas

    Confort 40% a 70% NOTA Las especificaciones técnicas de este producto y el contenido del manual de instrucciones pueden variar Memoria Mín / máx sin previo aviso. Los dibujos no son a escala. Unidades Barómetro mb / hPa o inHg Resolución 1 mb (0.03 inHg) RESOLUCIÓN DE PROBLEMAS...
  • Seite 42: Sobre Oregon Scientific

    SOBRE OREGON SCIENTIFIC Visite nuestra página web (www.oregonscientific.com) para conocer más sobre los productos de Oregon Scientific tales como: Reproductores MP3, juegos y productos de aprendizaje electrónico para niños, relojes de proyección, productos para la salud y el deporte, estaciones meteorológicas y teléfonos digitales y de conferencia.
  • Seite 43 Adaptateur secteur 6 V AC / DC Régler l’alarme quotidienne ........7 • Piles Régler la pré-alarme ..........7 BAR933HG --- Appareil principal BAR933HG + sonde Activer l’alarme ............8 RTGR368N Répétition d’alarme ..........8 Baromètre ..............8 BAR936HG --- Appareil principal BAR936HG + sonde RTGR368N + Sonde UV UVR138 Affichage du baromètre .........
  • Seite 44: Vue D'ensemble Du Produit

    VUE D’ENSEMBLE DU PRODUIT FACE AVANT 1. Affichage LCD 2. MODE : Pour modifier les réglages / l’affichage 3. MEMORY [MÉMOIRE] : Pour afficher les relevés de température / d’humidité minimum, maximum et actuelles / l’indice UV 4. HISTORIQUE : Pour afficher l’historique du baromètre / des températures / de l’humidité...
  • Seite 45: Affichage Lcd

    10. Compte à rebours du temps d’exposition aux UV AFFICHAGE LCD 11. Icône de piles faibles pour la sonde UV 12. Temps d’exposition aux UV (pour un utilisateur particulier) 13. Numéro d’utilisateur (pour le mode UV) ou historique des indices UV / des relevés de pression atmosphérique Zone d’affichage des messages 1.
  • Seite 46: Sonde Sans Fil (Rtgr368N)

    SONDE SANS FIL (RTGR368N) 1. Affichage LCD 2. Voyant lumineux indicateur d’état 3. Trou d’aération 4. Pied pliable 1. Signal de réception 2. Heure 3. Numéro de canal 4. Relevés de température / d’humidité 5. Icône de piles faibles 6. Temp. (°C ou °F) 7.
  • Seite 47: Mise En Marche

    MODIFIER LES REGLAGES MISE EN MARCHE 1. Appuyer sur SELECT pour alterner entre les PILES différentes zones d’affichage. indique la zone Les piles sont fournies avec le produit : sélectionnée. • Appareil principal 4 x UM-4 (AAA) 1,5 V • Sonde sans fil 2 x UM-3 (AA) 1,5 V Insérer les piles avant la première utilisation, en...
  • Seite 48: Transmission Des Données De La Sonde

    Installation du pied : Utilisation de la fixation murale: Pour rechercher une sonde UV : appuyer sur SELECT pour sélectionner la zone d’affichage du baromètre / de l’indice UV. apparaît à côté de cette zone d’affichage. Appuyer sur MEMORY et CHANNEL sans relâcher pendant 2 secondes.
  • Seite 49: Activer / Désactiver L'heure Radio-Pilotée

    ACTIVER / DESACTIVER L’HEURE RADIO-PILOTEE ALARMES Pour pouvoir régler l’heure manuellement, la fonction Ce produit contient 2 types d’alarme : une alarme quotidienne radio-pilotée doit avoir été désactivée au préalable : et une pré-alarme en cas de neige. L’alarme quotidienne se Pour désactiver l’heure radio-pilotée, sélectionner la déclenche à...
  • Seite 50: Activer L'alarme

    écoulé depuis que le relevé a été effectué (relevé effectué il y a 2 heures, il y a 3 heures, etc.). séparément (en option) pour le BAR933HG. La sonde UV permet d’obtenir les informations suivantes : •...
  • Seite 51: Autres Fonctions Uv

    • Calcul automatique des temps d’exposition aux UV REMARQUE La sonde UV doit avoir été activée pour adaptés en fonction de plusieurs profils d’utilisateur pouvoir régler les autres fonctions UV. Se reporter au (4 maximum). manuel d’utilisation UVR138 pour plus d’informations. •...
  • Seite 52: Affichage De L'historique Des Températures Et De L'humidité

    • Pour effacer les enregistrements, appuyer sur Pour afficher l’indice de chaleur : MEMORY sans relâcher pendant 2 secondes. Un bip sonore confirme que la mémoire vient d’être effacée. 1. Appuyer sur SELECT pour sélectionner la zone d’affichage de la température. apparaît à...
  • Seite 53: Volume De La Fonction Vocale

    Ce produit est conçu pour offrir des années de service UV : Portez lunettes de soleil 6 à 7 Fort s’il est manipulé correctement. Oregon Scientific décline et vêtements toute responsabilité en cas d’utilisation de cet appareil UV : Évitez l’exposition au 8 à...
  • Seite 54: Résolution Des Problèmes

    • Ne pas manipuler les composants internes. SPECIFICATIONS • Ne pas mélanger des piles neuves avec des piles Dimensions de l’appareil principal usagées ou des piles de différents types. L x l x H 295 x 86 x 110 mm •...
  • Seite 55: À Propos D'oregon Scientific

    PAYS CONCERNES RTT&E néanmoins, si vous souhaitez contacter le service client Tous les pays de l’UE, Suisse CH Oregon Scientific directement, allez sur le site www2.oregonscientific.com/service/support ou appelez et Norvège N le 949-608-2848 aux US.
  • Seite 56 Ricerca del Sensore ..........6 con visualizzazione di messaggi sulle condizioni Orologio e Calendario ..........6 climatiche di Oregon Scientific BAR933HG / BAR936HG. Questo dispositivo multifunzionale è in grado di fornire Orologio radiocontrollato ........6 l’ora precisa, le previsioni del tempo e di monitorare la Attivazione / Disattivazione della Funzione di temperatura e l’umidità...
  • Seite 57: Caratteristiche Del Prodotto

    CARATTERISTICHE DEL PRODOTTO VISTA ANTERIORE 1. Display LCD 2. MODE: Per cambiare impostazioni / display 3. MEMORY: Per visualizzare le informazioni relative a temperatura / umidità / dei raggi UV attuali, massime e minime 4. HISTORY: Per visualizzare i valori pressione barometrica della temperatura / umidità...
  • Seite 58 9. UVI MASSIMO / MINIMO DISPLAY LCD 10. Il conto alla rovescia per l’esposizione ai raggi UV è iniziato 11. Icona indicante il basso stato di carica della batteria del sensore UV 12. Tempo di esposizione ai raggi UV per l’utente. 13.
  • Seite 59: Sensore Remoto (Rtgr368N)

    SENSORE REMOTO (RTGR368N) 1. Display LCD 2. LED indicatore dello stato di ricezione 3. Condotto di ventilazione 4. Supporto apribile 1. Ricezione del segnale 2. Orario radiocontrollato 3. Numero di canale 4. Valori della temperatura / umidità 5. Icona indicante il basso stato di carica della batteria 6.
  • Seite 60: Operazioni Preliminari

    CAMBIARE LE IMPOSTAZIONI OPERAZIONI PRELIMINARI 1. Premere il pulsante SELECT per scegliere la BATTERIE sezione. L’icona indica la sezione scelta. Le batterie sono fornite con il prodotto: • Unità principale 4 del tipo UM-4 (AAA) da 1,5 V • Unità remota 2 del tipo UM-3 (AA) da 1,5 V Inserire le batterie prima di utilizzare l’unità...
  • Seite 61: Trasmissione Dati Del Sensore

    Per aprire il supporto: Per utilizzare il foro Per cercare il sensore UV, premere il pulsante SELECT d’attacco al muro. per selezionare la Sezione UVI / Barometro. L’icona apparirà vicino alla sezione. Quindi, tenere premuti contemporaneamente i pulsanti MEMORY e CHANNEL per 2 secondi.
  • Seite 62: Attivazione / Disattivazione Della Funzione Di Radiocontrollo

    Premere il pulsante MODE per scegliere tra le diverse NOTA Per forzare una ricerca manuale per la ricezione modalità di visualizzazione delle informazioni sul display a radiofrequenze dell’orologio, tenere premuto il pulsante SEARCH sul sensore remoto (RTGR368N) per dell’orologio: 2 secondi. •...
  • Seite 63: Attivare L'allarme

    Ad esempio, se si imposta l’allarme alle 7:00 del mattino Se non appare l’icona premere il pulsante MODE. e il preallarme a 45 minuti, quest’ultimo suonerà alle 6:15 se la temperatura esterna rilevata dal sensore sul SELEZIONARE L’UNITÀ DI MISURA Canale 1 è...
  • Seite 64: Misurazione Dei Raggi Uv

    2 minuti anche se la suoneria in dotazione al BAR986HG ed è disponibile come dell’allarme è stata interrotta. accessorio opzionale per il BAR933HG. Il sensore UV fornisce le seguenti informazioni: MEMORIA DEI VALORI MASSIMI / MINIMI DELL’UVI Per visualizzare i valori massimi e minimi dell’UVI •...
  • Seite 65: Selezionare L'unità Di Misura

    I dati relativi alla temperatura sono riportati in alto, quelli Dati memorizzati relativi all’Umidità: relativi all’umidità in basso. TENDENZA DELLA TEMPERATURA E DELL’UMIDITÀ Le linee di tendenza sono visualizzate vicino ai valori della temperatura e dell’umidità. TENDENZA COSTANTE IN AUMEN- DIMINU- SELEZIONARE L’UNITÀ...
  • Seite 66: Funzione Parlante

    Si consiglia di leggere il capitolo “Uso della funzione FUNZIONE PARLANTE parlante” per maggiori informazioni in merito alla L’orologio è in grado di fornire informazioni relative regolazione del volume. all’ora, la temperatura, l’umidità e le previsioni del tempo premendo un pulsante o all’ora programmata. VISUALIZZAZIONE DEI MESSAGGI NOTA Per utilizzare la funzione parlante, è...
  • Seite 67: Retroilluminazione

    B X A X P 295 x 86 x 110 mm funzionamento soddisfacente a condizione che venga (11,61 x 3,39 x maneggiato con cura. Oregon Scientific declina ogni 4,33 pollici) responsabilità per danni derivanti da un utilizzo Peso 386 grammi (0,85 once) dell’apparecchio diverso da quello specificato nel...
  • Seite 68: Informazioni Su Oregon Scientific

    (da 68 °F a 77 °F) Per avere maggiori informazioni sui nuovi prodotti Memoria Minima / Massima Oregon Scientific, come le fotocamere digitali, il lettori MP3, i computer didattici per ragazzi, gli orologi con Umidità Relativa proiezione dell’ora, le stazioni barometriche, gli orologi da polso multifunzione, gli strumenti per la cura della Gamma Umidità...
  • Seite 69: Dichiarazione Di Conformità

    Informazioni aggiuntive: DICHIARAZIONE DI CONFORMITÁ L'apparecchio è inoltre conforme alla Direttiva sulla Questo prodotto contiene il modulo di trasmissione Bassa Tensione 73 / 23 / EC, alla Direttiva sulla approvato ed è conforme ai requisiti essenziali Compatibilità Elettromagnetica 89 / 336 / EC, alla dell'articolo 3 della Direttiva 1999 / 5 / CE di R&TTE se Direttiva R&TTE 1999 / 5 / EC (appendice II) e recante utilizzato per l'uso previsto e se vengono applicati i...
  • Seite 70 Draadloze Sensor (RTGR368N) ......4 Hoe te Beginnen ............5 INLEIDING Batterijen ..............5 Bedankt voor het kiezen van het Oregon Scientific Wisselstroomadapter (Hoofdtoestel) ..... 5 BAR933HG / BAR936HG Weerstation met Boodschap Instellingen Veranderen ......... 5 Informatie Dienst. Dit krachtige toestel combineert Draadloze Sensor .............
  • Seite 71: Product Overzicht

    PRODUCT OVERZICHT VOORAANZICHT 1. LCD scherm 2. MODE: Verander instellingen / weergave 3. MEMORY: Bekijk huidige, maximum en minimum temperatuur / vochtigheid / UV peilingen. 4. HISTORY: Bekijk vroegere barometer / temperatuur/ vochtigheid en UV peilingen 5. MESSAGE: Bekijk verschillende boodschappen 6.
  • Seite 72: Lcd Scherm

    11. Lege batterij icoon voor de UV sensor. LCD SCHERM 12. UV blootstellingtijd voor gebruiker 13. Gebruiker nr. (voor UV Modus) of uurgeschiedenis voor UVI / Barometrische Druk peilingen. Boodschap Weergave Veld 1. Weersvoorspelling Gebied: Geanimeerde Weersvoorspelling 2. Klok / Wekker / Kalender Veld: Radiogestuurde 1.
  • Seite 73 DRAADLOZE SENSOR (RTGR38N) 1. LCD scherm 2. LED status indicator 3. Ventilatie Gleuf 4. Uitklapbare Standaard 1. Signaal ontvangst 2. Tijd 3. Kanaal nummer 4. Temp / Vochtigheid peilingen 5. Lege batterij icoon 6. Temp (°C of °F) 7. Vochtigheid % 1.
  • Seite 74: Draadloze Sensor (Rtgr368N)

    INSTELLINGEN VERANDEREN HOE TE BEGINNEN 1. Druk SELECT om doorheen de verschillende velden BATTERIJEN te schakelen. geeft het geselecteerde Veld weer. Batterijen worden meegeleverd met dit product: • Hoofdtoestel 4 x UM-4 (AAA) 1.5V • Draadloos Toestel 2 x UM-3 (AA) 1.5V Plaats de batterijen vóór U het toestel de eerste keer gebruikt, met de polariteit overeenkomend zoals geïllustreerd in het batterijvak.
  • Seite 75: Sensor Data Transmissie

    De standaard uitklappen: De muurbevestiging gebruiken: Om de UV sensor te zoeken, druk op SELECT om naar het UVI / Barometer Veld te navigeren. zal naast het Veld worden weergegeven. Druk dan tegelijkertijd op MEMORY en CHANNEL en hou deze ingedrukt gedurende 2 seconden.
  • Seite 76: De Radiogestuurde Klok Aan / Uit Schakelen

    DE RADIOGESTUURDE KLOK AAN / UIT GESCHAKELEN WEKKERS Indien U de klok handmatig wil instellen, dient U eerst Dit product heeft 2 weksignalen: Het Dagelijks de radiogestuurde functie uit te schakelen. Navigeer naar Weksignaal en het Pre-Weksignaal voor sneeuwweer. het Klok / Wekker Veld om dit te doen. Hou vervolgens Het Dagelijks Weksignaal kan zo ingesteld worden om de DOWN toets op het hoofdtoestel gedurende elke dag op dezelfde tijd af te gaan.
  • Seite 77: Het Weksignaal Activeren

    BAR986HG en is ook te verkrijgen herhaaldelijk op HISTORY om de metingen af te gaan. als een optie bij de BAR933HG. De UV sensor geeft Het nummer in het HR vak, geeft weer hoe lang geleden U de volgende informatie in een handomdraai: elke meting is genomen (b.v., 2 uur geleden, 3 uur...
  • Seite 78: Nieuw Bijgekomen Uv Functies

    • UVI Gevaar Alarm wanneer de UV Index een TEMPERATUUR EN VOCHTIGHEID gevaarlijk niveau nadert. Het weerstation kan de volgende informatie van een van de 5 draadloze sensoren weergeven: UV data wordt weergegeven in hetzelfde veld als de barometer. Druk SELECT om naar het Barometer Veld •...
  • Seite 79: Temperatuur En Vochtigheid Geschiedenis Bekijken

    2. Druk MODE om de Warmte Index weergave te bereiken. TEMPERATUUR EN VOCHTIGHEID GESCHIEDENIS BEKIJKEN 3. Druk CHANNEL om het gewenste kanaal te kiezen. Ga naar het Temperatuur of Vochtigheid Veld om de OPMERKING De Warmte Index zal "NA" weergeven laatste 24 uur temperatuur- en vochtigheidgeschiedenis indien de temperatuur lager is dan 26°C / 80°F, of het te bekijken.
  • Seite 80: Boodschap Weergave

    Dit product is ontworpen om U jaren lang trouw dienst te doen, indien het op een correcte manier wordt gebruikt. UV: Draag beschermende kledij Medium Oregon Scientific is niet verantwoordelijk voor gelijk welke UV: Draag zonnebril & Hoog afwijkingen in het gebruik van dit toestel van degene...
  • Seite 81: Probleemgids

    Bezoek onze website (www.oregonscientific.com) om Resolutie meer te weten over uw nieuwe product en andere 20 °C tot 25 °C Comfort Oregon Scientific producten zoals digitale fototoestellen, (68 °F tot 77 °F) gezondheids- en fitnessuitrusting en weerstations. Op Geheugen Min / Max deze website vindt u tevens de informatie over onze klantendienst, voor het geval u ons wenst te contacteren.
  • Seite 82: Eg-Verklaring Van Gelijkvormigheid

    EG-VERKLARING VAN GELIJKVORMIGHEID Dit product voldoet aan de essentiële vereisten van Artikel 3 van de R&TTE-richtlijnen 1999 / 5 / EC, indien gebruikt als aangewezen en dat volgende normen werden toegepast: Veiligheid van informatietechnologische uitrusting (Artikel 3.1.a van de R&TTE-richtlijnen) Toegepasten normen: EN 60950-1 : 2000 Elektromagnetische congruentie...
  • Seite 83 Para Começar ............5 INTRODUÇÃO Pilhas ..............5 Adaptador AC (Unidade principal) ......5 Obrigado por escolher a Estação Meteorológica com Serviço de Mensagem de Informação BAR933HG / Alterar Ajustes ............5 BAR936HG da Oregon Scientific . Este potente Sensor Remoto ............5 dispositivo traz: informação da hora, monitorização e...
  • Seite 84: Visão Geral Do Produto

    VISÃO GERAL DO PRODUTO VISTA FRONTAL 1. Painel LCD 2. MODE (MODO): Alterar ajustes / exibir 3. MEMORY (MEMÓRIA): Ver leituras de temperatura / umidade / UV atual, máximo e mínimo 4. HISTORY (HISTÓRICO): Ver histórico das leituras do barômetro / temperatura / umidade e UV 5.
  • Seite 85: Painel Lcd

    11. Ícone de pilha fraca para o sensor UV PAINEL LCD 12. Tempo de exposição aos raios UV para o usuário 13. Nº do usuário (para Modo UV) ou histórico horário para leitura IUV / pressão barométrica Área de Mensagens 1.
  • Seite 86: Sensor Remoto (Rtgr368N)

    SENSOR REMOTO (RTGR368N) 1. Tela LCD 2. Indicador do estado LED 3. Canal de ventilação 4. Suporte dobrável 1. Recepção do Sinal 2. Hora 3. Número do canal 4. Leituras Temp / Umidade 5. Ícone de pilha fraca 6. Temp (°C ou °F) 7.
  • Seite 87: Para Começar

    ALTERAR AJUSTES PARA COMEÇAR 1. Pressione SELECIONAR para alternar entre áreas. PILHAS indica a área selecionada. As pilhas são fornecidas com este produto: • Unidade principal 4 x UM-4 (AAA) 1.5V • Unidade remota 2 x UM-3 (AA) 1.5V Insira as pilhas antes da primeira utilização, observando a polaridade indicada no compartimento de pilhas.
  • Seite 88: Transmissão Dos Dados Do Sensor

    Para fechar o suporte: Para usar o suporte de parede: RELÓGIO E CALENDÁRIO Este produto rastreia a hora e data com base nos sinais rádio-controlados do sensor remoto RTGR368N, ou dos ajustes inseridos manualmente. Para obter melhores resultados: RELÓGIO RÁDIO-CONTROLADO •...
  • Seite 89: Ajustar O Relógio

    RF do relógio ativado: SOM DO ALARME O toque dos alarmes pode ser ajustado para som de bip ou de voz. No entanto, o som escolhido, ou seja bip ou voz, será adotado para o Alarme Diário e Pré-Alarme. O som de bip tocará por 2 minutos, ficando mais alto e mais rápido com o decorrer do tempo.
  • Seite 90: Ativar O Alarme

    O Sensor de Radiação Ultra-Violeta UVR138 vem foi feita (por exemplo, 2 horas atrás, 3 horas atrás, etc). com o BAR986HG e está disponível como item opcional para o BAR933HG. O sensor UV fornece as seguintes informações na ponta dos dedos: •...
  • Seite 91: Novas Características Adicionais Uv

    NOVAS CARACTERÍSTICAS ADICIONAIS UV VERIFICAR A ÁREA DA TEMPERATURA E UMIDADE CONTAGEM REGRESSIVA DO TEMPO DE Pressione SELECIONAR para navegar até a Área da EXPOSIÇÃO AOS RAIOS UV Temperatura e Umidade. Para configurar a contagem regressiva do tempo de exposição é preciso configurar o Tipo de Pele e o Fator Os dados da temperatura aparecem na parte de cima, de Proteção Solar (FPS) da seguinte forma: os da umidade na parte de baixo.
  • Seite 92: Tendência Da Temperatura E Umidade

    Histórico da Umidade: ATIVAR / DESATIVAR A FUNÇÃO FALANTE Para ativar ou desativar a função falante: • Ligue ou desligue o adaptador. TENDÊNCIA DA TEMPERATURA E UMIDADE As linhas de tendência são apresentadas próximas às leituras da temperatura e umidade. •...
  • Seite 93: Luz De Fundo

    Este produto foi projetado para oferecer anos de Mensagens do Índice UV (apenas aparece quando o funcionamento, desde que manuseado adequadamente. A sensor UV opcional está conectado): Oregon Scientific não se responsabilizará por quaisquer MENSAGEM DEFINIÇÃO desvios na utilização do aparelho além do especificado nas instruções ou quaisquer alterações ou consertos não...
  • Seite 94: Especificações

    Unidade da Temperatura para um melhor desempenho do produto. Alcance Interior -5°C a 50°C (23°F a 122°F) SOBRE A OREGON SCIENTIFIC Alcance Exterior -20°C a 60°C (-4°F a 140°F) Visite nosso site (www.oregonscientific.com.br) para aprender mais sobre nossos outros produtos, tais como Resolução...
  • Seite 95: Declaração De Conformidade-Ec

    Informações Adicionais: DECLARAÇÃO DE CONFORMIDADE-EC O produtos está em conformidade com as diretrizes de Este produto contém um módulo transmissor aprovado que Baixa Voltagem 73 / 23 / EC, a diretriz EMC 89 / 336 / EC está em conformidade com os requerimentos essenciais e diretriz R&TTE 1999 / 5 / EC (apêndice II) e leva a do artigo 3 da diretriz R&TTE 1999 / 5 / EC, se usado para marca CE respectiva.
  • Seite 96 Försäkran om överensstämmelse ......13 Trådlös fjärrenhet (RTGR368N) ......4 Att Komma Igång ............. 5 INTRODUKTION Batterier ..............5 Tack för att du har valt en BAR933HG / BAR936HG AC Nätadapter (HUVUDENHET) ......5 Talande Väderstation från Oregon Scientific Denna Ändra inställningar ..........5 kraftfulla utrustning knyter samman tidtagning, Trådlös fjärrenhet .............
  • Seite 97: Produktöversikt

    PRODUKTÖVERSIKT VY FRAMSIDA 1. LCD display 2. MODE: Ändra display / inställningar 3. MEMORY: Visa aktuell, högsta och lägsta temperatur / luftfuktighet / UV värden 4. HISTORY: Visa historik för barometer / temperatur / luftfuktighet och UV värden 5. MEDDELANDE: Visa olika meddelanden 6.
  • Seite 98: Lcd Display

    11. Ikon för låg batterinivå i UV sensorn LCD DISPLAY 12. UV exponeringstid för användare 13. Användarnummer (för UV-läge) eller timhistorik för UVI / Barometertryck Meddelandeområde 1. Väderprognosområde: Animerad väderprognos 1. Meddelandedisplay 2. Klocka / Alarm / Kalenderområde: Radiokontrollerad 2. CAUTION Framträder när ett varningsmeddelande klocka;...
  • Seite 99: Trådlös Fjärrenhet (Rtgr368N)

    TRÅDLÖS FJÄRRENHET (RTGR368N) 1. LCD display 2. LED indikator 3. Ventilationskanal 4. Utfällbart stativ 1. Signalmottagning 2. Tid 3. Kanalnummer 4. Temp / Luftfuktighet 5. Ikon för låg batterinivå 6. Temp (°C eller °F) 7. Luftfuktighet % 1. Väggmontering 2. EU / UK radioformatsomkopplare 3.
  • Seite 100: Att Komma Igång

    ÄNDRA INSTÄLLNINGAR ATT KOMMA IGÅNG 1. Tryck SELECT för att växla mellan olika områden. BATTERIER indikerar valt område. Batterier medföljer produkten: • Huvudenhet 4 x UM-4 (AA) 1,5V • Fjärrenhet 2 x UM-3 (AA) 1,5V Se till att batterierna sätts in enligt figuren i batterifacket. För bästa resultat, installera batterierna i fjärrenheten före huvudenheten.
  • Seite 101: Sensordataöverföring

    Att fälla ut stativet: Att väggmontera: KLOCKA OCH KALENDER Denna produkt inhämtar tid och datum m h a radiosignaler som mottagits av fjärrenheten RTGR368N eller genom manuell inställning. För bästa resultat: RADIOKONTROLLERAD KLOCKA • Sätt i batterierna och välj kanal, enhet och format Denna produkt synkroniserar automatiskt datum och tid för radiosignalen innan du monterar sensorn.
  • Seite 102: Ställ In Klockan

    RF-klockan aktiverad ALARMLJUD Alarmen kan ställas in så att de antingen piper eller talar. Oavsett om du väljer pip- eller talalarm kommer inställningen att påverka både det dagliga alarmet och föralarmet. Det pipande alarmet kommer att pipa i 2 minuter samtidigt som det ökar gradvis i styrka och hastighet.
  • Seite 103: Aktivera Alarm

    Numret i HR rutan indikerar förfluten tid sen senaste mätning (t.ex. för 2 timmar sen, 3 timmar sen, etc.). UVR138 Ultraviolett Strålningssensor följer med BAR986HG och finns som tillval till BAR933HG. UV-sensorn ger dig följande information: • 10-timmars Ultraviolett Index (UVI).
  • Seite 104: Nya Uv-Tilläggsfunktioner

    Temperaturen visas ovanför luftfuktigheten. NYA UV-TILLÄGGSFUNKTIONER NEDRÄKNINGSTIMER FÖR UV EXPONERING För att ställa in nedräkningstimern för exponering måste du ställa in Hudtyp och Solskyddsfaktor (SPF) enligt följande: 1. Tryck SELECT för att gå till Barometerområdet, tryck därefter MODE för att välja UV-displayen. VÄLJ MÄTENHET Skjut °C / °F omkopplaren (i batterifacket) till önskat 2.
  • Seite 105: Temperatur Och Luftfuktighetstrend

    TEMPERATUR OCH LUFTFUKTIGHETSTREND AKTIVERA/INAKTIVERA TALFUNKTION Trendlinjerna visas bredvid temperatur och För att aktivera/inaktivera talfunktionen: luftfuktighetsvärdena. • Anslut eller dra ur nätadaptern. TREND STIGANDE STADIGT FALLANDE ELLER TEMPERATUR • Tryck och håll inne UP och DOWN i 3 sekunder. kommer att visas i det nedre högra hörnet av LCD LUFTFUKTIGHET displayen när talfunktionen är aktiverad.
  • Seite 106: Bakgrundsbelysning

    Värmeindexmeddelanden NOTE När du trycker på RESET kommer produkten att återställas till fabriksinställning och all sparad MEDDELANDE DEFINITION information kommer att försvinna. Heat Index N / A Possibility of 26.7°C till 32.2°C / SÄKERHET OCH UNDERHÅLL heat exhaustion 80°F till 90°F Strong heat: Possibility 32.2°C till 40.5°C / Rengör produkten med en lätt fuktad trasa och milt alkoholfritt...
  • Seite 107: Specifikationer

    Alarm Dagligt och Föralarm pip SPECIFIKATIONER och talalarm; 2 minuters stigande i ljudstyrka Dimensioner för huvudenheten Snooze 8 minuters snooze L x B x H 295 x 86 x 110 mm (11,61 x 3,39 x 11,00 cm) Strömförsörjning Vikt 386 gram (0,85 lbs) utan batteri Huvudenhet Dimensioner för fjärrenheten...
  • Seite 108: Försäkran Om Överensstämmelse

    Ytterligare information: FÖRSÄKRAN OM ÖVERENSSTÄMMELSE Produkten är anpassad till "Low Voltage Directive Den här produkten överensstämmer med de viktigaste 73 / 23 / EC", "EMC Directive 89 / 336 / EC" och "R&TTE kraven i "Artikel 3 i R&TTE 1999 / 5 / EC-direktiven" om direktivet 1999 / 5 / EC (bilaga II)"...
  • Seite 109 INTRODUCTION Batteries ..............5 AC Adaptor (Main Unit) .......... 5 Thank you for selecting the Oregon Scientific BAR933HG / BAR936HG Weather Station with Scrolling Change Settings ............ 5 Message Alerts. This powerful device bundles time Remote Sensor ............5 keeping, weather messaging and monitoring, indoor and outdoor temperature and humidity readings, barometric Set Up Thermo / Hygro Sensor (RTGR368N) ..
  • Seite 110: Product Overview

    PRODUCT OVERVIEW FRONT VIEW 1. LCD display 2. MODE: Change settings / display 3. MEMORY: View current, maximum and minimum temperature / humidity / UV readings 4. HISTORY: View historical barometer / temperature / humidity and UV readings 5. MESSAGE: View different messages 6.
  • Seite 111: Lcd Display

    11. Low battery icon for UV sensor LCD DISPLAY 12. UV exposure time for user 13. User no. (for UV Mode) or hour history for UVI / Barometric pressure reading Message Display Area 1. Weather Forecast Area: Animated weather forecast 2.
  • Seite 112: Remote Sensor (Rtgr368N)

    REMOTE SENSOR (RTGR368N) 1. LCD display 2. LED status indicator 3. Ventilation duct 4. Fold-out stand 1. Signal reception 2. Time 3. Channel number 4. Temp / humidity readings 5. Low battery icon 6. Temp (°C or °F) 7. Humidity % 1.
  • Seite 113: Getting Started

    CHANGE SETTINGS GETTING STARTED 1. Press SELECT to switch between Areas. BATTERIES indicates the selected Area. Batteries are supplied with this product: • Main unit 4 x UM-4 (AAA) 1.5V • Remote unit 2 x UM-3 (AA) 1.5V Insert batteries before first use, matching the polarity as shown in the battery compartment.
  • Seite 114: Sensor Data Transmission

    To fold out the stand: To use the wall mount: CLOCK AND CALENDAR This product tracks the time and date based on radio- controlled signals from the RTGR368N remote sensor, or manual settings that you enter. For best results: RADIO-CONTROLLED CLOCK •...
  • Seite 115: Set Clock

    RF clock enabled: ALARM SOUND The alarms can be set to sound either a beeping alarm or a talking alarm. However, the sound you choose i.e. beeping or talking will apply to both the Daily and Pre-Alarm. The beeping alarm will beep for 2 minutes and get louder and faster during this time.
  • Seite 116: Activate Alarm

    (e.g. 2 hours ago, 3 hours ago, e.t.c.). The UVR138 Ultra-Violet Radiation Sensor is included with the BAR986HG and is available as an optional item for the BAR933HG. The UV sensor gives you the following information at your fingertips: •...
  • Seite 117: New Additional Uv Features

    Temperature data is given at the top, humidity is below. NEW ADDITIONAL UV FEATURES UV EXPOSURE TIME COUNTDOWN To set the exposure time countdown you need to set the Skin Type and Sun Protection Factor (SPF) as follows: 1. Press SELECT to navigate to the Barometer Area, then press MODE to select the UV display.
  • Seite 118: Temperature And Humidity Trend

    TEMPERATURE AND HUMIDITY TREND ENABLE / DISABLE TALK FUNCTION The trend lines are shown next to the temperature and To enable or disable the talk function: humidity readings. • Plug or unplug the adaptor. TREND RISING STEADY FALLING TEMPERATURE • Press and hold UP and DOWN for 3 seconds.
  • Seite 119 This product is designed to give you years of service if handled properly. Oregon Scientific will not be responsible for any deviations in the usage of the device UV Index Messages (displays only when optional...
  • Seite 120: Specifications

    Approx. every 1 minute Hereby, Oregon Scientific, declares that this Weather Channel No. 1, 2, 3, 4 or 5 Station with Scrolling Message Alerts model BAR933HG / °C or °F BAR936HG is in compliance with the essential Unit requirements and other relevant provisions of Directive 1999 / 5 / EC.
  • Seite 121 !"#$%&'() ! KKKKKKKKKKKKKKKKKKKKKKKKKKKKKKKKKKKKKKKKKKKKKKKKKKKKKKKKKKKKKK NM ! KKKKKKKKKKKKKKKKKKKKKKKKKKKKKKKKKKKKKKKKKKKKKKKKKKKKKKKKKKKKKKKKKKK NM _^oVPPed=L=_^oVPSed !"# KKKKKKKKKKKKKKKKKKKKKKKKKKKKKKKKKKKKKKKKKKKKK NM !"# KKKKKKKKKKKKKKKKKKKKKKKKKKKKKKKKKKKKKKKKKKKKKKKKKKKKKKK NM KKKKKKKKKKKKKKKKKKKKKKKKKKKKKKKKKKKKKKKKKKKKKKKKKKKKKKKKKKKKKK NM ! KKKKKKKKKKKKKKKKKKKKKKKKKKKKKKKKKKKKKKKKKKKKKKKKKKKKKKKKKKKKKKKKKKK NM KKKKKKKKKKKKKKKKKKKKKKKKKKKKKKKKKKKKKKKKKKKKKKKKKKKKKKKKKKKKKKKKKKKKKKKKKK NN KKKKKKKKKKKKKKKKKKKKKKKKKKKKKKKKKKKKKKKKKKKKKKKKKKKKKKKKKKKKKKKKKKKKKKKKKKKK N ! KKKKKKKKKKKKKKKKKKKKKKKKKKKKKKKKKKKKKKKKKKKKKKKKKKKKKKKKKKKKKKKKKKK NN KKKKKKKKKKKKKKKKKKKKKKKKKKKKKKKKKKKKKKKKKKKKKKKKKKKKKKKKKKKKKKKKKKKKKKKKKKKK N !"#$%& KKKKKKKKKKKKKKKKKKKKKKKKKKKKKKKKKKKKKKKKKKKKKKKKK NN ! KKKKKKKKKKKKKKKKKKKKKKKKKKKKKKKKKKKKKKKKKKKKKKKKKKKKKKKKKKKKKKKKKKKKK O KKKKKKKKKKKKKKKKKKKKKKKKKKKKKKKKKKKKKKKKKKKKKKKKKKKKKKKKKKKKKKKKKKKKKKKKKK NN KKKKKKKKKKKKKKKKKKKKKKKKKKKKKKKKKKKKKKKKKKKKKKKKKKKKKKKKKKKKKKKKKKKK O !"#$%&' KKKKKKKKKKKKKKKKKKKKKKKKKKKKKKKKKKKKKKKKKKKKK NN KKKKKKKKKKKKKKKKKKKKKKKKKKKKKKKKKKKKKKKKKKKKKKKKKKKKKKKKKKKKKKKKKKKK O KKKKKKKKKKKKKKKKKKKKKKKKKKKKKKKKKKKKKKKKKKKKKKKKKKKKKKKKKKKKKKKKKKKKKKKKKK NO !"...
  • Seite 122 !" !=L= !"#$%#&'(=L= !"=L= !"#$%&'( !"#$ !"#$%& !"#$%&' !"#=L= !"#$%& !"#=L= !"#$%& =L = !"#$%& ! !"#$% !"F QK ãÄ=L=áåeÖ= !"F !"F !"#$%&'()*+",-./ Downloaded from www.Manualslib.com manuals search engine...
  • Seite 123 !"#$%$&'()* !" !"#$%&'( !"#$%F= !"#$%& !" !"# !"# !"#$%&$%'( !"=L= !" !"#$%&" !"#$%&' !"# !"#$%&'( !"# !" !"#$%&'() !"# !"#$%& !"#$ !"#$%& =oc= !=ENJRF !"# !"#$ !"#$ !!"# !"#$%=L= !=ENJRF=L= !"# !"#$%&'()*+,-./0/123 !"# !"#$%& !"#$ !"# !"#$ !" !"#$%&'()* !"#$%&'()* !"#$% !"#$ !"#$%&'()*%...
  • Seite 124 !"=EoqdoPSUkF !" !" OK iba= !"# °cF =E°` !" !"#$%& QK °`=L=°c= R T G R 3 6 8 N Made in PR C =ENJRF SEARCH RESET 1 2 3 4 5 CHANNEL EU UK Downloaded from www.Manualslib.com manuals search engine...
  • Seite 125 !"#$%&'( ) =pbib`q=E !"#$% !"#$%& • Q rjJQ=E^^^F=NKRs • O rjJP=E^^F=NKRs !"#$%&'()*+,-(./,-01 !"#$%&'()*+, -./0 E=H= =J=F= !"#$%&'()*+,#-$./012' !"#$%& '()*+=E !"=L= !"#$% &'()* !"=L= !"#$= =jlab=E !"# $%&=^i^oj=E F=L = = !"#$ !"#!$%&'()*+ !=jlab=E !"#$%& !"#$% =rm=E F= =altk=E !"#$% =jlab=E !"...
  • Seite 126 !" !"#$% !" !"#=oqdoPSUk= !"#$%& '( !"#$%&' ()*+,-./%&01 !"#$%&'() !"#$ !"#$%&'()*+,&-./012 • !"#$%&'()*+,-./0)123=E !"#$%&'() !"=E !"#$%&'()*+ !"#$%&'()*+,-.!"/012 !"#$%&'()*+,-./01 • !"#$%&'() N R M M = E V P O !"#=E !"#$%TM =EOPM • !" EoqdoPSUkF= !"#$%&=E !"#$%&'( • !"#$%&'()* +,=obpbq=E !"# !"#$%&'()*+,$%&'()-.
  • Seite 127 =oc= !"#$%&'((%)*&+,-./0 12 !"#$%&'$()*+,-./01-. !"#O !"#$%&"!'()*+ ! "# =oc= !"#$Q !"#$%&'()*!+, !"# !"#$%&'()*+,-./012 !"#$%&'()*+,,-.*/01 !"# !"#$%&'()*+,-./ 0=oc= !"#$%&'(%) =pbib`q=E !"# = !"#$%&'()*+ F=L = = !"#$%&=E^i =^i^oj=E !"#F !"#$%&'(%) =pbib`q=E !"#$ = !=jlab=E !=^i^oj=E F=L= = !"#$"%&'$())'$*+,=rm=E !"#$% !"#$ =EH=L=J=OP !"...
  • Seite 128 !"#$%&'=^i^oj=E F=L = = !" !"#$%&'()*+,-./&"#012 !"#$%!"&'()*+,#-.!"I= !"#NO OQ PM RM =ENV PN rm=E F= =altk=E !"#$ !"#$!%&'()*R !"#$%& ! " O ! " # $ % & ' ( % ) = E !"#$%&'()*+, pkllwb=E !"#$%&'()*+, !"#$%&'()"*+,#-./ !" =pkllwb=E F=L=_^`hifdeq=E !"#$%&'() = = = = = =...
  • Seite 129 !"#$%&' !(#) !"#$% !"#$%&'(# !"#$%&'()*+,'-./ !"#$=EpmcF !"# !"#$%& '( =pbib`q=E !"#$%&'( =jlab=E !"# !"F= !"#$%&' =°`=L=°c= !"#$NJQ =`e^kkbi=E !=jlab=E !"#$%&' !"#$ !"#$% !"#$%&'NJR =`e^kkbi=E =rm=E F= =altk=E !" #$%&'()*+, !"#$%&"'()*+#,-=jlab=E !"#$ %!&'()*=EpmcF= !"#$%&'()*+ ,%'-./0 !"#$% =rm=E F= =altk=E !"#$%&'=jlab=E !"# ! "#$% &%'() !"#$%&'()*+,-(./012 !"#$%...
  • Seite 130 ! "# !"# !" #$%&'()*+,- !"#$%&'() !"#$%& • !=rm=E • F= =altk=E !"#$%= !"#$%&'()*+ !"#$%&'()*+,-./0&1 !=rm=E F= =altk=E !"#$%&'()'*+,-./01234 !"# !"# !"#$%%&'()*+',+-./012 !"=pkllwb=E F=L=ifdeq=E !"#$%&'()#*+,-#$./0.1 [TMB !"#$%&'()S !"OQ OMJOR°` QMJTMB !"# $%&'%(')*+,-. ESUJTT°cF YQMB !"#$=L= =pbib`q=E !=jlab=E !"#$%&"'()*+' !"#$%&'()*+ =jlab=E !"#$%&'F !"#$%&...
  • Seite 131 !"#$ !=obpbq=E !"#$%&'( !"#$%&'()*+,-.'/012$ !"#$%& !"#$ OSKT°` POKO°`=L=UM°c VM°c !"#$%&'()*#+,-./0-.12 !"#$%&' !"#$ %&'()*+,-./0'123 POKO°` QMKR°`=L=VM°c !"# NMR°c !"#$%&' QMKR°` RQKQ°`=L=NMR°c NPM°c !"#$ RQKQ°`=L=NPM !"#$%&'()*+$,= !"#$% !"#$%&'()*+,-./0123*4 !"#$==E !"#$%&'()*+,- !"#$%&'()*"lêÉÖçå=pÅáÉåíáÑáÅ= !"F ! "#$%&'()* !"#$%&'()*+,-./01234 !"#$%& • !"#$% !"#$%&' ()*+,'-./01 • !"#$%&'()* !"...
  • Seite 132 !"#$ !% !"#$$% !" =ñ= =ñ= OVR=ñ=US=ñ=NNM ENNKSN=ñ=PKPV=ñ=QKPP= PUS= =EMKUR F !"# !"# !"# =ñ= =ñ= TM=ñ=OQKR=ñ=NNS Q rjJQ=E^^^F=NKRs EOKTS=ñ=MKVS=ñ=QKRT= !"# NNQ= =EMKOR F O rjJP=E^^F=NKRs !" °`= =°c !"#$%&'()*+#$,-./0 !" JR°` RM°C EOP°c =NOO°cF =lobdlk=p`fbkqfcf` !" JOM°` =SM°` EJQ°c NQM°cF !"#=lêÉÖçå=pÅáÉåíáÑáÅ= !"= =jmP...
  • Seite 133 !"#$%&' KKKKKKKKKKKKKKKKKKKKKKKKKKKKKKKKKKKKKKKKKKKKKKKKKKKKKKKKKKKKKKKKKK NM ! KKKKKKKKKKKKKKKKKKKKKKKKKKKKKKKKKKKKKKKKKKKKKKKKKKKKKKKKKKKKKKKKKKK NM _^oVPPed=L=_^oVPSed !"# KKKKKKKKKKKKKKKKKKKKKKKKKKKKKKKKKKKKKKKKKKKKK NM !"# KKKKKKKKKKKKKKKKKKKKKKKKKKKKKKKKKKKKKKKKKKKKKKKKKKKKKKK NM KKKKKKKKKKKKKKKKKKKKKKKKKKKKKKKKKKKKKKKKKKKKKKKKKKKKKKKKKKKKKK NM ! KKKKKKKKKKKKKKKKKKKKKKKKKKKKKKKKKKKKKKKKKKKKKKKKKKKKKKKKKKKKKKKKKKK NM KKKKKKKKKKKKKKKKKKKKKKKKKKKKKKKKKKKKKKKKKKKKKKKKKKKKKKKKKKKKKKKKKKKKKKKKKK NN KKKKKKKKKKKKKKKKKKKKKKKKKKKKKKKKKKKKKKKKKKKKKKKKKKKKKKKKKKKKKKKKKKKKKKKKKKKK N ! KKKKKKKKKKKKKKKKKKKKKKKKKKKKKKKKKKKKKKKKKKKKKKKKKKKKKKKKKKKKKKKKKKK NN KKKKKKKKKKKKKKKKKKKKKKKKKKKKKKKKKKKKKKKKKKKKKKKKKKKKKKKKKKKKKKKKKKKKKKKKKKKK N !"#$%& KKKKKKKKKKKKKKKKKKKKKKKKKKKKKKKKKKKKKKKKKKKKKKKKK NN ! KKKKKKKKKKKKKKKKKKKKKKKKKKKKKKKKKKKKKKKKKKKKKKKKKKKKKKKKKKKKKKKKKKKKK O KKKKKKKKKKKKKKKKKKKKKKKKKKKKKKKKKKKKKKKKKKKKKKKKKKKKKKKKKKKKKKKKKKKKKKKKKK NN KKKKKKKKKKKKKKKKKKKKKKKKKKKKKKKKKKKKKKKKKKKKKKKKKKKKKKKKKKKKKKKKKKKK O !"#$%&' KKKKKKKKKKKKKKKKKKKKKKKKKKKKKKKKKKKKKKKKKKKKK NN KKKKKKKKKKKKKKKKKKKKKKKKKKKKKKKKKKKKKKKKKKKKKKKKKKKKKKKKKKKKKKKKKKKK O KKKKKKKKKKKKKKKKKKKKKKKKKKKKKKKKKKKKKKKKKKKKKKKKKKKKKKKKKKKKKKKKKKKKKKKKKK NO !"...
  • Seite 134 !" ! !=L= !"#$%#&'(=L= !"=L= !"#$%&'( !"#$ !"#$%& !"#$%& !"=L= !"#$%& !"=L= !"#$%& =L = !"#$%& ! !"#$% !"F QK ãÄ=L=áåeÖ= !"F !"F !"#$%&'()*!+,-. Downloaded from www.Manualslib.com manuals search engine...
  • Seite 135 !"#$%$&'()* !" ! NNK= !"#$%& !"#$%F= !"#$%&'=L !" !"# !"# !"#$%&'%() !"=L= !" !"#$%&" !"#$%&' !"# !"#$%&'( !"# !" !"#$%&'($ !"# !"# !"#$ !"#$%& !"#$% =ENJRF !" !"#$ !"#$ !"# !"#=L= !"# !"# =ENJRF=L= !"#$%&'()*+,-,./0123 !"!#$%&'( !"# NMK= !"#$%&' !"#$ !"# !"#$ !"#"...
  • Seite 136 !"=EoqdoPSUkF !" ! !"#$%&' !"#$ !" !"#$%& R T G R 3 6 8 N Made in PR C =ENJRF SEARCH RESET 1 2 3 4 5 CHANNEL EU UK Downloaded from www.Manualslib.com manuals search engine...
  • Seite 137 !"#$%&'()*+ =pbib`q=E !"#$% !"#$%& • Q rjJQ=E^^^F=NKR • O rjJP=E^^F=NKR !"#$%&'()*&+,)*-.=EH JF= !"#$% &'()*+,-./0%1 !"#"$%&'( )!"*+,-.%&/ !"#$ %&'()=E !"=L= !"#$%&'( !"F = =jlab=E !"#$%&=^i^oj=E F=L = = !" !"#$ !"#$%&'( !"#$%&' =jlab=E !"#$%K =rm=E F= =altk=E !"#$%& =jlab=E !" ! "#$=oqdoPSUk= !"#$ !"#$%&'S !"#$=ER...
  • Seite 138 !" !"#$%& !" !"#$=oqdoPSUk= !"#$%&' ( !"#$%&'( )*+,-./01 !"#$%&' !"#$ !"#$%&'()*&+,-. /01 !"#$%&'()=E • !"#$%&' !"#$%&' ()*+,-./01234 !"#$%&'()*+,-./01NRMM !"#$%&'()*+,-./*+,0 • !"#$%&'()=EoqdoPSUkF= EVPO !"=E !"#$%&TM =EOPM • !"#$%=E !"#$%&'() • !"#$$%&'() *+=obpbq=E !"#$%&' !"#$%&'()*$%&'()+,OJNM !"#$%&'($%&')*+,-./ !"#$%&'()*+,-./01- • !"#$%&'()* +,-./!0 • !"#$%& = !"#$ !"#$%&'()*+,-./012 !"#$%&'=E= = F=...
  • Seite 139 !"#$% !"#$%&'())*+,-./01234* ! ""#$% &' ()'*+,-./01 !" !"# !"#$ %&'()* ! "# !"#$% !"#$%%&Q !"#$%&'()* !" !"#$%&'()*+,-./012 !"#$%&'()*++,-./01 !"# !"#$%&'(%) =pbib`q=E !"#$%&'()*+,-./0 !" = !"#$%&'()*+,-. F=L = = !"#$%&=E^i =^i^oj=E !"F !"#$%&'(%) =pbib`q=E !"# = =jlab=E F=L = = =^i^oj=E !"#"$%&'())&'*+,=rm=E !"#$%&' F= =altk=E...
  • Seite 140 !"#$%#&'=^i^oj=E F=L = = !"#$%&'()*+,!"-.PM RM !"#$%&'#$()*+,-.%/0#$I !"#NO OQ !" ENV PN =rm=E F= =altk=E !"#$!%&'(R !"#$%&'() !"#$%&#'=E =pkllwb=E !"#$%&'()*+,-./01 2 !"#$% !"#$%&'(")*+#,-. !" =pkllwb=E F=L=_^`hifdeq=E !"# !"#=påççòÉ=E ! = = = I= = = !"#$%&'()*+#,-./01234 !"=E !"#$%&'( !"# !"#$%&' =pbib`q=E !"# = =jlab=E...
  • Seite 141 !"#$%&' !(#) !"#$%& !"#$%&# !"#$%&'()*'+,- !./01 !"=EpmcF !"# !"#$%& '( =pbib`q=E !"#$%&'( =jlab=E !"# !"F= !"#$%&' !"#$NJQ =`e^kkbi=E !"#$%&'() =jlab=E !"#$ !"# !"#Q !"#$%&'NJR =rm=E F= =altk=E =`e^kkbi=E !"#$%&'()*+,-.=jlab=E !"#!$%&'()* !"#$ %!&'()*=EpmcF= !" !"#$% !"#$%&'()* +,-./01/ =rm=E F= =altk=E !"#$%&'()=jlab=E !"#$%&'()*+,-*./012 ! "#$%&'%()* !"#$%...
  • Seite 142 ! "# !"# !" #$%&'()*+, !"#$%&'() !"#$%& • • =rm=E F= =altk=E !"#$% !"#$%&'()*+ !"#$%&'()*+,-./01' !=rm=E F= =altk=E !"# !"#$%&'(&)*+,-./ 0&1 !"#$%&'()*+,(-,./0123 =pkllwb=E F=L=ifdeq=E !"#$%&'()#*+,#$-./-0/ [TMB !"#$%&'(S !"OQ OMJOR°` QMJTMB !"#$%&$'&()*+,- ESUJTT°cF !"#$=L= YQMB =pbib`q=E =jlab=E !"#$%&'()*+ ,-./ !"#$%&'()*+ =jlab=E !"#$%&'(F !"#$%&...
  • Seite 143 !"# !=obpbq=E !"#$%&' !"#$%&'()*+,-./01# !"#$%& !"#$ OSKT°` POKO°`=L UM°c VM°c !"#$%&'()*#+,-./-.01 !"#$% !"#$ %&'()*+ !,-.'/01 POKO°` QMKR°`=L !"# VM°c NMR°c !"#$%&' QMKR°` RQKQ°`=L NMR°c NPM°c !"#$ RQKQ°`=L=NPM°c !"#$%&'()*+,$ -./01 !"#$%&'( )*+,-./0123 !"#$%&'()*+,-./01234 !"#$=E !"#$%&'()*+ !"#$%&' !"#$%&'()*+,-./0123! • !"#$%& !"#$%&'()*+ ,-./01+ !"#$% •...
  • Seite 144 !"#$ !% !"#$$%& !" !" =ñ= =ñ= OVR=ñ=US=ñ=NNM ENNKSN=ñ=PKPV=ñ=QKPP= PUS= =EMKUR F !"# !"#$ !"# Q rjJQ=E^^^F=NKR =ñ= =ñ= TM=ñ=OQKR=ñ=NNS EOKTS=ñ=MKVS=ñ=QKRT= !"# NNQ= =EMKOR F O rjJP=E^^F=NKR !"#$%&'()*!"+,-./ !" !" JR°`= =RM°` EOP°c= =NOO°cF =lobdlk=p`fbkqfcf` !" JOM°`= =SM°` EJQ°c= =NQM°cF !"#=lêÉÖçå=pÅáÉåíáÑáÅ= !"= =jmP...
  • Seite 145 © 2004 Oregon Scientific. All Rights Reserved. 086-003589-023 Downloaded from www.Manualslib.com manuals search engine...

Diese Anleitung auch für:

Bar936hg

Inhaltsverzeichnis