Inhaltsverzeichnis
Werbung
Verfügbare Sprachen
Verfügbare Sprachen
Quicklinks
NEFL42HI-EU / NEFL50HI-EU / NEFL60HI-EU / NEFL72HI-EU / NEFL100HI-EU
MULTIPLE PRODUCT CODES (LEAVE BLANK IF N/A)
SAFETY INFORMATION
WARNING
!
FIRE OR EXPLOSION HAZARD
If the information in these instructions are
not followed exactly, a fi re or explosion may
result causing property damage, personal
injury, or loss of life.
- Do not store or use gasoline or other
fl ammable vapors and liquids in the vicinity of
this or any other appliance.
INSTALLER:
Leave this manual with the appliance
CONSUMER:
Retain this manual for future reference
Wolf Steel Ltd., 24 Napoleon Rd., Barrie, ON, L4M 0G8 Canada / 103 Miller Drive, Crittenden, Kentucky, USA, 41030
$10.00
ADD MANUAL TITLE
OPERATION MANUAL
purview 42 / 50 / 60 / 72 / 100 series
INTERTEK
www.tuv.com
ID 1419075957
Wolf Steel Europe BV
Phone 1 (866) 820-8686 • www.napoleon.com • hearth@napoleon.com
De Riemsdijk 22, 4004 LC Tiel, The Netherlands
INSTALLATION AND
(MUST use title from Price Book)
ADD BUTTON BATTERY WARNING IF APPLICABLE
IMPORTED BY WOLF STEEL EUROPE (THE NETHERLANDS)
CERTIFIED TO THE CANADIAN AND AMERICAN NATIONAL STANDARDS:
IF INSTALLATION + OPERATION, ADD SERIAL
CSA /
IF SEPARATE MANUALS, ADD "PLACE
LOGO
BARCODE LABEL ON THE OWNER'S MANUAL"
ENGLISH
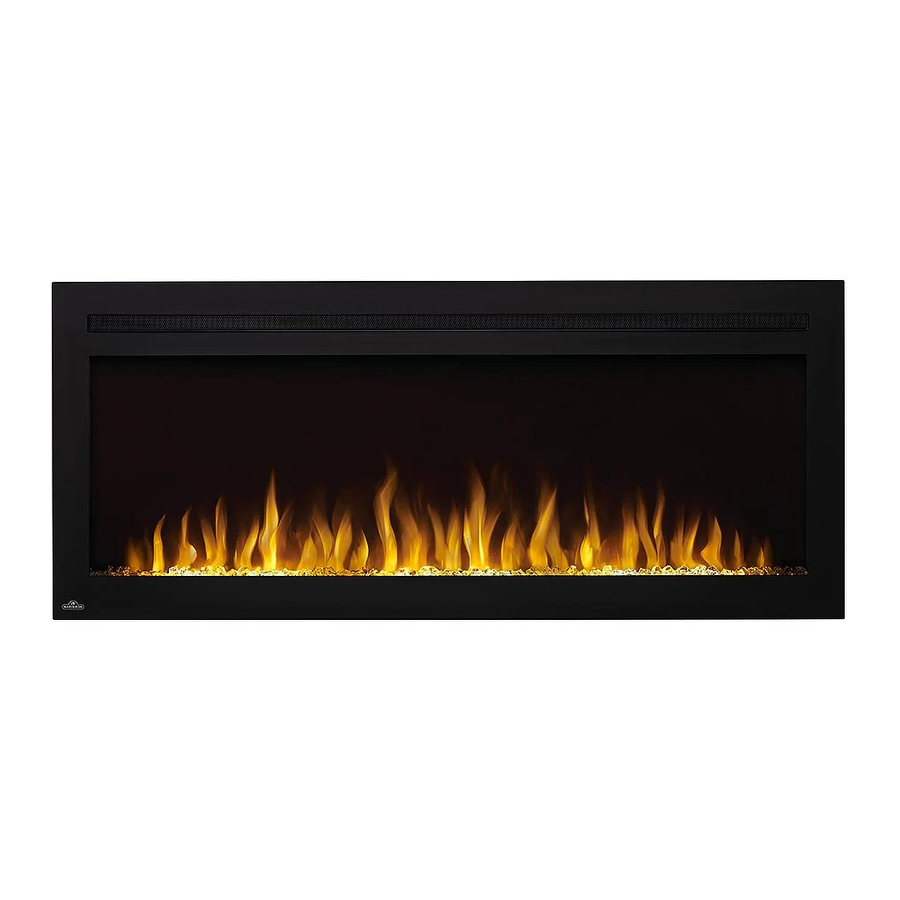
Product Name / Code
(NEFL60HI-EU Illustrated)
(IF MULTIPLE, _____ ILLUSTRATED)
ADD PRODUCT IMAGE
FOR INDOOR USE ONLY
CSA 22.2 NO. 46 / UL 1278
NUMBER LABEL HERE
W415-2803 / B / 06.01.20
Werbung
Kapitel
Inhaltsverzeichnis
Fehlerbehebung

Verwandte Anleitungen für Napoleon NEFL42HI-EU


Inhaltszusammenfassung für Napoleon NEFL42HI-EU
- Seite 1 BARCODE LABEL ON THE OWNER’S MANUAL” www.tuv.com ID 1419075957 Wolf Steel Ltd., 24 Napoleon Rd., Barrie, ON, L4M 0G8 Canada / 103 Miller Drive, Crittenden, Kentucky, USA, 41030 Wolf Steel Europe BV Phone 1 (866) 820-8686 • www.napoleon.com • hearth@napoleon.com De Riemsdijk 22, 4004 LC Tiel, The Netherlands $10.00...
-
Seite 2: Safety Information
safety information WARNING • If equipped with a heater, this appliance can be hot when operated and can cause severe burns if contacted. • Do not operate appliance before reading and understanding operating instructions. Failure to operate appliance according to operating instructions could cause fi re or injury. •... - Seite 3 safety information WARNING • To prevent a possible fi re, do not block air intakes or exhaust in any manner. Do not use on soft surfaces, like a carpet, where openings may become blocked. • Always plug appliances directly into a wall outlet/receptacle. Never use an extension cord or relocatable power tap (outlet/power strip).
-
Seite 4: Inhaltsverzeichnis
3.4.1 fully recessed installation 3.4.2 partially recessed installation electrical information hard-wiring installation wiring diagram (NEFL42HI-EU) wiring diagram (NEFL50/60HI-EU) wiring diagram (NEFL72HI-EU) wiring diagram (NEFL100HI-EU) finishing front glass removal / installation crystal ember installation operating instructions... - Seite 5 model designation 1.0 general information dimensions (NEFL42/50/60HI-EU) W415-2803 / B / 06.01.20...
-
Seite 6: General Information
general information dimensions (NEFL72/100HI-EU) W415-2803 / B / 06.01.20... -
Seite 7: Rating Plate Information
Wolf Steel Ltd. teel Ltd. eel Ltd. Wolf Steel Europe BV Wolf Steel Eur Wolf Steel DESIGNED IN NORTH AMERICA 24 Napoleon Road, oleon Road, on Road, De Riemsdijk 22, 4004 LC Tiel, De Ri De R BY WOLF STEEL LTD. -
Seite 8: Listing Approvals
This appliance has been tested with the GS Standards for fi xed and located-dedicated electric room appliances in Europe. If you need assistance during installation, pelase contact your local dealer. Model NEFL42HI-EU NEFL50HI-EU NEFL60HI-EU NEFL72HI-EU NEFL100HI-EU... -
Seite 9: Unpacking And Testing The Appliance
220-240V, 10 amp minimum grounded outlet. hardware list Quantity Ref. Description NEFL42HI-EU NEFL50HI-EU NEFL60HI-EU NEFL72HI-EU NEFL100HI-EU Wood Screws... -
Seite 10: Appliance Placement
2.0 appliance placement WARNING • Due to high temperatures, this electric appliance should be located out of traffi c. Keep combustible materials such as furniture, pillows, bedding, papers, clothes, curtains, and similar items at least 36” from the front of the appliance. -
Seite 11: Installation
3.0 installation WARNING • Risk of fi re! The power cord must not be pinched against a sharp edge. Secure cord to avoid tripping or snagging to reduce the risk of fi re, electric shock, or personal injury. Do not run cord under carpeting. Do not cover cord with throw rugs, runners, or similar items. -
Seite 12: Framing
Finishing Material 20 3/4" 20 3/4" (527mm) (527mm) (Non-Load 3 1/2" (89mm) MIN Bearing) 5" (127mm) MAX MODEL NO. NEFL42HI-EU 39 1/2” (1002mm) NEFL50HI-EU 47 1/2” (1205mm) NEFL60HI-EU 57 1/2” (1459mm) NEFL72HI-EU 69” (1752mm) NEFL100HI-EU 97” (2463mm) W415-2803 / B / 06.01.20... -
Seite 13: Wall Mount Installation
installation wall mount installation Due to the many different materials used on different walls, it is highly recommended that you consult your local builder before you install this appliance on the wall. Select a location that is not prone to moisture and is located at least 36" (91.4cm) away from combustible materials such as curtain drapes, furniture, bedding, paper, etc. - Seite 14 installation With the wall mounting bracket installed, have two people lift the appliance up and insert the hooks on the bracket into the slots on the back of the appliance (Fig. 3-3). Wall Wall Fig. 3-3 Fig. 3-3 Check the appliance for stability ensuring that the bracket will not pull free from the wall. Install media (see “crystal ember installation”...
-
Seite 15: Recessed Pre-Installation
installation recessed pre-installation Due to the many different materials used on different walls, it is highly recommended that you consult your local builder before you install this appliance on the wall. note: It is recommended the walls of the appliance enclosure be fi nished (i.e. drywall) to avoid exposed insulation or vapour barrier coming in contact with the appliance. -
Seite 16: Partially Recessed Installation
installation 3.4.2 partially recessed installation Install 2 metal brackets (1 per side) (supplied) onto the top sides of the appliance (Fig. 3-6). note: The appliance comes with 2 screws already installed in the bracket locations. Ensure to remove those screws, re-use them to fi x the metal brackets to the appliance, and then screw the brackets to the wall. The appliance comes with 2 metal brackets installed. -
Seite 17: Electrical Information
4.0 electrical information hard-wiring installation WARNING • Turn off the appliance completely and let it cool down before servicing. Only a qualifi ed service person should service and repair this electric appliance. Hard-Wiring Connection If it is necessary to hard-wire this appliance, a qualifi ed electrician mus remove the cord connection and wire the appliance directly to the household wiring. -
Seite 18: Wiring Diagram (Nefl42Hi-Eu)
(NEFL42HI-EU) W415-2803 / B / 06.01.20... -
Seite 19: Wiring Diagram (Nefl50/60Hi-Eu)
electrical information wiring diagram (NEFL50/60HI-EU) W415-2803 / B / 06.01.20... -
Seite 20: Wiring Diagram (Nefl72Hi-Eu)
electrical information wiring diagram (NEFL72HI-EU) W415-2803 / B / 06.01.20... -
Seite 21: Wiring Diagram (Nefl100Hi-Eu)
electrical information wiring diagram (NEFL100HI-EU) W415-2803 / B / 06.01.20... -
Seite 22: Finishing
5.0 fi nishing WARNING • Power supply service must be completed prior to fi nishing to avoid reconstruction. • Heat vents and air openings cannot be covered in any circumstances. front glass removal / installation With one hand on the front glass to prevent it from falling, remove the two screws (1 per side) from the top of the appliance (Fig. -
Seite 23: Operating Instructions
6.0 operating instructions Once the appliance has been plugged into a grounded electrical outlet or hard-wired to a dedicated 220-240V power supply, it is ready to operate. note: Ensure the house circuit breakers for the power supply are turned on. In the event of a power failure, the appliance will lose its memory function and will reset to factory mode when the power returns. - Seite 24 operating instructions Turns the appliance on / off. Power Controls orange fl ame brightness. 5 Settings: F4 - Brightest Orange Flame F0 - Dimmest Controls white fl ame brightness. 5 Settings: F4 - Brightest White Flame F0 - Dimmest Controls the heater. Press button to initiate. 4 Settings: H0 - No heater or blower bL - Blower only...
-
Seite 25: Operating Remote Control
operating instructions operating remote control POWER Turns the appliance ON/OFF. Controls Orange Flame brightness. FLAME - ORANGE 6 Settings: F5-F4-F3-F2-F1-F0. Flame dims from F5 to F1. F5 is the brightest setting and F0 is off. Controls White Flame brightness. FLAME - WHITE 6 Settings: F5-F4-F3-F2-F1-F0. -
Seite 26: Timer Settings On Remote Control
operating instructions timer settings on remote control 6.3.1 set current day and time 1. Press once. When “MON” (Monday) begins fl ashing, use to select the current day. 2. Press . When the hour digits begin fl ashing, use to select the current hour. 3. -
Seite 27: Replacement Parts
7.0 replacement parts WARNING • Failure to position the parts in accordance with this manual or failure to use only parts specifi cally approved with this appliance may result in property damage or personal injury. Contact your dealer for questions concerning prices and policies on replacement parts. Normally, all parts can be ordered through your Authorized dealer / distributor. -
Seite 28: Nefl42/50/60/72/100Hi-Eu Overview
NEFL42/50/60/72/100HI-EU overview Items may not appear exactly as illustrated. Part Number Ref. Description Stocked NEFL42HI-EU NEFL50HI-EU NEFL60HI-EU NEFL72HI-EU NEFL100HI-EU Synchronus Motor W435-0105-SER Blower & Heater W010-4774-SER Assembly Plastic Stripe W497-1598-SER W497-1599-SER W497-1600-SER W497-1604-SER W497-1605-SER Wall Mounting W080-1616 W080-1621... -
Seite 29: Troubleshooting
8.0 troubleshooting WARNING • Turn off the appliance completely and let cool before servicing. Only a qualifi ed service person should service and repair this electric appliance. symptom problem solution Appliance will not Appliance is not plugged into an Check plug, and plug in the appliance if necessary. come on when electrical outlet. - Seite 30 troubleshooting symptom problem solution Ember bed is Brightness not selected. See “operation” section. not glowing or Ember LED issue. Inspect the ember bed LEDs and replace, if necessary. dimming. Main PCB board issue. Inspect the main PCB board and replace, if necessary. LED fl...
-
Seite 31: Warranty
Notwithstanding any provisions contained in the Limited Warranty, Napoleon responsibility under this warranty is defi ned as above, and it shall not in any event extend to any incidental, consequential, or indirect damages. - Seite 32 7200, Route Transcanadienne, Montréal, Québec H4T 1A3 24 Napoleon Road, Barrie, Ontario, Canada L4M 0G8 214 Bayview Drive, Barrie, Ontario, Canada L4N 4Y8 103 Miller Drive, Crittenden, Kentucky, USA 41030 De Riemsdijk 22, 4004 LC Tiel, The Netherlands napoleon.com...
- Seite 33 BARCODE LABEL ON THE OWNER’S MANUAL” www.tuv.com ID 1419075957 Wolf Steel Ltd., 24 Napoleon Rd., Barrie, ON, L4M 0G8 Canada / 103 Miller Drive, Crittenden, Kentucky, USA, 41030 Wolf Steel Europe BV Téléphone 1 (866) 826 8686 • www.napoleon.com • hearth@napoleon.com De Riemsdijk 22, 4004 LC Tiel, Pays-Bas W415-2803 / 06.01.20...
-
Seite 34: Consignes De Sécurité
consignes de sécurité AVERTISSEMENT • Si équipé avec un chauffage, cet appareil peut être chaud lorsqu’il fonctionne et peut causer de graves brûlures en cas de contact. • Ne faites pas fonctionner l’appareil avant d’avoir lu et compris les instructions d’utilisation. L’incapacité de respecter les instructions pourrait causer un incendie ou des blessures corporelles. - Seite 35 consignes de sécurité AVERTISSEMENT • Pour prévenir les risques d’incendie, ne bloquez pas les entrées d’air et les sorties d’air de quelque manière que ce soit. Ne placez pas cet appareil sur une surface molle telle qu’un tapis où les ouvertures pourraient se bloquer.
- Seite 36 fi xation murale préparation de l’installation encastrée 3.4.1 installation entièrement encastrée 3.4.2 installation partiellement encastrée caractéristiques électriques installation du raccordement câblé schéma de câblage (NEFL42HI-EU) schéma de câblage (NEFL50/60HI-EU) schéma de câblage (NEFL72HI-EU) schéma de câblage (NEFL100HI-EU) finition retrait / installation de la vitre installation des braises en cristal mode d’emploi...
- Seite 37 model designation 1.0 informations générales dimensions (NEFL42/50/60HI-EU) W415-2803 / 06.01.20...
-
Seite 38: Informations Générales
informations générales dimensions (NEFL72/100HI-EU) W415-2803 / 06.01.20... -
Seite 39: Informations De La Plaque Signalétique
UNE INSTALLATION EN MAISON MOBILE. www.tuv.com ID 1419075957 TENSION: 220-240 VAC FRÉQUENCE: 50 Hz PUISSANCE: 1400-1600W CODE DE DATE: XXXXX MODÈLES NEFL60HI-EU NEFL60HI-EU NEFL60HI-EU NEFL72HI-EU NEFL100HI-EU NEFL42HI-EU NEFL42HI-EU NEFL42HI-EU NEFL50HI-EU NEFL50HI-EU NEFL50HI-EU Fabricant: Fabricant: Fabricant: Importateur: Importate Importate Wolf Steel Ltd. -
Seite 40: Fi Che Technique Et Homologation
fi che technique et homologation Cet appareil a été testé selon les normes GS européennes pour appareils de chauffage électriques installés de façon permanente. En cas d'aide requise pendant l'installation, contacter votre détaillant local. Modèle NEFL42HI-EU NEFL50HI-EU NEFL60HI-EU NEFL72HI-EU NEFL100HI-EU Description Appareil électrique... -
Seite 41: Déballage Et Test De L'appareil
à cet effet de 220-240 V, 10 A minimum. liste du matériel Quantité Réf. Description NEFL42HI-EU NEFL50HI-EU NEFL60HI-EU NEFL72HI-EU NEFL100HI-EU Vis à bois Chevilles pour placoplâtre... -
Seite 42: Emplacement De L'appareil
2.0 emplacement de l’appareil AVERTISSEMENT • En raison des températures élevées qu'il produit, cet appareil électrique ne doit pas être placé dans une zone de passages fréquents. Maintenir tout matière combustible, tels que des meubles, des coussins, des draps, du papier, des habits, des rideaux et autres objets similaires à... -
Seite 43: Installation
3.0 installation AVERTISSEMENT • Risque d’incendie! Le cordon d’alimentation ne doit pas être coincé contre une arrète vive. Fixez le cordon pour éviter les chutes ou les accrochages afi n de réduire le risque d’incendie, de choc électrique ou de blessures corporelles. -
Seite 44: Cadre
Matériau de fi nition 20 3/4" 20 3/4" (527mm) (527mm) (Ne peut supporter de 3 1/2" (89mm) MIN charge) 5" (127mm) MAX N° DE MODÈLE NEFL42HI-EU 1 002 mm NEFL50HI-EU 1 205 mm NEFL60HI-EU 1 459 mm NEFL72HI-EU 1 752 mm NEFL100HI-EU 2 463 mm W415-2803 / 06.01.20... -
Seite 45: Installation De La Fi Xation Murale
installation installation de la fi xation murale En raison de la variété de matériaux pouvant être utilisés sur les murs, il est fortement recommandé de consulter votre détaillant local avant d'installer cet appareil au mur. Choisir un endroit sec et à l'abri de l'humidité, situé à une distance d'au moins 91,4 cm de tout matériau combustible, tels que des rideaux, des meubles, des tissus, du papier, etc. - Seite 46 installation Une fois que le support de fi xation murale est installé, soulever l’appareil avec l’aide d’une autre personne et insérer les crochets du support dans les fentes de montage à l’arrière de l’appareil (Fig. 3-3). Wall Wall Fig. 3-3 Fig. 3-3 Vérifi...
-
Seite 47: Préparation De L'installation Encastrée
installation préparation de l’installation encastrée En raison de la variété de matériaux pouvant être utilisés sur les murs, il est fortement recommandé de consulter votre détaillant local avant d'installer cet appareil au mur. Remarque : Il est recommandé que les cloisons de l'espace où est encastré l'appareil soient achevées et couvertes (placoplâtre) afi... -
Seite 48: Installation Partiellement Encastrée
installation 3.4.2 installation partiellement encastrée Installer les deux supports métalliques (un de chaque côté) (fournis) sur les côtés supérieurs de l'appareil (Fig. 3-6). Remarque : L'appareil comprend 2 vis pré-installées aux emplacements des supports de fi xation. Retirer ces vis et les utiliser ensuite pour fi xer les supports métalliques sur l'appareil. Enfi n, visser les supports sur le mur. L'appareil comprend 2 supports métalliques pré-installés. -
Seite 49: Caractéristiques Électriques
4.0 caractéristiques électriques installation du raccordement câblé AVERTISSEMENT • Avant tout entretien, éteindre l'appareil et attendre qu'il refroidisse. L'entretien et la réparation de cet appareil électrique ne doivent être effectués que par un professionnel. Installation du raccordement câblé S'il est nécessaire d'installer cet appareil avec un raccordement câblé, un électricien qualifi é doit retirer le cordon d'alimentation et raccorder l'appareil directement au circuit électrique domestique. -
Seite 50: Schéma De Câblage (Nefl42Hi-Eu)
électriques schéma de câblage (NEFL42HI-EU) W415-2803 / 06.01.20... -
Seite 51: Schéma De Câblage (Nefl50/60Hi-Eu)
caractéristiques électriques schéma de câblage (NEFL50/60HI-EU) W415-2803 / 06.01.20... -
Seite 52: Schéma De Câblage (Nefl72Hi-Eu)
caractéristiques électriques schéma de câblage (NEFL72HI-EU) W415-2803 / 06.01.20... -
Seite 53: Schéma De Câblage (Nefl100Hi-Eu)
caractéristiques électriques schéma de câblage (NEFL100HI-EU) W415-2803 / 06.01.20... -
Seite 54: Finition
5.0 fi nition AVERTISSEMENT • L'installation de l'alimentation électrique doit être terminée avant la fi nition pour éviter de devoir démonter l'appareil. • Les fentes et les ouvertures d'aération ne doivent jamais être obstruées. retrait / installation de la vitre Tout en retenant la vitre d'une main, retirer les deux vis (une par côté) situées en haut de l'appareil (Fig. 5-1). -
Seite 55: Mode D'emploi
6.0 mode d’emploi Une fois branché à une prise mise à la terre ou câblé à une source d'alimentation 220-240 V dédiée, l'appareil est prêt à être utilisé. Remarque : Il est nécessaire de s'assurer que les disjoncteurs d'alimentation du domicile sont allumés. En cas de coupure d’électricité, l'appareil perdra sa fonction mémoire et se réinitialisera selon les paramètres d'origine une fois le courant rétabli. - Seite 56 mode d’emploi Allume/éteint l'appareil. Alimentation Contrôle l'intensité lumineuse de la fl amme orange. 5 modes : F4 - Intensité maximale Flamme orange F0 - Intensité minimale Contrôle l'intensité lumineuse de la fl amme blanche. 5 modes : F4 - Intensité maximale Flamme blanche F0 - Intensité minimale Contrôle le chauffage.
-
Seite 57: Utilisation De La Télécommande
mode d’emploi utilisation de la télécommande ALIMENTATION Allume/éteint l'appareil. Contrôle l'intensité lumineuse de la flamme orange. FLAMME ORANGE 6 modes : F5-F4-F3-F2-F1-F0. L'intensité de la flamme diminue de F5 à F1. F5 est le réglage le plus fort et F0 est éteint. Contrôle l'intensité... -
Seite 58: Réglages Du Programmateur Sur La Télécommande
mode d’emploi réglages du programmateur sur la télécommande 6.3.1 réglage de la date et l’heure 1. Appuyer une fois sur . Lorsque « MON » (lundi) se met à clignoter, utiliser pour sélectionner le jour actuel. 2. Appuyer sur . Lorsque les chiffres de l'heure se mettent à clignoter, utiliser pour sélectionner l'heure actuelle. -
Seite 59: Pièces De Rechange
7.0 pièces de rechange AVERTISSEMENT • Omettre de positionner les pièces conformément à ce manuel ou d’utiliser uniquement des pièces spécifi quement approuvées pour cet appareil peut causer des dommages matériels ou des blessures corporelles. Contactez votre détaillant pour les questions concernant les prix et la disponibilité des pièces de remplace- ment. -
Seite 60: Vue D'ensemble Des Pièces Pour Les Modèles Nefl42/50/60/72/100Hi-Eu
NEFL42/50/60/72/100HI-EU Items may not appear exactly as illustrated. Les produits peuvent être légèrement différents des illustrations présentées ici. Numéro de la pièce Réf. Description En stock NEFL42HI-EU NEFL50HI-EU NEFL60HI-EU NEFL72HI-EU NEFL100HI-EU Moteur synchrone W435-0105-SER... -
Seite 61: Dépannage
8.0 dépannage AVERTISSEMENT • Avant tout entretien, éteindre l'appareil et attendre qu'il refroidisse. L'entretien et la réparation de cet appareil électrique ne doivent être effectués que par un professionnel. symptôme problème solution L'appareil ne L'appareil n'est pas branché à Vérifi er le branchement et brancher l'appareil si nécessaire. s'allume pas une prise de courant. - Seite 62 dépannage La fl amme ne Le moteur est bloqué/défaillant. Éteindre et rallumer plusieurs fois. Si le problème persiste, bouge pas. contacter le détaillant. Le lit de braises L'intensité lumineuse n'est pas Consulter la section « mode d'emploi ». ne s'illumine pas. sélectionnée. Problème de l'éclairage LED des Inspecter les lampes LED du lit de braises et remplacer si braises.
-
Seite 63: Garantie
De telles dépenses ne sont pas couvertes par la garantie. Nonobstant toute disposition prévue dans la garantie limitée, la responsabilité de Napoleon au titre de cette garantie est défi nie comme ci-dessus, et elle ne peut s'appliquer en aucune façon à des dommages accessoires, immatériels ou indirects. - Seite 64 7200, Route Transcanadienne, Montréal, Québec H4T 1A3 24 Napoleon Road, Barrie, Ontario, Canada L4M 0G8 214 Bayview Drive, Barrie, Ontario, Canada L4N 4Y8 103 Miller Drive, Crittenden, Kentucky, USA 41030 De Riemsdijk 22, 4004 LC Tiel, Pays-Bas napoleon.com...
-
Seite 65: Geltungsbereich Serien
NEFL42HI-EU / NEFL50HI-EU / NEFL60HI-EU / NEFL72HI-EU / NEFL100HI-EU DEUTSCH INSTALLATIONS- UND ADD MANUAL TITLE BETRIEBSHANDBUCH Geltungsbereich Serien 42/50/60/72/100 (NEFL60HI-EU abgebildet) SICHERHEITSINFORMATIONEN WARNUNG BRAND- ODER EXPLOSIONSGEFAHR Wenn Informationen diesen Anweisungen nicht genau befolgt werden, kann es zu einem Brand oder einer... -
Seite 66: Sicherheitsinformation
Sicherheitsinformation WARNUNG • Falls das Gerät mit einer Heizung ausgestattet ist, kann es während des Betriebs heiß werden. Bei Berührung kann es zu schweren Verbrennungen kommen. • Betreiben Sie das Gerät erst, wenn Sie die Betriebsanweisungen gelesen und verstanden haben. Wenn Sie das Gerät nicht entsprechend den Betriebsanweisungen betreiben, kann es zu Bränden oder Verletzungen kommen. - Seite 67 Sicherheitsinformation WARNUNG • Zur Reduzierung der Brandgefahr darf der Luftein- und -auslass in keiner Weise blockiert werden. Nicht auf weichen Oberfl ächen wie Teppichen verwenden, auf denen Öffnungen blockiert werden können. • Geräte immer direkt an eine Wandsteckdose anschließen. Niemals ein Verlängerungskabel oder eine Steckdosenleiste verwenden.
- Seite 68 Installation Mindestabstand zu brennbaren Materialien Einrahmung Wandmontage Voreinbau 3.4.1 Vollständiger Einbau 3.4.2 Teilweiser Einbau Elektrische Informationen Installation der Festverdrahtung Anschlussplan (NEFL42HI-EU) Anschlussplan (NEFL50/60HI-EU) Anschlussplan (NEFL72HI-EU) Anschlussplan (NEFL100HI-EU) Abschließende Schritte Abnehmen/Anbringen der Glasscheibe Installation der Kristallglut-Elemente Betriebsanweisungen Bedienen des Touch-Displays Bedienen der Fernbedienung Zeiteinstellungen auf der Fernbedienung 6.3.1 Einstellen von Datum und Uhrzeit...
- Seite 69 model designation 1.0 Allgemeine Informationen Abmessungen (NEFL42/50/60HI-EU) W415-2803 / 06.01.20...
-
Seite 70: Allgemeine Informationen
Allgemeine Informationen Abmessungen (NEFL72/100HI-EU) W415-2803 / 06.01.20... -
Seite 71: Typenschildinformationen
Ltd. el Ltd Wolf Steel Europe BV Wolf S Wolf S ENTWICKELT IN NORDAMERIKA 24 Napoleon Road, eon Road, eon Road, De Riemsdijk 22, 4004 LC Tiel, VON WOLF STEEL LTD. Barrie, ON, L4M 0G8 Kanada N, L4M 0G8 Kana... -
Seite 72: Zulassungen
Allgemeine Informationen Zulassungen Dieses Gerät wurde entsprechend den GS-Standards für feste und standortgebundene Elektrogeräte in Europa getestet. Falls Sie Hilfe beim Aufbau benötigen, wenden Sie sich bitte an Ihren Händler vor Ort. Modell NEFL42HI-EU NEFL50HI-EU NEFL60HI-EU NEFL72HI-EU NEFL100HI-EU Beschreibung Elektronisches Gerät... -
Seite 73: Auspacken Und Testen Des Geräts
Installation des Geräts sämtliche Verpackungsmaterialien und testen Sie, ob das Gerät ordnungsgemäß funktioniert. Stecken Sie dafür das Netzkabel in eine geeignete, geerdete Steckdose mit 220 bis 240 Volt und 10 Ampere minimum. Liste der Montageteile Anzahl Ref. Beschreibung NEFL42HI-EU NEFL50HI-EU NEFL60HI-EU NEFL72HI-EU NEFL100HI-EU Holzschrauben Trockenwanddübel... -
Seite 74: Aufstellen Des Geräts
2.0 Aufstellen des Geräts WARNUNG • Aufgrund der hohen Temperaturen ist das Elektrogerät außerhalb von stark frequentierten Bereichen zu platzieren. Halten Sie brennbare Materialien wie Möbel, Kissen, Bettzeug, Papiere, Kleidung, Vorhänge und ähnliche Gegenstände mindestens 91,4 cm (36") von der Vorderseite des Geräts entfernt. •... -
Seite 75: Installation
3.0 Installation WARNUNG • Brandgefahr! Das Netzkabel darf nicht an einer scharfen Kante gequetscht werden. Sichern Sie das Kabel, um Stolpern oder Hängenbleiben zu vermeiden und so das Risiko von Brand, Stromschlag oder Verletzungen zu verringern. Verlegen Sie das Kabel nicht unter Teppichboden. Decken Sie das Kabel nicht mit kleinen Teppichen, Läufern oder ähnlichen Gegenständen ab. - Seite 76 Oberfl ächenmaterial 20 3/4" 20 3/4" (527mm) (527mm) (nicht-tragend) 3 1/2" (89mm) MIN 5" (127mm) MAX MODELL-NR. NEFL42HI-EU 1002 mm (39 1/2”) NEFL50HI-EU 1205 mm (47 1/2”) NEFL60HI-EU 1459 mm (57 1/2”) NEFL72HI-EU 1752 mm (69”) NEFL100HI-EU 2463 mm (97”)
-
Seite 77: Wandmontage
Installation Wandmontage Da Wände viele verschiedene Oberfl ächenmaterialien aufweisen können, sollten Sie Ihr Bauunternehmen vor Ort fragen, bevor Sie das Gerät in die Wand einbauen. Wählen Sie einen Standort aus, der nicht anfällig für Feuchtigkeit ist und sich in einem Abstand von mindestens 91,4 cm (36”) zu brennbaren Materialien wie Vorhängen, Möbeln, Bettwäsche, Papier usw. - Seite 78 Installation Nachdem die Wandhalterung montiert wurde, lassen Sie das Gerät von zwei Personen anheben, und führen Sie die Haken an der Halterung in die Aussparungen auf der Rückseite des Geräts ein (Abb. 3-3). Wand Wall Wand Wall Abb. 3-3 Abb. 3-3 Stellen Sie sicher, dass das Gerät ordnungsgemäß...
-
Seite 79: Voreinbau
Installation Voreinbau Da Wände viele verschiedene Oberfl ächenmaterialien aufweisen können, sollten Sie Ihr Bauunternehmen vor Ort fragen, bevor Sie das Gerät in die Wand einbauen. Hinweis: Es wird empfohlen, die Wände des Gerätegehäuses mit einer Oberfl ächenvergütung zu versehen (d. h. Trockenwand), damit exponierte Isolierungen oder Dampfsperren nicht in Kontakt mit dem Gerät kommen können. -
Seite 80: Teilweiser Einbau
Installation 3.4.2 Teilweiser Einbau Bringen Sie zwei mitgelieferte Metallhalterungen (eine pro Seite) an der Oberseite des Geräts an (Abb. 3-6). Hinweis: Das Gerät wird mit zwei Schrauben geliefert, die bereits an den Positionen der Halterungen angebracht sind. Entfernen Sie diese Schrauben, verwenden Sie sie zur Befestigung der Metallhalterungen am Gerät und schrauben Sie die Halterungen dann an die Wand. -
Seite 81: Elektrische Informationen
4.0 Elektrische Informationen Installation der Festverdrahtung WARNUNG • Schalten Sie das Gerät vollständig aus, und lassen Sie es abkühlen, bevor es gewartet wird. Das Elektrogerät darf nur von qualifi ziertem Servicepersonal gewartet und repariert werden. Anschluss der Festverdrahtung Sollte es notwendig sein, das Gerät festzuverdrahten, muss ein qualifi zierter Elektriker den Kabelanschluss entfernen und das Gerät direkt mit der Hausinstallation verbinden. -
Seite 82: Anschlussplan (Nefl42Hi-Eu)
Elektrische Informationen Anschlussplan (NEFL42HI-EU) W415-2803 / 06.01.20... -
Seite 83: Anschlussplan (Nefl50/60Hi-Eu)
Elektrische Informationen Anschlussplan (NEFL50/60HI-EU) W415-2803 / 06.01.20... -
Seite 84: Anschlussplan (Nefl72Hi-Eu)
Elektrische Informationen Anschlussplan (NEFL72HI-EU) W415-2803 / 06.01.20... -
Seite 85: Anschlussplan (Nefl100Hi-Eu)
Elektrische Informationen Anschlussplan (NEFL100HI-EU) W415-2803 / 06.01.20... -
Seite 86: Abschließende Schritte
5.0 Abschließende Schritte WARNUNG • Die Stromversorgung muss fertiggestellt werden, bevor die letzten Teile montiert werden, um ein erneutes Auseinanderbauen zu vermeiden. • Wärmeabzüge und Luftöffnungen dürfen in keinem Fall verdeckt werden. Abnehmen/Anbringen der Glasscheibe Halten Sie die Glasscheibe mit einer Hand fest, damit sie nicht umfallen kann, und entfernen Sie die zwei Schrauben (eine pro Seite) an der Oberseite des Geräts (Abb. -
Seite 87: Betriebsanweisungen
6.0 Betriebsanweisungen Sobald das Gerät an eine geerdete Steckdose angeschlossen oder mit einer eigenen Stromversorgung von 220 bis 240 V festverdrahtet ist, ist es einsatzbereit. Hinweis: Vergewissern Sie sich, dass die Sicherungsschalter des Hauses für die Stromversorgung eingeschaltet sind. Im Falle eines Stromausfalls verliert das Gerät seine Speicherfunktion und schaltet bei Wiederherstellung der Stromversorgung auf den Werksmodus zurück. - Seite 88 Betriebsanweisungen Dient zum Ein- und Ausschalten des Geräts. Netzschalter Regelt die Helligkeit der orangefarbenen Flamme. 5 Einstellungen: F4 – Maximale Helligkeit Orange Flamme F0 – Minimale Helligkeit Regelt die Helligkeit der weißen Flamme. 5 Einstellungen: F4 – Maximale Helligkeit Weiße Flamme F0 –...
-
Seite 89: Bedienen Der Fernbedienung
Betriebsanweisungen Bedienen der Fernbedienung NETZSCHALTER Schaltet das Gerät EIN/AUS. Regelt die Helligkeit der orangefarbenen Flamme. FLAMME – ORANGE 6 Einstellungen: F5-F4-F3-F2-F1-F0. Die Helligkeit der Flamme reicht von F5 bis F1. F5 ist dabei die hellste Einstellung, bei F0 ist die Flamme aus. Regelt die Helligkeit der weißen Flamme. -
Seite 90: Zeiteinstellungen Auf Der Fernbedienung
Betriebsanweisungen Zeiteinstellungen auf der Fernbedienung 6.3.1 Einstellen von Datum und Uhrzeit 1. Drücken Sie einmal . Wenn „MON“ (Montag) blinkt, wählen Sie mit den aktuellen Tag aus. 2. Drücken Sie . Wenn die Stundenziffern blinken, wählen Sie mit die aktuelle Stundenzahl aus. 3. -
Seite 91: Ersatzteile
7.0 Ersatzteile WARNUNG • Wenn die Teile nicht gemäß diesem Handbuch eingebaut werden oder Teile verwendet werden, die nicht für dieses Gerät zugelassen sind, können Sach- oder Personenschäden entstehen. Bei Fragen zu Preisen und Richtlinien zu Ersatzteilen wenden Sie sich an Ihren Händler. In der Regel können alle Teile über Ihren autorisierten Händler/Lieferanten bestellt werden. -
Seite 92: Nefl42/50/60/72/100Hi-Eu Übersicht
Ersatzteile NEFL42/50/60/72/100HI-EU Übersicht Items may not appear exactly as illustrated. Möglicherweise sehen einzelne Elemente nicht genau wie abgebildet aus. Teilenummer Ref. Beschreibung Lager NEFL42HI-EU NEFL50HI-EU NEFL60HI-EU NEFL72HI-EU NEFL100HI-EU Synchronmotor W435-0105-SER Gebläse- und W010-4774-SER Heizerbaugruppe Kunststoffleiste W497-1598-SER W497-1599-SER W497-1600-SER W497-1604-SER W497-1605-SER... -
Seite 93: Fehlerbehebung
8.0 Fehlerbehebung WARNUNG • Schalten Sie das Gerät vollständig aus, und lassen Sie es vor der Wartung abkühlen. Das Elektrogerät darf nur von qualifi ziertem Servicepersonal gewartet und repariert werden. Symptom Problem Lösung Das Gerät schaltet Das Gerät ist nicht an eine Überprüfen Sie den Stecker und schließen Sie das Gerät sich nicht ein, wenn Steckdose angeschlossen. - Seite 94 Fehlerbehebung Schwache oder keine Flammenhelligkeit nicht Siehe Abschnitt „Betrieb”. Flamme. ausgewählt. Problem mit Flammen-LED. Überprüfen Sie die LED und tauschen Sie sie gegebenenfalls aus. Problem mit der Überprüfen Sie die Hauptleiterplatte und tauschen Sie sie Hauptleiterplatte. gegebenenfalls aus. Flamme bewegt sich Motor ist abgewürgt/funktioniert Zyklus ein/aus.
-
Seite 95: Garantie
Einbau des über die Gewährleistung bezogenen Teils; und solche Kosten werden von dieser Gewährleistung nicht abgedeckt. Unbeschadet anders lautender Bestimmungen in dieser eingeschränkten Gewährleistung ist die Verantwortung von Napoleon wie oben beschrieben defi niert und wird in keinem Fall auf zufällige, daraus folgende oder indirekte Schäden erweitert. - Seite 96 Beim Austausch alter Geräte gegen neue ist der Händler gesetzlich verpflichtet, Ihr altes Gerät mindestens kostenfrei zurückzunehmen. 7200, Route Transcanadienne, Montréal, Québec H4T 1A3 24 Napoleon Road, Barrie, Ontario, Canada L4M 0G8 214 Bayview Drive, Barrie, Ontario, Canada L4N 4Y8 103 Miller Drive, Crittenden, Kentucky, USA 41030 De Riemsdijk 22, 4004 LC Tiel, Niederlande napoleon.com...
- Seite 97 NEFL42HI-EU / NEFL50HI-EU / NEFL60HI-EU / NEFL72HI-EU / NEFL100HI-EU NEDERLANDS INSTALLATIE- EN ADD MANUAL TITLE BEDIENINGSHANDLEIDING purview 42/50/60/72/100-serie (Illustratie van NEFL60HI-EU) VEILIGHEIDSINFORMATIE WAARSCHUWING BRAND- OF EXPLOSIEGEVAAR Nalaten de informatie in deze instructies nauwlettend te volgen, kan brand of een explosie met materiële schade, persoonlijk letsel of overlijden tot gevolg hebben.
- Seite 98 veiligheidsinformatie WAARSCHUWING • Als het apparaat is uitgerust met een verwarming kan het apparaat tijdens gebruik heet worden en bij aanraking ernstige brandwonden veroorzaken. • Gebruik het apparaat niet voordat u de bedieningsinstructies hebt gelezen en begrepen. Als het apparaat niet volgens de bedieningsinstructies wordt gebruikt, kan dit tot brand of letsel leiden.
- Seite 99 veiligheidsinformatie WAARSCHUWING • Om een eventuele brand te voorkomen, mag u de luchtinlaat of uitlaat op geen enkele wijze blokkeren. Gebruik het apparaat niet op zachte oppervlakken, zoals een vloerkleed, waar openingen geblokkeerd kunnen raken. • Sluit apparaten altijd rechtstreeks aan op een wandcontactdoos/stopcontact. Gebruik nooit een verlengsnoer of een verplaatsbare stekkerdoos (verdeeldoos).
- Seite 100 3.4.1 volledige inbouw 3.4.2 gedeeltelijke inbouw elektriciteit installeren via vaste bedrading bedradingsschema (NEFL42HI-EU) bedradingsschema (NEFL50/60HI-EU) bedradingsschema (NEFL72HI-EU) bedradingsschema (NEFL100HI-EU) afwerking verwijderen/installeren van het glazen voorpaneel plaatsen van de kristallen decoratie bedieningsinstructies...
- Seite 101 model designation 1.0 algemene informatie afmetingen (NEFL42/50/60HI-EU) W415-2803 / 06.01.20...
-
Seite 102: Algemene Informatie
algemene informatie afmetingen (NEFL72/100HI-EU) W415-2803 / 06.01.20... -
Seite 103: Informatie Typeplaatje
NEFL50 Fabrikant: Fabrikant: brikan Importeur: Wolf Steel Ltd. Wolf Steel Europe BV ONTWORPEN IN NOORD-AMERIKA 24 Napoleon Road, De Riemsdijk 22, 4004 LC Tiel, DOOR WOLF STEEL LTD. Barrie, ON, L4M 0G8 Canada Nederland GEMAAKT IN CHINA SERIENUMMER: NEFLXX W385-4537 / A opmerking: Het typeplaatje moet altijd bij het apparaat blijven. -
Seite 104: Goedkeuringen
Dit apparaat is getest volgens de GS-normen voor vaste en locatiespecifi eke elektrische binnenhuisapparatuur in Europa. Voor hulp bij het installeren neemt u contact op met uw plaatselijke dealer. Model NEFL42HI-EU NEFL50HI-EU NEFL60HI-EU NEFL72HI-EU NEFL100HI-EU Omschrijving Elektrisch apparaat... -
Seite 105: Het Apparaat Uitpakken En Testen
Haal het apparaat voorzichtig uit de doos en verwijder de steunen. Verwijder voordat u het apparaat installeert al het verpakkingsmateriaal en test of het apparaat goed werkt door het netsnoer aan te sluiten op een gunstig geplaatst, geaard stopcontact van 220-240 V en minimaal 10 A. lijst montagemateriaal Aantal Ref. Omschrijving NEFL42HI-EU NEFL50HI-EU NEFL60HI-EU NEFL72HI-EU NEFL100HI-EU Houtschroeven Gipsplaatankers... -
Seite 106: Plaatsing Van Het Apparaat
2.0 plaatsing van het apparaat WAARSCHUWING • Vanwege de hoge temperatuur mag dit elektrische apparaat niet in looppaden worden geplaatst. Houd brandbare materialen zoals meubels, kussens, beddengoed, papier, kleding, gordijnen en soortgelijke voorwerpen minstens 90 cm (36 inch) van de voorzijde van het apparaat verwijderd. •... -
Seite 107: Installeren
3.0 installeren WAARSCHUWING • Brandgevaar! Het netsnoer mag niet tegen een scherpe rand geklemd zitten. Zet het snoer vast om struikelen of vasthaken te voorkomen en de kans op brandgevaar, een elektrische schok of persoonlijk letsel te beperken. Leg het snoer niet onder vloerbedekking. Bedek het snoer niet met vloerkleden, lopers of vergelijkbare attributen. -
Seite 108: Inbouwen
Afwerkmateriaal 20 3/4" 20 3/4" (527mm) (527mm) (Niet-dragend) 3 1/2" (89mm) MIN 5" (127mm) MAX MODELNR. NEFL42HI-EU 1002 mm (39 1/2 inch) NEFL50HI-EU 1205 mm (47 1/2 inch) NEFL60HI-EU 1459 mm (57 1/2 inch) NEFL72HI-EU 1752 mm (69 inch) NEFL100HI-EU 2463 mm (97 inch) W415-2803 / 06.01.20... -
Seite 109: Wandmontage
installeren wandmontage Vanwege de verschillende materialen die op muren worden gebruikt, raden wij u met klem aan uw plaatselijke bouwbedrijf te raadplegen voordat u dit apparaat aan de muur installeert. Kies een niet-vochtgevoelige locatie op een afstand van 91 cm (36 inch) van brandbare materialen, zoals gordijnen, meubels, beddengoed, papier, etc. - Seite 110 installeren Nadat de montagesteun is geïnstalleerd, tilt u het apparaat met zijn tweeën op en plaatst u de twee haken op de steun in de twee sleuven aan de achterzijde van het apparaat (afb. 3-3). Muur Wall Muur Wall Afb. 3-3 Afb.
-
Seite 111: Inbouw Pre-Installatie
installeren inbouw pre-installatie Vanwege de verschillende materialen die op muren worden gebruikt, raden wij u met klem aan uw plaatselijke bouwbedrijf te raadplegen voordat u dit apparaat aan de muur installeert. opmerking: We raden u aan de wanden van de apparaatopening (met gipsplaat) te bedekken om te voorkomen dat blootliggende isolatie of het vochtscherm in aanraking komt met het apparaat. -
Seite 112: Gedeeltelijke Inbouw
installeren 3.4.2 gedeeltelijke inbouw Installeer twee metalen steunen (één per kant) (meegeleverd) aan op de bovenkant van het apparaat (afb. 3-6). opmerking: Het apparaat wordt geleverd met twee schroeven die al op de steunlocaties zijn aangebracht. Verwijder deze schroeven, gebruik ze opnieuw om de metalen steunen aan het apparaat te bevestigen en schroef de steunen aan de muur. - Seite 113 4.0 elektriciteit installeren via vaste bedrading WAARSCHUWING • Schakel het apparaat volledig uit en laat het afkoelen voordat u onderhoud uitvoert. Dit elektrische apparaat mag alleen worden onderhouden en gerepareerd door een erkende onderhoudsmonteur. Aansluiten via vaste bedrading Als dit apparaat op vaste bedrading moet worden aangesloten, moet een erkende elektricien het snoer verwijderen en het apparaat rechtstreeks op het elektriciteitsnet aansluiten.
-
Seite 114: Elektriciteit
(NEFL42HI-EU) W415-2803 / 06.01.20... -
Seite 115: Bedradingsschema (Nefl50/60Hi-Eu)
elektriciteit bedradingsschema (NEFL50/60HI-EU) W415-2803 / 06.01.20... -
Seite 116: Bedradingsschema (Nefl72Hi-Eu)
elektriciteit bedradingsschema (NEFL72HI-EU) W415-2803 / 06.01.20... -
Seite 117: Bedradingsschema (Nefl100Hi-Eu)
elektriciteit bedradingsschema (NEFL100HI-EU) W415-2803 / 06.01.20... -
Seite 118: Afwerking
5.0 afwerking WAARSCHUWING • Om herbouw te vermijden, moet de elektrische voeding volledig zijn aangelegd voordat de afwerking wordt voltooid. • Ventilatieroosters en luchtopeningen mogen onder geen beding worden afgedekt. verwijderen/installeren van het glazen voorpaneel Houd één hand op het glazen voorpaneel om te voorkomen dat het paneel valt en verwijder de twee schroeven (één per kant) aan de bovenkant van het apparaat (afb. -
Seite 119: Bedieningsinstructies
6.0 bedieningsinstructies Zodra het apparaat is aangesloten op een geaard stopcontact of een vaste bedrading naar een eigen voeding van 220-240 V is het klaar voor gebruik. opmerking: Zorg dat de stroomonderbrekers in de woning zijn ingeschakeld. Bij een stroomstoring verliest het apparaat de geheugenfunctie. - Seite 120 bedieningsinstructies Hiermee schakelt u het apparaat aan/uit. Aan/uit Hiermee regelt u de helderheid van de oranje vlam. 5 standen: F4 - Felst Oranje vlam F0 - Minst fel Hiermee regelt u de helderheid van de witte vlam. 5 standen: F4 - Felst Witte vlam F0 - Minst fel...
-
Seite 121: Bediening Met De Afstandsbediening
bedieningsinstructies bediening met de afstandsbediening AAN/UIT Hiermee schakelt u het apparaat AAN/UIT. Hiermee regelt u de helderheid van de oranje vlam. VLAM - ORANJE 6 standen: F5-F4-F3-F2-F1-F0. De vlam dimt van F5 tot F1. F5 is de helderste stand en F0 is uit. Hiermee regelt u de helderheid van de witte vlam. -
Seite 122: Timerinstellingen Op De Afstandsbediening
bedieningsinstructies timerinstellingen op de afstandsbediening 6.3.1 huidige dag en tijd instellen 1. Druk eenmaal op . Wanneer ‘MA’ (maandag) gaat knipperen, selecteert u met de huidige dag. 2. Druk op . Wanneer het uur gaat knippert, selecteert u met het huidige uur. 3. - Seite 123 7.0 vervangingsonderdelen WAARSCHUWING • Nalaten de onderdelen in overeenstemming met deze handleiding te plaatsen of uitsluitend onderdelen te gebruiken die speciaal voor dit apparaat zijn goedgekeurd, kan materiële schade of persoonlijk letsel tot gevolg hebben. Neem contact op met uw dealer voor vragen over prijzen en ons beleid wat betreft vervangende onderdelen. Normaal gesproken kunnen alle onderdelen via uw erkende dealer/distributeur worden besteld.
-
Seite 124: Vervangingsonderdelen
Overzicht van de NEFL42/50/60/72/100HI-EU Items may not appear exactly as illustrated. Items kunnen anders zijn dan afgebeeld. Onderdeelnummer Ref. Omschrijving voorraad NEFL42HI-EU NEFL50HI-EU NEFL60HI-EU NEFL72HI-EU NEFL100HI-EU Synchroonmotor W435-0105-SER Blower- en W010-4774-SER verwarmingseenheid Plastic strip W497-1598-SER W497-1599-SER W497-1600-SER W497-1604-SER W497-1605-SER... -
Seite 125: Probleemoplossing
8.0 probleemoplossing WAARSCHUWING • Schakel het apparaat volledig uit en laat het afkoelen voordat u onderhoud uitvoert. Dit elektrische apparaat mag alleen worden onderhouden en gerepareerd door een erkende onderhoudsmonteur. symptoom probleem oplossing Het apparaat gaat Het apparaat is niet aangesloten Controleer of de stekker in het stopcontact zit. - Seite 126 probleemoplossing Zwakke of geen vlam. Helderheid van de vlam niet Zie het hoofdstuk ‘bedieningsinstructies’. geselecteerd. Probleem met de led-lampen Controleer de led-lamp en vervang deze zo nodig. van de vlam. Probleem met de Controleer de hoofdprintplaat en vervang deze zo nodig. hoofdprintplaat.
-
Seite 127: Garantie
Napoleon aanvaardt geen andere aansprakelijkheden met betrekking tot de verkoop van dit product, noch machtigt Napoleon derden om dergelijke aansprakelijkheid namens het bedrijf te aanvaarden. Napoleon is niet aansprakelijk voor schade aan het apparaat, de messing rand of andere onderdelen ten gevolge van water, het weer, langdurig vocht, condensatie, schadelijke chemicaliën of reinigingsmiddelen . - Seite 128 NAPOLEON BIEDT AL MEER DAN 40 JAAR PRODUCTEN VOOR WOONCOMFORT : Betekenis van doorgekruiste vuilniscontainer: Gooi elektrische apparaten niet weg bij het ongesorteerd huishoudelijk afval. Breng ze naar de speciale inzamelpunten. Vraag bij de gemeente na welke inzamelpunten er zijn. Als elektrische apparaten op een vuilnisbelt of stortplaats belanden, kunnen gevaarlijke stoffen in het grondwater lekken en in de voedselketen terechtkomen, en dat is schadelijk voor uw gezondheid en welzijn.