Herunterladen Inhalt Inhalt Diese Seite drucken

Werbung

Verfügbare Sprachen

Verfügbare Sprachen

Med-fit-1-instuctionmanual.qxp_Layout 1 24/07/2020 09:43 Page cov1
med
fit
Med-Fit 1
Instruction Manual
Betriebsanleitung
Manuel d'instruction

Werbung

Inhaltsverzeichnis
loading

Inhaltszusammenfassung für Med-fit 1

  • Seite 1 Med-fit-1-instuctionmanual.qxp_Layout 1 24/07/2020 09:43 Page cov1 Med-Fit 1 Instruction Manual Betriebsanleitung Manuel d’instruction...
  • Seite 2: Vorbereitung Der Haut

    Med-fit-1-instuctionmanual.qxp_Layout 1 24/07/2020 09:43 Page cov2 Skin Preparation Before Application of Self-Adhesive Electrodes For best results please wash the area to be treated with a solution of warm salt water (mix one tablespoon of salt in warm water) and rub the area with the salt solution.
  • Seite 3: Inhaltsverzeichnis

    Med-fit-1-instuctionmanual.qxp_Layout 1 24/07/2020 09:43 Page cov3 INDEX Chapter Contents Page 1. General Description ............1 2. Warnings & Precautions ..........2 3. Control Layout ..............3 ..........4 5. Accessories ..............5 6. Graphic Symbols ............6 7. Parameter Controls ............6 8. Attachment of Electrodes Lead Wires ......9 9.
  • Seite 4: General Description

    Med-fit-1-instuctionmanual.qxp_Layout 1 24/07/2020 09:43 Page 1 Chapter 1 : GENERAL DESCRIPTION The MED-FIT 1 is a battery operated pulse generator that sends electrical impulses to the body by means of electrodes attached to the skin. The device has two independently controllable channels. A pair of electrodes can be connected to each channel.
  • Seite 5: Warnings & Precautions

    Med-fit-1-instuctionmanual.qxp_Layout 1 24/07/2020 09:43 Page 2 Tens is unsuitable and should not be used in the following situations. • Persons suffering from conditions where the circulation is impaired. • Epilepsy, Heart Condition or any form of Malignancy. • Patients with poor skin sensation and non-compliant patients who are emotionally disturbed or have dementia.
  • Seite 6: Control Layout

    Med-fit-1-instuctionmanual.qxp_Layout 1 24/07/2020 09:43 Page 3 Chapter 3 : CONTROL LAYOUT...
  • Seite 7 Pulse rate decreases linearly, over a period of 4 seconds, from the control setting value to a value which is 40% less. The lower pulse rate will continue for 1 second and then the pulse rate increases linearly over a period of 4 seconds to the original value.
  • Seite 8: Accessories

    Med-fit-1-instuctionmanual.qxp_Layout 1 24/07/2020 09:43 Page 5 Chapter 5 : ACCESSORIES Each set MED-FIT 1 are completed with standard accessories and standard label as given below I. Accessories REF. NO. DESCRIPTION Q’TY 1. SA 10 50 X 50 mm Adhesive Electrodes...
  • Seite 9: Graphic Symbols

    Med-fit-1-instuctionmanual.qxp_Layout 1 24/07/2020 09:43 Page 6 Chapter 6 : GRAPHIC SYMBOLS Note Operating Instructions Degree of Electrical Protection BF Do not insert the plug into AC power supply socket. Direct Current (DC power source) Consult Instructions for use Manufacturer Serial Number...
  • Seite 10: Pulse Rate

    Med-fit-1-instuctionmanual.qxp_Layout 1 24/07/2020 09:43 Page 7 PULSE RATE The Pulse Rate (frequency, pulses per second or Hertz) is thought to determine whether the spinal gating mechanism or the endorphin release mechanism is activated. As a rough guide the higher frequencies, those above 70Hz, will activate the spinal gating mechanism.
  • Seite 11 Med-fit-1-instuctionmanual.qxp_Layout 1 24/07/2020 09:43 Page 8 INTENSITY Each patient responds differently to different levels of intensity, due to varying degrees of tissue resistance, innnervation, skin thickness, etc. Intensity instructions are therefore limited to the following settings: Perception - The intensity is increased so that the patient can feel the stimulation, but there is no muscular contraction.
  • Seite 12: Attachment Of Electrodes Lead Wires

    Med-fit-1-instuctionmanual.qxp_Layout 1 24/07/2020 09:43 Page 9 Chapter 8 : ATTACHMENT OF ELECTRODE LEAD WIRES The wires provided with the system insert into the jack sockets located on top of the device. Holding the insulated portion of the connector, push the plug into one of the jacks (see drawing); one or two sets of wires may be used.
  • Seite 13: Preparation For Use

    Chapter 10 : APPLICATION OF RE-USABLE SELF ADHESIVE ELECTRODES Application 1. Clean and dry the skin at the thoroughly with soap and water prior to application of electrodes. 2. Insert the lead wire into the pin connector on the pre-wired electrodes.
  • Seite 14: Adjusting The Controls

    Med-fit-1-instuctionmanual.qxp_Layout 1 24/07/2020 09:43 Page 11 Important 1. Do not apply to broken skin. 2. The electrodes should be discarded when they no longer adhere. 3. The electrodes are intended for single patient use only. 4. If irritation occurs, discontinue use and consult your clinician.
  • Seite 15 Med-fit-1-instuctionmanual.qxp_Layout 1 24/07/2020 09:43 Page 12 3.On/Off Switch and Intensity Control : The unit is switched on by turning the appropriate channel control clockwise. The LED will illuminate as described above. The output intensity increases as the control is turned further clockwise. To reduce the output intensity and/or switch off the unit the control is turned anti-clockwise.
  • Seite 16 Med-fit-1-instuctionmanual.qxp_Layout 1 24/07/2020 09:43 Page 13 5. Mode Control Expose the controls by sliding front cover down. This switch has 3 positions: B for Burst stimulation, N for Constant stimulation, and M for modulated stimulation. Push the Mode Selector to the desired position.
  • Seite 17: Battery Information

    5. Replace the battery compartment cover and slide to close Chapter 12 : BATTERY INFORMATION PRECATIONS 1. Remove battery if equipment is not likely to be used for some time. 2. Please recycle the used battery in accordance with domestic regulation.
  • Seite 18: Battery Charging

    (d) WARNINGS: 1. Do not attempt to charge any other types of batteries in your charger, other than the nickel-cadmium rechargeable batteries. Other types of batteries may leak or burst.
  • Seite 19: Maintenance Transportation And Storage

    °C 20% ~ 95%, Atmosphere pressure 500hPa ~ 1060hPa. Chapter 14 : SAFETY-TECHNICAL CONTROLS For safety reasons, check your MED-FIT 1 each week based on the following checklist. 1. Check the device for external damage. - deformation of the housing.
  • Seite 20: Conformity To Safety Standards

    EN 60601-1-2:2001 and EN 60601-1:1990+A1:1993+A2:1995 +A13:1996 safety standards. Chapter 16 : WARRANTY All MED-FIT 1 models carry a warranty of one year from the date of delivery. The warranty applies to the stimulator only and covers both parts and labour relating thereto.
  • Seite 21 Med-fit-1-instuctionmanual.qxp_Layout 1 24/07/2020 09:43 Page 18...
  • Seite 22 Med-fit-1-instuctionmanual.qxp_Layout 1 24/07/2020 09:43 Page 19 Kapitel 1 Vorwort Der akute Schmerz hat meist eine einfache Ursache (Unfall, Entzündung) und ist daher in der Regel leicht zu behandeln. Mit seinen vielfältigen Entste- hungs- und Erscheinungsformen stellt der chronische Schmerz dagegen für den behandelnden Arzt eine schwierige Herausforderung dar.
  • Seite 23 Med-fit-1-instuctionmanual.qxp_Layout 1 24/07/2020 09:43 Page 20 Kapitel 2 Sicherheitshinweise 1. Vor Inbetriebnahme Gebrauchsanweisung lesen! 2. Sollte TENS nicht den gewünschten Effekt erzielen, oder die Stimulation unangenehm sein, beziehungsweise eine Schmerzverstärkung hervorrufen, wenden Sie sich bitte an Ihren Arzt. 3. Das TENS Gerät soll niemals in Verbindung mit dem Führen einer Maschine oder eines Fahrzeuges angewendet werden.
  • Seite 24 Med-fit-1-instuctionmanual.qxp_Layout 1 24/07/2020 09:43 Page 21 Kapitel 3 1. Ungeklärte Schmerzursache. 2. Bei implantierten elektronischen Geräten (z.B. Herzschrittmacher). 3. Schwere Herzrhythmusstörungen. 4. Aversion gegen Elektrizität. 6. Während der ersten drei Schwangerschaftsmonate. 7. Psychische Leiden, Epilepsien. 8. Stimulation über der Halsschlagader.
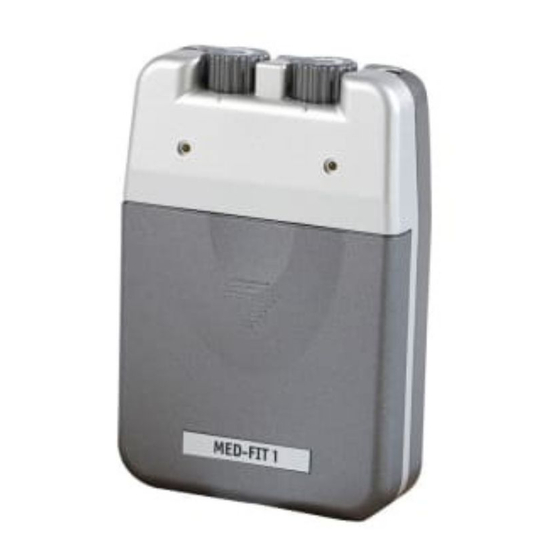
  • Seite 25 Med-fit-1-instuctionmanual.qxp_Layout 1 24/07/2020 09:43 Page 22 Kapitel 5 Gerätebeschreibung (1) Anschlussbuchse (2) Intensitätsregler (Ein-/Ausschalter) (3) Betriebsanzeige (4) Impulsweiteneinstellung (5) Betriebsarteneinstellung (6) Frequenzeinstellung (7) Batterieband (8) Batteriefach...
  • Seite 26 Med-fit-1-instuctionmanual.qxp_Layout 1 24/07/2020 09:43 Page 23 Kapitel 6 Bildzeichen Bedienungsanweisung beachten Schutzgrad BF Stecker nicht in 220 / 380 V Netz Steckdose stecken Frequenz Impulsweite Geschutzt gegen feste Fremdkorper groser als 12 mm und gegen Tropfwasser mit einem Auftreffwinkel zur senkrechten von 15°.
  • Seite 27 Med-fit-1-instuctionmanual.qxp_Layout 1 24/07/2020 09:43 Page 24 Kapitel 7 Technische Daten PARAMETER TECHNISCHE BESCHREIBUNG 01. Kanäle zwei 02. Intensität Stufenlos regelbar, von 0 bis 80 mA bei einen Widerstand von 500 Ohm pro Kanal 03. Impulsform Asymmetrisch, biphasisch, rechteckig (gleichstromfrei) 04. Spannung konstant 05.
  • Seite 28 Med-fit-1-instuctionmanual.qxp_Layout 1 24/07/2020 09:43 Page 25 Kapitel 8 Lieferumfang Das N601 wird serienmäßig in folgender Ausstattung geliefert; Ausstattung: BEST. Nr. BESCHREIBUNG MENGE 1. ZE102 50 X 50 mm selbstklebenden Elektroden 4 Stück 2. ZE401 Elektroden Kabel 2 Stück 3. ZE601 9 V Batterie, alkaline 1 Stück...
  • Seite 29 Med-fit-1-instuctionmanual.qxp_Layout 1 24/07/2020 09:43 Page 26 Eine längere Impulsdauer ist am besten dazu geeignet das motorische Nervensystem zu stimulieren. Eine kürzere Impulsdauer stimuliert das sen- sorische Nervensystem. Die Wahl der Impulsdauer geschieht in Abhängigkeit von der gewählten Be- triebsart. Frequenz (Hz) Die Wahl der Frequenz ist davon abhängig, ob eine schnell einsetzende oder...
  • Seite 30 Med-fit-1-instuctionmanual.qxp_Layout 1 24/07/2020 09:43 Page 27 Intensität tensitätsregler im Uhrzeigersinn wird der betreffende Kanal eingeschaltet und in der Stärke reguliert. Einstellung Intensität bei höheren Frequenzen Reizstärke deutlich unter der Schmerzschwelle liegen sollte. Einstellung Intensität bei niedrigen Frequenzen Der Patient sollte hierbei leichte Muskelzuckungen verspüren.
  • Seite 31 Med-fit-1-instuctionmanual.qxp_Layout 1 24/07/2020 09:43 Page 28 Elektrodenkabel Anschlussbuchse Elektroden Nachdem die Elektrodenkabel mit dem Gerät verbunden worden sind, können Sie die Kabel mit den Elektroden verbinden. Vorsicht t ä ü Steckdose. Kapitel 12 Reinigen Sie die Kabel mit einem feuchten Tuch, anschließend reiben Sie die Kabel mit etwas Talkum ein, was die Lebensdauer verlängert und die Hand-...
  • Seite 32 Med-fit-1-instuctionmanual.qxp_Layout 1 24/07/2020 09:43 Page 29 Die Elektroden sollten aus hygienischen Gründen nur von einer Person ange- wandt werden. Es wird empfohlen die Hautstellen vor Aufbringen der Elektroden mit Wasser und Seife zu reinigen und die Stelle anschließend zu trocknen.
  • Seite 33 Med-fit-1-instuctionmanual.qxp_Layout 1 24/07/2020 09:43 Page 30 Einschalten A u s s - Intensitätsregler 3. Anschlussbuchsen Bevor Sie die Elektrodenkabel mit dem Gerät verbinden, stellen Sie sicher, das dieses ausgeschaltet ist. Die Elektrodenkabel werden nun in die Nachdem die Elektrodenkabel mit dem Gerät verbunden wurden, können...
  • Seite 34 Med-fit-1-instuctionmanual.qxp_Layout 1 24/07/2020 09:43 Page 31 5. Frequenzeinstellung Die Frequenz (Impulse pro Sekunde) ist von 2 Hz bis 150 Hz. stufenlos einstellbar. Die eingestellte Frequenz ist für beide Kanäle gleich. A. Frequenzeinstellung erhöhen Durch Drehen im Uhrzeigersinn des Knopfes nimmt die Frequenz k o n - tinuierlich zu.
  • Seite 35 Nach längerem Gebrauch sollte die Batterie gewechselt werden, um die Wirkungsweise des TENS-Gerätes zu erhalten 1. Das Gerät auf beiden Kanälen ausschalten. 2. Das Batteriefach durch Aufschieben öffnen. 3. Entfernen Sie die alte Batterie 4. Setzen Sie bitte eine neue Batterie in das Batteriefach ein.
  • Seite 36 Nach längerer Lagerung müssen Akkus vor Gebrauch wieder aufgeladen werden. Akku laden (1) Schließen Sie das Ladegerät an einen 220 Volt Anschluss an. (2) Beachten Sie die Vorschriften des Akku-Herstellers über die Ladezeit. (3) Wenn die vom Hersteller genannte Ladezeit erreicht ist, entnehmen Sie den Akku und schalten das Ladegerät aus.
  • Seite 37 Der Akku sollte nicht zusammen mit Münzen und ähnlichen Metallteilen aufbewahrt werden. (c) Warnung : 1. Laden Sie nur wiederaufladbare Nickel/Kadmium Akkus in Ihrem Lade- gerät. Andere Batterien werden undicht oder können explodieren. 2. Erwärmen Sie keine Akkus , sonst können diese explodieren.
  • Seite 38 Med-fit-1-instuctionmanual.qxp_Layout 1 24/07/2020 09:43 Page 35 Kapitel 17 Wartung , Transport und Lagerung des Gerätes 1. Für die Reinigung des Gerätes eignet sich Alkohol. Beachten Sie: Während des Umgangs mit leicht entzündlichen Flüssigkeiten nicht rauchen und kein offenes Licht verwenden.
  • Seite 39 Med-fit-1-instuctionmanual.qxp_Layout 1 24/07/2020 09:43 Page 36 Bitte wenden Sie sich an Ihren Händler, falls Sie Probleme mit dem Gerät oder dem Zubehör haben. Die Lebensdauer des N601 ist auf 10 Jahre begrenzt, danach sollte eine Generalüberholung durchgeführt werden. Die Sicherheit- stechnische Kontrolle gemäß...
  • Seite 40 Med-fit-1-instuctionmanual.qxp_Layout 1 24/07/2020 09:43 Page 37 Kapitel 20 Konformitätserklärung Das N601 TENS Gerät entspricht den grundlegenden Anforderungen gemäß Anhang 1 – I der Richtlinie 93/42/EWG. Kapitel 21 Garantie Die Garantie für ein N601 TENS Gerät beträgt vom Tage der Lieferung an 2 Jahre.
  • Seite 41 Med-fit-1-instuctionmanual.qxp_Layout 1 24/07/2020 09:43 Page 38 INDEX Contenu du chapitre ......Page Description générale ......39 Avertissements et précautions .
  • Seite 42: Description Générale

    Med-fit-1-instuctionmanual.qxp_Layout 1 24/07/2020 09:43 Page 39 Chapitre 1 : DESCRIPTION GÉNÉRALE Le MED-FIT 1 est un générateur d'impulsions fonctionnant avec des piles envoyant des impulsions électriques au corps par le biais d'électrodes collées sur la peau. L'appareil possède deux canaux contrôlables de façon indépendante.
  • Seite 43 Med-fit-1-instuctionmanual.qxp_Layout 1 24/07/2020 09:43 Page 40 Les appareils Tens ne conviennent pas et ne doivent pas être utilisés dans les situations suivantes. • Condition médicale causant une altération de la circulation sanguine. • Épilepsie, problèmes cardiaques et toute forme de malignité.
  • Seite 44: Disposition Des Commandes

    Med-fit-1-instuctionmanual.qxp_Layout 1 24/07/2020 09:43 Page 41 Chapitre 3 : DISPOSITION DES COMMANDES (1) CONNECTEUR CÂBLE (2) COMMANDE INTENSITÉ (INTERRUPTEUR MARCHE/ARRÊT) (3) PILOTE (4) COMMANDE LONGUEUR IMPULSION (5) COMMANDE MODE (6) COMMANDE FRÉQUENCE IMPULSION (7) BANDE PILE (8) BOÎTIER PILE...
  • Seite 45: Spécifications Techniques

    Med-fit-1-instuctionmanual.qxp_Layout 1 24/07/2020 09:43 Page 42 Chapitre 4 : SPÉCIFICATIONS TECHNIQUES Les spécifications techniques du MED-FIT 1 sont les suivantes M" u t i A A j e i t r c % e t $ r c % f f f...
  • Seite 46: Accessoires

    Fils conducteurs d'électrode ....2 Pile 9 V, type 6F22 .....1 Manuel d'instructions .
  • Seite 47: Symboles Graphiques

    Med-fit-1-instuctionmanual.qxp_Layout 1 24/07/2020 09:43 Page 44 Chapitre 6 : SYMBOLES GRAPHIQUES Remarque sur les instructions d'utilisation Degré de protection électrique BF N'insérez pas la fiche dans la prise d'alimentation secteur. Courant continu (source d'alimentation CC) Consultez les instructions d'utilisation Fabricant Numéro de série...
  • Seite 48 Med-fit-1-instuctionmanual.qxp_Layout 1 24/07/2020 09:43 Page 45 FRÉQUENCE DES IMPULSIONS La fréquence des impulsions (fréquence, impulsions par seconde ou Hertz) sert à déterminer si le mécanisme d'atténuation spinale ou de diffusion d'endorphine est activé. Pour donner une idée, les hautes fréquences, celles au-dessus de 70 Hz activeront le mécanisme d'atténuation spinale.
  • Seite 49 Med-fit-1-instuctionmanual.qxp_Layout 1 24/07/2020 09:43 Page 46 INTENSITÉ Chaque patient répond différemment aux différents niveaux d'intensité, en raison des différents degrés de résistance des tissus, de l'innervation, de l'épaisseur de la peau... Les instructions d'intensité sont donc restreintes aux réglages suivants : Perception - L'intensité...
  • Seite 50: Branchement Des Fils Conducteurs Des Électrodes

    Med-fit-1-instuctionmanual.qxp_Layout 1 24/07/2020 09:43 Page 47 En général, le soulagement de la douleur diminuera sous 30 minutes après la fin de la stimulation. Le soulagement de la douleur obtenu avec des TENS à basse fréquence peut durer plus longtemps. Chapitre 8 : BRANCHEMENT DES FILS CONDUCTEURS DES ÉLECTRODES...
  • Seite 51: Préparation Pour Utilisation

    Retrait 1. Retirez les électrodes de la peau ; ne tirez pas sur les fils conducteurs car vous pourriez endommager les électrodes. 2. Placez les électrodes sur le revêtement et retirez le fil conducteur en le tournant et en tirant dessus délicatement.
  • Seite 52: Ajuster Les Commandes

    Med-fit-1-instuctionmanual.qxp_Layout 1 24/07/2020 09:43 Page 49 IMPORTANT 1. N'appliquez pas sur les peaux abimées. 2. Les électrodes doivent être jetées lorsqu'elles n'adhèrent plus. 3. Les électrodes sont conçues pour une utilisation par un seul patient. 4. En cas d'irritation, cessez l'utilisation et consultez votre médecin.
  • Seite 53 Med-fit-1-instuctionmanual.qxp_Layout 1 24/07/2020 09:43 Page 50 3. Interrupteur marche/arrêt et contrôle de l'intensité : L'appareil s'allume en faisant tourner la commande de canal adéquate dans le sens horaire. La DEL s'éclairera comme décrit ci-dessus. L'intensité de la sortie augmente lorsque la commande est tournée davantage dans le sens horaire.
  • Seite 54 Med-fit-1-instuctionmanual.qxp_Layout 1 24/07/2020 09:43 Page 51 5. Commande de mode Accédez aux commandes en faisant coulisser le couvercle avant vers le bas. Cet interrupteur possède 3 positions : B pour stimulation par décharge, N pour stimulation constante et M pour stimulation modulée.
  • Seite 55: Informations Sur Les Piles

    Avec le temps, pour assurer la sécurité fonctionnelle de l'appareil TENS, il est nécessaire de changer la pile. 1. Vérifiez que les deux commandes d'intensité sont en position arrêt. 2. Faites coulisser et retirez le couvercle du compartiment. 3. Retirez la pile du compartiment.
  • Seite 56: Recharger Les Piles

    Après de longues périodes de stockage, rechargez la pile avant utilisation. RECHARGER LES PILES (1) Branchez le chargeur sur toute prise électrique de 110 ou 220/240 V. L'utilisation de toute extension non fournie avec le chargeur peut causer des incendies, électrocutions ou blessures corporelles.
  • Seite 57: Maintenance, Transport Et Stockage De L'appareil

    6. L'appareil EMS emballé doit être stocké et transporté avec des températures de -20 à 60°C, une humidité relative de 20 à 95 % et une pression atmosphérique de 500 à 1 060 hPa. Chapitre 14 : CONTRÔLES TECHNIQUES DE SÉCURITÉ...
  • Seite 58: Conformité Aux Normes De Sécurité

    EN 60601-1-2:2001 et EN 60601-1:1990+A1:1993+A2:1995 Chapitre 16 : GARANTIE Tous les modèles MED-FIT 1 disposent d'une garantie d'un an à compter de la date de livraison. La garantie s'applique au stimulateur uniquement et couvre les pièces et la main d'œuvre concernant l’appareil.
  • Seite 59 Med-fit-1-instuctionmanual.qxp_Layout 1 24/07/2020 09:43 Page 56...
  • Seite 60 Med-fit-1-instuctionmanual.qxp_Layout 1 24/07/2020 09:43 Page cov4 Med-fit Ltd Unit 8, Martel Court, S. Park Business Park Hamilton Road, Stockport, SK1 2AF Tel: 0161 429 7330 Web: www.med-fit.co.uk...

Inhaltsverzeichnis