Tripp Lite DWF3770L Benutzerhandbuch
Feste wandhalterung für flachbildschirme
Verfügbare Sprachen
Verfügbare Sprachen
13-10-124-9332E3.indb 1
Downloaded from
www.Manualslib.com
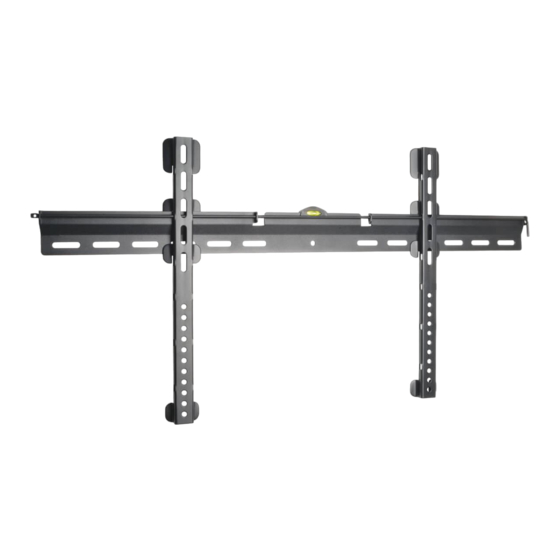
Owner's Manual
Fixed Flat Screen
Wall Mount
MODEL: DWF3770L
Español 9 • Français 17 • Русский 25 • Deutsch 33
CAUTION: DO NOT EXCEED MAXIMUM LISTED WEIGHT CAPACITY. SERIOUS INJURY OR
PROPERTY DAMAGE MAY OCCUR!
300x300/400x200
400x400/600x400
800x400
1111 W. 35th Street, Chicago, IL 60609 USA • www.tripplite.com/support
Copyright © 2013 Tripp Lite. All rights reserved.
manuals search engine
70"
MAX
1
65kg
(143lbs)
MAX
11/19/2013 4:30:47 PM
Inhaltsverzeichnis

Verwandte Anleitungen für Tripp Lite DWF3770L


Inhaltszusammenfassung für Tripp Lite DWF3770L
-
Seite 33: Feste Wandhalterung Für Flachbildschirme
KÖNNEN SCHWERE KÖRPERVERLETZUNGEN ODER ERHEBLICHE SACHSCHÄDEN EINTRETEN! 300x300/400x200 70” 400x400/600x400 65kg (143lbs) 800x400 1111 W. 35th Street, Chicago, IL 60609 USA • www.tripplite.com/support Copyright © 2013 Tripp Lite. Alle Rechte vorbehalten. 13-10-124-9332E3.indb 33 11/19/2013 4:30:59 PM Downloaded from www.Manualslib.com manuals search engine... - Seite 34 Einsatz sicher ist. Da die Anwendungen variieren können, übernimmt der Hersteller keine Garantie bezüglich der Eignung dieser Geräte für einen bestimmten Verwendungszweck. Tripp Lite hat den Grundsatz, sich kontinuierlich zu verbessern. Spezifikationen können ohne Ankündigung geändert werden.
- Seite 35 Komponentenliste WICHTIG: Überprüfen Sie, ob Sie alle in der Komponentenliste aufgeführten Teile erhalten haben, bevor Sie mit der Installation beginnen. Wenn Teile beschädigt oder nicht vorhanden sind, besuchen Sie www.tripplite.com/support. Wandplatte (x1) Adapterhalterung (x2) Sicherheitsschiene (x1) Paket M M5X14 (x4) M6X14 (x4) M8X20 (x4) M6X30 (x4)
- Seite 36 1a. Wandbefestigung für Holzbalken {Für 406 mm (16”) / 450 mm (17,7”) / 600 mm (23,6”) / 610 mm (24”) Balken} Suchen und markieren Sie die genaue Position der Befestigungslöcher Bohren Sie die Führungslöcher Schrauben Sie die Wandplatte an die Wand D6 Unterlegscheibe Ankerbolzen WARNUNG...
- Seite 37 1b. Montieren an Vollziegel und Beton Suchen und markieren Sie die genaue Position der Befestigungslöcher Bohren Sie die Führungslöcher Betonanker D6 Unterlegscheibe Ankerbolzen Schrauben Sie die Wandplatte an die Wand WARNUNG • Bei der Installation der Wandhalterung auf Betonschalstein muss der Beton mindestens 35 mm (1-3/8 Zoll) dick sein, um Betonanker zu verwenden.
-
Seite 38: Installieren Der Adapterhalterungen
2. Installieren der Adapterhalterungen Oberseite des Fernsehers 2-1 Für flache Hinterfolien M5x14 Unterlegscheibe M6x14 M8x20 13-10-124-9332E3.indb 38 11/19/2013 4:30:59 PM Downloaded from www.Manualslib.com manuals search engine... - Seite 39 2. Installieren der Adapterhalterungen 2-2 Für versenkte Hinterfolie oder den Zugriff auf A/V-Eingänge M8x20 M6x30 M6x30 M6x30 M8x20 M8x30 M8x30 M8x30 Unterleg- Unterlegscheibe Unterlegscheibe Unterlegscheibe scheibe oder oder oder Kleiner Kleiner Abstandhalter Abstandhalter Kleiner Großer Kleiner Großer Abstandhalter Abstandhalter Abstandhalter Abstandhalter Hinweis: Verwenden Sie die für den Bildschirmtyp geeigneten Schrauben, Unterlegscheiben und Abstandhalter (falls erforderlich).
- Seite 40 3. Hängen Sie den Fernseher an die Wandplatte Wand Wand • Bevor Sie den Fernseher loslassen, stellen Sie sicher, dass die Adapterhalterungen sicher an der Wandplatte angebracht sind. • Schieben Sie die Sicherheitsschiene oben in die Halterung, um den Fernseher zu sichern. •...