Keter MANOR 4x6S Gebrauchsanleitung
Vorschau ausblenden
Andere Handbücher für MANOR 4x6S:
- Montageanleitung (36 Seiten) ,
- Gebrauchsanleitung (17 Seiten) ,
- Montageanleitung (24 Seiten)
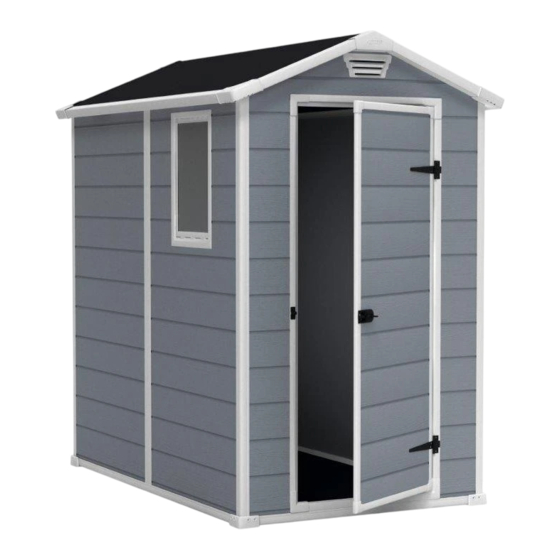
MANOR 4x6S
USER MANUAL | MODE D'EMPLOI | MANUAL DEL USUARIO | GEBRAUCHSANLEITUNG |
GEBRUIKSHANDLEIDING | MANUALE PER L'UTENTE | MANUAL DO UTILIZADOR
WARRANTY ACTIVATION
A-1265-12 585436 46S.indd 1
US, Canada:
Tel: +1-888-374-4262
Fax: +1-317-575-4502
UK: Tel: +44-121-506-0008
Fax: +44-121-422-0808
Spain: Tlf: +34-949-277-421
Fax: +34-949-348-976
Other European Countries:
Tel: +31-8847-22277, Fax: +31-1612-27002
Thank you for your purchase of the Keter shed. In order to activate your warranty,
please log onto our website and fill in the form under warranty activation.
SKU: 17197126 | 17194155
WWW.KETER.COM
31.10.2017 17:34
Inhaltsverzeichnis

Verwandte Anleitungen für Keter MANOR 4x6S


Inhaltszusammenfassung für Keter MANOR 4x6S
- Seite 1 Fax: +34-949-348-976 Other European Countries: Tel: +31-8847-22277, Fax: +31-1612-27002 Thank you for your purchase of the Keter shed. In order to activate your warranty, WARRANTY ACTIVATION please log onto our website and fill in the form under warranty activation. A-1265-12 585436 46S.indd 1...
- Seite 2 SITE PREPARATION | PRÉPARATION DU SITE | PREPARACIÓN DEL LUGAR | VORBEREITUNG DES AUFSTELLUNGSORTES | VOORBEREIDING VAN HET TERREIN | PREPARAZIONE DEL LUOGO DI MONTAGGIO | PREPARAÇÃO DO LOCAL Level the ground surface | Égalisez la surface du sol | Nivele la superficie del suelo | Ebnen Sie die Bodenoberfläche | Maak de bodem vlak | Livella la superficie del terreno | Nivele a superfície do solo Recommendation: Construct a wooden or concrete base as a foundation | Recommandation: fabriquez une base en bois ou en béton en guise de fondation | Recomendación: construya una base de madera o de cemento a modo de cimiento |...
- Seite 3 BEFORE STARTING ASSEMBLY | AVANT DE COMMENCER LE MONTAGE | ANTES DE EMPEZAR EL ARMADO | VOR MONTAGEBEGINN | VOORDAT U BEGINT TE MONTEREN | PRIMA DI INIZIARE IL MONTAGGIO | ANTES DE INICIAR A MONTAGEM Read the care and safety guidelines at the end of this manual | Check to ensure that there are no missing or damaged parts BEFORE starting or arranging assembly | Review all assembly instructions | Assemble all the parts according to the directions in this manual.
- Seite 4 SCREWS | VIS | SCHRAUBEN | TORNILLOS | SCHROEVEN | VITI | PARAFUSOS | ŚRUBY • Please refer to the screw index below to find the actual screw size. • Veuillez vous référer à l’index des vis ci-dessous pour trouver la taille de la vis réelle. •...
-
Seite 5: Inhaltsverzeichnis
SHED PARTS | PIÈCES DE L’ABRI | PARTES DEL COBERTIZO | TEILE DES SCHUPPENS | ONDERDELEN VAN HET SCHUURTJE | COMPONENTI DEL DEPOSITO ATTREZZI | PEÇAS DO ABRIGO Remove all parts from the package(s) and spread them out on a clean work surface | Code letters are imprinted on each part for easy identification | Retirez toutes les pièces du/des paquet(s) et étalez-les sur une surface de travail propre | Des lettres sont imprimées sur chaque pièce pour une identification facile | Saque todas las piezas del paquete o paquetes y póngalas sobre una superficie de trabajo limpia | El código de letras está... - Seite 6 ROOF PARTS | PIÈCES DU TOIT | DACHELEMENTE | PARTES DEL TECHO | DAKONDERDELEN | PARTI DEL TETTO | PEÇAS DO TELHADO e1d (x4) 56 cm 22” rc (x4) r1m (x1) rc1 (x2) 172 cm 121x195 cm 67.7” kc (x2) 43.6”x76.8”...
-
Seite 7: T (X4)
FLOOR ASSEMBLY | MONTAGE DU SOL | ARMADO DEL PISO | MONTAGE DER BODENPLATTE | VLOERMONTAGE | MONTAGGIO DEL PAVIMENTO | MONTAGEM DO PISO A-1265-12 585436 46S.indd 7 31.10.2017 17:34... - Seite 8 • Turn over the floor panel • Retournez le panneau du sol • Dé la vuelta al panel del suelo • Drehen Sie die Bodenplatte um • Draai het vloerpaneel om • Capovolgi il pannello del pavimento • Vire o painel do pavimento •...
-
Seite 9: W1D (X3)
• Turn over the floor panel • Retournez le panneau du sol • Dé la vuelta al panel del suelo • Drehen Sie die Bodenplatte um • Draai het vloerpaneel om • Capovolgi il pannello del pavimento • Vire o painel do pavimento WALL ASSEMBLY | MONTAGE DU MUR | ARMADO DE PAREDES | MONTAGE DER WÄNDE | MONTAGE VAN DE MUREN | ASSEMBLAGGIO DELLE PARETI | MONTAGEM DA PAREDE A-1265-12 585436 46S.indd 9... - Seite 10 • Use spatula (part “SPA”) for easier insertion of panel into profile. • Utilisez la spatule (partie « SPA ») pour une meilleure insertion du panneau dans le profil. • Utilice una espátula (pieza “SPA”) para una mejor inserción del panel en el perfil. •...
- Seite 11 • Fully fit the panel inside the profile • Fixez entièrement le panneau dans la découpe • Coloque completamente el panel dentro del perfil • Passen Sie das Panel genau und akkurat in das Profil ein • Plaats het paneel volledig in het profiel •...
- Seite 12 • Fully fit the panel inside the profile • Fixez entièrement le panneau dans la découpe • Coloque completamente el panel dentro del perfil • Passen Sie das Panel genau und akkurat in das Profil ein • Plaats het paneel volledig in het profiel •...
- Seite 13 • Fully fit the panel inside the profile • Fixez entièrement le panneau dans la découpe • Coloque completamente el panel dentro del perfil • Passen Sie das Panel genau und akkurat in das Profil ein • Plaats het paneel volledig in het profiel •...
- Seite 14 • Fully fit the panel inside the profile • Fixez entièrement le panneau dans la découpe • Coloque completamente el panel dentro del perfil • Passen Sie das Panel genau und akkurat in das Profil ein • Plaats het paneel volledig in het profiel s26b •...
- Seite 15 • Fully fit the panel inside the profile • Fixez entièrement le panneau dans la découpe • Coloque completamente el panel dentro del perfil • Passen Sie das Panel genau und akkurat in das Profil ein • Plaats het paneel volledig in het profiel •...
- Seite 16 s26b A-1265-12 585436 46S.indd 16 31.10.2017 17:34...
- Seite 17 • Ensure roof is set fully down; use spatula as shown in the figure • Assurez-vous que le toit est bien entièrement posé ; utilisez la spatule comme le montre la figure • Asegúrese de que el techo esté completamente encajado abajo; utilice la espátula como lo muestra la figura •...
-
Seite 18: Lewf (X1)
DOOR ASSEMBLY | MONTAGE DE LA PORTE | ARMADO DE LA PUERTA | MONTAGE DER TÜR | DEURMONTAGE | MONTAGGIO DELLA PORTA | MONTAGEM DA PORTA rewf lewf • Align holes in aluminum profiles with slits in door panel • Aligner les trous des profils en aluminium sur les fentes du panneau de porte •... -
Seite 19: Uwf (X1)
Self drill screw ds2b (x4) 12 mm 0.47” click ds2b A-1265-12 585436 46S.indd 19 31.10.2017 17:34... - Seite 20 Self drill screw s10b (x8) 12 mm 0.47” s13b (x4) 12 mm 0.47” A-1265-12 585436 46S.indd 20 31.10.2017 17:34...
- Seite 21 • Align edge of aluminum profile with edge of door panel • Alignez le bord du profil en aluminium avec le bord du panneau de porte • Alinee el borde del perfil de aluminio con el borde del panel de la puerta •...
- Seite 22 • Turn over the door panel • Retourner le vantail • Dele la vuelta al panel de la puerta • Türplatte umklappen • Draai het deurpaneel om • Capovolgi il pannello della porta • Volte o painel da porta A-1265-12 585436 46S.indd 22 31.10.2017 17:34...
- Seite 23 Self drill screw s10b (x8) 12 mm 0.47” s10b • Turn over the door panel • Retourner le vantail • Dele la vuelta al panel de la puerta • Türplatte umklappen • Draai het deurpaneel om • Capovolgi il pannello della porta •...
- Seite 24 smdl (x1) smdp (x1) smdl + smdp (x1) dh (x2) s13b (x12) 12 mm 0.47” s13b s13b smdl + smdp A-1265-12 585436 46S.indd 24 31.10.2017 17:34...
- Seite 25 smdb (x1) s13b (x10) 12 mm 0.47” smdb s13b A-1265-12 585436 46S.indd 25 31.10.2017 17:34...
- Seite 26 kc (x2) s26b (x4) 26 mm 1” click s26b v (x2) click click A-1265-12 585436 46S.indd 26 31.10.2017 17:34...
- Seite 27 f-out (x1) pls (x1) acw (x1) f-out A-1265-12 585436 46S.indd 27 31.10.2017 17:34...
- Seite 28 • f-in (x1) sc15 (x7) • 16 mm 0.63” • • • • • • • • • sc15 • • • • • • • f-in • • • • OPTION | OPCIÓN | OPTIE | OPZION | OPÇÃOE •...
- Seite 29 CARE AND SAFETY GUIDELINES • The shed is intended for storage purposes only. It is not designed for habitation. • It is strongly recommended to secure the shed to an immovable object or anchor to the ground by drilling holes in the shed floor (at the pre-marked locations) and inserting proper screws into the ground (screws are not included).
- Seite 30 • Tragen Sie eine Schutzbrille und befolgen Sie bei Verwendung von Elektrowerkzeugen immer die Anweisungen des Herstellers. • Reinigen Sie den Schuppen mit einem Gartenschlauch und einem milden Reinigungsmittel. Verwenden Sie auf keinen Fall eine harte Bürste und Scheuer - oder Entfettungsmittel sowie Öl- oder Acetonhaltige Reinigungsmittel, da diese Flecken verursachen oder den Schuppen beschädigen könnten. •...
- Seite 31 Keter no se hace responsable por ningún daño realizado por terceros o daños o pérdida de objetos dentro o cerca de la cobertizo. Al entregar el ticket o factura de compra y prueba del presunto fallo del producto, y sujeto a informar del fallo de manera puntual, Keter, a su discreción, reemplazará...
- Seite 32 O seu abrigo Keter (“o Produto”) foi fabricado manualmente a partir de materiais recicláveis de qualidade superior sob controlo e supervisão rigorosos. Em caso de ocorrência de algum problema com o Produto, por favor, faça a sua reclamação para o serviço de apoio ao cliente Keter no nosso site (www.keter.com) ou por telefone.