Herunterladen Inhalt Inhalt Diese Seite drucken
Garmin VIRB Gebrauchsanweisung
Vorschau ausblenden Andere Handbücher für VIRB:

Werbung

Verfügbare Sprachen
  • DE

Verfügbare Sprachen

  • DEUTSCH, seite 9
VIRB™ Remote Instructions.............................................................................................................. 2
Instructions de la télécommande VIRB™.......................................................................................... 4
VIRB™ Istruzioni del telecomando.................................................................................................... 6
VIRB™ Fernbedienung - Anweisungen............................................................................................ 8
VIRB™ Instrucciones del mando a distancia................................................................................... 10
Instruções do controlo remoto VIRB™............................................................................................ 12
®
Garmin
and the Garmin logo are trademarks of Garmin Ltd. or its subsidiaries, registered in the USA and other countries. VIRB™ and ANT+™ are trademarks of Garmin Ltd. or its subsidiaries. These
trademarks may not be used without the express permission of Garmin.
This product is ANT+™ certified. Visit
www.thisisant.com/directory
TRA
REGISTERED No:
ER0127480/14
DEALER No:
DA0061884/11
February 2014
for a list of compatible products and apps.
190-01627-90_0B
TA-2013/2179
Printed in Taiwan

Werbung

Inhaltsverzeichnis
loading

Inhaltszusammenfassung für Garmin VIRB

  • Seite 1: Inhaltsverzeichnis

    Garmin and the Garmin logo are trademarks of Garmin Ltd. or its subsidiaries, registered in the USA and other countries. VIRB™ and ANT+™ are trademarks of Garmin Ltd. or its subsidiaries. These trademarks may not be used without the express permission of Garmin.
  • Seite 3: Virb™ Remote Instructions

    Pairing the Remote with Your Device Using a Phillips screwdriver, remove the three screws from The first time you connect the VIRB remote to your VIRB the back plate device, you must pair the remote with your device.
  • Seite 4 Replace the backplate, aligning the post with the gap in the circuit board Replace and tighten the three screws. NOTE: Do not overtighten. Specifications Battery type User-replaceable CR2032, 3 volts Battery life Up to 1.5 years (1 hour per day) Operating temperature From -10°...
  • Seite 5: Instructions De La Télécommande Virb

    A l'aide d'un tournevis cruciforme, retirez les trois vis du Couplage de la télécommande avec votre cache appareil Lors de la première connexion de la télécommande VIRB avec votre appareil VIRB, vous devez coupler la télécommande avec celui-ci. Sur l'appareil VIRB, sélectionnez REGLAGE >...
  • Seite 6: Caractéristiques Techniques

    Placez la pile neuve dans le cache, pôle positif vers le bas. Vérifiez que le joint est parfaitement positionné dans la rainure. Replacez le couvercle, en faisant aligner la borne sur le trou situé sur la carte de circuits imprimés Fermez et fixez les trois vis.
  • Seite 7: Virb™ Istruzioni Del Telecomando

    Rosso lampeggiante Il dispositivo sta registrando un video. Associazione del telecomando al dispositivo La prima volta che si connette il telecomando VIRB al dispositivo VIRB, è necessario associare il telecomando al dispositivo. Sul dispositivo VIRB, selezionare IMPOSTAZIONI > Telecomando > Telecomando per attivare la funzione telecomando.
  • Seite 8: Caratteristiche Tecniche

    Installare la nuova batteria nella piastra posteriore con il lato positivo rivolto verso il basso. Verificare che la guarnizione sia inserita completamente nella scanalatura. Riposizionare la piastra posteriore, allineando la guida foro nella scheda dei circuiti Riposizionare e serrare le tre viti. NOTA: non stringere eccessivamente.
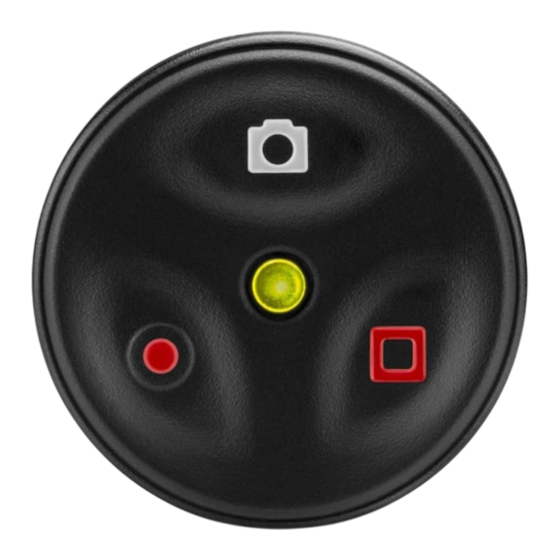
  • Seite 9: Virb™ Fernbedienung - Anweisungen

    Entferne mit einem Kreuzschlitzschraubendreher die drei Schrauben an der Rückplatte Koppeln der Fernbedienung mit dem Gerät Wenn du die VIRB Fernbedienung zum ersten Mal mit deiner VIRB verbinden, musst du beide Geräte miteinander koppeln. Wähle auf der VIRB die Option EINSTELLUNGEN >...
  • Seite 10: Technische Daten

    Leg die neue Batterie in die Rückplatte ein, wobei die Seite mit dem Plus nach unten zeigen muss. Vergewissere dich, dass die Dichtung fest in der Einkerbung sitzt. Setz die Rückplatte wieder auf. Dabei muss der Stift die Aussparung in der Platine ausgerichtet sein.
  • Seite 11: Virb™ Instrucciones Del Mando A Distancia

    El dispositivo está grabando un vídeo. Vinculación del mando a distancia con el dispositivo La primera vez que conectes el mando a distancia para VIRB a tu dispositivo VIRB, debes vincular el mando con el dispositivo. En el dispositivo VIRB, selecciona CONFIGURACIÓN >...
  • Seite 12 Coloca la nueva pila en la placa posterior con el lado positivo hacia abajo. Comprueba que la junta está totalmente asentada en la ranura. Vuelve a colocar la placa posterior alineando el borne el hueco del cuadro de circuito Vuelve a colocar los tres tornillos y fíjalos. NOTA: no los aprietes en exceso.
  • Seite 13: Instruções Do Controlo Remoto Virb

    O dispositivo está a gravar vídeo. Emparelhar o controlo remoto com o seu dispositivo Da primeira vez que ligar o controlo remoto VIRB ao seu dispositivo VIRB, tem de emparelhar os dois. No dispositivo VIRB, selecione CONFIGURAÇÃO > Remoto > Remoto para ativar a função de controlo remoto.
  • Seite 14: Especificações

    De -10 a 50 °C (de 14 a 122 °F) funcionamento Frequência/protocolo rádio Protocolo de comunicações sem fios ANT+ de 2,4 GHz Classificação de resistência à 5 ATM* água *O dispositivo suporta pressão equivalente a uma profundidade de 50 metros. © 2014 Garmin Ltd. or its subsidiaries www.garmin.com/support...

Inhaltsverzeichnis