Herunterladen Inhalt Inhalt Diese Seite drucken

Werbung

Verfügbare Sprachen

Verfügbare Sprachen

TOOLS
DIGITAL
MULTIMETER
USER'S
MANUAL
DE
EN
PL
RO
model: MIE-RB-55

Werbung

Inhaltsverzeichnis
loading

Inhaltszusammenfassung für Rebel MIE-RB-55

  • Seite 1 TOOLS DIGITAL MULTIMETER USER’S MANUAL model: MIE-RB-55...
  • Seite 3: Sicherheitsanweisungen

    SICHERHEITSANWEISUNGEN Um einen elektrischen Schlag, oder Verletzungen zu vermeiden, befolgen Sie die unteren Sicherheitsanweisungen: 1. Überprüfen Sie das Gehäuse vor der Verwendung des Geräts auf mechanische Beschädigungen. Verwenden Sie das Gerät nicht, wenn das Gehäuse Risse aufweist oder Teile fehlen. 2.
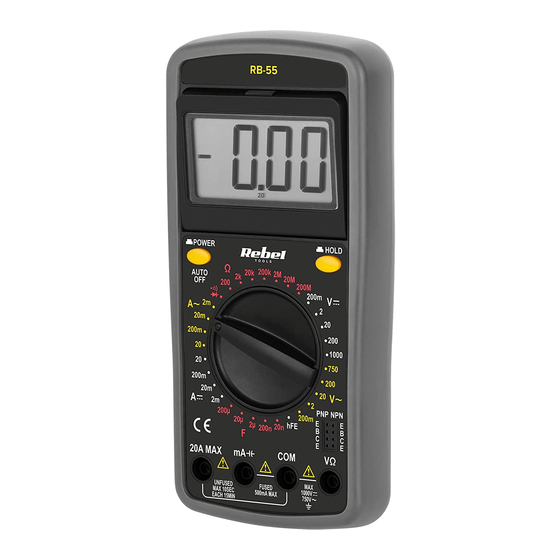
  • Seite 4: Produktbeschreibung

    oder zu einer Beschädigung des Geräts führen. 14. Das Gerät ist nur für den Innenbereich bestimmt. 15. Nehmen Sie die Batterie heraus, wenn das Gerät längere Zeit nicht benutzt wird.. PRODUKTBESCHREIBUNG 1. Display 2. Taste EIN/AUS [ON/OFF] 3. Taste Messung einfrieren 4.
  • Seite 5 3. Setzen Sie den Drehschalter auf den zugehörigen Strombereich. 4. Öffnen Messkreis verbinden Messleitungen in Serie. 5. Das Ergebnis wird am Display angezeigt. 6. Achtung: Bei Anschluss an die 20 A Buchse können die Messungen im Zeitraum wenigern Sekunden nur 15 Sekunden dauern.
  • Seite 6: Reinigung Und Wartung

    Wenn der Widerstand niedriger als 30 Ω+20 Ω ist, ertönt der Summer. hFE Transistortest 1. Setzen Sie den Drehschalter auf Position hFE. 2. Bestimmen Sie den Transistortyp (PNP oder NPN) und verbinden den Emitter, die Basis und den Kollektor mit den richtigen Buchsen.
  • Seite 7: Technische Daten

    TECHNISCHE DATEN Gleichspannung [DC] Bereich Auflösung Genauigkeit 200 mV 0,1 µV ±(0,5% + 3) 1 mV 20 V 10 mV ±(0,8% + 5) 200 V 100 mV 1000 V ±(1% + 5) • Eingangsimpedanz: 10 MΩ • Überlastschutz: 1000 V DC oder 750 V AC •...
  • Seite 8 Durchgangsprüfung und Diodenmessung Bereich Beschreibung Hinweise Wenn der Widerstand Leerlaufspannung niedriger als 30 Ω ± 20 Ω : etwa 2,8 V ist, ertönt der Summer Leerlaufspannung Vorwärtsspannungsabfal : etwa 2,8 V l wird angezeigt Überlastschutz: 250 V AC/DC. Gleichstrom [DC] Bereich Auflösung Genauigkeit...
  • Seite 9 Gleichstrom [AC] Bereich Auflösung Genauigkeit 20 µA 10 nA ±(2% + 5) 200 µA 100 nA 2000 µA 1 µA ±(2% + 3) 20 mA 10 µA 200 mA 100 µA ±(2% + 5) 1 mA ±(2,5% + 10) 20 A 10 mA •...
  • Seite 10 Kapazität Bereich Auflösung Genauigkeit 2 nF 1 pF 20 nF 10 pF 200 nF 100 pF ±(4% + 5) 2 uF 1 nF 20 uF 10 nF 200 uF 100 nF Überlastschutz: Sicherung 0,5A/250V Deutsch Korrekte Entsorgung dieses Produkts (Elektromüll) (Anzuwenden in den Ländern der Europäischen Union und anderen europäischen Ländern mit einem separaten Sammelsystem) Die Kennzeichnung auf dem Produkt bzw.
  • Seite 11: Safety Instructions

    SAFETY INSTRUCTIONS In order to avoid electric shock or other injuries, follow the safety instructions below: 1. Before using the device, inspect the case for any mechanical damage. If the case has cracks or is missing any part, do not use the device. 2.
  • Seite 12: Product Description

    PRODUCT DESCRIPTION 1. Display 2. ON/OFF button 3. Measurement hold button 4. Rotary switch 5. hFE terminal 6. Connection terminals OPERATION AC and DC measurement 1. Connect the red test lead to the VΩ terminal. 2. Connect the black test lead to the COM terminal. 3.
  • Seite 13 4. If the resistance measurement will be conducted on the circuit, disconnect the circuit from power and discharge all capacitors. 5. Connect the test leads to the measured circuit. 6. The result will appear on the display. Diode measurement 1. Connect the red test lead to the VΩ terminal. 2.
  • Seite 14: Cleaning And Maintenance

    CLEANING AND MAINTENANCE • The meter will turn off automatically after 15 minutes of idle. • Clean the device with soft, slightly damp cloth, without abrasive agents. • To change the battery, unscrew the screw of the battery compartment. Take out the battery compartment cover and replace the battery (note the polarity).
  • Seite 15 DC Current Range Resolution Accuracy 20 µA 10 nA 200 µA 100 nA ±(1,8% + 2) 2000 µA 1 µA 20 mA 10 µA 200 mA 100 µA ±(2% + 2) 1 mA ±(2% + 10) 20 A 10 mA •...
  • Seite 16 Continuity and diode measurement Range Description Remarks approximate Open circuit forward voltage drop voltage: 2,8 V will be displayed If the resistance is lower Open circuit than 30 Ω+20 Ω, the voltage: 2,8 V buzzer will buzz. Overload protection: 250 V DC/AC rms Resistance Range Resolution...
  • Seite 17 • Overload protection: F0,5A/250V fuse English Correct Disposal of This Product (Waste Electrical & Electronic Equipment) (Applicable in the European Union and other European countries with separate collection systems) This marking shown on the product or its literature, indicates that it should not be disposed with other household wastes at the end of its working life.
  • Seite 18 KWESTIE BEZPIECZEŃSTWA Aby uniknąć porażenia elektrycznego lub innej kontuzji podczas korzystania z urządzenia, należy stosować się do poniższych zasad bezpieczeństwa: 1. Przed rozpoczęciem korzystania z urządzenia należy sprawdzić jego obudowę kątem uszkodzeń mechanicznych. Jeżeli obudowa posiada pęknięcia lub braki, nie należy korzystać z urządzenia. 2.
  • Seite 19: Opis Urządzenia

    Może spowodować zmniejszenie dokładności pomiarów lub uszkodzenie urządzenia. 14. Urządzenie jest przeznaczone do użytku wewnętrznego. 15. Jeżeli urządzenie nie będzie używane przez dłuższy czas, należy wyjąć z niego baterię. OPIS URZĄDZENIA 1. Wyświetlacz 2. Włącznik 3. Przycisk zamrożenia pomiaru 4. Przełącznik wyboru trybu 5.
  • Seite 20 pomiarowe do obwodu szeregowo. 5. Wynik zostanie wyświetlony na wyświetlaczu. Uwaga: przy podłączeniu do gniazda 20 A, pomiary mogą trwać maksymalnie sekund kilkusekundowymi przerwami. Pomiar rezystancji 1. Podłączyć czerwony przewód pomiarowy do gniazda VΩ. 2. Podłączyć czarny przewód pomiarowy do gniazda COM. 3.
  • Seite 21: Czyszczenie I Konserwacja

    Test tranzystorów hFE 1. Ustawić przełącznik wyboru trybu do pozycji hFE. 2. Należy ustalić typ tranzystora (PNP lub NPN) i podłączyć emiter, kolektor i bazę do odpowiednich gniazd. 3. Na wyświetlaczu pojawi się przybliżona wartość hFE. Pomiar pojemności 1. Podłączyć czarny przewód pomiarowy do gniazda COM. 2.
  • Seite 22 • Impedancja wejściowa: 10 MΩ • Ochrona przed przeciążeniem: 1000 V DC lub 750 V AC • Maksymalne napięcie wejściowe: 1000 V DC Napięcie AC Zakres Rozdzielczość Dokładność 200 mV 0,1 µV ±(0,5% + 5) 1 mV 20 V 10 mV ±(0,8% + 2) 200 V 100 mV...
  • Seite 23 Prąd AC Zakres Rozdzielczość Dokładność 20 µA 10 nA ±(2% + 5) 200 µA 100 nA 2000 µA 1 µA ±(2% + 3) 20 mA 10 µA 200 mA 100 µA ±(2% + 5) 1 mA ±(2,5% + 10) 20 A 10 mA •...
  • Seite 24 Rezystancja Zakres Rozdzielczość Dokładność 200 Ω 0,1 Ω ±(1% + 10) 2 KΩ 1 Ω 20 KΩ 10 Ω ±(1% + 4) 200 KΩ 100 Ω 2 MΩ 1 KΩ 20 MΩ 10 KΩ ±(1% + 10) 200 MΩ 100 KΩ ±(5% + 10) •...
  • Seite 25 Poland Prawidłowe usuwanie produktu (zużyty sprzęt elektryczny i elektroniczny) Oznaczenie umieszczone na produkcie lub w odnoszących się do niego tekstach wskazuje, że po upływie okresu użytkowania nie należy usuwać z innymi odpadami pochodzącymi z gospodarstw domowych. Aby uniknąć szkodliwego wpływu na środowisko naturalne i zdrowie ludzi wskutek niekontrolowanego usuwania odpadów, prosimy o oddzielenie produktu od innego typu odpadów oraz odpowiedzialny recykling w celu promowania ponownego użycia zasobów materialnych jako stałej praktyki.
  • Seite 26 INSTRUCTIUNI PRIVIND SIGURANȚA Pentru a evita șocurile electrice sau alte răniri, urmați instrucțiunile de siguranță de mai jos: 1. Înainte de a utiliza dispozitivul, inspectați carcasa pentru eventualele deteriorări mecanice. Dacă carcasa are fisuri sau piese lipsă, nu utilizați dispozitivul. 2.
  • Seite 27: Descriere Produs

    inchis. 15. Scoateți bateriile atunci când nu folosiți dispozitivul o perioadă mai lungă de timp. DESCRIERE PRODUS 1. Afișaj 2. Buton ON/OFF 3. Buton reținere date 4. Comutator rotativ 5. Soclu hFE 6. Terminale de conectare FUNCȚIONARE Măsurare AC și DC 1.
  • Seite 28 Atenție: în timp ce este conectat la terminalul 20 A, măsurătorile pot dura maxim 15 secunde după care se face o pauză de 10 minute între măsurători. Măsurare rezistență 1. Conectați cablul roșu de testare la terminalul VΩ. 2. Conectați cablul de testare negru la terminalul COM. 3.
  • Seite 29: Curățare Și Întreținere

    3. Va fi afișată valoarea aproximativă a hFE. Măsurare capacitate 1. Conectați cablul de testare roșu la terminalul VΩmA. 2. Conectați cablul de testare negru la terminalul COM. 3. Conectați cablurile de testare la condensatorul măsurat. Atenție: înainte de măsurare, deconectați circuitul de alimentare și descărcați toți condensatorii.
  • Seite 30 Tensiune AC Domeniu Rezoluție Precizie 200 mV 0,1 µV ±(1,2% + 5) 1 mV 20 V 10 mV ±(1% + 5) 200 V 100 mV 750 V ±(1,2% + 5) • Impedanță intrare: 10 MΩ • Interval frecvență: 40 Hz ~ 400 Hz •...
  • Seite 31 200 mA 100 µA ±(2% + 2) 1 mA ±(2% + 10)20 A 10 mA • Protecție la suprasarcină: • mA: F0,5A/250V • A: F2A/250V • 20A: nicio siguranță • Cădere de tensiune: 200 mV Curent AC Nivel Rezoluție Precizie 20 µA 10 nA 200 µA...
  • Seite 32 20 MΩ 10 KΩ ±(1% + 10) 200 MΩ 100 KΩ ±(5% + 10) • Tensiune circuit deschis: aprox. 0,5 V (200 MΩ: 3 V) • Protecție la suprasarcină: 250 V DC/AC Capacitate Nivel Rezoluție Precizie 2 nF 1 pF 20 nF 10 pF 200 nF...
  • Seite 34 www.rebelelectro.com...

Inhaltsverzeichnis