TFA 30.5020 Bedienungsanleitung
Vorschau ausblenden
Andere Handbücher für 30.5020:
TFA Anl. No. 30.5020_12_13
11.12.2013
15:40 Uhr
VISION –
Digitales Fenster-Thermo-Hygrometer
1. Bevor Sie mit dem Gerät arbeiten
• Stellen Sie mit der „+" Taste die
gewünschten Stunden ein. Für einen
• Lesen Sie sich bitte die Bedienungsan-
Schnelldurchlauf halten Sie den Knopf
leitung genau durch.
gedrückt.
• Durch die Beachtung der Bedienungs-
• Drücken Sie nochmals die MODE Taste
anleitung vermeiden Sie auch Beschä-
und stellen Sie auf gleiche Weise die
digungen des Gerätes und die Gefähr-
Minuten ein.
dung Ihrer gesetzlichen Mängelrechte
• Durch Drücken der MODE Taste kehren
durch Fehlgebrauch.
Sie in den Normalmodus zurück.
• Für Schäden, die aus Nichtbeachtung
dieser Bedienungsanleitung verursacht
7. Anbringung
werden, übernehmen wir keine Haf-
• Entfernen Sie die Schutzfolie von den
tung. Ebenso haften wir nicht für inkor-
beiden Klebestreifen und befestigen Sie
rekte Messwerte und Folgen, die sich
den Halter außen am Fenster. Fenster-
aus solchen ergeben können.
scheibe bitte vorher reinigen! Das Gerät
• Beachten Sie besonders die Sicher-
lässt sich nun ganz einfach ein- und aus-
heitshinweise!
hängen.
• Bewahren Sie diese Bedienungsanlei-
tung gut auf!
Achtung:
• Vermeiden Sie direkte Sonneneinstrah-
2. Einsatzbereich und alle Vorteile Ihres
lung: Diese verfälscht die angezeigten
neuen Gerätes auf einen Blick
Werte und kann dazu führen, dass bei
• Klares funktionales Design
extrem hohen Temperaturen das Display
• Bequemes Ablesen der Außentempera-
beschädigt wird oder bei dauerhafter
tur und der Luftfeuchtigkeit von Innen
Sonneneinstrahlung die Flüssigkristalle
• Maxima- und Minimatemperatur mit
ausbleichen können.
automatischer Rückstellung
• Zur Verbesserung des UV- und Regen-
• Leicht zu befestigen, zum Fensterputzen
schutzes und zur besseren Ablesbarkeit
abnehmbar
des Displays speziell bei Dunkelheit liegt
• Wetterfest
eine Kunststoffscheibe bei. Wir empfeh-
len die Anbringung insbesondere, wenn
3. Zu Ihrer Sicherheit
der Standort Ihres Vision auf der Wetter-
seite liegt oder starker Sonneneinstrah-
• Das Produkt ist ausschließlich für den
lung ausgesetzt ist.
oben beschriebenen Einsatzbereich ge-
• Die Scheibe kann einfach hinter das Dis-
eignet. Verwenden Sie das Produkt nicht
play in die dafür vorgesehenen Öffnun-
anders, als in dieser Anleitung darge-
gen gesteckt werden.
stellt wird.
• Das eigenmächtige Reparieren, Umbau-
8. Pflege und Wartung
en oder Verändern des Gerätes ist nicht
• Reinigen Sie das Gerät mit einem wei-
gestattet.
chen, leicht feuchten Tuch. Keine Scheu-
• Dieses Gerät ist nicht zur öffentlichen
er- oder Lösungsmittel verwenden!
Information geeignet und nur für den
• Entfernen Sie die Batterie, wenn Sie das
privaten Gebrauch bestimmt.
Gerät längere Zeit nicht verwenden.
Vorsicht!
8.1 Batteriewechsel
Verletzungsgefahr:
• Wenn die Anzeige schwächer wird,
• Bewahren Sie das Gerät und die Batterie
wechseln Sie bitte die 1,5 V AAA Batte-
außerhalb der Reichweite von Kindern auf.
rie.
• Entfernen Sie vorsichtig das Gerät aus
• Batterien nicht ins Feuer werfen, kurz-
der Halterung.
schließen, auseinander nehmen oder
aufladen. Explosionsgefahr!
• Vergewissern Sie sich, dass die Batterie
• Batterien enthalten gesundheitsschädli-
polrichtig eingelegt ist.
che Säuren. Um ein Auslaufen der Batte-
9. Fehlerbeseitigung
rien zu vermeiden, sollten schwache
Batterien
möglichst
schnell
ausge-
Problem
Lösung
tauscht werden. Beim Hantieren mit aus-
➜ Batterie polrichtig
Keine Anzeige /
gelaufenen Batterien chemikalienbestän-
Unkorrekte Anzeige
dige Schutzhandschuhe und Schutzbrille
➜ Batterie wechseln
tragen!
10. Entsorgung
Wichtige Hinweise
zur Produktsicherheit!
Dieses Produkt wurde unter Verwendung
hochwertiger Materialien und Bestandteile
• Vorsicht: Das Display ist empfindlich!
hergestellt, die recycelt und wiederverwen-
Beim Entfernen der Scheibe oder beim
det werden können.
Ablösen des Gerätes vom Halter das Dis-
play nicht knicken oder daran ziehen.
Batterien und Akkus dürfen
• Setzen Sie das Gerät keinen extremen
keinesfalls in den Hausmüll!
Temperaturen, Vibrationen und Erschüt-
Als
Verbraucher
terungen aus.
gesetzlich
brauchte Batterien und Akkus
4. Inbetriebnahme / Bedienung
zur umweltgerechten Entsor-
gung beim Handel oder ent-
• Entfernen Sie die Schutzfolie auf der
sprechenden
Vorder- und Rückseite des Gerätes. Öff-
nen Sie mit einem Schraubenzieher das
gemäß nationaler oder lokaler
Bestimmungen abzugeben.
Batteriefach und entfernen Sie den Bat-
Die Bezeichnungen für enthal-
terieunterbrecherstreifen. Das Gerät ist
tene Schwermetalle sind:
jetzt betriebsbereit.
Cd=Cadmium, Hg=Quecksilber,
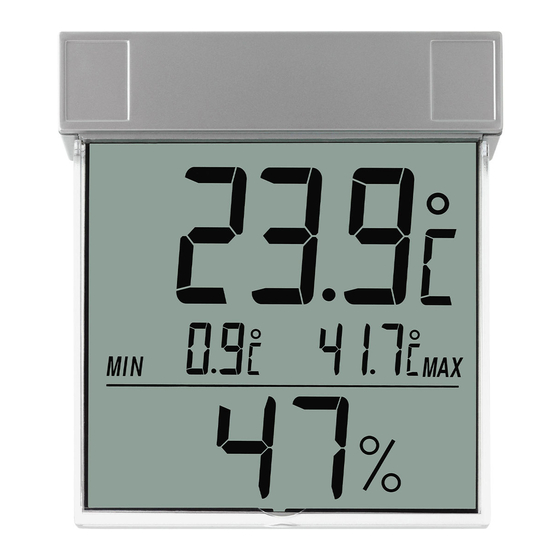
• Das obere Display zeigt Ihnen die aktuel-
Pb=Blei
le Temperatur und die Höchst- und
Tiefsttemperatur und das untere Display
Dieses Gerät ist entsprechend
die Luftfeuchtigkeit an.
der EU-Richtlinie über die Ent-
sorgung von Elektro- und Elek-
Wichtiger Hinweis für die Benutzung:
tronik-Altgeräten (WEEE) ge-
kennzeichnet.
• Aufgrund der Wärmeabstrahlung (je
Dieses Produkt darf nicht mit
nach Isolierung) bzw. der geschützten
dem Hausmüll entsorgt werden.
Lage Ihres Fensters kann die auf Ihrem
Der Nutzer ist verpflichtet, das
Vision angezeigte Temperatur höher sein
Altgerät zur umweltgerechten
als die Außentemperatur in freier, unge-
Entsorgung bei einer ausgewie-
schützter Lage direkt über dem Boden.
senen Annahmestelle für die
Entsorgung von Elektro- und
5. Höchst- und Tiefstwerte
Elektronikgeräten abzugeben.
• Die Maxima- und Minimawerte werden
automatisch zurückgestellt: Die Höchst-
TFA Dostmann GmbH & Co.KG
temperatur um 8 Uhr morgens und die
Zum Ottersberg 12, D-97877 Wertheim.
Tiefsttemperatur um 20 Uhr abends.
Diese Anleitung oder Auszüge daraus dür-
Dafür müssen Sie die aktuelle Uhrzeit
fen nur mit Zustimmung von TFA Dostmann
einstellen:
veröffentlicht werden. Die technischen
Daten entsprechen dem Stand bei Druckle-
6. Einstellung der Uhrzeit
gung und können ohne vorherige Benach-
• Durch Drücken der MODE Taste gelan-
richtigung geändert werden.
gen Sie in den Einstellmodus.
www.tfa-dostmann.de
Seite 1
VISION –
Digital window thermo-hygrometer
1. Before you start using it
7. Positioning
• Please make sure to read the instruc-
• Remove the protective foil from both
tion manual carefully.
adhesive strips and fix the holder outside
• Following and respecting the instruc-
at the window. Please clean the window
tions in your manual will prevent dam-
glass before. Now you can hang up and
age to your instrument and loss of your
demount the instrument very easily.
statutory rights arising from defects
Attention:
due to incorrect use.
• We shall not be liable for any damage
• Avoid direct sunshine: It falsifies the
occurring as a result of not following
indicated values! Extremely high tem-
these instructions. Likewise, we take
peratures may lead to damages of the
no responsibility for any incorrect
display. Permanent sunshine may bleach
readings and for any consequences
the liquid crystals.
• To improve UV and rain protection and
which may result from them.
the clearness of the display especially
• Please take particular note of the safe-
when it's dark you find enclosed a plas-
ty advice!
tic plate. We recommend the use partic-
• Please keep this instruction manual for
ularly when your Vision is located at the
future reference.
weather side or exposed to strong solar
radiation.
2. Field of operation and all the benefits
• Simply put the plate in the provided slots
of your new instrument at a glance
behind the display.
• Clear functional design
• Easy reading of the outside temperature
8. Care and maintenance
and humidity from the inside
• Clean your instrument with a soft damp
• Maximum and minimum temperature
cloth. Do not use solvents or scouring
with auto reset
agents.
• Easy to fix, demountable for window
• Remove the battery if you do not use it
cleaning
for a long period of time.
• Weather resistant
8.1 Battery replacement
3. For your safety
• Replace the battery when the display
• This product is exclusively intended for
becomes weak.
the field of application described above.
• Carefully remove the device from the
It should only be used as described
holder.
within these instructions.
• Insert the battery (1,5 V AAA) observing
• Unauthorised repairs, modifications or
the correct polarity.
changes to the product are prohibited.
• This product is not be used public infor-
9. Troubleshooting
mation, it is only intended for home use.
Problems
Caution!
No display /
Risk of injury:
Incorrect display
• Keep this instrument and the battery out
of the reach of children.
• Batteries must not be thrown into a fire,
10. Waste disposal
short-circuited, taken apart or re-
This product has been manufactured using
charged. Risk of explosion!
high-grade
• Batteries contain harmful acids. Low
which can be recycled and reused.
batteries should be changed as soon as
possible to prevent damage caused by
leaking.
• Wear chemical-resistant protective gloves
and safety glasses when handling leak-
ing batteries.
einlegen
Important information
on product safety!
• Attention: The display is delicate! Do
not pull or bend when removing the
plate or demounting the instrument.
• Do not place your product near extreme
temperatures, vibrations or shocks.
4. Getting started / Operation
• Remove the protective foil from the front
and the back of the advice. Open the bat-
sind
Sie
tery compartment by a screw driver and
verpflichtet,
ge-
remove the battery insulation strip. The
unit is now ready to use.
• The upper display shows the current
temperature and the maximum and the
Sammelstellen
minimum temperature and the lower dis-
play the relative humidity.
Important note for the use:
• Due to the heat emission (depending on
insolation) and the protected location of
your window it is possible that the tem-
perature displayed on your Vision is
higher than the outdoor temperature at a
free unsheltered location directly over
the ground.
5. Maximum and minimum temperatures
• The MAX-MIN values are automatically
reset. There is an automatic update of
maximum temperature at 8:00 and mini-
mum temperature at 20:00. Therefore
the current time must be set:
6. Setting of the clock
• Press the MODE button to enter setting
TFA Dostmann GmbH & Co.KG
mode. Set the hours by pressing the "+"
Zum Ottersberg 12, D-97877 Wertheim.
button. Hold and press the button for a
No part of this manual may be reproduced
fast count.
without written consent of TFA Dostmann.
• Press the MODE button again to set
The technical data are correct at the time of
minutes in the same way.
going to print and may change without
• To return to normal mode press the
prior notice.
12/13
MODE button once more.
www.tfa-dostmann.de
VISION –
Thermo-hygromètre de fenêtre digital
1. Avant d'utiliser votre appareil
• Lisez attentivement le mode d'emploi.
• En respectant ce mode d'emploi, vous
éviterez d'endommager votre appareil
et de perdre vos droits résultant d'un
défaut pour cause d'utilisation non
conforme.
• Nous n'assumons aucune responsabili-
té pour des dommages qui auraient été
causés par le non-respect du présent
mode d'emploi. De même, nous n'as-
sumons aucune responsabilité pour
des relevés incorrects et les consé-
quences qu'ils pourraient engendrer.
• Suivez bien toutes les consignes de
sécurité!
• Conservez soigneusement le mode
d'emploi!
2. Aperçu du domaine d'utilisation et
tous les avantages de votre nouvel
appareil
• Design clair et fonctionnel
• Lecture simple de la température et
humidité extérieure à l'intérieure
• Température maxima et minima avec
réactualisation automatique
• Assemblage facile, démontable pour la
nettoyage de fenêtre
• Résistant aux intempéries
3. Pour votre sécurité
• L'appareil est uniquement destiné à
l'utilisation décrite ci-dessus. Ne l'utili-
sez jamais à d'autres fins que celles
décrites dans le présent mode d'emploi.
• Vous ne devez en aucun cas réparer,
démonter ou modifier l'appareil par vous
Solutions
même.
• Cet appareil ne convient pour l'informa-
➜ Ensure correct
tion publique, il est destiné uniquement
polarity of the
à un usage privé.
battery
➜ Change the battery
Attention!
Danger de blessure:
• Gardez l'appareil et la pile hors de la
materials
and
components
portée des enfants.
• Ne jetez jamais les piles dans le feu, ne
Never dispose of empty batter-
les court-circuitez pas, ne les démontez
ies and rechargeable batteries
pas et ne les rechargez pas. Risques
in household waste.
d'explosion!
As a consumer, you are legally
• Les piles contiennent des acides nocifs
required to take them to your
pour la santé. La pile faible doit être
retail store or to appropriate
remplacée le plus rapidement possible,
collection sites depending on
afin d'éviter une fuite.
national or local regulations in
• Pour manipuler des piles qui ont coulé,
order to protect the environ-
utilisez des gants de protection chimique
ment.
spécialement adaptés et portez des
The symbols for the heavy
lunettes de protection !
metals contained are:
Cd=cadmium,
Hg=mercury,
Conseils importants
Pb=lead
de sécurité du produit!
This instrument is labeled in
• Attention: l'écran est très sensible! Ne
accordance with the EU Waste
pas plier ou tirer sur l'écran lors du
Electrical and Electronic Equip-
retrait de la plaque ou lors de l'extrac-
ment Directive (WEEE).
tion de l'appareil hors de son support.
• Évitez d'exposer l'appareil à des tempé-
Please do not dispose of this
ratures extrêmes, à des vibrations ou à
instrument
in
household
waste. The user is obligated to
des chocs.
take end-of-life devices to a
designated collection point for
4. Mise en service / Opération
the disposal of electrical and
• Retirer le film protecteur sur l'avant et
electronic equipment, in order
l'arrière de l'appareil. Ouvrez le compar-
to
ensure
environmentally-
timent de la pile avec un tournevis adap-
compatible disposal.
té. Enlever la bande d'interruption de la
pile. L'instrument est maintenant prêt à
fonctionner.
• L'affichage supérieur vous indique la
température momentanée, la températu-
re maximale et minimale et l'affichage
inférieur l'humidité momentanée.
Remarque importante pour l'emploi:
• En raison de la dissipation thermique
(en dépendance de l'isolation) respecti-
vement la position protégée de votre
fenêtre la température indiquée sur votre
Vision peut être plus élevée que la tem-
pérature extérieure en position libre et
dégagée directement au-dessus du sol.
5. Températures maximales et minimales
• Les valeurs maximales et minimales
sont mises en arrière automatiquement:
la température maximale à 8 le matin et
la température minimale à 8 le soir. Pour
cela il faut ajuster l'heure actuelle:
12/13
Bedienungsanleitung
Operating Instructions
6. Réglage de l'heure
Gebruiksaanwijzing
• Appuyez sur la touche MODE pour arri-
Instrucciones para el manejo
ver au mode de réglage. Vous pouvez
Mode d'emploi
donner l'heure avec la touche „+". Si
vous maintenez la touche appuyée, la
Istruzioni
valeur augmentera plus vite.
• Presser encore une fois la touche MODE
pour régler les minutes de la même
manière.
• En pressant la touche MODE une troisiè-
me fois le mode normal apparaît.
7. Fixation
• Retirer le film protecteur par les deux
adhésives et fixer le support à l'extérieur
de la fenêtre. Veuillez nettoyer la fenêtre
en avance. L'appareil peut être accroché
et décroché facilement.
Attention:
• Évitez l'ensoleillement direct, il fausse
les valeurs indiquées. Par cela durant
des températures extrêmement hautes
l'affichage peut être endommagé ou les
cristaux liquides peuvent décolorer à
cause d'un ensoleillement permanent.
• Pour améliorer la protection contre les
UV et les intempéries, et pour une
meilleure lisibilité de l'écran, en particu-
lier dans l'obscurité, nous avons joint
une plaque en matière synthétique. Nous
en recommandons l'emploi, en particu-
lier lorsque l'emplacement de votre
Vision est tourné vers le côté intempé-
VISION
ries ou se trouve exposé à un fort rayon-
nement solaire.
Digitales Fenster-Thermo-Hygrometer
• Il suffit simplement de glisser cette
plaque derrière l'écran, dans les ouver-
Digital window thermo-hygrometer
tures prévues à cet effet.
Thermo-hygromètre de fenêtre digital
8. Entretien et maintenance
• Pour le nettoyage de votre appareil, utili-
Termo-igrometro da finestra digitale
sez un chiffon doux et humide. N'utilisez
aucun agent solvant abrasif!
Digitale venster thermo-hygrometer
• Enlevez la pile, si vous n'utilisez pas
votre appareil pendant une durée pro-
Termo-Higrómetro de ventana digital
longée.
8.1 Remplacement de la pile
• Veuillez échanger la pile si l'affichage
devient faible.
• Enlevez délicatement l'appareil du sup-
port.
• Insérer la pile (1,5 V AAA), polarité +/-
comme illustrée.
9. Dépannage
Problème
Résolution
Affichage manquant / ➜ Contrôlez la
incorrecte
bonne polarité de
la pile
➜ Changez la pile
10. Traitement des déchets
Ce produit a été fabriqué avec des maté-
riaux et des composants de haute qualité
qui peuvent être recyclés et réutilisés.
Les piles et accus usagés ne
peuvent en aucun cas être jetés
dans les ordures ménagères !
En tant qu'utilisateur, vous
avez l'obligation légale de rap-
porter les piles et accus usagés
à votre revendeur ou de les
déposer dans une déchetterie
-25°C...+70°C
proche
de
votre
domicile
conformément à la réglemen-
±1,0°C
tation nationale et locale.
@ 0°C...+50°C
Les métaux lourds sont dési-
Rest ±1,5°C
gnés comme suit: Cd=cad-
mium, Hg=mercure, Pb=plomb
Cet appareil est conforme aux
normes de l'UE relatives au
traitement des déchets élec-tri-
ques et électroniques (WEEE).
L'appareil usagé ne doit pas
être jeté dans les ordures
ménagères. L'utilisateur s'enga-
ge, pour le respect de l'environ-
nement, à déposer l'appareil
usagé dans un centre de traite-
ment agréé pour les déchets
électriques et électroniques.
TFA Dostmann GmbH & Co.KG
Zum Ottersberg 12, D-97877 Wertheim.
La reproduction, même partielle de la présen-
te mode d'emploi est strictement interdite
avec accord explicite de TFA Dostmann. Les
spécifications techniques de ce produit ont
été actualisées au moment de l'impression et
peuvent être modifiées, sans avis préalable.
www.tfa-dostmann.de
12/13
Kat. Nr. 30.5020
MODE
+
30%...80%
Batterie
Battery
±5%
1 x 1,5 V AAA
inklusive / included
RoHS

Verwandte Anleitungen für TFA 30.5020


Inhaltszusammenfassung für TFA 30.5020
- Seite 1 Dafür müssen Sie die aktuelle Uhrzeit button. Hold and press the button for a No part of this manual may be reproduced fen nur mit Zustimmung von TFA Dostmann te mode d'emploi est strictement interdite • Les valeurs maximales et minimales einstellen: fast count.
- Seite 2 Regolare l'ora dente autorizzazione della TFA Dostmann. I Dostmann worden gepubliceerd. De techni- de la TFA Dostmann. Los datos técnicos de temperatuur om 8 uur 's morgens en de tura máxima a las 8:00 de la mañana y la con il tasto “+”.