Herunterladen Inhalt Inhalt Diese Seite drucken
Victure PC730 Handbuch
Vorschau ausblenden Andere Handbücher für PC730:
Inhaltsverzeichnis

Werbung

Verfügbare Sprachen
  • DE

Verfügbare Sprachen

  • DEUTSCH, seite 17

Werbung

Inhaltsverzeichnis
loading

Inhaltszusammenfassung für Victure PC730

  • Seite 3 Menu English Deutsch Français Italiano Español 日本語...
  • Seite 5: Inhaltsverzeichnis

    Table of contents Notes Product diagram Camera connection and addition Download the APP Wireless connection Wired connection Details of software function Set up mobile detection function Insert SD card Set up motion detection function Sharing camera Product specification Q&A Customer service...
  • Seite 6: Notes

    Notes SD card speed should be higher than C10, and the device supports 64G · card storage at maximum. · Before using the SD card, please insert it and format it in the APP first. · The device supports 2.4G WiFi connection only. Before adding camera by the APP, please make sure WiFi for phone connection is 2.4G.
  • Seite 7: Product Diagram

    Product diagram ① ② ③ ④ ⑥ ⑦ ⑧ ⑤ 1. Indicator 5. Microphone 2. Lens 6. Reset Button 3. Photoresistance 7. Power Port 4. SD Card Slot 8. RJ45...
  • Seite 8: Camera Connection And Addition

    Camera connection and addition Download APP Operate IPC360 app, register and log in with your email address. · Or search for IPC360 in application store, then download and install the APP. · IPC360 IPC360 Download Wireless connection 1. Connect phone with 2.4G WiFi. 2.
  • Seite 9 3. Enter camera list screen, click “+” on the top right corner, and select wireless adding mode. 4. Plug the camera into the power, and press the reset button for 3 seconds, then the indicator will flashes in red slowly with “ DI DI ” beeps, which means the device has been reset successfully.
  • Seite 10: Wired Connection

    Wired connection 1. Connect the camera via network cable first,then connect phone with WiFi. 2. Operate IPC360, register with email address and log in. 3. Enter camera list screen, click “+” on the top right corner, and select wired connection mode. 4.
  • Seite 11: Details Of Software Function

    Details of software function My camera 360° Click On/ Off to enable or disenable mobile detection and alert notification. Unbind the camera and the mobile phone. Share the camera with other users by entering their IPC360 accounts. Camera settings.
  • Seite 12: Set Up Mobile Detection Function

    Set up mobile detection function Insert SD card 1. Format the SD on the computer first. 2. Unplug the camera power supply,use a screwdriver to unscrew the screw and open the SD card slot. 3. Insert SD card. 4. Plug in power supply and wait for camera to power on. 5.
  • Seite 13: Sharing Camera

    Sharing camera 1. After adding the camera, enter camera interface, and click Share button at the bottom. 2. Click “+” on the top right corner,and add an account you want to share,the acount you share to should download and register IPC360 app first.
  • Seite 14: Product Specification

    Product specification Antenna 2.4Ghz-2.5Ghz Sensor SC2235 Focal length: 3.6mm Lens Pixel: 2Mp Infrared LED 850nm 36PCS Protocol: 802.11 b/g/n WIFI Frequency band: 2.4G Channel: 1TX/1RX Format: H.264 Video Resolution: 1920X1080 Max. frame rate: 25FPS 1080P Storage Above C10 Microphone/ -38dB; 8ohm, 1W loudspeaker Power Max.
  • Seite 15: Q&A

    Q&A How many cameras can be connected with one account at most? One account can be connected with maximum of 20 cameras. Does camera has requirements for memory card? The camera supports 64G memory card at most, and card speed should be higher than C10.
  • Seite 16: Customer Service

    Customer service This product comes with one-year warranty. If you have any question regarding the product, feel free to contact us. Email address for VICTURE customer service: bulletcam@govic- ture.com...
  • Seite 17 Inhaltsverzeichnis Hinweise Produktdiagramm Verbindung und Hinzufügen der Videokameras APP Herunterladen Drahtlose Verbindung Drahtgebundene Verbindung Detaillierte Softwarefunktionen Einstellung der Bewegungserkennungsfunktion Die SD-Karte einlegen Einstellung der Bewegungserkennungsfunktion Videokamera-Sharing-Funktionen Produktparameter Q&A After-Sale-Service...
  • Seite 18: Hinweise

    Hinweise · Die SD Karte sollte mindestens eine Class 10 SD Karte sein, das Gerät unterstützt bis zu 64 GB SD-Kartenspeicher. · Bevor Sie die SD-Karte für die Aufnahme verwenden, legen Sie die SD-Karte ein und formatieren Sie die Karte mit Hilfe der App. ·...
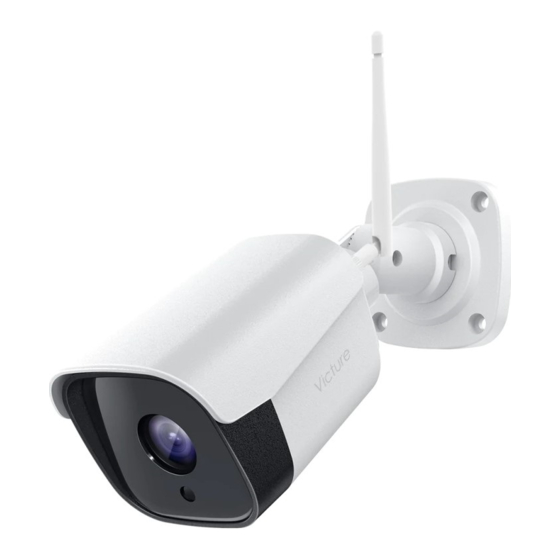
  • Seite 19: Produktdiagramm

    Produktdiagramm ① ② ③ ④ ⑥ ⑦ ⑧ ⑤ 1. Indikator 5. Mikrofon 2. Objektiv 6. Reset-Taste 3. Photoresistenz 7. Schnittstelle 4. SD-Kartensteckplatz 8. RJ45...
  • Seite 20: Verbindung Und Hinzufügen Der Videokameras

    Verbindung und Hinzufügung der Videokameras APP Herunterladen · Sie können die APP “IPC360” herunterladen und installieren, indem Sie den folgenden QR-Code scannen. Sie können die APP “IPC360” auch im “App Store” suchen und dann · herunterladen und installieren. IPC360 IPC360 Download Drahtlose Verbindung 1.
  • Seite 21 3. Um die Kamera der Videokameraliste hinzuzufügen, klicken Sie auf das "+" in der oberen rechten Ecke und wählen Sie den drahtlosen Modus. 4. Schließen Sie die Kamera an die Stromversorgung an und drücken Sie die Reset-Taste 3 Sekunden lang. Dann blinkt die Anzeige langsam rot und die Signaltöne „DI DI “...
  • Seite 22: Drahtgebundene Verbindung

    Live-Video-Schnittstelle aufrufen und die Anzeige blinkt schnell grün. Wenn Sie das Menü verlassen, blinkt es langsam grün. Drahtgebundene Verbindung 1. Schließen Sie die Kamera zuerst über ein Netzwerkkabel an, und verbinden Sie dann das Telefon mit WLAN. 2. Öffnen Sie die APP „IPC360”, registrieren Sie eine E-Mail-Adresse und loggen sich dann ein.
  • Seite 23: Detaillierte Softwarefunktionen

    Detaillierte Softwarefunktionen My camera 360° Klicken Sie Einschalten/Ausschalten der mobilen Überwachung und Empfehlung der Alarmfunktion. Die Verbindung zwischen der Kamera und dem Telefon wird gelöscht. Klicken Sie auf das Symbol und auf das „+ “ in der oberen rechten Ecke. Geben Sie die registrierte Benutzer-Telefonnummer oder E-Mail ein, die Sie für die gleichen registrierten Benutzer der APP teilen können.
  • Seite 24: Einstellung Der Bewegungserkennungsfunktion

    Einstellung der Bewegungserkennungsfunktion Die SD-Karte einlegen 1. Ziehen Sie das Netzteil aus der Steckdose um die Kamera abzus- chalten. 2. Lösen Sie die Schraube mit einem Schraubendreher und öffnen Sie den SD-Kartensteckplatz. 3. Legen Sie die SD-Karte ein. 4. Stecken Sie das Netzteil der Videokamera wieder in die Steckdose und warten Sie, bis die Videokamera erfolgreich gestartet wird.
  • Seite 25: Einstellung Der Bewegungserkennungsfunktion

    Einstellung der Bewegungserkennungsfunktion 1. Klicken Sie auf den Alarmtyp, öffnen Sie die Bewegungserken- nungsfunktion. 2. Um die Vorwarnzeit und die Bewegungserkennungsempfindlichkeit einzustellen. Camera setting Alert mode Finish Rename Motion Detection Shared camera Alert sound switch Shooting angle Indicator LED Alert mode Videokamera-Sharing-Funktionen 1.
  • Seite 26: Produktparameter

    Produktparameter Antenne 2.4Ghz-2.5Ghz Sensor SC2235 Brennweite: 3.6mm Lens Pixel: 2Mp Infrarot-LED 850nm 36PCS Protokoll: 802.11 b/g/n WIFI Frequenzband: 2.4G Kanal : 1TX/1RX Format: H.264 Video Auflösung: 1920x1080 Max. Bildrate: 25FPS 1080P Speicherung Über C10 Mikrofon/Lautsprecher -38dB; 8ohm, 1W Leistung Max. 7W Spannung Andere Max.
  • Seite 27: Q&A

    Q&A Wie viele Videokameras kann ich mit einem Konto verbinden? Ein Konto kann bis zu 20 Videokameras verbinden. Hat die Videokamera Anforderungen für die Speicherkarte? Die Videokamera unterstützt bis zu 64G Speicherkarte, Karten- geschwindigkeit ist am besten mit einer Class 10 SD Karte. Was kann man machen, wenn die Hinzufügung der Videokamera nicht erfolgreich ist? Bitte setzen Sie die Videokamera zurück und fügen Sie sie erneut...
  • Seite 28: After-Sale-Service

    After-Sale-Service Wir bieten After-Sale-Service innerhalb von einem jahr ab Kaufdatum an. Wenn Sie Probleme bei der Verwendung haben, können Sie uns gerne zu jeder Zeit kontaktieren. VICTURE Kunden-Support E-Mail: bulletcam@govicture.com...
  • Seite 29 Table des matièr Remarques Schéma du produit Connexion et ajout de caméra Téléchargement app Connexion sans fil Connexion filaire Détails des fonctions du logiciel Configuration de la fonction de détection mobile Insertion de carte SD Configuration de la Fonction de la détection de mouvement Fonction du partage de la caméra Paramètres détaillés Q&A...
  • Seite 30: Remarques

    Remarques · La vitesse de la carte sd doit être au dessus de C10, la machine supporte le stockage de carte sd jusqu'à 64 Go. · Avant d'utiliser la carte sd pour l'enregistrement, veuillez tout d'abord insérer la carte sd et la formater dans APP. ·...
  • Seite 31: Schéma Du Produit

    Schéma du produit ① ② ③ ④ ⑥ ⑦ ⑧ ⑤ 1. Indicateur 5. Microphone 2. Objectif 6. Touche de Reconfiguration 3. Photorésistance 7. Interface de Source 4. Fente Pour Carte SD d’ alimentation électrique 8. RJ45...
  • Seite 32: Connexion Et Ajout De Caméra

    Connexion et ajout de caméra Téléchargement app · IPC360 APP peut être téléchargée et installée en scannant le code bidimensionnel ci-dessous. · Il est possible également de rechercher IPC360 dans la boutique de l'application pour télécharger et installer. IPC360 IPC360 Download Connexion sans fil 1.
  • Seite 33 3. Entrez dans l'interface de la liste de la caméra, cliquez sur ''+'' au coin supérieur à droite, sélectionnez la modalité d'ajout sans fil. 4. Branchez l'appareil photo sur le secteur et appuyez sur le bouton de réinitialisation pendant 3 secondes. L'indicateur clignotera lentement en rouge avec des bips «DI DI», ce qui signifie que l'appareil a été...
  • Seite 34: Connexion Filaire

    Connexion filaire 1. Connect the camera via network cable first,then connect phone with WiFi. 2. Ouvrez IPC360, Utilisez l'adresse mail pour enregistrer et connecter. 3. Entrez dans l'interface de la liste de la caméra, cliquez sur ''+'' au coin supérieur à droite, sélectionnez la modalité d'ajout filaire. 4.
  • Seite 35: Détails Des Fonctions Du Logiciel

    Détails des fonctions du logiciel My camera 360° Cliquez pour activer / désactiver la surveillance mobile et l’ envoi de l’ alarme . Délier la caméra et le téléphone . Cliquez sur l'icône, cliquez sur + au coin en haut à droite, entrez le numéro de téléphone ou la boîte email pour l'enregistrement, il est possible de partager aux les utilisateurs qui ont enregistré...
  • Seite 36: Configuration De La Fonction De Détection Mobile

    Configuration de la fonction de détection mobile Insertion de carte SD 1. Débranchez la source d'alimentation de la caméra . 2. Utilisez un tournevis pour dévisser la vis et ouvrir la fente pour carte 3. L'insertion de carte SD . 4.
  • Seite 37: Configuration De La Fonction De La Détection De Mouvement

    Configuration de la Fonction de la détection de mouve- ment 1. Cliquez sur le type d'alerte, ouvrez la fonction de détection mobile. 2. Pour configurer le temps de l'alerte et la sensibilité de détection mobile . Camera setting Alert mode Finish Rename Motion Detection...
  • Seite 38: Paramètres Détaillés

    Paramètres détaillés Antenna 2.4Ghz-2.5Ghz Sensor SC2235 Focal length: 3.6mm Lens Pixel: 2Mp Infrared LED 850nm 36PCS Protocol: 802.11 b/g/n WIFI Frequency band: 2.4G Channel: 1TX/1RX Format: H.264 Video Resolution: 1920X1080 Max. frame rate: 25FPS 1080P Storage Above C10 Microphone/ -38dB; 8ohm, 1W loudspeaker Power Max.
  • Seite 39: Q&A

    Q&A Combien de caméra à connecter au maximum par un compte? Un compte peut connecter 20 caméras au maximum Est-ce qu'il existe les exigences pour la carte mémoire de caméra? La caméra supporte la carte mémoire 64G au maximum, de préférence d'une vitesse de carte en dessus de C10 Comment faire en cas d'échec de l'ajout de caméra? Après avoir réinitialisé...
  • Seite 40: Service Après-Vente

    Ce produit bénéficie du service après-vente d'un an à compter de la date d'achat. Si vous rencontrez tout le problème quelconque au cours de l'utilisation, il est possible de nous contacter à tout moment. Adresse mail du soutien de service après-vente VICTURE : bulletcam@govic- ture.com...
  • Seite 41 Indice del contenuto Premesse Schema composizione prodotto Connessione videocamera ed aggiunte Scaricare l’applicazione Connessione wireless Connessione con cavo Spiegazione dettagliata delle funzioni di software Impostare la funzione di ricerca cellulare Inserimento scheda SD Impostare la funzione di rilevazione del movimento Condividere la videocamera Dettagli specifici del prodotto Domande e risposte...
  • Seite 42: Premesse

    Premesse La scheda SD deve avere una velocità maggiore di C10. Il dispositivo · supporta schede di memoria con una capacità massima di 64GB. · Prima di usare la scheda SD, inseriscila e formattale prima nell’app. Il dispositivo supporta esclusivamente la connessione Wifi 2.4G. Prima di ·...
  • Seite 43: Schema Composizione Prodotto

    Schema composizione prodotto ① ② ③ ④ ⑥ ⑦ ⑧ ⑤ 1. Indicatore 5. Microfono 2. Obiettivo 6. Pulsante di Ripristino 3. Fotoresistore 7. Porta di Alimentazione 4. Slot per Scheda SD 8. RJ45...
  • Seite 44: Connessione Videocamera Ed Aggiunte

    Connessione videocamera ed aggiunte Scarica l’applicazione Inquadra il seguente codice QR per scaricare ed installare l’app IPC360. · In alternativa ricarica l’app IPC360 nello store delle applicazioni, · scaricala ed installala. IPC360 IPC360 Download Connessione wireless 1. Connetti il cellulare ad una rete wifi 2.4G. 2.
  • Seite 45 3. Vai nella schermata della lista delle videocamere e schiaccia su “+” , in corrispondenza dell’ angolo in alto a destra, dopo di che seleziona l’ aggiunta tramite wireless. 4. Collegare la fotocamera all'alimentazione e premere il pulsante di ripristino per 3 secondi, quindi l'indicatore lampeggerà in rosso lenta- mente con i segnali acustici "DI DI", il che significa che il dispositivo è...
  • Seite 46: Connessione Con Cavo

    7. Infine, apparirà una finestra di dialogo per ricordarti che la videocamera è stata aggiunta e devi rinominare la videocamera. Dopo la ridenomi- nazione, è possibile accedere all'interfaccia video dal vivo e l'indicatore lampeggerà rapidamente in verde. Se esci, lampeggerà lentamente in verde.
  • Seite 47: Spiegazione Dettagliata Delle Funzioni Di Software

    Spiegazione dettagliata delle funzioni di software My camera 360° Fare clic per attivare / disattivare il monitoraggio del movimento e visualizzare la funzione di allarme. Annullare l'associazione tra la videocamera e il cellulare. Condivisione - fare clic sull'icona, fare clic su "+" nell'angolo in alto a destra, inserire il numero di cellulare o l'indirizzo e-mail dell'utente per registrazione, è...
  • Seite 48: Impostare La Funzione Di Ricerca Cellulare

    Impostare la funzione di ricerca cellulare Inserimento scheda SD 1. Scollega la videocamera dalla sorgente di corrente. 2. Utilizzare un cacciavite per svitare la vite e aprire lo slot della scheda 3. Inserisci la scheda SD. 4. Collega la videocamera alla corrente ed aspetta che si accenda. 5.
  • Seite 49: Impostare La Funzione Di Rilevazione Del Movimento

    Impostare la funzione di rilevazione del movimento 1. Clicca sulla modalità allarme ed apri la modalità di rilevazione movimento. 2. Impostare l’orario dell’allarme e la sensibilità della rilevazione di movimento. Camera setting Alert mode Finish Rename Motion Detection Shared camera Alert sound switch Shooting angle Indicator LED...
  • Seite 50: Dettagli Specifici Del Prodotto

    Dettagli specifici del prodotto Antenna 2.4Ghz-2.5Ghz Sensor SC2235 Messa a fuoco: 3.6mm Lens Pixel: 2Mp LED infrarosso 850nm 36pezzi Protocol: 802.11 b/g/n WIFI Frequenza: 2.4G Canale: 1TX/1RX Formato: H.264 Video Risoluzione: 1920x1080 Max. frame rate: 25FPS 1080P Memoria Superiore a C10 Microfono/ -38dB;...
  • Seite 51: Domande E Risposte

    Domande e risposte Quante videocamere possono essere collegate ad un solo account? Ad un account possono essere collegate un massimo di 20 videocamere. Quali sono le caratteristiche richieste per la memory card? La videocamera supporta schede SD con una memoria fino a 64GB, con una velocità...
  • Seite 52: Servizio Clienti

    Servizio clienti Con questo prodotto otterrai un anno di garanzia. Qualora dovessi avere delle domande sul prodotto, sentiti libero di contattarci.Indirizzo email per il servizio clienti VICTURE: bulletcam@govic- ture.com...
  • Seite 53 Catálogo Precauciones Diagrama esquemático de los productos Cámara conectada y agregada Descarga de la app Conexión inalámbrica Conexión alámbrica Funciones detalladas del software Configuración de detección de desplazamiento Inserte la tarjeta SD Configuración de detección de movimiento Función para compartir la cámara Parámetros detallados Pregunta &...
  • Seite 54: Precauciones

    Precauciones · Velocidad de la tarjeta sd más de C10, la máquina admite la memoria de tarjeta sd hasta 64G. Antes de usar la tarjeta sd para grabar, inserte la tarjeta sd y formatéela · en la APP. · La máquina solo admite conexión de WiFi 2.4G. Antes de utilizar la APP para agregar la cámara, asegúrese de que el WiFi sea WiFi 2.4G.
  • Seite 55: Diagrama Esquemático De Los Productos

    Diagrama esquemático de los productos ① ② ③ ④ ⑥ ⑦ ⑧ ⑤ 1. Indicador 5. Micrófono 2. Lente 6. Botón de reinicio 3. Fotorresistencia 7. Puerto de Alimentación 4. Ranura para Tarjeta SD 8. RJ45...
  • Seite 56: Cámara Conectada Y Agregada

    Cámara conectada y agregada Descarga de la app Puede escanear el código QR abajo para descargar e instalar la IPC360 APP. · También puede buscar IPC360 en la tienda de app para descargar e · instalar. IPC360 IPC360 Download Conexión inalámbrica 1.
  • Seite 57 3. Ingrese a la interfaz de la lista de cámaras, haga clic en "+" en la esquina superior derecha, seleccione el modo de adición inalámbrico. 4. Enchufe la cámara a la corriente y presione el botón de reinicio durante 3 segundos, luego el indicador parpadeará en rojo lentam- ente con "DI DI", lo que significa que el dispositivo se ha reiniciado correctamente.
  • Seite 58: Conexión Alámbrica

    Conexión alámbrica 1. Conecte primero la cámara a través del cable de red, luego conecte el teléfono con WiFi. 2. Abra el IPC360, use el correo electrónico para registrarse e iniciar sesión. 3. Ingrese a la interfaz de la lista de cámaras, haga clic en "+" en la esquina superior derecha, seleccione el modo de adición alámbrico.
  • Seite 59: Funciones Detalladas Del Software

    Funciones detalladas del software My camera 360° Haga clic para activar / desactivar la detección de movimiento y activar la función de alarma. Para desbloquear la conexión entre la cámara y el teléfono. Haga clic en el icono, haga clic en "+" en la esquina superior dere- cha, ingrese el número de teléfono o el correo electrónico que utilizó...
  • Seite 60: Configuración De Detección De Desplazamiento

    Configuración de detección de desplazamiento Inserte la tarjeta SD 1. Desconecte el poder de la cámara. 2. Utilice un destornillador para destornillar el tornillo y abrir la ranura de la tarjeta SD. 3. Inserte la tarjeta SD. 4. Conecte el poder y espere a que la cámara se inica con éxito. 5.
  • Seite 61: Configuración De Detección De Movimiento

    Configuración de detección de movimiento 1. Haga clic en el tipo de alerta para abrir la función de detección de movimiento. 2. Ajustar la hora de alerta y la sensibilidad de detección de movimiento. Camera setting Alert mode Finish Rename Motion Detection Shared camera Alert sound switch...
  • Seite 62: Función Para Compartir La Cámara

    Función para compartir la cámara 1. haga clic en el boton de compartir debajo de la camera改成y haga clic en el botón Compartir en la parte inferior. 2. Haga clic en “+” en la esquina superior derecha y agregue una cuenta que desee compartir, la cuenta que comparte para descargar y registrar primero la aplicación IPC360.
  • Seite 63: Parámetros Detallados

    Parámetros detallados Antena 2.4Ghz-2.5Ghz Sensor SC2235 Longitud focal: 3.6mm Lente Pixel: 2Mp LED infrarrojo 850nm 36PCS Protocol: 802.11 b/g/n WIFI Banda de frecuencia: 2.4G Canal: 1TX/1RX Formato: H.264 Vídeo Resolución: 1920x1080 Velocidad de fotogramas máxima: 25FPS 1080P Almacenamiento Más de C10 Micrófono / altavoz -38dB;...
  • Seite 64: Pregunta & Respuesta

    Pregunta & Respuesta ¿Cuántas cámaras pueden conectar a una cuenta? Se pueden conectar hasta 20 cámaras a una cuenta. ¿La cámara tiene los requisitos para la tarjeta de memoria? La cámara admite la memoria de tarjeta sd hasta 64G, la velocidad de la tarjeta sd más de C10.
  • Seite 65: Postventa

    Postventa El producto disfruta de un año de servicio postventa a partir de la fecha de compra. Si tiene algún problema con su uso, no dude en contactarnos. Correo electrónico de soporte posventa de VICTURE: bulletcam@govic- ture.com...
  • Seite 66 目次 注意事項 製品見取り図 ビデオカメラ接続 ・ 追加 appダウンロード 無線接続 有線接続 APP画面のアイコンの詳細 動き検出機能設定 SDカード挿入 運動検出機能設定 ビデオカメラ共有機能 詳細パラメータ Q&A アフターサービス...
  • Seite 67 注意事項 SDカード速度がC10 以上です。 機器は最大64GのSDカードストレージをサポ · ートします。 SDカードを使用して記録する前に、 SDカードを挿入し、 APP内にフォーマット · してください。 機器は2.4GのWiFi接続のみをサポートします。 APPを使用してビデオカメラを · 追加する前に、 携帯電話に接続しているWiFiが2.4GのWiFiであることを確認 してください。 WiFiパスワードは特殊文字を許可しません。 · 機器はonvifプロトコルをサポートしないので、 DVR/NVRに使用できません。 · 機器は、 独特なビデオ暗号化技術を使用します。 SDカードに保存されたビデ · オは、 APPのみで表示されます。 カードリーダーを使用してビデオをPCにコピ ーすることができません。 機器はループ記録技術を使用します。 SDカードがいっぱいになった後、 ビデ · オカメラは最も古いファイルを自動的に上書きして、 ビデオを保存します。...
  • Seite 68 製品見取り図 ① ② ③ ④ ⑥ ⑦ ⑧ ⑤ 1. インジケータ 5. マイク 2. レンズ 6. リヤツトキ一 3. 光電感度電気抵抗 7.電源アダプタ一接続端子 4. メモリ一カ一ド 8. RJ45...
  • Seite 69 ビデオカメラ接続 ・ 追加 appダウンロード 1. 以下のQRコードをスキャンし、 IPC360 APPをダウンロード ・ インストールします。 2. App StoreでIPC360を検索し、 ダウンロード ・ インストールします。 IPC360 IPC360 Download 無線接続 1. 携帯電話を 2.4G WiFi に接続します。 2. IPC360 を開き、メールボックスを使用して登録・ログインします。...
  • Seite 70 3. ビデオカメラリスト画面に入り、 右上の 「+」 をクリックし、 無線追加方式を選 択します。 4. カメラを電源に接続し、 リセッ トボタンを3秒間押すと、 「 DI DI」 のビープ音 が鳴り、 インジケータがゆっく りと赤く点滅します。 これは、 デバイスが正常にリ セッ トされたことを意味します。 そうでない場合は、 電源を抜いてもう一度差 し込んでください。 その後、 もう一度リセッ トしてみてください。 My camera Network mode Smart wireless mode(recommended) Connect camera to WIFI 360° インジケータがゆっく...
  • Seite 71 有線接続 1. まずネッ トワークケーブルでカメラを接続してから、電話を WiFi に接続 します。 2. ドライバを使用してネジを外し、SD カードスロッ トを開きます。 3. IPC360 を開き、メールボックスを使用して登録・ログインします。 4. ビデオカメラリスト画面に入り、右上の「+」をクリックし、有線追加方 式を選択します。 5. 「ビデオカメラや携帯電話に接続しているのは同一ルーターです」と確 保し、次に「次へ」をクリック し、APP 検索完了を待ちます。 6. 検索完了後、ビデオカメラをクリック して追加します。 My camera Network mode Wire mode The camera is connected to the router via a network cable 360°...
  • Seite 72 APP画面のアイコンの詳細 My camera 360° このボタンをクリックするとモーション検知機能と警報プッシュ通知機 能をオン / オフにすることができます。 カメラと携帯の接続を解除します。 このアイコンををクリックしてから右上の「+」をクリックして、共有 するユーザーの携帯電話番号やメールアドレスを入力すると、この APP に登録しているユーザーに共有できます。 設定。...
  • Seite 73 動き検出機能設定 SD カード挿入 1. 下部の [ 共有 ] ボタンをクリック します。 2. 右上隅にある「+」をクリックして、共有するアカウントを追加します。 共有するアカウントで、まず IPC360 アプリをダウンロードして登録します。 3. 電源を挿入し、ビデオカメラの成功な起動を待ちます。 4. メモリカード情報をクリックし、次に「メモリカードをフォーマッ トする」 をクリック して SD カードをフォーマッ トします。 5. SD カードをフォーマッ トした後、 APP を終了してから再度ログインします。 Memory card information Camera setting Change router Picture Camera information Status Memory card information Firmware upgrade...
  • Seite 74 運動検出機能設定 1. アラームタイプをクリックし、 動き検出機能を有効にします。 2. アラーム時間と動き検出感度を設定します。 Camera setting Alert mode Finish Rename Motion Detection Shared camera Alert sound switch Shooting angle Indicator LED Alert mode ビデオカメラ共有機能 1. ビデオカメラを成功に追加した後、 ビデオカメラリスト画面に入り、 クリックビ デオカメラの下の共有ボタンをクリックします。 2. 右上の 「+」 をクリックし、 アカウントを入力して、 共有します。 3. 成功に共有した後、 そのアカウントは同時にログインしてビデオカメラを見る ことができます。...
  • Seite 75 詳細パラメータ Antenna 2.4Ghz-2.5Ghz Sensor SC2235 Focal length: 3.6mm Lens Pixel: 2Mp Infrared LED 850nm 36PCS Protocol: 802.11 b/g/n WIFI Frequency band: 2.4G Channel: 1TX/1RX Format: H.264 Video Resolution: 1920x1080 Max. frame rate: 25FPS 1080PP Storage Above C10 Microphone/ -38dB; 8ohm, 1W loudspeaker Power Max.
  • Seite 76 Q&A 一つのアカウントは何台のビデオカメラに接続できますか? 一つアカウントは 20 のビデオカメラに接続できます。 ビデオカメラのメモリカードは要求がありますか? ビデオカメラは最大 64G のメモリカードをサポートします。カード速 度が C10 以上です。 ビデオカメラ追加が失敗した場合、どうしますか? ビデオカメラをリセッ トした後、再追加してください。...
  • Seite 77 アフターサービス 本製品購入日以降1年間のアフターサービスを提供致します。 ご使用する時に、 何の問題がございましたら、 いつでもご連絡ください。 VICTUREアフターサービスメールボックス : bulletcam@govicture.com...
  • Seite 81 封面封底 :128g 铜版纸 过哑膜 内页 :80g 金太阳双胶 尺寸 :88mm*118mm 出血裁掉 装订方式 :胶装...

Inhaltsverzeichnis