Herunterladen Inhalt Inhalt Diese Seite drucken

Telstar BiOptima Bedienungsanleitung

Mikrobiologische sicherheitswerkbänke
Inhaltsverzeichnis

Werbung

Verfügbare Sprachen

Verfügbare Sprachen

USER MANUAL
MANUAL DE USUARIO
MANUEL D'UTILISATION
BEDIENUNGSANLEITUNG
Microbiological Safety Cabinets
Cabinas de Seguridad Microbiológica
Cabines de sécurité microbiologique
Mikrobiologische Sicherheitswerkbänke
BiOptima / BiOptima Cyto

Werbung

Inhaltsverzeichnis
loading

Inhaltszusammenfassung für Telstar BiOptima

  • Seite 1 USER MANUAL MANUAL DE USUARIO MANUEL D'UTILISATION BEDIENUNGSANLEITUNG Microbiological Safety Cabinets Cabinas de Seguridad Microbiológica Cabines de sécurité microbiologique Mikrobiologische Sicherheitswerkbänke BiOptima / BiOptima Cyto...
  • Seite 3 USER’S MANUAL Microbiological Safety Cabinet BiOptima / BiOptima Cyto Failure to read, understand and follow the instructions in this manual may result in damage to the unit, injury to operating personnel and poor equipment performance.
  • Seite 4 UM-BiOptima-EN-1907 2 / 39...
  • Seite 5: Inhaltsverzeichnis

    Set point alarm inflow air velocity test _________________________ 35 9.6. Smoke test __________________________________________________ 35 CERTIFICATES ___________________________________________________ 36 10.1. EU declaration of conformity _____________________________________ 36 10.2. Guarantee ___________________________________________________ 36 TROUBLESHOOTING _______________________________________________ 37 Translation of the original manual UM-BiOptima-EN-1907 3 / 39...
  • Seite 6: Symbols And Abbreviations

    Abbreviations used in this manual: Volts s, h Seconds, hours Amperes Hertz W, kW, µW Watts, kilowatts, microwatts Decibel mm, cm, m Millimetres, centimetres, metres ºC Celsius Kilogram Microbiological Safety Cabinets “Tested safety” according German standards UM-BiOptima-EN-1907 4 / 39...
  • Seite 7: General Data

    1. GENERAL DATA Operating Instructions Manual for Microbiological Safety Cabinets Class II BiOptima according to EN 12469 standards, and version BiOptima Cyto for cytostatics, according to EN 12469 and DIN 12980 standards, which ensure (applying correct techniques in laboratory) high level protection for the operator, the environment and the sample.
  • Seite 8: Description Of The Safety Cabinets

    Furthermore the pre-filter will enhance the life span of the HEPA filter significantly. In the BiOptima Cyto model, as can be seen in Annex A2, both, inflow and recirculated flow pass through a first filter step with several HEPA filters (10). Access to these filters is completely safe in order to replace them without any risk of contamination.
  • Seite 9: Components Description

    U.V light, then the fans will automatically disconnect. 2.5. CERTIFICATION Quality control and tests results certification carried out in line with the applicable standards EN 12469 & DIN 12980. See Certificate inside the cabinet. UM-BiOptima-EN-1907 7 / 39...
  • Seite 10: Technical Features

    2.6. TECHNICAL FEATURES Features Units. BiOptima 4 BiOptima 6 External dimensions (LxWxH) 1338 x 825 x 1450 1948 x 825 x 1450 (Width including armrest) Internal dimensions (LxWxH) 1190 x 548 x 666 1800 x 548 x 666 Front opening height...
  • Seite 11 Features Units. BiOptima Cyto 4 BiOptima Cyto 6 External dimensions (LxWxH) 1338 x 832 x 2212 1948 x 832 x 2212 (Width including armrest) Internal dimensions (LxWxH) 1190 x 548 x 666 1800 x 548 x 666 Front opening height...
  • Seite 12: Installing Instructions

    Side air vents are not appropriate for rooms where cabinets are installed. g) Due to the ceiling temperature affects air distribution, sites should be selected with enough space. We recommend 250 mm minimum free space between the exhaust and the ceiling. UM-BiOptima-EN-1907 10 / 39...
  • Seite 13: Precautions For First Connection

    1.5 mm WARNING The plug connection must be located in such a place to prevent it from being unplugged intentionally or accidentally during operation, e.g., next to a wall or closed to another equipment. EARTH WIRE UM-BiOptima-EN-1907 11 / 39...
  • Seite 14: Electrical Connection And Services

    During normal work in these safety cabinets and because of a basic principle of recirculation and depression in the work zone, no perforated surface in the work zone should be covered with paper or sanitary fabric. UM-BiOptima-EN-1907 12 / 39...
  • Seite 15: Cabinet Exhaust Ducting

    Duct of at least 250 mm diameter. Outlet protected from back airflow, closure, entry of any element in the duct which may result in air flow restriction (animals…). GS has not been tested for the canopy. It must be tested after installation. UM-BiOptima-EN-1907 13 / 39...
  • Seite 16: Installation Tests

    TELSTAR also recommends making the following tests: Light Test. Noise Level Test Telstar, its representatives and distributors put a qualified technical team at your disposition that uses control equipment with maximum health protection for carrying out this installation test under full safety guarantees.
  • Seite 17: Operating Instructions

    The cabinet can only be used by qualified staff who meets the correct work techniques in the laboratory. If these techniques are not fulfilled, faulty working of the equipment may happen. WARNING The EN 12469 certification does not allow the deactivation of the password enquiry. UM-BiOptima-EN-1907 15 / 39...
  • Seite 18: Front Panel Positions

    Depending on the initial glass position, it will automatically stop at the precise working position or in the closed position. Note: Lights will blink during glass movement. Closed position Working position Open position UM-BiOptima-EN-1907 16 / 39...
  • Seite 19 In case of power failure, user is able to close the glass thanks to the battery that is installed for that purpose. WARNING The glass is required to be in full lifted position before closing the front glass towards the cabinet. In case this is not fulfilled, the glass may be damaged. UM-BiOptima-EN-1907 17 / 39...
  • Seite 20: General Working Recommendations

    Any equipment connected to the internal sockets inside the cabinet should meet all the electrical specifications. p) People traffic generates air movements that may cause unexpected loss of the containment barrier and, in the case of Class II cabinets, a reduced level of product UM-BiOptima-EN-1907 18 / 39...
  • Seite 21: Ergonomics

    4.3.1. ERGONOMICS Microbiological security cabinet BiOptima and its accessories have been designed following recommendations and specifications of the standard EN ISO 14738:2010. Users should consider their position when working with the cabinet, for their own safety.
  • Seite 22 UM-BiOptima-EN-1907 20 / 39...
  • Seite 23 In addition, in order to protect both the product and the user, it is necessary that the cabinet is placed in a location without air currents, which may cause turbulence in the laminar down flow. UM-BiOptima-EN-1907 21 / 39...
  • Seite 24: Definition Of The Working Area

    • Do not work in any area with perforations and do not cover them up. • Always work within the limits according the following image. UM-BiOptima-EN-1907 22 / 39...
  • Seite 25: Control Keyboard-Display

    Confirm the value of the selected field and move the selection to the next field. After pressing for the final time: Right Password: it accesses the Main Operation screen. Wrong Password: Cursor returns to the first field. UM-BiOptima-EN-1907 23 / 39...
  • Seite 26 Confirm the value. ECO Mode Confirmation screen. 2.3. Increase the value of the selected field. Decrease the value of the selected field. Confirm the value of the selected field and move the selection to the next field. UM-BiOptima-EN-1907 24 / 39...
  • Seite 27 Disinfection Menu screen. 2.4.1.1.2. U.V. Time adjust screen. Confirm the selected value and save it.* Reset the numeric value. Back to U.V. Menu screen. Value 000 means infinite time: start and stop will be made manually. UM-BiOptima-EN-1907 25 / 39...
  • Seite 28 Go to PIN Configuration screen. Go to Date & Hour screen. Go to Sensors Information screen. Go to Main Operation screen. 3.1. Contrast screen. Increase the value. Decrease the value. Confirms value returns Configuration Menu screen. UM-BiOptima-EN-1907 26 / 39...
  • Seite 29 Coded password. case forgotten password, by giving this code to Telstar the previous password will be recovered. Back to Configuration Menu screen. 3.5. Date-hour screen. Saves the value. (format dd/mm/yy hh:mm). Cancel and/or edit the entered value.
  • Seite 30 Back to Auto Power on screen. 3.6. Sensors Information screen. It shows information about the values of the sensors of the cabinet in real time. Move window up. Move window to the work-position. Move window down. Back to Configuration Menu screen. UM-BiOptima-EN-1907 28 / 39...
  • Seite 31: Disconnection

    Should the main microprocessor fail, the auxiliary microprocessor will activate the optical alarm, and also the acoustic alarm. In such a case, move the glass to the closed position and cover the cabinet exhaust. Disconnect the equipment and contact the Telstar Technical Service.
  • Seite 32: Optional Accessories

    For these reasons, the electrically controlled valve that enables gas entry can only be activated when the fans are working and it is automatically disconnected when the alarm indicating a lack of impulsion flow is activated. UM-BiOptima-EN-1907 30 / 39...
  • Seite 33: Maintenance

    Minimum once a year or after filter changes Set point alarm downflow air velocity test Inflow air velocity Test Set point alarm inflow air velocity test Smoke test Light test Recommended during the start up of the cabinet Noise level Test UM-BiOptima-EN-1907 31 / 39...
  • Seite 34: Absolute Filters

    Manual. The pre-filter is assembled under the worktop. According to EN12469:2000 Annex K the pre-filter needs to be replaced on every maintenance occasion. Replacement can be done easily following the instructions described in the Service Manual. UM-BiOptima-EN-1907 32 / 39...
  • Seite 35: Spare Parts

    SPEED PROBE 0.2-1.0 M/S (2 UNITS) BiOptima 4 / Cyto 4 Description DOWNFLOW (2 UNITS) / EXHAUST FAN (1 UNIT) PRE-FILTER BIOPTIMA 4 G3 (EN 779) ABSOLUTE FILTER H14 1219X457X90 ABSOLUTE FILTER H14 610X457X90 LED LIGHTING BIOPTIMA 4 BiOptima 6 / Cyto 6...
  • Seite 36: Cleaning And Disinfection

    Vaporized hydrogen peroxide systems provide rapid, safe, low-temperature decontamination methods for any enclosed area that may be contaminated with micro-organisms, including spore-forming bacteria. See Annex A5.4 for the disinfection with vaporized hydrogen peroxide procedure. UM-BiOptima-EN-1907 34 / 39...
  • Seite 37: Maintenance Table

    9.4.1. SET POINT ALARM DOWNFLOW AIR VELOCITY TEST See Annex A9.4.1 9.5. INFLOW AIR VELOCITY TEST See Annex A9.5 9.5.1. SET POINT ALARM INFLOW AIR VELOCITY TEST See Annex A9.5.1 9.6. SMOKE TEST See Annex A9.6 UM-BiOptima-EN-1907 35 / 39...
  • Seite 38: Certificates

    CERTIFICATES 10.1. EU DECLARATION OF CONFORMITY See Annex A10.1 10.2. GUARANTEE See Annex A10.2 UM-BiOptima-EN-1907 36 / 39...
  • Seite 39: Troubleshooting

    Clogged laminar down flow LAM. FLOW ” the hours it has been under operation. filter or aspiration filter (see Chapter (Chapter 4.5 point 3.2). (Model BiOptima Cyto). 4.5 point D) Notify the technical service to change the filter. Excessive laminar down flow...
  • Seite 40 Working position inductive “ WORK sensors unadjusted. Notify the Technical Service to receive POSITION” instructions to adjust the inductive sensor. (see Chapter 4.5 pto. D) Call a specialised technician to replace the Main control is damaged. control. UM-BiOptima-EN-1907 38 / 39...
  • Seite 41 Call a specialised technician to replace the Main control is damaged. control. WARNING All repair and maintenance work in the cabinet should be done by qualified technical staff with knowledge about the maintenance procedures required by the cabinet. UM-BiOptima-EN-1907 39 / 39...
  • Seite 43 MANUAL DE USUARIO Cabinas de Seguridad Microbiológica BiOptima / BiOptima Cyto La omisión de la lectura, comprensión y seguimiento de las instrucciones de este manual pueden resultar en daños a la unidad, a las personas y pobre rendimiento del equipo.
  • Seite 44 2 / 39 UM-BiOptima-SP-1907...
  • Seite 45 Test set point alarmas velocidad entrada de aire _________________ 35 9.6. Test de humo ________________________________________________ 35 CERTIFICADOS ___________________________________________________ 36 10.1. Declaración de conformidad UE __________________________________ 36 10.2. Garantía ____________________________________________________ 36 POSIBLES PROBLEMAS Y SOLUCIONES ________________________________ 37 Manual original UM-BiOptima-SP-1907 3 / 39...
  • Seite 46: Simbología Y Abreviaturas

    Relación de abreviaturas utilizadas en el presente manual: Voltios s, h Segundos, horas Amperios Hertzios W, kW, µW Vatios, kilovatios, microvatios Decibelios mm, cm, m Milímetros, centímetros, metros ºC Grados centígrados Kilogramos Cabina de Seguridad Microbiológica “Seguridad verificada” según la normativa alemana UM-BiOptima-SP-1907 4 / 39...
  • Seite 47: Datos Generales

    1. DATOS GENERALES Manual de Instrucciones para la cabina de Seguridad Microbiológica Clase II BiOptima según normativa EN 12469, y versión BiOptima Cyto para citostáticos, según normativas EN 12469 y DIN 12980 que aseguran (aplicando las técnicas correctas de trabajo en laboratorio) una alta protección al operador, al medio ambiente y a la muestra.
  • Seite 48: Datos De La Cabina

    útil de los filtros HEPA de forma significativa. En el modelo BiOptima Cyto, como puede verse en el Anexo A2, ambos flujos de entrada y recirculación son conducidos a través de una primera etapa de filtración con varios filtros HEPA (10).
  • Seite 49: Descripción De Los Componentes

    2.5. CERTIFICACIÓN Control de calidad y certificación con los resultados de los ensayos realizados según normas EN 12469 Y DIN 12980. Certificado en el interior de la cabina. UM-BiOptima-SP-1907 7 / 39...
  • Seite 50: Características Técnicas

    2.6. CARACTERÍSTICAS TÉCNICAS Características Unid. BiOptima 4 BiOptima 6 Dimensiones externas (LxWxH) 1338 x 825 x 1450 1948 x 825 x 1450 (Ancho incluyendo reposabrazos) Dimensiones internas 1190 x 548 x 666 1800 x 548 x 666 (LxWxH) Altura abertura frontal...
  • Seite 51 Características Unid. BiOptima Cyto 4 BiOptima Cyto 6 Dimensiones externas (LxWxH) 1338 x 832 x 2212 1948 x 832 x 2212 (Ancho incluyendo reposabrazos) Dimensiones internas 1190 x 548 x 666 1800 x 548 x 666 (LxWxH) Altura abertura frontal...
  • Seite 52: Instrucciones De Instalación

    Los difusores de aire laterales no son apropiados para estancias con cabinas instaladas. UM-BiOptima-SP-1907 10 / 39...
  • Seite 53: Precauciones En La Primera Conexión

    Conectar la cabina en una clavija inaccesible para el usuario, evitando así la posibilidad de que sea desenchufada voluntaria o involuntariamente mientras esté en funcionamiento. Por ejemplo emplazando el equipo junto a una pared o junto a otro equipo. TOMA DE TIERRA UM-BiOptima-SP-1907 11 / 39...
  • Seite 54: Conexión Eléctrica Y De Servicios

    Durante el trabajo normal en estas cabinas de seguridad y por un principio básico de recirculación y depresión en la zona de trabajo no debe taparse con papel o tejido sanitario ninguna superficie perforada de la zona de trabajo. UM-BiOptima-SP-1907 12 / 39...
  • Seite 55: Conducción De La Cabina

    Proteger la salida frente a la entrada de corrientes, de obturaciones, de la entrada de elementos que puedan alterar la conducción del aire (animales…). No se ha verificado GS para el canopy. Debe ser verificada tras la instalación. UM-BiOptima-SP-1907 13 / 39...
  • Seite 56: Test De Instalación

    Test de fugas en el filtro de flujo laminar. Test de fugas en el filtro de extracción. Test de fugas en el filtro de aspiración (Sólo modelo BiOptima Cyto) Test de velocidad de flujo laminar. Test de set points de flujo laminar.
  • Seite 57: Instrucciones De Uso

    La cabina sólo puede ser utilizada por personal cualificado que cumpla las técnicas correctas de trabajo en laboratorio. En caso de no respetar estas técnicas, puede derivar en un mal funcionamiento del equipo. PRECAUCIÓN La certificación EN 12469 no permite inhabilitar la petición de password. UM-BiOptima-SP-1907 15 / 39...
  • Seite 58: Posicionamiento Del Frontal

    Dependiendo de la posición inicial del vidrio, se detendrá automáticamente en la posición de trabajo precisa o bien en la posición cerrada. Nota: las luces parpadearán durante el movimiento del cristal. Posición cerrado Posición trabajo Posición abierto UM-BiOptima-SP-1907 16 / 39...
  • Seite 59 PRECAUCIÓN Es imprescindible que el cristal se encuentre en la posición superior antes de volver a llevar el cristal hacia la cabina. En caso de que esto no se cumpla, el cristal puede resultar dañado. UM-BiOptima-SP-1907 17 / 39...
  • Seite 60: Recomendaciones De Trabajo Generales

    Durante el trabajo en la cabina y en las operaciones de limpieza, debe evitarse dañar los filtros HEPA dando golpes, proyectando líquidos o salpicaduras, etc. o) Todos los equipos conectados en la base interna de la cabina deben cumplir con todas las especificaciones eléctricas. UM-BiOptima-SP-1907 18 / 39...
  • Seite 61: Ergonomía

    4.3.1. ERGONOMÍA La cabina de seguridad biológica BiOptima, así como sus accesorios, ha sido diseñada siguiendo las especificaciones y recomendaciones de la Norma EN ISO 14738:2010 Por su seguridad, el usuario deberá tener en cuenta las posturas adoptadas durante el trabajo realizado con la cabina.
  • Seite 62 UM-BiOptima-SP-1907 20 / 39...
  • Seite 63 Además como protección tanto del producto como del usuario, es necesario que la cabina se ubique en un lugar donde no se produzcan corrientes de aire, que pueda causar turbulencias en el flujo laminar. UM-BiOptima-SP-1907 21 / 39...
  • Seite 64: Definición De La Zona De Trabajo

    Para evitar crear turbulencias en el flujo laminar y proteger al usuario y al producto, será necesario establecer un área de trabajo en el interior de la cabina. • No trabajar sobre las zonas perforadas ni obstruirlas. • Trabajar siempre dentro de los límites según se indica en la siguiente imagen. UM-BiOptima-SP-1907 22 / 39...
  • Seite 65: Carátula De Mandos Y Menús

    Aumenta el valor del campo seleccionado. Disminuye el valor del campo seleccionado. Confirma el valor del campo y selecciona el campo siguiente. aceptar último campo: Password correcto: pasa a la pantalla Menú Principal. Password incorrecto: devuelve la selección al primer campo. UM-BiOptima-SP-1907 23 / 39...
  • Seite 66 Aumenta el valor. Disminuye el valor. Confirma el valor. 2.3. Pantalla Confirmación ECO Mode. Aumenta el valor del campo seleccionado. Disminuye el valor del campo seleccionado. Confirma el valor del campo y selecciona el campo siguiente. UM-BiOptima-SP-1907 24 / 39...
  • Seite 67 Menú Descontaminación. 2.4.1.1.2. Pantalla Temporizador U.V. Confirma el valor seleccionado y lo guarda.* Resetea los campos numéricos. Vuelve a la pantalla Menú U.V. Valor 000 significa tiempo infinito: el encendido y el apagado se harán manualmente. UM-BiOptima-SP-1907 25 / 39...
  • Seite 68 Acceso a la pantalla Información Sensores. Acceso al Menú Principal. 3.1. Pantalla Contraste. Aumenta el valor del campo seleccionado. Disminuye el valor del campo seleccionado. Confirma el valor del campo y vuelve a la pantalla Menú Configuración. UM-BiOptima-SP-1907 26 / 39...
  • Seite 69 Modifica el password de usuario. Devuelve el password de usuario cifrado. En caso de olvido, enviando este código cifrado al Servicio Técnico de Telstar se recuperará el password de usuario. Vuelve a la pantalla Menú Configuración. 3.5. Pantalla Fecha-hora.
  • Seite 70 3.6. Pantalla Información Sensores. Muestra información sobre los valores de los sensores de la cabina en tiempo real. Sube el cristal frontal. Mueve el cristal frontal a posición trabajo. Baja el cristal frontal. Vuelve a la pantalla Menú Configuración. UM-BiOptima-SP-1907 28 / 39...
  • Seite 71: Desconexión

    En el caso de que el microprocesador principal fallara, el microprocesador auxiliar activa las alarmas ópticas, y acústicas. Si esto sucede, mover el frontal a la posición de cerrado. Desconectar el equipo y contactar con el Servicio Técnico de Telstar. 4.6.
  • Seite 72: Optional Accessories

    Debido a estos motivos la electroválvula que habilita la entrada de gas sólo podrá activarse cuando los ventiladores estén en funcionamiento y será desconectada de forma automática ante la alarma de falta de flujo de impulsión. UM-BiOptima-SP-1907 30 / 39...
  • Seite 73: Mantenimiento

    Test set point alarmas de velocidad de impulsión de filtro Test de velocidad aire de entrada Test set point alarmas de velocidad de aire de entrada Test de humo Test de luminosidad Recomendado durante la puesta en marcha de la Test acústico cabina UM-BiOptima-SP-1907 31 / 39...
  • Seite 74: Absolute Filters

    El prefiltro viene montado bajo las bandejas de trabajo. Según el Anexo K de la norma EN12469:2000, el prefiltro debe ser cambiado en toda intervención de mantenimiento. El reemplazo puede realizarse fácilmente siguiendo las instrucciones descritas en el manual de mantenimiento. UM-BiOptima-SP-1907 32 / 39...
  • Seite 75: Lista De Recambios

    BiOptima 4 / Cyto 4 Nº Descripción VENTILADOR DE FLUJO LAMINAR (2 U.) / EXTRACCIÓN (1 U.) PRE-FILTRO BIOPTIMA 4 G3 (EN 779) FILTRO ABSOLUTO HEPA H14 1219X457X90 FILTRO ABSOLUTO HEPA H14 610X457X90 LUMINARIA LED BIOPTIMA 4 BiOptima 6 / Cyto 6 Nº...
  • Seite 76: Limpieza Y Desinfección

    área cerrada que pueda estar contaminada con micro-organismos, incluyendo bacterias formadoras de esporas. Para el procedimiento de desinfección con peróxido de hidrógeno vaporizado, ver el Anexo A5.4. UM-BiOptima-SP-1907 34 / 39...
  • Seite 77: Histórico De Mantenimiento

    TEST SET POINT ALARMAS VELOCIDAD DE IMPULSIÓN Ver Anexo A9.4.1 9.5. TEST DE VELOCIDAD AIRE DE ENTRADA Ver Anexo A9.5 9.5.1. TEST SET POINT ALARMAS VELOCIDAD ENTRADA DE AIRE Ver Anexo A9.5.1 9.6. TEST DE HUMO Ver Anexo A9.6 UM-BiOptima-SP-1907 35 / 39...
  • Seite 78: Certificados

    CERTIFICADOS 10.1. DECLARACIÓN DE CONFORMIDAD UE Ver Anexo A10.1 10.2. GARANTÍA Ver Anexo A10.2 UM-BiOptima-SP-1907 36 / 39...
  • Seite 79: Posibles Problemas Y Soluciones

    Filtro de extracción o Revisar fecha del último cambio de filtro y aspiración (modelo horas de uso (Apdo. 4.5 pto 3.2). BiOptima Cyto) colmatados. Avisar al servicio técnico para el cambio de filtro. Cabina conducida y Colocar un ventilador adicional al final del conducción demasiado...
  • Seite 80 POSICION desajustado. suelto. ” TRABAJO Llamar a Servicio Técnico para recibir (ver Apdo. 4.5 instrucción para ajustar el sensor inductivo. pto. D) Control principal dañado. Llamar a servicio técnico especializado para reemplazar la tarjeta de control. UM-BiOptima-SP-1907 38 / 39...
  • Seite 81 Llamar a servicio técnico especializado para Control principal dañado. reemplazar control. PRECAUCIÓN Todas las reparaciones o intervenciones de mantenimiento en la cabina deben ser realizadas por personal técnico cualificado con conocimiento sobre los procedimientos de mantenimiento requeridos por esta cabina. UM-BiOptima-SP-1907 39 / 39...
  • Seite 83 MANUEL D'UTILISATION Cabines de sécurité microbiologique BiOptima / BiOptima Cyto Ne pas lire, comprendre et suivre les instructions de ce manuel peut entraîner des dommages à l'appareil, des blessures au personnel et la performance des équipements pauvres.
  • Seite 84 UM-BiOptima-FR-1907 2 / 39...
  • Seite 85 Test set point alarmes vitesse entrée d’air ______________________ 35 9.6. Test de fumée ________________________________________________ 35 CERTIFICATS ____________________________________________________ 36 10.1. Déclaration de conformité UE ____________________________________ 36 10.2. Garantie ____________________________________________________ 36 TROUBLESHOOTING _______________________________________________ 37 Traduction du manuel original UM-BiOptima-FR-1907 3 / 39...
  • Seite 86: Symboles Et Abreviations

    AUTOCOLLANT « DOP PORTS ». Abréviations utilisées dans ce manuel: Volts s, h Secondes, heures Ampères Hertz W, kW, µW Watts, kilowatts, microwatts Décibels mm, cm, m Millimètres, centimètres, mètres ºC Degrés centigrades «Sécurité testée», selon les Kilogrammes normes allemandes UM-BiOptima-FR-1907 4 / 39...
  • Seite 87: Données Générales

    Manuel d'utilisation de la cabine de sécurité microbiologique de classe II BiOptima standard, selon la réglementation EN 12469, et la version BiOptima Cyto pour cytostatiques, selon les réglementations EN 12469 et DIN 12980, qui garantit (en appliquant les techniques de travail en laboratoire correctes) une haute protection à...
  • Seite 88: Données De La Cabine

    à collecter les fluides déversés. En outre, les préfiltres augmenteront considérablement la durée de vie du filtre HEPA. Comme indiqué dans l'Annexe A2 du modèle BiOptima Cyto, les fluxes d'air laminaire et d'extraction traversent une première étape de filtrage avec plusieurs filtres HEPA (10). L'accès à...
  • Seite 89: Description Des Composants

    U.V., il faut mettre la vitre frontale en position fermée, ce qui entraîne la déconnexion automatique des ventilateurs. 2.5. CERTIFICATION Contrôle de qualité et certification avec les résultats des essais réalisés suivant les normes EN 12469 et DIN 12980. Certificat à l'intérieur de la cabine. UM-BiOptima-FR-1907 7 / 39...
  • Seite 90: Caractéristiques Techniques

    2.6. CARACTÉRISTIQUES TECHNIQUES Caractéristiques Unité BiOptima 4 BiOptima 6 Dimensions externes (LxWxH) 1338 x 825 x 1450 1948 x 825 x 1450 (Ampleur repose-bras compris) Dimensions internes 1190 x 548 x 666 1800 x 548 x 666 (LxWxH) Hauteur ouverture frontale...
  • Seite 91 Caractéristiques Unité BiOptima Cyto 4 BiOptima Cyto 6 Dimensions externes (LxWxH) 1338 x 832 x 2212 1948 x 832 x 2212 (Ampleur repose-bras compris) Dimensions internes 1190 x 548 x 666 1800 x 548 x 666 (LxWxH) Hauteur ouverture frontale...
  • Seite 92: Instructions D'installation

    Les conditions optimales de travail sont : Température : 18-28ºC Humidité relative : 50%±20% Si une de ces conditions n'est pas satisfaite, le fonctionnement optimal de la cabine n'est pas garanti. UM-BiOptima-FR-1907 10 / 39...
  • Seite 93: Précautions Lors Du Premier Branchement

    Raccorder la cabine à une prise inaccessible pour l'utilisateur afin d'éviter qu'elle puisse être débranchée volontairement ou involontairement pendant son fonctionnement. Par exemple en plaçant l'appareil près d'un mur ou d'un autre appareil. PRISE DE TERRE UM-BiOptima-FR-1907 11 / 39...
  • Seite 94: Raccordement Électrique Et De Services

    Pendant le travail habituel dans ces cabines de sécurité, et pour un principe de base de recirculation et de dépression dans la zone de travail, aucune surface perforée de la zone de travail ne doit être couverte avec du papier ou du tissu de laboratoire. UM-BiOptima-FR-1907 12 / 39...
  • Seite 95: Installation De Conduit De La Cabine

    Conduit minimal de 250 mm de diamètre. Protéger la sortie de l'entrée de courants, d'obturations, de l'entrée d'éléments pouvant altérer la conduite de l'air (animaux...). GS n’a pas été testé pour Hotte aspirante. II doit être testé après l’installation. UM-BiOptima-FR-1907 13 / 39...
  • Seite 96: Test D'installation

    Test de fuites sur le filtre à flux laminaire Test de fuites sur le filtre d'extraction Test de fuites sur le filtre d’aspiration (seulement sur le modèle BiOptima Cyto) Test de vitesse de flux laminaire Test de set points de flux laminaire Test de vitesse air d'entrée...
  • Seite 97: Instructions D'utilisation

    Le non-respect de ces techniques peut entraîner un mauvais fonctionnement de l'appareil. ATTENTION La certification EN 12469 ne permet pas d'inhabiliter la demande de mot de passe pour la mise en marche ni pour la déconnexion de la cabine. UM-BiOptima-FR-1907 15 / 39...
  • Seite 98: Positionnement Du Panneau Frontal

    Selon sa position initiale, elle s’arrêtera automatiquement à la position de travail précise ou en position fermée. Avis : la lumière clignotera pendant le mouvement de la vitre. Position fermée Position de travail Position ouverte UM-BiOptima-FR-1907 16 / 39...
  • Seite 99 En cas de panne de courant, l’utilisateur peut fermer la vitre frontale grâce à la batterie installée à cet effet. PRUDENCE La vitre frontale doit être entièrement levée avant de la refermer vers la cabine. Dans le cas contraire, on pourrait endommager la vitre. UM-BiOptima-FR-1907 17 / 39...
  • Seite 100: Recommandations D'utilisation Générales

    Pendant le travail dans la cabine et les opérations de nettoyage, éviter d'endommager les filtres HEPA avec des coups, des projections de liquides ou des éclaboussures, etc. o) Tous les appareils raccordés à la prise interne de la cabine doivent respecter toutes les spécifications électriques. UM-BiOptima-FR-1907 18 / 39...
  • Seite 101: Ergonomie

    4.3.1. ERGONOMIE La cabine de sécurité biologique BiOptima, ainsi que ses accessoires, ont été conçus suivant les spécifications et les recommandations de la norme EN ISO 14738:2010. Pour sa sécurité, l'utilisateur doit tenir compte des positions à adopter lors du travail avec la cabine.
  • Seite 102 UM-BiOptima-FR-1907 20 / 39...
  • Seite 103 De plus, pour la protection du produit comme de l'utilisateur, la cabine doit être dans un endroit où il n'y a pas de courants d'air, qui pourraient provoquer des turbulences du flux laminaire. UM-BiOptima-FR-1907 21 / 39...
  • Seite 104: Définition De La Zone De Travail

    Pour éviter de générer des turbulences du flux laminaire et protéger l'utilisateur et le produit, il faut établir une zone de travail à l'intérieur de la cabine. • Ne pas travailler sur les zones perforées et ne pas les couvrir. • Toujours travailler dans les limites selon l’image suivante. UM-BiOptima-FR-1907 22 / 39...
  • Seite 105: Panneau De Commandes Et Menus

    Confirme la valeur du champ et sélectionne le champ suivant. Lorsque le dernier champ est accepté : Mot de passe correct : passe à l'écran Menu principal. Mot de passe incorrect : la sélection retourne au premier champ. UM-BiOptima-FR-1907 23 / 39...
  • Seite 106 Écran intensité lumineuse. Augmente la valeur. Réduit la valeur. Confirme la valeur. 2.3. Écran Confirmation Écomode. Augmente la valeur du champ sélectionné. Réduit la valeur du champ sélectionné. Confirme la valeur du champ et sélectionne le champ suivant. UM-BiOptima-FR-1907 24 / 39...
  • Seite 107 Menu désinfection. 2.4.1.1.2. Écran Temporisateur U.V. Confirme la valeur du champ sélectionné et l’enregistre.* Réinitialise les champs numériques. Retourne à l’écran Menu U.V. Valeur 000 signifie un temps infini: démarrage et arrêt sera effectué manuellement. UM-BiOptima-FR-1907 25 / 39...
  • Seite 108 Accès à l’écran Information sur les capteurs. Accès à l'écran Menu principal. 3.1. Écran Contraste. Augmente la valeur du champ sélectionné. Réduit la valeur du champ sélectionné. Confirme la valeur et retourne à l’écran Menu Configuration. UM-BiOptima-FR-1907 26 / 39...
  • Seite 109 Modifie le mot de passe d'utilisateur. Redonne passe d'utilisateur chiffré. En cas d'oubli, en envoyant ce code chiffré au Service technique de Telstar, il est possible de récupérer le mot de passe d'utilisateur. Retourne à l’écran Menu Configuration. 3.5. Écran Réglage date-heure.
  • Seite 110 Cela renseigne sur les valeurs des capteurs de la cabine en temps réel. Soulève la vitre frontale. Déplace la vitre frontale vers la position de travail. Déplace la vitre frontale vers le bas. Retourne à l’écran Menu Configuration. UM-BiOptima-FR-1907 28 / 39...
  • Seite 111: Déconnexion

    En cas de défaillance du microprocesseur principal, le microprocesseur auxiliaire active les alarmes visuelles et sonores. Si cela se produit, faire glisser le panneau frontal en position fermée. Déconnecter l'appareil et contacter le Service technique de Telstar. 4.6. DÉCONNEXION Pour procéder à l'arrêt de la cabine, appuyer sur le bouton d'allumage/extinction (Annexe A3 pos.
  • Seite 112: Accessoires En Option

    Par conséquent, l'électrovanne qui habilite l'entrée de gaz ne peut être activée que lorsque les ventilateurs sont en fonctionnement, et est déconnectée de manière automatique en cas d'alarme de flux de soufflage insuffisant. UM-BiOptima-FR-1907 30 / 39...
  • Seite 113: Maintenance

    Test set point alarmes de vitesse de soufflage de filtre Test de vitesse air d'entrée Test set point alarmes de vitesse d'air d'entrée Test de fumée Test de luminosité Recommandé lors de la mise en marche de la Test acoustique cabine UM-BiOptima-FR-1907 31 / 39...
  • Seite 114: Filtres Absolus

    Le préfiltre est assemblé sous le plan de travail. Conformément à la norme EN12469: 2000 Annexe K, le préfiltre doit être remplacé à chaque occasion de maintenance. Le remplacement peut être effectué facilement en suivant les instructions décrites dans le manuel d'entretien. UM-BiOptima-FR-1907 32 / 39...
  • Seite 115: Pièces De Rechange

    BiOptima 4 / Cyto 4 Nº Description VENTILATEUR À FLUX LAMINAIRE (2 U.) / D'EXTRACTION (1 U.) PRE-FILTRE BIOPTIMA 4 G3 (EN 779) FILTRE ABSOLU HEPA H14 1219X457X90 FILTRE ABSOLU HEPA H14 610X457X90 LUMIÈRE LED BIOPTIMA 4 BiOptima 6 / Cyto 6 Nº...
  • Seite 116: Nettoyage Et Désinfection

    à basse température pour une zone fermée qui peut être contaminée par des micro-organismes, y compris les bactéries formant des spores. Pour la procédure de décontamination au peroxyde d’hydrogène vaporisé, voir Annexe A5.4. UM-BiOptima-FR-1907 34 / 39...
  • Seite 117: Historique De Maintenance

    TEST SET POINT ALARMES VITESSE DE SOUFFLAGE Voir Annexe A9.4.1 9.5. TEST DE VITESSE AIR D'ENTRÉE Voir Annexe A9.5 9.5.1. TEST SET POINT ALARMES VITESSE ENTREE D’AIR Voir Annexe A9.5.1 9.6. TEST DE FUMÉE Voir Annexe A9.6 UM-BiOptima-FR-1907 35 / 39...
  • Seite 118: Certificats

    CERTIFICATS 10.1. DÉCLARATION DE CONFORMITÉ UE Voir Annexe A10.1 10.2. GARANTIE Voir Annexe A10.2 UM-BiOptima-FR-1907 36 / 39...
  • Seite 119: Troubleshooting

    Revoir date du dernier changement de filtre Filtre d'extraction ou et heures d'utilisation (Partie 4.5, point d’aspiration (modèle 3.2). BiOptima Cyto) colmatés Avertir le service technique pour le changement de filtre. Cabine avec conduit, et Placer un ventilateur supplémentaire à la fin conduit trop long du conduit (Partie 3.5).
  • Seite 120 « POSITION ajusté Appeler le Service technique pour obtenir les TRAVAIL» instructions pour régler le capteur inductif. (voir Partie 4.5, point D) Contrôle principal Appeler le service technique spécialisé pour endommagé remplacer le contrôle. UM-BiOptima-FR-1907 38 / 39...
  • Seite 121 Appeler le service technique spécialisé pour endommagé remplacer le contrôle. ATTENTION Toutes les réparations ou interventions de maintenance sur la cabine doivent être réalisées par du personnel technique qualifié possédant des connaissances sur les procédures de maintenance requises par cette cabine. UM-BiOptima-FR-1907 39 / 39...
  • Seite 123 BEDIENUNGSANLEITUNG Mikrobiologische Sicherheitswerkbänke BiOptima / BiOptima Cyto Nichtlesen, Nichtverstehen und Nichtbefolgung der Anweisungen in diesem Handbuch kann zu Geräteschaden, Körperverletzung und mangelhafter Geräteleistung führen.
  • Seite 124 UM-BiOptima-GE-1907 2 / 39...
  • Seite 125 PRÜFUNGEN _____________________________________________________ 35 9.1. Dichtheitsprüfung Filter laminare Strömung _________________________ 35 9.2. Leckageprüfung Abluftfilter ______________________________________ 35 9.3. Leckageprüfung Ansaugfilter (nur Modell BiOptima Cyto) ______________ 35 9.4. Geschwindigkeitsprüfung laminare Strömung________________________ 35 9.4.1. Prüfung des Sollwertes für Alarm der Downflow-Geschwindigkeit ____ 35 9.5.
  • Seite 126: Symbole Und Abkürzungen

    AUFKLEBER ”DOP PORTS” Abkürzungen, die in dieser Bedienungsanleitung verwendet werden: Volt s, h Sekunden, Stunden Ampere Hertz W, kW, µW Watt, Kilowatt, Mikrowatt Dezibel mm, cm, m Millimeter, Zentimeter, Meter º C Grad Celsius “Geprüfte Sicherheit” Kilogramm Kennzeichnung UM-BiOptima-GE-1907 4 / 39...
  • Seite 127: Allgemeine Informationen

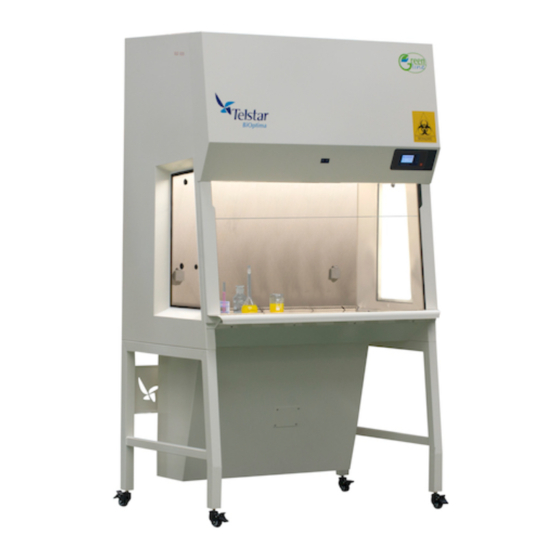
    1. ALLGEMEINE INFORMATIONEN Gebrauchsanweisung für mikrobiologische Sicherheitswerkbank der Klasse II BiOptima, Gemäß Norm EN 12469 und version BiOptima Cyto für Zytostatica Gemäß Norm EN 12469 und DIN 12980 die (bei Anwendung der richtigen Techniken für die Laborarbeit) einen hohen Schutz für Personen, Umwelt und Probe gewährleisten.
  • Seite 128: Daten Der Sicherheitswerkbank

    Materialien zu schützen und verschüttete Flüssigkeiten zu sammeln. Darüber hinaus wird der Vorfilter die Lebensdauer des HEPA-Filters deutlich erhöhen. Im Modell BiOptima Cyto werden Eintritts- und Fortluft in einem ersten Filterschritt durch HEPA-Absolutfilters (10) geleitet, wie in Anhang A2 zu erkennen. Der Zugang zu den Filtern ist vollkommen sicher, so dass eine gefahrloses Auswechseln gewährleistet ist.
  • Seite 129: Beschreibung Der Komponenten

    Personen führen. Aus diesen Gründen muss zum Einschalten der UV-Lampe die Frontscheibe geschlossen werden, wodurch die Lüfter automatisch ausgehen. 2.5. ZERTIFIZIERUNG Qualitätskontrolle und Testergebnisse Zertifizierung gemäss der geltenden EN 12469 und DIN 12980 Normen durchgeführt. Zertifikat im Inneren der Sicherheitswerkbank. UM-BiOptima-GE-1907 7 / 39...
  • Seite 130: Technische Merkmale

    2.6. TECHNISCHE MERKMALE Technische Merkmale Einheit BiOptima 4 BiOptima 6 Äußere Abmessungen (LxBxH) 1338 x 825 x 1450 1948 x 825 x 1450 (Breite einschließlich Armlehne) Innenmaße (LxBxH) 1190 x 548 x 666 1800 x 548 x 666 Höhe der Öffnung an der...
  • Seite 131 Technische Merkmale Einheit BiOptima Cyto 4 BiOptima Cyto 6 Äußere Abmessungen (LxBxH) 1338 x 832 x 2212 1948 x 832 x 2212 (Breite einschließlich Armlehne) Innenmaße (LxBxH) 1190 x 548 x 666 1800 x 548 x 666 Höhe der Öffnung an der...
  • Seite 132: Installationsanleitung

    Um die Überhitzung des Arbeitsbereiches zu vermeiden, empfehlen wir, dass die Raumtemperatur innerhalb des Komfortbereichs am Arbeitsplatz liegt. Die optimalen Arbeitsbedingungen sind: Temperatur: 18-28 º C Luftfeuchtigkeit: 50% ± 20% Wenn diese Bedingungen nicht erfüllt sind, optimale Betrieb Sicherheitswerkbank nicht gewährleistet. UM-BiOptima-GE-1907 10 / 39...
  • Seite 133: Vorsichtsmaßnahmen Beim Erstanschluss

    Schließen Sie die Sicherheitswerkbank an einer für den Benutzer unzugänglichen Steckdose an, um so zu verhindern, dass der Stecker während des Betriebs absichtlich oder unabsichtlich herausgezogen wird. Stellen Sie das Gerät zum Beispiel an die Wand oder neben ein weiteres Gerät. ERDUNG UM-BiOptima-GE-1907 11 / 39...
  • Seite 134: Elektrische Anschlüsse Und Energieversorgung

    Stoffen gearbeitet wird, die nicht durch absolute Filter neutralisiert werden. Während der normalen Arbeit an diesen Sicherheitswerkbänken und auf Grund des einfachen Prinzips der Zirkulation und des Unterdrucks dürfen die Luftschlitze nicht mit Papier oder Tücher abgedeckt werden. UM-BiOptima-GE-1907 12 / 39...
  • Seite 135: Ableitung Der Sicherheitswerkbank

    Leistung nicht zu storen: Leitung mit Mindestdurchmesser von 250 mm. Den Ausgang vor Eintritt von Zugluft, Fremdkörpern und anderen Behinderungen (z. B. Tiere) schützen. Ist nicht GS geprüft. Muss nach Einbau zusätzlich geprüft werden. UM-BiOptima-GE-1907 13 / 39...
  • Seite 136: Prüfung Der Installation

    Telstar empfiehlt auch die folgende Prüfungen durchzuführen: Prüfung der Beleuchtungsstärke. Prüfung des Geräuschpegels. Telstar, ihre Vertreter und Distributoren stellen Ihnen ein Team von Fachleuten mit modernen Kontrollgeräten zur Verfügung, die unter Gewährleistung des Gesundheitsschutzes und aller Sicherheitsbestimmungen die Überprüfung der Installation durchführen.
  • Seite 137: Bedienungsanweisung

    Die Sicherheitswerkbank darf nur von Fachpersonal verwendet werden, das die richtigen Techniken Laborarbeit einhält. Nichtbeachtung dieser Techniken kann Fehlfunktionen des Gerätes führen. VORSICHT Gemäß Zertifizierung EN 12469 darf die Passwortabfrage für das Ein- und Ausschalten der Sicherheitswerkbank nicht deaktiviert werden. UM-BiOptima-GE-1907 15 / 39...
  • Seite 138: Positionierung Der Vorderseite

    Frontscheibe nach unten zu bewegen. Abhängig von der anfänglichen Frontscheibeposition stoppt sie automatisch in der genauen Arbeitsposition oder in der geslossenen Position. Hinweis: Die Lichter blinken während der Frontscheibebewegung. Geschlossene Position Arteitsposition Öffene Position UM-BiOptima-GE-1907 16 / 39...
  • Seite 139 Im Falle eines Stromausfalls kann der Benutzer das Glass schließen dank die Batterie, die für diesen Zweck installiert ist. VORSICHT Die Frontscheibe muss vollständig angehoben sein, bevor sie zum Sicherheitswerkbank hin geschlossen wird. Andernfalls könnte die Frontscheibe beschädigt werden. UM-BiOptima-GE-1907 17 / 39...
  • Seite 140: Allgemeine Empfehlungen Für Die Arbeit

    Nährböden, Proben, Tuben, Flaschen usw. aus Sicherheitswerkbank entnommen und in wasserfesten und gegebenenfalls für die Sterilisierung geeigneten Tüten entsorgt. n) Während der Arbeit an der Sicherheitswerkbank und der Reinigung dürfen die HEPA-Filter nicht durch Schläge, Stöße, Vergießen oder Verspritzen von Flüssigkeiten usw. beschädigt werden. UM-BiOptima-GE-1907 18 / 39...
  • Seite 141: Ergonomie

    Steckdose Sicherheitswerkbank angegebenen Verbrauch übersteigen. 4.3.1. ERGONOMIE Die biologische Sicherheitswerkbank BiOptima und ihr Zubehör wurden gemäß Vorgaben und Empfehlungen der DIN EN ISO 14738:2010 entworfen. Zu seiner Sicherheit sollte der Benutzer seine Körperhaltung während der Arbeit an der Sicherheitswerkbank berücksichtigen.
  • Seite 142 UM-BiOptima-GE-1907 20 / 39...
  • Seite 143 Darüber hinaus muss die Sicherheitswerkbank zum Schutz des Produktes und des Benutzers an einem Standort aufgestellt werden, wo kein Luftzug auftritt, der Verwirbelungen der laminaren Strömung verursachen kann. UM-BiOptima-GE-1907 21 / 39...
  • Seite 144: Definition Des Arbeitsbereichs

    Zur Vermeidung von Verwirbelungen der laminaren Strömung und zum Schutz der Benutzer und des Produktes muss ein Arbeitsbereich im Inneren der Sicherheitswerkbank geschaffen werden. • Nicht auf den perforierten Bereichen arbeiten oder diese abdecken. • Arbeiten Sie immer innerhalb der Grenzen gemäß dem folgenden Bild. UM-BiOptima-GE-1907 22 / 39...
  • Seite 145: Bedienfeld Und Menüs

    Erhöht den Wert des ausgewählten Feldes. Verringert Wert ausgewählten Feldes. Bestätigt den Wert des Feldes und wählt das nächste Feld aus. Mit der Bestätigung des letzten Feldes: Richtiges Password: Zugang Display Hauptmenü. Falsches Password: Auswahl geht zum ersten Feld zurück. UM-BiOptima-GE-1907 23 / 39...
  • Seite 146: Display Bestätigung Ausschalten Der Lüfter

    2.2. Display Lichtintensität. Erhöht den Wert. Verringert den Wert. Bestätigt den Wert. Display Bestätigung ECO Mode. 2.3. Erhöht den Wert des ausgewählten Feldes. Verringert Wert ausgewählten Feldes. Bestätigt den Wert des Feldes und wählt das nächste Feld aus. UM-BiOptima-GE-1907 24 / 39...
  • Seite 147 Schaltet die UV-Lampe und zurück zum Menü Dekontamination. 2.4.1.1.2. Display Zeitschaltuhr UV-Lampe. Bestätigt speichert gewählten Wert.* Zurücksetzen der Zahlenfelder. Zurück zum Display Menü UV-Lampe. Wert 000 bedeutet unendliche Zeit: Start und stopp wird manuel vorgenommen werden. UM-BiOptima-GE-1907 25 / 39...
  • Seite 148 Zugang zum Menü PIN-Konfiguration. Zugang zum Datum und Uhrzeit. Zugang zum Sensoren Informationen. Zugang zum Hauptmenü. 3.1. Display Bildschirmkontrast. Erhöht den Wert des ausgewählten Feldes. Verringert Wert ausgewählten Feldes. Bestätigt den Wert und zurück zum Menü Konfiguration. UM-BiOptima-GE-1907 26 / 39...
  • Seite 149 Ändert das Benutzerpasswort. Gibt Benutzerpasswort verschlüsselt aus. Wenn Sie dass Passwort vergessen, können Sie diesen verschlüsselten Code an den Kundendienst von Telstar senden und das Nutzerpasswort zurückerhalten. Zurück zum Menü Konfiguration. 3.5. Display Datum und Uhrzeit. Speichert den Wert. (Format TT/MM St:Min) Stornieren oder bearbeiten den Wert.
  • Seite 150 Kehrt zum Programmierung automatisches Einschalten zurück. 3.6. Display Sensoren Informationsanzeige. Es zeigt Informationen über die Werte der Sensoren der Sicherheitswerkbank in Echtzeit. Frontscheibe nach oben geweben. Frontscheibe nach Arbeitsposition geweben. Frontscheibe nach unten geweben. Zurück zum Menü Konfiguration. UM-BiOptima-GE-1907 28 / 39...
  • Seite 151: Ausschalten

    E. Hilfs-oder redundante Mikroprozessorschaltung. Falls der Hauptmikroprozessor ausfällt, aktiviert der Hilfsmikroprozessor den audiovisuellen Alarm. Bewegen Sie in diesem Fall die Frontscheibe in die geschlossene Stellung. Schalten Sie das Gerät aus und wenden Sie sich an den Kundendienst von Telstar. 4.6. AUSSCHALTEN Drücken Sie zum Ausschalten der Sicherheitswerkbank die Taste zum Ein- und Ausschalten...
  • Seite 152: Optionales Zubehör

    Der Gasanschluss muss die Sicherheitsbestimmungen der jeweiligen Länder, Regionen und Unternehmen erfüllen. Aus diesen Gründen kann das Elektroventil, das den Zufluss von Gas regelt, nur geöffnet werden, wenn die Lüfter in Betrieb sind. Es wird automatisch bei Alarm wegen zu geringem Downflow beschlossen. UM-BiOptima-GE-1907 30 / 39...
  • Seite 153: Wartung

    Geschwindigkeitsprüfung der laminaren Strömung Jahr oder nach Prüfung des Sollwertes für Alarm der Down-Flow Geschwindigkeit Filterwechsel Prüfung der Zuluftgeschwindigkeit Prüfung des Sollwertes für Alarm der Zuluftgeschwindigkeit Smoketest Prüfung der Beleuchtungsstärke Während der Inbetriebnahme der Sicherheitswerkbank Prüfung des Schallpegels empfohlen UM-BiOptima-GE-1907 31 / 39...
  • Seite 154: Absolute Filter

    Wechsel bei Betrieb der Kabine entsprechend den Anweisungen des Wartungshandbuchs durchgeführt wird. Der Vorfilter wird unter dem Arbeitsbereich montiert. Nach EN12469: 2000 Anhang K muss der Vorfilter bei jedem Wartungsfall ersetzt werden. Der Austausch kann einfach entsprechend den Anweisungen des Wartungshandbuchs durchgeführt wird. UM-BiOptima-GE-1907 32 / 39...
  • Seite 155: Ersatzteile

    STRÖMUNGSSENSOR 0,2-1,0 M/S (2 STÜCKE) BiOptima 4 / Cyto 4 Beschreibung LÜFTER LAMINARE STRÖMUNG (2 STÜCKE) /ABLUFT (1 STÜCK) VOR-FILTER BIOPTIMA 4 G3 (EN 779) ABSOLUTER HEPA FILTER H14 1219X457X90 ABSOLUTER HEPA FILTER H14 610X457X90 LED LEUCHT BIOPTIMA 4 BiOptima 6 / Cyto 6 Beschreibung LÜFTER LAMINARE STRÖMUNG (3 STÜCKE) /ABLUFT (1 STÜCK)
  • Seite 156: Reinigung Und Desinfektion

    HEPA-filter evakuierungskanäle. Das verdampfte Wasserstoffperoxyd Systeme bietet schnelle, sichere, Tieftemperature- Dekontaminationsverfahren für jeden geschlossenen Bereich, der mit Mikroorganismen kontaminiert sein können, einschliesslich sporenbildende Bakterien. Für das Vorgehen zur Dekontaminierung mit verdampfte Wasserstoffperoxyd siehe Anhang A5.4. UM-BiOptima-GE-1907 34 / 39...
  • Seite 157: Wartungsprotokoll

    9.1. DICHTHEITSPRÜFUNG FILTER LAMINARE STRÖMUNG Siehe Anhang A9.1 9.2. LECKAGEPRÜFUNG ABLUFTFILTER Siehe Anhang A9.2 9.3. LECKAGEPRÜFUNG ANSAUGFILTER (NUR MODELL BIOPTIMA CYTO) Siehe Anhang A9.3 9.4. GESCHWINDIGKEITSPRÜFUNG LAMINARE STRÖMUNG Siehe Anhang A9.4 9.4.1. PRÜFUNG DES SOLLWERTES FÜR ALARM DER DOWNFLOW- GESCHWINDIGKEIT Siehe Anhang A9.4.1...
  • Seite 158: Zertifikate

    ZERTIFIKATE 10.1. EG KONFORMITÄTSERKLÄRUNG Siehe Anhang A10.1 10.2. GARANTIE Siehe Anhang A10.2 UM-BiOptima-GE-1907 36 / 39...
  • Seite 159: Mögliche Probleme Und Lösungen

    Überprüfen Sie das Datum des letzten Abluftfilter oder Filterwechsel und die Betriebsstunden (Kapitel Ansaugfilter (Modell 4.5 Punkt 3.2). BiOptima Cyto) gesättigt. Rufen Sie den Kundendienst an, damit der Filter gewechselt wird. Bei Sicherheitswerkbank Bauen Sie einen zusätzlichen Lüfter am Ende mit Ableitung ist diese zu der Leitung ein (Kapitel 3.5).
  • Seite 160 Arbeitsstellung hat sich " ARBEITSPOS gelockert. Rufen Sie den Kundendienst an, um Anweisungen (siehe ITION" zur Einstellung des Induktivgeber zu erhalten. Kapitel 4.5 Punkt D) Rufen Sie den Kundendienst an, um die Steuerung Hauptsteuerung beschädigt. zu ersetzen. UM-BiOptima-GE-1907 38 / 39...
  • Seite 161 Stromversorgung. Hauptsteuerung Rufen Sie den Kundendienst an, um die Steuerung zu beschädigt. ersetzen. VORSICHT Alle Reparaturen oder Wartungsarbeiten der Sicherheitswerkbank müssen von Fachpersonal mit Kenntnissen der für diese Sicherheitswerkbank erforderlichen Wartungsarbeiten durchgeführt werden. UM-BiOptima-GE-1907 39 / 39...
  • Seite 163 8. Sortie d'air d’échappement 9. Prefiltre 1. Downflow Strömung Ventilator 2. Abluft Ventilator 3. Plenum 4. HEPA-Filter der laminaren Strömung 5. HEPA-Filter der Abluft 6. Arbeitsbereich 7. Öffnung für Zuluft und Schutzbarriere 8. Abluftöffnung 9. Vorfilter Annexes-UM-BiOptima-EN-SP-FR-GE-1907 1 / 85...
  • Seite 164 10. Filtre HEPA d'admission 1. Downflow Strömung Ventilator 2. Abluft Ventilator 3. Plenum 4. HEPA-Filter der laminaren Strömung 5. HEPA-Filter der Abluft 6. Arbeitsbereich 7. Öffnung für Zuluft und Schutzbarriere 8. Abluftöffnung 9. Vorfilter 10. HEPA-Filter der Ansaug Annexes-UM-BiOptima-EN-SP-FR-GE-1907 2 / 85...
  • Seite 165 Anexo A3. CARÁTULA DE MANDOS Annex A3. CONTROL ALARM 1. Botón de Encendido/Apagado 1. On/Off button 2. Botones de navegación 2. Navigation buttons 3. Pantalla gráfica 3. Graphic screen Annexes-UM-BiOptima-EN-SP-FR-GE-1907 3 / 85...
  • Seite 166 Annexe A3. PANNEAU DE Anhang A3. BEDIENFELD COMMANDES 1. Bouton d'allumage/extinction 1. Taste zum Ein- und Ausschalten 2. Boutons de navigation 2. Navigationstasten 3. Écran graphique 3. Display Annexes-UM-BiOptima-EN-SP-FR-GE-1907 4 / 85...
  • Seite 167 Lleve las bandejas de trabajo a la derecha y, con la mano derecha, introduzca y coloque el nuevo prefiltro en el bastidor. o) Devuelva las bandejas de trabajo a su posición. p) Quítese los guantes y deposítelos en un recipiente adecuado. Annexes-UM-BiOptima-EN-SP-FR-GE-1907 5 / 85...
  • Seite 168 Put the segmented worktop at the right and, using the right hand, introduce and place the new pre- filter in the frame. (Fig. 6) o) Put the segmented worktop back in its position. p) Take off the gloves and dispose them away in the appropriate container. Annexes-UM-BiOptima-EN-SP-FR-GE-1907 6 / 85...
  • Seite 169 Annexes-UM-BiOptima-EN-SP-FR-GE-1907 7 / 85...
  • Seite 170 Placez les plateaux de travail segmentés à droite et, de la main droite, introduisez et placez le nouveau préfiltre dans son emplacement. (Fig. 6) o) Remettez les plateaux de travail segmentés dans ses positions. p) Enlever les gants et jetez-les dans le récipient approprié. Annexes-UM-BiOptima-EN-SP-FR-GE-1907 8 / 85...
  • Seite 171 Legen Sie die segmentierte Arbeitsplatte auf die rechte Seite und setzen Sie den neuen Vorfilter mit der rechten Hand ein. (Fig. 6) o) Setzen Sie die segmentierte Arbeitsplatte wieder in ihre Position. p) Ziehen Sie die Handschuhe ab und entsorgen Sie sie in einem geeigneten Behälter. Annexes-UM-BiOptima-EN-SP-FR-GE-1907 9 / 85...
  • Seite 172 Annexes-UM-BiOptima-EN-SP-FR-GE-1907 10 / 85...
  • Seite 173 BIOLOGICAL DANGER Never clean a used unit without safety precautions The unit has to be cleaned regularly. Preferably, each time after the unit has been used. Put on gloves and sleeves. Use glasses and mouth protection. Annexes-UM-BiOptima-EN-SP-FR-GE-1907 11 / 85...
  • Seite 174 Should some bleach is poured, the surface must be always thoroughly rinsed and completely dried with a spatula (glass cleaner type). It is required to dry completely all surfaces always after cleaning or disinfecting in order to preserve the original qualities of the surfaces. Annexes-UM-BiOptima-EN-SP-FR-GE-1907 12 / 85...
  • Seite 175 Remember that every segment or shelve has to be cleaned and/or disinfected both in its lower and upper sides. The parts will be cleaned inside the cabinet while this is running. Annexes-UM-BiOptima-EN-SP-FR-GE-1907 13 / 85...
  • Seite 176 After working in the safety cabinet. c) Whenever there is a change of work program. d) In event of liquid spilling on the work table. e) Before carrying out mechanical or biological control tests in the working area. Annexes-UM-BiOptima-EN-SP-FR-GE-1907 14 / 85...
  • Seite 177 BIOLOGISCHE GEFAHR Reinigen Sie ein gebrauchtes Gerät niemals ohne Sicherheitsvorkehrungen. Das Gerät muss regelmäßig gereinigt werden. Vorzugsweise jedes Mal, nachdem die Einheit benutzt wurde. Stellen Sie Handschuhe und Ärmel auf. Gläser und Mundschutz verwenden. Annexes-UM-BiOptima-EN-SP-FR-GE-1907 15 / 85...
  • Seite 178 Wenn Bleichmittel vergossen wird, muss die Oberfläche gut gespült werden und sie muss mit einem Spatel (Glasreiniger Typ) getrocknet werden. Allen Oberflächen müssen immer vollständig nach der Reinigung oder Desinfektion getrocknet werden, um die ursprünglichen Eigenschaften der Oberflächen erhalten. Annexes-UM-BiOptima-EN-SP-FR-GE-1907 16 / 85...
  • Seite 179 Innenwanne zu erleichtern und die Sterilisation der Segmente im Autoklav zu ermöglichen. Von jedem Segment und jeder Wanne muss sowohl die Unter- als auch die Oberseite gereinigt und/oder desinfiziert werden. Reinigung erfolgt innerhalb Arbeitsbereiches Sicherheitswerkbank, während sie in Betrieb ist. Annexes-UM-BiOptima-EN-SP-FR-GE-1907 17 / 85...
  • Seite 180 Vor Beginn jeder Arbeit in der Sicherheitswerkbank. g) Nachdem die Arbeit beendet wurde. h) Wenn Änderungen des Arbeitsprogramms auftreten. Wenn Flüssigkeiten auf dem Arbeitstisch ausgelaufen sind. Vor der Durchführung eines mechanischen oder biologischen Prüfverfahrens im Arbeitsbereich. Annexes-UM-BiOptima-EN-SP-FR-GE-1907 18 / 85...
  • Seite 181 Many of these solutions require certain application times depending on the type of micro-biological agent used in the cabin; we recommend that you consult the instructions for application and precautions for use given by the manufacturer of the disinfectant. Annexes-UM-BiOptima-EN-SP-FR-GE-1907 19 / 85...
  • Seite 182 The movement of the glass exerts a strong force. Check that no one has their hands, any part of the body or obstacles below the glass, as it can cause injuries. Warn other people working near the cabinet. Annexes-UM-BiOptima-EN-SP-FR-GE-1907 20 / 85...
  • Seite 183 Arbeiten geeignet ist. Viele dieser Lösungen erfordern bestimmte Einwirkzeiten, die abhängig von den mikrobiologischen Mitteln sind, die in der Sicherheitswerkbank verwendet werden. Konsultieren Sie bitte die Verarbeitungshinweise und Vorsichtsmaßnahmen, die vom Hersteller des Desinfektionsmittels vorgesehen sind. Annexes-UM-BiOptima-EN-SP-FR-GE-1907 21 / 85...
  • Seite 184 Das System zum Hoch- und Herunterfahren der Scheibe erfolgt mit hoher Kraft. Keine Körperteile oder Gegenstand unter die sich bewegende Scheibe halten, da dies zu Körperverletzungen oder Sachschäden führen könnte. Personen, die im Umfeld der Kabine arbeiten, entsprechend warnen. Annexes-UM-BiOptima-EN-SP-FR-GE-1907 22 / 85...
  • Seite 185 The necessary material to perform decontamination by gas is as follows: 1 vaporized hydrogen peroxide decontamination kit accessory. 1 Plastic bag 1800x600 mm. 1 Roll of packaging tape. 1 Roll of adhesive tape. 1 Allen key. Vaporization hydrogen peroxide system. Vaporized hydrogen peroxide sensor. Annexes-UM-BiOptima-EN-SP-FR-GE-1907 23 / 85...
  • Seite 186 At any case, a visible warning should indicate the cabinet is being disinfected. b) Install the vaporized hydrogen peroxide accessory kit in side glass (input port), and the exhaust cover on top (output port). Seal the exhaust cover with tape. Annexes-UM-BiOptima-EN-SP-FR-GE-1907 24 / 85...
  • Seite 187 Close the front window and place the glass in working position. Switch on the cabinet and set up in ECO mode (low velocity mode). Lights will be automatically switched off, screen will be red and alarm will sound. Mute the alarm. Annexes-UM-BiOptima-EN-SP-FR-GE-1907 25 / 85...
  • Seite 188 Connect the vaporization hydrogen peroxide system hoses to the proper port. Check that input of vapor is fixed in side glass, and output is fixed on top. h) Cabinet is ready to start with decontamination cycle. Annexes-UM-BiOptima-EN-SP-FR-GE-1907 26 / 85...
  • Seite 189 Ambient limit is 1 ppm*, and at that concentration 8 h of continuous work is allowed. With ambient concentration of 5 ppm* 2h of continuous work is allowed. * 0.5 ppm in Germany Annexes-UM-BiOptima-EN-SP-FR-GE-1907 27 / 85...
  • Seite 190 Suitable protective respiratory equipment designed for being used with hydrogen peroxide should be available in case of an emergency. c) Once the process has finished, switch off the equipment through the control panel. Annexes-UM-BiOptima-EN-SP-FR-GE-1907 28 / 85...
  • Seite 191 Verdampfte Wasserstoffperoxyd wird in diesem Verfahren verwendet. Es wird das folgende Material benötigt, um die Gas Dekontamination duchzuführen: 1 Verdampfte Wasserstoffperoxyd Dekontaminations-Set-Zubehör. 1 Plastiktüte 1800x600 mm. 1 Rolle von Verpackungsband. 1 Rolle Klebeband. 1 Inbusschlüssel. Verdampfte Wasserstoffperoxyd System. Verdampfte Wasserstoffperoxyd Sensor. Annexes-UM-BiOptima-EN-SP-FR-GE-1907 29 / 85...
  • Seite 192 Vorsichtsmaßnahmen durchgeführt werden. Es muss gut sichtbar eine Warnung aufgestellt werden, dass die Sicherheitswerkbank desinfiziert wird. b) Installieren Sie das Verdampfte Wasserstoffperoxyd Dekontaminations-Set-Zubehör in der seitlichen Glass (Eingangsanschluss) und die Abgas Abdeckung auf der Oberseite (Ausgangs-Port). Verschliesen Sie den Abluftdeckel mit Klebeband. Annexes-UM-BiOptima-EN-SP-FR-GE-1907 30 / 85...
  • Seite 193 Schliessen Sie die Frontscheibe und legen Sie sie in Arbetisposition. Schalten Sie den Schrank ein und wählen Sie den ECO-Modus (geringer Geschwindigkeit- Modus). Das Licht wird automatisch ausgeschaltet, der Bildschirm wird rot und der Alarm wird geschaltet. Stummschalten Sie der Alarm. Annexes-UM-BiOptima-EN-SP-FR-GE-1907 31 / 85...
  • Seite 194 Schliessen Sie die Steris Wasserstoffperoxid Schläuche an den richtigen Anschluss. Überprüfen Sie, dass die Eingabe von Dampf in den Seiten Glass befestigt ist, und dass der Ausgang an der Oberseite befestigt ist. h) Der Werkbank is dann bereit, der Dekontaminationszyklus zu starten. Annexes-UM-BiOptima-EN-SP-FR-GE-1907 32 / 85...
  • Seite 195 Sicherheitsgründen überwacht werden, aus diesem Grund muss man einen Sensor für diesen Zweck platzieren. Grenzewert in der Luft ist 1 ppm*. Bei dieser Konzentration 8 Stunden ununterbrochener Arbeit ist erlaubt. Bei einer Konzentration von 5 ppm* 2 Stunden ununterbrochener Arbeit ist erlaubt. * 0,5 ppm in Deutschland Annexes-UM-BiOptima-EN-SP-FR-GE-1907 33 / 85...
  • Seite 196 Entfernung autoklaviert oder verbrannt werden. b) Es sollten angemessene Atemschutzgeräte für Wasserstoffperoxid zur Verfügung gestellt werden, die in Notfällen verwendet werden können. c) Sobald der Desinfektionsprozess abgeschlossen ist, trennen Sie das Geräte auf die gleiche Weise mit dem Bedienfeld. Annexes-UM-BiOptima-EN-SP-FR-GE-1907 34 / 85...
  • Seite 197 Anexo A6. TABLA DE MANTENIMIENTO Annex A6. MAINTENANCE TABLE FECHA DESCRIPCIÓN DE LA INTERVENCIÓN NOMBRE FIRMA DATE WORK DESCRIPTION NAME SIGNATURE Annexes-UM-BiOptima-EN-SP-FR-GE-1907 35 / 85...
  • Seite 198 Annexe A6. TABLEAU DE MAINTENANCE Anhang A6. WARTUNGSPLAN DATE DESCRIPTION DE L'INTERVENTION SIGNATURE DATUM BESCHREIBUNG DER ARBEITEN NAME UNTERSCHRIFT Annexes-UM-BiOptima-EN-SP-FR-GE-1907 36 / 85...
  • Seite 199 Anexo A7. Annex A7. Annexe A7. Anhang A7. ESQUEMA ELECTRICAL SCHÉMA SCHALTPLAN ELÉCTRICO 230V DIAGRAM 230V ÉLECTRIQUE 230V 50/60 Hz 50/60 Hz 50/60 Hz 230V 50/60Hz Annexes-UM-BiOptima-EN-SP-FR-GE-1907 37 / 85...
  • Seite 200 Annexes-UM-BiOptima-EN-SP-FR-GE-1907 38 / 85...
  • Seite 201 Annexes-UM-BiOptima-EN-SP-FR-GE-1907 39 / 85...
  • Seite 202 Annexes-UM-BiOptima-EN-SP-FR-GE-1907 40 / 85...
  • Seite 203 Annexes-UM-BiOptima-EN-SP-FR-GE-1907 41 / 85...
  • Seite 204 Annexes-UM-BiOptima-EN-SP-FR-GE-1907 42 / 85...
  • Seite 205 Annexes-UM-BiOptima-EN-SP-FR-GE-1907 43 / 85...
  • Seite 206 Annexes-UM-BiOptima-EN-SP-FR-GE-1907 44 / 85...
  • Seite 207 Annexes-UM-BiOptima-EN-SP-FR-GE-1907 45 / 85...
  • Seite 208 Annexes-UM-BiOptima-EN-SP-FR-GE-1907 46 / 85...
  • Seite 209 Annexes-UM-BiOptima-EN-SP-FR-GE-1907 47 / 85...
  • Seite 210 Demostrar la no existencia de fugas en los filtros Check the integrity of the downflow filters. absolutos de impulsión. 2. ALCANCE 2. SCOPE BiOptima / BiOptima Cyto BiOptima / BiOptima Cyto 3. HERRAMIENTAS 3. TOOLS Generador de aerosol frío o caliente.
  • Seite 211 0,01% of the specific concentración determinada antes del filtro. concentration before the filter. Fig. 4. Resultado correcto: no fuga Fig. 5. Resultado incorrecto: fuga Correct result: filter not leaking Wrong result: filter leaking Annexes-UM-BiOptima-EN-SP-FR-GE-1907 49 / 85...
  • Seite 212 Montrer la non-existence de fuites au niveau des Beleg, dass die absoluten Downflow-Filter keine filtres absolus de soufflage. Leckagen aufweisen. 2. PORTÉE 2. ANWENDUNGSBEREICH BiOptima / BiOptima Cyto BiOptima / BiOptima Cyto 3. OUTILS 3. WERKZEUGE Générateur d'aérosol froid ou chaud. Aerosolgenerator, heiß oder kalt.
  • Seite 213 0,01% der vor dem Filter concentration avant le filtre. bestimmten Konzentration sein. Fig. 4. Résultat correct : aucune fuite Fig. 5. Résultat incorrect: existence de fuite Korrectes Ergebnis: kein Leckage Falsches Ergebnis: Leckage Annexes-UM-BiOptima-EN-SP-FR-GE-1907 51 / 85...
  • Seite 214 Demostrar la no existencia de fugas en los filtros Prove the not existence of leaks in the HEPA absolutos de extracción. exhaust filters. 2. ALCANCE 2. SCOPE BiOptima / BiOptima Cyto BiOptima / BiOptima Cyto 3. HERRAMIENTAS 3. TOOLS • •...
  • Seite 215 0.01 % of the concentración determinada antes del filtro. specific concentration before the filter. Fig. 4. Resultado correcto: no fuga Fig. 5. Resultado incorrecto: fuga Correct result: there isn’t Leak Wrong result: there is a leak Annexes-UM-BiOptima-EN-SP-FR-GE-1907 53 / 85...
  • Seite 216 Montrer la non-existence de fuites au niveau des Beleg, dass die absoluten Abluft-Filter keine filtres absolus d'extraction. Leckagen aufweisen. 2. PORTÉE 2. ANWENDUNGSBEREICH BiOptima / BiOptima Cyto BiOptima / BiOptima Cyto 3. OUTILS 3. WERKZEUGE • • Générateur d'aérosol froid ou chaud.
  • Seite 217 0,01 % der vor dem Filter concentration avant le filtre. bestimmten Konzentration sein. Fig. 4. Résultat correct: aucune fuite Fig. 5. Résultat incorrect: existence de fuite Korrektes Ergebnis: keine Leckage Falsches Ergebnis: Leckage Annexes-UM-BiOptima-EN-SP-FR-GE-1907 55 / 85...
  • Seite 218 Prove the not existence of leaks in the HEPA Demostrar la no existencia de fugas en los inflow filters. filtros absolutos de aspiración. 2. ALCANCE 2. SCOPE BiOptima Cyto BiOptima Cyto 3. HERRAMIENTAS 3. TOOLS Generador de aerosol frío o caliente. Aerosol generator (cool or hot).
  • Seite 219 Check the photometer display reading during Comprobar el display del fotómetro durante the whole process (Figure 5). todo el proceso (Figura 5). Fig. 6 Annexes-UM-BiOptima-EN-SP-FR-GE-1907 57 / 85...
  • Seite 220 0.02% of the specific concentración determinada antes del filtro. concentration before the filter. Fig. 4. Resultado correcto: no fuga Fig. 5. Resultado incorrecto: fuga Correct result: filter not leaking Wrong result: filter leaking Annexes-UM-BiOptima-EN-SP-FR-GE-1907 58 / 85...
  • Seite 221 Beweisen, dass die absoluten Ansaug-Filter Montrer la non-existence de fuites au niveau keine Leckagen aufweisen. des filtres absolus d'aspiration. 2. PORTÉE 2. ANWENDUNGSBEREICH BiOptima Cyto BiOptima Cyto 3. OUTILS 3. WERKZEUGE Générateur d'aérosol froid ou chaud. Aerosolgenerator, heiß oder kalt.
  • Seite 222 Déplacez lentement le générateur d’aérosol nach links, bis Sie den mittleren Teil des vers la gauche jusqu’à atteindre la partie Schranks erreichen. central de la cabine. Überprüfen Photometeranzeige Vérifiez l’affichage du photomètre (Figure 5). (Abbildung 5). Fig. 6 Annexes-UM-BiOptima-EN-SP-FR-GE-1907 60 / 85...
  • Seite 223 0,02% der vor dem Filter concentration avant le filtre. bestimmten Konzentration sein. Fig. 4. Résultat correct : aucune fuite Fig. 5. Résultat incorrect: existence de fuite Korrectes Ergebnis: kein Leckage Falsches Ergebnis: Leckage Annexes-UM-BiOptima-EN-SP-FR-GE-1907 61 / 85...
  • Seite 224 2. ALCANCE 2. SCOPE BiOptima / BiOptima Cyto BiOptima / BiOptima Cyto 3. HERRAMIENTAS 3. TOOLS herramienta utilizar The tool to use is an omnidirectional anemómetro omnidireccional.
  • Seite 225 Annexes-UM-BiOptima-EN-SP-FR-GE-1907 63 / 85...
  • Seite 226 10x10 cm downflow test. empleados para el test de velocidad. Modelo / Model Puntos / Points BiOptima Cyto 4 BiOptima Cyto 6 BiOptima Cyto 4 BiOptima Cyto 6 5. CRITERIO DE ACEPTACIÓN 5. ACCEPTANCE CRITERIA •...
  • Seite 227 Geschwindigkeit rang d'uniformité dans la zone de flux Gleichmäßigkeit im Bereich der laminaren laminaire. Strömung. 2. PORTÉE 2. ANWENDUNGSBEREICH BiOptima / BiOptima Cyto BiOptima / BiOptima Cyto 3. OUTILS 3. WERKZEUGE L'instrument à utiliser Das zu verwendende Werkzeug ist ein anémomètre omnidirectionnel.
  • Seite 228 Annexes-UM-BiOptima-EN-SP-FR-GE-1907 66 / 85...
  • Seite 229 Ablesepunkte in einem Raster von 10 x 10 cm cm pour le test d’air de soufflage. für den Downflow-Test dargestellt. Modèle / Modell Points / Punkte BiOptima Cyto 4 BiOptima Cyto 6 BiOptima Cyto 4 BiOptima Cyto 6 5. CRITÈRE D'ACCEPTATION 5.
  • Seite 230 2. ALCANCE 2. SCOPE BiOptima / BiOptima Cyto BiOptima / BiOptima Cyto 3. HERRAMIENTAS 3. TOOLS Anemómetro omnidireccional. Omnidirectional anemometer 4.
  • Seite 231 Strömungsgeschwindigkeit zulässigen inférieure ou supérieure à celle permise. Wert über- oder unterschreitet. 2. PORTÉE 2. ANWENDUNGSBEREICH BiOptima / BiOptima Cyto BiOptima / BiOptima Cyto 3. OUTILS 3. WERKZEUGE Anémomètre omnidirectionnel. Omnidirektionales Anemometer. 4. MÉTHODOLOGIE 4.
  • Seite 232 Clase II en cuanto a la protección del operador. 2. ALCANCE 2. SCOPE BiOptima / BiOptima Cyto BiOptima / BiOptima Cyto 3. HERRAMIENTAS 3. TOOLS Anemómetro con rango de hasta 7 m/s. Anemometer with a range till 7 m/s.
  • Seite 233 + right port / 2). Puerto de presión de impulsión: / Downflow pressure port: izquierdo / left derecho / right Útil de montaje listo para tomar la presión del plenum de extracción. No quitar la arandela de nylon. Annexes-UM-BiOptima-EN-SP-FR-GE-1907 71 / 85...
  • Seite 234 The average inflow velocity must fulfill: BiOptima 4: 0,65 ±0,02 m/s BiOptima 4: 0.65 ±0.02 m/s BiOptima 6 / Cyto 4 / Cyto 6: 0,6 ±0,02 m/s BiOptima 6 / Cyto 4 / Cyto 6: 0.6 ±0.02 m/s • •...
  • Seite 235 Klasse II für den Schutz von Personen la Classe II de protection de l'opérateur. zu prüfen. 2. PORTÉE 2. ANWENDUNGSBEREICH BiOptima / BiOptima Cyto BiOptima / BiOptima Cyto 3. OUTILS 3. WERKZEUGE Anémomètre avec une plage jusqu’à 7 Anemometer mit einer Reichweite von bis m/s.
  • Seite 236 / link droit / recht Montagewerkzeug bereit für die Entnahme des Abluftkammerdrucks. Entfernen Sie nicht die Nylonscheibe. Outil de montage prêt pour prendre la pression du plénum d’extraction. Ne pas enlever la rondelle en nylon Annexes-UM-BiOptima-EN-SP-FR-GE-1907 74 / 85...
  • Seite 237 La vitesse d’entrée moyenne doit remplir: erfüllen (Gesamtmittelwert): BiOptima 4: 0,65 ±0,02 m/s BiOptima 4: 0,65 ±0,02 m/s BiOptima 6 / Cyto 4 / Cyto 6: 0,6 ±0,02 m/s BiOptima 6 / Cyto 4 / Cyto 6: 0,6 ±0,02 m/s • •...
  • Seite 238 2. ALCANCE 2. SCOPE BiOptima / BiOptima Cyto BiOptima / BiOptima Cyto 3. HERRAMIENTAS 3. TOOLS Anemómetro con rango de hasta 7 m/s.
  • Seite 239 Third row at 10 mm above the armrest. Rotación del anemómetro. Girar ligeramente en ambas direcciones y mantener el anemómetro en el valor mayor. Tras 20 segundos anotar la medida media Dirección de flujo de aire Annexes-UM-BiOptima-EN-SP-FR-GE-1907 77 / 85...
  • Seite 240 Display v.-0,05 < V. real < Display v.+0,05 Display v.-0.05 < Real inflow < Display v.+0.05 Velocidad de entrada del display ≤ 0,72 m/s Display entry velocity ≤ 0.72 m/s when alarm cuando la alarma se active. is activated. Annexes-UM-BiOptima-EN-SP-FR-GE-1907 78 / 85...
  • Seite 241 à celui permis. Strömungsgeschwindigkeit den zulässigen Wert über- oder unterschreitet. 2. PORTÉE 2. ANWENDUNGSBEREICH BiOptima / BiOptima Cyto BiOptima / BiOptima Cyto 3. OUTILS 3. WERKZEUGE Anémomètre avec une plage jusqu’à 7 m/s. Anemometer mit einer Reichweite von bis zu 7 m/s.
  • Seite 242 Après 20 secondes, notez la mesure moyenne. Anemometerdrehung. Drehen Sie sich leicht in beide Richtungen und halten Sie den Anemometer auf dem höheren Wert. Notieren Sie sich nach 20 Sekunden die Durchschnittsmessung. Direction du flux d’air Luftstromrichtung Annexes-UM-BiOptima-EN-SP-FR-GE-1907 80 / 85...
  • Seite 243 V.d’affichage-0,05 < Flux réel < V.d’affichage+0,05 Anzeigewert-0,05 < Realer Inflow < Anzeigewert+0,05 Vitesse d'entrée du display ≤ 0,72 m/s quand Zuluftgeschwindigkeit des Display ≤ 0,72 m/s l’alarme est activée. in dem Moment, in dem der Alarm aktiviert wird. Annexes-UM-BiOptima-EN-SP-FR-GE-1907 81 / 85...
  • Seite 244 Comprobar la cabina en lo referente a protección Verify the cabinet for personnel and product personal y la protección del producto. protection. 2. ALCANCE 2. SCOPE BiOptima / BiOptima Cyto BiOptima / BiOptima Cyto 3. HERRAMIENTAS 3. TOOLS • Generador de humo.
  • Seite 245 El humo generado en el interior no deberá salir No smoke shall be refluxed out of the cabinet de la cabina, garantizando la protección del once drawn in, guaranteeing the protection of operario y del medio ambiente. the operator and environment. Annexes-UM-BiOptima-EN-SP-FR-GE-1907 83 / 85...
  • Seite 246 Vérifier la cabine en ce qui concerne la protection Prüfung der Sicherheitswerkbank in Bezug personnelle et la protection du produit. auf die Sicherheit von Personen und Produkt. 2. PORTÉE 2. ANWENDUNGSBEREICH BiOptima / BiOptima Cyto BiOptima / BiOptima Cyto 3. OUTILS 3. WERKZEUGE Générateur de fumée Rauchgenerator 4.
  • Seite 247 La fumée générée à l'intérieur ne devra pas • sortir de la cabine, garantissant ainsi la innerhalb Sicherheitswerkbank protection l'opérateur erzeugte Rauch darf die Sicherheitswerkbank l'environnement. nicht verlassen die Kabine und gewährleistet so den Schutz von Person und Umwelt. Annexes-UM-BiOptima-EN-SP-FR-GE-1907 85 / 85...
  • Seite 248 A10.1-UM-BiOptima-SP-EN-1907...
  • Seite 249 A10.1-UM-BiOptima-FR-GE-1907...
  • Seite 250: Certificado De Garantía

    The inappropriate use of the equipment excludes AZBIL TELSTAR TECHNOLOGIES, S.L.U. of any responsibility for eventual direct or indirect damages of any nature. Likewise, this guarantee will be void if pieces other than the ones supplied by AZBIL TELSTAR TECHNOLOGIES, S.L.U. are used for the repairing of the equipment.
  • Seite 251: Certificat De Garantie

    Die falsche Verwendung der Geräte enthebt die AZBIL TELSTAR TECHNOLOGIES GmbH von jeglicher Haftung für mögliche direkte oder indirekte Schäden aller Art. Diese Garantie erlischt, wenn der Käufer nicht die Originalersatzteile, die von der AZBIL TELSTAR TECHNOLOGIES GmbH geliefert werden, für die Reparatur der Geräte verwendet.

Diese Anleitung auch für:

Bioptima cyto

Inhaltsverzeichnis