Inhaltsverzeichnis
Werbung
Quicklinks
Copyright Notice:
Copyright Notice:
Copyright Notice:
Copyright Notice:
Copyright Notice:
No part of this installation guide may be reproduced, transcribed, transmitted, or trans-
lated in any language, in any form or by any means, except duplication of documen-
tation by the purchaser for backup purpose, without written consent of ASRock Inc.
Products and corporate names appearing in this guide may or may not be registered
trademarks or copyrights of their respective companies, and are used only for identifica-
tion or explanation and to the owners' benefit, without intent to infringe.
Disclaimer:
Disclaimer:
Disclaimer:
Disclaimer:
Disclaimer:
Specifications and information contained in this guide are furnished for informational
use only and subject to change without notice, and should not be constructed as a
commitment by ASRock. ASRock assumes no responsibility for any errors or omissions
that may appear in this guide.
With respect to the contents of this guide, ASRock does not provide warranty of any kind,
either expressed or implied, including but not limited to the implied warranties or
conditions of merchantability or fitness for a particular purpose. In no event shall
ASRock, its directors, officers, employees, or agents be liable for any indirect, special,
incidental, or consequential damages (including damages for loss of profits, loss of
business, loss of data, interruption of business and the like), even if ASRock has been
advised of the possibility of such damages arising from any defect or error in the guide
or product.
This device complies with Part 15 of the FCC Rules. Operation is subject to the
following two conditions:
(1) this device may not cause harmful interference, and
(2) this device must accept any interference received, including interference that
may cause undesired operation.
CALIFORNIA, USA ONLY
The Lithium battery adopted on this motherboard contains Perchlorate, a toxic
substance controlled in Perchlorate Best Management Practices (BMP) regulations
passed by the California Legislature. When you discard the Lithium battery in
California, USA, please follow the related regulations in advance.
"Perchlorate Material-special handling may apply, see
www.dtsc.ca.gov/hazardouswaste/perchlorate"
ASRock Website: http://www.asrock.com
Copyright©2010 ASRock INC. All rights reserved.
ASRock
N68-GS3 UCC / N68-S3 UCC
Published February 2010
Motherboard
1 1 1 1 1
Werbung
Inhaltsverzeichnis

Verwandte Anleitungen für ASROCK N68-GS3 UCC


Inhaltszusammenfassung für ASROCK N68-GS3 UCC
- Seite 1 ASRock. ASRock assumes no responsibility for any errors or omissions that may appear in this guide. With respect to the contents of this guide, ASRock does not provide warranty of any kind, either expressed or implied, including but not limited to the implied warranties or conditions of merchantability or fitness for a particular purpose.
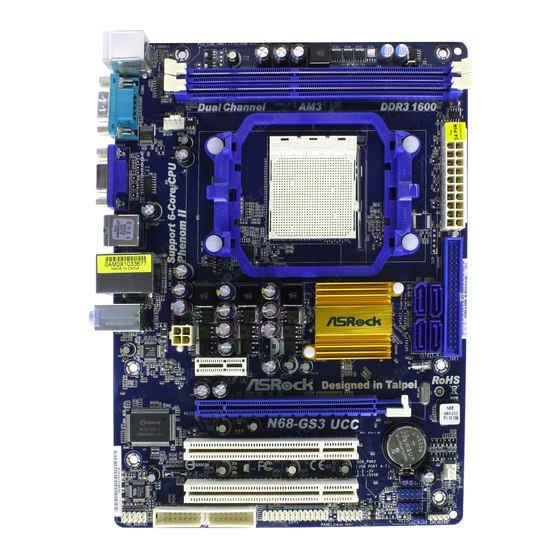
- Seite 2 Motherboard Layout Motherboard Layout Motherboard Layout Motherboard Layout Motherboard Layout (N68- (N68- (N68-GS3 UCC / N68-S3 UCC) GS3 UCC / N68-S3 UCC) GS3 UCC / N68-S3 UCC) GS3 UCC / N68-S3 UCC) (N68- (N68- GS3 UCC / N68-S3 UCC) PS2_USB_PW1 Jumper...
- Seite 3 I/O P I/O P I/O Panel (N68- anel (N68- anel (N68- anel (N68-GS3 UCC / N68-S3 UCC) GS3 UCC / N68-S3 UCC) GS3 UCC / N68-S3 UCC) GS3 UCC / N68-S3 UCC) I/O P I/O P anel (N68- GS3 UCC / N68-S3 UCC) PS/2 Mouse Port (Green) USB 2.0 Ports (USB01)
-
Seite 4: Package Contents
Introduction Introduction Introduction Thank you for purchasing ASRock N68-GS3 UCC / N68-S3 UCC motherboard, a reliable motherboard produced under ASRock’s consistently stringent quality control. It delivers excellent performance with robust design conforming to ASRock’s com- mitment to quality and endurance. - Seite 5 - 4 x Ready-to-Use USB 2.0 Ports - 1 x RJ-45 LAN Port with LED (ACT/LINK LED and SPEED LED) - HD Audio Jack: Line in / Front Speaker / Microphone 5 5 5 5 5 ASRock N68-GS3 UCC / N68-S3 UCC Motherboard...
- Seite 6 7 / 7 64-bit / Vista / Vista 64-bit / XP / XP 64-bit compliant Certifications - FCC, CE * For detailed product information, please visit our website: http://www.asrock.com 6 6 6 6 6 ASRock N68-GS3 UCC / N68-S3 UCC Motherboard...
- Seite 7 ® ® Power Management for USB 2.0 works fine under Microsoft Windows 64-bit / 7 / Vista 64-bit / Vista / XP 64-bit / XP SP1 or SP2. 7 7 7 7 7 ASRock N68-GS3 UCC / N68-S3 UCC Motherboard...
- Seite 8 10. It is a user-friendly ASRock overclocking tool which allows you to surveil your system by hardware monitor function and overclock your hardware devices to get the best system performance under Windows ® environment. Please visit our website for the operation procedures of ASRock OC Tuner.
- Seite 9 When placing screws into the screw holes to secure the motherboard to the chassis, please do not over-tighten the screws! Doing so may damage the motherboard. 9 9 9 9 9 ASRock N68-GS3 UCC / N68-S3 UCC Motherboard...
-
Seite 10: Cpu Installation
Then connect the CPU fan to the CPU FAN connector (CPU_FAN1, see Page 2, No. 2). For proper installation, please kindly refer to the instruction manuals of the CPU fan and the heatsink. ASRock N68-GS3 UCC / N68-S3 UCC Motherboard... -
Seite 11: Installing A Dimm
2.3 Installation of Memory Modules (DIMM) 2.3 Installation of Memory Modules (DIMM) N68-GS3 UCC / N68-S3 UCC motherboard provides two 240-pin DDR3 (Double Data Rate 3) DIMM slots, and supports Dual Channel Memory Technology. For dual channel configuration, you always need to install two identical (the same brand, speed, size and chip-type) memory modules in the DDR3 DIMM slots to activate Dual Channel Memory Technology. -
Seite 12: Installing An Expansion Card
Step 3. Align the card connector with the slot and press firmly until the card is completely seated on the slot. Step 4. Fasten the card to the chassis with screws. ASRock N68-GS3 UCC / N68-S3 UCC Motherboard... - Seite 13 Right click the desktop, choose “Personalize”, and select the “Display Settings” tab so that you can adjust the parameters of the multi-monitor according to the steps below. A. Click the number ”2” icon. ASRock N68-GS3 UCC / N68-S3 UCC Motherboard...
- Seite 14 BIOS. If you need to clear the CMOS when you just finish updating the BIOS, you must boot up the system first, and then shut it down before you do the clear-CMOS action. ASRock N68-GS3 UCC / N68-S3 UCC Motherboard...
- Seite 15 No. 7) Serial ATA (SATA) Either end of the SATA data cable Data Cable can be connected to the SATA / SATAII hard disk or the SATAII (Optional) connector on the motherboard. ASRock N68-GS3 UCC / N68-S3 UCC Motherboard...
- Seite 16 D. MIC_RET and OUT_RET are for HD audio panel only. You don’t need to connect them for AC’97 audio panel. E. Enter BIOS Setup Utility. Enter Advanced Settings, and then select Chipset Configuration. Set the Front Panel Control option from [Auto] to [Enabled]. ASRock N68-GS3 UCC / N68-S3 UCC Motherboard...
- Seite 17 20-pin ATX power supply. To use the 20-pin ATX power supply, please plug your power supply along with Pin 1 and Pin 13. 20-Pin ATX Power Supply Installation ASRock N68-GS3 UCC / N68-S3 UCC Motherboard...
-
Seite 18: Installing Windows
PCI / PCIE buses are in the fixed mode so that FSB can operate under a more stable overclocking environment. Please refer to the warning on page 7 for the possible overclocking risk before you apply Untied Overclocking Technology. ASRock N68-GS3 UCC / N68-S3 UCC Motherboard... - Seite 19 ROM drive. It will display the Main Menu automatically if “AUTORUN” is enabled in your computer. If the Main Menu does not appear automatically, locate and double- click on the file “ASSETUP.EXE” from the “BIN” folder in the Support CD to display the menus. ASRock N68-GS3 UCC / N68-S3 UCC Motherboard...
-
Seite 20: Einführung
1. Einführung 1. Einführung 1. Einführung Wir danken Ihnen für den Kauf des ASRock N68-GS3 UCC / N68-S3 UCC Motherboard, ein zuverlässiges Produkt, welches unter den ständigen, strengen Qualitätskontrollen von ASRock gefertigt wurde. Es bietet Ihnen exzellente Leistung und robustes Design, gemäß der Verpflichtung von ASRock zu Qualität und Halbarkeit. -
Seite 21: Spezifikationen
- 1 x PS/2-Tastaturanschluss - 1 x Serieller port: COM1 - 1 x VGA port - 4 x Standard-USB 2.0-Anschlüsse - 1 x RJ-45 LAN Port mit LED (ACT/LINK LED und SPEED LED) ASRock N68-GS3 UCC / N68-S3 UCC Motherboard... - Seite 22 - Treiber, Dienstprogramme, Antivirussoftware (Probeversion), ASRock-Software-Suite (CyberLink DVD Suite und Creative Sound Blaster X-Fi MB) (OEM- und Testversion) Einzigartige - ASRock OC Tuner (siehe VORSICHT 10) Eigenschaft - Intelligent Energy Saver (Intelligente Energiesparfunktion) (siehe VORSICHT 11) - Sofortstart - ASRock Instant Flash (siehe VORSICHT 12)
- Seite 23 Ob die Speichergeschwindigkeit 1600 MHz unterstützt wird, hängt von der von Ihnen eingesetzten AM3-CPU ab. Schauen Sie bitte auf unseren Internetseiten in der Liste mit unterstützten Speichermodulen nach, wenn Sie DDR3 1600-Speichermodule einsetzen möchten. ASRock-Internetseite: http://www.asrock.com ASRock N68-GS3 UCC / N68-S3 UCC Motherboard...
- Seite 24 ® Systemleistung unter der Windows Umgebung zu erreichen. Besuchen Sie bitte unsere Website für die Operationsverfahren von ASRock OC Tuner. ASRock-Website: http://www.asrock.com 11. Mit einer eigenen, modernen Hardware und speziellem Softwaredesign, bietet der Intelligent Energy Saver eine revolutionäre Technologie zur bisher unerreichten Energieeinsparung.
- Seite 25 13. Allein der Name – OC DNA* – beschreibt es wörtlich, was die Software zu leisten vermag. OC DNA ist ein von ASRock exklusiv entwickeltes Dienstprogramm, das Nutzern eine bequeme Möglichkeit bietet, Übertaktungseinstellungen aufzuzeichnen und sie Anderen mitzuteilen. Es hilft Ihnen, Ihre Übertaktungsaufzeichnung im Betriebssystem zu speichern und vereinfacht den komplizierten Aufzeichnungsvorgang von Übertaktungseinstellungen.
-
Seite 26: Einstellung Der Jumper
CMOS gelöscht wurde. Wenn Sie den CMOS- Inhalt gleich nach dem Aktualisieren des BIOS löschen müssen, müssen Sie zuerst das System starten und dann wieder ausschalten, bevor Sie den CMOS-Inhalt löschen. ASRock N68-GS3 UCC / N68-S3 UCC Motherboard... -
Seite 27: Anschlüsse
3,0 Gb/s. (SATAII_4 (PORT 1.1): siehe S.2, No. 7) Serial ATA- (SATA-) Sie können beide Enden des Datenkabel SATA-Datenkabels entweder mit der SATA / SATAII- (Option) Festplatte oder dem SATAII-Anschluss am Mainboard verbinden. ASRock N68-GS3 UCC / N68-S3 UCC Motherboard... - Seite 28 Diese Anschlüsse müssen nicht an die AC’97-Audioleiste angeschlossen werden. E. Rufen Sie das BIOS-Setup-Dienstprogramm auf. Wechseln Sie zu Erweiterte Einstellungen und wählen Sie Chipset-Konfiguration. Setzen Sie die Option Frontleistenkontrolle von [Automatisch] auf [Aktiviert]. ASRock N68-GS3 UCC / N68-S3 UCC Motherboard...
- Seite 29 ATX-Netzteil verwendet werden. Um ein 20-pol. ATX-Netzteil zu verwenden, stecken Sie den Stecker mit Pin 1 und Pin 13 ein. n Sie zu ation. Setzen Installation eines 20-pol. ATX-Netzteils uf [Aktiviert]. ASRock N68-GS3 UCC / N68-S3 UCC Motherboard...
- Seite 30 12V-ATX-Netzteil Stromversorgung mit ATX 12- Volt-Stecker mit diesem (4-pin ATX12V1) Anschluss verbinden müssen, (siehe S.2, No. 24) damit ausreichend Strom geliefert werden kann. Andernfalls reicht der Strom nicht aus, das System zu starten. ASRock N68-GS3 UCC / N68-S3 UCC Motherboard...
- Seite 31 ASSETUP.EXE im BIN-Verzeichnis der Support-CD, um die Menüs aufzurufen. Das Setup-Programm soll es Ihnen so leicht wie möglich machen. Es ist menügesteuert, d.h. Sie können in den verschiedenen Untermenüs Ihre Auswahl treffen und die Programme werden dann automatisch installiert. ASRock N68-GS3 UCC / N68-S3 UCC Motherboard...
-
Seite 32: Contenu Du Paquet
1. Introduction 1. Introduction Merci pour votre achat d’une carte mère ASRock N68-GS3 UCC / N68-S3 UCC, une carte mère très fiable produite selon les critères de qualité rigoureux de ASRock. Elle offre des performances excellentes et une conception robuste conformément à... - Seite 33 I/O Panel - 1 x port souris PS/2 - 1 x port clavier PS/2 - 1 x port série: COM1 - 1 x port VGA - 4 x ports USB 2.0 par défaut ASRock N68-GS3 UCC / N68-S3 UCC Motherboard...
- Seite 34 - Gestion jumperless - Support SMBIOS 2.3.1 CD d’assistance - Pilotes, utilitaires, logiciel anti-virus (Version d’essai), Suite logicielle ASRock (CyberLink DVD Suite et Creative Sound Blaster X-Fi MB) (Version OEM et d’essai) Caractéristique - Tuner ASRock OC (voir ATTENTION 10) unique - Économiseur d’énergie intelligent (voir ATTENTION 11)
- Seite 35 Si vous le faites, c’est à vos frais et vos propres risques. Nous ne sommes pas responsables des dommages possibles causés par l’overclocking. ASRock N68-GS3 UCC / N68-S3 UCC Motherboard...
- Seite 36 SATA au connecteur SATAII. La gestion de l’alimentation pour l’USB 2.0 fonctionne bien sous Microsoft ® Windows ® 7 64-bit / 7 / Vista 64-bit/ Vista / XP 64-bit / XP SP1; SP2. ASRock N68-GS3 UCC / N68-S3 UCC Motherboard...
- Seite 37 (L’économiseur d’énergie intelligent). Site Web d’ASRock: http://www.asrock.com 12. O ASRock Instant Flash é um utilitário de flash do BIOS incorporado na memória Flash ROM. Esta prática ferramenta de actualização do BIOS permite-lhe actualizar o BIOS do sistema sem necessitar de entrar nos ®...
- Seite 38 Pour améliorer la dissipation de la chaleur, n’oubliez pas de mettre de la pâte thermique entre le CPU le dissipateur lors de l’installation du PC. ASRock N68-GS3 UCC / N68-S3 UCC Motherboard...
- Seite 39 BIOS à jour. Si vous avez besoin d’effacer la CMOS lorsque vous avez fini de mettre le BIOS à jour, vous devez d’abord initialiser le système, puis le mettre hors tenon avant de procéder à l’opération d’effacement de la CMOS. ASRock N68-GS3 UCC / N68-S3 UCC Motherboard...
- Seite 40 L’interface SATAII voir p.2 fig. 5) actuelle permet des taux (SATAII_3 (PORT 1.0): transferts de données pouvant voir p.2 fig. 8) aller jusqu’à 3,0 Go/s. (SATAII_4 (PORT 1.1): voir p.2 fig. 7) ASRock N68-GS3 UCC / N68-S3 UCC Motherboard...
- Seite 41 à la procédure ci-dessous : A. Connectez Mic_IN (MIC) à MIC2_L. B. Connectez Audio_R (RIN) à OUT2_R et Audio_L (LIN) à OUT2_L. C. Connectez Ground (GND) à Ground (GND). ASRock N68-GS3 UCC / N68-S3 UCC Motherboard...
- Seite 42 CPU sur cette carte mère, veuillez le connecter aux broches 1-3. Installation de ventilateur à 3 broches Broches 1-3 connectées Connecteur d’alimentation ATX Veuillez connecter une unité d’alimentation ATX sur ce (ATXPWR1 br. 24) connecteur. (voir p.2 fig. 4) ASRock N68-GS3 UCC / N68-S3 UCC Motherboard...
- Seite 43 électrique avec (ATX12V1 br. 4) prise ATX 12V sur ce (voir p.2 fig. 24) connecteur afin d’avoir une alimentation suffisante. Faute de quoi, il ne sera pas possible de mettre sous tension. ées ASRock N68-GS3 UCC / N68-S3 UCC Motherboard...
- Seite 44 CD-ROM. Le Menu principal s’affiche automatiquement si “AUTORUN” est activé dans votre ordinateur. Si le Menu principal n’apparaît pas automatiquement, localisez dans le CD technique le fichier “ASSETUP.EXE” dans le dossier BIN et double-cliquez dessus pour afficher les menus. ASRock N68-GS3 UCC / N68-S3 UCC Motherboard...
- Seite 45 1. Introduzione Grazie per aver scelto una scheda madre ASRock N68-GS3 UCC / N68-S3 UCC, una scheda madre affidabile prodotta secondo i severi criteri di qualità ASRock. Le prestazioni eccellenti e il design robusto si conformano all’impegno di ASRock nella ricerca della qualità...
- Seite 46 - 1 x Porta PS/2 per tastiera - 1 x Porta COM - 1 x Porta VGA - 4 x Porte USB 2.0 già integrate - 1 x porta LAN RJ-45 con LED (LED azione/collegamento e LED velocità) ASRock N68-GS3 UCC / N68-S3 UCC Motherboard...
- Seite 47 - Supporta SMBIOS 2.3.1 CD di - Driver, utilità, software antivirus (Versione dimostrativa), supporto Suite software ASRock (Suite CyberLink DVD e Creative Sound Blaster X-Fi MB) (OEM e Versione demo) Caratteristi- - Sintonizzatore ASRock OC (vedi ATTENZIONE 10) ca speciale - Intelligent Energy Saver (Risparmio intelligente dell’energia)
- Seite 48 * Per ulteriori informazioni, prego visitare il nostro sito internet: http://www.asrock.com AVVISO Si prega di prendere atto che la procedura di overclocking implica dei rischi, come anche la regolazione delle impostazioni del BIOS, l’applicazione della tecnologia Untied Overclocking Technology, oppure l’uso di strumenti di overclocking forniti da terzi. L’overclocking può...
- Seite 49 64-bit / Vista / XP 64 bit / XP SP1; SP2. 10. Si tratta di uno strumento di sicronizzazione ASRock di face uso in grado di implementare il controllo del sistema tramite la funzione di hardware monitor e sincronizzare le Vostre unita‘ hardware per ottenere la migliore prestazione in Windows ®...
- Seite 50 Non cancellare la CMOS subito dopo aver aggiornato il BIOS. Se è necessario cancellare la CMOS una volta completato l’aggiornamento del BIOS, è necessario riavviare prima il sistema, e poi spegnerlo prima di procedere alla cancellazione della CMOS. ASRock N68-GS3 UCC / N68-S3 UCC Motherboard...
- Seite 51 3.0 Gb/s. Cavi dati Serial ATA (SATA) Entrambe le estremità del cavo dati SATA possono collegarsi (Opzionale) all’hard disk SATA / SATAII o al connettore SATAII sulla scheda madre. ASRock N68-GS3 UCC / N68-S3 UCC Motherboard...
- Seite 52 D. MIC_RET e OUT_RET sono solo per il pannello audio HD. Non è necessario collegarli per il pannello audio AC’97. E. Entrare nel programma di impostazione BIOS. Entrare su Impostazioni avanzate, quindi selezionare Configurazione chipset. Impostare l’opzione Comando pannello anteriore da [Auto] a [Attivato]. ASRock N68-GS3 UCC / N68-S3 UCC Motherboard...
- Seite 53 ATX a 24 pin, ma può funzionare lo stesso se si adotta un alimentatore ATX a 20 pin. Per usare l’alimentatore ATX a 20 pin, collegare l’alimentatore con il Pin 1 e il Pin 13. Installazione dell’alimentatore ATX a 20 pin ASRock N68-GS3 UCC / N68-S3 UCC Motherboard...
- Seite 54 È necessario collegare una alimentazione con spinotto da (4-pin ATX12V1) 12V ATX a questo connettore (vedi p.2 item 24) in modo che possa fornire energia sufficiente. In caso contrario l’unità non si avvia. ASRock N68-GS3 UCC / N68-S3 UCC Motherboard...
- Seite 55 “AUTORUN” è attivata nel computer, apparirà automaticamente il Menù principale. Se il Menù principale non appare automaticamente, posizionarsi sul file ASSETUP. EXE nel CESTINO del CD di supporto e cliccare due volte per visualizzare i menù. ASRock N68-GS3 UCC / N68-S3 UCC Motherboard...
- Seite 56 1. Introducción 1. Introducción Gracias por su compra de ASRock N68-GS3 UCC / N68-S3 UCC placa madre, una placa de confianza producida bajo el control de calidad estricto y persistente. La placa madre provee realización excelente con un diseño robusto conforme al compromiso de calidad y resistencia de ASRock.
- Seite 57 - 1 x puerto de ratón PS/2 Trasero - 1 x puerto de teclado PS/2 - 1 x puerto serial: COM1 - 1 x puerto VGA - 4 x puertos USB 2.0 predeterminados ASRock N68-GS3 UCC / N68-S3 UCC Motherboard...
- Seite 58 ASRock (CyberLink DVD Suite y Creative Sound Blaster X-Fi MB) (OEM y versión de prueba) Característica - Sintonizador de ASRock OC (vea ATENCIÓN 10) Única - Administrador de energía inteligente (vea ATENCIÓN 11) - Instant Boot - ASRock Instant Flash (vea ATENCIÓN 12)
- Seite 59 Esta placa base es compatible con una CPU de hasta 95W. Por favor, consulte nuestro sitio web para conocer la lista de compatibilidad de CPUs. Sitio Web de ASRock: http://www.asrock.com La función UCC (Unlock CPU Core, desbloquear núcleo la CPU) simplifica la activación de una CPU AMD.
- Seite 60 (Economizador de energía inteligente). Sitio web de ASRock: http://www.asrock.com 12. ASRock Instant Flash es una utilidad de programación del BIOS que se encuentra almacenada en la memoria Flash ROM. Esta sencilla herramienta de actualización de BIOS le permitirá actualizar el BIOS del sistema sin necesidad de acceder a ningún sistema operativo, como...
- Seite 61 13. El nombre del propio software, OC DNA, indica con claridad aquello de lo que es capaz. OC DNA, una exclusiva utilidad desarrollada por ASRock, representa para el usuario una forma cómoda de grabar su configuración de OC y compartirla con otras personas. Esta utilidad le permitirá guardar sus registros de aceleración en el sistema operativo y simplificar el...
- Seite 62 COMS. Si necesita borrar la CMOS cuando acabe de finalizar la actualización de la BIOS, debe arrancar primero el sistema y, a continuación, apagarlo antes de realizar la acción de borrado de CMOS. ASRock N68-GS3 UCC / N68-S3 UCC Motherboard...
- Seite 63 (SATAII_4 (PORT 1.1): vea p.2, No. 7) Cable de datos de Ambos extremos del cable serie ATA (SATA) pueden conectarse al disco duro SATA / SATAII o la (Opcional) conexión de la placa base. ASRock N68-GS3 UCC / N68-S3 UCC Motherboard...
- Seite 64 E. Entre en la Utilidad de configuración del BIOS Entre en Configuración avanzada y, a continuación, seleccione Configuración del conjunto de chips. En el panel de control frontal cambie la opción [Automático] a [Habilitado]. ASRock N68-GS3 UCC / N68-S3 UCC Motherboard...
- Seite 65 Para usar una fuente de alimentación ATX de 20 pins, por favor, conecte su fuente de alimentación usando los Pins 1 y 13. Instalación de una Fuente de Alimentación ATX de 20 Pins ASRock N68-GS3 UCC / N68-S3 UCC Motherboard...
- Seite 66 Para iniciar la instalación, ponga el CD en el lector de CD y se desplegará el Menú Principal automáticamente si «AUTORUN» está habilitado en su computadora. Si el Menú Principal no aparece automáticamente, localice y doble-pulse en el archivo ASSETUP.EXE para iniciar la instalación. ASRock N68-GS3 UCC / N68-S3 UCC Motherboard...
- Seite 67 1. Introdução 1. Introdução Gratos por comprar nossa placa–mãe N68-GS3 UCC / N68-S3 UCC, um produto confiável feito com ASRock um estrito controle de qualidade consistente. Com um excelente desempenho, essa placa é dotada de um projeto robusto que atende a ASRock de compromisso com a qualidade e durabilidade.
-
Seite 68: Especificações
- 1 x porta para mouse PS/2 traseiro - 1 x porta para teclado PS/2 - 1 x porta COM1 - 1 x porta VGA - 4 x portas USB 2.0 padrão ASRock N68-GS3 UCC / N68-S3 UCC Motherboard... - Seite 69 - Suporte para SMBIOS 2.3.1 CD de suporte - Controladores, utilitários, software antivírus (Experimentacao Versao), conjunto de programas da ASRock (CyberLink DVD Suite e Creative Sound Blaster X-Fi MB) (OEM e versão de demonstração) Funcionalidade - Sintonizador ASRock OC (veja o AVISO 10) Única...
- Seite 70 CPU AM3 que adoptar. Se quiser adoptar um módulo de memória DDR3 1600 para utilização com esta placa principal, consulte a lista de memória suportada no nosso web site para saber quais os módulos de memória compatíveis. Web site da ASRock http://www.asrock.com ASRock N68-GS3 UCC / N68-S3 UCC Motherboard...
- Seite 71 64-bit / Vista / XP 64-bit / XP SP1; SP2. 10. É uma ferramenta de overclocking da ASRock fácil de utilizar que lhe permite vigiar i seu sistema via a função de monitorização de hardware e proceder ao overclock dos dispositivos de hardware para obter o melhor desempenho em ambiente Windows ®...
- Seite 72 13. O próprio nome do software – OC DNA diz-lhe literalmente aquilo de que é capaz. OC DNA, um utilitário exclusivo desenvolvido pela ASRock, proporciona uma forma conveniente para o utilizador gravar as definições OC e partilhar com outros. Ajuda-o a guardar o seu registo de “overclocking”...
- Seite 73 Por favor lembrese de remover o jumper depois de limpar o COMS. Se precisar limpar o CMOS ao concluir a atualização do BIOS, deverá reiniciar o sistema primeiro e, em seguida, desligá-lo antes de executar a ação de limpeza o CMOS. ASRock N68-GS3 UCC / N68-S3 UCC Motherboard...
- Seite 74 2, No. 7) Cabo de dados Tanto a saída do cabo de Serial ATA (SATA) dados SATA pode ser conectado ao disco rígido (opcional) SATA / SATAII quanto o conector SATAII na placa mãe. ASRock N68-GS3 UCC / N68-S3 UCC Motherboard...
- Seite 75 áudio AC’97. E. Entre no utilitário de configuração do BIOS. Vá até à opção Definições avançadas e escolha Configuração do chipset. Defina a opção Controlo do painel frontal de [Automático] para [Activado]. ASRock N68-GS3 UCC / N68-S3 UCC Motherboard...
- Seite 76 Para usar a fonte de alimentação de 29 pinos, por favor ligue a sua fonte de alimentação com o Pino 1 e o Pino 13. Instalação da Fonte de alimentação ATX de 20 Pinos ASRock N68-GS3 UCC / N68-S3 UCC Motherboard...
- Seite 77 CD-ROM do computador. Automaticamente iniciará o menu principal, casa o “AUTORUN” esteja ativado. Se o menu principal não aparecer automaticamente, explore o CD e execute o “ASSETUP.EXE” localizado na pasta “BIN”. ASRock N68-GS3 UCC / N68-S3 UCC Motherboard...
- Seite 78 ASRock N68-GS3 UCC / N68-S3 UCC Motherboard...
- Seite 79 ‘ ’ ® ® ® ASRock N68-GS3 UCC / N68-S3 UCC Motherboard...
- Seite 80 ® ASRock N68-GS3 UCC / N68-S3 UCC Motherboard...
- Seite 81 “ ” “ ” ® ® ® “ ” “ ” ASRock N68-GS3 UCC / N68-S3 UCC Motherboard...
- Seite 82 ® ® ASRock N68-GS3 UCC / N68-S3 UCC Motherboard...
- Seite 83 “ ” “ ” “ ” “ ” ASRock N68-GS3 UCC / N68-S3 UCC Motherboard...
- Seite 84 ASRock N68-GS3 UCC / N68-S3 UCC Motherboard...
- Seite 85 ASRock N68-GS3 UCC / N68-S3 UCC Motherboard...
- Seite 86 4 3 2 1 ASRock N68-GS3 UCC / N68-S3 UCC Motherboard...
- Seite 87 “ ” “ ” ASRock N68-GS3 UCC / N68-S3 UCC Motherboard...
- Seite 88 ASRock N68-GS3 UCC / N68-S3 UCC Motherboard...
- Seite 89 ‘ ’ ® ® ® ASRock N68-GS3 UCC / N68-S3 UCC Motherboard...
- Seite 90 1 0 0 1 0 0 1 0 0 1 0 0 1 0 0 ASRock N68-GS3 UCC / N68-S3 UCC Motherboard...
- Seite 91 ® ® “ ” ® ® ® 1 0 1 1 0 1 1 0 1 1 0 1 1 0 1 ASRock N68-GS3 UCC / N68-S3 UCC Motherboard...
- Seite 92 ® ® ® ® – 1 0 2 1 0 2 1 0 2 1 0 2 1 0 2 ASRock N68-GS3 UCC / N68-S3 UCC Motherboard...
- Seite 93 1 0 3 1 0 3 1 0 3 1 0 3 1 0 3 ASRock N68-GS3 UCC / N68-S3 UCC Motherboard...
- Seite 94 1 0 4 1 0 4 1 0 4 1 0 4 1 0 4 ASRock N68-GS3 UCC / N68-S3 UCC Motherboard...
- Seite 95 1 0 5 1 0 5 1 0 5 1 0 5 1 0 5 ASRock N68-GS3 UCC / N68-S3 UCC Motherboard...
- Seite 96 4 3 2 1 1 0 6 1 0 6 1 0 6 1 0 6 1 0 6 ASRock N68-GS3 UCC / N68-S3 UCC Motherboard...
- Seite 97 ® ® 1 0 7 1 0 7 1 0 7 1 0 7 1 0 7 ASRock N68-GS3 UCC / N68-S3 UCC Motherboard...
- Seite 98 1 0 8 1 0 8 1 0 8 1 0 8 1 0 8 ASRock N68-GS3 UCC / N68-S3 UCC Motherboard...
- Seite 99 ‘ ’ ™ ® ® ® 1 0 9 1 0 9 1 0 9 1 0 9 1 0 9 ASRock N68-GS3 UCC / N68-S3 UCC Motherboard...
- Seite 100 ® ® 1 1 0 1 1 0 1 1 0 1 1 0 1 1 0 ASRock N68-GS3 UCC / N68-S3 UCC Motherboard...
- Seite 101 ® ® ® ® ® 1 1 1 1 1 1 1 1 1 1 1 1 1 1 1 ASRock N68-GS3 UCC / N68-S3 UCC Motherboard...
- Seite 102 ® 1 1 2 1 1 2 1 1 2 1 1 2 1 1 2 ASRock N68-GS3 UCC / N68-S3 UCC Motherboard...
- Seite 103 1 1 3 1 1 3 1 1 3 1 1 3 1 1 3 ASRock N68-GS3 UCC / N68-S3 UCC Motherboard...
- Seite 104 1 1 4 1 1 4 1 1 4 1 1 4 1 1 4 ASRock N68-GS3 UCC / N68-S3 UCC Motherboard...
- Seite 105 4 3 2 1 1 1 5 1 1 5 1 1 5 1 1 5 1 1 5 ASRock N68-GS3 UCC / N68-S3 UCC Motherboard...
- Seite 106 ® ® 1 1 6 1 1 6 1 1 6 1 1 6 1 1 6 ASRock N68-GS3 UCC / N68-S3 UCC Motherboard...
- Seite 107 1 1 7 1 1 7 1 1 7 1 1 7 1 1 7 ASRock N68-GS3 UCC / N68-S3 UCC Motherboard...
- Seite 108 1 1 8 1 1 8 1 1 8 1 1 8 1 1 8 ASRock N68-GS3 UCC / N68-S3 UCC Motherboard...
- Seite 109 ® ® ® 1 1 9 1 1 9 1 1 9 1 1 9 1 1 9 ASRock N68-GS3 UCC / N68-S3 UCC Motherboard...
- Seite 110 ® ® 1 2 0 1 2 0 1 2 0 1 2 0 1 2 0 ASRock N68-GS3 UCC / N68-S3 UCC Motherboard...
- Seite 111 ® ® ® ® ® 1 2 1 1 2 1 1 2 1 1 2 1 1 2 1 ASRock N68-GS3 UCC / N68-S3 UCC Motherboard...
- Seite 112 ® 1 2 2 1 2 2 1 2 2 1 2 2 1 2 2 ASRock N68-GS3 UCC / N68-S3 UCC Motherboard...
- Seite 113 1 2 3 1 2 3 1 2 3 1 2 3 1 2 3 ASRock N68-GS3 UCC / N68-S3 UCC Motherboard...
- Seite 114 1 2 4 1 2 4 1 2 4 1 2 4 1 2 4 ASRock N68-GS3 UCC / N68-S3 UCC Motherboard...
- Seite 115 4 3 2 1 1 2 5 1 2 5 1 2 5 1 2 5 1 2 5 ASRock N68-GS3 UCC / N68-S3 UCC Motherboard...
- Seite 116 1 2 6 1 2 6 1 2 6 1 2 6 1 2 6 ASRock N68-GS3 UCC / N68-S3 UCC Motherboard...
- Seite 117 ® ® ® 1 2 7 1 2 7 1 2 7 1 2 7 1 2 7 ASRock N68-GS3 UCC / N68-S3 UCC Motherboard...