Herunterladen Inhalt Inhalt Diese Seite drucken

Werbung

Verfügbare Sprachen
  • DE

Verfügbare Sprachen

  • DEUTSCH, seite 11
U7 Jump Starter
User Manual
JP
EN DE
FR
IT
ES

Werbung

Inhaltsverzeichnis
loading

Inhaltszusammenfassung für Suaoki U7

  • Seite 1 U7 Jump Starter User Manual EN DE...
  • Seite 3 CONTENTS English···························1-7 Deutsch························8-15 Français·····················16-23 Italiano······················· 24-31 Español······················32-39 日本語························40-46...
  • Seite 4: Product Overview

    Thank you for choosing SUAOKI. Please read all instructions carefully before use. Timely maintenance and careful usage ensures years-long of service. Product Overview Jump Starter ⑦ ① ⑤ LED Flashlight TYPE-C Input/Output Port ② ⑥ EC5 Jumping Port Power Button ③...
  • Seite 5 Smart Battery Clamp Force Start Button Indicator Light EC5 Plug Power Indicator Lights Click on the power button and the battery indicator light would be on. Power Indicator Light 1 light 2 lights 3 lights 4 lights Power Level <25% <50% <75% <100%...
  • Seite 6 Note: 1. Do not charge the product immediately right after jump-starting your car. 2. Please disconnect the battery clamps from the product before charging it. 3. Do not charge the product continuously for more than 10 hours. 4. Do NOT charge the jump starter via a USB-A power adapter from non-normalized manufacturers.
  • Seite 7 However, if the buzzer beeps, the clamps are connected in reverse order. If buzzer beeps even though the clamps are correctly connected, the vehicle’s battery is severely damaged. If the red and green indicator lights keep flashing alternately (the buzzer may beep), you need to use force start function (check ‘Force Start Function’...
  • Seite 8 Charging electronic devices 1. Choose the right charging cable for your electronic device. 2. You can either plug the USB-A connector at one end of the USB cable (included) to the USB1/USB2 output port of the product or plug a USB-C to USB-C cable (not included) to the TYPE-C port of the product.
  • Seite 9 2. Reverse polarity protection. If the clamps are connected to the wrong polarities, alarm would be set off (the red indicator light stays on and the buzzer beeps) and the output would be turned off automatically. 3. Detect defective battery. If the car battery is severely damaged, alarm would be set off (the red indicator light stays on and the buzzer beeps) and the output would be turned off automatically.
  • Seite 10: Product Specifications

    Our company provides customers with warranty of 12 months from the date of purchase. Contact us For any inquiries or comments concerning our products, please send an email to support@suaoki.com, and we will respond to you as soon as possible. EN-7...
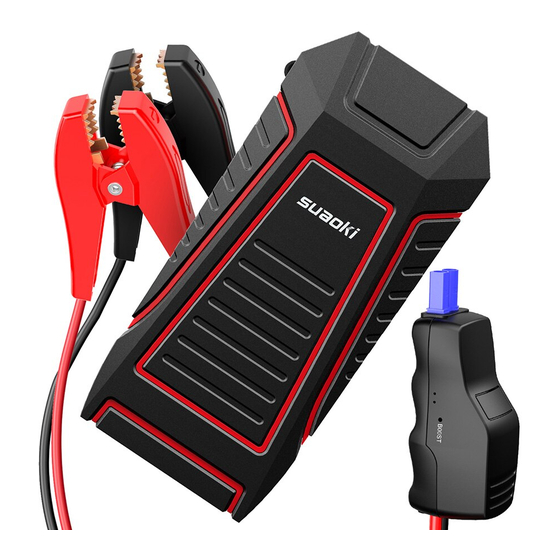
  • Seite 11 Vielen Dank, dass Sie sich für SUAOKI entschieden haben. Mit normaler Pflege und angemessener Behandlung bietet der SUAOKI U7-Starthilfe jahrelangen zuverlässigen Service an. Bitte lesen Sie alle Anweisungen vor Gebrauch sorgfältig durch. Produktübersicht Starthilfe ⑦ ① ⑥ LED-Taschenlampe Ein- / Ausschalter ②...
  • Seite 12: Betriebsanzeige Leuchte

    Smart Battery Clamp Zwangsstarttaste Anzeigeleuchte EC5-Stecker Betriebsanzeige Leuchte Klicken Sie auf den Netzschalter und die Batterieanzeige leuchtet. Leistungsanzeigeleuchte 1 Leuchte 2 Leuchten 3 Leuchten 4 Leuchten Leistungsstufe <25% <50% <75% <100% 1. Während der Starthilfe aufgeladen wird, blinkt die Leistungsanzeigeleuchte, um anzuzeigen, dass sie nicht vollständig aufgeladen ist.
  • Seite 13: Starthilfe Für Ein 12V-Fahrzeug

    Anm.: 1. Laden Sie das Produkt nicht sofort nach dem Start Ihres Autos auf. 2. Stellen Sie sicher, dass die Batterieklemmen nicht mit dem Produkt verbunden sind, wenn Sie es aufladen möchten. 3. Es wird empfohlen, das Produkt nicht länger als 10 Stunden ununter- brochen aufzuladen.
  • Seite 14 Wenn der Summer jedoch piept, werden die Klemmen in umgekehrter Reihenfolge angeschlossen. Wenn der Summer piept, obwohl die Klemmen korrekt angeschlossen sind, ist die Fahrzeugbatterie stark beschädigt. Wenn die rote und die grüne Anzeigeleuchte abwechselnd blinken (der Summer piept möglicherweise), müssen Sie die Zwangsstartfunktion verwenden (weitere Informationen finden Sie im Abschnitt „Zwangsstart- funktion“).
  • Seite 15: Aufladung Elektronischer Geräte

    Aufladung elektronischer Geräte 1. Wählen Sie das richtige Ladekabel für Ihr elektronisches Gerät. 2. Sie können entweder den USB-A-Stecker an einem Ende des USB-Kabels (im Lieferumfang enthalten) an den USB1 / USB2-Ausgang des Produkts anschließen oder ein USB-C-zu-USB-C-Kabel (nicht im Lieferumfang enthalten) an den TYP- C-Port des Produkts anschließen.
  • Seite 16 Eigenschaften der intelligenten Batterieklemmen 1. Batteriespannungserkennung. Wenn die erkannte Spannung nicht normal ist, wird der Alarm ausgelöst (Die rote Anzeigeleuchte bleibt an und der Summer piept) und der Ausgang wird automatisch ausges- chaltet. 2. Verpolungsschutz. Wenn die Klemmen mit falscher Polarität angeschlossen werden, wird der Alarm ausgelöst (Die rote Anzeige- leuchte bleibt an und der Summer piept) und der Ausgang wird automatisch ausgeschaltet.
  • Seite 17 9. Laden Sie dieses Produkt NICHT mit zu hoher Spannung oder zu hohem Strom auf. 10. Merken Sie bitte, dass die Betriebstemperatur dieses Produktes -4℉ ~ 140 ℉ ist. 11. Bitte schlagen, schütteln oder werfen Sie dieses Produkt nicht mit Gewalt.
  • Seite 18: Garantie

    Garantie Unsere Firma gewährt Kunden eine Garantie von 12 Monaten ab Kaufdatum. Kontaktieren Sie uns Bei Fragen oder Kommentaren zu unseren Produkten senden Sie bitte eine E-Mail an support@suaoki.com. Wir werden uns so schnell wie möglich bei Ihnen melden. DE-15...
  • Seite 19: Présentation Du Produit

    Merci d’avoir choisi SUAOKI. Avec des soins normaux et un traitement approprié, le démarreur de voiture SUAOKI U7 fournira des années de service fiable. Veuillez lire attentivement toutes les instructions avant utilisation. Présentation du Produit Démarreur de Voiture ⑦ ①...
  • Seite 20 Pinces de la Batterie Intelligente Bouton de Démarrage Forcé Voyant Fiche EC5 Voyants d’alimentation Cliquez sur le bouton d’alimentation et le voyant de batterie serait allumé. Voyant d’alimentation 1 voyant 2 voyants 3 voyants 4 voyants Niveau de charge <25% <50% <75% <100%...
  • Seite 21 Remarque : 1. Ne chargez pas le produit immédiatement après l’avoir utilisé pour démarrer votre voiture. 2. Assurez-vous que les pinces de la batterie ne sont pas connectées au produit lorsque vous êtes sur le point de le charger. 3. Il est conseillé de ne pas charger le produit en continu pendant plus de 10 heures.
  • Seite 22 Cependant, si l’avertisseur sonne, les pinces sont connectées dans l’ordre inverse. Si l’avertisseur sonne alors que les pinces sont correctement connectées, la batterie du véhicule est sérieusement endommagée. Si les voyants rouge et vert continuent de clignoter alternativement (l’avertisseur peut sonner), vous devez utiliser la fonction de démarrage forcé...
  • Seite 23 Charge des appareils électroniques 1. Choisissez le bon câble de recharge pour votre appareil électronique. 2. Vous pouvez soit brancher le connecteur USB-A d’une des extrémités du câble USB (fourni) sur le port de sortie USB1/USB2 du produit, soit brancher un câble USB-C à USB-C (non fourni) au connecteur TYPE- Port C du produit.
  • Seite 24 Caractéristiques des pinces de la batterie intelligente 1. Détection de tension de batterie. Si la tension détectée est anormale, une alarme est déclenchée (le voyant rouge reste allumé et l’avertisseur sonne) et la sortie est automatiquement désactivée. 2. Protection contre l’inversion de polarité. Si les pinces sont connectées aux polarités incorrectes, une alarme est déclenchée (le voyant rouge reste allumé...
  • Seite 25: Spécifications Du Produit

    Port Type C : 5V/3A Entrée Port Type-C : 5V/3A Courant de démarrage 400A Courant de crête 800A Température de fonctionnement °F °F/-20℃~60℃ ~140 Le forfait comprend: 1 x Démarreur de Voiture U7 1 x Câble USB (USB-A à USB-C) FR-22...
  • Seite 26: Contactez-Nous

    Notre société offre à ses clients une garantie de 12 mois à compter de la date d’achat. Contactez-nous Pour toute question ou commentaire concernant nos produits, veuillez envoyer un courrier électronique à support@suaoki.com, et nous vous répondrons dans les meilleurs délais. FR-23...
  • Seite 27: Panoramica Del Prodotto

    Grazie per aver scelto SUAOKI. Con la cura normale ed il trattamento adeguato, l’avviatore di emergenza auto SUAOKI U7 fornirà anni di servizio affidabile. Leggere attentamente tutte le istruzioni prima dell'uso. Panoramica del prodotto Avviatore di Emergenza Auto ⑦ ①...
  • Seite 28 Morsetto intelligente di batteria Tasto di avvio forzato Luce dell’indicatore Spina EC5 Luci dell’indicatore di potenza Cliccare sul tasto di alimentazione e la luce dell’indicatore della batteria sarebbe accesa Luce dell'indicatore di potenza 1 luce 2 luci 3 luci 4 luci Livello di Potenza <25% <50%...
  • Seite 29 Nota: 1. Non ricaricare il prodotto immediatamente dopo aver usato il prodotto per avviare la vostra auto per emergenza. 2. Assicurarsi che i morsetti della batteria non siano collegati al prodotto quando si sta per caricarlo. 3. Si consiglia di non caricare continuamente il prodotto per più di dieci ore. 4.
  • Seite 30 Tuttavia, se il campanello suona, i morsetti sono collegati in ordine inverso. Se il campanello suona, anche se i morsetti sono correttamente collegati, la batteria del veicolo è gravemente danneggiata. Se le luce rossa e verde dell'indicatore continuano a lampeggiare alternativamente (il campanello può...
  • Seite 31 Ricarica dei Dispositivi elettronici 1. Scegliere il cavo di ricarica corretto per il dispositivo elettronico. 2. È possibile collegare il connettore USB-A ad una estremità del cavo USB (incluso) alla porta di uscita USB1/USB2 del prodotto o collegare un cavo USB-C al cavo USB-C (non incluso) alla porta TYPE-C del prodotto.
  • Seite 32 Caratteristiche del morsetto intelligente della batteria 1. Rilevazione della tensione della batteria. Se la tensione rilevata è anomala, l'allarme verrebbe attivato (la luce rossa dell’indicatore rimane accesa e il campanello suona) e l'uscita verrebbe spenta automaticamente. 2. Protezione delle polarità inverse. Se i morsetti sono collegati a polarità sbagliata, l'allarme verrebbe attivato (la luce rossa dell’indicatore rimane accesa e il campanello suona) e l'uscita verrebbe spenta automaticamente.
  • Seite 33: Specifiche Del Prodotto

    Porta USB 1:5V/2.4A Uscita Porta USB 2: 5V/2.4A Porta Type-C:5V/3A Ingresso Porta Type-C:5V/3A Corrente iniziale 400A Corrente di picco 800A Temperatura operativa °F °F/-20℃~60℃ ~140 La confezione comprende: 1 x Avviatore di emergenza U7 1 x cavo USB (USB-A a USB-C) IT-30...
  • Seite 34 1 x Carta di ringraziamento Garantie La nostra azienda fornisce ai clienti una garanzia di 12 mesi dalla data di acquisto. Contattarci Per qualsiasi richiesta o commento riguardante i nostri prodotti, inviare un'e-mail a support@suaoki.com, e vi risponderemo al più presto. IT-31...
  • Seite 35: Descripción Del Producto

    Gracias por seleccionar SUAOKI. Con el cuidado normal y el tratamiento adecuado, el SUAOKI U7 Ar proporcionará varios años de servicio confiable. Por favor, lea todas las instrucciones cuidadosamente antes de usarlo. Descripción del producto Arrancador de Ccoche ⑦ ①...
  • Seite 36 Abrazadera de batería inteligente Botón de inicio forzado Luz indicadora EC5 Enchufe Luces indicadoras de energía Presione el botón de encendido y la luz indicadora de batería estará encendida. Luz indicadora de energía 1 luz 2 luces 3 luces 4 luces Nivel de energía <25% <50%...
  • Seite 37 Nota: 1. No cargue el producto inmediatamente después de usarlo para reactivar su vehículo. 2. Asegúrese de que las abrazaderas de la batería no estén conectadas al producto cuando esté a punto de cargarlo. 3. Se recomienda que no cargar el producto continuamente por más de 10 horas.
  • Seite 38 Sin embargo, si el zumbador emite los pitidos, las abrazaderas se conectan en orden inverso. Si el zumbador emite los pitidos aunque las abrazaderas están conectadas correctamente, la batería del vehículo está severamente dañada. Si las luces indicadoras roja y verde siguen parpadeando alternativamente (el zumbador podrá...
  • Seite 39 Carga de dispositivos electrónicos 1. Seleccione el cable de carga correcto para su dispositivo electrónico. 2. Puede conectar el conector USB-A en un extremo del cable USB (incluido) al puerto de salida USB1 / USB2 del producto o conectar un USB-C del cable de USB-C (no incluido) al puerto de TIPO-C del producto.
  • Seite 40 Características de la abrazadera de batería inteligente 1. Detección de voltaje de batería. Si el voltaje detectado es anormal, la alarma se apagará (la luz indicadora roja permanecerá encendida y el zumbador emitirá los pitidos) y la salida se apagará automáticamente. 2.
  • Seite 41: Especificaciones Del Producto

    USB 1 Puerto:5V/2.4A USB 2 Puerto: 5V/2.4A Salida Tipo-C Puerto:5V/3A Entrada Tipo-C Puerto:5V/3A 400A Corriente de inicio Corriente pico 800A Temperatura de funcionamiento °F °F/-20℃~60℃ ~140 El paquete incluye: 1 x U7 Arrancador 1 x USB Cable (USB-A a USB-C) ES-38...
  • Seite 42 1 x Abrazadera de batería inteligente 1 x Manual de usuario 1 x Tarjeta de agradecimiento Contáctenos Nuestra empresa proporciona a los clientes una garantía de 12 meses a partir de la fecha de compra. ES-39...
  • Seite 43 SUAOKIをご購入いただき、誠にありがとうございます。一般的な手入 れ及び適切な操作でSUAOKI U7 ジャンプスターターは長年間信頼できる サービスを提供します。使用前、取扱説明書をしっかりとお読みくださ い。 製品概覧 ジャンプスターター ⑦ ① LED ライト ⑥ 電源ボタン 電源ボタンを短く押しすると、電源 ② EC5 ジャンピングポート ライトは点灯し、ジャンプスタータ ③ USB1 5V 出力ポート ーの電源レベルを表します。そして ④ USB2 5V 出力ポート 、USB出力もオンになります。 ⑤ TYPE-C 入力/出力ポート ⑦ 電源表示灯 JP-40...
  • Seite 44 スマートバッテリクランプ 強制起動 ボタン インジケータライト EC5 プラグ 電源表示灯 電源ボタンをクリックすると、バッテリ表示灯は点灯します。 電源表示灯 1 ライト 1 ライト 1 ライト 1 ライト 電源レベル <25% <50% <75% <100% 1. ジャンプスターター充電中、電源表示灯は点滅し、満充電になって いないことを示します。製品満充電後、4つの電源表示灯はオンのま まになります。 2. USBポートか点滅ライトを利用する場合、電源表示灯は残りのバッテ リレベルを表示します。一つの電源表示灯だけ点滅する場合、製品 は低バッテリレベルにあり、直ちに充電する必要があります。製品 利用時、全ての電源表示灯が消灯したら、低バッテリレベルによる 保護メカニズムが作動しはじめました。 3. その時、ご商品に充電する必要ございます。 操作ガイド 製品の充電 1. USBケーブルの片側の端末を5Vアダプタ(同梱品ではない)に接続しま す。それから、アダプタを壁のコンセントに挿入します。 2. USBケーブルの別側の端末を製品のTYPE-C入力ポートに接続します。 適切に接続した後、製品は自動的に充電します。...
  • Seite 45 注意: 1. 本製品を使って、自動車を起動した後、すぐに充電しないでくださ い。 2. 充電しようとするとき、バッテリクランプが製品に接続されていない ことをご確認ください。 3. 本製品を連続10時間以上充電しないことを推奨します。 4. 非正規化メーカーのUSBアダプタ経由でジャンプスターターを充電し ないでください。充電が制限されているか、フル充電できない原因 となることがあります。 12Vの自動車を起動する 注意: ジャンプスタート機能利用前、電源レベルが約50%であることを確保し てください。 高周波状態でジャンプスターターで自動車を起動しないでください。 ジャンプスターターでリトライする前、30秒以上の間隔を開けてくだ さい。 ステップ 1:バッテリクランプのEC5プラグを製品のジャンピングポート に挿入します。ジャンプスターターの内蔵バッテリが正常に稼働した 場合、赤と緑の表示灯は交互に点滅します。バッテリが正常に稼働し ていない場合、赤の表示灯は点灯し、ブザーはビープ音を出します。 ステップ 2:赤のバッテリクランプをバッテリ (+)の陽極端子に接続し、 黒のクランプをバッテリ (-)の陰極端子に接続します。赤と黒のクラン プが接続後、緑の表示灯は点灯します。それで、自動車を起動できる 状態となりました。 一方、ブザーからビープ音が発生すると、クランプがテレコに接続し ました。クランプが正しく接続したが、ブザーから以前としてビープ 音が発生したら、自動車のバッテリは重度なダメージを受けたことを 示します。 JP-42...
  • Seite 46 ▪赤と緑の表示灯が交互に点滅すると(ブザーもビープ音がするかもし れない)、強制起動機能を利用する必要があります。(「強制起動機能」 で詳細をご確認ください)。 ▪赤の表示灯が点灯し、ブザーがなった場合、強制起動機能を利用す る必要があります。(「強制起動機能」で詳細をご確認ください) ステップ 3-a: 自動車を起動します。 緑の表示灯が点灯すると、30秒以 内、自動車を起動する必要があります。 ステップ 3-b: 自動車の強制起動を実施します。 注意:強制起動機能利用時、短絡保護機能が無効になります。本モード 利用前、黒と赤のクランプが正しく接続されたことをご確認くださ い。 Q: どんな場合、強制起動機能を利用する? 自動車バッテリの電圧レベルが1ボルト以下、または自動車にバッテリ がついていない状態で、ジャンプスターターの機能を試したい場合、 強制起動機能を利用する必要があります。 Q:強制起動機能の利用方法は? 1. 強制起動ボタンを3秒長押しし、緑の表示灯は点灯します。 2. 一旦緑の表示灯が点灯したら、30秒以内自動車を起動する必要があ ります。 3. 自動車起動後、赤の表示灯は点灯します。自動車バッテリからジャン プスターターのコネクタを外してください。 ステップ 4:自動車起動後、直ちに自動車のバッテリからクランプを取 り外す必要があります。 ステップ 5:ジャンプスタートポートからバッテリクランプのEC5 プラ グを取り外します。 JP-43...
  • Seite 47 電子機器の充電 1. お使いの電子機器に正しい充電ケーブルを選びます。 2. USBケーブル(同梱物)のUSB-Aコネクタを製品のUSB1/USB2出力ポート に挿入するか、USB-Cケーブル (同梱物ではない)のUSB-Cコネクタに 接続してから、製品のTYPE-Cポートに接続できます。 3. ケーブルの片側端末のUSB-Cコネクタを携帯かタブレットなどの電子 機器に接続します。 4. 電源ボタンを押すと、本製品は接続した機器を充電します。 LED点滅ライトの利用 電源ボタンを長押しすると、点滅ライトがオンになります。それか ら、電源スイッチをクリックするごとに照明モードを変更できます。 全部で4 LEDライトモードは以下の順序で現れます: 点灯モード、SOS モード、点滅モード並びに赤の警告ライトモード。 . スマートバッテリクランプの特徴 1. バッテリ電圧検出。検出された電圧が異常な場合、アラームは発生し ます (赤の表示灯が点灯し、ブザーがなります)。また、出力は自動的 にオフになります。 JP-44...
  • Seite 48 2. 逆極性保護。クランプが間違った極に接続された場合、アラームは発 生します (赤の表示灯が点灯し、ブザーがなります)。 また、出力は 自動的にオフになります。 3. 欠陥バッテリ検出。自動車のバッテリが重度なダメージが発生した場 合、アラームは発生します (赤の表示灯が点灯し、ブザーがなりま す)。 また、出力は自動的にオフになります。 4. 逆充電保護。 5. 強制起動機能。 警告 1. クランプのEC5プラグがしっかりとジャンピングポートに挿入された ことをご確認ください。さもないと、クランプのプラスチック部分 が溶けるかもしれません。 2. 自動車が起動できない場合、バッテリクランプが正しく接続されたか ご確認ください。クランプに埃か汚れがついていないことを確保し てください。3回試したのに、自動車は依然として起動できない場 合、強制起動機能を利用しないでください。さもないと、製品のダ メージが発生しえます。自動車がその他の方面がダメージが発生し たかチェックする必要があります。 3 赤のクランプを黒のクランプに接続しないでください。 4 自分で本製品を分解しないでください。さもないと安全面の危険の 発生、または保証対象外とされる恐れがあります。 5 バッテリが膨らんだ場合、本製品を利用しないでください。 6 湿気の多いところに本製品を置かないでください。 7 子供の手が届かないところに本製品を保管してください。 8 本製品を火に投げないでください。 9 過電圧か過電流で本製品を充電しないでください。...
  • Seite 49 USB 1ポート: 5V/2.4A USB 2ポート: 5V/2.4A 出力 Type-Cポート: 5V/3A Type-Cポート: 5V/3A 入力 400A 起動電流 800A ピーク電流 稼働温度 °F °F/-20℃~60℃ ~140 コンテンツ: 1 x U7ジャンプスターター 1 x USBケーブル (USB-AからUSB-Cまで) 1 x スマートバッテリクランプ 1 x ユーザマニュアル 1 x 感謝状 品質保証 当社は購入日より12ヶ月の保証期間を提供いたします。 JP-46...
  • Seite 50 お問い合わせ 本製品に関する質問かコメントについて、support@suaoki.comまで メールしてください。早急な回答にお努めします。...
  • Seite 51 MANUFACTURER INFORMATION HERSTELLER INFORMATIONEN Shenzhen Dika Na'er E-Commerce Co., Manufacturer::Shenzhen Dika Na'er Ltd. E-Commerce Co., Ltd. ROOM1907-38-85,GUANGYING ROOM1907-38-85, GUANGYING-GEB- BUILDING,NO.38, Futian South Road, ÄUDE, NR. 38, Futian Süden Straße, Futian DIST, ShenzhenCN Futian Region, ShenzhenCN INFORMATIONS DE FABRICATION INFORMAZIONI DI FABBRICAZIONE Shenzhen Dika Na'er E-Commerce Co., Produttore:Shenzhen Dika Na'er Ltd.
  • Seite 52 Web: www.Suaoki.com E-mail: support@suaoki.com MADE IN CHINA...

Inhaltsverzeichnis