Herunterladen Inhalt Inhalt Diese Seite drucken
Klarstein Elizabeth Bedienungsanleitung

Klarstein Elizabeth Bedienungsanleitung

Elektrischer einbaubackofen
Vorschau ausblenden Andere Handbücher für Elizabeth:

Werbung

Verfügbare Sprachen
  • DE

Verfügbare Sprachen

  • DEUTSCH, seite 1
Elizabeth
Elektrischer Einbaubackofen
Built-in Electric Oven
Horno eléctrico empotrable
Four électrique encastrable
Forno a incasso
10034880 10034881

Werbung

Inhaltsverzeichnis
loading

Inhaltszusammenfassung für Klarstein Elizabeth

  • Seite 1 Elizabeth Elektrischer Einbaubackofen Built-in Electric Oven Horno eléctrico empotrable Four électrique encastrable Forno a incasso 10034880 10034881...
  • Seite 3: Inhaltsverzeichnis

    Sehr geehrter Kunde, wir gratulieren Ihnen zum Erwerb Ihres Gerätes. Lesen Sie die folgenden Hinweise sorgfältig durch und befolgen Sie diese, um möglichen Schäden vorzubeugen. Für Schäden, die durch Missachtung der Hinweise und unsachgemäßen Gebrauch entstehen, übernehmen wir keine Haftung. Scannen Sie den folgenden QR-Code, um Zugriff auf die aktuellste Bedienungsanleitung und weitere Informationen rund um das Produkt zu erhalten.
  • Seite 4: Produktdatenblatt

    PRODUKTDATENBLATT Angaben nach 66/2104 Symbol Wert Einheit Modellkennung 10034880, 10034881 Art des Backofens Elektrobackofen Masse des Gerätes Anzahl der Garräume Wärmequelle je Garraum (Strom Strom oder Gas) Volumen je Garraum Energieverbrauch (Strom) bei der Erhitzung einer Standardbeladung im Garraum EC Elektrischer eines Elektrobackofens während 0,80 kWh/Zyklus...
  • Seite 5: Sicherheitshinweise

    SICHERHEITSHINWEISE VORSICHT Verbrennungsgefahr! Dieses Gerät und die zugänglichen Geräteteile werden während der Verwendung sehr heiß. Lassen Sie Vorsicht walten und berühren Sie keinesfalls die Heizelemente. • Halten Sie Kinder unter 8 Jahren vom Gerät fern. • Kinder ab 8 Jahren, psychisch, sensorisch und körperlich eingeschränkte Menschen dürfen das Gerät nur benutzen, wenn sie vorher von einer für sie verantwortlichen Aufsichtsperson ausführlich mit den Funktionen und den Sicherheitsvorkehrungen vertraut gemacht wurden und die damit verbundenen Risiken verstehen.
  • Seite 6 • Bewegen Sie Backbleche und Backgitter niemals, während diese heiß sind, sondern lassen Sie diese zunächst abkühlen. • Schalten Sie das Gerät vor Reinigung und Wartung immer aus und ziehen Sie den Stecker aus er Steckdose. • Dieses Gerät ist für die Verwendung in Haushalten ausgelegt und kann in Standardküchen oder Wohneinheiten eingebaut werden.
  • Seite 7 VORSICHT Stromschlaggefahr! Versuchen Sie keinesfalls, ein beschädigtes Gerät selbst zu reparieren und hören Sie auf, dieses zu verwenden. Schalten Sie das Gerät aus, ziehen Sie den Netzstecker aus der Steckdose und kontaktieren Sie den Kundendienst. • Lassen Sie das Netzkabel nicht über scharfe Kanten verlaufen und knicken oder verbiegen Sie dieses nicht, damit es nicht beschädigt wird.
  • Seite 8: Installation

    INSTALLATION VORSICHT Verletzungsgefahr! Lassen Sie die Installation immer von geschultem Fachpersonal durchführen, um Stromschläge, Personenschäden und Schäden am Gerät zu vermeiden. Hinweise zum Einbau in die Küchenzeile Passen Sie den Ofen in die dafür vorgesehene Öffnung in der Küchenzeile ein. Er kann unter einer Arbeitsfl äche oder in einen stehenden Schrank eingefügt werden.
  • Seite 9 Hinweise zum elektrischen Anschluss • Das Gerät ist für die feste Installation mit einem dreipoligen Netzkabel ausgelegt und darf nur von einem zugelassenen Fachmann gemäß Anschlussplan angeschlossen werden. • Nur eine Elektrofachkraft, welche die einschlägigen Vorschriften berücksichtigt, darf das Netzkabel austauschen. •...
  • Seite 10: Einbau

    Einbau Bevor Sie das Gerät installieren, vergewissern Sie sich bitte, dass der Schrank die folgenden inneren Leermaße aufweist. Um die Luftzirkulation zu gewährleisten, muss der Ofen in Übereinstimmung mit den in der folgenden Abbildung dargestellten Abmessungen und Abständen installiert werden.
  • Seite 11: Geräteübersicht

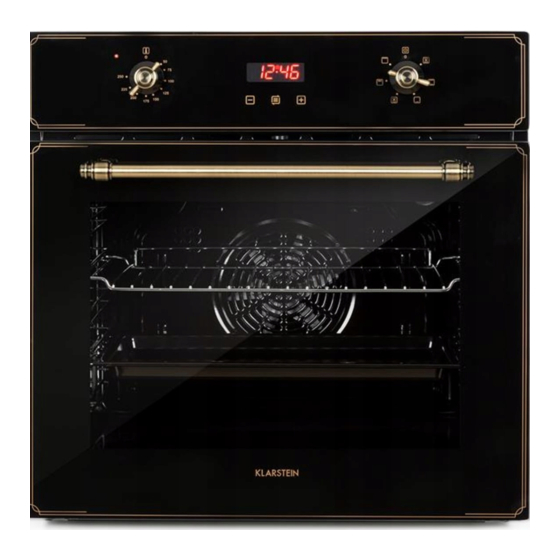
    GERÄTEÜBERSICHT Bedienfeld Ofenlampe Abnehmbare Einschübe Leistungsschild Ofentür Zubehör Gitterrost: Zum Backen und Grillen Backblech: Wird zum Garen großer Mengen von Lebensmitteln verwendet, wie feuchte Kuchen, Gebäck, Tiefkühlkost. Wird ebenfalls zum Auffangen von Fett, Krümeln und Sauce verwendet. Einschübe: Zur leichteren Reinigung des Ofens lassen Sich die beiden Einschübe entfernen.
  • Seite 12 Hinweis: Reinigen Sie das Zubehör vor der Benutzung mit etwas Wasser und Spülmittel und verwenden Sie nur Originalzubehör. Wichtiger Hinweis zu den Einschüben • Um zu gewährleisten, dass der Ofen sicher verwendet werden kann, ist das korrekte Platzieren der Gitter und Backbleche zwingend notwendig. •...
  • Seite 13: Bedienfeld Und Funktionsregler

    BEDIENFELD UND FUNKTIONSREGLER Betriebsleuchte Temperaturregler: Drehen Sie den Regler auf die gewünschte Temperatur Display Minus-Taste Timer/Uhr einstellen Plus-Taste Funktionsregler: Drehen Sie den Regler auf die gewünschte Funktion Funktionsregler Drehen Sie den Funktionsregler auf das gewünschte Symbol. Folgende Funktionen stehen zur Auswahl: Oberhitze/Unterhitze + Umluft Die Kombination von Ventilator und dem oberem und unterem Heizelement sorgt für eine gleichmäßigeren Wärmeverteilung und spart bis zu 30-40 %...
  • Seite 14: Garzeiten Und Einstellungen

    Unterhitze + Umluft Der hintere Lüfter und das untere Heizelement arbeiten gleichzeitig. Die Temperatur kann zwischen 50 °C und 250 °C eingestellt werden. Oberhitze + Grill Das obere Innenring-Heizelement und das obere Außenring-Heizelement arbeiten gleichzeitig. Die Temperatur kann zwischen 50 °C und 250 °C eingestellt werden.
  • Seite 15: Bedienung

    BEDIENUNG Uhrzeit einstellen • Wenn das Gerät zum ersten Mal eingeschaltet wird, zeigt die Uhr [12.00] an und das Uhr-Symbol blinkt. • Drücken Sie auf die Tasten [+] oder [-], um die aktuelle Uhrzeit einzustellen. • Warten Sie dann 5 Sekunden, bis die Zeit übernommen wird und das Uhr-Symbol zu blinken aufhört.
  • Seite 16 Endzeit einstellen Wenn eine Endzeit eingestellt ist, wird der Ofen zu dieser Uhrzeit automatisch abgeschaltet. • Drücken Sie die Taste [M], bis das folgende Symbol auf dem Display blinkt: • Drücken Sie auf die Tasten [+] oder [-], um die Endzeit einzustellen. Warten Sie dann kurz.
  • Seite 17: Reinigung Und Pflege

    REINIGUNG UND PFLEGE Entfernen der Ofentür Das Entfernen der Ofentür ermöglicht Ihnen einen leichteren Zugang zum gesamten Ofeninneren für die Reinigung und Wartung des Ofens. Öffnen Sie die Ofentür und ziehen Schließen Sie die Tür auf 15°, heben Sie Sie die Verriegelungen an den beiden sie an und entfernen Sie die Tür.
  • Seite 18: Reinigung

    Reinigung Alle Gerätebestandteile, die mit Lebensmitteln in Berührung kommen, müssen regelmäßig gereinigt werden. • Schalten Sie das Gerät vor jeder Reinigung und Wartung aus und trennen Sie dieses vom Stromnetz. • Drehen Sie alle Schalter in die Position „aus“. • Warten Sie, bis das Gerät soweit abgekühlt ist, dass es nur noch warm und nicht heiß...
  • Seite 19: Hinweise Zur Entsorgung

    HINWEISE ZUR ENTSORGUNG Befindet sich die linke Abbildung (durchgestrichene Mülltonne auf Rädern) auf dem Produkt, gilt die Europäische Richtlinie 2012/19/EU. Diese Produkte dürfen nicht mit dem normalen Hausmüll entsorgt werden. Informieren Sie sich über die örtlichen Regelungen zur getrennten Sammlung elektrischer und elektronischer Gerätschaften.
  • Seite 21 Dear Customer, Congratulations on purchasing this device. Please read the following instructions carefully and follow them to prevent possible damages. We assume no liability for damage caused by disregard of the instructions and improper use. Scan the QR code to get access to the latest user manual and more product information.
  • Seite 22: Product Data Sheet

    PRODUCT DATA SHEET Information according to 66/2104 Symbol Value unit Model identification 10034880, 10034881 Type of oven Domestic electric oven Mass of the appliance Number of cavities Heat source per cavity (electricity Electricity or gas) Volume per cavity Energy consumption (electricity) required to heat a standardised load in a cavity of an electric 0,80...
  • Seite 23: Safety Instructions

    SAFETY INSTRUCTIONS CAUTION Risk of burns. This device and the accessible parts of the device become very hot during use. Use extreme care and caution and never touch the heating elements. • Keep children under 8 years away from the device. •...
  • Seite 24 • Never move the baking trays or baking grates while they are hot, but rather allow them to cool down first. • Before cleaning and maintenance, always switch off the appliance and unplug the appliance from the mains socket. • This appliance is designed for household use and can be installed in standard kitchens or residential units.
  • Seite 25 CAUTION Risk of electric shock! Do not attempt to repair a damaged device yourself and stop using it. Turn off the power, unplug the appliance and contact your service representative. • To prevent damage, do not allow the power cord to run over sharp edges and do not bend or fold it.
  • Seite 26: Installation

    INSTALLATION CAUTION Risk of injury! Always have the installation carried out by trained specialist personnel to avoid electric shocks, personal injury and damage to the device. Note on Fitting the Oven into the Kitchen Unit Fit the oven into the space provided in the kitchen unit; it may be fi tted underneath a work top or into an upright cupboard.
  • Seite 27 Notes on electrical connection • The device is designed for fixed installation with a three-pole mains cable and may only be connected by an authorised specialist in accordance with the wiring diagram. • Only a qualified electrician who complies with the relevant regulations may replace the mains cable.
  • Seite 28 Installation Before installing the unit, please make sure that the cabinet has the following empty internal dimensions. To ensure air circulation, the oven must be installed in accordance with the dimensions and distances shown in the figure below.
  • Seite 29: Product Overview

    PRODUCT OVERVIEW Control Panel Oven lamp Removable slide-ins Rating label Oven door Accessories Grating: for baking and grilling Baking tray: Used to cook large quantities of food, such as moist cakes, pastries, frozen foods. Also used to collect fat, crumbs and sauce. Slide-ins: For easier cleaning of the oven, the two drawer units can be removed.
  • Seite 30 Note: Before use, clean the accessories with a little water and detergent and use only original accessories. Important note on the slide-in modules • To ensure that the oven can be used safely, it is essential that the grilles and baking trays are placed correctly.
  • Seite 31: Control Panel And Function Controls

    CONTROL PANEL AND FUNCTION CONTROLS Operating light Temperature controller: turn the controller to the desired temperature. Display Minus key Setting the timer/clock Plus key Function controller: turn the controller to the desired function. Function controls Turn the function control knob to the desired symbol. The following functions are available: Top heat/bottom heat + circulating air The combination of fan and upper and lower heating elements ensures...
  • Seite 32: Cooking Times And Settings

    Bottom heat + circulating air The rear fan and the lower heating element work simultaneously. The temperature can be set between 50 °c and 250 °c. The temperature can be set between 50 °c and 250 °c. The temperature can be set between 50 °c and 250 °c.
  • Seite 33: Operation

    OPERATION Setting the time • When the unit is turned on for the first time, the clock displays [12.00] and the clock icon blinks. • Press the [+] or [-] button to set the current time. • Then wait 5 seconds until the time is set and the clock icon stops blinking. Setting the Alarm The alarm can be applied to any function.
  • Seite 34 Setting the end time If an end time is set, the oven is automatically switched off at this time. • Press the [M] key until the following symbol flashes on the display: • Press the [+] or [-] button to set the end time. Wait briefly. If the symbol stops flashing, the set time has been accepted.
  • Seite 35: Cleaning And Care

    CLEANING AND CARE Removing the oven door Removing the oven door gives you easier access to the entire interior of the oven for cleaning and maintenance of the oven. Open the oven door and pull back the Close the door to 15°, lift it up and latches on the two door hangers.
  • Seite 36 Cleaning All parts of the appliance that come into contact with food must be cleaned regularly. • Switch off the appliance before each cleaning and maintenance and disconnect it from the mains supply. • Turn all switches to the „off“ position. •...
  • Seite 37: Hints On Disposal

    HINTS ON DISPOSAL According to the European waste regulation 2012/19/EU this symbol on the product or on its packaging indicates that this product may not be treated as household waste. Instead it should be taken to the appropriate collection point for the recycling of electrical and electronic equipment.
  • Seite 39: Datos Técnicos

    Estimado cliente: Le felicitamos por la adquisición de este producto. Lea atentamente el siguiente manual y siga cuidadosamente las instrucciones de uso con el fin de evitar posibles daños. La empresa no se responsabiliza de los daños ocasionados por un uso indebido del producto o por haber desatendido las indicaciones de seguridad.
  • Seite 40: Ficha Técnica Del Aparato

    FICHA TÉCNICA DEL APARATO Información de acuerdo con 66/2104 Símbolo Valor Unidad Denominación del modelo 10034880, 10034881 Tipo de horno Horno eléctrico Dimensiones del aparato Número de cámaras Fuente de calor de cada cámara Alimentación (electricidad o gas) Volumen de cada cámara Consumo eléctrico por cámara al calentar una carga estándar en CE Horno...
  • Seite 41: Indicaciones De Seguridad

    INDICACIONES DE SEGURIDAD ATENCIÓN ¡Riesgo de quemaduras! Tanto este aparato como sus partes accesibles alcanzan temperaturas muy elevadas durante el funcionamiento. Tenga cuidado de no tocar el elemento calefactor. • Mantenga a los niños menores de 8 años lejos del aparato. •...
  • Seite 42 • No mueva las bandejas o rejillas cuando están calientes. Deje que se enfrían primero. • Apague el aparato y desconecte el enchufe de la toma de corriente antes de limpiarlo o realizar trabajos de mantenimiento. • Este aparato está diseñado para uso doméstico y puede instalarse en cocinas estándares o viviendas.
  • Seite 43 ATENCIÓN ¡Riesgo de descarga eléctrica! No intente reparar el aparato usted mismo. Si el aparato está dañado, no lo utilice. Apague el aparato, desconecte el enchufe de la toma de corriente y póngase en contacto con el servicio técnico. • No doble el cable de alimentación ni deje quede colgando de cantos afi lados. Mantenga el cable lejos de las superfi cies calientes y llamas abiertas.
  • Seite 44: Installation

    INSTALLATION ATENCIÓN ¡Peligro de lesiones! Haga que la instalación sea realizada siempre por personal capacitado y cualifi cado para evitar descargas eléctricas, lesiones y daños en el aparato. Indicaciones para el montaje en la unidad de cocina Coloque el horno en la abertura prevista en la unidad de cocina. Se puede insertar debajo de una encimera o en un armario de pie.
  • Seite 45 Indicaciones sobre la conexión eléctrica • El aparato debe proveerse de un enchufe de tres clavijas para una instalación permanente y solo podrá ser instalado por un especialista autorizado siguiendo el diagrama de conexiones. • Solo personal electricista que respete las disposiciones correspondientes podrá sustituir el cable de alimentación.
  • Seite 46 Montaje Antes de instalar el aparato, asegúrese de que el armario presente las siguientes medidas internas en vacío. Para garantizar la circulación del aire, el horno debe coincidir con las dimensiones y distancias indicadas en la siguiente ilustración.
  • Seite 47: Descripción Del Aparato

    DESCRIPCIÓN DEL APARATO Panel de control Lámpara del horno Ranuras extraíbles Placa de características Puerta del horno Accesorios Rejilla: Para hornear y asar Bandeja de horneado: Se utiliza para cocinar grandes cantidades de alimentos, como tortas húmedas, repostería, productos ultracongelados. Se emplea también para recoger grasa, migas y salsas.
  • Seite 48 Advertencia: Limpie los accesorios antes de su uso con un poco de agua y lavavajillas y utilice solamente accesorios originales. Indicaciones importantes sobre las ranuras • Para garantizar que el horno se puede utilizar de un modo seguro, se requiere una colocación correcta de la rejilla y la bandeja de horneado.
  • Seite 49: Panel De Control Y Reguladores De Función

    PANEL DE CONTROL Y REGULADORES DE FUNCIÓN Luz de funcionamiento Regulador de temperatura: Gire el regulador hasta la temperatura deseada. Pantalla Botón menos Ajustar la temperatura/hora Botón más Regulador de función: Gire el regulador hasta la función deseada. Regulador de función Gire el regulador de función al símbolo deseado.
  • Seite 50: Tiempos De Cocción Y Ajustes

    Calor abajo + ventilación El ventilador trasero y la resistencia inferior funcionan simultáneamente. La temperatura puede ajustarse entre 50 °C y 250 °C. Calor arriba + grill La resistencia interior superior y la resistencia exterior superior funcionan simultáneamente. La temperatura puede ajustarse entre 50 °C y 250 °C. Grill La resistencia interior superior está...
  • Seite 51: Utilización

    UTILIZACIÓN Ajustar la hora • Si el aparato se enciende por primera vez, en la hora aparece [12.00] y el símbolo de la hora parpadea. • Utilice los botones (+) o (-) para regular la hora actual. • Espere 5 segundos hasta que se acepte el tiempo y el símbolo de la hora dejará de parpadear.
  • Seite 52 Configurar hora de finalización Al configurar una hora de finalización, el horno se apaga automáticamente a esta hora. • Pulse el botón [M] hasta que parpadee el siguiente símbolo en pantalla: • Utilice los botones (+) o (-) para regular la hora de finalización. Espere un momento.
  • Seite 53: Limpieza Y Cuidado

    LIMPIEZA Y CUIDADO Retirar la puerta del horno El desmontaje de la puerta del horno le permite acceder fácilmente a todo el interior del horno para realizar labores de mantenimiento y limpieza. Abra la puerta del horno y tire de los dos Cierre la puerta en un ángulo de 15°, cierres situados en ambas bisagras de la levántela y retírela.
  • Seite 54 Limpieza Limpie con regularidad todas las piezas del aparato que entren en contacto con alimentos. • Apague el aparato antes de limpiarlo y de realizar labores de mantenimiento y desconéctelo de la red eléctrica. • Coloque todos los interruptores en la posición OFF. •...
  • Seite 55: Retirada Del Aparato

    RETIRADA DEL APARATO Si el aparato lleva adherida la ilustración de la izquierda (el contenedor de basura tachado) entonces rige la normativa europea, directiva 2012/19/UE. Este producto no debe arrojarse a un contenedor de basura común. Infórmese sobre las leyes territoriales que regulan la recogida separada de aparatos eléctricos y electrónicos.
  • Seite 57: Fiche Technique

    Chère cliente, cher client, Toutes nos félicitations pour l’acquisition de ce nouvel appareil. Veuillez lire attentivement et respecter les instructions de ce mode d’emploi afin d’éviter d’éventuels dommages. Le fabricant ne saurait être tenu pour responsable des dommages dus au non- respect des consignes de sécurité...
  • Seite 58: Fiche De Données Produit

    FICHE DE DONNÉES PRODUIT Données selon 66/2104 Symbole Valeur Unité Identification du modèle 10034880, 10034881 Type de four Four électrique Dimensions de l'appareil „) Nombre d'espaces de cuisson Source de chaleur par espace de Électricité cuisson (électricité ou gaz) Capacité des espaces de cuisson Consommation d'énergie (électrique) lors du chauffage d'une charge standard dans...
  • Seite 59: Consignes De Sécurité

    CONSIGNES DE SÉCURITÉ ATTENTION Risque de brûlures ! Cet appareil et ses parties accessibles deviennent très chauds pendant l‘utilisation. Soyez prudent et ne touchez jamais les éléments chauffants. • Gardez les enfants de moins de 8 ans à l ‚écart de l‘appareil. •...
  • Seite 60 • Ne déplacez jamais les plaques ou les grilles de cuisson pendant qu‘elles sont chaudes, mais laissez-les d‘abord refroidir. • Éteignez toujours l‘appareil avant le nettoyage et la maintenance et débranchez la fiche de la prise. • Cet appareil est conçu pour un usage domestique et peut être encastré dans une cuisine standard ou dans un appartement.
  • Seite 61 ATTENTION Risque de choc électrique ! N‘essayez pas de réparer vous-même un appareil endommagé et cessez de l‘utiliser. Éteignez l‘appareil, débranchez le cordon d‘alimentation de la prise et contactez le service clientèle. • Ne laissez pas le cordon d‘alimentation passer sur des arêtes vives, ne le pliez pas ou ne le tordez pas pour éviter de l‘endommager.
  • Seite 62: Installation

    INSTALLATION ATTENTION Risque de blessure ! Faites toujours effectuer l‘installation par du personnel formé et qualifi é afi n d‘éviter les chocs électriques, les blessures et les dommages à l‘appareil. Conseils pour l‘encastrement dans une cuisine intégrée Montez le four dans l‘ouverture prévue dans la cuisine intégrée. Vous pouvez l‘insérer sous un plan de travail ou dans un caisson posé.
  • Seite 63 Consignes pour les branchements électriques • L‘appareil est conçu pour une installation permanente avec un câble secteur à trois broches et ne peut être banché que par un spécialiste agréé et conformément au schéma de connexion. • Seul un électricien qualifié qui suit les réglementations applicables peut remplacer le cordon d‘alimentation.
  • Seite 64 Encastrement Avant d‘installer l‘appareil, assurez-vous que le placard a les dimensions internes suivantes. Pour assurer la circulation de l‘air, le four doit être installé conformément aux dimensions et aux distances indiquées sur l‘illustration suivante.
  • Seite 65: Aperçu De L'appareil

    APERÇU DE L‘APPAREIL Panneau de commande Lampe du four Glissières amovibles Plaque signalétique Porte du four Accessoires Grille de cuisson : pour cuire et faire griller Plaque de cuisson : Utilisé pour cuire de grandes quantités d'aliments, tels que des gâteaux humides, des pâtisseries, des aliments surgelés.
  • Seite 66 Remarque : Nettoyez les accessoires avec un peu d‘eau et de détergent avant utilisation et utilisez uniquement des accessoires d‘origine. Remarque importante concernant les glissières • Afin de garantir l‘utilisation du four en toute sécurité, le placement correct des grilles et des plaques de cuisson est impératif. •...
  • Seite 67: Panneau Dde Commande Et Réglage Des Fonctions

    PANNEAU DDE COMMANDE ET RÉGLAGE DES FONCTIONS Voyant de fonctionnement Réglage de la température : Tournez le contrôleur à la température souhaitée Ecran Touche Moins Réglage de l'heure et de la minuterie Touche Plus Réglage e la fonction : tournez la commande sur la fonction souhaitée Réglage de la fonction Tournez la commande de fonction sur le symbole souhaité.
  • Seite 68: Temps De Cuisson Et Réglages

    Chaleur de sole + chaleur tournante Le ventilateur arrière et l'élément chauffant inférieur fonctionnent simultanément. La température peut être réglée entre 50 ° C et 250 ° C. Chaleur de voûte + gril Les anneaux intérieur et extérieur de l'élément chauffant supérieur fonctionnent simultanément.
  • Seite 69: Utilisation

    UTILISATION Réglage de l‘heure • Au premier démarrage de l‘appareil, l‘horloge affiche [12,00] et le symbole de l‘horloge clignote. • Appuyez sur la touche [+] ou [-] pour régler l‘heure actuelle. • Attendez ensuite 5 secondes jusqu‘à ce que l‘heure soit acceptée et que le symbole de l‘horloge cesse de clignoter.
  • Seite 70 Réglage de l‘heure de fin Le four s‘éteint automatiquement à l‘heure de fin réglée. • Appuyez sur la touche [M] jusqu‘à ce que le symbole suivant clignote à l‘écran : • Appuyez sur la touche [+] ou [-] pour régler l‘heure de fin. Attendez un instant. Lorsque le symbole cesse de clignoter, l‘heure réglée a été...
  • Seite 71: Nettoyage Et Entretien

    NETTOYAGE ET ENTRETIEN Pour démonter la porte du four Retirer la porte du four vous permet d‘accéder plus facilement à tout l‘intérieur pour le nettoyage et l‘entretien Ouvrez la porte du four et tirez les Fermez la porte à 15 °, soulevez-la et loquets des deux crochets de porte vers retirez la porte.
  • Seite 72 Nettoyage Toutes les parties de l‘appareil qui entrent en contact avec des aliments doivent être nettoyées régulièrement. • Avant le nettoyage et l‘entretien, éteignez l‘appareil et débranchez-le de l‘alimentation électrique. • Mettez tous les interrupteurs en position „off“. • Attendez que l‘appareil ait refroidi et qu‘il soit seulement chaud et non brûlant, car cela facilitera le nettoyage de l‘appareil.
  • Seite 73: Conseils Pour Le Recyclage

    CONSEILS POUR LE RECYCLAGE Le pictogramme ci-contre apposé sur le produit signifie que la directive européenne 2012/19/UE s‘applique (poubelle à roues barrée d’une croix). Ces produits ne peuvent être jetés dans les poubelles domestiques courantes. Renseignez- vous concernant les règles appliquées pour la collecte d’appareils électriques et électroniques.
  • Seite 75 Gentile cliente, La ringraziamo per aver acquistato il dispositivo. La preghiamo di leggere attentamente le seguenti istruzioni per l’uso e di seguirle per evitare possibili danni tecnici. Non ci assumiamo alcuna responsabilità per danni scaturiti da una mancata osservazione delle avvertenze di sicurezza e da un uso improprio del dispositivo.
  • Seite 76: Scheda Dati Del Prodotto

    SCHEDA DATI DEL PRODOTTO Indicazioni secondo 66/2104 Simbolo Valore Unità Contrassegno dispositivo 10034880, 10034881 Tipo di forno Forno elettrico Dimensioni del dispositivo „) Numero dei vani di cottura Fonte di calore di ogni vano di Elettricità cottura (elettricità o gas) Volume di ogni vano di cottura Consumo energetico (elettricità) durante il riscaldamento di carichi...
  • Seite 77: Avvertenze Di Sicurezza

    AVVERTENZE DI SICUREZZA ATTENZIONE Pericolo di ustione! Questo dispositivo e i componenti accessibili diventano estremamente caldi durante l’utilizzo. Prestare attenzione e non toccare assolutamente gli elementi riscaldanti. • Tenere i bambini sotto a 8 anni lontano dal dispositivo. • Questo dispositivo può essere utilizzato da bambini a partire da 8 anni e da persone con limitate capacità...
  • Seite 78 • Non spostare teglie e griglie mentre sono bollenti, ma aspettare che si raffreddino. • Spegnere sempre il dispositivo e staccare la spina prima di pulizia e manutenzione. • Questo dispositivo è progettato per utilizzo casalingo e può essere incassato in cucine standard e unità...
  • Seite 79 ATTENZIONE Pericolo di folgorazione! Non cercare assolutamente di riparare autonomamente un dispositivo danneggiato e smettere di utilizzarlo. Spegnere il dispositivo, staccare la spina e contattare il servizio di assistenza ai clienti. • Non far passare il cavo di alimentazione lungo bordi taglienti e non piegarlo, in modo da non danneggiarlo.
  • Seite 80: Installazione

    INSTALLAZIONE ATTENZIONE Pericolo di lesione! Lasciare eseguire l’installazione sempre da personale tecnico preparato, in modo da evitare folgorazioni, danni a persone e danni al dispositivo. Avvertenze per l’incasso nella cucina Mettere il forno nell’apposito vano della vostra cucina. Può essere posizionato sotto un piano di lavoro o in un mobile verticale.
  • Seite 81 Avvertenze sul collegamento elettrico • Il dispositivo è progettato per installazione fissa con cavo a tre poli e può essere collegato solo da un tecnico autorizzato, nel rispetto del piano di allacciamento. • Il cavo di alimentazione può essere sostituito solo da un elettricista, nel rispetto delle normative vigenti.
  • Seite 82 Incasso Prima di installare il dispositivo, si prega di assicurarsi che il mobile presenti le seguenti misure di spazio libero. Per garantire la circolazione dell’aria, il forno deve essere installato nel rispetto delle misure e delle distanze indicate nell’immagine seguente.
  • Seite 83: Descrizione Del Dispositivo

    DESCRIZIONE DEL DISPOSITIVO Pannello di controllo Luce del forno Ripiani rimovibili Targhetta delle prestazioniprestazioni Sportello del forno Accessori Griglia: per cuocere e grigliare. Teglia: per cucinare grandi quantità di alimenti, come torte umide, biscotti, prodotti surgelati. Serve anche per raccogliere grasso, briciole e salse. Ripiani: rimovibili per facilitare la pulizia del forno.
  • Seite 84 Nota: pulire gli accessori con un po’ d’acqua e detersivo per piatti prima dell’utilizzo e usare solo accessori originali. Avvertenze importanti sui ripiani • Per garantire l’utilizzo sicuro del forno, il corretto posizionamento di griglia e teglia è assolutamente necessario. •...
  • Seite 85: Pannello Di Controllo E Manopole Di Regolazione

    PANNELLO DI CONTROLLO E MANOPOLE DI REGOLAZIONE Spie di funzionamento Temperatura: girare la manopola sulla temperatura desiderata Display Meno Impostare timer/orologio Più Funzioni: girare la manopola sulla funzione desiderata Manopola delle funzioni Girare la manopola sul simbolo desiderato. Sono disponibili le seguenti funzioni: Calore dall’alto/dal basso + ventola La combinazione di ventola ed elementi riscaldanti superiore e inferiore garantisce una distribuzione del calore omogenea e risparmia fino al 30-...
  • Seite 86: Tempi Di Cottura E Impostazioni

    Calore dal basso + ventola La ventola posteriore e l’elemento riscaldante in basso lavorano contemporaneamente. La temperatura può essere regolata tra 50 e 250 °C. Calore dall’alto + grill L’elemento riscaldante ad anello interno in alto e l’elemento riscaldante ad anello esterno in alto funzionano contemporaneamente.
  • Seite 87: Utilizzo

    UTILIZZO Impostare l’ora • Quando si accende il dispositivo per la prima volta, l’orologio mostra (12:00) e il simbolo dell’ora lampeggia. • Premere + o – per impostare l’ora attuale. • Attendere 5 secondi, fino a quando l’ora viene salvata e il simbolo dell’orologio smette di lampeggiare.
  • Seite 88 Impostare il tempo di spegnimento Se è impostato un tempo di spegnimento, il forno viene spento all’ora impostata. • Premere M fino a quando sul display lampeggia • Premere + o – per impostare il tempo di spegnimento. Attendere brevemente. Quando non lampeggia più, il tempo di spegnimento è...
  • Seite 89: Pulizia E Manutenzione

    PULIZIA E MANUTENZIONE Rimuovere lo sportello del forno La rimozione dello sportello permette un accesso facilitato all’interno del forno per pulizia e manutenzione. Aprire lo sportello e tirare indietro i Chiudere lo sportello a 15°, sollevarlo blocchi sui due ganci. e toglierlo.
  • Seite 90 Pulizia Tutti i componenti che entrano in contatto con alimenti devono essere puliti regolarmente. • Spegnere il dispositivo e staccare la spina prima di ogni opera di pulizia e manutenzione. • Mettere tutti gli interruttori in posizione off. • Attendere che il dispositivo si sia raffreddato, in modo che sia solo caldo e non bollente, dato che così...
  • Seite 91: Smaltimento

    SMALTIMENTO Se sul prodotto è presente la figura a sinistra (il cassonetto mobile sbarrato), si applica la direttiva europea 2012/19/UE. Questi prodotti non possono essere smaltiti con i rifiuti normali. Informarsi sulle disposizioni vigenti sulla raccolta separata di dispositivi elettrici ed elettronici. Non smaltire i vecchi dispositivi con i rifiuti domestici.

Inhaltsverzeichnis