SOUND2GO Sixties Bedienungsanleitung
Verfügbare Sprachen
Verfügbare Sprachen
Inhaltsverzeichnis
Inhaltsverzeichnis

Verwandte Anleitungen für SOUND2GO Sixties


Inhaltszusammenfassung für SOUND2GO Sixties
- Seite 3 Bedienungsanleitung Bedienungsanleitung Sixties Bedienungsanleitung S. 2 User manual S. 20...
- Seite 4 Dieses Produkt ist konform mit allen relevanten Richtlinien der Europäischen Union. Die vollständige CE-Erklärung mit allen angewendeten Teststandards erhalten Sie als Download auf unserer Homepage www.s2g.info. Bedienungsanleitung Bitte lesen sie vor der Verwendung des Gerätes diese Bedienungs- anleitung aufmerksam durch und befolgen Sie die darin enthaltenen Anweisungen.
- Seite 5 Technische Daten • Ausgangsleistung: 4 W (RMS) • Signalrauschabstand: ≥70 dBA • Klirrfaktor: ≤1% • Frequenzgang: 100 Hz – 18 kHz • Übertragungsarten: Bluetooth / AUX / Micro-SD-Karte / FM- Radio • Lautstärke-Regelung: Drehknopf 360 Grad • Lautsprecher: 52 mm ø, 4 Ω, 4 W • Akku: Lithium-Ionen-Akku 1800 mAh, 3,7V • Anschlusswert: Gleichstrom 5V, 600 mA • Maximale Empfindlichkeit AUX-In 1000 mV • Umgebungstemperatur: 0° ~ +50° C • Größe: 90 * 92 * 68 mm • Gewicht: 374 g Lieferumfang Lautsprecher Fernbedienung...
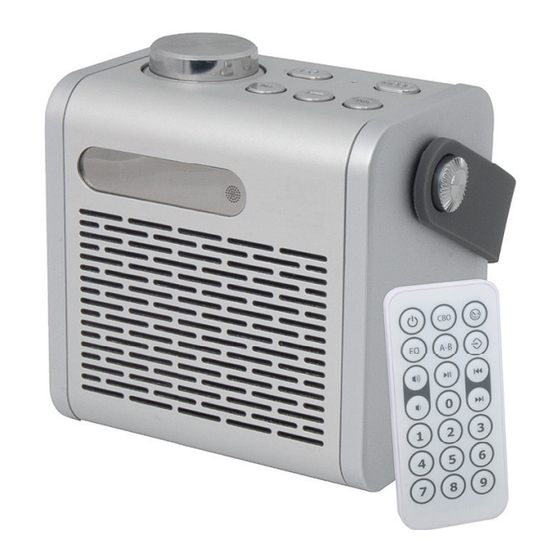
- Seite 6 Übersicht Lautsprecher LED-Display Empfangsdiode für die Fernbedienung Lautstärke-Regelung Equalizer Wiedergabe / Pause Mikrofon Rückwärts Vorwärts Betriebsart („Mode“) An / Aus Micro-SD-Kartenschacht AUX-In LED für Ladestand Micro-USB-Ladeanschluss...
- Seite 8 Übersicht Fernbedienung Abspielmodus Standby A – B Auswahlpositionen Equalizer Wiedergabe / Pause Lauter Leiser Auswahl Titelnummer Sendersuche Auswahl Betriebs - Modus Vorheriger Titel Nächster Titel...
- Seite 10 Bedienung Zum Aufladen des Lautsprechers verbinden Sie diesen an Buchse 14 mittels des USB-Ladekabels mit einem USB-Ladegerät (Gleich- strom 5 V) oder einem anderen Gerät mit einem USB-Anschluss (z. B. Laptop oder PC). Das erste Aufladen dauert ca. 4 bis 5 Stunden. Schalten Sie den Lautsprecher mit dem Schiebeschalter 10 ein („On“). Der Lautsprecher startet in dem zuletzt benutzten Wieder- gabe-Modus. Wenn kein entsprechendes Gerät gefunden werden kann, drücken Sie bitte Knopf 09 („Mode“) um den gewünschten Abspielmodus auszuwählen. Drehen Sie Knopf 03 zur Lautstärkeregelung. Schalten Sie das Gerät mit dem Schalter 10 aus („Off“). Aufladen Wenn die LED 13 leuchtet, laden Sie bitte das Gerät auf. Die Lade- zeit beträgt ca. 4 bis 6 Stunden. Während des Ladevorgangs leuchtet das Batterie-Icon im LED-Dis- play permanent. Die LED 13 auf der Rückseite des Gerätes leuchtet währenddessen rot. Bei Vollladung ändert sie ihre Farbe in Grün.
-
Seite 11: Manuelle Bedienung
Bluetooth-Modus / Musik abspielen / Freisprechen Manuelle Bedienung Drücken Sie Knopf 09 („Mode“) bis im Display „blue“ erscheint. Aktivieren Sie das Bluetooth-Gerät (z. B. Smartphone / Laptop). Su- chen Sie nach dem Bluetooth-Gerät „S2G Sixties“. Wenn Sie einen Piep-Ton hören, sind die beiden Bluetooth-Geräte gekoppelt. Sie können jetzt über Bluetooth die Musik von Ihrem Bluetooth-Gerät hören. Wechseln Sie mit Knopf 07 und 08 (Rückwärts / Vorwärts) zwischen den Titeln. Regeln Sie die Lautstärke mit dem Regler 03. Während die Musik über Bluetooth abgespielt wird, steht die Frei- sprechfunktion zur Verfügung. Wenn ein Anruf eingeht, während die Musik abgespielt wird, wird diese gestoppt. Drücken Sie den „Wie- dergabe/Pause“-Knopf (05), um den Anruf anzunehmen. Mit dem gleichen Knopf können Sie den Anruf beenden und die Musikwieder-... - Seite 12 Via Fernbedienung Wählen Sie den „blue“-Modus mit Knopf 10 (Auswahl Eingang) auf der Fernbedienung. Danach können Sie mit der Wiedergabe starten, sofern das Abspielgerät koppelt. Es ertönt ein kurzer Signalton. Schalten Sie mit Knopf 05 zwischen Wiedergabe und Pause um. Wechseln Sie mittels der Knöpfe 11 und 12 (Rückwärts / Vorwärts) zwischen den Titeln. Regeln Sie die gewünschte Lautstärke mit den Knöpfen 06 und 07 (Lauter / Leiser). FM Radio Manuelle Bedienung Drücken Sie Knopf 09 („Mode“) um in den Radio-Modus zu wech- seln. Das Display zeigt dann die aktuelle Sender-Frequenz an. Wenn Sie das FM-Radio zum ersten Mal einschalten, drücken Sie bitte Knopf 05 drei Sekunden lang um die automatische Sendersu- che zu starten. Dieser Vorgang kann einige Minuten in Anspruch nehmen.
-
Seite 13: Via Fernbedienung
erforderlich. Maximal 32 Stationen können abgespeichert werden. Wechseln Sie mit Knopf 07 und 08 (Rückwärts / Vorwärts) zwischen den Sendern. Regeln Sie die Lautstärke mit dem Regler 03. Via Fernbedienung Wählen Sie auf der Fernbedienung mit Knopf 10 (Auswahl Eingang) den Radio-Modus. Das Display zeigt die aktuelle Senderfrequenz Starten Sie mit Knopf 09 (Sendersuche) die automatische Sender- suche. Suchen Sie mittels der Knöpfe 11 und 12 (Rückwärts / Vorwärts) ei- nen bestimmten Sender. Drücken Sie auf der Fernbedienung Knopf 04 (Equalizer) um ihn abzuspeichern. Frequenzauswahl: Wählen Sie mit den Ziffern „0“ bis „9“ direkt eine Senderfrequenz aus. Beispiel: Mit der Eingabe „1071“ wählen Sie direkt die Frequenz 107,1 MHz aus. Warten Sie einige Sekunden, bis das Gerät die Frequenz automatisch übernimmt. Stationsauswahl: Wählen Sie mit den Zifferntasten direkt eine ge- speicherte Station aus. Beispiel: Mit der Eingabe „12“ (zwei Zeichen) - Seite 14 wählen Sie die auf Position 12 gespeicherte Senderfrequenz aus. Wechseln Sie mittels der Knöpfe 11 und 12 (Rückwärts / Vorwärts) zwischen den Sendern Regeln Sie die gewünschte Lautstärke mit den Knöpfen 06 und 07 (Lauter / Leiser). Micro-SD-Karten abspielen Manuelle Bedienung Legen Sie eine Micro-SD-Karte mit MP3-Dateien in den mit TF ge- kennzeichneten Schacht 11 an der Rückseite des Lautsprechers ein. Normalerweise wird das Gerät diese Karte ab der Stelle abspielen, an welcher es beim letzten Mal aufgehört hat. Wählen Sie mit Knopf 09 („Mode“) den SD-Karten-Modus. Das Display wird „SD“ anzeigen. Wechseln Sie mit Knopf 07 und 08 (Rückwärts / Vorwärts) zwischen den Titeln. Regeln Sie die Lautstärke mit dem Regler 03. Wählen Sie mittels des Knopfes 04 (Equalizer) eine der sechs voreingestellten Einstellungen aus: JAZZ / CLASSIC / POP / ROCK...
- Seite 15 / NORMAL / BASS. Der Equalizer arbeitet ausschließlich nur beim Abspielen einer SD Karte. Via Fernbedienung Legen Sie eine Micro SD-Karte mit MP3-Dateien in den mit TF ge- kennzeichneten Schacht 11 an der Rückseite des Lautsprechers ein. Normalerweise wird das Gerät diese Karte ab der Stelle abspielen, an welcher es beim letzten Mal aufgehört hat. Wählen Sie auf der Fernbedienung mit Knopf 10 (Auswahl Eingang) den SD-Karten-Modus. Das Display zeigt „SD“ an. Wechseln Sie mittels der Knöpfe 11 und 12 (Rückwärts / Vorwärts) zwischen den Titeln. Titelauswahl: Wählen Sie mit den Ziffern „0“ bis „9“ einen Titel aus.
- Seite 16 voreingestellten Einstellungen aus: JAZZ / CLASSIC / POP / ROCK / NORMAL / BASS. Der Equalizer arbeitet ausschließlich nur beim Abspielen einer SD Karte. Schalten Sie mit Knopf 05 zwischen auf Wiedergabe und Pause um. Wählen der Abspielreihenfolge (nur im SD-Karten-Modus) Wählen Sie auf der Fernbedienung mittels Knopf 01 (CBO) zwischen „ALL“ (alle Titel nacheinander abspielen) / „RAND“ (zufällige Reihen- folge) / „SING“ (einen Titel wiederholen). Die Standardeinstellung ist „ALL“. Beispiel: Das Gerät spielt den 98. Titel ab. Wenn Sie jetzt „SING“ auswählen, wird dieser eine Titel wiederholt bis Sie Knopf 01 für eine andere Einstellung wieder drücken. Knopf 03 (A – B Auswahlpositionen) erlaubt Ihnen, eine bestimmte Passage wiederholen zu lassen. Drücken Sie den Knopf zu Beginn der gewünschten Passage. Das Display zeigt an „P---A“, also Anfang der Passage ausgewählt. Die Musik spielt weiter. Wenn das Ende der gewünschten Passage erreicht ist, drücken Sie Knopf 03 nochmals. Das Display zeigt an „P---B“, also ist das Ende der Passage ausgewählt. Das Gerät schaltet jetzt automatisch zum ausgewählten Anfang der Passage zurück und wiederholt die Passage vom Anfang bis zum...
- Seite 17 ausgewählten Ende. Diesen Modus können Sie nun durch nochmaliges Drücken von Knopf 03 beenden. Das Display zeigt dann „P---E“. Aux-Modus Manuelle Bedienung Verbinden Sie mit dem 3,5 mm – Klinkenkabel die Buchse 12 (AUX- in) des Lautsprechers mit dem passenden Ausgang eines Medienge- rätes (z. B. Smartphone, MP3-Spieler oder Laptop). Wählen Sie mit dem Knopf 09 („MODE“) den AUX-In-Modus. Das Display zeigt „AUX“ an. Regeln Sie die Lautstärke mit dem Regler 03. Drücken Sie Knopf 05 um den Lautsprecher stumm zu schalten. Via Fernbienung Verbinden Sie mit dem 3,5 mm – Klinkenkabel die Buchse 12 (AUX- in) des Lautsprechers mit dem passenden Ausgang eines Medienge- rätes (z.
- Seite 18 den AUX-In-Modus. Das Display zeigt „AUX“ an. Regeln Sie die gewünschte Lautstärke mit den Knöpfen 06 und 07 (Lauter / Leiser). Drücken Sie Knopf 05 um den Lautsprecher stumm zu schalten. Achtung Das Gerät erwärmt sich beim Aufladen, das ist normal. Bitte gehen Sie sorgsam mit dem Gerät um und halten Sie es sau- ber. Versuchen Sie, das Gerät und das Zubehör trocken aufzube- wahren, vermeiden Sie, dass es Feuchtigkeit oder Nässe ausgesetzt wird. Bitte reinigen Sie das Gerät mit einem antistatischen Tuch. Benutzen Sie keine chemischen Substanzen (Alkohol, Tenside), Reinigungs- mittel oder Scheuermittel zur Reinigung des Gerätes.
- Seite 19 betreiben Sie es nicht in heißer oder feuchter Umgebung. Bitte verwenden Sie nur von uns geliefertes Zubehör. Öffnen oder Veränderungen des Gerätes führen zum Erlöschen der Garantie. Bei nicht durch menschliches Handeln verursachten Schä- den oder Ausfall des Gerätes kontaktieren Sie bitte den autorisierten Handel. Bitte lesen sie vor der Verwendung des Gerätes diese Bedienungs- anleitung aufmerksam durch und befolgen Sie die darin enthaltenen Anweisungen.
- Seite 20 Ein Austausch oder eine Reparatur verlängert nicht den Garantie- zeitraum, ausschlaggebend ist immer das Kaufdatum. Ausgetausch- te oder ersetzte Teile gehen in unser Eigentum über. Die Garantie deckt folgende Schäden nicht ab: - Unzulässige Veränderung, Reparatur oder Demontage des Geräts. - Unsachgemäße Benutzung, Fahrlässigkeit oder Unfall. Mobiset GmbH erklärt, dass das Produkt „Sixties“ den grundlegen- den Anforderungen und weiteren relevanten Bestimmungen der EU-Richtlinien entspricht. Die Konformitätserklärung finden Sie auf www.mobiset.de.