Werbung
Inhaltsverzeichnis
Einbauanleitung
D
Fitting instructions
GB
Instructions in
another language
www.oxomi.com/p/2025060
Fig. 1
MONTAGEVIDEOS
INSTALLATION VIDEOS
PLANUNGSUNTERLAGEN
PLANNING DOCUMENTS
ALLGEMEINE UNTERLAGEN
GENERAL DOCUMENTS
Serie F/M
(Gehäuse)
Series F/M
(housing)
Austria-Patent-Nr. 410125
Europa-Patent-Nr. 1028295
ÖNORM H6036
IP X5
Werbung
Inhaltsverzeichnis

Verwandte Anleitungen für Limodor F Serie

Inhaltszusammenfassung für Limodor F Serie
- Seite 1 Einbauanleitung Fitting instructions Serie F/M Instructions in (Gehäuse) another language www.oxomi.com/p/2025060 Series F/M (housing) Austria-Patent-Nr. 410125 Europa-Patent-Nr. 1028295 Fig. 1 MONTAGEVIDEOS INSTALLATION VIDEOS PLANUNGSUNTERLAGEN PLANNING DOCUMENTS IP X5 ALLGEMEINE UNTERLAGEN GENERAL DOCUMENTS ÖNORM H6036...
- Seite 2 Anleitung. Anwendungsbereich: • Für den Einbau in ein Gehäuse der Serie „LIMODOR F/M“ sind nur die Gebläseeinsätze der Serie „LIMODOR F/M“ und der Serie „LIMODOR F/M-EC“ geeignet. • Die Geräte sind für die bedarfsabhängige Entlüftung von Wohnungen oder einzelner Wohnbereiche nach H6036 vorgesehen.
- Seite 3 The same applies for non-observance of the instructions in the manual. Scope of application: • For installation in a housing of the series „LIMODOR F/M“ are only the blower inserts of the series „LIMODOR F/M“ and the series „LIMODOR F/M-EC“ suitable. •...
-
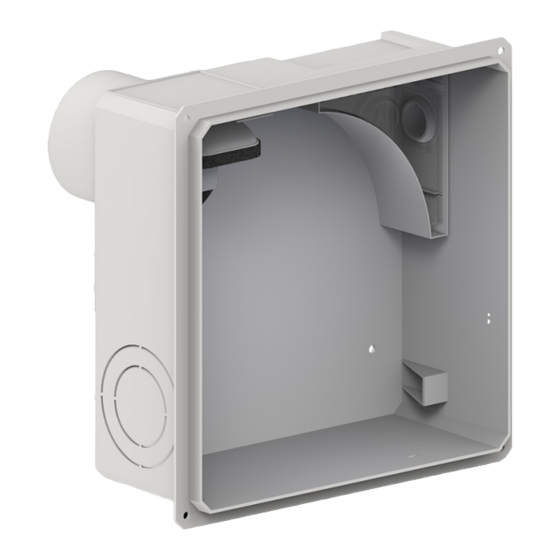
Seite 4: Aufbau Gehäuse
Fan housing LF/M-R Fig. 2 1) Ausblasstutzen 1) Exhaust vent 2) Ventilrahmen 2) Valve yoke 3) Zwischenstück 3) Spacer 4) Netzklemme 4) Power supply terminal 5) Kabeleinführungen 5) Cable entries hinten / seitlich rear/side Maßskizze Dimensional sketch LIMODOR F/M-UP Fig. 3... -
Seite 5: Installation Instructions
LIMODOR F/M-R Fig. 4 Einbauhinweise Installation instructions Mögliche Einbaulagen Fig. 5 Fig. 6 Possible installation positions Luftrückschlagventil Air non-return valve Fig. 7 Fig. 8 Fig. 9 Einstellen der Luftrückschlagklappe für den Ge- For the device installation, set the air non-return räteeinbau mit der Ausblasöffnung nach unten. -
Seite 6: Ausblasstutzen Umbau
Ausblasstutzen Umbau Altering the exhaust vent Das Gehäuse LF/M-UP (3) mit dem Ausblasstutzen (1) nach oben kann auf ein Gehäuse LF/M-R (4) mit dem Ausblasstutzen (1) rückwärtig umgebaut werden und umgekehrt. Jedoch ist ein anderes Zwischenstück (2) nötig! The housing LF/M-UP (3) with the exhaust vent (1) may be converted backward and upside down onto a housing LF/M-R (4) with an exhaust vent (1). - Seite 7 Elektroanschluss Gebläseeinsatz Electrical connection fan unit LIMODOR F/M (Fig. 16-23) LIMODOR F/M (Fig. 16-23) im Anschluss befindet sich der Elektro- on the next page you will find the anschluss für den Gebläseeinsatz electrical connection fan unit LIMODOR F/M-EC (Fig. 24-30) LIMODOR F/M-EC (Fig.
- Seite 8 IMPORTANT! With partial load appliances (TL, Fig.20, 22) lighting must always be switched via a 2-pole switch. VL...Full load TL...Partial load Elektroanschluss Gebläseeinsatz Electrical connection fan unit LIMODOR F/M-EC LIMODOR F/M-EC N 1 2 L 3 4 5 6 N 1 2 L 3 4 5 6 Fig. 24...
- Seite 9 N 1 2 L 3 4 5 6 N 1 2 L 3 4 5 6 Fig. 26 Fig. 27 N 1 2 L 3 4 5 6 N 1 2 L 3 4 5 6 Fig. 28 Fig. 29 N 1 2 L 3 4 5 6 Fig.
-
Seite 10: Wall Mounting
Wandmontage Wall mounting Fig. 31 Fig. 32 ET = 0 cm ET = 8 cm Fig. 33 Abstand vom Putz zu Gehäusekante (ET) Distance from plaster to edge (ET) 0 – 8 cm 0 - 8 cm Attention! Not beyond the masonry! Achtung! Nicht über das Mauerwerk hinaus! -
Seite 11: Leichtwandmontage
Leichtwandmontage Easy wall mounting Fig. 34 Fig. 35 # 25001 # 25001 (Fig. 35) Fig. 36 a = Plattenstärke + 5mm (Fig. 35) a = Panel thickness +5mm # 25001 Gefahr von Fremdluftansaugung und/oder Geruchsübertragung. Fig. 37 Schachtöffnungen dauerhaft dicht verschließen! 1... -
Seite 12: Zubehör / Ersatzteile
Zubehör / Ersatzteile Accessories / Spare parts Beschreibung Art.nr. Type Description Art.nr. Aufputzset LF/M-AP zum Umbau des Standardgehäuse (Ausblasstutzen Abgang oben) in Gehäuse-R (Ausblasstutzen Abgang rückwärts) inkl. Aufputzrahmen 23002 Surface mounting set LF/M-AP for the conversion of the standard housing (exhaust vent at the Aufputzset LF/M-AP top) in housing R (exhaust vent backwards) including the surface Surface mounting... - Seite 13 Beschreibung Art.nr. Type Description Art.nr. Ausgleichsrahmen LV1 zur Abdeckung des Putzrandes 25009 Adjustment frame LV1 to cover the plaster base Ausgleichsrahmen LV1 Adjustment frame Montagevorrichtung MB für Schachtmontage 27001 Installation fixture MB for shaft mounting Montagevorrichtung MB Installation fixture MB Montageset LF/M-MS für Leichtwand- und Deckenmontage 25001...
-
Seite 14: Mögliche Störungsursachen
Mögliche Störungsursachen Störungen können vermieden werden, wenn man die Lüftungsanlage sorgfältig plant und die Montageanleitungen genauestens einhält. Sollte es jedoch zu Störungen kommen, können sie in der folgenden Tabelle nach möglichen Ursachen suchen und Abhilfe finden. Mögliche Störungen Störungsursache Abhilfe Einzellüfter erreicht zu geringe Steigstrang ist zu klein dimen- Neuberechnung des Steigstranges und Vergrö-... - Seite 15 Possible causes of malfunction Malfunctions may be avoided with careful planning of the ventilation system and complying with the assembly instruc- tions. However, should there be malfunctions, please check the following table to find remedy for possible causes. Possible malfunctions Reason for malfunction Remedy Single fan provides inefficient air...
- Seite 16 Notizen Notes Limot Elektromotorenbauges.m.b.H. & Co.KG 4060 Leonding http://www.limodor.com Paschinger Straße 56 INNOVATION ON AIR e-mail: office@limot.com Tel. +43 57556...