FAAC 746ER serie Handbuch
Inhaltsverzeichnis
Verfügbare Sprachen
Verfügbare Sprachen
Inhaltsverzeichnis

Verwandte Anleitungen für FAAC 746ER serie


Inhaltszusammenfassung für FAAC 746ER serie
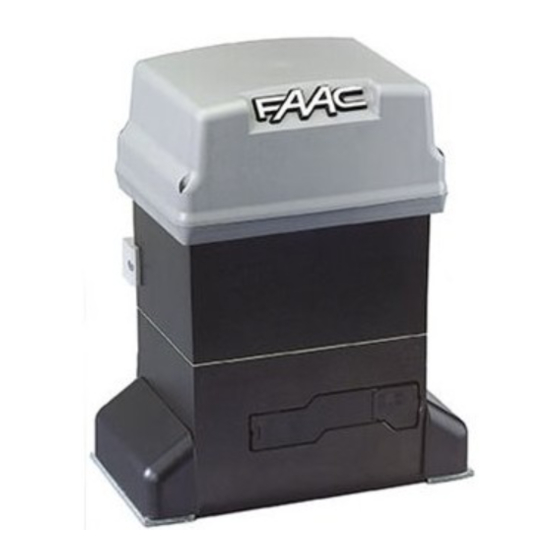
- Seite 1 746ER & 780D 746ER & 780D...
- Seite 53 746ER & 780D 746ER & 780D...
-
Seite 57: Manueller Betrieb
- Der Betreiber sollte keinerlei Reparaturarbeiten oder sonstige direkte Den Entriegelungshebel erneut schliessen. Eingriffe selbst vornehmen. Diesbezüglich sollte er sich ausschließlich Den Schlüssel in Gegenuhrzeigersinn drehen. an qualifiziertes Fachpersonal der Fa. FAAC wenden. Den Schlüssel abnehmen und die Schutzklappe des Schlosses - Die Funktionstüchtigkeit Automation, schließen. - Seite 60 Le descrizioni e le illustrazioni del presente manuale non sono impegnative. La FAAC si riserva il diritto, lasciando inalterate le caratteristiche essenziali dell’apparecchiatura, di apportare in qualunque momento e senza impegnarsi ad aggiornare la presente pubblicazione, le modifiche che essa ritiene convenienti per miglioramenti tecnici o per qualsiasi altra esigenza di carattere costruttivo o commerciale.
-
Seite 61: Eg-Konformitätserklärung Für Maschinen
Produktes beeinträchtigen und/oder eine Gefahrenquelle darstellen. 18) Die Firma FAAC lehnt jede Haftung hinsichtlich der Sicherheit und des 6) Die Firma FAAC lehnt jede Haftung für Schäden, die durch unsachgemäßen störungsfreien Betriebs der Automatik ab, soweit Komponenten auf der oder nicht bestimmungsgemäßen Gebrauch der Automatik verursacht... - Seite 62 746 ER Z16 - 746 ER Z20 - 746 ER CAT - 746 ER RF Ta = Öffnungszeit Bei der Automation FAAC Mod. 746 für Schiebetore handelt es sich um Tc = Schließzeit einen elektromechanischen Antrieb, der die Bewegung je nach Tor über Tp = Pausenzeit ein Zahnstangen- oder Kettengetriebe auf den Schiebeflügel überträgt.
-
Seite 63: Mauerarbeiten Für Die Grundplatte
Für eine leichte Ausführung der Anschlüsse sollten die Kabel ca. 2. ABMESSUNGEN 40 cm (Abb. 5-6 Bez.³) aus der Bohrung der Grundplatte herausstehen. Abb. 4 Abb. 2 Maße in mm. 3. ELEKTRISCHE ANSCHLÜSSE (Standardanlage) Abb. 5 ³ Antrieb 746 mit Gerät 780D Photozellen Schlüsseltaste Blinkleuchte... -
Seite 64: Montage Der Zahnstange
4.4. MONTAGE DER ZAHNSTANGE 4.4.1. ZAHNSTANGE AUS STAHL ZUM ANSCHWEISSEN (Abb.13) 1) Die drei Gewindesperrzähne auf dem Element der Zahnstange Abb. 8 montieren und im oberen Bereich des Langlochs positionieren. Auf diese Weise ermöglicht das Spiel auf dem Langloch eventuelle, mit der Zeit erforderlich werdende Einstellungen. -
Seite 65: Einbau Des Kettenritzels
Abb. 19 4.5.2. MOD. 746 ER RF (Abb. 20 - 21) Abb. 15 1) Federstecker mit einem Hammer in die Welle eintreiben. 2) Den Bügel der Umlenkrollen mit Hilfe der im Bausatz enthaltenen vier Schrauben (M5 x 12) und entsprechenden Scheiben gemäß... -
Seite 66: Anordnung Und Komponenten
5.3. ANORDNUNG UND KOMPONENTEN 5. ELEKTRONISCHES GERÄT 780D DISPLAY FÜR ANZEIGE UND PROGRAMMIERUNG 5.1. HINWEISE Led LED-DIODE FÜR KONTROLLE STATUS EINGÄNGE Achtung: vor der Ausführung jeglicher Art von Eingriffen auf dem elektronischen Gerät (Anschlüsse, Instandhaltung) ist stets die Stromzufuhr KLEMMENBRETT NIEDERSPANNUNG abzuschalten. -
Seite 67: Elektrische Anschlüsse
Sicherheitsvorrichtungen beim Schließvorgang: Diese 5.4. ELEKTRISCHE ANSCHLÜSSE Vorrichtungen greifen lediglich während der Schließbewegung des Tors ein, wenn ein Hindernis erfasst wird. Sie bewirken die unverzügliche erneute Öffnung 230Vac oder die Öffnung bei Freiwerden (siehe Programmierung 50-60Hz im Abschnitt 5.5.2.) Sicherheitsvorrichtungen beim Öffnungs-/Schließvorgang: Diese Vorrichtungen greifen während der Öffnungs- und Schließbewegung des Tors ein. - Seite 68 Anschluß von zwei Photozellenpaaren im Schließvorgang Anschluß eines Photozellenpaares im Öffnungsvorgang und zwei Leisten Abb. 29 Anschluß eines Photozellenpaares im Schließvorgang Abb. 32 Anschluß eines Photozellenpaars beim Schließvorgang, eines Paars beim Öffnungsvorgang sowie eines Paars beim Öffnungs-/Schließvorgang Abb. 30 Anschluß eines Photozellenpaares im Öffnungsvorgang und eines Photozellenpaares im Schließvorgang sowie einer Leiste TX OP/CL RX OP/CL...
- Seite 69 Für die Installation von mehreren Impulsgebern für die Teilöffnung Anschluß eines Photozellenpaars beim Schließvorgang und eines Paars sind die Ruhestromkontakte in Parallelschaltung anzuschließen beim Öffnungs-/Schließvorgang (Abb. 35). FSW OP - Kontakt Sicherheitsvorrichtungen beim Öffnungsvorgang (Klemme 3): Die Funktion der Sicherheitsvorrichtungen beim Öffnungsvorgang liegt im Schutz des Bereichs, der von der Bewegung des Flügels in der Öffnungsphase betroffen ist.
-
Seite 70: Basisprogrammierung
TX -FSW - Negativ Versorgung Übertragungsgeräte Photozellen (Klemme 5.5. PROGRAMMIERUNG Für die Programmierung der Betriebsweise der Automation Durch Verwendung dieser Klemme für den Anschluß des Negativs muss der Modus "PROGRAMMIERUNG" mit Hilfe der Tasten F, + der Versorgung der Übertragungsgeräte der Photozellen kann und - und dem Display auf dem Gerät aufgerufen werden. -
Seite 71: Detaillierte Programmierung
Display Funktion Default Display Funktion Default KRAFT: FAILSAFE-FUNKTION: Reguliert den Schub des Motors. Die Einschaltung dieser Funktion ermöglicht die = Mindestkraft Ausführung eines Betriebstests auf den Photozellen vor jeder Bewegung des Tors. Fällt der Test negativ = Höchstkraft aus (Photozellen außer Betrieb, angezeigt durch den Wert auf dem Display), so beginnt das ÖFFNUNGSRICHTUNG:... -
Seite 72: Logik Photozellen Öffnungsvorgang
Display Funktion Default Display Funktion Default LOGIK PHOTOZELLEN ÖFFNUNGSVORGANG: TEILÖFFNUNG: Hier wird die Eingriffsmodalität der Photozellen im Mit diesem Parameter kann der Umfang der Öffnungsvorgang angewählt. Teilöffnung des Flügels reguliert werden. Diese Photozellen greifen lediglich auf der Die Zeit ist zwischen einstellbar, Öffnungsbewegung ein: sie blockieren die Bewegung die Schritte liegen bei jeweils 1 Sekunden. -
Seite 73: Bestimmung Der Öffnungsrichtung Und Betriebsweise Der Endschalter-Led
Achtung: Die im Lieferumfang enthaltenen Magnete sind aufgrund 6. INBETRIEBNAHME der Stärke des von ihnen erzeugten Magnetfelds in der Lage, 6.1. ELEKTRISCHE ANSCHLÜSSE Elemente mit Magnetstreifen (Kreditkarten, Magnetbänder, Flop- py-Disks usw.) sowie elektronische und mechanische Geräte Alle elektrischen Anschlüsse an die Karte ausführen, wie in Kapitel 5 (z.B. -
Seite 74: Überprüfung Der Eingänge
Hinweise zur Anbringung der Feinbleche Gegenuhrzeigersinn zu drehen. Ü Der Antrieb wird mit einer auf den höchsten Wert eingestellten Kupplung • Für einen ordnungsgemäßen Betrieb muss in der geliefert. Anfänglich muss also die Schraube im Gegenuhrzeigersinn gedreht Stillstandposition des Tors mindestens ein Abstand von 2 cm werden, um die optimale Einstellung zu erhalten. -
Seite 75: Sonderanwendungen
Den Schlüssel im Gegenuhrzeigersinn drehen. Öl bis zur Markierung nachfüllen. Den Schlüssel abnehmen und die Schutzklappe des Schlosses Ausschließlich Öl der Marke FAAC XD 220 verwenden. schließen. Das Tor bewegen, bis die Entriegelung einrastet. 10.MONTAGE DER STEUEREINHEIT CN 60E (EXTRA) Der Antrieb ist für den Einbau der Steuereinheit der leitfähigen... - Seite 112 Le descrizioni e le illustrazioni del presente manuale non sono impegnative. La FAAC si riserva il diritto, lasciando inalterate le caratteristiche essenziali dell’apparecchiatura, di apportare in qualunque momento e senza impegnarsi ad aggiornare la presente pubblicazione, le modifiche che essa ritiene convenienti per miglioramenti tecnici o per qualsiasi altra esigenza di carattere costruttivo o commerciale.