Inhaltsverzeichnis
Werbung
Verfügbare Sprachen
Verfügbare Sprachen
Quicklinks
Waterpik
Water Flosser
®
Model WF-02
Munddusche Waterpik® Modells WF-02 Serie
Hydropulseur Waterpik® Modèle Série WF-02
Idropulsore Waterpik® Modello Serie WF-02
Irrigador bucal Waterpik® Modelo Serie WF-02
Waterpik® Water Flosser Model WF-02 serie
Modelo do Irrigador dentário Waterpik® Série WF-02
Ирригатор Waterpik® Модель WF-02 Series
Werbung
Inhaltsverzeichnis

Verwandte Anleitungen für Waterpik WF-02-Serie


Inhaltszusammenfassung für Waterpik WF-02-Serie
- Seite 1 Model WF-02 Munddusche Waterpik® Modells WF-02 Serie Hydropulseur Waterpik® Modèle Série WF-02 Idropulsore Waterpik® Modello Serie WF-02 Irrigador bucal Waterpik® Modelo Serie WF-02 Waterpik® Water Flosser Model WF-02 serie Modelo do Irrigador dentário Waterpik® Série WF-02 Ирригатор Waterpik® Модель WF-02 Series...
-
Seite 2: Important Safeguards
IMPORTANT SAFEGUARDS IMPORTANT SAFEGUARDS • Do not use iodine or water insoluble concentrated essential oils in the Water Flosser. Use of these can reduce product performance and will shorten the life When using electrical products, especially when children are present, basic of the product. - Seite 3 TABLE OF CONTENTS Product Description Getting Started Cleaning and Troubleshooting Your Waterpik® Water Flosser Limited Two-Year Warranty...
-
Seite 4: Product Description
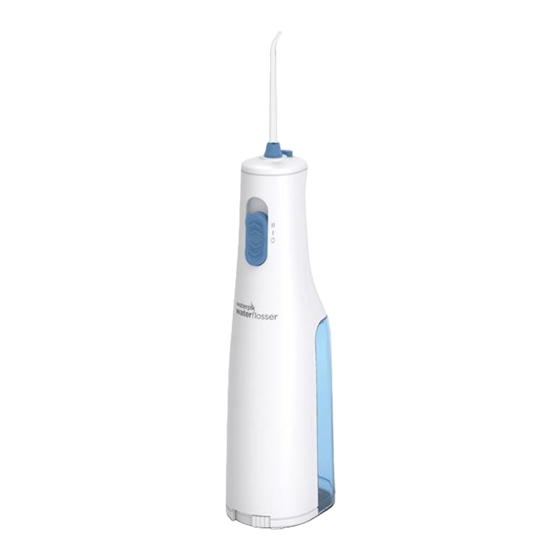
PRODUCT DESCRIPTION 1. Power/pressure switch TIPS 2. Power handle A. Orthodontic Tip* - Braces/General Use 3. Battery door B. Pik Pocket™ Tip* 4. Tip - Periodontal Pockets/Furcations 5. Tip eject button C. Plaque Seeker™ Tip* 6. Flip top water inlet - Implants/Crowns/Bridges/ Retainers/General Use 7. -
Seite 5: Getting Started
GETTING STARTED Inserting Batteries 1. Remove water reservoir. 2. Twist battery door left from the locked position to unlocked position and pull battery door away from the unit. 3. Insert 3 AA batteries as shown. 4. To replace battery door, line-up arrows, push and twist. Replace batteries when performance is no longer effective. - Seite 6 Filling the Reservoir Fill Lift the flip top on reservoir and fill the reservoir with lukewarm water. Inserting and Removing Tips Insert tip into the center of the knob at the top of the Water Flosser handle. The colored ring will be flush with the end of the Eject knob if the tip is correctly locked into place.
- Seite 7 NOTE: Not all tips included with all models. TIP USAGE Pik Pocket™ Tip The Pik Pocket™ tip is specifically designed to deliver water or anti-bacterial solutions deep into periodontal pockets. To use the Pik Pocket™ tip, set the unit to the lowest pressure setting. Place the soft tip against a tooth at a 45-degree angle and gently place the tip under the gumline, into the pocket.
-
Seite 8: Service & Maintenance
Using Mouthwash and Other Solutions AA Battery Care and Disposal Your Waterpik® Water Flosser can be used to deliver mouthwash and antibacterial • Alkaline batteries and NiMH rechargeable batteries are acceptable. solutions. After using any special solution, rinse unit to prevent clogging by partially •... - Seite 9 Refer to the serial and model numbers in all correspondence. These numbers are located on the back of the handle and bottom of the reservoir respectively. Still have questions? Go to www.waterpik.com/intl to find your local distributor Water Pik, Inc. warrants to the original purchaser/owner of this product that it is free from defects in materials and workmanship for two years from date of purchase.
-
Seite 10: Wichtige Sicherheitshinweise
WICHTIGE SICHERHEITSHINWEISE WICHTIGE SICHERHEITSHINWEISE • Entfernen Sie vor der Benutzung dieses Produkts sämtlichen Mund-Schmuck. • Nicht bei offenen Wunden an der Zunge oder im Mund verwenden. Bei der Verwendung von Elektrogeräten müssen, besonders, wenn Kinder in der Nähe • Wenn Ihr Arzt die Einnahme von Antibiotika vor einer Zahnbehandlung sind, die Sicherheitsmaßnahmen immer befolgt werden. - Seite 11 INHALTSVERZEICHNIS Produktbeschreibung Inbetriebnahme Reinigung und Problemlösung bei Ihrem Waterpik® Water Flosser Begrenzte Garantie von zwei Jahren...
-
Seite 12: Produktbeschreibung
PRODUKTBESCHREIBUNG 1. Power/Druckregler DÜSEN 2. Griff A. Orthodontic-Düse* - Zahnspangen/Allgemeiner Gebrauch 3. Batteriefachabdeckung B. Pik Pocket™ Subgingivaldüse* 4. Jet-Düse - Parodontaltaschen/Furkationen 5. Düsenauswurftaste C. Plaque Seeker™ Düse* 6. Aufklappbarer - Implantate/Kronen/Brücken/Zahnspangen/ Wassereinlass Allgemeiner Gebrauch D. Zahnbürstenaufsatz* 7. Wassertank - Allgemeiner Gebrauch E. - Seite 13 INBETRIEBNAHME Inserting Batteries 1. Den Wassertank abnehmen. 2. Die Abdeckung des Batteriefachs nach links, aus der verriegelten Position in die entriegelte Position drehen und die Abdeckung vom Gerät abziehen. 3. 3 AA-Batterien wie dargestellt einlegen. 4. Um die Abdeckung erneut einzusetzen, die Pfeile ausrichten, drücken und drehen. Ersetzen Sie die Batterien, wenn die Geräteleistung nicht mehr ausreichend ist.
-
Seite 14: Füllen Des Wassertanks
Füllen Füllen des Wassertanks Den Wassertank aufklappen und mit lauwarmem Wasser füllen. Aufsetzen und Abziehen der Düsen Die Düse in die Mitte der Knopföffnung oben am Griff der Munddusche einstecken. Der farbige Ring schließt glatt mit dem Ende des Auswerfen Knopfs ab, wenn die Düse richtig eingesetzt ist. -
Seite 15: Gebrauch Der Aufsätze
HINWEIS: Nicht alle Spitzen sind bei allen Modellen enthalten. GEBRAUCH DER AUFSÄTZE Pik Pocket™ Subgingivaldüse Die Pik Pocket™ Subgingivaldüse ist speziell für die Verabreichung von Wasser oder antibakteriellen Lösungen tief in die Zahnfleischtaschen ausgelegt. Um die Pik Pocket™ -Spitze zu verwenden, stellen Sie an der Einheit den niedrigsten Druck ein. Drücken Sie die weiche Spitze im 45-Grad-Winkel gegen einen Zahn und schieben Sie die Spitze sanft unter den Zahnfleischrand, in die Tasche. -
Seite 16: Reinigung Und Problemlösung Bei Ihrem Waterpik® Water Flosser
REINIGUNG UND PROBLEMLÖSUNG BEI IHREM WATERPIK® WATER FLOSSER Verwendung von Mundwasser und anderen Lösungen Dieser Vorgang sollte alle 1-3 Monate wiederholt werden, um eine optimale Ihr Waterpik® Water Flosser kann verwendet werden, um Mundspülungen und Leistung zu gewährleisten. antibakterielle Lösungen anzuwenden. Nach Verwendung einer Speziallösung Pflege und Entsorgung der AA-Batterien spülen Sie die Einheit gründlich, um einem Verstopfen vorzubeugen, indem Sie das... -
Seite 17: Begrenzte Garantie Von Zwei Jahren
Sie bitte an den Vertriebshändler in Ihrem Land. Die Anschrift finden zu fordern, um zu bestätigen, dass der Anspruch unter die Garantiebestimmungen Sie unter www.waterpik.com/intl. Bitte senden Sie das Produkt nicht an fällt. Wir ersetzen jedes Teil des Produkts, das unserer Meinung nach defekt ist, Niederlassungen von Waterpik International, Inc., da sich dadurch der Service... -
Seite 18: Précautions Importantes
PRÉCAUTIONS IMPORTANTES PRÉCAUTIONS IMPORTANTES • Retirez tout article de joaillerie buccale avant une utilisation de ce produit. • N’utilisez pas l’appareil si vous avez une plaie ouverte sur la langue ou dans la Pour l’utilisation de tout produit électrique, particulièrement si des enfants sont bouche. - Seite 19 TABLE DES MATIÈRES Description du produit Comment démarrer Nettoyage et dépannage de l’hydropulseur Waterpik® Garantie limitée de deux ans...
-
Seite 20: Description Du Produit
DESCRIPTION DU PRODUIT 1. Interrupteur marche/ pression EMBOUTS 2. Poignée d’alimentation A. Embout orthodontique* - Appareils orthodontiques/Utilisation générale 3. Couvercle du B. Embout Pik Pocket™* compartiment des piles - Poches parodontales/Furcations 4. Embout C. Embout Plaque Seeker™* 5. Bouton d’éjection - Implants/Couronnes/Bridges/ de l’embout Appareils de rétention/Utilisation générale... -
Seite 21: Comment Démarrer
COMMENT DÉMARRER Insertion des piles 1. Retirez le réservoir d’eau. 2. Faites tourner le couvercle du compartiment des piles de la gauche (position verrouillée) vers la position déverrouillée et retirez le couvercle du compartiment des piles de l’appareil. 3. Insérez 3 piles de type AA comme illustré. 4. -
Seite 22: Remplissage Du Réservoir
Remplir Remplissage du réservoir Soulevez le couvercle basculant du réservoir et remplissez le réservoir d’eau tiède. Insertion et retrait des embouts Éjecter Insérez l’embout dans le centre du bouton sur le dessus du manche de l’hydropulseur. L’anneau coloré se trouvera en affleurement avec l’extrémité... - Seite 23 REMARQUE : tous les embouts ne sont pas compris avec tous les modèles. UTILISATION DE L’embout Embout Pik Pocket™ L’embout Pik Pocket™ est spécialement conçu pour diriger l’eau ou les solutions antibactériennes dans la profondeur des poches parodontales. Pour l’utilisation de l’embout de périodontie Pik Pocket,™ sélectionnez la plus basse pression sur l’appareil. Placez l’extrémité souple de l’embout contre une dent, en formant un angle de 45 degrés, et introduisez doucement l’extrémité...
-
Seite 24: Nettoyage Et Dépannage De L'hydropulseur Waterpik
Utilisation de rince-bouche et d’autres solutions réservoir soit vide. Pour le rinçage, videz de la même manière le réservoir rempli Vous pouvez utiliser l’hydropulseur Waterpik® pour l’administration d’un rince- d’eau tiède pure. bouche ou d’une solution antibactérienne. Après l’utilisation d’une quelconque Il est recommandé... -
Seite 25: Garantie Limitée De Deux Ans
Veuillez ne pas expédier le produit aux bureaux de tout composant du produit dont nous constatons une défectuosité, sous réserve que Waterpik International, Inc. car cela pourrait occasionner des délais de service. le produit n’ait pas fait l’objet de modification, détérioration ou emploi impropre ou Faites référence aux numéros de série et de modèle dans toute votre... - Seite 26 INFORMAZIONI IMPORTANTI SULLA SICUREZZA INFORMAZIONI IMPORTANTI • Non utilizzare iodio, candeggina, né oli essenziali concentrati insolubili in acqua con questo prodotto. In caso contrario le prestazioni possono diminuire e la SULLA SICUREZZA durata del prodotto può risultare abbreviata. Quando si usano apparecchi elettrici, soprattutto in presenza di bambini, è •...
- Seite 27 INDICE Descrizione del prodotto Per iniziare Pulizia dell’idropulsore Waterpik® e risoluzione dei problemi Garanzia limitata di due anni...
-
Seite 28: Descrizione Del Prodotto
DESCRIZIONE DEL PRODOTTO 1. Interruttore alimentazione / PUNTE pressione A. Beccuccio ortodontico* - Apparecchi ortodontici/Uso generale 2. Manico B. Beccuccio Pik Pocket™* 3. Porta batteria - Tasche parodontali/Forcazioni 4. Beccuccio C. Beccuccio antiplacca Plaque Seeker™* 5. Tasto di espulsione - Impianti/Corone/Ponti/Fermi/ Uso generale del beccuccio D. -
Seite 29: Per Iniziare
PER INIZIARE Inserimento delle batterie 1. Rimuovere il serbatoio dell’acqua. 2. Girare lo sportello della batteria a sinistra dalla posizione di blocco alla posizione di sblocco e togliere lo sportello della batteria dall’unità. 3. Inserire 3 batterie AA come illustrato. 4. -
Seite 30: Riempimento Del Serbatoio
Riempimento Riempimento del serbatoio Sollevare il coperchio e riempire il serbatoio con acqua tiepida. Inserimento e rimozione del beccuccio Inserire il beccuccio nel foro situato sulla parte superiore del manico. Quando il beccuccio è in posizione, l’anello colorato si Espulsione allinea con l’estremità... - Seite 31 NOTA: non tutti i punte sono forniti con tutti i modelli. USO DEI PUNTE Beccuccio Pik Pocket™ Il beccuccio Pik Pocket™ serve per l’erogazione di acqua o soluzioni antibatteriche nelle tasche parodontali. Per usare il punta Pik Pocket,™ impostare l’unità sul valore di pressione più basso. Posizionare il punta morbido su un dente formando un angolo di 45°...
- Seite 32 Uso di colluttori e altre soluzioni Manutenzione e smaltimento delle batterie AA È possibile usare l’idropulsore Waterpik® per l’erogazione di collutori e altre soluzioni • Le batterie alcaline e le ricaricabili NiMH sono adatte. antibatteriche. Dopo aver usato una soluzione speciale, risciacquare per evitare •...
-
Seite 33: Garanzia Limitata Di Due Anni
Water Pik, Inc. sostituisce a spedire il prodotto agli uffici Waterpik International, Inc., o i tempi di assistenza sua discrezione le parti del prodotto che ritiene difettose, qualora il prodotto non saranno più... -
Seite 34: Medidas De Seguridad Importantes
MEDIDAS DE SEGURIDAD IMPORTANTES MEDIDAS DE SEGURIDAD • No use yodo, agentes blanqueadores, ni aceites esenciales concentrados que no sean solubles en agua en el irrigador bucal. El uso de los mismos puede reducir el IMPORTANTES desempeño del producto y acortará la vida útil del producto. Cuando use productos eléctricos, especialmente en presencia de niños, siga siempre •... - Seite 35 ÍNDICE Descripción del producto Introducción Cómo limpiar y reparar el irrigador bucal inalámbrico Waterpik® Garantía limitada de dos años...
-
Seite 36: Descripción Del Producto
DESCRIPCIÓN DEL PRODUCTO 1. Interruptor de encendido/ PUNTAS presión A. Boquilla de ortodoncia* 2. Mango - Frenos / uso general B. Boquilla Pik Pocket™* 3. Tapa de las pilas - Furcaciones / bolsas periodontales 4. Boquilla C. Boquilla Plaque Seeker™ 5. -
Seite 37: Colocación De Las Pilas
INTRODUCCIÓN Colocación de las pilas 1. Quite el depósito de agua. 2. Gire la tapa de las pilas hacia la izquierda desde la posición bloqueada a desbloqueada y retire la tapa de las pilas para quitarla de la unidad. 3. Introduzca 3 pilas AA como se muestra. 4. - Seite 38 Llenar Llenado del depósito Abra la tapa del depósito y llénelo con agua tibia. Cómo insertar y quitar las boquillas Inserte la boquilla en el centro del rotador que se encuentra en la parte superior del mango del irrigador bucal. Si la boquilla Expulsar está...
- Seite 39 NOTA: No se incluyen todas los puntas o cabezales en todos los modelos USO DE LAS PUNTAS Boquilla Pik Pocket™ La boquilla Pik Pocket™ está diseñada específicamente para hacer llegar el agua o las soluciones antibacterianas a las partes profundas de la bolsa periodontal. Para usar la punta Pik Pocket,™...
- Seite 40 Uso de enjuague bucal y otras soluciones Cuidado y eliminación de las pilas AA Puede utilizar su irrigador bucal Waterpik® para aplicar enjuagues bucales y • Se pueden utilizar pilas alcalinas y pilas recargables de NiMH. soluciones antibacterianas. Después de usar cualquier solución especial, enjuague •...
-
Seite 41: Garantía Limitada De Dos Años
Inc. se reserva el derecho de solicitar que se devuelva el producto para analizarlo y Por favor, no envíe ningún producto a las oficinas de Waterpik International, Inc.; confirmar que la reclamación esté cubierta por la garantía. Reemplazaremos cualquier de hacerlo, se podría retrasar el servicio. -
Seite 42: Belangrijke Voorzorgsmaatregelen
BELANGRIJKE VOORZORGSMAATREGELEN BELANGRIJKE • Gebruik geen jodium, bleekmiddel of niet-oplosbare essentiële olie concentraten in dit apparaat. Gebruik hiervan kan de werking van het apparaat verminderen VOORZORGSMAATREGELEN en zal de levensduur ervan verkorten. Bij het gebruik van elektrische apparaten, vooral daar waar kinderen zijn, dient u •... - Seite 43 INHOUDSTABEL Productbeschrijving Van start gaan Reinigen en problemen oplossen van uw Waterpik® Water Flosser Twee jaar beperkte garantie...
-
Seite 44: Productbeschrijving
PRODUCTBESCHRIJVING 1. Aan-uit/drukschakelaar TIPS 2. Bedieningshandgreep A. Orthodontische tip* - Beugels/algemeen gebruik 3. Batterijklepje B. Pik Pocket™ Tip* 4. Tip - Parodontale pockets/furcaties 5. Knop om tip uit te werpen C. Plaque Seeker™ Tip* 6. Vulopening met deksel - Implantaten/kronen/bruggen/ beugels/algemeen gebruik 7. -
Seite 45: Van Start Gaan
VAN START GAAN Batterijen plaatsen 1. Haal het waterreservoir los. 2. Ontgrendel het batterijklepje door het naar links te draaien en haal de batterijen uit het apparaat. 3. Plaats 3 AA-batterijen zoals afgebeeld.. 4. Plaats het batterijklepje door de pijltjes tegen elkaar te leggen, het klepje aan te drukken en te draaien. Vervang de batterijen wanneer het apparaat merkbaar minder goed werkt. - Seite 46 Het reservoir vullen Vullen Open de deksel van het reservoir op en vul het reservoir met lauw warm water. De tips insteken en verwijderen Steek de tip in het midden van de opening boven op de handgreep van de Water Flosser. Als de tip juist op zijn plaats is Uitwerpen vergrendeld moet de gekleurde ring vlak liggen met het einde van de knop.
-
Seite 47: Tongreinigingstip
NB: Alle tips zijn niet bij alle modellen inbegrepen GEBRUIK VAN DE TIP Pik Pocket™ Tip De Pik Pocket™ tip is specifiek ontwikkeld om water of antibacteriële oplossingen diep in de tandvleespockets te brengen. Voor het gebruik van de Pik Pocket™ Tip stelt u het apparaat op de laagste drukinstelling in. Plaats de zachte tip tegen een tand onder een hoek van 45 graden en plaats de tip zachtjes onder de tandvleesrand, in de opening tussen tand en tandvlees. - Seite 48 Mondwater en andere oplossingen gebruiken Gebruik en afvoeren van AA-batterijen Uw Waterpik® Water Flosser kan worden gebruikt in combinatie met mondwater • In dit apparaat kunt u alkaline- en oplaadbare NiMH-batterijen gebruiken. en antibacteriële oplossingen. Om verstopping te voorkomen dient u het reservoir •...
-
Seite 49: Twee Jaar Beperkte Garantie
Hebt u nog vragen? Ga naar www.waterpik.com/intl om uw plaatselijke winkel of jettips etc. distributeur te vinden. Deze garantie geeft u specifieke juridische rechten. Afhankelijk van de wetten in het land waar u woont kan het zijn dat u andere rechten heeft. Ga naar www.waterpik.com/intl om uw locale distributeur te vinden. -
Seite 50: Salvaguardas Importantes
SALVAGUARDAS IMPORTANTES SALVAGUARDAS IMPORTANTES • Não utilize iodo, soluções salinas ou óleos essenciais concentrados insolúveis em água neste produto. A utilização de um destes produtos pode reduzir o Ao utilizar produtos elétricos, especialmente com crianças presentes, devem ser desempenho do produto e vai encurtar a vida útil do produto. sempre seguidas as precauções básicas de segurança, incluindo o seguinte: •... - Seite 51 ÍNDICE Descrição do produto Introdução Limpeza e resolução de problemas do Irrigador dentário Waterpik® Garantia limitada de dois anos...
-
Seite 52: Descrição Do Produto
DESCRIÇÃO DO PRODUTO 1. Interruptor de alimentação/ PONTAS pressão A. Ponta ortodôntica* 2 Pega elétrica - Aparelhos/utilização geral B. Ponta Pik Pocket™* 3. Porta da bateria - Bolsas periodontais/furcações 4. Ponta C. Ponta Plaque Seeker™* 5. Botão de ejeção da ponta - Implantes/coroas/pontes dentários/ 6. - Seite 53 INTRODUÇÃO Inserção de baterias 1. Remova o reservatório de água. 2. Rode a porta da bateria para a esquerda a partir da posição bloqueada para a posição desbloqueada e remova a porta da bateria da unidade. 3. Introduza 3 pilhas AA conforme ilustrado. 4.
-
Seite 54: Enchimento Do Reservatório
Encher Enchimento do reservatório Eleve a “flip top” no reservatório e encha-o com água morna. Inserção e remoção das pontas Insira a ponta no centro do botão na parte superior da pega do irrigador dentário. O anel colorido fica nivelado com a extremidade Ejetar do botão se a ponta estiver bloqueada corretamente. - Seite 55 NOTA: Nem todas as pontas estão incluídas em todos os modelos. UTILIZAÇÃO DA PONTA Ponta Pik Pocket™ A ponta Pik Pocket™ foi especialmente concebida para fornecer água ou soluções antibacterianas às bolsas periodontais. Para utilizar a ponta Pik Pocket™, coloque a unidade na configuração de pressão inferior. Coloque a ponta flexível contra os dentes num ângulo de 45 graus e coloque delicadamente a ponta sob a linha da gengiva na bolsa.
-
Seite 56: Limpeza E Resolução De Problemas Do Irrigador Dentário Waterpik
Utilização de antisséticos bucais ou de outras soluções Este processo deve ser realizado a cada 1 a 3 meses para garantir o desempenho O irrigador dentário Waterpik® pode ser utilizado para fornecer antisséticos bocais ideal. e soluções antibacterianas. Após utilizar qualquer solução especial, lave a unidade Cuidados e eliminação das pilhas AA... - Seite 57 Não envie de garantia. Iremos substituir qualquer peça do produto, que na nossa opinião o produto para os escritórios da Waterpik International, Inc., pois tal ação irá se encontre defeituoso, desde que o produto não tenha utilizado indevidamente, atrasar a assistência.
-
Seite 58: Важные Меры Предосторожности
гарантии. СОХРАНИТЕ ЭТУ ИНСТРУКЦИЮ. • Пользуйтесь только теми насадками и аксессуарами, которые рекомендованы Ирригаторы полости рта Waterpik предназначены для массажа тканей десен, удаления Water Pik, Inc. зубного налета и улучшения здоровья десен. Ирригаторы Waterpik обеспечивают • Не роняйте и не помещайте посторонние объекты в любое отверстие изделия. - Seite 59 СОДЕРЖАНИЕ Описание изделия Перед началом использования Очистка, поиск и устранение неисправностей ирригатора Waterpik® Ограниченная гарантия на два годА...
-
Seite 60: Описание Изделия
ОПИСАНИЕ ИЗДЕЛИЯ 1. Переключатель мощности/ НАСАДКИ давления A. Ортодонтическая насадка* 2. Корпус с блоком питания - ортодонтические скобы/общее использование В. Насадка Pik Pocket™* 3. Крышка батарейки - десневые карманы/фуркации 4. Насадка C. Насадка Plaque Seeker™* 5. Кнопка сброса насадки - импланты/коронки/мосты/ретейнеры/ 6. -
Seite 61: Перед Началом Использования
ПЕРЕД НАЧАЛОМ ИСПОЛЬЗОВАНИЯ Замена батареек 1. Снимите резервуар для воды. 2. Поверните крышку батарейки влево из положения «закрыто» в положение «открыто» и откройте крышку прибора. 3. Вставьте 3 АА батарейки, как показано на рисунке. 4. Устанавливая крышку батарейного отсека на место, убедитесь, что стрелки на ней находятся друг напротив друга, затем... - Seite 62 Наполнение Наполнение резервуара Поднимите откидывающуюся крышку и наполните резервуар теплой водой. Присоединение и отсоединение насадок Вставьте насадку в центр выступа, которым оканчивается корпус ирригатора. Если насадка закрепилась правильно, цветное Сброс насадки кольцо установится встык с выступом. Для того, чтобы отсоединить насадку от корпуса, нажмите на кнопку сброса и потяните насадку...
- Seite 63 ПРИМЕЧАНИЕ: не все насадки входят в комплект каждой модели. ПОЛЬЗОВАНИЕ НАСАДКАМИ Периодонтическая насадка Pik Pocket™ Периодонтическая насадка Pik Pocket™ разработана специально для глубокой чистки периодонтических карманов водой или противомикробными средствами. При использовании насадки Pik Pocket™, установите самый низкий уровень давления. Поднесите мягкую насадку к зубу под...
-
Seite 64: Очистка, Поиск И Устранение Неисправностей Ирригатора Waterpik
Использование ополаскивателя для рта и других растворов Уход за батарейками класса AA и утилизация использованных батареек Ирригатор Waterpik® может использоваться для подачи ополаскивателя и антибактериальных растворов. После использования любого специального раствора • Можно использовать щелочные батарейки и перезаряжаемые батарейки NiMH. - Seite 65 У вас также могут быть другие права в зависимости от закона страны, в которой вы проживаете. Адрес местного дистрибьютора можно узнать на сайте www.waterpik.com/intl. Средний cpok службы ирригатора Waterpik® (WF-02) составляет 2 года, хотя он может изменяться в зависимости от того, как используется устройство.
- Seite 66 Water Pik, Inc., a subsidiary of Church & Dwight Co., Inc. 1730 East Prospect Road Fort Collins, CO 80553-0001 USA 844-821-4873 www.waterpik.com SOFIBEL SAS 92686 Levallois-Perret Cedex-France Church & Dwight UK LTD., Folkestone, CT19 6PG UK: 0800 121 6080 Designed and Tested in the USA. Made in China.