Werbung
Quicklinks
Quick Start Guide
E
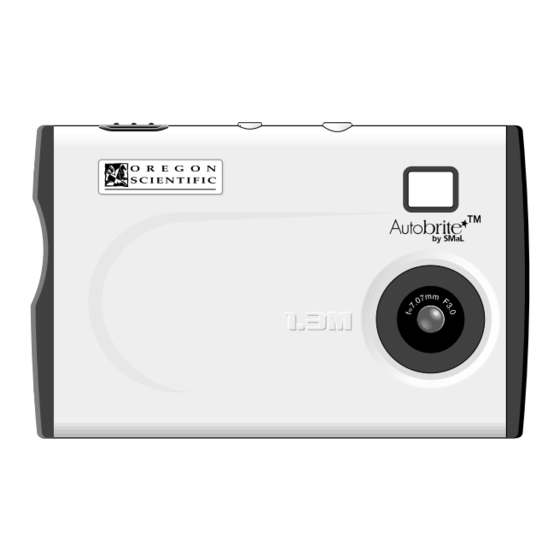
Front View
Back View
Flash jack
Flash nut
Flash nut
Flash jack
Viewfinder
Viewfinder
Shutter button
Liquid crystal
Shutter
display
button
Strap lug
Sound
button
Lens
Mode
Lens pop-up dial
button
Liquid Crystal Display
LCD
Description
LCD
Description
Number of Available Shots.
A
Image Size
Battery Status
B : 1280 x 1024 pixels
The battery has ample charge.
C : 640 x 480 pixels
The battery is approximately half
e
Delete Mode
charged.
Deletes the last image shot
The battery charge is low. Recharge
Deletes all the images
the battery as it will run out shortly.
(Flashes 5 times and the camera
Formats the memory
switches off.)
Beep Tone on
The battery is exhausted. Recharge
Flash on
the battery immediately.
* Avoid switching the camera on and
off repeatedly when the battery is
low on charge.
Taking Pictures
NOTE: Be sure that the camera has enough battery life before taking pictures. If needed, charge the camera
before use.
1) Switch the camera on.
3) When you press the shutter button, the camera
takes the picture. The image is then recorded and
the number in the counter decreases.
NOTE: The image will be blurred if the camera moves
when taking the picture (camera shake). Take care to
avoid camera shake, particularly when shooting in dark
locations.
2) Loading the strap over your wrist, brace your
elbows firmly against your body and hold the
Auto Power Off Function
camera steadily with both hands. Compose
The Auto Power Off function automatically switches the
your shot so that the subject you want to
camera off to avoid wasting battery power when the
photograph is within the field of view.
camera is left unused for 30 seconds while switched on.
* The Auto Power Off function does not operate when a
USB connection is being used.
* To take pictures after the camera has automatically
switched off (Auto Power Off), press the Mode button or
Sound button to turn on the camera again.
* If you intend to leave the camera unused for a long
period, turn the lens pop-up dial to OFF option to switch
off the camera.
Guide de démarrage rapide
F
Vue de face
Vue de dos
Prise flash
Ergot flash
Viseur
Ergot flash
Prise flash
Oculaire
du viseur
Ecran
Déclencheur
Tige d'attache
LCD
pour dragonne
Touche
son
Déclencheur
Touche
Objectif
Molette de sortie
mode
de l'objectif
L'écran LCD
LCD
Description
LCD
Description
Nombre de prises disponibles.
A
Taille de l'image
Statut de la batterie
B : 1280 x 1024 pixels
La batterie est amplement chargée.
C : 640 x 480 pixels
La batterie est approximativement
e
Mode d'annulation
chargée à moitié.
Efface la dernière photo prise
La charge de la batterie est faible.
Efface toutes les photos
La recharger car elle est sur le point
de s'épuiser. (Clignote 5 fois et
Formate la mémoire
l'appareil photo s'éteint.)
Bip sonore activé
La batterie est épuisée. La
Flash allumé
recharger immédiatement.
* Eviter d'allumer et éteindre l'appareil
photo plusieurs fois de suite quand
la batterie est faiblement chargée.
Prendre des photos
REMARQUE: S'assurer de la charge suffisante des piles avant de commencer à prendre des vues. Recharger l'appareil
si nécessaire avant utilisation.
1) Mettre l'appareil photo en marche.
3) Appuyer sur l'obturateur pour prendre la photo.
L'image est alors enregistrée et le nombre du
compteur baisse.
REMARQUE: L'image sera floue si l'appareil photo
bouge durant la prise de vue (l'appareil tremble). Faire
attention à ne pas bouger l'appareil, particulièrement en
prenant des photos dans des endroits sombres.
2) Enrouler la lanière autour du poignet ; serrer
fermement les coudes au corps et tenir l'appareil
Fonction de mise hors tension automatique
photo des deux mains. Composer la photo de façon
La commande de mise hors tension éteint automatiquement
à ce que le sujet visé soit dans le champ de vision.
l'appareil photo quand il est allumé et non utilisé pendant
30 secondes.
* La fonction de mise hors tension automatique ne
fonctionne pas avec une connexion USB.
• Pour prendre une photo quand l'appareil s'est éteint
automatiquement, rentrer l'objectif et le ressortir.
• Si on prévoit de ne pas utiliser l'appareil pendant une
période prolongée, rentrer l'objectif pour l'éteindre.
SD Memory Card
The SD Memory Card is an external memory card that can be plugged into your Digital Camera. You can store
extra images onto the card, in addition to the camera's own internal 16MB memory. When you insert the SD card
into the camera, a "SD" card icon will be displayed on the LCD. This indicates the shots to be taken will be stored
into the SD card only.
Caution: Make sure the camera is turned off before inserting the SD Memory card.
SD card
NOTE: The camera can only work with one kind of memory at a time. If the SD Memory card is installed, the
slot
images and camera settings in the camera's internal memory will NOT be available.
USB socket
Insert SD card in
the card slot
Macro Mode
To activate the macro mode, you can just simply turn the lens
pop-up dial from On to " " icon. Then, you can capture the
objects in a short distance.
Using Flash Module
To connect the flash module, insert the plug of the flash into the jack of the camera main unit. Turn on the power
switch of the flash located at the side of the camera. The " " icon is then displayed on the LCD screen. Now the
camera is ready to take pictures with flash.
Carte mémoire SD
La carte mémoire SD est une carte mémoire externe qui s'insère dans votre appareil photo numérique. Vous
pouvez utiliser cette carte pour stocker des images, en plus des images stockées dans la mémoire interne de
16MB. Lorsque vous insérez la carte, l'icône "SD" sera affiché à l'écran LCD. Cette icône signifie que les images
seront stockées uniquement sur la carte SD.
Attention: Eteindre l'appareil photo avant d'insérer la carte mémoire SD.
Fente pour
REMARQUE: L'appareil photo ne prend en charge qu'une seule mémoire à la fois. Si la carte SD est insérée, les
carte SD
images et réglages sauvegardés dans la mémoire interne de l'appareil NE SERONT PAS disponibles.
Prise USB
Insérer la carte SD
dans la fente
Mode macro
Pour activer le mode Macro, tournez la molette jusqu'à la
position " " . Vous pouvez maintenant photographier des objets
à très proche distance.
Utilisation du module flash
Pour connecter le module flash, insérez la fiche du module dans la prise située sur le boîtier principal de l'appareil.
Tournez la molette de serrage jusqu'à ce que le module soit fermement fixé à l'appareil. Allumez le module en
actionnant le commutateur flash situé sur le côté de l'appareil. L'icône " " apparaît à l'écran LCD. L'appareil photo
est maintenant prêt à prendre des vues en mode flash.
Kurzübersicht
D
DS6628
Vorderansicht
Rückansicht
Blitzlichthalterung
Blitz-Anschlussbuchse
Sucher
Auslöser-
Flüssigkrist-
Öse für
Taste
allanzeige
Trageschlaufe
Signalton-
Taste
Objektiv
Objektiv-Schalter
Flüssigkristallanzeige (LCD)
SD card icon is displayed
when card is inserted
LCD
Beschreibung
Anzahl der möglichen Aufnahmen
Batterie Ladezustand
Die Batterie wurde vollständig
aufgeladen.
Die Batterie ist ungefähr zur Hälfte
aufgeladen.
Die Batterie ist beinahe leer. Laden
Sie die Batterie auf, da diese schon
bald leer sein wird. (Blinkt 5-mal und
die Kamera schaltet sich aus.)
Die Batterie ist leer. Laden Sie die
Batterie unverzüglich auf.
* Vermeiden Sie wiederholtes Ein-
und Ausschalten der Kamera wenn
die Batterie schwach ist.
Aufnahmen erstellen
HINWEIS: Stellen Sie sicher, dass die Batterie der Kamera ausreichend aufgeladen ist, bevor Sie Aufnahmen
damit machen. Laden Sie die Kamera auf, falls nötig.
1) Schalten Sie die Kamera ein.
3) Die Kamera nimmt ein Foto auf, wenn Sie den
HINWEIS: Das Bild ist unscharf, wenn Sie die Kamera
während der Aufnahme bewegen (Kamera verwackelt).
Achten Sie darauf, dass die Kamera während der
Aufnahme nicht wackelt, besonders dann, wenn Sie
Aufnahmen an dunklen Orten machen.
2) Führen Sie die Hand durch die Halteschlaufe,
setzen Sie Ihre Ellenbogen auf Ihrem Körper auf,
und halten Sie die Kamera mit beiden Händen.
Rahmen Sie Ihr Bild, so dass das Objekt im Sucher
zu sehen ist.
Guida di partenza rapida
I
DS6628
Raffigurazione anteriore
Raffigurazione posteriore
Attacco flash
Mirino
Connettore flash
Finestra
mirino
Display
Otturatore
a cristalli
Attacco
liquidi
cinghia
Pulsante
Audio
Selettore di
Obiettivo
Pulsante
escursione
Modalità
obiettivo
L'icône SD est affichée
Display a cristalli liquidi
lorsque la carte est insérée
LCD
Descrizione
Numero di pose disponibili
Stato batteria
La batteria ha ampia autonomia.
La batteria è caricata circa a metà.
La batteria ha bassa autonomia.
Ricaricarla poiché è in procinto di
scaricarsi completamente. (lampeggia
5 volte e la fotocamera si spegne.)
La batteria è esaurita. Ricaricare
immediatamente la batteria.
* Evitare di accendere e spegnere
ripetutamente la fotocamera quando
la carica della batteria è bassa.
COME SCATTARE FOTOGRAFIE
NOTA: Prima di scattare fotografie, accertarsi che le batterie della fotocamera abbiano energia sufficiente.
All'occorrenza, caricare la batteria prima dell'uso.
1) Accendere la fotocamera.
3) Quando si preme il pulsante dell'otturatore, la
NOTA: Se si muove la fotocamera mentre si sta scattando
una foto, l'immagine risulterà mossa. Evitare di muovere la
fotocamera, in modo particolare quando si scattano fotografie
in luoghi scarsamente illuminati.
2) Indossando la cinghia intorno al polso, stringere i gomiti
verso il corpo e tenere la fotocamera con entrambe le
mani. Scattare la foto in modo che il soggetto che si
desidera fotografare rientri nel campo visivo.
Einsetzen der SD Speicherkarte
Blitz-Anschlussbuchse
Die SD-Speicherkarte (Secure Digital) ist ein externes Speichermedium, welches Sie in das entsprechende
Blitzlichthalterung
Aufnahmefach Ihrer Digitalkamera einführen können, und mittels der die Erweiterung der Speicherkapazität der
Sucher
Kamera auf 16 MB möglich ist. Sobald Sie eine SD-Karte in die Kamera einführen, erscheint der "SD"-Indikator in
Auslöser-
der LCD-Anzeige. Dadurch wird angezeigt, dass Aufnahmen nur auf der SD-Karte gespeichert werden.
Taste
Vorsicht: Achten Sie darauf, dass die Kamera ausgeschaltet ist, bevor Sie die SD-Speicherkarte einführen.
SD-
HINWEIS: Die Kamera funktioniert nur jeweils mit einem Speichermedium. Wenn eine SD-Karte in der Kamera
Speicherkarten-
vorhanden ist, werden alle Bildaufnahmen und Kurzfilme automatisch auf der Karte gespeichert, und Sie können in
Steckplatz
diesem Fall NICHT auf die im internen Speicher der Kamera gespeicherten Aufnahmen und Einstellungen zugreifen.
Betriebsmodus-
Taste
USB-
Anschlussbuchse
LCD
Beschreibung
Bildgröße
A
B : 1280 x 1024 Pixel
C : 640 x 480 Pixel
e
Löschen-Modus
Löschen des zuletzt aufgenommenen
Fotos.
Makro-Modus
Löschen aller gespeicherten Fotos.
Drehen Sie den Objektiv-Schalter einfach in die Einstellung " ",
Formatiert den Speicher
um den Makro-Modus zu aktivieren. Sie können nun Gegenstände
fotografieren, welche sich sehr nahe vor dem Objektiv befinden.
Signaltöne ein.
Blitz „ein"
Der Einsatz des Blitzmoduls
Auslöser betätigen. Das Bild wird nun gespeichert,
Schließen Sie das Blitzmodul an der Buchse der Kamera an. Drehen Sie das Rändelrad, bis das Blitzmodul fest
und der Zähler wird um 1 Bild abwärts eingestellt.
mit der Kamera verbunden ist. Schalten Sie das Blitzmodul mittels des Schalters an der Seite der Kamera ein. Der
" " Blitzlicht-Indikator erscheint nun in der LCD-Anzeige. Die Kamera kann nun Aufnahmen mit Blitzlicht erstellen.
Automatische Abschaltung
Die automatische Abschaltfunktion schaltet die Kamera
automatisch aus, um die Batterie zu schonen nachdem
30 Sekunden lang keine Tastenbetätigung erfolgt ist.
* Die automatische Abschaltung funktioniert nicht, wenn
das Gerät am USB-Port angeschlossen ist.
• Schalten Sie die Kamera wieder ein, nachdem diese
von der automatischen Abschaltung abgeschaltet
wurde, indem Sie das Objektiv in das Gehäuse zurück
drücken, und anschließend wieder ausfahren.
• Wenn Sie die Kamera voraussichtlich längere Zeit nicht
einsetzen, sollten Sie stets das Objektiv vollständig in
das Gehäuse zurück drücken, um die Kamera
auszuschalten.
Scheda di memoria SD
Connettore flash
Si tratta di una scheda di memoria esterna che può essere collegata alla Fotocamera Digitale. Permette di
Attacco flash
registrare ulteriori immagini e fa da complemento alla memoria interna da 16 Mb della fotocamera. Quando si
inserisce la scheda SD nella fotocamera, sull'LCD compare l'icona "SD", per indicare che le foto scattate verranno
Otturatore
memorizzate solamente nella scheda SD.
Avvertenza: Prima di inserire la Scheda di memoria SD, accertarsi che la fotocamera sia spenta.
Ingresso
NOTA: La Fotocamera può funzionare solamente con un tipo di memoria alla volta. Se la scheda di memoria SD è
scheda SD
installata, le immagini e le impostazioni fotografiche della memoria interna della Fotocamera NON saranno
disponibili.
Presa USB
LCD
Descrizione
A
Formato immagine
B : 1280 x 1024 pixel
C : 640 x 480 pixel
e
Modo cancellazione
Cancella l'ultima immagine ripresa
Cancella tutte le immagini
Modalità Macro
Formatta la memoria
Per attivare la modalità Macro, basta ruotare il selettore di
Segnale acustico attivo
escursione dell'obiettivo da On all'icona " ". In questo modo si
Flash attivo
possono riprendere oggetti a breve distanza.
Uso del Modulo Flash
fotocamera riprende l'immagine. Questa viene quindi
Per collegare il modulo flash, inserire il connettore del flash nella presa dell'unità principale. Ruotare la vite finché il
registrata e il contatore si decrementa di un'unità.
flash è fissato saldamente alla fotocamera. Accendere l'interruttore del flash, ubicato sul lato della fotocamera.
Sullo schermo LCD appare l'icona " ". La fotocamera è così pronta a scattare fotografie con il flash.
Funzione di autospegnimento
Questa funzione permette di spegnere automaticamente
la fotocamera per evitare il consumo della batteria quando
l'unità viene lasciata inattiva per 30 secondi.
* La funzione di autospegnimento non è disponibile
quando si usa un collegamento USB.
• Per scattare fotografie dopo lo spegnimento automatico
della fotocamera (Auto Power Off), richiudere l'obiettivo
e poi estrarlo nuovamente.
• Se si prevede di non utilizzare la fotocamera per lunghi
periodi di tempo, richiudere l'obiettivo e spegnere
completamente la fotocamera.
DS6628
Führen Sie die
SD-Karte in das
Aufnahmefach ein
Das SD-Kartensymbol
erscheint, sobald eine
Karte eingeführt wird
DS6628
Inserire la scheda
SD nell'apposito
ingresso
Con la scheda inserita,
appare l'icona SD
Werbung

Verwandte Anleitungen für Oregon Scientific DS6628


Inhaltszusammenfassung für Oregon Scientific DS6628
- Seite 1 Quick Start Guide Kurzübersicht DS6628 DS6628 Front View Back View SD Memory Card Vorderansicht Rückansicht Einsetzen der SD Speicherkarte Flash jack Blitz-Anschlussbuchse The SD Memory Card is an external memory card that can be plugged into your Digital Camera. You can store...
- Seite 2 Guía de funcionamiento rápido Snelle start gids DS6628 DS6628 Vista frontal Vista posterior Tarjeta de memoria SD Aanzicht voorkant Aanzicht achterkant SD-geheugenkaart Soporte para el Flash Toma del flash Flitslichtmoer Flitslichtcontact La tarjeta de memoria SD es una tarjeta de memoria externa que se puede acoplar a la cámara digital. Puede De SD-geheugenkaart is een externe geheugenkaart die u in uw digitale camera kunt steken.