Werbung
Quicklinks
take the photo. The
number of photos by one.
ENGLISH
Clear Photos: Clear Photos mode will permanently delete all
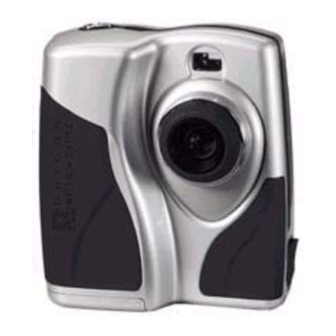
DIGITAL CAMERA MODEL DS-3898(A)
photos stored in the DS-3898(A). Before activating the Clear
Photos mode make sure that all photos have been downloaded
The DS-3898(A) Digital Camera makes taking filmless photos
to the PC. In Clear Photo mode the symbol "CL" will be
fun and easy!
displayed in the
Your choice! - Take 26 photos at a higher resolution or 107
feature, set the mode to "CL" and then press
photos at a more moderate resolution. Download your photos to
button twice. The
your PC (USB cable included) and then the DS-3898(A) is ready
and display the photo capacity for the selected resolution.
to take more photos! Or capture live action using the video cam
feature and the included Windows Netmeeting software.
®
Use the ArcSoft
PC software (included) to modify your photos
and add special effects or create montages! Post your photo
Low Resolution: In the low resolution mode the DS-3898(A)
"masterpieces" on your website, incorporate them into email
has an 107 photo capacity at a resolution of 320 x 240 pixels.
greeting cards to send to friends and relatives, or print them
and the symbol "Lr" will be displayed in the
out on your color printer (color printer not included). Easily create
COUNTER window. Press the
photo albums on your PC to save all the fun and memories.
this resolution.
In addition, you can use the Microsoft Windows Netmeeting
Note: At low resolution the number 99 will be displayed when
software (included) to have a video conference with your friends.
the available pictures are more than 99, this is normal.
I
C
Standby
A
D
E
K
J
H
Press the
B
button to sequence
G
through the camera
modes
Install the Batteries
1. To install the batteries, unlock the battery compartment
by sliding the
A
battery door lock to the unlocked position.
2. Remove the battery compartment cover and insert
B
the batteries (included) into the battery compartment with
the polarity in the direction as shown inside the compartment.
3. Replace the cover back over the battery compartment
Taking Photos
and slide the lock to the locked position.
1. Press
desired camera mode.
Note: The DS-3898(A) will not operate without battery power.
2. When activated,
When the batteries need replacing the
D
PHOTO COUNTER
green light.
will flash rapidly and the user will not be able to take photos.
Note: After 30 seconds of no activity, the camera will
Always download photos to the PC prior to replacing batteries
default to Standby mode. When the camera is not
to avoid memory loss.
active the Status LED will not be lit.
Important: Do not mix old batteries with new batteries.
3. Look through the
Always dispose of exhausted batteries properly. Do not insert
you can see the subject clearly.
anything except batteries into the battery compartment as
4. Press
this may cause damage to the camera.
5. The
D
one with each photo taken.
Select the Camera Mode
6. When a photograph is taken, a single short beep will be
emitted. After the beep sounds, the camera is ready to
After the camera is turned on, select the desired camera mode.
The mode selections are: Standby, Normal, Continuous
take another photograph.
Capture, Self Timer, Clear Photos and Resolution Setting.
Important: When the maximum number of photos have been
Note: To conserve battery power the DS-3898(A) will
taken,
D
SHUTTER is pressed when "00" is displayed, a series of
automatically default to Standby mode after 30 seconds of
short beeps will sound indicating that the maximum number
no activity. Press
MODE to reactivate the DS-3898(A).
C
of photographs have been taken.
Press the
C
MODE button to sequentially advance through
The photographs must be downloaded or cleared from the
the mode selections. The different modes are:
camera before more photographs can be taken.
(See Downloading Photographs.)
Note: The DS-3898(A) will not take photos in low light
Standby: The DS-3898(A) automatically defaults to this mode
conditions. When the light is too low for the DS-3898(A), a
conserve power after 30 seconds of no activity.
low tone beep will be emitted when photo is attempted.
Connecting the Camera to Your PC
1. Connect and install the
USB port of your PC.
Normal mode: In this mode the DS-3898(A) has a maximum
26 photo capacity at the higher resolution of 640 x 480 pixels.
2. Open the
the cable into the PC Interface Jack.
In Low Resolution the maximum number of photos is 107.
3. Install the ArcSoft
With each photo taken the
D
PHOTO COUNTER will decrease
by one. In Normal mode "Hr," (high resolution) will be briefly
4. Follow the instructions for downloading photographs.
displayed in the
D
PHOTO COUNTER window and then
The DS-3898(A) has video streaming capability. To use the
be replaced by "26" indicating the maximum photo capacity.
web cam feature:
1. Position the camera where the
is facing the subject.
2. Follow instructions provided in the Windows Netmeeting
Continuous Capture: In continuous capture the DS-3898(A) will
software for video conferencing function.
take photos rapidly without interruption until the maximum
number of photos has been taken. To use this feature, press
and hold the
E
SHUTTER button. When the maximum
number of photos have been taken the DS-3898(A) will stop
the audible tone. Continuous capture photos can be
converted to video file format (.AVI file) on the PC. In
Continuous Counter mode the symbol "Ct" will be displayed
in the
D
PHOTO COUNTER window.
Self Timer: The self timer feature delays taking the photo for
10 seconds. The self time symbol "St" will be displayed in the
PHOTO COUNTER window. To use this feature, press the
D
E
SHUTTER button once to activate the self time. During
the 10 second interval an audible tone will sound every second.
At the end of the 10 second delay period, the DS-3898(A) will
D
PHOTO COUNTER will decrease the
Installing the Software
1. Make sure that no programs, such as games or anti-virus
software, are running on the PC. If programs are open,
close and exit from the programs before going on to step 2.
2. Insert the ArcSoft
the PC.
3. After a short period, a setup menu will appear on the PC
screen.
4. From the setup menu, choose what language you want
the setup instructions to be in. After highlighting your
D
PHOTO COUNTER window. To use this
E
SHUTTER
selection, click OK.
5. Follow the on-screen instructions to install the software.
D
PHOTO COUNTER window will reset
6. Register the software. To register the software, click on
PROGRAMS/ARCSOFT/REGISTER & UPGRADE.
Follow the on-screen instructions to complete registration.
Important: If the setup menu does not automatically appear
after inserting the CD-ROM in the CD-ROM drive, follow these
instructions: In Windows, click on START and then click on
PHOTO
RUN from the start menu. Type: d:\setup and press the Enter
D
key on your keyboard where 'd' is the drive letter of the CD-
E
SHUTTER button to select
Rom drive. The setup portion of the software will activate.
Note: 1) The DS-3898(A) does not need to be connected to
the PC during the software installation process. 2) When
you finish installing the supplied software, click "Yes, I want
Normal/
Continuous
to restart my computer now" only if the message box displays
Capture
Self Timer
High Resolution
"InstallShield Wizard Complete." For other situations, always
click "No, I will restart my computer later."
Downloading Photos
To run the ArcSoft
®
software, from the main menu screen in
Windows, click on "Start." After clicking on "Start," click on
MODE
C
"Programs" and then on "ARCSOFT Photo Studio Suite."
Once the ArcSoft
®
menu appears, click on the program that
High Resolution
you want to use.
Downloading Photos:
1. Connect the DS-3898(A) to the PC. (See Connecting the
Clear Photos
Low Resolution
Camera to Your PC.)
2. Open the ArcSoft
select and click on "Photo Base" to open.
3. From the "Photo Base" menu, click on "Acquire" (the
camera icon). A pull down menu will appear. Select
MODE to activate the camera and select the
"Oregon Scientific" and click "Select."
C
4. The photos will be displayed on the screen in thumbnail
form. (The photos will be in a reduced size and shown on
the STATUS LED will show a steady
J
the screen at the same time.)
5. To download all the photos to the PC, click "Select All"
and then click "OK".
To download selected photos, click on each desired
thumbnail photos and then click "OK".
K
VIEWFINDER and make sure that
6. To stop the download process, click on the "X" in the right
corner of the "Oregon Scientific."
E
SHUTTER to take the photograph.
PHOTO COUNTER will decrease by a value of
Customer Assistance
Should you have questions or require additional information,
please contact our Customer Service Department at 800-
853-8883 or via email at helpme@oscientific.com
Warranty
the PHOTO COUNTER will show "00." If
E
Oregon Scientific warrants this product to be free of manufacturing
defects for 90 days from retail purchase. Defective products
are be returned to the place of retail purchase.
This warranty does not cover products subjected to tampering,
abuse, misuse or accidental damage.
Software
To use the exciting software included with your DS-3898(A),
click the start button in Windows. From the START menu,
click PROGRAMS then click on the software you wish to
use. Help screens are included with each program.
F
USB Cable (included) to the
Important: Before using the software, photos must be
downloaded from the DS-3898(A) to the PC.
Camera Connection Cable Door and plug
G
Photo Base
®
software (included) on your PC.
With "Photo Base" you can create photo albums, slide shows,
video postcards, greeting cards, or send your photos by
email to friends and relatives.
Note: In the photo album drop-down menu, there are two
Front-View Viewfinder
I
choices: "photos" and "new." The photo's included in the
"photo" selection have been selected and included by ArcSoft
and have not been taken with the DS-3898(A).
Photo Studio
After photos have been arranged in a photo album, with
"Photo Studio" you can change the way they look. Use "Photo
Studio" to edit and retouch photos, change colors, cut and
paste, and add special effects.
Photo Fantasy
F
"Photo Fantasy" is a collection of photos, including football
and basketball players, ballerina and astronaut, to which you
can add your face or any other face from a downloaded photo.
Note: The CD must be in the CD-ROM drive to use this software.
Photo Montage
Turn your photo into a montage collage with "Photo Montage."
Note: The CD must be in the CD-ROM drive to use this software.
Photo Printer
With a compatible color printer connected to your PC, you
can print out your photos using "Photo Printer."
Video Creator: Pictures taken in continuous mode on your
®
CD-ROM into the CD-ROM drive of
camera can be converted to an AVI movie on your PC using
the Video Creator. Please note that all pictures on your
camera and not just those created in continuous mode will
be made into an AVI movie.
1. Make sure your camera is connected via the USB port
and that the driver has been installed successfully.
2. Select PROGRAMS in the Windows menu, and select
"Video Creator" in the Video Creator directory.
3. Select CREATE and input a filename for your AVI movie file.
4. Select OPEN and input the filename. Your movie will be
able to be played.
®
Windows NetMeeting
: To use the camera as a web
camera for communicating live with your friends, or video
conferencing, the Windows Netmeeting (included in this
CDROM) must be installed. In addition, you must select the
Oregon Scientific DS-3898(A) as the video camera device.
1. First be sure to download all your pictures to your PC and
save them. Using the camera as a web camera will erase
all pictures stored in the camera memory.
2. Connect the camera to your PC as described above.
3. Run the Windows Netmeeting.
4. Select Tools and then Options.
5. Select Video and the Video camera properties menu will
be displayed.
6. Select Oregon Scientific DS-3898(A) and click OK.
Important: An Internet email account is required for connection
to the Internet.
Note: The DS-3898(A) must be connected to the PC to use
the video feature and software.
Notice of FCC Compliance
This device complies with Part 15 of the FCC Rules.
®
software and from the main menu
Operation is subject to the following two conditions: 1) This
device may not cause harmful interference, and 2) This
devlice must accept any interference received, including
interference that may cause undesired operation.
Warning: Changes or modifications to this product not
expressly approved by the party responsible for compliance
could void user's authority to use this product.
Note: This product has been tested and found to comply
with the limits for a Class B digital device, pursuant to Part
15 of the FCC Rules. These limits are designed to provide
reasonable protection against harmful interference in a
residential installation. This product generates, uses and
radiate radio frequency energy and, if not installed and used
in accordance with the instructions, may cause harmful
interference to radio communications.
However, there is no guarantee that interference will not occur
in particular installation. If this product does cause harmful
interference to radio or television reception, which can be
determined by turning the product off and on, the user is
encouraged to correct the interference by one or more of the
following measures:
-
Increase the separation between the product and the
affected equipment.
-
Consult the dealer or an experienced radio/television
technican for assistance.
Tested To Comply With FCC Standards FOR HOME OR
OFFICE USE
Important: Shielded cables must be used with this product
to ensure compliance with the Class B FCC limits.
Taking Care of Your Camera
With careful treatment you will have many years of fun with
your DS-3898(A) Digital Camera!
1. Do not immerse the camera in water. Water will damage
the electronic components.
2. Do not bang or drop the camera as this may damage
the electronic components.
3. Do not clean the camera with household cleaners or
chemicals.
4. To clean the camera casing, carefully wipe the casing
with a clean soft cloth that has been slightly dampened
®
with water.
5. To clean the lens, gently blow on the lens to remove dust
and dirt, then wipe the lens with a camera lens cleaning
tissue.
6. Turn the camera off when not in use.
7. When battery power is exhausted, replace the old
batteries with new batteries. Do not mix old batteries with
new batteries.
8. Only insert the batteries in the polarity direction as shown
in block 1, above.
9. Do not put anything into the battery compartment except
batteries.
10. Batteries contain dangerous chemicals and if mistreated
or improperly disposed of can cause harm, injury or damage.
11. Do not open the camera casing or tamper with the
camera's electronic components; doing so will void the
camera's warranty.
1
Specifications
Memory
: 26 Pictures at 640 X 480 pixels
107 Pictures at 320 X 240 pixels
Veille (standby): Le DS-3898(A) se met automatiquement sur
Color Resolution
: 24 bit
ce mode après 30 secondes de non-utilisation.
Focus Range
: 50 cm to Infinity (focus free)
Memory Type
: SDRAM (8M byte)
Create Video File
: 10 Seconds @ 320 X 240
PC Camera Mode
: Yes
Mode normal: Dans ce mode le DS-3898(A) a une capacité
Continuous Capture
: 10 fps
maximum de 26 photos en haute résolution de 640 x 480
Self Timer
: 10 Seconds
pixels. En basse résolution le nombre maximum de photos
PC Interface
: USB
est de 107. A chaque photo prise le COMPTEUR DE PHOTOS
Buzzer Output
: Yes
D
diminuera d'un. En Mode normal "Hr" (haute résolution)
Tripod Mount
: Yes
s'affichera brièvement dans la fenêtre du COMPTEUR DE
Display
: LCD Status Display
PHOTOS
Power
: 4 AA-Size 1.5V Alkaline Battery
capacité maximum de photos.
Battery Life
: Approximately 10 hours of
continuous use
Automatic Off
: 30 Seconds
Temperature
: Operation: 32
o
F - 104
o
F
(-20
o
C - 60
o
C)
Capture continue: En capture continue le DS-3898(A) prendra
Storage: -4
o
F - 140
o
F
les photos rapidement sans interruption jusqu'à ce que le
(-20
o
C - 60
o
C)
nombre maximum de photos ait été atteint. Pour utiliser cette
Weight
:
206 g. (with batteries)
option, appuyer et tenir appuyé le bouton SHUTTER
Dimensions
: 85 L X 38 D X 96 H (mm)
le nombre maximum de photos a été fait, le DS-3898(A)
Accessories
: USB Cable
arrête le signal sonore. Les photos en capture continue
Strap
peuvent être convertie en format vidéo (fichier AVI ) sur
l'ordinateur. En mode Compteur Continue le sumbole "CT"
sera affiché dans le fenêtre du COMPTEUR DE PHOTOS
FRENCH
Digitale Kamera DS-3898(A)
Retardateur: Cette caractéristique permet un délai de 10
Prendre des photos et les convertir en format vidéo est simple
secondes avant de prendre la photo. Le symbole de retardateur
et amusant avec le DS -3898(A). Utilisez le logiciel ArcSoft
®
"St" s'affiche dans la fenêtre COMPTEUR DE PHOTOS
pour modifier vos photos, ajoutez des effets spéciaux et faire
Pour activer cette caractéristique, appuyer une fois sur la
des montages.
commande SHUTTER
A vous de choisir ! Prenez 26 photos avec une résolution plus
vous entendrez un signal sinore chaque seconde. A la fin de
élevée ou 107 photos avec une résolution standard.
la période de 10 secondes, le DS-3898(A) prendra la photo. Le
Téléchargez vos photos sur votre PC (cable USB inclus) et
COMPTEUR DE PHOTOS
le DS -3898(A) sera prêt à prendre de nouvelles photos ! ou
photos d'un.
filmez directement l'action à l'aide du vidéo cam et du logiciel
Windows Netmeeting inclus
Téléchargez vos photos sur votre Web site, envoyez les par
email en carte de voeux à la famille et aux amis ou imprimez
Effaçage des Photos: Le Mode Effaçage des photos effacera
vos photos numériques (imprimante non fournie). Créez
définitivement toutes les photos stockées dans le DS-3898(A).
facilement des albums sur votre ordinateur pour sauvegarder
Avant d'activer le mode d'Effaçage des Photos, assurez-vous
vos photos. Grâce au logiciel Microsoft Windows Netmeeting
que vous avez déchargé toutes les photos sur l'ordinateur.
En mode Effaçage des Photos le symbole "CL" sera affiché
(inclus), vous pouvez avoir une Visio Conférence avec vos
amis.
dans la fenêtre du COMPTEUR DE PHOTOS
utiliser cette option passer en mode "CL" et appuyer deux
I
fois sur le bouton SHUTTER
A
C
DE PHOTOS
E
D
K
capacité de photos pour le mode sélectionné.
J
H
Basse Résolution: Dans le mode de basse résolution, le
DS-3898(A) a une capacité de 107 photos à une résolution de
B
320 x 240 pixels. Dans le mode de basse résolution, le symbole
G
"Lr" s'affiche dans la fenêtre COMPTEUR DE PHOTOS
Appuyer sur la commande SHUTTER
Installation des piles
Note: En basse résolution, le nombre 99 s'affiche quand le
nombre de photos disponibles est supérieur à 99. Ceci est
1. Pour installer les piles, ouvrir le logement à piles en
faisant coulisser le verrou de la
A
trappe en position
normal.
ouverte.
Veille
2. Enlever le couvercle du compartiment à piles et insérer
les piles (inclues) dans le compartiment à piles en
B
respectant bien les polarités comme montré à l'intérieur
du compartiment.
3. Replacer le couvercle sur le compartiment à piles et
faire glisser le verrou sur la position de verrouillage.
Note: Le DS -3898(A) ne marchera pas sans piles. Quand vous
Appuyez sur le bouton
avez besoin de remplacer
D
les piles, le COMPTEUR DE
MODE
pour faire
C
PHOTOS clignotera rapidement et l'utilisateur ne pourra plus
une revue séquentielle
prendre de photos. Toujours décharger vos photos sur votre
des modes de votre
ordinateur avant de remplacer les piles pour éviter des pertes
appareil photo
de photos en mémoire.
Important: Ne pas mélanger les vieilles piles usagées avec
des piles neuves. Vous débarrasser correctement des piles
usagées. Ne rien insérer d'autre que des piles dans le
compartiment à piles, cela pourrait endommager votre
appareil photo.
Prendre des Photos
1. Appuyer sur MODE
Sélection du Mode de l'Appareil photo
mode de photos désiré.
Pour mettre l'appareil photo en marche, sélectionnez le mode
2. Quand elle est activée, le LED STATUT
de l'appareil photo. Les modes à sélectionner sont: Veille
lumière verte permanente.
Note: Après 30 secondes de non-utilisation, l'appareil
(Standby), Normal, Capture Continue, Retardateur, Effaçage
de Photos, et Choix de la Résolution.
photo se mettra en mode Veille. Quand l'appareil photo
n'est pas activé, la LED Lumière Electro-luminescente
Note: Pour économiser l'énergie des piles, le DS-3898(A) se
n'est pas allumée.
mettra automatiquement en Mode Veille (standby) après 30
3. Regarder à travers l'OBJECTIF
secondes de non-activité. Appuyer sur
MODE pour
C
vous voyez clairement le sujet
réactiver le DS-3898(A).
4. Appuyez sur SHUTTER
Appuyer sur le bouton
MODE pour avancer par
5. La valeur du COMPTEUR DE PHOTOS
C
séquence à travers la sélection des modes Les différents
d'un à chaque photo prise.
modes sont:
6. Quand une photo est prise, un signal de bip sonore sera
émis. Après ce bip sonore, l'appareil est prêt à prendre
une autre photo.
D
puis sera remplacé par "26" indiquant la
E
. Quand
D
.
D
.
. Pendant l'intervalle de 10 secondes
E
D
diminuera le nombre de
D
. Pour
. La fenêtre du COMPTEUR
E
D
se remettra en marche et affichera la
D
.
pour la sélectionner.
E
Normal/
Capture
Continue
Retardateur
Haute Résolution
Haute Résolution
Effacer les
Basse Résolution
pour activer et sélectionner le
C
affiche une
J
K
et assurez-vous que
E
pour prendre la photo
D
diminuera
Werbung

Verwandte Anleitungen für Oregon Scientific DS3898A


Inhaltszusammenfassung für Oregon Scientific DS3898A
- Seite 1 PHOTO COUNTER will show “00.” If following measures: Oregon Scientific warrants this product to be free of manufacturing "Lr" s'affiche dans la fenêtre COMPTEUR DE PHOTOS SHUTTER is pressed when “00” is displayed, a series of automatically default to Standby mode after 30 seconds of...
- Seite 2 Sekunden wird ein hörbarer Ton jede Sekunde ausgesendet. Note: Le DS-3898(A) ne prend pas de photos quand la Oregon Scientific garantie ce produit de tout défaut de par la partie responsable de la conformité pourrait annuler le zu verändern und spezielle Effekte einzufügen oder Montagen Nach einer Verzögerung von 10 Sekunden, schiesst die DS-...
- Seite 3 2. Schlage die Kamera nicht an und lasse sie nicht fallen, denn attr averso le modalità fotocamera. 6. Selezionare Oregon Scientific DS-3898(A) e fare clic su OK. pile. Quando sarà necessario, sostituire le pile. Ricordarsi di della fotocamera. dies könnte die elektronischen Komponenten beschädigen.
- Seite 4 Sin embargo no existe garantía de que no puedan ocurrir Apertar o botão Nota: La DS-3898(A) se coloca en standby depués de 30 Oregon Scientific garantiza que este produto está libre de interferencias en una instalación en particular. Para determinar Importante: Cuando el número máximo de fotografías ha MODE para selecionar segundos de inatividad para así...
- Seite 5 Tecle: d:\setup e aperte a tecla Enter no teclado. A parte do Dimensões : 85 L x 38 F x 96 A (mm) aantal is gemaakt. Om deze stand in te schakelen, houdt u in de rechterboven hoek van het “Oregon Scientific” scherm. ® Windows NetMeeting Acessórios...
- Seite 6 4. Kies Tools en daarna Options. 5. Kies Video, waarna het Video camera eigenschappen menu wordt getoond. 6. Kies Oregon Scientific DS-3898(A) en klik op OK. Belangrijk: u dient een internet account te hebben om toegang te krijgen tot het Internet.