Herunterladen Inhalt Inhalt Diese Seite drucken
Rehan Looky+ Bedienungsanleitung

Rehan Looky+ Bedienungsanleitung

Elektronische handlupe
Vorschau ausblenden Andere Handbücher für Looky+:
Inhaltsverzeichnis

Werbung

Verfügbare Sprachen
  • DE

Verfügbare Sprachen

  • DEUTSCH, seite 18
User manual
Bedienungsanleitung
Gebruiksaanwijzing
Manuel d' útilisation
Manuel del usuario
Manuale dúso

Werbung

Inhaltsverzeichnis
loading

Inhaltszusammenfassung für Rehan Looky+

  • Seite 1 User manual Bedienungsanleitung Gebruiksaanwijzing Manuel d’ útilisation Manuel del usuario Manuale dúso...
  • Seite 2 Looky+ logo is a trademark of Rehan Electronics First Edition (January 2010) V1.0...
  • Seite 3 English ..........5 Deutsch ......... 17 Nederlands ........29 Français ......... 41 Español.......... 53 Italiano .......... 65...
  • Seite 4 Manufactured by: Rehan Electronics Ltd. Aughrim Road, Carnew, Co-Wicklow, Ireland www.lookyplus.com...
  • Seite 6: Inhaltsverzeichnis

    Table of Contents  1 Introduction ................ 2 General description Looky+ ...........  3 Intended use ................  4 Maintenance ................4.1 Battery maintenance  ............ 5 Installation - batteries ............ 6 Handle ..................  7 Controls ................7.1 Switching the Looky+ on and off ........
  • Seite 7: Introduction

    1 Introduction Congratulations with the purchase of your Looky+! In this manual you will find a detailed description of all the functions of the Looky+. If you still have any queries after reading this manual, please contact your supplier (see the back of the manual for contact details).
  • Seite 8: Maintenance

    4 Maintenance Only use accessories for the Looky+ that are approved of by the producer. 4.1 Battery maintenance  Remove the batteries from the Looky+ if you do not intend to use the device for an extended period of time. This will improve the longevity of the batteries. ...
  • Seite 9: Installation - Batteries

    5 Installation – batteries Remove the lid from the battery compartment by pressing down on the arrow and moving the lid in the direction of the arrow. Place the first battery at the back of the battery compartment. Now place the second battery. Note: charge the batteries before using your Looky+! See the charging instructions on page 12.
  • Seite 10: Digital Zoom

    7.2 Digital zoom  Press the yellow button (button 2) to digitally enlarge the image on the screen.  By pressing the yellow button (button 2) you can switch between the 4 zoom presets.  By pressing the yellow button (button 2) after having selected the highest magnification, you will return to the lowest magnification.
  • Seite 11: Freeze Image

    7.4 Freeze image  By pressing button 1 briefly you can freeze the image on the screen.  Press button 1 briefly again to unfreeze the image on the screen.  When the image is frozen you can still cycle through the different reading modes by pressing the blue button (button 3).
  • Seite 12: Advanced Settings - Z Button

    7.5.2 Advanced settings – Z button With the Z button you can adjust the brightness of the screen. By pressing the Z button you will lower the screen brightness by 20% - by doing so you will hear a sound that decreases in pitch. The lowest screen brightness is 20%, when you press the Z button once more the screen brightness will go back to 100% - when doing so you will hear a sound that increases in pitch.
  • Seite 13: Charging Instructions

    9 Charging instructions Plug the adaptor into the wall socket and connect the plug into the power jack (1) of the Looky+. You will hear two brief beeps and the LED light (2) will be switched on during charging. Charging time: ± 5 hours (depending on the battery capacity) Time of use: ±...
  • Seite 14: Troubleshoot

    10 Troubleshoot In this chapter you will find a description of some of the error messages the Looky+ can give, along with the corresponding solutions. Please read this section carefully if you are experiencing any problems with your Looky+. If you still have any queries after reading this section, please contact your supplier.
  • Seite 15: Specifications

    11 Specifications Measurements (length x width x height) and weight (incl. batteries): Looky+ : 113 x 75 x 38 mm (± 200 gr.) Screen: TFT diameter : 3.5 inch Magnification: Minimal : ± 2x Maximal : ± 20x Power supply: Batteries : 2x AA/LR6 Adaptor...
  • Seite 16: Discarding The Looky

    12 Discarding the Looky+ This symbol of the crossed out wheelie bin indicates that the product must not be disposed of with your other household waste. Check local regulations for proper disposal of electronic products. 13 Warranty regulations This device is subject to the warranty regulations of your supplier. For further information regarding these regulations, please contact your supplier.
  • Seite 18 Inhaltsverzeichnis  1 Einleitung ................ 2 Allgemeine Beschreibung des Looky+ ........ 3 Bestimmungsgemäße Verwendung ........ 4 Wartungsvorschriften ............4.1 Wartung der Batterien ............ 5 Einlegen der Batterien ............ 6 Handgriff ................ 7 Bedienungsanweisungen ............7.1    Ein- und Ausschalten des Looky+ ........
  • Seite 19: Einleitung

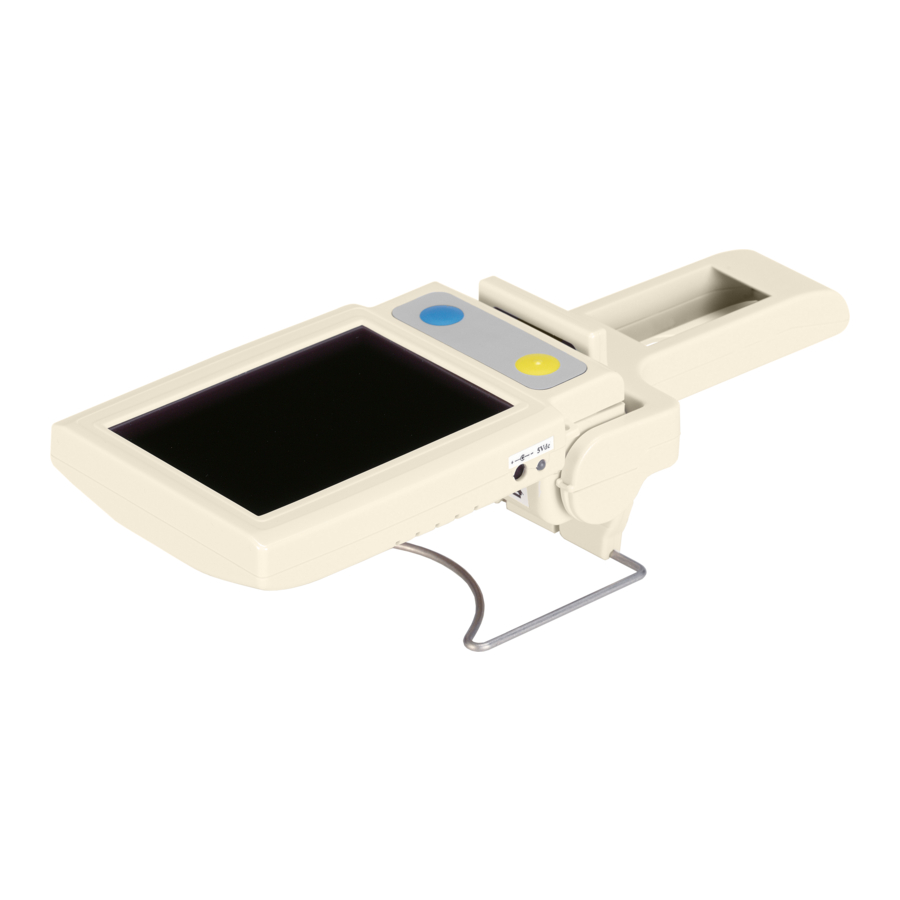
    1 Einleitung Herzlichen Glückwunsch zu Ihrem Looky+! Diese Anleitung enthält eine ausführliche Beschreibung der Funktionen des Looky+. Wenn Sie nach dem Lesen der Anleitung noch Fragen haben, nehmen Sie bitte Kontakt mit Ihrem Lieferanten auf (die Kontaktinformationen finden Sie auf der Rückseite). 2 Allgemeine Beschreibung des Looky+ Vorderseite Handgriff...
  • Seite 20: Wartungsvorschriften

    4 Wartungsvorschriften Verwenden Sie nur vom Hersteller geliefertes oder genehmigtes Zubehör. 4.1 Wartung der Batterien  Nehmen Sie die Batterien aus dem Looky+, wenn Sie es längere Zeit nicht verwenden. Damit verlängern Sie die Lebensdauer der Batterien.  Batterien sind empfindlich in Bezug auf Überladen. Die Batterien sollten vorzugsweise erst aufgeladen werden, wenn sie ganz leer sind.
  • Seite 21: Einlegen Der Batterien

    5 Einlegen der Batterien  Nehmen Sie die Batterieabdeckung vom Looky+ ab; drücken Sie dazu auf den Pfeil und schieben Sie die Abdeckung in die Richtung des Pfeils.  Legen Sie zuerst die Batterie ein, die hinten in das Batteriefach gehört. ...
  • Seite 22: Digital Vergrößern

    7.2 Digital vergrößern  Drücken Sie den gelben Knopf (Knopf 2), um das Bild auf dem Looky+ digital zu vergrößern.  Das Looky+ bietet 4 digitale Vergrößerungsfaktoren.  Wenn Sie den gelben Knopf (Knopf 2) drücken, nachdem Sie die größte Vergrößerung ausgewählt haben, kehren Sie wieder zur kleinsten Vergrößerung zurück.
  • Seite 23: Standbildfunktion

    7.4 Standbildfunktion Indem Sie Knopf 1 kurz drücken, können Sie das Bild anhalten (Standbild). Sie machen damit praktisch ein Foto. Drücken Sie erneut kurz Knopf 1, um wieder zu wirklichen Anzeige zurückzukehren. Wenn die Standbildfunktion aktiviert ist, können Sie noch immer zwischen den verschiedenen Leseständen umschalten, indem Sie den blauen Knopf (Knopf 3) drücken.
  • Seite 24: Erweiterte Einstellungen - Knopf Z

    7.5.2 Erweiterte Einstellungen – Knopf Z Mit Knopf Z können Sie die Helligkeit des Bildschirms anpassen. Durch Drücken des Knopfs Z reduzieren Sie die Helligkeit um 20 %, Sie hören dann auch einen Signalton, dessen Höhe abnimmt. Die niedrigste Lichtstärke ist 20 %; wenn Sie Knopf Z dann erneut drücken, kehrt die Helligkeit zur Einstellung 100 % zurück, Sie hören dann auch einen Signalton, dessen Höhe zunimmt.
  • Seite 25: Ladeanweisungen

    9 Ladeanweisungen Sorgen Sie dafür, dass das Looky+ ausgeschaltet ist. Stecken Sie den Adapter in die Steckdose und schließen sie den Stecker an den Adaptereingang (1) des Looky+ an. Sie hören dann zwei kurze Pieptöne und Sie sehen, dass die LED(2) aufleuchtet, wenn das Looky+ mit dem Laden beginnt.
  • Seite 26: Fehlerbehebung

    10 Fehlerbehebung In diesem Kapitel wird eine Reihe von Fehlermeldungen beschrieben, die das Looky+ anzeigen kann, sowie die betreffenden Lösungen. Lesen Sie diesen Abschnitt gründlich durch, wenn Sie Probleme mit dem Looky+ haben. Haben Sie nach dem Konsultieren dieses Abschnitts noch immer Fragen, wenden Sie sich bitte an Ihren Lieferanten.
  • Seite 27: Technische Daten

    11 Technische Daten Abmessungen (Länge x Breite x Höhe) und Gewicht (inkl. Batterien): Looky+ : 113 x 75 x 38 mm (± 200 Gramm) Bildschirm: : 3,5 Zoll Vergrößerung: Minimal : ± 2x Maximal : ± 20x Stromversorgung: Batterien : 2x AA/LR6 Netzteil : 5V DC 1,8A Gebrauchsbedingungen:...
  • Seite 28: Entsorgen

    12 Entsorgen Das Symbol “Mülltonne mit Kreuz” bedeutet dass dieses Produkt nicht mit dem Hausmüll entsorgt werden darf. Bitte wenden Sie sich an die öffentlichen örtlichen Entsorgungsbetriebe. 13 Garantiebestimmungen Für dieses Gerät gelten die allgemeinen Garantiebestimmungen Ihres Lieferanten. Nehmen Sie Kontakt mit Ihrem Lieferanten auf, wenn Sie weitere Informationen dazu wünschen.
  • Seite 30 Inhoudsopgave  1 Introductie ................ 2 Algemene beschrijving Looky+   .......... 3 Bedoeld gebruik  .............. 4 Onderhoudsvoorschriften ............. 4.1 Onderhoud batterijen ............ 5 Installatie - batterijen ............ 6 Handgreep ................ 7 Bedieningsinstructies ............7.1    In- en uitschakelen van de Looky+ ........
  • Seite 31: Introductie

    1 Introductie Gefeliciteerd met uw Looky+! In deze handleiding vindt u een uitgebreide beschrijving van de functionaliteiten van de Looky+. Indien u nog vragen heeft na het lezen van deze handleiding, neem gerust contact op met uw leverancier (zie achterzijde voor contact informatie). 2 Algemene beschrijving Looky+ Voorkant handgreep...
  • Seite 32: Onderhoudsvoorschriften

    4 Onderhoudsvoorschriften Gebruik alleen door de fabrikant bijgeleverde of goedgekeurde accessoires. 4.1 Onderhoud batterijen  Verwijder de batterijen uit de Looky+ indien u deze voor langere tijd niet gebruikt. Dit bevordert de levensduur van de batterijen.  Batterijen zijn gevoelig voor overladen. Het is aanbevolen om batterijen pas op te laden als ze volledig leeg zijn.
  • Seite 33: Installatie - Batterijen

    5 Installatie – batterijen Haal het batterijklepje van de Looky+ af door op het pijltje te drukken en het klepje in de richting van de pijl te duwen. Plaats eerst de batterij die achterin het batterijcompartiment geplaatst moet worden. Plaats hierna de tweede batterij. Let op: laad de batterijen op voordat u de Looky+ in gebruik neemt! Zie de laadinstructies op pagina 36.
  • Seite 34: Digitaal Vergroten

    7.2 Digitaal vergroten  Druk op de gele knop (knop 2) om het beeld op de Looky+ digitaal te vergroten.  De Looky+ beschikt over 4 digitale vergrotingsstanden.  Als u op de gele knop (knop 2) drukt nadat u de grootste vergroting heeft geselecteerd, komt u weer op de kleinste vergroting terug.
  • Seite 35: Beeld Bevriezen

    7.4 Beeld bevriezen  Door knop 1 kortstondig in te drukken kunt u het beeld stopzetten (bevriezen). U neemt als het ware een foto.  Druk nogmaals kortstondig op knop 1 om terug te keren naar de werkelijke weergave.  Als het beeld bevroren is kunt u nog steeds wisselen tussen de verschillende leesstanden door op de blauwe knop (knop 3) te drukken.
  • Seite 36: Geavanceerde Instellingen - Z Knop

    7.5.2 Geavanceerde instellingen – Z knop Met de Z knop kunt u de helderheid van het scherm aanpassen. Door het indrukken van de Z knop verlaagt u de helderheid met 20%, u hoort dan ook een geluid dat in toonhoogte afneemt. De laagste verlichting sterkte is 20%, indien u nog een keer de Z knop indrukt zal de helderheid weer terug naar 100% gaan, u hoort dan een geluid dat in toonhoogte toeneemt.
  • Seite 37: Laadinstructies

    9 Laadinstructies Zorg dat de Looky+ uit staat. Steek de adapter in de wandcontactdoos en sluit de stekker aan op de adapter ingang (1) van de Looky+. U hoort twee korte pieptonen en u ziet de LED(2) branden als de Looky+ begint met laden. Laadtijd: ±...
  • Seite 38: Probleem Oplossing

    geluid is hoorbaar Let op: het laadproces wordt onderbroken als u de Looky+ inschakelt! 10 Probleem oplossing In dit hoofdstuk worden een aantal foutmeldingen beschreven die de Looky+ kan geven met de desbetreffende oplossingen. Lees deze sectie goed door indien u problemen ervaart met de Looky+.
  • Seite 39: Specificaties

    ≥2300mAh 11 Specificaties Afmetingen (lengte x breedte x hoogte) en gewicht (incl. batterijen): Looky+ : 113 x 75 x 38 mm (± 200 gram) Scherm: : 3,5 inch Vergroting: Minimaal : ± 2x Maximaal : ± 20x Voeding: Batterijen : 2x AA/LR6 Adapter : 5V DC 1,8A Gebruiksomstandigheden:...
  • Seite 40: Recyclen

    12 Recyclen Dit symbool geeft aan dat het product niet via het huis- houdelijke afval mag worden afgevoerd. Voor meer informatie over de afvoer van uw oude apparatuur neemt u contact op met de plaatselijke autoriteiten. 13 Garantie bepalingen Dit apparaat valt onder de algemene garantie bepalingen van uw leverancier. Voor meer informatie hierover, neem contact op met uw leverancier.
  • Seite 42 Sommaire  1 Introduction ................  2 Description générale du Looky+ ...........  3 Utilisation visée .............. 4 Prescriptions d’entretien ............. 4.1 Entretien des piles ............ 5 Mise en place des piles ............ 6 Poignée ................ 7 Instructions d’utilisation ............7.1    Mise en route et arrêt du Looky+ ........
  • Seite 43: Introduction

    1 Introduction Nous vous remercions pour votre achat d’un Looky+ ! Vous trouvez dans ce manuel une description détaillée des fonctionnalités du Looky+. Si après sa lecture, vous aviez encore des questions, nous vous invitons à prendre contact avec votre fournisseur (voir coordonnées au dos).
  • Seite 44: Prescriptions D'entretien

    Attention : N’ouvrez jamais l’appareil vous-même ; faites le toujours faire par le fabricant ou par un réparateur agréé par ce dernier. Le fait d’essayer de réparer l’appareil vous-même entraîne l’annulation de la garantie. 4 Prescriptions d’entretien N’utilisez que des accessoires livrés ou agréés par le fabricant. 4.1 Entretien des piles ...
  • Seite 45: Mise En Place Des Piles

     Leur durée de vie moyenne est habituellement de 300 cycles de charge mais dépend de l’utilisation. La capacité totale diminue progressivement après plusieurs cycles de charge.  Rechargez les piles dans un environnement bien ventilé. 5 Mise en place des piles Ôtez le couvercle du compartiment piles du Looky+, en appuyant sur la flèche et en faisant glisser le couvercle dans le sens de la flèche.
  • Seite 46: Agrandissement Numérique

     Pour éteindre le Looky+ maintenez le bouton 1 enfoncé jusqu’à ce que vous entendiez à nouveau un son à deux tons, un ton aigu suivi d’un ton grave. L’écran du Looky+ s’éteint à présent. 7.2 Agrandissement numérique  Appuyez sur le bouton jaune (bouton 2) pour agrandir numériquement l’image sur le Looky+.
  • Seite 47: Geler L'image

     Appuyez sur le bouton bleu (bouton 3) pour sélectionner parmi différentes apparences de lecture.  En appuyant plusieurs fois sur le bouton bleu (bouton 3) il vous est proposé les apparences de lecture suivantes : Apparence photo avec éclairage – Blanc/Noir – Noir/Blanc – Jaune/Bleu – Jaune/Noir. ...
  • Seite 48: Réglages Avancés - Bouton Z

    vous appuyez sur le bouton, vous entendez un bruit dont la tonalité augmente, les messages sonores du Looky+ sont alors activés. Attention : une fois le son désactivé, il y aura toujours une alarme lorsque, durant la charge des piles, il apparaît un défaut. C’est alors le seul son que le Looky+ puisse encore émettre! 7.5.2 Réglages avancés –...
  • Seite 49: Instructions De Charge

    9 Instructions de charge Veillez à ce que le Looky+ soit éteint. Branchez l’adaptateur sur une prise murale et enfoncez la fiche sur l’entrée adaptateur (1) du Looky+. Vous entendez deux bips et vous voyez la LED (2) s’allumer lorsque le Looky+ se met en charge. Temps de charge: ±...
  • Seite 50: Résolution Des Problémes

    Durée d’utilisation: ± 2 heures (selon la capacité des piles) Allumage LED fixe Les piles sont en charge Allumage LED clignotant Les piles sont complètement chargées La LED clignote et l’on Les piles du Looky+ sont défectueuses entend alarme à ou du type non rechargeable.
  • Seite 51: Caractéristiques

    panne La LED clignote Une erreur - contactez votre four- lorsque le Looky+ est interne est nisseur allumé et non survenue dans le branché sur Looky+. l’adaptateur. Le Looky+ fait Les piles sont - remplacez les piles: entendre un bruit de défectueuses ou veillez à...
  • Seite 52: Mise Au Rebut

    Durée d’utilisation et temps de charge: Vous pouvez utiliser en moyenne le Looky+ durant 2 heures, avec la capacité recommandée de 2300 mAh. Le temps de charge moyen du Looky+ est de 5 heures pour des piles ayant la capacité recommandée de 2300 mAh. 12 Mise au rebut Ce symbole de la poubelle indique que le produit ne doit pas être jeté...
  • Seite 54 Índice  1 Introducción ................  2 Descripción general de la Looky+ ..........  3 Uso previsto ................  4 Disposiciones de mantenimiento .......... 4.1 Mantenimiento de las pilas .......... 5 Instalación - pilas .............. 6 Mango ..................  7 Instrucciones de manejo ............7.1    Encendido y apagado de la Looky+ ........
  • Seite 55: Introducción

    11 Especificaciones ..............12 Eliminación ................13 Disposiciones de garantía ............. 14 Información de contacto del proveedor ........ 1 Introducción ¡Le felicitamos por comprar la Looky+! En este manual encontrará una amplia descripción de las funciones de la Looky+. Si tiene más preguntas después de leer este manual, no dude en ponerse en contacto con su proveedor (véase la última página para la información de contacto).
  • Seite 56: Uso Previsto

    3 Uso previsto Este aparato está destinado única y exclusivamente para ampliar textos, material fotográfico y objetos. Si se modifica el objetivo de uso se anulará la validez de la marca CE. Atención: no abra nunca Ud. mismo el aparato, deje que lo haga siempre el fabricante o un reparador autorizado por el fabricante.
  • Seite 57: Mantenimiento De Las Pilas

    4.1 Mantenimiento de las pilas  Saque las pilas de la Looky+ si no la va usar durante mucho tiempo, ya que esto ayudará a que las pilas duren más tiempo.  Las pilas son sensibles a la sobrecarga. Se recomienda cargar las pilas solo cuando estén completamente vacías.
  • Seite 58: Instrucciones De Manejo

    7 Instrucciones de manejo 7.1 Encendido y apagado de la Looky+  Para encender la Looky+, mantenga pulsado el botón 1 durante un segundo. Entonces oirá un sonido de dos tonos –un tono bajo seguido de uno alto- y la pantalla se encenderá. ...
  • Seite 59: Seleccionar Posiciones De Lectura

    7.3 Seleccionar posiciones de lectura  Pulse el botón azul (botón 3) para seleccionar diversas posiciones de lectura.  Pulsando varias veces el botón azul (botón 3), irá a parar a las siguientes posiciones de lectura: Posición de foto con iluminación – Blanco/negro –...
  • Seite 60: Configuración Avanzada -Botón

    7.5.1 Configuración avanzada –Botón X Con el botón X podrá conectar o desconectar los mensajes acústicos de la Looky+. Si al pulsar el botón escucha un sonido que se va haciendo más bajo, eso significará que se han desconectado los mensajes acústicos de la Looky+. Si al pulsar el botón escucha un sonido que se va haciendo más alto, entonces se habrán conectado los mensajes acústicos de la Looky+.
  • Seite 61: Instrucciones De Carga

    9 Instrucciones de carga Asegúrese de que la Looky+ está apagada. Introduzca el adaptador en la toma de corriente de la pared y conecte el enchufe en la entrada del adaptador (1) de la Looky+. Oirá dos pitidos breves y verá que el LED (2) se enciende cuando la Looky+ empiece a cargar.
  • Seite 62: Resolución De Problemas

    Tiempo de carga: ± 5 horas (dependiendo de la capacidad de la pila) Duración de uso: ± 2 horas (dependiendo de la capacidad de la pila) El LED está encendido las pilas se están cargando constantemente El LED parpadea las pilas están totalmente cargadas El LED parpadea y se oye la Looky+ tiene pilas estropeadas o no una sirena de dos sonidos...
  • Seite 63 El LED parpadea Ha ocurrido un - póngase en contacto mientras la Looky+ error en la Looky+ con su proveedor está encendida y no está conectada al cargador La Looky+ emite un Las pilas están - cambie las pilas: sonido parecido a estropeadas o no asegúrese de que sean una sirena cuando...
  • Seite 64 Humedad relativa : <90%, sin condensación Duración de uso y tiempo de carga: Podrá utilizar la Looky+ de media 2 horas a una capacidad recomendada de 2300 mAh. El tiempo de carga medio de la Looky+ es de 5 horas en pilas con la capacidad recomendada de 2300 mAh.
  • Seite 66 Sommario  1 Introduzione ................  2 Descrizione generale Looky+ .......... 3 Scopo d’uso .................  4 Prescrizioni di manutenzione ..........4.1 Manutenzione delle batterie .......... 5 Installazione - batterie ............ 6 Impugnatura ................  7 Istruzioni di funzionamento ..........7.1    Accensione e spegnimento del Looky+ ........
  • Seite 67: Introduzione

     9 Istruzioni di carica ............... 10 Risoluzione dei problemi ............11 Specifiche ................12 Smaltimento ................ 13 Condizioni di garanzia ............14 Informazioni di contatto del rivenditore ........ 1 Introduzione Congratulazioni per l’acquisto del vostro nuovo Looky+! In questo manuale troverete un’ampia descrizione delle funzionalità del Looky+! Se dopo aver letto il presente manuale avete altre domande da fare, non esitate a contattare il vostro rivenditore (vedere le informazioni di contatto sul retro).
  • Seite 68: Scopo D'uso

    3 Scopo d’uso Questa apparecchiatura è destinata esclusivamente alla riproduzione ingrandita di testi, materiale fotografico e oggetti. Se viene alterato lo scopo d’uso, decadrà la validità del contrassegno CE. Attenzione: non aprire in alcun caso l’apparecchiatura – fatelo fare dal produttore o da un riparatore autorizzato dal produttore stesso.
  • Seite 69: Manutenzione Delle Batterie

    Utilizzare solo accessori forniti o approvati dal produttore. 4.1. Manutenzione delle batterie  Rimuovere le batterie dal Looky+ se l’apparecchio non verrà utilizzato per un lungo periodo. Questo aumenterà la durata delle batterie.  Le batterie sono sensibili a situazioni di sovraccarica. Si consiglia di caricare le batterie solo se sono completamente scariche.
  • Seite 70: Istruzioni Di Funzionamento

    Il Looky+ può anche essere utilizzato come assistente alla scrittura. Per fare ciò dovrete aprire al massimo l’impugnatura. Tenendo l’impugnatura piatta sul tavolo, lo schermo rimarrà inclinato. Quindi lo spazio sotto il Looky+ potrà essere utilizzato per la scrittura. 7 Istruzioni di funzionamento 7.1 Accensione e spegnimento del Looky+ ...
  • Seite 71: Selezione Delle Opzioni Di Lettura

    7.3 Selezione delle opzioni di lettura  Premere il pulsante blu (pulsante 3) per selezionare le diverse opzioni di lettura.  Premendo più volte il pulsante blu (pulsante 3) verranno selezionate le seguenti opzioni di lettura: Opzione foto con illuminazione – Bianco/Nero – Nero/Bianco – Giallo/Blu – Giallo/Nero. ...
  • Seite 72: Impostazioni Avanzate

    7.5 Impostazioni avanzate Il Looky+ ha 2 pulsanti nascosti con i quali si possono definire le impostazioni avanzate dell’apparecchiatura. Questi pulsanti, chiamati X e Z, si trovano nel vano batterie (rimuovere prima le batterie dal Looky+). Accertarsi che il Looky+ sia collegato all’adattatore e sia acceso per utilizzare queste funzioni.
  • Seite 73: Istruzioni Di Carica

     L’ultima opzione di lettura (esclusa l’opzione foto senza illuminazione – in questo caso il Looky+ si avvierà con l’ultima opzione di lettura utilizzata prima dell’opzione foto senza illuminazione).  Se il suono è ACCESO o SPENTO.  La luminosità impostata per lo schermo. 9 Istruzioni di carica Accertarsi che il Looky+ sia spento.
  • Seite 74: Risoluzione Dei Problemi

    Tempo di carica: ± 5 ore (a seconda della capacità della batteria) Durata di utilizzo: ± 2 ore (a seconda della capacità della batteria) LED sempre acceso le batterie vengono caricate LED lampeggiante le batterie sono completamente cariche LED lampeggiante con il Looky+ ha delle batterie difettose un suono di sirena a due oppure di tipo non caricabile...
  • Seite 75: Specifiche

    Il Looky+ si spegne Il Looky+ si speg- - spegnere tempora- neamente il Looky+ da solo con un su- ne da solo se non se non va utilizzato ono a due tonalità viene mosso per - spostare il Looky+ 3 minuti Il Looky+ non si Le batterie sono - sostituire le batterie...
  • Seite 76: Smaltimento

    Batterie : 2x AA/LR6 Adattatore : 5V DC 1,8A Condizioni di utilizzo: Temperatura : da +5 °C a +35 °C Umidità dell’aria : <70%, senza condensa Condizioni di conservazione e trasporto: Temperatura : da +0°C a +45°C Umidità dell’aria : <90%, senza condensa Durata di utilizzo e tempo di carica: Potete utilizzare il Looky+ per circa 2 ore alla capacità...
  • Seite 77 14 Informazioni di contatto del rivenditore...

Inhaltsverzeichnis