DELTA DORE PASS X2D Kurzanleitung
PASS X2D X3D
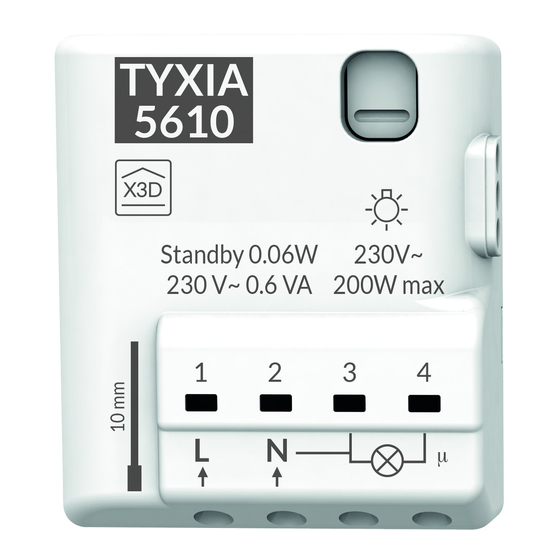
TYXIA 5xxx
TYXIA
1
2
3
TYMOOV
FR
Utilisez un outil isolé électriquement
pour réaliser les actions sur la touche
de configuration du récepteur.
1 - Installation
Installez le PASS X2D X3D dans une boîte d'encastrement.
230 V
N
50 Hz
L
2721332 Rev.1
2 - Association
Etape 1
Ê Mettez l'installation sous tension. Appuyez 3 secondes sur la touche
du PASS X2D X3D jusqu'à ce que son voyant clignote. Relâchez.
Ë Sur l'émetteur (X2D), envoyez l'ordre d'association (voir sa notice).
Ì Vérifiez que le voyant du PASS X2D X3D ne clignote plus.
ON
1
2
230V~
50 Hz
>3s
... ... ...
PASS X2D X3D
Etape 2
Ê Appuyez 3 secondes sur la touche du récepteur (X3D) jusqu'à ce que
son voyant clignote. Relâchez.
Ë Sur l'émetteur X2D, envoyez l'ordre d'association (voir sa notice).
Ì Vérifiez que le voyant du récepteur ne clignote plus.
Les produits sont associés.
1
2
... ... ...
> 3s
TYXIA
TYXIA
1
2
3
4
1
1
2
2
3
3
4
4
3 - Supprimez une association (X3D)
Ê Appuyez 10 secondes sur la touche du récepteur (X3D)
jusqu'à ce que le voyant clignote rapidement, relâchez.
Ë Validez sur l'émetteur (X2D) (voir sa notice).
Ì Vérifiez que le voyant du récepteur ne clignote plus.
Les produits ne sont plus associés.
1
2
TYXIA
TYXIA
>10s
1
2
3
4
1
2
3
4
4 - Supprimez une association X2D
Ê Appuyez 10 secondes sur la touche du PASS X2D X3D
- après 3 secondes, le voyant clignote lentement.
- après 7 secondes, le voyant clignote rapidement. Relâchez.
Ë Validez sur l'émetteur X2D (voir sa notice).
Ì Vérifiez que le voyant du PASS X2D X3D ne clignote plus.
Les produits ne sont plus associés.
1
2
>10s
... ... ...
.. .. ..... .. ..
3s
7s
PASS X2D X3D
230 V~ 50 Hz - 2 VA
X2D : 868MHZ -->868,6MHz
X3D : 868,7MHZ -->869,2MHz
Puissance radio max < 10 mW
Récepteur catégorie 2
4
-10°C / +70°C
-10°C / +40°C
45 x 38 x 25 mm
Important product
information (Ë Ì)
EN
Use an electrically isolated tool to perform
the actions on the receiver
TYXIA
configuration button. .
1 - Installation
Install the PASS X2D X3D in the flush mounting box.
2 - Association
Step 1
Ê Switch on the installation. Press the PASS X2D X3D button for 3
seconds until its LED flashes. Release
Ë Send the association command to the transmitter (X2D) (refer to the
user guide).
Ì Make sure that the PASS X2D X3D LED has stopped flashing.
3
ON
OFF
230V~
50 Hz
OK
PASS X2D X3D
Step 2
Ê Press the receiver button (X3D) for 3 seconds until its LED flashes.
Release.
Ë Send the association command to the transmitter (X2D) (refer to the
user guide).
Ì Make sure that the receiver LED has stopped flashing.
3
The products are associated.
OFF
TYXIA
1
2
3
4
> 3s
TYXIA
OK
1
2
X2D
X3D
PASS
3 - Remove an association (X3D)
Ê Press the receiver button (X3D) for 10 seconds until the LED flashes.
Release
Ë Confirm on the transmitter (X2D) (refer to the user guide).
Ì Make sure that the receiver LED has stopped flashing.
The products are no longer associated.
3
OFF
TYXIA
1
2
3
4
TYXIA
OK
1
2
3
4
4 - Remove an association (X2D)
Ê Press the PASS X2D X3D button for 10 seconds :
- after 3 seconds, the LED flashes slowly.
- after 7 seconds, the LED flashes quickly. Release
Ë Confirm on the transmitter (X2D) (refer to the user guide).
Ì Make sure that the PASS X2D X3D LED has stopped flashing
3
The products are no longer associated.
OFF
OK
PASS X2D X3D
Compatibité / Compatibility/ Kompatibilität / Compatibilidad / Compatibilità / Zgodność / Compatibiliteit
= class II
6351503 - TYXIA 223
6351034 - TYXIA 253
(uniquement si associé avec
TYXIA 5630 ou 5730)
6351072 - TYXIA 258
6351045 - MICROMODULE TYXIA 26X
6700059 - TYXIA 140B
6351012 - TYXIA 140
16 max.
6351010 - TYXIA 141
6412257 - MICRO COX
6412229 - MINICOX
6412206 - DOFX
6412202 - COX
6351023 - TYXIA 320 Détecteur IR EXT.
6411101 - CSX 20
6411102 - CSX 40
6411108 - CSTX 50
6411109 - CTX 60
6700015 - TYDOM 310
6701017 - TYDOM 315
7719998 - Commande centrale RADIO VR OEM
7729915 - Télécommande 10 Canaux X2D AM
N
230 V
50 Hz
L
2721332 Rev.1
1
2
OFF
>3s
... ... ...
1
2
... ... ...
TYXIA
3
4
1
1
2
2
3
3
4
4
X2D
1
2
TYXIA
>10s
1
2
3
4
OK
1
2
>10s
... ... ...
.. .. ..... .. ..
3s
7s
X2D
6351400 - TYXIA 5610
6351906 - TYXIA 5612
6351401 - TYXIA 5630
6351402 - TYXIA 5730
Gamme moteurs TYMOOV Radio
DE
Verwenden Sie ein elektrisch isolisertes
Werkzeug, um die Eingriffe an der
TYXIA
Konfigurationstaste des Empfängers vorzunehmen
1 - Installation
Installieren Sie den PASS X2D X3D in der Unterputzdose.
2 - Zuordnung
Schritt 1
Ê Setzen Sie die Anlage unter Spannung. Drücken Sie 3 Sekunden lang
auf die Taste des PASS X2D X3D, bis dessen Kontrolllampe blinkt.
Lassen Sie die Taste los.
Ë Geben Sie über den Sender die Zuordnungsanweisung (X2D)
(siehe entsprechende Anleitung).
Ì Achten Sie darauf, dass die Kontrollleuchte am PASS X2D X3D
jetzt nicht mehr blinkt.
3
ON
1
230V~
50 Hz
>3s
OK
... ... ...
PASS X2D X3D
Schritt 2
Ê Drücken Sie 3 Sekunden lang auf die Taste des Empfängers (X3D),
bis dessen Kontrolllampe blinkt. Lassen Sie die Taste los.
Ë Geben Sie über den Sender die Zuordnungsanweisung (X2D)
(siehe entsprechende Anleitung).
Ì Achten Sie darauf, dass die Kontrollleuchte am Empfänger jetzt nicht
3
mehr blinkt. Die Geräte sind nun miteinander verbunden.
OFF
1
TYXIA
... ... ...
1
2
3
4
> 3s
TYXIA
TYXIA
OK
1
2
3
4
1
1
2
2
3
3
4
4
X3D
PASS
3 - Zuordnung löschen (X3D)
Ê Drücken Sie 10 Sekunden lang die Taste am Empfänger (X3D),
bis die Kontrolllampe schnell blinkt. Lassen Sie wieder los.
Ë Bestätigen Sie am Sender (X2D) (siehe entsprechende Anleitung).
Ì Achten Sie darauf, dass die Kontrollleuchte am Empfänger jetzt nicht
mehr blinkt. Die Geräte sind nun nicht mehr miteinander verbunden.
3
1
OFF
TYXIA
TYXIA
TYXIA
>10s
1
2
3
4
1
2
3
4
1
4 - Zuordnung löschen (X2D)
Ê Halten Sie die Taste (PASS X2D X3D ) 10 Sekunden lang gedrückt:
- Nach 3 Sekunden blinkt die Kontrollleuchte langsam.
- Nach 7 Sekunden blinkt die Kontrollleuchte schnell.
Lassen Sie die Taste los.
Ë Bestätigen Sie am Sender (X2D) (siehe entsprechende Anleitung).
Ì Achten Sie darauf, dass die Kontrollleuchte am PASS X2D X3D
jetzt nicht mehr blinkt. Die Geräte sind nun nicht mehr miteinander
verbunden.
3
1
OFF
>10s
OK
... ... ...
.. .. ..... .. ..
3s
7s
PASS X2D X3D
X3D
TYXIA
.
N
230 V
50 Hz
L
2721332 Rev.1
2
3
OFF
OK
2
3
OFF
TYXIA
1
2
3
4
OK
X2D
X3D
PASS
2
3
OFF
TYXIA
2
3
4
1
2
3
4
OK
2
3
OFF
OK

Verwandte Anleitungen für DELTA DORE PASS X2D


Inhaltszusammenfassung für DELTA DORE PASS X2D
- Seite 1 Ê Setzen Sie die Anlage unter Spannung. Drücken Sie 3 Sekunden lang Ê Mettez l’installation sous tension. Appuyez 3 secondes sur la touche Ê Switch on the installation. Press the PASS X2D X3D button for 3 auf die Taste des PASS X2D X3D, bis dessen Kontrolllampe blinkt.
- Seite 2 Ê Zet de installatie onder spanning. Druk gedurende 3 seconden op de het lampje snel knippert, laat de knop los. toets van de PASS X2D X3D tot het lampje knippert. Laat de toets los. Ë Bevestig op de zender (X2D) (zie handleiding).
- Seite 3 Passerelle X2D/X3D : recommandation sur la mise en service sur une installation composée de récepteurs X2D/X3D (ex : Tyxia 4xxx ou moteurs Rollia) et des récepteurs X3D (ex : Tyxia 5XXX ou moteur Tymoov) Contexte : dans le cadre d’un SAV ou d’une extension, la passerelle X2D->X3D permet d’assurer la compatibilité...