BEA SKDA663-771C Bedienungsanleitung
Quicklinks
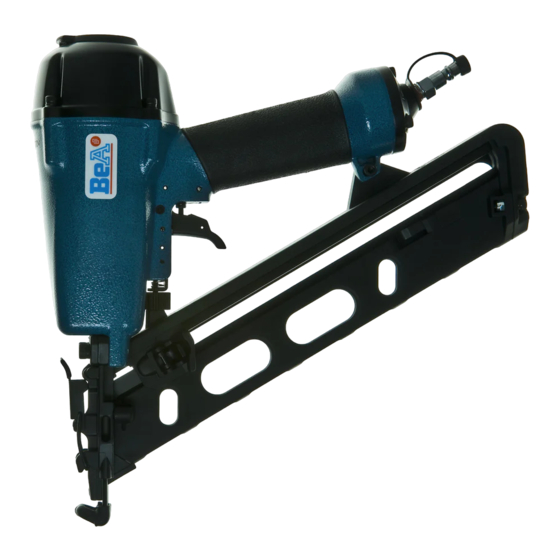
Stiftnagler SKDA663-771C
[1] Abmessungen: L = 319 ; H = 304 ; B = 91 mm;
[2] Gewicht ; 1,86kg.
[3] Zulässiger Luftdruck 8 bar
[4] empfohlener Betriebsdruck : 5 -7 bar
[5] Luftverbrauch pro Eintreibvorgang bei 6 bar: 2 l
freie Luft.
[6] Eintreibgegenstand:SKDA-Stift in den Längen
von 25 bis 64 mm
[7] A-bewerteter Einzelereignis-
Schalleistungspegel
L Wa, 1s = 84 dB
[8] A-bewerteterEinzelereignis-
Emission Schalldruckpegel
am Arbeitsplatz
L pA, 1s = 78 dB
[9] Vibrationskennwert: 3,17 m/s²
[10] Magazinart: Hinterlader
[11] Ladekapazität: min 100 Stifte
[12] Luftanschluß: 9 bis 10mm Nennweite
Diese Ersatzteilliste/Servicehinweise bildet mit
dem
beiliegenden
Benutzer-Handbuch
Betriebsanleitung.
Bitte
vor
aufmerksam
lesen
und
Sicherheitshinweise
beachten.
Achtung:
Gerät von der Druckluftzufuhr abkoppeln,
Magazin entleeren.Die Befestigung der Kappe muß mit
einem
Drehschrauber
erfolgen,
Drehmoment auf 7 Nm eingestellt ist.
Austausch des Treibers und des Kolbens
Die vier Zylinderschrauben 13302926 herausdrehen
und
die
Kappe
komplett
abheben.
Ersatztreiber, der von unten in den Treiberkanal
eingeführt wird, die Kolben-Treiber-Einheit nach oben
aus dem Gehäuse hinausdrücken. Mit einem Dorn
sorgfältig den Stift hinausdrücken. Defekte Teile
austauschen. Vor dem Wiedereinsetzen Kolben-O-Ring
einfetten mit O-Ring-Fett 13301706.
Auswechseln des Puffers und des Zylinders
Kappe
und
Kolben-Treiber-Einheit,
beschrieben, demontieren. Zylinder und Puffer lassen
sich leicht dem Gehäuse entnehmen. Defekte Teile
ersetzen und leicht gefettet (O-Ring-Fett 13301706)
wieder einsetzen.
Justieren der Eintreibtiefe
Ein paar Nägel in ein Materialmuster eintreiben. An der
Einstellmutter 14506744 drehen und die Eintreibtiefe
einstellen.
Achtung!
Immer erst das Gerät von der
Pneumatik-Druckquelle trennen bevor an der
Einstellmutter 14506744 gedreht wird.
Pneumatic brad nailers SKDA663-
771C
This Spare parts list/service instructions and the
enclosed
Operator's
Manual
Operating Instructions. Before using read both
and strictly ob serve safety instructions.
In the German section of the spare parts list the
technical data are listed under codes [ ] (also see User
Manual).
Important: Disconnect the machine from compressed
air supply, empty the magazine. The cover should only
be fastened with the aid of a mechanical screwdriver -
torque set at 7 Nm.
Replacing the driver and the piston: Unscrew the
four cheese-head screws 13302926 and lift-off the
complete cover. Push the piston-driver-unit upwards
out of the housing with the aid of the replacement
driver which is inserted from below into the driver
channel. Carefully push out the pin with a mandrill.
Replace faulty parts. Before replacing, grease the
piston o-ring with o-ring grease 13301706.
Exchanging the buffer and the cylinder:
Dismount the hood and piston-driver-unit as mentioned
above. Remove the cylinder and buffer in an upward
direction from the housing. Replace faulty parts. Re-
insert the lightly greased piston O-ring (O-ring grease
13301706).
Adjusting the riveting depth:
Drive a few pins into a piece of sample material. Turn
the depth-adjustment nut 14506744 to adjust the
riveting depth.
Caution! Always disconnect the machine from the
compressed air source before turning the depth-
adjustment nut 14506744.
Cloueuses pneumatiques
SKDA663-771C
Cette Nomenclature des pièces détachées et
instructions
de
montage
et le
l'utilisateur font partie du Mode d'Emploi. Avant
utilisation
veuillez les lire attentivement.
La
partie
en
langue
allemande
caractéristiques techniques avec des références [ ]
(voir manuel d'instruction).
D
die
Inbetriebnahme
bei
dem
das
Mit
dem
wie
oben
GR
constitute
the
F
Manuel
de
contient
les
Attention :
Débrancher l'alimentation en air comprimé et vider le
magasin.
Le cache doit être fixé à l'aide d'une visseuse réglée sur
un couple de 7 Nm.
Remplacement du chassoir et du piston
Retirer les quatre vis à tête cylindrique 13302926 et
soulever complètement le cache. Introduire par en bas
le chassoir de remplacement dans le canal afin de faire
ressortir par le haut l'ensemble constitué du piston et
du chassoir. Faire sortir la broche en appuyant
délicatement avec un mandrin. Remplacer les pièces
défectueuses. Avant de remettre en place le joint
torique du piston, le lubrifier avec de la graisse pour
joint torique 13301706.
Remplacement du butoir et du cylindre
Démonter le cache et l'ensemble constitué du piston et
du chassoir comme décrit ci-dessus. Retirer le cylindre
et le butoir par en haut. Remplacer les éléments
défectueux. Lubrifier légèrement les pièces avant de les
remettre en place (graisse pour joints toriques
13301706).
Ajustage de la profondeur d'enfoncement
Faire un essai en enfonçant quelques clous. Tourner la
ecrou de réglage 14506744 pour régler la profondeur
d'enfoncement.
Attention !
Toujours
débrancher
l'alimentation en air comprimé avant d'ajuster la ecrou
de réglage 14506744.
Grapadora neumátoca SKDA663-
771C
Esta
Lista
de
piezas
e
mantenimiento son partes - junto con las
Instrucciones para el operario - de las normas de
trabajo.
Antes
del
utilizo
detenidamente dichas instrucciones y atender las
instrucciones de seguridad.
En la parte alemana de la lista de repuestos figuran
datos técnicos bajo cifras características. [ ] (Véase
también el manual de usuario.)
Atención: desconectar el aparato del suministro de
aire comprimido, vaciar el cargador. Se debe fijar la
tapa con un destornillador con un par fijado a 7 Nm.
Sustitución del percutor y del pistón. Destornillar
los cuatro tornillos cilíndricos 13302926 y levantar
totalmente la cubierta. Sacar de la carcasa la unidad
pistón-percutor mediante introduciendo por debajo el
percutor de repuesto en el canal del percutor y
presionando hacia arriba. Sacar la punta con cuidado
con ayuda de una punzón. Sustituir las piezas
defectuosas. Lubricar la junta tórica del pistón con
grasa de junta tórica 13301706 antes de volver a
montar el pistón.
Sustitución del tope y del cilindro.
Desmontar la cubierta y la unidad pistón-percutor
como se describe arriba. Sacar de la carcasa el cilindro
y el tope, hacia arriba. Sustituir la pieza defectuosa y
volver a colocarla ligeramente engrasada (grasa de
junta tórica 13301706).
Ajustar la profundidad de clavado.
Clavar unas cuantas puntas en una muestra de
material. Ajustar la profundidad de clavado girando el
tuerca de ajuste 14506744.
Atención: desconectar
siempre
suministro neumático antes de girar el tuerca de ajuste
14506744
Fissatrice pneumatica SKDA663-771C
La Lista ricambi/istruzioni di manutenzione e
l'allegato Manuale per l'utilizzatore costituiscono
le istruzioni per l'uso. Leggere attentamente prima
di
utilizzare
la
fissatrice
assolutamente le norme di sicurezza riportate.
Nella parte tedesca della distinta pezzi di ricambio, i
dati tecnici sono evidenziati tra parentesi quadr [ ]. (cfr.
anche il manuale per l'operatore).
Attenzione: staccare l'utensile dal compressore,
svuotare il caricatore. La testata deve essere fissata
con un avvitatore, con momento torcente regolato a 7
Nm.
Sostituzione del punzone e del pistone.
Svitare le quattro viti a testa cilindrica 13302926 e
rimuovere completamente la testata. Con il punzone di
ricambio, che deve essere introdotto dal lato inferiore
del relativo condotto, spingere verso l'alto il gruppo
punzone-pistone in modo tale da farlo fuoriuscire. Con
una spina, spingere delicatamente il chiodo verso l'alto.
Sostituire le parti difettose. Prima di rimontarlo,
ingrassare l'anello O-ring del pistone con l'apposito
grasso 13301706.
l'appareil
de
E
instrucciones
de
deben
leerse
el
aparato
del
I
e
rispettare

Verwandte Anleitungen für BEA SKDA663-771C


Inhaltszusammenfassung für BEA SKDA663-771C
- Seite 1 Replace faulty parts. Before replacing, grease the piston o-ring with o-ring grease 13301706. Exchanging the buffer and the cylinder: Fissatrice pneumatica SKDA663-771C Dismount the hood and piston-driver-unit as mentioned above. Remove the cylinder and buffer in an upward La Lista ricambi/istruzioni di manutenzione e direction from the housing.
- Seite 2 Fastgørelsen af skærmen skal ske med en 14506744. skruetrækker, hvor drejemomentet er indstillet på 7 Wbijak gwoździ SKDA663-771C Udskiftning af drivdorn og stempel. Skru de fire Niniejsza lista części zamiennych i wskazówki serwisowe cylinderskruer 13302926 ud og løft skærmen helt af.
- Seite 3 Αντικαθιστάτε τα εξαρτήµατα που έχουν βλάβη. Πριν από την επανατοποθέτηση λιπαίνετε τον O-δακτύλιο εµβόλου µε γράσο O-δακτυλίων 13301706. Καρφωτικό SKDA663-771C Αυτός ο Κατάλογος ανταλλακτικών / Οδηγίες για τη συντήρηση αποτελεί µαζί Αντικατάσταση του προσκρουστήρα και του κυλίνδρου. µε το συνηµµένο εγχειρίδιο του χειριστή τις οδηγίες χρήσης. Παρακαλούµε να...
- Seite 4 Français Nomenclature des piéces détachées et instructions de montage Español Lista de recambios e instrcciones de uso SKDA663-771C Art.-Nr.12100345 Type Tipo BeA Gruppe, Bogenstraße 43 - 45, 22926 Ahrensburg/Germany, Telefon +49 (0) 4102 78-0, Telefax +49 (0) 4102 78319 http://www.bea-group.com...