Inhaltsverzeichnis
Werbung
Verfügbare Sprachen
Verfügbare Sprachen
Quicklinks
Werbung
Inhaltsverzeichnis

Verwandte Anleitungen für Peavey PV 8 serie


Inhaltszusammenfassung für Peavey PV 8 serie
- Seite 1 8 and PV 8 USB ® ® Compact Mixers Operating Manual www.peavey.com...
- Seite 2 ATTENTION: Afin de réduire le risque de choc électrique, ne pas enlever le couvercle. Il ne se trouve à l’intérieur aucune pièce pouvant être reparée par l’utilisateur. Confiez I’entretien et la réparation de l’appareil à un réparateur Peavey agréé. AVIS: Dans le but de reduire les risques d’incendie ou de decharge electrique, cet appareil ne doit pas etre expose a la pluie ou a l’humidite et aucun objet rempli de liquide, tel qu’un vase, ne doit...
-
Seite 3: Important Safety Instructions
IMPORTANT SAFETY INSTRUCTIONS WARNING: When using electrical products, basic cautions should always be followed, including the following: Read these instructions. Keep these instructions. Heed all warnings. Follow all instructions. Do not use this apparatus near water. Clean only with a dry cloth. Do not block any of the ventilation openings. -
Seite 4: Wichtige Sicherheitshinweise
WICHTIGE SICHERHEITSHINWEISE ACHTUNG: Beim Einsatz von Elektrogeräten müssen u.a. grundlegende Vorsichtsmaßnahmen befolgt werden: Lesen Sie sich diese Anweisungen durch. Bewahren Sie diese Anweisungen auf. Beachten Sie alle Warnungen. Befolgen Sie alle Anweisungen. Setzen Sie dieses Gerät nicht in der Nähe von Wasser ein. Reinigen Sie es nur mit einem trockenen Tuch. -
Seite 5: Instructions Importantes De Securite
INSTRUCTIONS IMPORTANTES DE SECURITE ATTENTION: L’utilisation de tout appareil électrique doit être soumise aux precautions d’usage incluant: Lire ces instructions. Gardez ce manuel pour de futures références. Prétez attention aux messages de précautions de ce manuel. Suivez ces instructions. N’utilisez pas cette unité proche de plans d’eau. N’utilisez qu’un tissu sec pour le nettoyage de votre unité. - Seite 6 INSTRUCCIONES IMPORTANTES PARA SU SEGURIDAD CUIDADO: Cuando use productos electrónicos, debe tomar precauciones básicas, incluyendo las siguientes: Lea estas instrucciones. Guarde estas instrucciones. Haga caso de todos los consejos. Siga todas las instrucciones. No usar este aparato cerca del agua. Limpiar solamente con una tela seca.
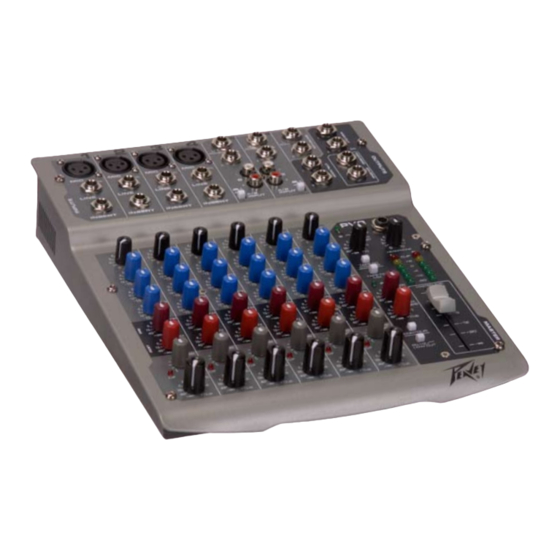
- Seite 7 ENGLISH 8, PV 8 USB ® ® Compact Mixers Congratulations on purchasing the Peavey PV 8 or PV 8 USB Compact Mixer. The PV 8 is a studio-quality mixing console ® ® ® designed to meet diverse needs while occupying a small space. These are the perfect consoles for small venue performances or home recording environments.
-
Seite 8: Front Panel
Front Panel Gain This control establishes the nominal operating level for the channel. The input gain can be adjusted over a wide range to compensate for soft voices or very loud drums. To maximize the signal-to-noise ratio, the gain should be set to the proper level, with the channel Fader (12) set to 0. If the clip LED comes on and remains lit, try reducing the gain. - Seite 9 Front Panel Phantom Power LED This LED lights when the Phantom Power Switch (11) has been engaged. Phantom Power Switch Applies +48 VDC Voltage to the input XLR connectors to power microphones requiring phantom power. If phantom power is used, do not connect unbalanced dynamic microphones or other devices to the XLR inputs that cannot handle this Voltage.
-
Seite 10: Rear Panel
Front Panel Headphone Output The Headphone Output is a 1⁄4 " TRS (tip= left; ring = right; sleeve = ground). The signal sent to this output is normally the Left/Right mix. When the Tape to Control Room switch is engaged, the tape input signal is added to the Left/Right mix and can be monitored in the headphones. - Seite 11 Front Panel Stereo (1⁄4") Inputs These 1⁄4" unbalanced inputs work as a stereo line input using both jacks or as a mono input if the connection is made to the Left/Mono input only. The A/B input selector must be in the "A" position for these jacks to be active.
- Seite 12 Use to connect the included power supply. Be sure the power supply is connected to the PV®8 before connecting to a power source. Use 15 VDC, 0.5A adapter only. Note: Replace only with Peavey part number 30901986 for Domestic or 30902780 for Export. Power Switch Depressing the power switch supplies power to the unit.
- Seite 13 ® 8 Block Diagram...
- Seite 14 8 Series Specifications ® Inputs Input Levels Function Input Z Input Gain Bal/ Connector (ohms min) Setting Min** Nominal* Unbal Microphone 2.2k Max Gain -83 dBu -59 dBu -41 dBu XLR Pin 1 Gnd (150 ohms) (63 dB) Pin 2 (+) Pin 3 (-1) Min Gain -30 dBu...
- Seite 15 8 Specifications ® Frequency Response Mic Input to Left/Right Output 14 Hz to 25 kHz +0 dB/-1 dB Total Harmonic Distortion <0.01% 20 Hz to 20 kHz Mic to Left/Right Output (10 Hz to 80 kHz BW) <0.005% Typical (22 Hz to 22 kHz BW) <0.0007% Mic Pre-amp Distortion Hum and Noise Output...
-
Seite 16: Características Y Funciones
ESPAÑOL 8, PV 8 USB ® ® Consolas de mezcla compactas Gracias por su compra de la consola de mezcla Peavey PV 8 o de la PV 8 USB. Las consolas de mezcla PV 8 son de calidad ® ®... -
Seite 17: Panel Delantero
Panel delantero Gain (ganancia) Este control ajusta el nivel de operación nominal del canal correspondiente. Se puede ajustar la ganancia de entrada en un amplio rango, a fin de compensar por voces a bajo volumen y también por tambores a alto volumen. Para maximizar la relación señal/ruido, se debe ajustar la ganancia al nivel adecuado estando el atenuador (Fader - 12) en la posición de 0. - Seite 18 Panel delantero LED de alimentación eléctrica fantasma (Phantom Power) Esta lámpara de LED se enciende al activar el interruptor de alimentación eléctrica fantasma (Phantom Power - 11). Interruptor de alimentación eléctrica fantasma (Phantom Power) Aplica un voltaje de +48 VCC a las tomas XLR de la consola a fin de suministrar electricidad a los micrófonos que requieran alimentación eléctrica fantasma.
-
Seite 19: Panel Trasero
Panel delantero Toma de auriculares (Headphone) La toma de auriculares es del tipo TRS (punta = izquierdo; anillo = derecho; manguito = tierra) de 1⁄4”. Por lo general la señal presente en esta toma es la mezcla Izquierdo/Derecho. Si se acopla el interruptor de grabación a cabina de control (Tape to Control Room), se suma la señal de entrada de grabación a la mezcla Izquierdo/Derecho y se puede monitorear con los auriculares. - Seite 20 Panel delantero Tomas estéreo de 1⁄4” Estas tomas de entrada de 1⁄4” del tipo de señal desbalanceada funcionan como una entrada de señal de línea estéreo cuando se utilizan ambas tomas, o se puede conectar una sola señal de línea a la toma Izquierdo/Mono (Left/Mono).
- Seite 21 ® Utilice solamente adaptadores de 15 VCC, de 0,5 A. Nota: Reemplace el adaptador sólo con el adaptador Peavey de número de pieza 30901986 en los Estados Unidos, o con el 30902780 fuera de los Estados Unidos. Interruptor de alimentación eléctrica (Power) Al presionar el interruptor de alimentación eléctrica se suministra electricidad al equipo.
- Seite 22 ® 8 Diagrama de bloques...
-
Seite 23: Especificaciones
Serie PV 8 - Especificaciones ® Entradas Niveles de entrada Función Z de la entrada Ajustes de la Bal/ Conector (Ohmios, min.) ganancia Min** Nominal* Desbal. de entrada Micrófono 2.2k Ganancia máxima -83 dBu -59 dBu -41 dBu XLR Pin 1 (tierra) (150 Ohmios) (63 dB) Pin 2 (+) - Seite 24 8 Especificaciones ® Respuesta de frecuencia Salidas de las entradas de micrófono a Izquierdo/Derecho 14 Hz hasta 25 kHz +0 dB/-1 dB Total Harmonic Distortion <0.01% de 20 Hz a 20 kHz, Mic a salida Izquierdo/Derecho (10 Hz a 80 kHz, BW) <0.005% típica (22 Hz a 22 kHz BW) <0.0007% distorsión del preamplificador de micrófonos...
- Seite 25 FRANçAIS 8 et PV 8 USB ® ® Console de Mixage Compacte Félicitations ! Vous avez fait l’acquisition d’une console de mixage compacte Peavey PV 8 ou PV 8 USB. La PV 8 est une ® ® ® console de mixage de qualité studio conçue pour répondre à des besoins très divers, tout en offrant un encombrement très limité.
-
Seite 26: Panneau Avant
Panneau Avant Gain Ce contrôle permet d’ajuster le niveau du canal. Le gain en entrée peut être réglé de sorte à gérer aussi bien des voix douces que des batteries puissantes. Pour optimiser le rapport signal-bruit, le gain doit être réglé... - Seite 27 Panneau Avant LED d’alimentation fantôme Cette LED s’allume lorsque l’alimentation fantôme (11) est activée. Interrupteur d’alimentation fantôme Envoie un courant de +48 V CC aux prises d’entrée XLR, afin d’alimenter les microphones nécessitant une alimentation fantôme. Si l’alimentation fantôme est active, ne branchez pas sur les entrées XLR de microphones dynamiques asymétriques ou autres appareils qui ne supporteraient pas cette tension.
-
Seite 28: Panneau Arrière
Panneau Avant Sortie casque La prise casque est une prise jack 6,35 mm stéréo symétrique. Le signal envoyé vers cette sortie est habituellement le mix stéréo. Lorsque le sélecteur “Tape to Control Room” est actionné, le signal de l’entrée “Tape” est ajouté au mix stéréo afin d’être contrôlé au casque. Niveau du casque Ce contrôle permet d’ajuster le niveau du signal d’écoute (sortie casque et sortie “Control Room”). - Seite 29 Panneau Arrière Entrées stéréo 6,35 mm Ces entrées 6,35 mm asymétriques fonctionnent comme une entrée ligne stéréo par l’intermédiaire de paires de jacks ou en mono si seule l’entrée gauche/mono est utilisée. Le sélecteur d’entrée A/B doit être en position A pour que ces entrées soient actives. Entrées RCA Ces entrées RCA fonctionnent comme des entrées ligne stéréo.
- Seite 30 8 avant tout branchement à une source électrique. Utilisez exclusivement un adaptateur ® 15 V CC, 0,5 A. Remarque : Remplacez exclusivement votre transformateur par le modèle Peavey référence 30901986 (120V) ou 30902780 (230V). Interrupteur de mise sous tension Cet interrupteur permet de mettre l’appareil sous tension.
- Seite 31 ® 8 Schéma fonctionnel...
-
Seite 32: Caractéristiques
8: Caractéristiques ® Entrées Niveaux d’entrée Fonction Réglage Sym/ Connecteur Entrée Z (ohms du gain Min** Nominal* Asym min) d’entrée Microphone 2.2k Gain max -83 dBu -59 dBu -41 dBu XLR Broche 1 Terre (150 ohms) (63 dB) Broche 2 (+) Broche 3 (-1) Gain min -30 dBu... - Seite 33 8: Caractéristiques ® Réponse en Fréquences Entrée micro vers Sortie Droite/Gauche 14 Hz à 25 kHz +0 dB/-1 dB Distortion harmonique totale <0.01% 20 Hz à 20 kHz Mic vers Sortie Droite/Gauche (10 Hz à 80 kHz BW) <0.005% en moyenne (22 Hz à...
-
Seite 34: Installationshinweis
DEUTSCH 8, PV 8 USB ® ® Kompaktmischer Herzlichen Glückwunsch! Sie haben gerade das Peavey PV 8 bzw. PV 8 USB Kompakt-Mischpult erworben. Das PV 8 ist ein ® ® ® Mischpult, das trotz seiner geringen Maße Studioqualität liefert und die verschiedensten Bedürfnisse erfüllt. Diese Mischpulte sind perfekte Lösungen für kleinere Veranstaltungen oder für das Heimstudio. - Seite 35 Vorderseite Gain Mit diesem Regler wird der Nennbetriebspegel für den Kanal eingestellt. Die Eingangsverstärkung kann über einen weiten Bereich eingestellt werden, um zarte Stimmen oder ein sehr lautes Schlagzeug zu kompen- sieren. Um den Rauschabstand zu maximieren, sollte die Verstärkung auf den korrekten Pegel mit dem Kanal-Überblendregler (12) auf 0 gestellt werden.
- Seite 36 Vorderseite Phantom Power LED Diese LED leuchtet auf, wenn der Phantomspeisung- Schalter (11) gedrückt wurde. Schalter für Phantomspeisung Versorgt die XLR-Eingänge mit +48 V Gleichspannung, um Mikrofone mit Phantomspeisung zu betreiben. Wird die Phantomspeisung verwendet, dürfen keine unsymmetrischen dynamischen Mikrofone oder anderen Geräte an die XLR-Eingänge angeschlossen werden, die mit dieser Spannung nicht zurechtkommen.
- Seite 37 Vorderseite Kopfhörerausgang Der Kopfhörerausgang ist als 1⁄4” Klinkenanschluss ausgeführt (Spitze = links; Ring = rechts; Hülse = Masse). Das an diesen Ausgang übertragene Signal ist normalerweise eine Klangmischung mit linkem/ rechtem Kanal. Ist der Schalter Tape/USB To CTRL/HP aktiviert, wird das Tape-Eingangssignal in das Klanggemisch Links/Rechts übernommen und ist per Kopfhörer abhörbar.
- Seite 38 Rückseite Stereo-Eingänge (1/4”) Diese unsymmetrischen 1/4”-Eingänge dienen als Stereo-Line-Eingänge, sofern beide Klinkenbuchsen angeschlossen werden bzw. als Mono- Eingänge, wenn nur der linke Mono-Eingang angeschlossen wird. Zum Aktivieren dieser Buchsen muss der A/B-Eingangswählschalter auf Position “A” stehen. Cinch-Eingänge Diese Cinch-Anschlüsse dienen als Stereo-Line-Eingänge. Zum Aktivieren dieser Anschlüsse muss der A/B-Eingangswählschalter auf Position “B”...
- Seite 39 8 an eine Stromquelle ® muss zunächst das Netzteil angeschlossen werden. Das Netzteil muss 15 VDC und 0,5 A liefern können. Hinweis: Nur durch Peavey-Ersatzteil Nr. 30901986 (USA-Modelle) bzw. durch 30902780 (Exportmodelle) ersetzen. Netzschalter Durch Drücken dieses Schalters wird das Gerät mit Netzspannung versorgt.
- Seite 40 ® 8 Blockschaltbild...
- Seite 41 8 Series - technische Daten ® Eingänge Eingangspegel Funktion Eingang Z Eingangspegel- Symm./ Anschluss (Ohm min.) Einstellung Min** Nominal* Unsymm. Mikrofon 2,2 k Verstärkung max. -83 dBu -59 dBu -41 dBu Symm. XLR Pin 1 Masse (150 Ohm) (63 dB) Pin 2 (+) Pin 3 (-1) Verstärkung min.
-
Seite 42: Gleichtaktunterdrückung (Mikro-Eingang)
8 - technische Daten ® Frequenzdurchgang Mikro-Eingang an Signalausgang links/rechts 14 Hz bis 25 kHz +0 dB/-1 dB Total Harmonic Distortion <0,01% 20 Hz bis 20 kHz vom Mikrofon-Eingang zum Ausgang links/rechts (10 Hz bis 80 kHz BW) <0,005% normal (22 Hz bis 22 kHz BW) <0,0007% Klirrfaktor Mikrofon-Vorverstärker Brummen und Rauschen... - Seite 43 What Peavey Will Do We will repair or replace (at Peavey's discretion) products covered by warranty at no charge for labor or materials. If the product or component must be shipped to Peavey for warranty service, the consumer must pay initial shipping charges. If the repairs are covered by warranty, Peavey will pay the return shipping charges.
- Seite 44 Peavey pagará el costo del envío de retorno. Cómo recibir el servicio de garantía (1)Lleve el producto defectuoso junto con su recibo de venta u otra prueba de la fecha de compra a su concesionario autorizado de Peavey o a un centro de servicio autorizado de Peavey.
- Seite 45 Nous réparerons ou remplacerons (à notre discrétion) les produits couverst par la garantie, sans facturation de pièces ou de main d’oeuvre. Dans le cas où le produit ou le composant doit être expédié à Peavey pour une réparation dans le cadre de la garantie, les frais d’expédition initiaux sont à la charge du client. Si les réparations sont couvertes par la garantie, Peavey prendra à...
- Seite 46 ALTERNATIVE (2) (2) Das defekte Gerät kann frei Haus an Peavey Electronics Corporation, International Service Center, 412 Highway 11 & 80 East, Meridian, MS 39301 in die USA geschickt werden. Der Sendung ist eine ausführliche Erläuterung des Problems sowie eine Kopie Ihres Verkaufsbelegs bzw. sonstiger Kaufnachweise beizufügen, da dieser zur Beurteilung der Garantieberechtigung herangezogen wird.
- Seite 48 Features and specifications subject to change without notice. Peavey Electronics Corporation • 5022 Hartley Peavey Drive • Meridian, MS 39305 (601) 483-5365 • FAX (601) 486-1278 • www.peavey.com © 2007...