Herunterladen Inhalt Inhalt Diese Seite drucken
Celestron NexStar EVOLUTION 8 EDGE HD Kurzanleitung

Celestron NexStar EVOLUTION 8 EDGE HD Kurzanleitung

Vorschau ausblenden Andere Handbücher für NexStar EVOLUTION 8 EDGE HD:

Werbung

Verfügbare Sprachen
  • DE

Verfügbare Sprachen

  • DEUTSCH, seite 27
NexStar
EVOLUTION 8
EDGE HD
with StarSense AutoAlign
QUICK SETUP GUIDE
#12096

Werbung

Inhaltsverzeichnis
loading

Inhaltszusammenfassung für Celestron NexStar EVOLUTION 8 EDGE HD

  • Seite 1 NexStar EVOLUTION 8 EDGE HD with StarSense AutoAlign QUICK SETUP GUIDE #12096...
  • Seite 3: Inhaltsverzeichnis

    Table of Contents System Requirements . . . . . . . . . . . . . . . . . . . . . . . . . . . . . . . . . . . . . . . . . . . . 5 Solar Warning .
  • Seite 4 ENGLISH...
  • Seite 5: System Requirements

    Android device with Android 4 .0 if used without the included StarSense hand control . • Free download of Celestron SkyPortal app from the App Store or Google Play if used without the included NexStar+ hand control .
  • Seite 6: Overview

    Overview Optical Tube Assembly Altitude Clutch Knob Azimuth Clutch Knob Fork Arm Mount Tripod Accessory Tray Tripod Leg Height Adjustment Knobs StarSense Camera StarPointer Pro Primary Mirror Clutch Knobs Eyepiece Diagonal Visual Back Focus Knob Bubble Level Parts List TELESCOPE EdgeHD 8”...
  • Seite 7: How To Use This Quick Setup Guide

    Central Column SkyPortal Android https://play .google .com/store/apps/ details?id=com .celestron .skyportal&hl=en Tripod Support Nut and Washer 3 . Place the accessory tray over the central column so that each of the three arms of the tray is supporting a tripod leg .
  • Seite 8 Attach the Mount to the Tripod Attach the Telescope to the Mount 1 . Position the fork arm mount over the center post on the 1 . Loosen the orange altitude clutch lock knob and rotate the tripod head . Do not let go of the mount until it has registered altitude axis until the quick release knob faces downward .
  • Seite 9 1 . Power the scope on and connect to its WiFi network from 2 . Insert the 40mm Plössl eyepiece into the Star Diagonal your phone or tablet . The WiFi network name will begin and tighten the thumbscrews . with “Celestron-XX” . Power Logo Eyepiece Wifi Logo...
  • Seite 10: Important Information About Your Edge Hd 8" Optical Tube Assembly

    StarSense with the telescope in SkyPortal . If you are using a DSLR, the distance is already set correctly when you use these standard adapters available from Celestron: Aligned and Ready to Observe! T-ring for the make and model of your camera Tap objects on your screen and select GoTo, or search for a specifi c object in the search fi eld .
  • Seite 11 A dedicated 0 .7x Focal Reducer for the 8” EdgeHD is concentric to the star pattern available from Celestron . This focal reducer maintains the indicates the telescope requires collimation. flat-field and coma-free imaging performance specifically designed for this telescope .
  • Seite 13 NexStar EVOLUTION 8 EDGE HD avec StarSense AutoAlign GUIDE DE DÉMARRAGE RAPIDE #12096...
  • Seite 15 Sommaire Configuration système requise . . . . . . . . . . . . . . . . . . . . . . . . . . . . . . . . . . . . . . . 17 Avertissement concernant le soleil .
  • Seite 16 FRANÇAIS...
  • Seite 17: Configuration Système Requise

    Android avec Android 4 .0 si utilisé sans la commande à main StarSense . • Application Celestron SkyPortal en téléchargement gratuit sur l'App Store ou sur Google Play si utilisé sans la commande à main NexStar+ .
  • Seite 18: Présentation Générale

    Présentation générale Tube optique 10 . Bouton de blocage de l'altitude Molette de verrouillage de l’azimut 11 . Bras de fourche de monture 12 . Trépied 13 . Plateau à accessoires 14 . Molettes de réglage de la hauteur des pieds Caméra StarSense StarPointer Pro 15 .
  • Seite 19: Comment Utiliser Ce Guide Démarrage Rapide

    3 . Positionnez le plateau à accessoires sur la colonne centrale https://play .google .com/store/apps/ de manière à ce que les trois bras du plateau supportent details?id=com .celestron .skyportal&hl=en chacun un pied du trépied . 4 . Vissez la molette avec la rondelle dans la colonne et serrez fermement .
  • Seite 20: Fixation Du Tube Du Télescope Sur La Monture

    Fixer la monture à votre trépied Fixation du tube du télescope sur la monture 1 . Positionnez la monture du bras de fourche sur le port 1 . Desserrez le molette de verrouillage d'altitude et faites central de la tête du trépied . Ne lâchez pas la monture pivoter l'axe d'altitude jusqu'à...
  • Seite 21 étoile puis serrez les vis à main . pour la première fois. 1 . Allumez le télescope et connectez-y via Wi-Fi votre téléphone ou votre tablette . Le nom Wi-Fi commence par « Celestron-XX » . Oculaire Icône d'alimentation Diagonale en étoile...
  • Seite 22: Informations Importantes Concernant L'assemblage De Tube Optique Edge Hd 8

    Si vous utilisez une caméra numérique, alors la distance est cope avec SkyPortal . déjà réglée correctement lorsque vous utilisez ces adaptateur standards fournis par Celestron: Aligné et prêt à observer! Bague en T pour le modèle et la marque de votre caméra Tapez sur un objet sur l'écran puis sélectionnez Aller À,...
  • Seite 23 Réducteur de focale optionnel Une étoile non mise au point affichant une ombre Celestron offre un réducteur de focale 0,7x pour le secondaire non concentrique EdgeHD 8" . Ce réducteur de focal spécialement conçu à sa forme générale indique que la collimation doit pour ce télescope permet d'offrir des performances...
  • Seite 25 NexStar EVOLUTION 8 EDGE HD mit StarSense AutoAlign KURZANLEITUNG Nr. 12096...
  • Seite 27 Inhaltsverzeichnis Systemvoraussetzungen . . . . . . . . . . . . . . . . . . . . . . . . . . . . . . . . . . . . . . . . . . 29 Sonnenstrahlen-Warnhinweis .
  • Seite 28 DEUTSCH...
  • Seite 29: Systemvoraussetzungen

    Android-Geräten mit Android 4 .0 . • Wird die enthaltene NexStar+ Handsteuerung nicht verwendet, kann die kostenlose Celestron SkyPortal App im App Store oder bei Google Play heruntergeladen werden . Sonnenstrahlen-Warnhinweis • Niemals mit bloßem Auge oder mit einem Teleskop direkt in die Sonne schauen (außer bei Verwendung eines...
  • Seite 30: Übersicht

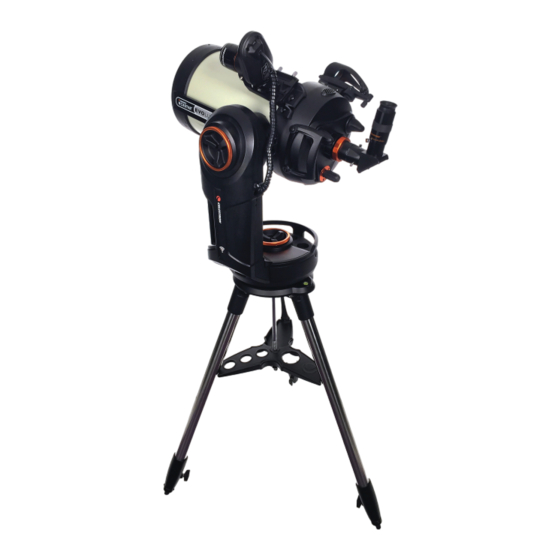
    Übersicht Tubenbaugruppe Höhenkupplungsknopf Azimutkupplungsknopf Gabelarmmontierung Stativ Zubehörablage Kupplungsknöpfe für die Stativbeinhöhe StarSense-Kamera StarPointer Pro Kupplungsknöpfe für den Primärspiegel Okular Spiegel Okularadapter Fokusknopf Wasserwaage Teileliste TELESKOP Optische Tubenbaugruppe des EdgeHD 8-Zoll 1,25-Zoll-Prismenzenitspiegel 40-mm-Plössel-Okular 13mm-Plössel-Okular Beleuchteter Reflex Finder für den StarPointer Pro Okularadapter MONTIERUNG UND STATIV NexStar Evolution-Gabelarmbaugruppe...
  • Seite 31: Diese Kurzanleitung Nutzen

    Mutter und Unterlegscheibe SkyPortal Android der Stativhalterung https://play .google .com/store/apps/ details?id=com .celestron .skyportal&hl=en 3 . Schieben Sie die Zubehörablage über die Mittelsäule, sodass jeder Ablagearm ein Stativbein stützt . 4 . Mutter und Unterlegscheibe wieder auf die Gewindesäule aufdrehen und anziehen . Die Zubehörablage darf sich nicht gegen das Stativ bewegen lassen .
  • Seite 32: Die Montierung Am Stativ Befestigen

    Die Montierung am Stativ befestigen Anbringen des Teleskops an die Montierung 1 . Positionieren Sie die Gabelarmmontierung über dem 1 . Lösen Sie den orangefarbenen Höheneinstellknopf und Mittelpfosten des Stativkopfs . Halten Sie die Montierung drehen Sie die Höhenachse, bis der Schnellwechselknopf so lange fest, bis diese über dem Mittelpfosten sitzt .
  • Seite 33: Das Starsense Am Teleskop Anbringen

    2 . Bringen Sie das 40-mm-Plössel-Okular am Zenitspiegel an und ziehen Sie die Flügelschrauben fest . 1 . Schalten Sie Ihr Teleskop ein und verbinden Sie es mit dem WLAN-Netzwerk Ihres Telefons oder Tablets . Der WLAN-Netzwerkname beginnt mit "Celestron-XX" . Netzlogo Okular WLAN-Logo...
  • Seite 34: Wichtige Informationen Über Ihren Optischen Edge Hd 8-Zoll-Tubus

    Wenn Sie ein DSLR verwenden, ist der Abstand bereits dem Teleskop unter SkyPortal notwendig . richtig eingestellt, wenn Sie die Standard-Adapter von Celestron nutzen: Ausrichtung abgeschlossen - die erste Observation T-Ring für die Marke und das Modell Ihrer Kamera kann beginnen! T-Adapter für das 8-Zoll-EdgeHD...
  • Seite 35 Ein defokussierter Stern, bei dem der sekundäre Ein spezieller 0,7-facher Fokalreduktor für das 8 Zoll Schatten nicht konzentrisch EdgeHD ist von Celestron verfügbar . Diese Fokalreduktor zum Sternmuster ist, weist auf die Notwendigkeit hält Flat-Field und komafreie Abbildungsleistung speziell für einer Kollimation hin.
  • Seite 37 NexStar EVOLUTION 8 EDGE HD con StarSense AutoAlign GUÍA DE INSTALACIÓN RÁPIDA #12096...
  • Seite 39 Índice Requisitos del sistema . . . . . . . . . . . . . . . . . . . . . . . . . . . . . . . . . . . . . . . . . . . 41 Aviso solar .
  • Seite 40 ESPAÑOL...
  • Seite 41: Requisitos Del Sistema

    Android con Android 4 .0 si se usa sin el mando manual StarSense incluido . • Descarga gratuida de la app SkyPortal de Celestron de la App Store o Google Play si se usa sin el mando manual NexStar+ incluido .
  • Seite 42: Descripción

    Descripción Estructura del tubo óptico Mando de bloqueo de altitud Mando de bloqueo de azimut Soporte del brazo de horquilla Trípode Bandeja de accesorios Mandos de ajuste de altura de la pata del trípode Cámara StarSense StarPointer Pro Mandos de bloqueo del espejo primario Ocular Diagonal...
  • Seite 43: Uso De Esta Guía De Instalación Rápida

    Rosca y arandela de https://play .google .com/store/apps/ soporte de trípode details?id=com .celestron .skyportal&hl=en 3 . Coloque la bandeja de accesorios sobre la columna central de forma que cada uno de los tres brazos de la bandeja soporte una pata del trípode .
  • Seite 44 Instalación del soporte en el trípode Instalación del telescopio en el soporte 1 . Coloque el soporte del brazo de horquilla sobre el poste 1 . Afloje el mando de bloqueo de altitud naranja y gire el central del cabezal del trípode . No suelte el soporte eje de altitud hasta que el mando de liberación rápida hasta que encaje con el poste central .
  • Seite 45 2 . Introduzca el ocular Plössl de 40mm en la diagonal este- 1 . Encienda el telescopio y conecte a la red WiFi desde su lar y apriete los tornillos manuales . teléfono o tableta . El nombre de la red WiFi comenzará con "Celestron-XX" . Ocular Logotipo de encendido...
  • Seite 46: Información Importante Sobre La Estructura De Tubo Óptico De Su Edge Hd 8

    Si usa una DSLR, la distancia ya está establecida en SkyPortal . correctamente cuando use estos adaptadores estándar disponibles en Celestron: Alineado y listo para observar Arandela T para la marca y modelo de su cámara Toque objetos en la pantalla y seleccione Ir a, o busque un objeto concreto en el campo de búsqueda .
  • Seite 47 Puede obtener un reductor focal 0,7x dedicado para el sea concéntrica con el patrón estelar indica que el telescopio EdgeHD 8" de Celestron . El reductor focal mantiene el precisa de colimación. rendimiento fotográfico de campo plano y ausencia de coma y ha sido especialmente diseñado para este telescopio .
  • Seite 49 NexStar EVOLUTION 8 EDGE HD Con StarSense AutoAlign GUIDA ALL'AVVIO RAPIDO #12096...
  • Seite 51 Indice Requisiti di sistema . . . . . . . . . . . . . . . . . . . . . . . . . . . . . . . . . . . . . . . . . . . . . 53 Avvertimento solare .
  • Seite 52 ITALIANO...
  • Seite 53: Requisiti Di Sistema

    7 .0 e successivi oppure un dispositivo Android con Android 4 .0 se utilizzato senza la pulsantiera StarSense inclusa . • Download gratuito dell'App Celestron SkyPortal da App Store o Google Play se utilizzato senza la pulsantiera NexStar+ inclusa .
  • Seite 54: Panoramica

    Panoramica Tubo ottico Leva di blocco dell'altezza Manopola di regolazione dell'Azimut Montatura Braccio forcella Treppiede Vassoio porta accessori Manopole di regolazione altezza gambe treppiede Fotocamera StarSense StarPointer Pro Manopole di regolazione dello spec- chio primario Oculare Diagonale Retro visivo Manopola di messa a fuoco Livella a bolla Elenco componenti TELESCOPIO...
  • Seite 55: Come Utilizzare Questa Guida All'avvio Rapido

    SkyPortal Android https://play .google .com/store/apps/ 3 . Collocare il vano accessori sopra la colonna centrale in details?id=com .celestron .skyportal&hl=en modo checiascuno dei tre bracci del vassoio sostenga una gamba del treppiede . 4 . Infilare il dado e la rondella di nuovo sulla colonna filettata e serrare saldamente in posizione .
  • Seite 56 Fissaggio del supporto al treppiede Fissaggio del telescopio alla montatura 1 . Posizionare la montatura del braccio forcella sopra il 1 . Allentare la leva arancione di blocco dell'altezza e ruotare perno centrale sullatesta del treppiede . Non lasciarla l'asse di altitudine fino a quando la manopola di sgancio andare fino a quando non si è...
  • Seite 57 . 1 . Accendere il dispositivo e connettersi alla propria rete Wi-Fi da telefono o tablet . Il nome della rete WiFi inizierà con "Celestron-XX" . Oculare Power Logo Diagonale stellare...
  • Seite 58: Informazioni Importanti Relative Al Tubo Ottico Edge Hd 8

    Se si utilizza una refl ex digitale, la distanza è già corretta- mente impostata quando si utilizzano gli adattatori standard Allineati e pronti per osservare! disponibili da Celestron: Toccare gli oggetti sullo schermo e selezionare Vai a, o T-ring per la marca e il modello della fotocamera cercare un oggetto specifi co nel campo di ricerca .
  • Seite 59 è Un riduttore di focale 0,7x dedicato all'EdgeHD 8" è concentrica al modello di disponibile da Celestron . Questo riduttore di focale mantiene stella indica che telescopio la flat-field e prestazioni di imaging senza coma appositamente necessita di collimazione.

Inhaltsverzeichnis