Herunterladen Inhalt Inhalt Diese Seite drucken
Arjo MAA8000 Bedienungsanleitung

Arjo MAA8000 Bedienungsanleitung

Bariatrische gurt
Vorschau ausblenden Andere Handbücher für MAA8000:
Inhaltsverzeichnis

Werbung

Verfügbare Sprachen
  • DE

Verfügbare Sprachen

  • DEUTSCH, seite 30
INSTRUCTIONS FOR USE
Bariatric Slings
EN · ZH · DE · FR · IT · NL
·Bedienungsanleitung · Notice d'utilisation · Istruzioni per l'uso · Gebruiksaanwijzing
04.SB.00-INT1_4 · 06/2018

Werbung

Inhaltsverzeichnis
loading

Inhaltszusammenfassung für Arjo MAA8000

  • Seite 1 INSTRUCTIONS FOR USE Bariatric Slings EN · ZH · DE · FR · IT · NL ·Bedienungsanleitung · Notice d’utilisation · Istruzioni per l’uso · Gebruiksaanwijzing 04.SB.00-INT1_4 · 06/2018...
  • Seite 2: Inhaltsverzeichnis

    NSTRUCTIONS Contents Foreword .............2 Attachment Methods..........7 Customer Support ........... 2 Metod 1 - Cross through (Legs crossed with cross- De nitions in this IFU ..........2 ing straps) ............... 7 Metod 2 - Abduction, Leg Separation (Legs opened Intended Use ............3 with non-crossing straps) ........
  • Seite 3: Intended Use

    Safe Working Load (SWL) for Bariatric Sling: The Bariatric Sling shall only be used by appropriately • MAA8000, MAA8000A, MAA8010, MAA8020, trained caregivers with adequate knowledge of the care MAA8030: 454 kg (1000 lbs). environment, and in accordance with the instructions The right type and size of slings should be used after outlined in the Instructions for Use.
  • Seite 4: Parts Designation

    Parts Designation 1. Sling Label 6. Leg fl ap (Located on the outside of the sling) 7. Body section 2. Stiffener pocket 8. Head section 3. Stiffener 9. Pulling handle 4. Shoulder strap with loops 5. Leg strap with loop Example of slings.
  • Seite 5: Select Sling Size

    The patient’s physical disabilities, weight distribution and general physique needs to be taken into consideration when selecting a sling. Transfer/Transport Article number Safe Working Load Product Description Size MAA8000 454 kg (1000 lbs) Standard M, L, XL, XXL MAA8000A 454 kg (1000 lbs) Standard...
  • Seite 6: Loop Attachment & Detachment

    Always follow the lowest SWL of the total system. E.g. Tenor lift/spreader bar has a SWL of 320 kg (705 lbs) and the MAA8000 has a SWL of 454 kg (1000 lbs). This means that the Tenor lift/spreader bar has the lowest SWL.
  • Seite 7: Attachment Methods

    Attachment Methods Metod 1 - Cross through (Legs crossed with crossing straps) This method is recommended for most general transfers. Sling models: MAA8000, MAA8010 Sling model: MAA8020 Metod 2 - Abduction, Leg Separation (Legs opened with non-crossing straps) In this method, the patient’s legs are separated, which is convenient for toileting and hygiene care.
  • Seite 8: Applying The Sling

    Applying the Sling • sling is centred and fl at without creases, In Bed (22 steps) • sling’s head support covers the neck/head area, 1. Place the lift nearby. • sling pieces are not twisted underneath the 2. Apply bed brakes and adjust the height of the bed patient.
  • Seite 9: In Chair/ Wheelchair (19 Steps)

    In Chair/ Wheelchair (19 steps) 14. Make sure the patient’s arms are inside the sling. WARNING NOTE To avoid injury to the patient, pay close Do NOT use a Hammock sling in chair/ attention when lowering or adjusting the wheelchair. Apply these in bed. spreader bar.
  • Seite 10 6. Patient able to sit up: Stand behind the patient avoid skin injuries, use an ArjoHuntleigh sliding and help him/her to a seated position. sheet/tube when placing the legs fl aps. Make sure the leg fl aps goes all the way around and are not 7.
  • Seite 11: Removing The Sling

    Removing the Sling In Bed (12 steps) In Chair/Wheelchair (13 steps) 1. Position the patient over the bed. (See Fig. 16 ) 1. Apply the brakes on the wheelchair. 2. Apply the bed brakes and adjust the height of the 2.
  • Seite 12: Cleaning And Disinfection

    Cleaning and Disinfection 5. Machine wash the sling at 70°C (158°F). In order WARNING to obtain suffi cient level of disinfection, please To prevent cross-contamination, always wash according to local hygiene legislation. follow the disinfection instructions in this If allowed according to the product label, tumble IFU.
  • Seite 13: Troubleshooting

    Troubleshooting Problem Action • Make sure that both shoulder loops are attached to the spreader bar at the same loop length. • Make sure that both leg loops are attached to the The patient is not positioned correctly in spreader bar at the same loop length. the sling (e.g.
  • Seite 14: Technical Speci Cations

    Technical Specifi cations General Safe working load (SWL) = Maximum total load See “Allowed Combinations” on page 6 2 years* Service life – Recommended period of use * Refer to “Expected Service Life” on page 3. Shelf life – Maximum period of storing new 5 years unpacked product Model and Type...
  • Seite 15: Label On The Sling

    Label on the Sling Care and Washing Symbols Article Number Article number with -X refers to Machine wash 70°C (158°F) XXXXXX-X the sling size. No bleaching allowed If the article number is stated without the size letter at the end, XXXXXXX No tumble drying allowed it means the sling is a One Size.
  • Seite 16: 客户支持

    使用说明书 目录 前言 ................16 连接办法 ..............21 客户支持 ..............16 方法 1 - 交叉(双腿交叉,使用交叉连接带) ..21 本 IFU 中的定义 ............16 方法 2 - 双腿外展打开(双腿打开,未用交叉带) 21 既定用途 ..............17 应用吊兜 ..............22 患者/病人评估 ............. 17 在床上(22 个步骤) ..........22 预计使用寿命 .............. 17 在座椅/轮椅上(19 个步骤) ........23 在地板上(35 个步骤)...
  • Seite 17: 既定用途

    既定用途 预计使用寿命 患者/病人评估 安全说明 警告 警告 为避免人身伤害,应始终有专人看护患者。 为避免人身伤害,仅应短期存储设备。如果存储 时间超过 IFU 中规定的时间,则会导致材料断 警告 裂和强度变弱。 为避免人身伤害,切勿在使用吊兜时让患者吸 警告 烟。吊兜会导致火灾。 为避免人身伤害,请避免阳光/紫外光照射到设 警告 备。暴露于阳光/紫外光会降低材料强度。 为避免人身伤害,应在使用前始终对患者状况进 安全规范 行评估。 警告 为避免摔倒,患者体重不得超出所用产品及附件 的安全工作负荷。...
  • Seite 18: 部件名称

    部件名称 使用准备 初次使用前(6 个步骤) 警告 注意 为了预防交叉感染,必须遵守本 IFU 中的消毒 ArjoHuntleigh 建议将患者姓名标注在吊兜保养 说明。 标牌上,避免患者之间交叉感染。 每次使用前(5 个步骤) 警告 为避免患者坠落,请确保根据 IFU 选择正确的 吊兜尺寸。 警告 为 避 免 人 身 伤 害 , 请 始 终 确 保 在 使 用 前 检 查 设备。...
  • Seite 19: 选择吊兜规格

    33.7 37.6 39.5 41.5 45.2 吊兜选择 转运/运输 商品编号 安全承重 产品说明 规格 标准 MAA8000 454 kg (1000 lbs) M, L, XL, XXL 标准 MAA8000A 454 kg (1000 lbs) M, L MAA8010 454 kg (1000 lbs) Basic M, L, XL, XXL 张开支腿型...
  • Seite 20: 连接与拆除环

    454 kg (1000 lbs) 四点式肥胖者 吊架 4 点式环状吊架 吊架 专用吊架 吊兜 规格 规格 规格 MAA8000 454 kg (1000 lbs) M, L, XL, XXL M, L, XL, XXL M, L, XL, XXL MAA8000A 454 kg (1000 lbs) M, L M, L MAA8010...
  • Seite 21: 连接办法

    连接办法 方法 1 - 交叉(双腿交叉,使用交叉连接带) 吊兜型号:MAA8000, MAA8010 吊兜型号:MAA8020 方法 2 - 双腿外展打开(双腿打开,未用交叉带) 吊兜型号:MAA8000, MAA8010 吊兜型号:MAA8020 警告 方法 2 可能不适合上肢控制力有限的患者,当达到最低坐姿时,可能导致患者向下滑落或几乎掉出吊 兜或者前倾。...
  • Seite 22: 应用吊兜

    应用吊兜 (请见图 7 ) 在床上(22 个步骤) (请见图 8 ) 警告 为避免人身伤害,确保患者手臂放在吊兜内。 警告 警告 为避免侧翻过程中出现人身伤害,确保有另一位 为避免伤害患者,在降低或调整吊架时要小心。 护理员在场和/或在另一侧使用床栏。 (请见图 9 ) 警告 为避免患者坠落,在吊升之前和之中都要确保吊 兜连接件牢靠连接。 (请见 图 6 ) 图 6 图 7 图 8 图 9...
  • Seite 23: 在座椅/轮椅上(19 个步骤

    在座椅/轮椅上(19 个步骤) 警告 说明 为避免伤害患者,在降低或调整吊架时要小心。 请勿在座椅/轮椅上使用 吊床吊兜 。请在床上使 用这些装置。 警告 确保吊带未套在轮椅或移位机脚轮上。 警告 为避免患者坠落,在吊升之前和之中都要确保吊 兜连接件牢靠连接。 在地板上(35 个步骤) (请见图 10 ) (请见图 8 ) (请见图 11 ) 5. 如果患者能够坐起,请继续执行下一步。如果 无法坐立,请执行第 9 步操作。 警告 为避免人身伤害,确保患者手臂放在吊兜内。 图 10 图 11...
  • Seite 24 6. 患者能够坐起: 警告 继续执行第 16 步操作。 为避免人身伤害,确保患者手臂放在吊兜内。 9. 患者无法坐起: ( 请 见 图 12 ) (请见图 8 ) (请见图 13 ) 警告 为避免患者坠落,在吊升之前和之中都要确保吊 兜连接件牢靠连接。 (请见图 13 ) (请见图 15 ) (请见图 14 ) 警告 为避免伤害患者,在降低或调整吊架时要小心。 图 12 图 13 图 14 图...
  • Seite 25: 拆除吊兜

    拆除吊兜 在床上(12 个步骤) 在座椅/轮椅上(13 个步骤) (请见图 16 ) (请见图 17 ) 警告 为避免伤害患者,在降低或调整吊架时要小心。 警告 为避免伤害患者,在降低或调整吊架时要小心。 警告 为避免侧翻过程中出现人身伤害,确保有另一位 (请见图 18 ) 护理员在场和/或在另一侧使用床栏。 图 16 图 17 图 18...
  • Seite 26: 清洁和消毒

    清洁和消毒 ° ° 警告 为了预防交叉感染,必须遵守本 IFU 中的消毒 ° 说明。 ° 警告 为避免材料损坏和人身伤害,请按照本 IFU 进 行清洁和消毒。 • 不得使用其它化学品。 • 切勿用氯进行清洁。 • 氯将会损坏材料表面。 警告 为避免人身伤害,请务必在对移位机消毒前拆除 吊兜。 清洁用化学品 清洁说明(7 个步骤) 消毒 保养和防护性维护 变脏/染污或用于其他患者时 警告 清洁/消毒 为避免伤害患者和护理人员,切勿改装设备或使 用不兼容的部件。 每次使用前后 贮存 目视检查所有外露部件 保养和维护...
  • Seite 27: 故障排除

    故障排除 故障 措施 • 确保将长度相同的两个肩部环连接至吊架。 • 确保将长度相同的两个腿部环连接至吊架。 患者在吊兜内的位置不正确(例如:一根吊 • 确保吊带未扭结。 带比另外一根短)。 • 确保患者坐在吊兜内。外部带有供参考的标牌。 • 确保患者位于吊兜中央。 患者坐在吊兜中时腿部感觉不适。 确保吊兜腿皮瓣上无褶皱。 按照相应 IFU 中的说明使用 ArjoHuntleigh 床单式移位易/ 吊兜难以使用(例如:在侧翻时)。 套管。 • 将患者放到床上或地板上,使其尽可能保持坐姿。将枕 头放置在患者的颈部/背部后方(放在吊兜之外)。 使用肩部环时有难度。 • 如有可能,提升床的靠背。 • 将吊架调节至后仰位置。注意患者头部。 • 弯曲患者双腿,或者将枕头置于患者膝下。如果在地 板上使用吊兜,请将患者的双腿放置在护理人员的膝 使用腿部环时有难度。 盖上。 • 将吊架尽可能地调节至坐立位置。 仅按照 第 20 页的“允许组合” 一节中所述的组合方式 难以将吊兜同移位机和吊架组合使用。...
  • Seite 28: 技术规格

    技术规格 基本信息 安全承重 (SWL)=最大总承重 请参阅 第 20 页的“允许组合” 2 年* 使用寿命 – 建议使用期 * 请参考 第 17 页的“预计使用寿命” 。 保质期 – 存储新的未开封产品的最长时间 5 年 型号和类型 请参阅 第 19 页的“吊兜选择” 操作、运输和存储环境 操作和存储:0°C 至 +40°C(+32°F 至 +104°F) 温度 运输:-25°C 至 +60°C(-13°F 至 +140°F) 操作和存储:+20°C (68°F) 时最高...
  • Seite 29: 吊兜上的标牌

    吊兜上的标牌 保养和洗涤标志 纤维成分 聚酯 70°C (158°F) 机洗 聚氨酯 不可漂白 其他符号 不可滚转干燥 安全承重 (SWL) 可以滚转干燥 患者姓名标志 不可熨烫 记录标志 不可干洗 请在使用前阅读本 IFU 证书/标记 商品编号 符合医疗设备指令 93/42/EEC 的 CE 标 制造日期与年份 志。设备经过测试,满足所有必需要求。 环状标志 制造商的名称和地址 使用环状吊架。 商品编号 带有 -X 的商品编号指吊兜规格。 XXXXXX-X 如果商品编号末尾未注明尺寸字 母,则表示吊兜为一号。 XXXXXXX...
  • Seite 30: Vorwort

    EDIENUNGSANLEITUNG Inhalt Vorwort ..............30 Befestigungsmethoden ........35 Kundendienst ............30 Methode 1 – Überkreuzen der Beine (Beine über- Begriffsbestimmungen zu dieser einandergeschlagen, Gurtbänder über Kreuz) ..35 Bedienungsanleitung ..........30 Methode 2 – Abduktion, Abspreizen der Beine (Beine gespreizt, Gurtbänder nicht über Kreuz) ..35 Verwendungszweck ...........31 Anlegen des Gurts ..........36 Patienten-/Bewohner-Gutachten ......
  • Seite 31: Verwendungszweck

    Position erforderlich. bariatrischen Gurt: Der bariatrische Gurt darf nur gemäß der • MAA8000, MAA8000A, MAA8010, MAA8020, Bedienungsanleitung und nur von Pfl egepersonal MAA8030: 454 kg (1000 lbs) verwendet werden, das ausreichend geschult ist und über Der richtige Gurttyp und die richtige Gurtgröße sind genügend Kenntnisse zu der Pfl...
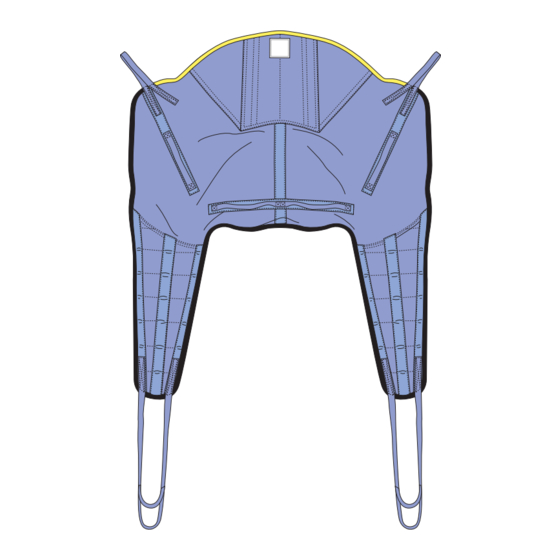
  • Seite 32: Komponentenbezeichnungen

    Komponentenbezeichnungen 1. Gurtetikett 6. Beinlasche (an der Außenseite des Gurts) 7. Körperabschnitt 2. Tasche für Versteifungselement 8. Kopfabschnitt 3. Versteifungselement 9. Zughebel 4. Schulterriemen mit Schlaufen 5. Beinlasche mit Schlaufe Mustergurt. Es sind nicht alle Modelle abgebildet. Vorbereitungen Vor der ersten Verwendung WARNUNG (6 Schritte) Die Ausrüstung muss zur Vermeidung von...
  • Seite 33: Auswahl Der Gurtgröße

    Faktoren, wie physische Behinderungen, die Gewichtsverteilung und die allgemeine Konstitution des Patienten/ Bewohners müssen bei der Gurtauswahl berücksichtigt werden. Transfer/Transport Safe working load Artikelnummer Produktbeschreibung Abmessungen (Sichere Arbeitslast) MAA8000 454 kg (1000 lbs) Standardausführung M, L, XL, XXL MAA8000A 454 kg (1000 lbs) Standardausführung M, L...
  • Seite 34: Befestigen Und Abnehmen Der Schlaufen

    Maßgebend ist immer die niedrigste Arbeitslast des Gesamtsystems. Beispiel: Der Tenor Lifter bzw. die Tenor Aufhängung hat eine sichere Arbeitslast von 320 kg (705 lbs) und MAA8000 hat eine sichere Arbeitslast von 454 kg (1000 lbs). Dies bedeutet, dass der Tenor Lifter bzw. die Tenor Aufhängung die niedrigste sichere Arbeitslast hat. Der Patient/Bewohner darf nicht mehr als die niedrigste sichere Arbeitslast wiegen.
  • Seite 35: Befestigungsmethoden

    Befestigungsmethoden Methode 1 – Überkreuzen der Beine (Beine übereinandergeschlagen, Gurtbänder über Kreuz) Diese Methode wird für die meisten allgemeinen Transfers empfohlen. Gurtmodelle: MAA8000, MAA8010 Gurtmodell: MAA8020 Methode 2 – Abduktion, Abspreizen der Beine (Beine gespreizt, Gurtbänder nicht über Kreuz) Bei dieser Methode sind die Beine des Patienten/Bewohners gespreizt, sodass sie sich für den Toilettengang und die Ausführung von Hygieneroutinen eignet.
  • Seite 36: Anlegen Des Gurts

    Anlegen des Gurts • der Gurt mittig und fl ach ohne Falten verläuft, Im Bett (22 Schritte) • der Kopfstützbereich des Gurts den Hals-/ 1. Halten Sie den Lifter in der Nähe bereit. Kopfbereich bedeckt, 2. Stellen Sie das Bett möglichst auf eine ergonomische •...
  • Seite 37: Im Stuhl/Rollstuhl (19 Schritte)

    Im Stuhl/Rollstuhl (19 Schritte) 14. Achten Sie darauf, dass sich der Arm des Patienten/ Bewohners innerhalb des Gurts befi ndet. HINWEIS WARNUNG Verwenden Sie KEINEN Hängemattengurt in einem Um Verletzungen des Patienten/Bewohners zu Stuhl/Rollstuhl. Wenden Sie diese Gurte nur im Bett an. vermeiden, seien Sie beim Senken oder Anpassen 1.
  • Seite 38 6. Der Patient/Bewohner ist in der Lage, sich WARNUNG zu setzen: Stellen Sie sich hinter den Patienten/ Bewohner und helfen Sie ihm/ihr in die Sitzposition. Um Verletzungen des Patienten/Bewohners zu 7. Legen Sie den Gurt so um den Rücken und Kopf des vermeiden, seien Sie beim Senken oder Anpassen Patienten/Bewohners, dass die Innenseite des Gurts am der Aufhängung vorsichtig.
  • Seite 39: Abnehmen Des Gurts

    Abnehmen des Gurts Im Bett (12 Schritte) Im Stuhl/Rollstuhl (13 Schritte) 1. Positionieren Sie den Bewohner/Patienten über dem 1. Arretieren Sie die Bremsen des Rollstuhls. Bett. (Siehe Abb. 16 ) 2. Positionieren Sie den Patienten/Bewohners über dem Stuhl/Rollstuhl. (Siehe Abb. 17 ) 2.
  • Seite 40: Reinigung Und Desinfektion

    Reinigung und Desinfektion 5. Waschen Sie den Gurt in der Maschine bei 70 °C WARNUNG (158 °F). Waschen Sie den Gurt in Übereinstimmung mit den lokalen Hygienevorschriften, um eine Um eine Kreuzkontamination zu verhindern, ausreichende Desinfektionsleistung zu erzielen. müssen Sie immer nach den Desinfektions- Wenn dies entsprechend dem Produktetikett anweisungen in dieser Bedienungsanleitung zugelassen ist, bei niedriger Temperatur im Trockner...
  • Seite 41: Fehlerbehebung

    Fehlerbehebung Problem Maßnahme • Stellen Sie sicher, dass beide Schulterschlaufen mit der gleichen Schulterlänge an der Aufhängung befestigt sind. • Stellen Sie sicher, dass beide Beinschlaufen mit derselben Schlaufenlänge an der Aufhängung befestigt sind. Der Patient/Bewohner wurde nicht richtig im Gurt •...
  • Seite 42: Technische Daten

    Technische Daten Allgemein Safe working load (sichere Arbeitslast) = Siehe „Zulässige Kombinationen“ auf Seite 34 Maximale Gesamtlast 2 Jahre* Lebensdauer – Empfohlene Nutzungsdauer * Siehe „Erwartete Lebensdauer“ auf Seite 31. Lagerungsdauer – maximale Lagerungsdauer des 5 Jahre neuen, noch verpackten Produkts Modell und Typ Siehe „Gurtauswahl“...
  • Seite 43: Etikett Am Gurt

    Etikett am Gurt Pfl ege- und Waschsymbole Faserzusammensetzung Polyester Maschinenwäsche bei 70 °C (158 °F) Polyurethan Nicht bleichen Versch. Symbole Nicht im Trockner trocknen Safe working load (Sichere Arbeitslast) Trocknen im Trockner ist möglich. Symbol für Patientenname Nicht bügeln Symbol: Aufzeichnung Nicht chemisch reinigen Die Bedienungsanleitung muss vor der Verwendung gelesen werden.
  • Seite 44: Avant-Propos

    ’ OTICE D UTILISATION Table des matières Avant-propos .............44 Méthodes de xation .........49 Support après-vente ..........44 Méthode 1 - Fixation croisée (jambes fermées et Dé nitions utilisées dans cette notice d’utilisation 44 jambières croisées) ..........49 Méthode 2 - Abduction, division des jambes Utilisation prévue ..........45 (jambes ouvertes et jambières non croisées) ..
  • Seite 45: Utilisation Prévue

    Le harnais bariatrique ne doit être utilisé que par du Charge maximale admissible (CMA) du harnais bariatrique : personnel soignant dûment formé et familiarisé avec • MAA8000, MAA8000A, MAA8010, MAA8020, l’environnement de soin, conformément aux consignes MAA8030 : 454 kg (1 000 lb). fi gurant dans la notice d’utilisation.
  • Seite 46: Désignation Des Pièces

    Désignation des pièces 1. Étiquette de harnais 6. Rabat de jambe (située à l’extérieur du harnais) 7. Partie du corps 2. Poche de renforcement 8. Tête 3. Baleine 9. Poignée 4. Sangle pour les épaules avec boucles Exemples de harnais. Certains modèles ne sont pas 5.
  • Seite 47: Sélection De La Taille Du Harnais

    Lors de la sélection d’un harnais, il convient de tenir compte des handicaps physiques, de la répartition du poids et de la condition physique générale du patient. Transfert et déplacement Charge maximale Référence Description du produit Dimensions admissible MAA8000 454 KG (1000 LB) Standard M, L, XL, XXL MAA8000A 454 KG (1000 LB) Standard M, L...
  • Seite 48: Fr Fixation Et Détachement Des Boucles

    Toujours respecter la CMA la plus faible de l’ensemble du système. Par exemple, l’ensemble lève-personne/berceau mobile Tenor a une CMA de 320 kg (705 lb) et le harnais MAA8000 a une CMA de 454 kg (1 000 lb). C’est donc le lève-personne/ berceau mobile Tenor qui a la CMA la plus faible.
  • Seite 49: Méthodes De Xation

    Méthode 1 - Fixation croisée (jambes fermées et jambières croisées) Cette méthode est recommandée pour la plupart des transferts généraux. Modèles de harnais : MAA8000, MAA8010 Modèle de harnais : MAA8020 Méthode 2 - Abduction, division des jambes (jambes ouvertes et jambières non croisées)
  • Seite 50: Pose Du Harnais

    Pose du harnais 14. Croiser les sangles pour les jambes. Tirer sur l’une des Au lit (22 étapes) sangles à travers l’autre. (Voir Fig. 8 ) 1. Placer le lève-personne à proximité. 2. Bloquer les freins et régler la hauteur du lit sur une AVERTISSEMENT position ergonomique, si possible.
  • Seite 51: Dans Un Siège/Fauteuil Roulant (19 Étapes)

    Dans un siège/fauteuil roulant 14. S’assurer que les bras du patient sont à l’intérieur du harnais. (19 étapes) AVERTISSEMENT REMARQUE Pour éviter de blesser le patient, faire NE PAS utiliser un harnais-hamac dans un siège bien attention lors de l’abaissement ou de ou un fauteuil roulant.
  • Seite 52 6. Patient capable de s’asseoir : rester debout 20. Placer les rabats de jambes sous les jambes du patient. Pour éviter des blessures cutanées, utiliser un drap/ derrière le patient et l’aider à s’asseoir. tube de transfert ArjoHuntleigh lors du placement des 7.
  • Seite 53: Retrait Du Harnais

    Retrait du harnais Au lit (12 étapes) Dans un siège/un fauteuil roulant 1. Positionner le patient sur le lit. (Voir Fig. 16 ) (13 étapes) 2. Bloquer les freins et régler la hauteur du lit sur une 1. Bloquer les freins du fauteuil roulant. position ergonomique, dans la mesure du possible.
  • Seite 54: Nettoyage Et Désinfection

    Nettoyage et désinfection recommandations de nettoyage. AVERTISSEMENT 5. Laver le harnais en machine à 70 °C (158 °F). Pour obtenir un niveau de désinfection suffi sant, laver Pour éviter tout risque de contamination conformément à la législation locale en matière croisée, toujours suivre les consignes de d’hygiène.
  • Seite 55: Dépistage Des Anomalies

    Dépistage des anomalies Problème Action • Véri er que les boucles au niveau des épaules sont attachées au berceau mobile selon la même longueur de boucle. • Véri er que les boucles au niveau des jambes sont Le patient n’est pas positionné correctement attachées au berceau mobile selon la même longueur dans le harnais (par exemple, une sangle est de boucle.
  • Seite 56: Caractéristiques Techniques

    Caractéristiques techniques Généralités Capacité maximale admissible (CMA) Voir « Combinaisons autorisées », page 48 (charge totale maximale) Durée de vie utile – Période d’utilisation 2 ans* recommandée * Se référer à « Durée de vie prévue », page 45. Durée de conservation – Période maximale de 5 ans stockage d’un produit nouveau et non déballé...
  • Seite 57: Étiquette Sur Le Harnais

    Étiquette sur le harnais Symboles d’entretien et de lavage Réf. article RÉF. La référence contenant -X désigne Lavage en machine à 70 °C (158 °F) XXXXXX-X la dimension du harnais. Si le numéro d’article est indiqué Chloration interdite RÉF. sans mention de la taille à la n, XXXXXXX cela signi e qu’il s’agit d’une taille Ne pas essorer...
  • Seite 58: Premessa

    ’ STRUZIONI PER L Indice Premessa ............58 Metodi di attacco ..........63 Assistenza Clienti ..........58 Metodo 1 - Incrociato (gambe incrociate con De nizioni impiegate nelle presenti IU ....58 cinghie trasversali) ..........63 Metodo 2 - Abduzione, separazione delle gambe Uso previsto............59 (gambe aperte con cinghie non incrociate) ...
  • Seite 59: Uso Previsto

    Carico di lavoro sicuro (SWL) per il corsetto bariatrico: Il corsetto bariatrico deve essere utilizzato esclusivamente • MAA8000, MAA8000A, MAA8010, MAA8020, da assistenti esperti e competenti, nel rispetto delle MAA8030: 454 kg (1000 lb). indicazioni riportate nelle Istruzioni per l’uso.
  • Seite 60: Identi Cazione Dei Componenti

    Identifi cazione dei componenti 1. Etichetta corsetto 6. Risvolto per gamba (situata all’esterno del corsetto) 7. Sezione corpo 2. Tasca di rinforzo 8. Sezione testa 3. Elemento di rinforzo 9. Maniglia 4. Cinghia per le spalle con anelli 5. Cinghia per le gambe con anelli Esempi di corsetti.
  • Seite 61: Selezione Della Taglia Del Corsetto

    Nella selezione del corsetto, occorre prendere in considerazione le disabilità fi siche, la distribuzione del peso e le caratteristiche fi siche generali del paziente. Trasferimento/trasporto Codice articolo Carico di lavoro sicuro Descrizione del prodotto Dimensioni MAA8000 454 kg (1000 lb) Standard M, L, XL, XXL MAA8000A 454 kg (1000 lb) Standard...
  • Seite 62: Aggancio E Sgancio Dell'asola

    Osservare sempre il carico di lavoro sicuro (SWL) più basso del sistema totale. Ad es. il sollevapazienti/la barra di sollevamento Tenor ha un valore SWL di 320 kg (705 lb) mentre il corsetto MAA8000 ha un valore SWL di 454 kg (1000 lb).
  • Seite 63: Metodi Di Attacco

    Metodi di attacco Metodo 1 - Incrociato (gambe incrociate con cinghie trasversali) Questo metodo è consigliato per la maggior parte dei trasferimenti. Modelli di corsetto: MAA8000, MAA8010 Modello di corsetto: MAA8020 Metodo 2 - Abduzione, separazione delle gambe (gambe aperte con cinghie non incrociate) In questo metodo, le gambe sono tenute separate, posizione utile per espletare le procedure di igiene personale.
  • Seite 64: Applicazione Del Corsetto

    Applicazione del corsetto 14. Incrociare le cinghie per le gambe. Tirare una cinghia A letto (22 punti) attraverso l’altra (vedere Fig. 8 ) 1. Posizionare vicino il sollevapazienti. 2. Applicare i freni al letto e regolare l’altezza del letto a AVVERTENZA una posizione ergonomica, se possibile.
  • Seite 65: Su Sedia/Sedia A Rotelle (19 Punti)

    Su sedia/sedia a rotelle (19 punti) 14. Accertarsi che le braccia del paziente siano all’interno del corsetto. NOTA AVVERTENZA NON utilizzare un corsetto ad amaca su una Per evitare lesioni al paziente, prestare sedia/sedia a rotelle. Applicarli a letto. particolare attenzione quando si abbassa o si 1.
  • Seite 66 6. Paziente in grado di stare seduto: in piedi dietro AVVERTENZA al paziente, aiutarlo ad alzarsi in posizione seduta. 7. Posizionare il corsetto sulla schiena e la testa del Per evitare lesioni al paziente, prestare paziente, con l’interno del corsetto rivolto verso il particolare attenzione quando si abbassa o si paziente.
  • Seite 67: Rimozione Del Corsetto

    Rimozione del corsetto A letto (12 punti) Su sedia/sedia a rotelle (13 punti) 1. Posizionare il paziente sul letto. (vedere Fig. 16 ) 1. Applicare i freni della sedia a rotelle. 2. Applicare i freni del letto e regolare l’altezza del letto 2.
  • Seite 68: Pulizia E Disinfezione

    Pulizia e disinfezione 5. Lavare il corsetto in lavatrice a una temperatura di AVVERTENZA 70 °C (158 °F). Per ottenere un livello di disinfezione suffi ciente, lavare in conformità alla legislazione locale Al fi ne di prevenire infezioni crociate, attenersi relativa all’igiene.
  • Seite 69: Risoluzione Dei Problemi

    Risoluzione dei problemi Problema Soluzione • Accertarsi che entrambi gli anelli per le spalle siano attaccati alla barra di sollevamento alla stessa lunghezza. • Accertarsi che entrambi gli anelli per le gambe Il paziente non è posizionato correttamente siano attaccati alla barra di sollevamento alla stessa nel corsetto (ad esempio, una cinghia è...
  • Seite 70: Speci Che Tecniche

    Specifi che tecniche Requisiti Carico di lavoro sicuro (SWL) = Vedere “Combinazioni consentite” a pagina 62 Carico massimo totale 2 anni* Durata utile - Periodo raccomandato di utilizzo * Consultare “Durata utile prevista” a pagina 59. Periodo di conservazione - Periodo massimo di conservazione del prodotto nuovo nella confezione 5 anni integra...
  • Seite 71: Etichetta Sul Corsetto

    Etichetta sul corsetto Simboli per la cura e il lavaggio Codice articolo RIF. Alla ne del codice, -X si riferisce Lavabile in lavatrice a 70 °C (158 °F) XXXXXX-X alla taglia del corsetto. Se il codice è riportato senza Non candeggiare RIF.
  • Seite 72: Voorwoord

    EBRUIKSAANWIJZING Inhoud Voorwoord ............72 Bevestigingsmethoden ........77 Klantenservice ............72 Methode 1 - Gekruist (benen bijeen met De nities in deze gebruiksaanwijzing ....72 gekruiste lussen) ........... 77 Methode 2 - Abductie (benen uit elkaar met Beoogd gebruik ..........73 niet-kruisende lussen) ........... 77 Beoordeling van de cliënt ........
  • Seite 73: Beoogd Gebruik

    Tilband voor obese cliënten: De Tilband voor obese cliënten mag uitsluitend worden • MAA8000, MAA8000A, MAA8010, MAA8020, gebruikt door getrainde zorgverleners met adequate kennis MAA8030: 454 kg (1000 lbs). van de zorgomgeving en overeenkomstig de instructies in Na vaststelling van de lichaamsomvang, conditie en soort de gebruiksaanwijzing.
  • Seite 74: Onderdelen

    Onderdelen 1. Tilbandetiket 7. Rompgedeelte (aan de buitenzijde van de tilband) 8. Hoofdgedeelte 2. Vakken voor baleinen 9. Handgreep 3. Baleinen 4. Schouderstrap met lusbevestiging Voorbeeld van tilbanden. Niet representatief voor alle 5. Beenstrap met lusbevestiging modellen. 6. Beenstrap Voorbereiding Vóór het eerste gebruik (6 stappen) WAARSCHUWING 1.
  • Seite 75: Tilbandmaat Selecteren

    Factoren zoals de fysieke beperkingen van de cliënt, de gewichtsverdeling en de algemene fysieke conditie moeten in overweging worden genomen bij het selecteren van een tilband. Transfer/transport Artikelnummer Veilig draagvermogen Productomschrijving Afmetingen MAA8000 454 kg (1000 lbs) Standaard M, L, XL, XXL MAA8000A 454 kg (1000 lbs) Standaard...
  • Seite 76: Lussen Bevestigen & Losmaken

    Houd altijd de laagste veilige tilbelasting (SWL) van het totale systeem aan. De lift/het tiljuk Tenor heeft bijvoorbeeld een SWL van 320 kg (705 lbs), terwijl de MAA8000 een SWL van 454 kg (1000 lbs) heeft. Dit betekent dat de Tenor lift/het tiljuk de laagste SWL heeft.
  • Seite 77: Bevestigingsmethoden

    Bevestigingsmethoden Methode 1 - Gekruist (benen bijeen met gekruiste lussen) Deze methode wordt aanbevolen voor de meeste algemene transfers. Tilbanden: MAA8000, MAA8010 Tilbanden: MAA8020 Methode 2 - Abductie (benen uit elkaar met niet-kruisende lussen) Bij deze methode worden de benen van de cliënt uit elkaar gehouden, wat gemakkelijk is voor toiletbezoek en hygiënische verzorging.
  • Seite 78: De Tilband Aanbrengen

    De tilband aanbrengen 14. Kruis de beenlussen. Trek de ene lus door de andere In bed (22 stappen) (Zie Afb. 8 ) 1. Plaats de lift dicht bij het bed. 2. Zet het bed op de rem en stel de hoogte van het bed in WAARSCHUWING op een ergonomische hoogte, indien mogelijk.
  • Seite 79: In Stoel/Rolstoel (19 Stappen)

    In stoel/rolstoel (19 stappen) 14. Verzeker u ervan dat de armen van de cliënt zich binnen de tilband bevinden. LET OP WAARSCHUWING Gebruik in een stoel/rolstoel GEEN Hammock Wanneer u het tiljuk laat zakken of instelt, tilband voor amputaties. Pas die toe in bed. dient u goed op te letten om letsel bij de cliënt 1.
  • Seite 80 6. Cliënt is in staat om te zitten: ga achter de cliënt 20. Plaats de beenstraps onder de benen van de cliënt. Gebruik een glijlaken/glijrol van ArjoHuntleigh staan en help hem/haar om te gaan zitten. wanneer u de beenstraps plaatst, om huidletsel te 7.
  • Seite 81: Tilband Verwijderen

    Tilband verwijderen In bed (12 stappen) In stoel/rolstoel (13 stappen) 1. Breng de cliënt in de juiste positie boven het bed. 1. Zet de rolstoel op de rem. (Zie Afb. 16 ) 2. Breng de cliënt in de juiste positie boven de stoel/het bed.
  • Seite 82: Reinigen En Desinfecteren

    Reinigen en desinfecteren 4. Controleer de symbolen op het productetiket voor WAARSCHUWING aanbevelingen voor reiniging. 5. Was de tilband in de wasmachine op 70 °C Desinfecteer altijd volgens de Instructies voor (158°F). Volg bij het wassen de plaatselijke desinfecteren in deze gebruiksaanwijzing om hygiënevoorschriften op voor een adequate kruisbesmetting te vermijden.
  • Seite 83: Problemen Oplossen

    Problemen oplossen Probleem Handeling • Zorg ervoor dat beide schouderlussen met dezelfde luslengte zijn bevestigd aan het tiljuk. • Zorg ervoor dat beide beenlussen met dezelfde luslengte De cliënt is niet correct in de tilband geplaatst zijn bevestigd aan het tiljuk. (de ene band is bijvoorbeeld korter dan de •...
  • Seite 84: Technische Specificaties

    Technische specifi caties Algemeen Veilige tilbelasting (SWL – Safe Working Load) = Zie “Toegestane combinaties” op pagina 76 totale maximumbelasting 2 jaar* Levensduur – aanbevolen gebruiksduur * Raadpleeg “Verwachte levensduur” op pagina 73. Houdbaarheid – maximale bewaartijd voor nieuw 5 jaar product zonder verpakking Model en type Zie “Tilbandselectie”...
  • Seite 85: Etiket Op De Tilband

    Etiket op de tilband Was- en onderhoudssymbolen Artikelnummer Artikelnummer met -X verwijst naar Machinewasbaar op 70 °C (158°F) XXXXXX-X de tilbandmaat. Als er achter het artikelnummer Bleken niet toegestaan geen maatindicatie staat vermeld, XXXXXXX betekent dit dat de tilband een Drogen in wasdroger niet toegestaan universele maat heeft.
  • Seite 86 Intentionally left blank...
  • Seite 87 AUSTRALIA FRANCE POLSKA Arjo Australia Pty Ltd Arjo SAS Arjo Polska Sp. z o.o. 78, Forsyth Street 2 Avenue Alcide de Gasperi ul. Ks Piotra Wawrzyniaka 2 O’Connor CS 70133 PL-62-052 KOMORNIKI (Pozna ) AU-6163 Western Australia FR-59436 RONCQ CEDEX...
  • Seite 88 At Arjo, we are committed to improving the everyday lives of people affected by reduced mobility and age-related health challenges. With products and solutions that ensure ergonomic patient handling, personal hygiene, disinfection, diagnostics, and the effective prevention of pressure ulcers and venous thromboembolism, we help professionals across care environments to continually raise the standard of safe and digni ed care.

Diese Anleitung auch für:

Maa8000aMaa8010Maa8020Maa8030

Inhaltsverzeichnis