Inhaltsverzeichnis
Werbung
Verfügbare Sprachen
Verfügbare Sprachen
Werbung
Inhaltsverzeichnis

Verwandte Anleitungen für Denver CRQ-110


Inhaltszusammenfassung für Denver CRQ-110
- Seite 1 ACHTUNG...
- Seite 2 Halten Sie rings um das Gerät einen Abstand von mindestens 5 cm für ausreichende Belüftung. Die Ventilation darf nicht durch Abdecken der Ventilationsöffnungen mit Zeitungen, Tischdecken oder Gardinen beeinträchtigt werden. Stellen Sie keine offenen Flammen (wie brennende Kerzen) auf dem Gerät ab. Bitte entsorgen Sie Batterien umweltgerecht.
-
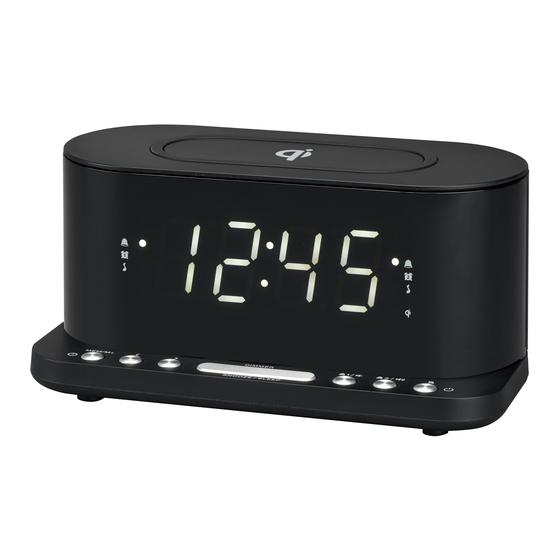
Seite 3: Ü Bersicht Des Geräts
Ü bersicht des Geräts 1. Qi-Bereich (Drahtlos-Ladefeld) 2. Taste UHRZEIT / Taste SPEICHER/SPEICHER+ / Taste EINSTELLEN / Taste JAHR- MONAT-TAG 3. RÜ CKWARTS 4. Vorlauf 5. Taste SCHLUMMER-/EINSCHLAFAUTOMATIK / Taste DIMMEN 6. Taste WECKER 1 / Taste LAUTSTÄ RKE SENKEN 7. -
Seite 4: Radio Hören
Stromversorgung anschließen 1. Schließen Sie das Kabel des Netzteils an die DC IN Buchse des Radios an. 2. Schließen Sie dann den Stecker des Netzteils an eine Steckdose an. Wenn das Display aufleuchtet, ist das Radio eingeschaltet und der Standby-Modus aktiviert. Reserve-Batterie ... -
Seite 5: Anzeige Von Informationen
Weckrufe einstellen Das Radio unterstützt bis zu 2 Weckrufeinstellungen. Weckrufe einstellen: 1. Halten Sie im Standby-Modus die Taste WECKER 1 oder WECKER 2 gedrückt, um in den Einstellmodus für die Weckzeit zu gelangen. 2. Drücken Sie im Einstellungsmodus die Taste WECKRUF 1 oder WECKRUF 2 wiederholt, um durch folgende Optionen zu scrollen: Weckzeit >... -
Seite 6: Display-Helligkeit
Mittwoch, d4 = Donnerstag, d5 = Freitag, d6 = Samstag und d7 = Sonntag) zu ändern. Drücken Sie im Radiomodus einmal die Taste ZURÜ CK oder VOR, um kurzzeitig die Anzeige von Uhrzeit auf die Anzeige der aktuellen Radiofrequenz umzuschalten. Display-Helligkeit ... - Seite 7 DK-8382 Hinnerup Denmark www.facebook.com/denverelectronics Hiermit erklärt Inter Sales A/S, dass der Funkanlagentyp CRQ-110 der Richtlinie 2014/53/EU entspricht. Der vollständige Text der EU-Konformitätserklärung ist unter der folgenden Internetadresse verfügbar: Bitte geben Sie „www.denver-electronics.com“ ein. Klicken Sie dann auf das Suchen-SYMBOL in der oberen Leiste der Webseite und geben Sie hier die Modellnummer crq-110 ein.
- Seite 8 MS-330 Please read this user manual carefully before using the receiver.
-
Seite 9: Location Of Controls
Location of Controls 1. Power Standby on/off 2. Mode Press to change the radio mode 3. Preset Press and hold to enter favourite list Press briefly to recall the favourite list 4. Left Back to previous menu/left cursor 5. Right Right cursor/Enter edit menu under Favourite list 6. - Seite 10 Connect the mains adaptor to the radio unit, one end to the DC IN on the radio and the other end to the AC mains wall socket. Caution: Use only the mains adaptor supplied with the radio. Connecting a power supply with a different rating will cause permanent damage to the radio and may be hazardous.
-
Seite 11: Internet Radio
Note: The encryption code would have been set up by the person who set up and configured your network. Follow the steps below to enter the password of your wifi network: Rotate the [Up/Down/Enter] knob to browse the character Press the [Right] button to skip to the next entry When it is done, push the [Up/Down/Enter] rotary knob to confirm. - Seite 12 The symbol on the top row means station is Push [Up/Down/Enter] knob added to favourite list to confirm The presets will be stored in ascending order. You can store up to 250 presets. Note: Preset 1 to 5 are reserved for your own choice of the dedicated radio channels. The preset will be intended to store from no.
-
Seite 13: Media Center
A dd New Radio Station If you want to add the station and you have the audio stream URL, it is suggested to add it through the MediaYou website as follow, or you can contact MediaYou if the station cannot be located. http://www.mediayou.net/ Please refer to the “Manage My mediaU”... - Seite 14 Weather Information The radio supports weather display in standby mode. Navigate to Information Center> Weather Information, choose the region you want it to display the weather information. After region is selected, continue pressing OK (push the [Up/Down/Enter] rotary knob) unit it shows <Add to Standby Display>, push the [Up/Down/Enter] rotary knob to confirm. The date/time and weather info will appear alternatively every 10 seconds under the standby mode.
- Seite 15 and save it. You can then organize your own favorite stations or add any new station which is not found on the station list. Once the changes are done, your radio will synchronize the changes immediately and you will find your favorite list under <My MediaU> on the radio menu. Note: If you are going to add URL which is not on MediaU database, ensure the URL is an audio streaming URL or contact Media U to add it for you.
- Seite 16 NAP Alarm If you would like to take a nap or need an alarm to due in short time, you can use this function. You can select the time from 5 minutes up to 120 minutes. No Snooze function available for the NAP alarm.
- Seite 17 Sometimes you may experience uneven playback of the internet radio. This can happen if the internet connection is slow or network congestion occurs. To help improving the situation, you can choose longer buffer time to get a few seconds of radio stream before beginning to play. The default value is 2 seconds.
-
Seite 18: Troubleshooting
Trouble Shooting If you have trouble connecting the radio to your wireless network, these steps may help to resolve the problem: -Confirm that a Wi-Fi or Ethernet Wired connected PC can access the internet (i.e. can browse the web) using the same network. -Check that a DHCP server is available, or that you have configured a static IP address on the radio. -
Seite 19: Technical Specification
-You have not connected to the wireless Access point. On the internet radio, select ‘Configuration’, ‘Network ’, ‘Wireless network connection’ and then select your Wireless network. (You may need to enter a security key to access the network wirelessly). -You have a firewall set on your PC which is stopping you accessing shared files. -If you have a third party firewall (Like Norton, or Zone Alarm) that will have its own control panel and you will need to consult the manual for your firewall. -
Seite 20: What Is Included In The Box
What is included in the box * Internet Radio * Power adaptor * User manual...