Herunterladen Inhalt Inhalt Diese Seite drucken
Klarstein ShirtButler Deluxe Handbuch

Klarstein ShirtButler Deluxe Handbuch

Shirt- und hosen-trockner

Werbung

Verfügbare Sprachen
  • DE

Verfügbare Sprachen

  • DEUTSCH, seite 1
ShirtButler Deluxe
Shirt- und Hosen-Trockner
Shirt and Trouser Dryer
Sécheuse de chemise et pantalon
Secadora de camisas y pantalones
Asciugatrice automatica per camice e pantaloni
10034022

Werbung

Inhaltsverzeichnis
loading

Inhaltszusammenfassung für Klarstein ShirtButler Deluxe

  • Seite 1 ShirtButler Deluxe Shirt- und Hosen-Trockner Shirt and Trouser Dryer Sécheuse de chemise et pantalon Secadora de camisas y pantalones Asciugatrice automatica per camice e pantaloni 10034022...
  • Seite 3: Inhaltsverzeichnis

    Sehr geehrter Kunde, wir gratulieren Ihnen zum Erwerb Ihres Gerätes. Lesen Sie die folgenden Hinweise sorgfältig durch und befolgen Sie diese, um möglichen Schäden vorzubeugen. Für Schäden, die durch Missachtung der Hinweise und unsachgemäßen Gebrauch entstehen, übernehmen wir keine Haftung. Scannen Sie den folgenden QR-Code, um Zugriff auf die aktuellste Bedienungsanleitung und weitere Informationen rund um das Produkt zu erhalten.
  • Seite 4: Sicherheitshinweise

    SICHERHEITSHINWEISE • Halten Sie das Gerät von Wasser und Feuer fern. Stellen Sie es auf einen ebene, stabilen Untergrund an einem gut belüfteten Ort auf. • Wischen Sie das Gerät nur mit einem weichen Tuch ab, reinigen Sie es nicht mit Wasser.
  • Seite 5: Geräteübersicht

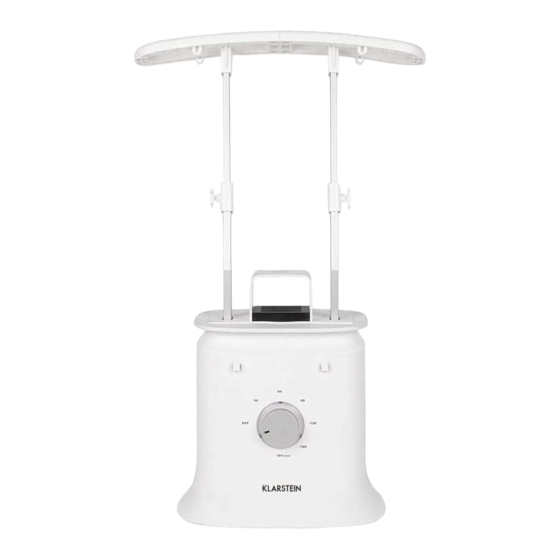
    GERÄTEÜBERSICHT Motor Teleskopstange Timer Schraube (Höhenverstellung) Befestigungspunkte Bügel Montagesockel Klammern Auslassöffnung Klammern mit elastischer Schnur Untere Stange Hemden-Luftsack Verbindungsstück Hosen-Luftsack...
  • Seite 6: Zusammenbau

    Komponenten Bezeichnung Stk. Motor Untere Stange Teleskopstange Bügel Klammern Klammern mit elastischer Schnur Hemden-Luftsack Hosen-Luftsack ZUSAMMENBAU Ziehen Sie den Netzstecker aus der Rückseite der Motoreinheit. Trocknen von Shirts Montieren Sie die beiden unteren Stangen an den entsprechenden Löchern der Motoreinheit. Setzen Sie die beiden Teleskopstangen auf die unteren Stangen.
  • Seite 7 Befestigen Sie das Kleidungsstück auf dem Hemden-Luftsack und schalten Sie den Motor ein. Befestigen Sie die Klammern mit der elastischer Schnur zuerst mit am Shirt und verbinden Sie sie dann mit den Befestigungspunkte der Motoreinheit, damit das Shirt glatter gezogen wird. Trocknen von Hosen Montieren Sie die beiden unteren Stangen an den entsprechenden Löchern der Motoreinheit.
  • Seite 8: Fehlerbehebung

    So benutzen Sie den Timer 1. Stecken Sie den Stecker in die Steckdose. 2. Drehen Sie den Timerknopf im Uhrzeigersinn, bis der Trockner zu arbeiten beginnt, die Betriebsanzeige leuchtet auf. 3. Drehen Sie den Drehknopf, um den Timer einzustellen. Nach Ablauf der eingestellten Zeit geht der Trockner automatisch aus.
  • Seite 9: Hinweise Zur Entsorgung

    HINWEISE ZUR ENTSORGUNG Befindet sich die linke Abbildung (durchgestrichene Mülltonne auf Rädern) auf dem Produkt, gilt die Europäische Richtlinie 2012/19/EU. Diese Produkte dürfen nicht mit dem normalen Hausmüll entsorgt werden. Informieren Sie sich über die örtlichen Regelungen zur getrennten Sammlung elektrischer und elektronischer Gerätschaften.
  • Seite 11 Dear Customer, Congratulations on purchasing this equipment. Please read this manual carefully and take care of the following hints to avoid damages. Any failure caused by ignoring the items and cautions mentioned in the instruction manual is not covered by our warranty and any liability. Scan the QR code to get access to the latest user manual and other information about the product.
  • Seite 12: Safety Instructions

    SAFETY INSTRUCTIONS • Keep the appliance away from water and fi re. Place it on a level, stable surface in a well-ventilated place. • Only wipe the appliance with a soft cloth and do not clean it with water. • Use the appliance to dry spun laundry only, not wet laundry that is still dripping. CAUTION Risk of burns! Never touch the surface of the dryer during use to avoid burns.
  • Seite 13: Product Overview

    PRODUCT OVERVIEW Motor Telescopic rod Timer Screw (height adjustment) Fixing points Hanger Mounting base Clamps Outlet Clamps with elastic cord Lower bar Shirt airbag Connector Trouser airbag...
  • Seite 14 Components Designation Stk. Motor Lower bar Telescopic rod Hanger Clamps Clamps with elastic cord Shirt airbag Trouser airbag ASSEMBLY Pull the mains plug out of the back of motor unit. Drying Shirts Install the two lower rods into the corresponding holes of the motor unit. Insert the two telescopic rods with lower rods.
  • Seite 15 Wear the garments on the shirts air bag and turn on the motor Connect the clips with elastic cord on the fixed points of motor unit. Stretch the clips along the bottom of the garment to make it smoother Drying Trousers Install the two lower rods into the corresponding holes of the motor unit.
  • Seite 16 Using the Timer 1. Insert the power plug into power socket. 2. Turn the timer knob clockwise until the machine starts to work, the power indicator will illuminate. 3. Rotate the knob to preset the timer. When the set time elapses, the device switches off automatically.
  • Seite 17: Hints On Disposal

    HINTS ON DISPOSAL According to the European waste regulation 2012/19/EU this symbol on the product or on its packaging indicates that this product may not be treated as household waste. Instead it should be taken to the appropriate collection point for the recycling of electrical and electronic equipment.
  • Seite 19: Fiche Technique

    Chère cliente, cher client, Toutes nos félicitations pour l’acquisition de ce nouvel appareil. Veuillez lire attentivement et respecter les instructions de ce mode d’emploi afin d’éviter d’éventuels dommages. Nous ne saurions être tenus pour responsables des dommages dus au non-respect des consignes et à la mauvaise utilisation de l’appareil.
  • Seite 20: Consignes De Sécurité

    CONSIGNES DE SÉCURITÉ • Gardez l‘appareil à l‘abri de l‘eau et du feu. Placez-le sur une surface plane et stable dans un endroit bien ventilé. • N‘essuyez l‘appareil qu‘avec un chiffon doux, ne l‘essuyez pas avec de l‘eau. • Utilisez l‘appareil uniquement pour sécher du linge bien essoré, pas pour le linge humide qui s‘égoutte encore.
  • Seite 21: Aperçu De L'appareil

    APERÇU DE L‘APPAREIL Moteur Tige télescopique Minuterie Vis (de réglage en hauteur) Points de fixation Cintre Socle de montage Pinces Evacuation Pinces avec corde élastique Tige inférieure Sac gonflable pour chemises Raccord Sac gonflable pour pantalons...
  • Seite 22 Composants Description qté. Moteur Tige inférieure Tige télescopique Cintre Pinces Pinces avec corde élastique Sac gonflable pour chemises Sac gonflable pour pantalons ASSEMBLAGE Débranchez le cordon d‘alimentation de l‘arrière du bloc moteur. Séchage de chemises Montez les deux tiges inférieures dans les trous correspondants du bloc moteur.
  • Seite 23 Fixez le vêtement sur le sac gonflable de la chemise et allumez le moteur. Commencez par attacher les pinces avec le cordon élastique à la chemise, puis connectez-les aux points de fixation du bloc moteur pour tendre la chemise et qu'elle soit plus lisse..
  • Seite 24: Résolution Des Problèmes

    Comment utiliser la minuterie 1. Branchez la fiche dans la prise. 2. Tournez le bouton de la minuterie dans le sens des aiguilles d‘une montre jusqu‘à ce que la sécheuse se mette en marche, le témoin d‘alimentation s‘allume. 3. Tournez le bouton pour régler la minuterie. Une fois la durée définie écoulée, la sécheuse s‘éteint automatiquement.
  • Seite 25: Informations Sur Le Recyclage

    INFORMATIONS SUR LE RECYCLAGE Vous trouverez sur le produit l’image ci-contre (une poubelle sur roues, barrée d‘une croix), ce qui indique que le produit se trouve soumis à la directive européenne 2012/19/ UE. Renseignez-vous sur les dispositions en vigueur dans votre région concernant la collecte séparée des appareils électriques et électroniques.
  • Seite 27 Estimado cliente: Le felicitamos por la adquisición de este producto. Lea atentamente el siguiente manual y siga cuidadosamente las instrucciones de uso con el fin de evitar posibles daños. La empresa no se responsabiliza de los daños ocasionados por un uso indebido del producto o por haber desatendido las indicaciones de seguridad.
  • Seite 28: Indicaciones De Seguridad

    INDICACIONES DE SEGURIDAD • Mantenga el aparato alejado del agua y del fuego. Coloque el aparato en un sitio plano, estable y bien ventilado. • Limpie el aparato solamente con un paño suave, nunca con agua. • En el aparato solo se puede secar ropa centrifugada, no ropa mojada que todavía esté...
  • Seite 29: Visión General Del Aparato

    VISIÓN GENERAL DEL APARATO Motor Barra telescópica Temporizador Tornillo (regulación de altura) Punto de fijación Percha Zócalo de montaje Pinzas Desagüe Pinzas con banda elástica Barra inferior Saco de aire para camisas Conector Saco de aire para pantalones...
  • Seite 30 Componentes Denominación Uds. Motor Barra inferior Barra telescópica Percha Pinzas Pinzas con banda elástica Saco de aire para camisas Saco de aire para pantalones MONTAJE Extraiga el enchufe de la parte trasera del motor. Secar camisas Monte ambas barras inferiores en los orificios correspondientes de la unidad del motor.
  • Seite 31 Fije la prenda de ropa en el saco para camisas y encienda el motor. Fije las pinzas a la banda elástica a la camiseta y luego agárrelas al motor con los puntos de fijación para que la camisa se quede estirada. Secar pantalones Monte ambas barras inferiores en los orificios correspondientes de la unidad del motor.
  • Seite 32: Resolución De Problemas

    Cómo utilizar el temporizador Conecte el enchufe a la toma de corriente. Gire el temporizador en sentido horario hasta que la secadora empiece a secar y el indicador de funcionamiento se ilumine. Gire el regulador para programar el temporizador. Cuando transcurra el tiempo seleccionado, la secadora se apaga automáticamente.
  • Seite 33: Retirada Del Aparato

    RETIRADA DEL APARATO Si el aparato lleva adherida la ilustración de la izquierda (el contenedor de basura tachado) entonces rige la normativa europea, directiva 2012/19/UE. Estos productos no pueden depositarse en los contenedores destinados a la basura común. Infórmese sobre las leyes territoriales que regulan la recogida separada de aparatos eléctricos y electrónicos.
  • Seite 35: Dati Tecnici

    Gentile cliente, ti ringraziamo per l’acquisto di questo apparecchio. Leggi attentamente le seguenti istruzioni e seguile per evitare possibili danni. Non ci assumiamo alcuna responsabilità per danni causati dall’inosservanza delle istruzioni e dall’uso improprio del prodotto. Scansiona il codice QR per accedere alla guida utente più...
  • Seite 36: Avvertenze Di Sicurezza

    AVVERTENZE DI SICUREZZA • Tenere il dispositivo lontano da acqua e fuoco. Posizionarlo su un fondo piano e stabile, in un ambiente ben ventilato. • Pulire il dispositivo solo con un panno morbido. Non utilizzare acqua. • Asciugare con il dispositivo solo indumenti centrifugati. Non asciugare indumenti ancora bagnati, che gocciolano.
  • Seite 37: Descrizione Del Dispositivo

    DESCRIZIONE DEL DISPOSITIVO Motore Asta telescopica Timer Manopola (regolazione altezza) Punti di fissaggio Gruccia Base di montaggio Mollette Apertura di emissione aria Mollette con fiocco elastico Asta inferiore Sacco d’aria per camice Connettore Sacco d’aria per pantaloni...
  • Seite 38 Componenti Definizione Quantità Motore Asta inferiore Asta telescopica Gruccia Mollette Mollette con fiocco elastico Sacco d’aria per camice Sacco d’aria per pantaloni ASSEMBLAGGIO Tirare fuori la spina dal retro dell’unità motore. Asciugare camice Montare entrambe le aste inferiore agli appositi fori sull’unità motore. Inserire entrambe le aste telescopiche sopra alle aste inferiori.
  • Seite 39 Fissare l’indumento al sacco d’aria per camice e accendere il motore. Fissare le mollette con fiocco elastico prima alla camicia e collegarli poi ai punti di fissaggio dell’unità motore, in modo che la camicia venga lisciata. Asciugare pantaloni Montare entrambe le aste inferiore agli appositi fori sull’unità motore. Inserire entrambe le aste telescopiche sopra alle aste inferiori.
  • Seite 40: Ricerca E Correzione Degli Errori

    Come utilizzare il timer: Inserire la spina nella presa elettrica. Girare la manopola del timer in senso orario, fino a quando l’asciugatrice inizia a funzionare e la spia di funzionamento si accende. Girare la manopola per impostare il timer. Quando scade il tempo impostato, il dispositivo si spegne automaticamente.
  • Seite 41: Smaltimento

    SMALTIMENTO Se sul prodotto è presente la figura a sinistra (il bidone dei rifiuti con le ruote), si applica la direttiva europea 2012/19/ UE. Questi prodotti non possono essere smaltiti con i rifiuti normali. Informarsi sulle disposizioni vigenti per la raccolta di dispositivi elettrici ed elettronici.

Inhaltsverzeichnis