Inhaltsverzeichnis

Verwandte Anleitungen für asalvo baby MIT


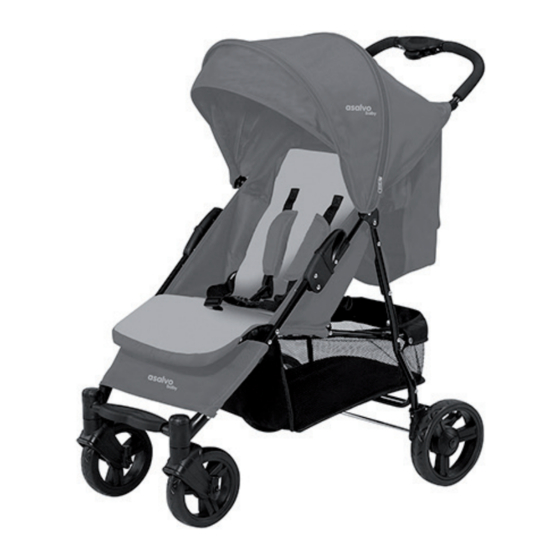
Inhaltszusammenfassung für asalvo baby MIT
- Seite 1 SILLA MIT GUÍA DEL USUARIO REF: 14924 - 15020 - 16140 Conforme a la normativa EN 1888:2012 Este cochecito está diseñado para niños de más de 6 meses y con un peso máximo de 15 kg (33 lbs). www.asalvo.com...
-
Seite 2: Abrir El Cochecito
¡POR FAVOR LEA CUIDADOSAMENTE ESTE MANUAL DE INSTRUCCIONES Y MANTÉNGALOS EN UN LUGAR SEGURO PARA FUTURAS REFERENCIAS! ESTE CONTIENE INFORMACIÓN IMPORTANTE, INSTRUCCIONES Y RECOMENDACIONES RELATIVAS A LA SILLA Y A SU USO SEGURO. ABRIR EL COCHECITO Suelte el gancho de plegado y extienda el chasis tal y como se muestra más abajo hasta que esté... - Seite 3 MONTAJE DE LAS RUEDAS 2. Montaje de las ruedas traseras: sujete el chasis y presione el eje de ruedas trasero en los tubos traseros hasta que los botones de anclaje estén bloqueados. Luego presione el botón del centro de la rueda trasera para ajustarla al eje (Fig.6-7) Fig.
- Seite 4 AJUSTES DE LA BARRA FRONTAL Presione el botón de la barra frontal para ajustar la altura de la barra (Fig.22). Pero por favor coloque la barra en la posición media cuando vaya andando (Fig.23). Fig. 23 Fig. 22 AJUSTE DEL RESPALDO Y EL REPOSAPIÉS 1.
-
Seite 5: Plegado De La Silla
PLEGADO DE LA SILLA Presione primero el Seguro lateral (Fig.24). Luego presione el botón pequeño y el grande del tirador de plástico para plegar la silla, apriete y bloquee el enganche. (Fig.13-15) Fig. 24 Fig. 13 Fig. 14 Fig. 15... - Seite 6 FUNCIONES DE LA RUEDAS 1. Ruedas traseras: presione hacia abajo el eje de freno de las ruedas traseras. Tire de uno de los ejes de freno para desbloquearlos. (Fig.16-Fig.17) Fig. 16 Fig. 17 2. Ruedas delanteras giratorias: Para desbloquear ruedas delanteras giratorias, rote...
- Seite 7 USO DEL ARNÉS Inserte las clavijas de los cinturones en la habilla hasta oír un “CLICK” y pueda ajustar la longitude del cinturón a la medida del niño. Presione los botones para liberar el arnés. ADVERTENCIA: Utilice siempre el arnés de seguridad. ADVERTENCIAS SOBRE SEGURIDAD Y CUIDADOS ADVERTENCIA: Leer estas instrucciones detenidamente...
- Seite 8 ADVERTENCIAS SOBRE SEGURIDAD Y CUIDADOS ADVERTENCIA: No deben utilizarse accesorios no aprobados por el fabricante. ADVERTENCIA: Este producto no es adecuado para correr o patinar. ADVERTENCIA: Siempre use el sistema de retención. ADVERTENCIA: Esta silla es para un solo bebé. ADVERTENCIA: La silla debe estar frenada para montar o bajar al bebé.
- Seite 9 STROLLER MIT INSTRUCTION MANUAL REF: 14924 - 15020 - 16140 Under the standard EN 1888: 2012 This stroller is designed for children from 6 months and with a maximum weight of 15 kg (33 lbs). www.asalvo.com...
- Seite 10 PLEASE READ CAREFULLY THIS INSTRUCTION MANUAL AND KEEP IT IN A SAFE PLACE FOR FUTURE REFERENCE! IT CONTAINS IMPORTANT INFORMATION, INSTRUCTIONS AND RECOMMENDATIONS FOR THE STROLLER AND ITS SAFE USAGE TO OPEN THE STROLLER Release the folding hook and spread up the frame as shown below until it is fully spread and locked.
- Seite 11 ASSEMBLING WHEELS 2. Rear wheels assembly: hold the frame and push the rear wheel axle onto the rear tubes until the spring buttons are locked. Then press the button in the center of the rear wheel to fix it on the wheel axle.(Fig.6-7) Fig.
- Seite 12 FRONT BAR FUNCTIONS Press both button of the fronr bar to adjust height of front bar (Fig.22). But pls hold the front bar on middle position when walk(Fig.23). Fig. 23 Fig. 22 BACKREST AND FOOTREST ADJUSTMENT 1. Lift up the steel bar on the backrest and adjust to desired position. 2.
-
Seite 13: Folding The Stroller
FOLDING THE STROLLER Push side lock to release it first (Fig.24) . Then press the small button and press the big button of the plastic handle to fold the stroller, squeezed and lock the hook.(Fig.13-15) Fig. 24 Fig. 13 Fig. 14 Fig. - Seite 14 WHELLS FUNCTIONS 1. Rear wheels: Step down one of the brake lever on the rear wheels to make the stroller stop moving. Pull up one of the brake lever to release the brakes.(Fig.16-Fig.17) Fig. 16 Fig. 17 2. Front swivel wheels: To unlock the swivel wheels, rotate clockwise Lock Open...
- Seite 15 USE OF HARNESS Lock buckle parts together until secure click is heard and you can adjust the belt length to fit your baby. Press the buttons to release the harness. WARNING: Use this harness at all times. SAFETY WARNINGS AND CARE WARNING: Read these instructions carefully before use and keep for future reference.
- Seite 16 SAFETY WARNINGS AND CARE WARNING: This chair is for a single baby. WARNING: The stroller should be stopped and locked to mount or lower the baby. CARE: Take out the baby, before going up or down stairs. This chair is not thought to be use with ride on extension. WARNING: Make sure that all safety locks are properly locked.
- Seite 17 CARRINHO MIT MANUAL DE INSTRUÇÕES REF: 14924 - 15020 - 16140 De acordo com a norma EN 1888:2012 Este assento è adequado para criança a partir dos 6 meses. Peso máximo da criança 15 kg. www.asalvo.com...
-
Seite 18: Montagem Das Rodas
POR FAVOR, LEIA ATENTAMENTE ESTE MANUAL DE INSTRUÇÕES E GUARDE-O EM LUGAR SEGURO, CASO NECESSITE DE O CONSULTAR NO FUTURO. ESTE MANUAL CONTÉM INFORMAÇÃO IMPORTANTE, INSTRUÇÕES E RECOMENDAÇÕES SOBRE A CADEIRA E A SUA UTILIZAÇÃO SEGURA. PARA ABRIR O CARRINHO Liberte o gancho dobrável e desdobre a estrutura como indicado abaixo até... - Seite 19 MONTAGEM DAS RODAS 2. Montagem das rodas traseiras: alinhe a estrutura e pressione o eixo de rodas traseiro, nos tubos traseiros, até que os botões de fixação fiquem bloqueados. De seguida, pressione o botão do centro da roda traseira para a ajustar ao eixo. (Fig.6-7) Fig.
- Seite 20 FUNÇÕES DA BARRA FRONTAL Pressione o botão da barra frontal para ajustar a altura da barra. (Fig.22) É recomendável colocar a barra na posição média quando estiver em andamento (Fig.23). Fig. 23 Fig. 22 AJUSTE DO ENCOSTO E DO REPOUSA-PÉS 1.
- Seite 21 DOBRAR A CADEIRA Pressione primeiro o Bloqueio lateral. (Fig.24) De seguida, pressione o botão pequeno e o grande do manípulo de plástico para dobrar a cadeira, aperte e bloqueie o engate. (Fig.13-15) Fig. 24 Fig. 13 Fig. 14 Fig. 15...
- Seite 22 FUNÇÕES DAS RODAS 1. Rodas traseiras: pressione para baixo o eixo do travão das rodas traseiras. Puxe um dos eixos do travão para os desbloquear.. (Fig.16-Fig.17) Fig. 16 Fig. 17 2. Rodas dianteiras giratórias: Para desbloquear as rodas dianteiras giratórias, rode o mecanismo de bloqueio no sentido dos ponteiros Lock Open...
- Seite 23 USO DO CINTO Insira os pinos dos cintos na fivela até ouvir um “CLICK” e poder ajustar o comprimento do cinto à altura da criança. Pressione os botões para soltar o cinto. AVISO: Use sempre o cinto de segurança. AVISOS DE SEGURANÇA E CUIDADOS AVISO: Leia estas instruções cuidadosamente antes de usar e guarde-as para futura referência.
- Seite 24 AVISOS DE SEGURANÇA E CUIDADOS AVISO: Use sempre o cinto de segurança quando o bebê está no lugar. ATENÇÃO: Esta cadeira é para uma único cadeira de bebê deve ser de travagem para montar ou abaixar o bebê. AVISO: Certifique-se de todos os bloqueios de segurança que são devidamente bloqueados.
- Seite 25 SIÈGE MIT MANUEL D’INSTRUCTIONS REF: 14924 - 15020 - 16140 En conformité avec la norme EN 1888: 2012 Siège de bébé, destine aux enfants avec un age compris entre 6 et 36 mois et qui ne pèsent pas plus de 15kg.
-
Seite 26: Ouverture De La Poussette
S’IL VOUS PLAIT LISEZ ATTENTIVEMENT CE MANUEL D’INSTRUCTIONS ET GARDEZ LE DANS UN ENDROIT SÛRE POUR DE FUTURES REFERENCES. CELUI CI CONTIENT DES INFORMATIONS IMPORTANTES, INSTRUCTIONS ET RECOMMENDATIONS RELATIVES AU SIEGE ET SON USAGE SÛRE. OUVERTURE DE LA POUSSETTE Relâchez le crochet pliant et déployez complètement le cadre comme indiqué... - Seite 27 Fig. 6 Fig. 7 RÉGLAGE DE LA BARRE AVANT Pour régler la barre avant, appuyer sur les deux extrémités sur les crochets latéraux et bloquez le mécanisme (Fig.9). Pour ôter la barre, débloquez le mécanisme de chaque côté. Fig. 9...
- Seite 28 FONCTIONS DE LA BARRE AVANT Appuyez sur le bouton de la barre avant pour régler la hauteur de la barre. (Fig.22) Mais lorsque vous marchez, veuillez placer la barre en position moyenne (Fig.23). Fig. 23 Fig. 22 RÉGLAGE DU DOSSIER ET DU REPOSE-PIED 1.
-
Seite 29: Pliage De La Poussette
PLIAGE DE LA POUSSETTE Appuyez d’abord sur la sécurité latérale (Fig.24) Puis, appuyez sur le petit bouton et sur le grand bouton de la poignée en plastique pour plier la poussette, serrez et bloquez le crochet (Fig.13-15). Fig. 24 Fig. 13 Fig. - Seite 30 FONCTIONS DES ROUES 1. Roues arrière : Appuyez vers le bas sur l’axe du frein des roues arrière. Tirez sur l’un des axes du frein pour les débloquer. (Fig.16-Fig.17) Fig. 16 Fig. 17 Roues avant pivotantes Pour débloquer les roues avant pivotantes, faites tourner...
-
Seite 31: Utilisation Du Harnais
UTILISATION DU HARNAIS Insérez les broches des ceintures dans la boucles, jusqu’à entendre un « CLICK » et que vous puissiez régler la longueur de la ceinture à la taille de l’enfant. Appuyez sur les boutons du harnais. AVERTISSEMENT : Utilisez toujours le harnais de sécurité. EXIGENCES DE SECURITE ET DANGERS AVERTISSEMENT : Lire attentivement les instructions avant... - Seite 32 EXIGENCES DE SECURITE ET DANGERS AVERTISSEMENT : N’utilisez pas d’accessoires non approuvés par le fabricant. AVERTISSEMENT : Ce produit n’est pas adapté pour courir ou pour patiner. AVERTISSEMENT : Utilisez toujours le système de retenue AVERTISSEMENT : Ce siège n’est utilisable que pour un seul enfant.
- Seite 33 KINDERWAGEN MIT HANDBUCH VON ANWEISUNGEN REF: 14924 - 15020 - 16140 Gewicht. Genügt Prüfstandard EN 1888: 2012 Dieser Kinderwagen wurde für Kinder ab 6 Jahren und einem Höchstgewicht von 15kg (33 Ibs) gebaut. www.asalvo.com...
-
Seite 34: Aufklappen Des Kinderwagens
LESEN SIE BITTE DIESES BEDIENUNGSANLEITUNG AUFMERKSAM DURCH UND BEWAHREN SIE SIE FÜR ZUKÜNFTIGE VERWENDUNG AN EINEM SICHEREN ORT AUF! SIE ENTHÄLT WICHTIGE INFORMATIONEN, ANLEITUNGEN UND EMPFEHLUNGEN ZUM WAGEN UND SEINER SICHEREN VERWENDUNG. AUFKLAPPEN DES KINDERWAGENS Lösen Sie den Falthaken und falten Sie das Gestell auseinander, bis es wie unten dargestellt vollständig auseinandergeklappt und eingerastet ist. (Abb.1-3) Abb. - Seite 35 MONTAGE DER RÄDER 2. Montage der Hinterräder: Halten Sie das Fahrgestell und drücken Sie die Achse der Hinterräder in die hinteren Stangen, bis die Verriegelungstasten blockiert sind. Drücken Sie nun auf den Knopf in der Mitte des Hinterrads, um sie an die Achse anzupassen. (Abb. 6-7) Abb.
-
Seite 36: Funktionen Des Schiebegriffs
FUNKTIONEN DES SCHIEBEGRIFFS Drücken Sie den Knopf am Schiebegriff, um seine Höhe zu verstellen (Abb. 22). Zum Schieben des Wagend benutzen Sie aber bitte die mittlere Position (Abb. 23). Abb.23 Abb.22 VERSTELLEN DER RÜCKENLEHNE UND DER FU STÜTZE 1. Heben sie die Stahlstange aus der Rückenlehne und bringen Sie sie in die gewünschte Position. -
Seite 37: Zusammenklappen Des Kinderwagens
ZUSAMMENKLAPPEN DES KINDERWAGENS Drücken Sie zuerst die Sicherung an der Seite (Abb.24). Nun drücken Sie den kleinen und großen Knopf an der Plastiklasche, um den Sitz einzuklappen, danach die Befestigung drücken und absichern. (Abb.13-15) Abb.24 Abb.13 Abb.14 Abb.15... -
Seite 38: Funktionen Der Räder
FUNKTIONEN DER RÄDER 1. Hinterräder: Drücken Sie die Bremsachse Hinterräder herunter. Ziehen Sie an einer der Bremsachsen, um sie zu entriegeln. (Abb. 16-Abb. 17) Abb.16 Abb.17 Drehbare Vorderräder: drehbaren Vorderräder zu entriegeln, drehen Sie den V e r r i e g e l u n g s m e c h a n i s m u s Uhrzeigersinn. -
Seite 39: Gebrauch Des Anschnallgurts
GEBRAUCH DES ANSCHNALLGURTS Stecken Sie die Schnalle der Gurte in die Gurtschnalle bis sie mit einem Klick einrasten und Sie die Gurtlänge an die Größe des Kindes anpassen können. Drücken Sie die Knöpfe, um den Gurt zu öffnen. WARNHINWEIS: Benutzen Sie immer den Sicherheitsgurt. - Seite 40 WARNUNG: Dieses Produkt ist nicht zum Rennen oder Rollschuhlaufen geeignet. WARNUNG: Verwenden Sie immer das Rückhaltesystem. WARNUNG: Dieser Kinderwagen darf nur mit einem Kind genutzt werden. WARNUNG: Die Bremsvorrichtung muss beim Hineinsetzen und Herausnehmen des Kindes aktiviert sein. WARNUNG: Vor dem Treppensteigen sollten Sie das Kind immer aus dem Kinderwagen herausnehmen.
- Seite 41 SEDIA DA PASSEGGIO MIT MANUALE DI ISTRUZIONI REF: 14924 - 15020 - 16140 Sotto lo standard EN 1888: 2012 Questo passeggino è stato progettato per i bambini di età superiore ai 6 mesi con un peso massimo di 15 kg (33 libbre).
- Seite 42 LEGGERE QUESTO MANUALE DI ISTRUZIONI ATTENTAMENTE E MANTENERLO IN UN LUOGO SICURO PER RIFERIMENTI FUTURI! QUESTO MANUALE CONTIENE INFORMAZIONI IMPORTANTI, ISTRUZIONI E CONSIGLI CONNESSI ALLA SEDIA E AL SUO IMPIEGO IN MODO SICURO. PER APRIRE IL PASSEGGINO Togli il gancio e apri il telaio come mostrato qui sotto finché non è completamente aperto e bloccato (fig.
- Seite 43 MONTAGGIO DELLE RUOTE 2. Montaggio delle ruote posteriori: collegare il telaio ed applicare pressione sull’asse delle ruote posteriori attraverso i tubi posteriori fino a quando le manopole del fissaggio siano bloccate. In seguito, applicare pressione sulla manopola centrale della ruota posteriore per adattarla al telaio.
- Seite 44 FUNZIONI DELLA SBARRA FRONTALE Applicare pressione sulla manopola della sbarra frontale all’altezza della sbarra (Fig.22). Tuttavia bisogna collocare la sbarra nella posizione di mezzo quando in movimento (Fig.23). Fig. 23 Fig. 22 REGOLAZIONE DELLO SCHIENALE E DEL POGGIAPIEDI 1. Alzare la sbarra in acciaio dello schienale e regolarla nella posizione desiderata.
- Seite 45 RIPIEGAMENTO DELLA SEDIA Applicare pressione sulla sicurezza laterale (Fig.24). Poi applicare pressione sulla manopola piccola e grande della maniglia di plastica per piegare la sedia, aprire e bloccare il gancio. (Fig.13-15) Fig. 24 Fig. 13 Fig. 14 Fig. 15...
- Seite 46 FUNZIONI DELLE RUOTE Ruote posteriori: applicare pressione sull’asse del freno delle ruote posteriori verso il basso. Tirare uno degli assi del freno per sbloccarli. (Fig.16-Fig.17) Fig. 16 Fig. 17 2. Ruote anteriori girevoli: Per sbloccare ruote anteriori girevoli, ruotare il meccanismo di blocco nel senso delle lancette dell’orologio.
- Seite 47 USO DELL’IMBRACATURA Inserire I tasselli delle cinture nella fibbia fino a sentire un “CLICK” e poter aggiustare la lunghezza della cintura all’altezza del bambino. Applicare pressione sulle manopole per rilasciare l’imbracatura. AVVERTENZA: Utilizzare sempre l’imbracatura di sicurezza. AVVERTENZE DI SICUREZZA E CURA AVVERTENZA: Leggere attentamente queste istruzioni prima dell’utilizzo e conservarle per futuri riferimenti.
- Seite 48 AVVERTENZE DI SICUREZZA E CURA AVVERTENZA: Non devono essere utilizzati accessori non approvati dal produttore. AVVERTENZA: Questo prodotto non é adatto per correre o pattinare. AVVERTENZA: Utilizzare sempre il sistema di chiusura. AVVERTENZA: Questa sedia é adatta per un solo bambino alla volta.